


1.nginx平滑升级
1.1查看当前的nginx版本
[root@nginx nginx-1.20.2]# nginx -V
nginx version: nginx/1.20.2     //版本为1.20.2
built by gcc 8.3.1 20191121 (Red Hat 8.3.1-5) (GCC)
built with OpenSSL 1.1.1c FIPS  28 May 2019
TLS SNI support enabled
configure arguments: --prefix=/usr/local/nginx --user=nginx --group=nginx --with-debug --with-http_ssl_module --with-http_realip_module --with-http_image_filter_module --with-http_gunzip_module --with-http_gzip_static_module --with-http_stub_status_module --http-log-path=/var/log/nginx/access.log --error-log-path=/var/log/nginx/error.log
1.2升级并添加echo功能
//下载echo功能的包和nginx的最新包

[root@nginx ~]# yum -y install git
[root@nginx ~]# wget https://nginx.org/download/nginx-1.22.0.tar.gz
[root@nginx ~]# git clone https://github.com/openresty/echo-nginx-module.git
[root@nginx ~]# tar xf nginx-1.22.0.tar.gz
[root@nginx ~]# ls
anaconda-ks.cfg  echo-nginx-module  nginx-1.22.0  nginx-1.22.0.tar.gz
[root@nginx src]# cp /usr/local/nginx/sbin/nginx{,.bak}    //备份老版本的nginx
[root@nginx src]# cd nginx-1.22.0/
[root@nginx nginx-1.22.0]# ./configure --prefix=/usr/local/nginx --user=nginx --group=nginx --with-debug --with-http_ssl_module --with-http_realip_module --with-http_image_filter_module --with-http_gunzip_module --with-http_gzip_static_module --with-http_stub_status_module --http-log-path=/var/log/nginx/access.log --error-log-path=/var/log/nginx/error.log --add-module=../echo-nginx-module    //加上升级前的版本编译参数,然后加上升级的参数
[root@nginx nginx-1.22.0]# make     //编译  禁止编译安装
[root@nginx nginx-1.22.0]# pkill nginx;\cp objs/nginx /usr/local/nginx/sbin/;nginx      //停掉老版本然后将新版的主程序放到/sbin/目录下,在开启新版本
[root@nginx nginx-1.22.0]# nginx -V      //此时的版本已经变成了新版了
nginx version: nginx/1.22.0
built by gcc 8.3.1 20191121 (Red Hat 8.3.1-5) (GCC)
built with OpenSSL 1.1.1c FIPS  28 May 2019
TLS SNI support enabled
configure arguments: --prefix=/usr/local/nginx --user=nginx --group=nginx --with-debug --with-http_ssl_module --with-http_realip_module --with-http_image_filter_module --with-http_gunzip_module --with-http_gzip_static_module --with-http_stub_status_module --http-log-path=/var/log/nginx/access.log --error-log-path=/var/log/nginx/error.log --add-module=../echo-nginx-module
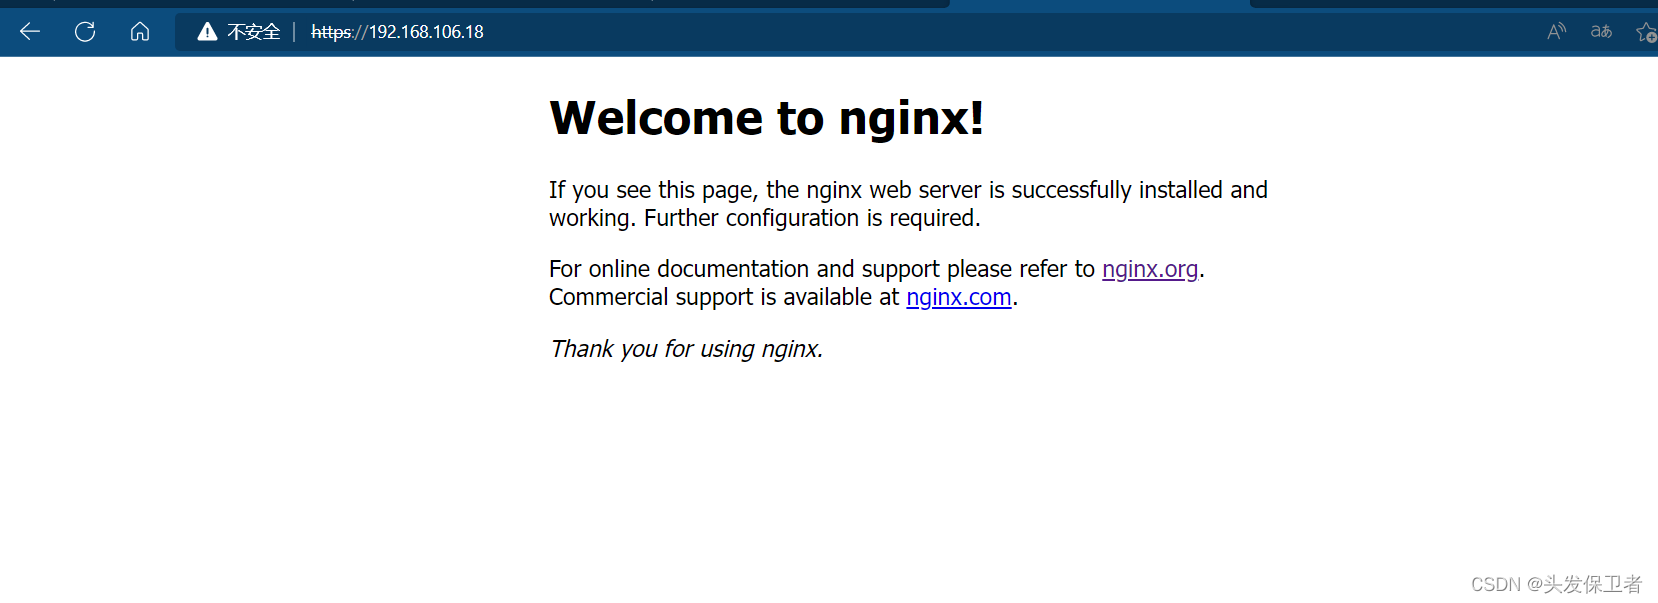
1.3.访问

1.4测试echo模块
[root@nginx nginx-1.22.0]# vim /usr/local/nginx/conf/nginx.conf
        location /test {
            echo "test";
        }
[root@nginx nginx-1.22.0]# nginx -t
nginx: the configuration file /usr/local/nginx/conf/nginx.conf syntax is ok
nginx: configuration file /usr/local/nginx/conf/nginx.conf test is successful
[root@nginx nginx-1.22.0]# nginx -s reload
[root@nginx nginx-1.22.0]# curl 192.168.106.18/test
test
2. location的使用
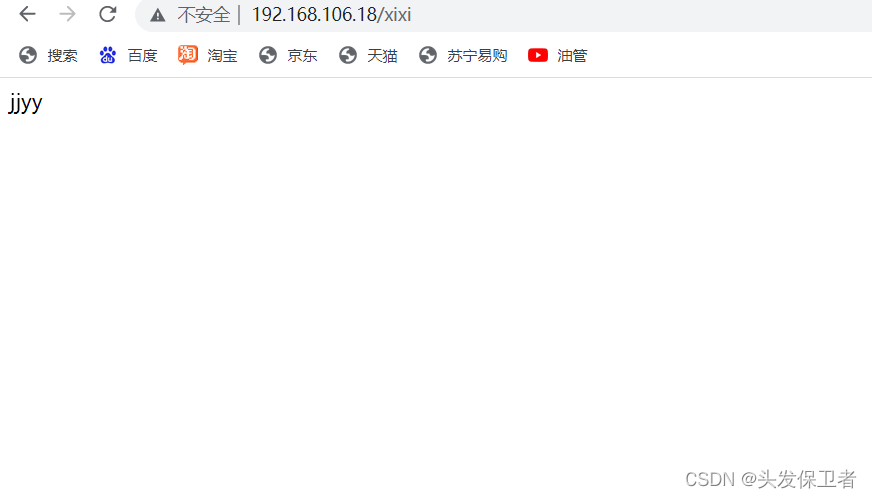
2.1没有修饰符表示必须以指定模式开始,如:
[root@nginx ~ ]# cd /usr/local/nginx/conf/
[root@nginx conf]# vim nginx.conf
server {
        listen       80;
        server_name  localhost;

        #charset koi8-r;

        #access_log  logs/host.access.log  main;

        location /xixi {
            echo 'jjyy';
        }
//效果
[root@nginx conf]# nginx -t
nginx: the configuration file /usr/local/nginx/conf/nginx.conf syntax is ok
nginx: configuration file /usr/local/nginx/conf/nginx.conf test is successful
[root@nginx conf]# nginx -s reload
[root@nginx conf]# curl 192.168.106.18/xixi
jjyy
[root@nginx conf]# curl 192.168.106.18/xixi1
jjyy
[root@nginx conf]# curl 192.168.106.18/xixi1sdas
jjyy
[root@nginx conf]# curl 192.168.106.18/xixi1sdasHASIK
jjyy
[root@nginx conf]# curl 192.168.106.18/xixi1sdasHASIK\?p1sad
jjyy
2.2. =:表示必须与指定的模式精确匹配,如:
[root@nginx conf]# vim nginx.conf
       location = /xixi1 {
            echo '123';
        }
//只有输入的是一摸一样才能查找到,否则就会报错或者查找到别的位置去
[root@nginx conf]# nginx -s reload
[root@nginx conf]# curl 192.168.106.18/xixi1/
jjyy
[root@nginx conf]# curl 192.168.106.18/xixi
jjyy
[root@nginx conf]# curl 192.168.106.18/xixi1
123
[root@nginx conf]# curl 192.168.106.18/sdfsd
<html>
<head><title>404 Not Found</title></head>
<body>
<center><h1>404 Not Found</h1></center>
<hr><center>nginx/1.22.0</center>
</body>
</html>
2.3. ~:表示指定的正则表达式要区分大小写,如:
[root@nginx conf]# vim nginx.conf

location ~ ^/abc$ {
            echo 'hello';
        }
//效果
[root@nginx conf]# nginx -s reload
[root@nginx conf]# curl 192.168.106.18/abc
hello
[root@nginx conf]# curl 192.168.106.18/Abc      //如果大小写不符也会报错
<html>
<head><title>404 Not Found</title></head>
<body>
<center><h1>404 Not Found</h1></center>
<hr><center>nginx/1.22.0</center>
</body>
</html>
2.1. ~*:表示指定的正则表达式不区分大小写,如:
[root@nginx conf]# vim nginx.conf
[root@       location ~* ^/abcd$ {
            echo 'nihao';
        }
nginx conf]# nginx -s reload
[root@nginx conf]# curl  192.168.106.18/abcd
nihao
[root@nginx conf]# curl  192.168.106.18/ABCD
nihao
[root@nginx conf]# curl  192.168.106.18/ABcd
nihao
[root@nginx conf]# curl  192.168.106.18/abc    //上面的正则表达式要以d结尾所以这里就访问到别的位置去了
hello
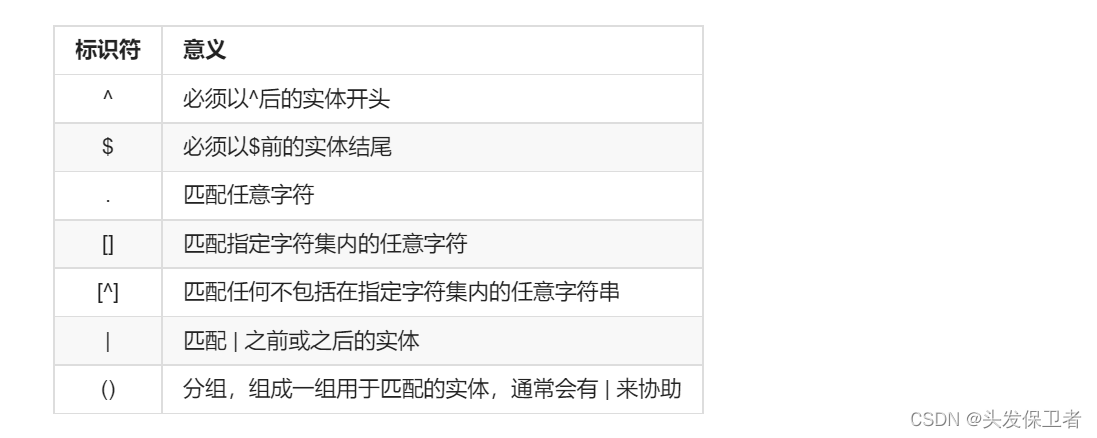
查找顺序和优先级:由高到底依次为
- 带有=的精确匹配优先
- 正则表达式按照他们在配置文件中定义的顺序
- 带有^~修饰符的,开头匹配
- 带有或*修饰符的,如果正则表达式与URI匹配
- 没有修饰符的精确匹配
优先级次序如下:
( location = 路径 ) --> ( location ^~ 路径 ) --> ( location ~ 正则 ) --> ( location ~* 正则 ) --> ( location 路径 )
3. 访问控制
用于location段
allow:设定允许哪台或哪些主机访问,多个参数间用空格隔开
deny:设定禁止哪台或哪些主机访问,多个参数间用空格隔开
示例:
3.1 拒绝192.168.106.17访问
[root@nginx conf]# vim nginx.conf

 location /xixi {
            deny 192.168.106.17;
            echo 'jjyy';
        }

[root@nginx conf]# nginx -t
nginx: the configuration file /usr/local/nginx/conf/nginx.conf syntax is ok
nginx: configuration file /usr/local/nginx/conf/nginx.conf test is successful
[root@nginx conf]# nginx -s reload
[root@nginx conf]# vim nginx.conf
//使用192.168.106.17进行访问,可以看到访问不了xixi这url但是其他的还是可以访问到,
[root@slave ~]# curl 192.168.106.18/xixi
<html>
<head><title>403 Forbidden</title></head>
<body>
<center><h1>403 Forbidden</h1></center>
<hr><center>nginx/1.22.0</center>
</body>
</html>
[root@slave ~]# curl 192.168.106.18/xixi1
123
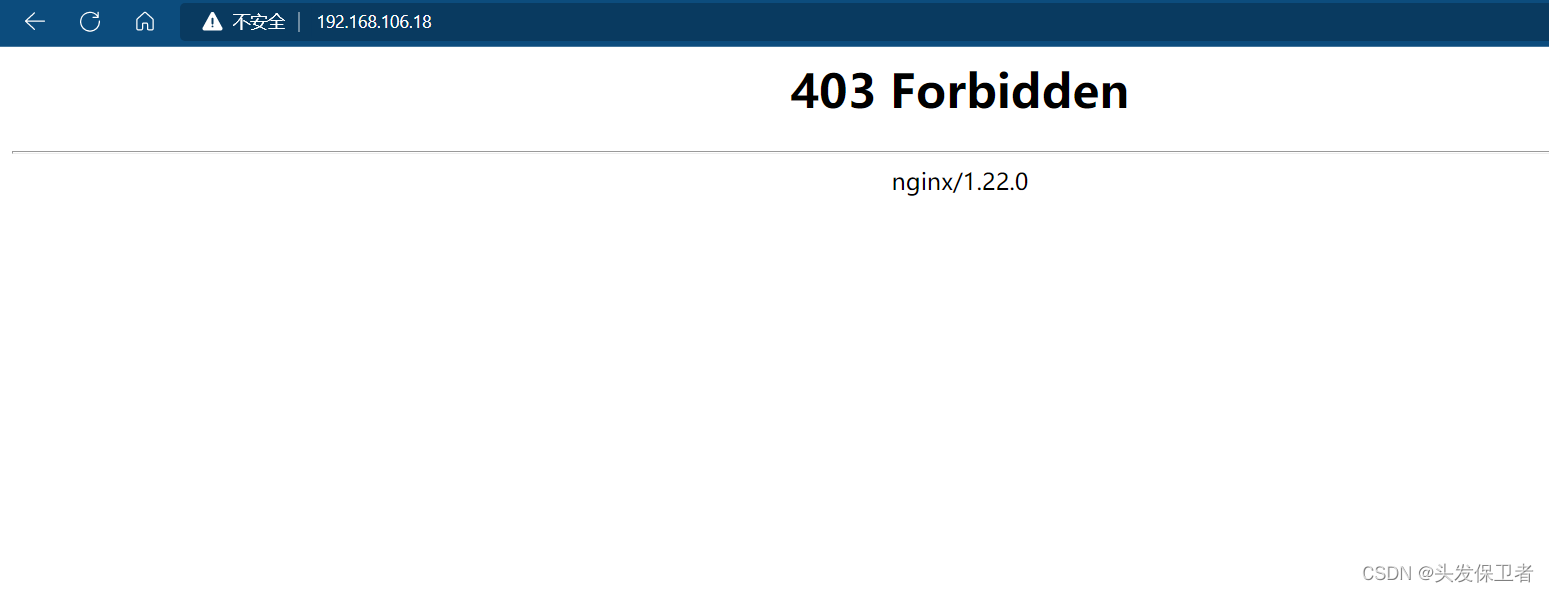
3.2 禁止除了192.168.106.17之外所有的ip访问
[root@nginx conf]# vim nginx.conf
       location /xixi {
            allow 192.168.106.17;
            deny all;
            echo 'jjyy';
        }

[root@nginx conf]# nginx -t
nginx: the configuration file /usr/local/nginx/conf/nginx.conf syntax is ok
nginx: configuration file /usr/local/nginx/conf/nginx.conf test is successful
[root@nginx conf]# nginx -s reload
[root@nginx conf]# curl 192.168.106.18/xixi       //连本地都禁止了
<html>
<head><title>403 Forbidden</title></head>
<body>
<center><h1>403 Forbidden</h1></center>
<hr><center>nginx/1.22.0</center>
</body>
</html>
//切换为192.168.106.17再次查看
[root@slave ~]# curl 192.168.106.18/xixi     //可以看到是可以访问的
jjyy
3.3 在http上设置禁止192.168.106.1访问
[root@nginx conf]# vim nginx.conf

http {
    include       mime.types;
    default_type  application/octet-stream;
    deny 192.168.106.1;
[root@nginx conf]# nginx -s reload
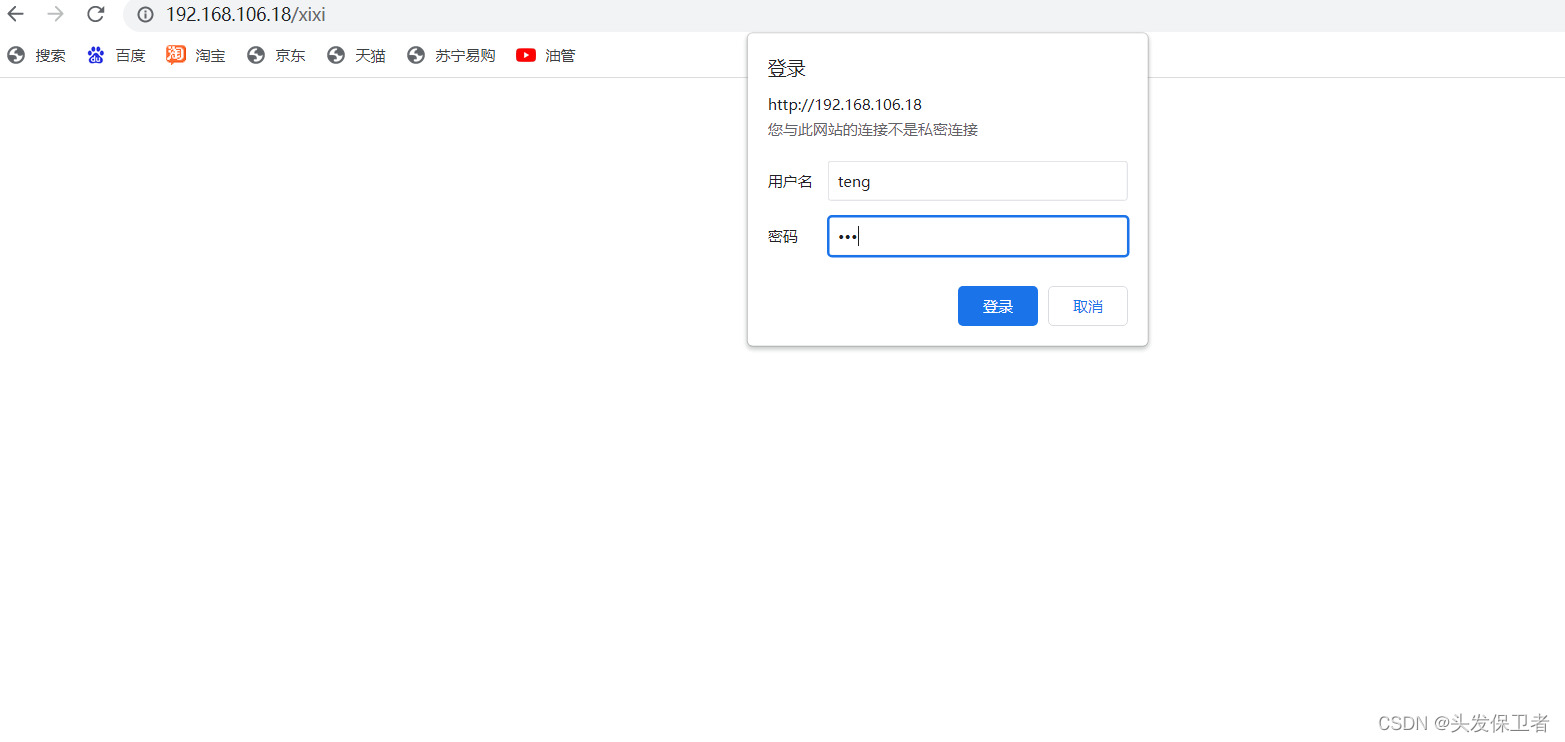
4.用户认证
//安装httpd包组
[root@nginx conf]# yum -y install httpd-tools
[root@nginx conf]# htpasswd -c -m /usr/local/nginx/conf/.user_auth teng
New password:
Re-type new password:
Adding password for user teng
[root@nginx conf]# vim nginx.conf
[root@nginx conf]# nginx -s reload
[root@nginx conf]# vim nginx.conf
[root@nginx conf]# nginx -t
nginx: the configuration file /usr/local/nginx/conf/nginx.conf syntax is ok
nginx: configuration file /usr/local/nginx/conf/nginx.conf test is successful
[root@nginx conf]# nginx -s reload
5. https配置
生成私钥,生成证书签署请求并获得证书,然后在nginx.conf中配置如下内容
[root@nginx conf]# cd /etc/pki/
[root@nginx pki]# mkdir CA
[root@nginx pki]# cd CA/
[root@nginx CA]# (umask 077;openssl genrsa -out private/cakey.pem 2048)
genrsa: Can't open "private/cakey.pem" for writing, No such file or directory
[root@nginx CA]# mkdir private
[root@nginx CA]# (umask 077;openssl genrsa -out private/cakey.pem 2048)
Generating RSA private key, 2048 bit long modulus (2 primes)
..............................................................................+++++
.................+++++
e is 65537 (0x010001)
[root@nginx CA]# openssl req -new -x509 -key private/cakey.pem -out cacert.pem -days 365
You are about to be asked to enter information that will be incorporated
into your certificate request.
What you are about to enter is what is called a Distinguished Name or a DN.
There are quite a few fields but you can leave some blank
For some fields there will be a default value,
If you enter '.', the field will be left blank.
-----
Country Name (2 letter code) [XX]:CN
State or Province Name (full name) []:HB
Locality Name (eg, city) [Default City]:WH
Organization Name (eg, company) [Default Company Ltd]:runtime
Organizational Unit Name (eg, section) []:www.example.com
Common Name (eg, your name or your server's hostname) []:www.example.com
Email Address []:1@2.com
[root@nginx CA]# ls
cacert.pem  private
[root@nginx CA]# mkdir certs newcerts crl
[root@nginx CA]# touch index.txt && echo 01 > serial
[root@nginx CA]# cd /usr/local/nginx/conf/
[root@nginx conf]# mkdir ssl
[root@nginx conf]# cd ssl/
[root@nginx ssl]# (umask 077;openssl genrsa -out nginx.key 2048)
Generating RSA private key, 2048 bit long modulus (2 primes)
......................+++++
.......................................................+++++
e is 65537 (0x010001)
[root@nginx ssl]# ls
nginx.key
[root@nginx ssl]# openssl req -new -key nginx.key -days 365 -out nginx.csr
Ignoring -days; not generating a certificate
You are about to be asked to enter information that will be incorporated
into your certificate request.
What you are about to enter is what is called a Distinguished Name or a DN.
There are quite a few fields but you can leave some blank
For some fields there will be a default value,
If you enter '.', the field will be left blank.
-----
Country Name (2 letter code) [XX]:CN
State or Province Name (full name) []:HB
Locality Name (eg, city) [Default City]:WH
Organization Name (eg, company) [Default Company Ltd]:runtime
Organizational Unit Name (eg, section) []:www.example.com
Common Name (eg, your name or your server's hostname) []:www.example.com
Email Address []:1@2.com

Please enter the following 'extra' attributes
to be sent with your certificate request
A challenge password []:
An optional company name []:
[root@nginx ssl]# ls
nginx.csr  nginx.key
[root@nginx ssl]# openssl ca -in nginx.csr -out nginx.crt -days 365
Using configuration from /etc/pki/tls/openssl.cnf
Check that the request matches the signature
Signature ok
Certificate Details:
        Serial Number: 1 (0x1)
        Validity
            Not Before: Sep  4 13:33:16 2022 GMT
            Not After : Sep  4 13:33:16 2023 GMT
        Subject:
            countryName               = CN
            stateOrProvinceName       = HB
            organizationName          = runtime
            organizationalUnitName    = www.example.com
            commonName                = www.example.com
            emailAddress              = 1@2.com
        X509v3 extensions:
            X509v3 Basic Constraints:
                CA:FALSE
            Netscape Comment:
                OpenSSL Generated Certificate
            X509v3 Subject Key Identifier:
                9B:3C:D2:87:11:9B:54:06:A8:BC:B7:B5:53:4F:AC:36:F3:30:84:7F
            X509v3 Authority Key Identifier:
                keyid:3F:28:D9:5D:A5:36:A4:53:B4:29:93:92:BC:B7:73:02:7B:4A:DD:E2

Certificate is to be certified until Sep  4 13:33:16 2023 GMT (365 days)
Sign the certificate? [y/n]:y


1 out of 1 certificate requests certified, commit? [y/n]y
Write out database with 1 new entries
Data Base Updated
[root@nginx ssl]# ls
nginx.crt  nginx.csr  nginx.key
[root@nginx ssl]# rm -rf nginx.csr      //以上是在获取证书
//修改nginx.conf文件
[root@nginx conf]# vim nginx.conf

    # HTTPS server      //找到HTTPS server 然后修改下面的密钥存放位置以及域名
    #
    server {
        listen       443 ssl;
        server_name  www.example.com;

        ssl_certificate      /usr/local/nginx/conf/ssl/nginx.crt;
        ssl_certificate_key  /usr/local/nginx/conf/ssl/nginx.key;

        ssl_session_cache    shared:SSL:1m;
        ssl_session_timeout  5m;

        ssl_ciphers  HIGH:!aNULL:!MD5;
        ssl_prefer_server_ciphers  on;

        location / {
            root   html;
            index  index.html index.htm;
        }
    }
[root@nginx conf]# nginx -s reload
5.1 效果
6. rewrite
语法:rewrite regex replacement flag;,如:

rewrite ^/images/(.*\.jpg)$ /tj/$1 break;
此处的$1用于引用(.*.jpg)匹配到的内容,又如:

rewrite ^/bbs/(.*)$ http://www.idfsoft.com/index.html redirect;

捕获子表达式,可以捕获放在()之间的任何文本,比如:
^(hello|sir)$       //字符串为“hi sir”捕获的结果:$1=hi$2=sir

//这些被捕获的数据,在后面就可以当变量一样使用了
[root@nginx conf]# vim nginx.conf

       location = /images {
            root html;
        }

[root@nginx conf]# cd ..
[root@nginx nginx]# cd html/
[root@nginx html]# mkdir images
[root@nginx html]# cd images/
[root@nginx images]# wget https://www.keaidian.com/uploads/allimg/190424/24110307_6.jpg -O 1.jpg     //随便下载一张图片
--2022-09-04 09:49:14--  https://www.keaidian.com/uploads/allimg/190424/24110307_6.jpg
正在解析主机 www.keaidian.com (www.keaidian.com)... 36.156.184.76, 111.12.158.24, 183.204.33.13, ...
正在连接 www.keaidian.com (www.keaidian.com)|36.156.184.76|:443... 已连接。
已发出 HTTP 请求,正在等待回应... 200 OK
长度:512695 (501K) [image/jpeg]
正在保存至: “1.jpg”

1.jpg                                            100%[=========================================================================================================>] 500.68K  1.37MB/s  用时 0.4s

2022-09-04 09:49:15 (1.37 MB/s) - 已保存 “1.jpg” [512695/512695])

[root@nginx images]# ls
1.jpg
[root@nginx conf]# nginx -t
nginx: the configuration file /usr/local/nginx/conf/nginx.conf syntax is ok
nginx: configuration file /usr/local/nginx/conf/nginx.conf test is successful
[root@nginx conf]# nginx -s reload
效果

//将images修改imgs
[root@nginx conf]# mv /usr/local/nginx/html/images /usr/local/nginx/html/imgs
[root@nginx conf]# ll ../html
总用量 8
-rw-r--r--. 1 root root 494 9月   4 04:57 50x.html
drwxr-xr-x. 2 root root  19 9月   4 09:49 imgs
-rw-r--r--. 1 root root 612 9月   4 04:57 index.html
[root@nginx conf]# vim nginx.conf

       location /images {
           rewrite ^/images/(.*\.jpg|.*\.png)$ /imgs/$1 break;
        }

[root@nginx conf]# nginx -t
nginx: the configuration file /usr/local/nginx/conf/nginx.conf syntax is ok
nginx: configuration file /usr/local/nginx/conf/nginx.conf test is successful
[root@nginx conf]# nginx -s reload

[root@nginx conf]# vim nginx.conf

       location /images {
            rewrite ^/images/(.*\.jpg)$ https://ts1.cn.mm.bing.net/th?id=OIP-C.atTl-J5TF3GE5FWfRtTIygHaJ8&w=72&h=100&c=8&rs=1&qlt=90&o=6&dpr=1.45&pid=3.1&rm=2 break;     //此处的url是随便一个图片的链接
        }
[root@nginx conf]# nginx -t
nginx: the configuration file /usr/local/nginx/conf/nginx.conf syntax is ok
nginx: configuration file /usr/local/nginx/conf/nginx.conf test is successful
[root@nginx conf]# nginx -s reload

7. 反向代理与负载均衡
nginx通常被用作后端服务器的反向代理,这样就可以很方便的实现动静分离以及负载均衡,从而大大提高服务器的处理能力。

nginx实现动静分离,其实就是在反向代理的时候,如果是静态资源,就直接从nginx发布的路径去读取,而不需要从后台服务器获取了。

但是要注意,这种情况下需要保证后端跟前端的程序保持一致,可以使用Rsync做服务端自动同步或者使用NFS、MFS分布式共享存储。

Http Proxy模块,功能很多,最常用的是proxy_pass和proxy_cache

如果要使用proxy_cache,需要集成第三方的ngx_cache_purge模块,用来清除指定的URL缓存。这个集成需要在安装nginx的时候去做,如:
./configure --add-module=../ngx_cache_purge-1.0 ......

nginx通过upstream模块来实现简单的负载均衡,upstream需要定义在http段内

在upstream段内,定义一个服务器列表,默认的方式是轮询,如果要确定同一个访问者发出的请求总是由同一个后端服务器来处理,可以设置ip_hash,如:
upstream idfsoft.com {
  ip_hash;
  server 127.0.0.1:9080 weight=5;
  server 127.0.0.1:8080 weight=5;
  server 127.0.0.1:1111;
}
注意:这个方法本质还是轮询,而且由于客户端的ip可能是不断变化的,比如动态ip,代理,翻墙等,因此ip_hash并不能完全保证同一个客户端总是由同一个服务器来处理。
定义好upstream后,需要在server段内添加如下内容:
server {
  location / {
    proxy_pass http://idfsoft.com;
  }
}
7.1. 实验环境
| 服务 | IP |
|---|---|
| nginx | 192.168.106.18 |
| httpd | 192.168.106.17 |
| lamp | 192.168.106.50 |
7.2.lamp搭建可以参考
《部署lamp》
7.3.部署httpd
//安装环境
[root@httpd ~]# yum -y install openssl-devel pcre-devel expat-devel libtool gcc-c++ libstdc++-devel make
//编译安装apache
[root@httpd ~]# cd /usr/src/
[root@httpd src]# ls
]  apr-1.7.0.tar.bz2  apr-util-1.6.1.tar.bz2  debug  httpd-2.4.43.tar.bz2  kernels
[root@httpd src]# tar xf apr-1.7.0.tar.bz2
[root@httpd src]# tar xf apr-util-1.6.1.tar.bz2
[root@httpd src]# ls
]  apr-1.7.0  apr-1.7.0.tar.bz2  apr-util-1.6.1  apr-util-1.6.1.tar.bz2  debug  httpd-2.4.43.tar.bz2  kernels
[root@httpd src]# cd apr-1.7.0/

[root@httpd apr-1.7.0]# vim configure
    cfgfile=${ofile}T
    trap "$RM \"$cfgfile\"; exit 1" 1 2 15
    # $RM "$cfgfile"			//把这里删除或者加#变成注释
[root@httpd apr-1.7.0]# ./configure --prefix=/usr/local/apr
[root@httpd apr-1.7.0]# make && make install
[root@httpd apr-1.7.0]# cd /usr/src/apr-util-1.6.1/
[root@httpd apr-util-1.6.1]#  ./configure --prefix=/usr/local/apr-util --with-apr=/usr/local/apr
[root@httpd apr-util-1.6.1]# make && make install

//现在开始安装apache
[root@httpd src]# tar xf httpd-2.4.43.tar.bz2
[root@httpd src]# cd httpd-2.4.43/
[root@httpd httpd-2.4.43]# ./configure --prefix=/usr/local/apache \
--enable-so \
--enable-ssl \
--enable-cgi \
--enable-rewrite \
--with-zlib \
--with-pcre \
--with-apr=/usr/local/apr \
--with-apr-util=/usr/local/apr-util/ \
--enable-modules=most \
--enable-mpms-shared=all \
--with-mpm=prefork
[root@httpd httpd-2.4.43]# make && make install
//启动apache
[root@httpd httpd-2.4.43]# /usr/local/apache/bin/apachectl start
AH00558: httpd: Could not reliably determine the server's fully qualified domain name, using localhost.localdomain. Set the 'ServerName' directive globally to suppress this message
[root@localhost httpd-2.4.53]# ss -antl
State      Recv-Q     Send-Q         Local Address:Port         Peer Address:Port
LISTEN     0          128                  0.0.0.0:80                0.0.0.0:*
LISTEN     0          32             192.168.122.1:53                0.0.0.0:*
LISTEN     0          128                  0.0.0.0:22                0.0.0.0:*
LISTEN     0          5                  127.0.0.1:631               0.0.0.0:*
LISTEN     0          128                  0.0.0.0:111               0.0.0.0:*
LISTEN     0          128                     [::]:22                   [::]:*
LISTEN     0          5                      [::1]:631                  [::]:*
LISTEN     0          128                     [::]:111                  [::]:*
[root@localhost httpd-2.4.53]# systemctl disable --now firewalld
Removed /etc/systemd/system/multi-user.target.wants/firewalld.service.
Removed /etc/systemd/system/dbus-org.fedoraproject.FirewallD1.service.
http效果图

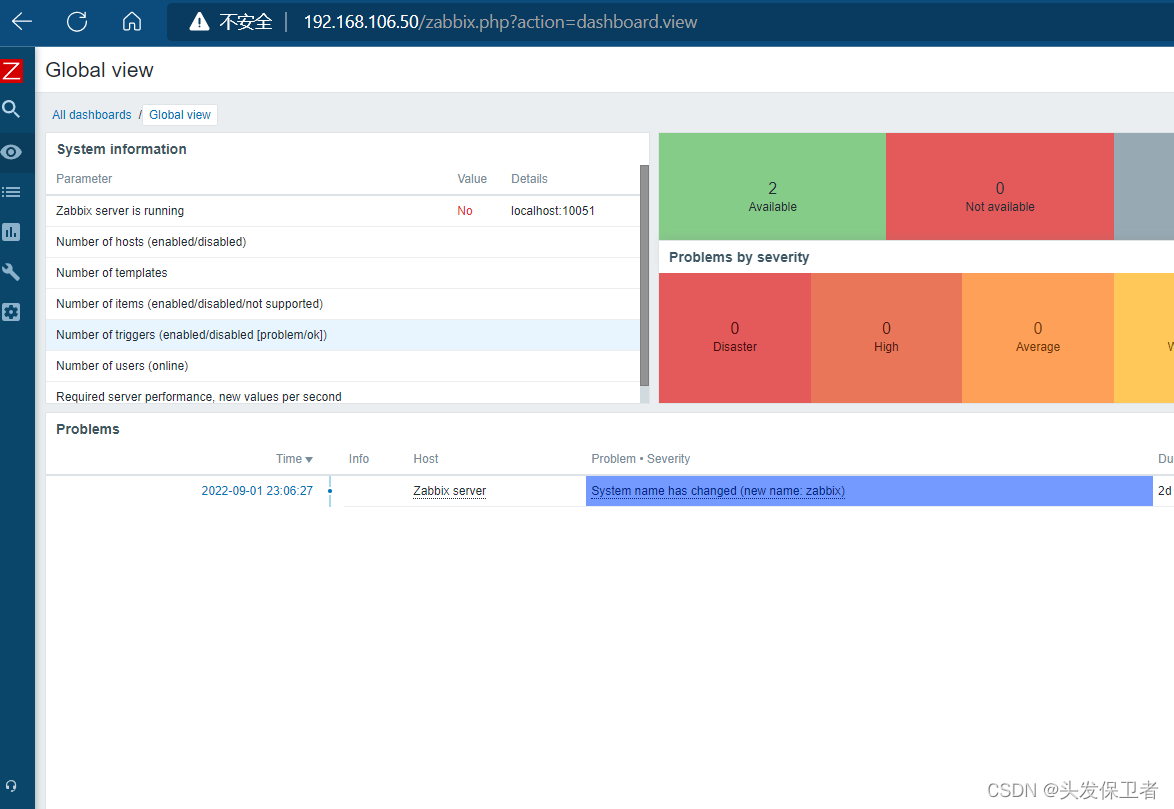
iamp效果图部署了一个zabbix(可选择不同的动态网页)
7.4. 配置nginx
在这里插入代码片
8.用zabbix监控nginx
环境配置:
| 服务端 | 客户端 | |
|---|---|---|
| 主机名 | zabbix | nginx |
| IP | 192.168.106.50 | 192.168.106.18 |
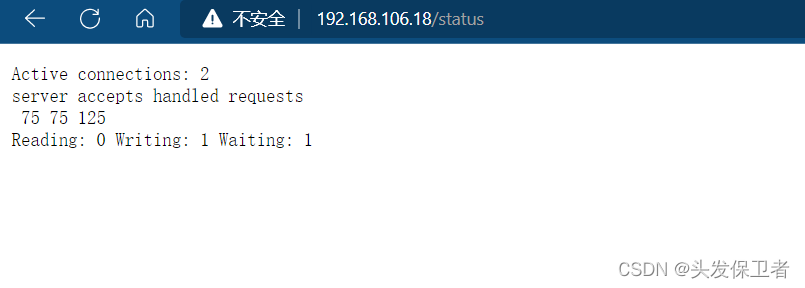
//开启状态界面 在server下面加
[root@nginx conf]# vim nginx.conf
        location /status {
            stub_status on;
            access_log off;
            allow 127.0.0.1;
            allow 192.168.106.1;
            deny all;
        }
[root@nginx conf]# nginx -s reload
//编写脚本
[root@nginx ~]# mkdir /scripts
[root@nginx ~]# cd /scripts/
[root@nginx scripts]# vi check_nginx.sh
[root@nginx scripts]# cat check_nginx.sh
#!/bin/bash
#Script to fetch nginx statuses for monitoring systems

HOST="127.0.0.1"
PORT="80"

function ping {
    /sbin/pidof nginx | wc -l
}

function active {
    /usr/bin/curl "http://$HOST:$PORT/nginx_status/" 2>/dev/null| grep 'Active' | awk '{print $NF}'
}
function reading {
    /usr/bin/curl "http://$HOST:$PORT/nginx_status/" 2>/dev/null| grep 'Reading' | awk '{print $2}'
}
function writing {
    /usr/bin/curl "http://$HOST:$PORT/nginx_status/" 2>/dev/null| grep 'Writing' | awk '{print $4}'
}
function waiting {
    /usr/bin/curl "http://$HOST:$PORT/nginx_status/" 2>/dev/null| grep 'Waiting' | awk '{print $6}'
}
function accepts {
    /usr/bin/curl "http://$HOST:$PORT/nginx_status/" 2>/dev/null| awk NR==3 | awk '{print $1}'
}
function handled {
    /usr/bin/curl "http://$HOST:$PORT/nginx_status/" 2>/dev/null| awk NR==3 | awk '{print $2}'
}
function requests {
    /usr/bin/curl "http://$HOST:$PORT/nginx_status/" 2>/dev/null| awk NR==3 | awk '{print $3}'
}
$1
//安装zabbix以及依赖包
[root@nginx scripts]# yum -y install net-snmp-devel libevent-devel
[root@nginx scripts]# wget https://cdn.zabbix.com/zabbix/sources/stable/5.0/zabbix-5.0.25.tar.gz
--2022-09-04 11:44:04--  http://wget/
正在解析主机 wget (wget)... 失败:未知的名称或服务。
wget: 无法解析主机地址 “wget”
--2022-09-04 11:44:09--  https://cdn.zabbix.com/zabbix/sources/stable/5.0/zabbix-5.0.25.tar.gz
正在解析主机 cdn.zabbix.com (cdn.zabbix.com)... 104.26.6.148, 172.67.69.4, 104.26.7.148, ...
正在连接 cdn.zabbix.com (cdn.zabbix.com)|104.26.6.148|:443... 已连接。
已发出 HTTP 请求,正在等待回应... 200 OK
长度:21300141 (20M) [application/octet-stream]
正在保存至: “zabbix-5.0.25.tar.gz”

zabbix-5.0.25.tar.gz   100%[=========================>]  20.31M  35.1KB/s  用时 10m 52s

2022-09-04 11:55:03 (31.9 KB/s) - 已保存 “zabbix-5.0.25.tar.gz” [21300141/21300141])

下载完毕 --2022-09-04 11:55:03--
总用时:10m 59s
下载了:1 个文件,10m 52s (31.9 KB/s) 中的 20M
[root@nginx src]# tar -xf zabbix-5.0.25.tar.gz zabbix-5.0.25/
[root@nginx src]# useradd -r -M -s /sbin/nologin zabbix
[root@nginx src]# cd zabbix-5.0.25/
[root@nginx zabbix-5.0.25]# ./configure --enable-agent     //检查
[root@nginx zabbix-5.0.25]# make && make install       //编译安装


 3万+
3万+


 被折叠的 条评论
为什么被折叠?
被折叠的 条评论
为什么被折叠?
 到【灌水乐园】发言


