1.阻塞队列(BlockingQueue)
1.概念
阻塞对列是一种特殊的队列,遵守"先进先出"的原则,其次还是一个线程安全的数据结构,并且具有以下特性:
当队列满的时候,继续入队会阻塞等待,直到有线程从队列中取走元素
当队列空时时候,继续出队会阻塞等待,直到有线程往队列中插入元素
阻塞队列的典型应用场景就是"生产消费者模型"。
2.生产消费者模型
生产者消费者模式就是通过一个容器来解决生产者和消费者的强耦合问题。
生产者和消费者彼此之间不直接通讯,而通过阻塞队列来进行通讯,所以生产者生产完数据之后不用等待消费者处理,直接扔给阻塞队列,消费者不找生产者要数据,而是直接从阻塞队列里取.
3.为什么要使用阻塞队列
解耦
现在的程序要尽量做到,高内聚 低耦合
高内聚:业务强相关的代码或者功能,组织在一起,为了后面的维护,写代码的一种方式
低耦合:不强相关的代码,或者重复的代码,尽量抽象成其他的接口,使用时直接调用,保证代码简洁,减少错误。
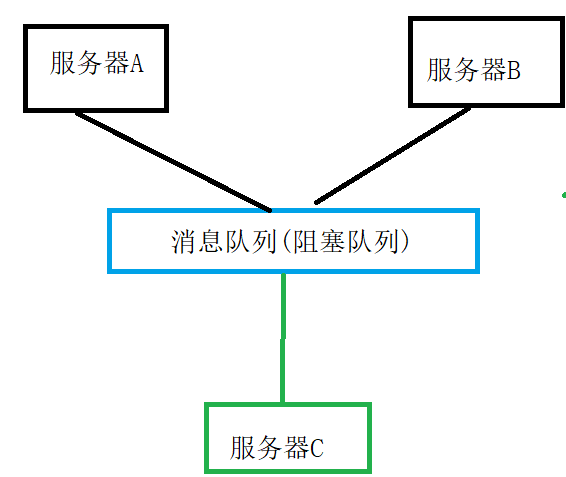
使用阻塞队列,可以很容易实现对于实际操作的变动,例如:
此时两个服务器AB工作,若要加入服务器C,此时他和AB服务器都强相关,所以修改较大

但是如果加入阻塞队列之后,工作变得非常简单,应用之间减少依赖

削峰填谷
削峰
例如每次双十一,当天服务器流量暴增,此时不可能所有的订单都直接访问服务器,而是依次插入消息队列,后台服务器保证正常运行,此为削峰。
填谷
经过双十一这天之后,后台服务器消息不多,此时读取消息队列的缓存消息进行处理,此为填谷。
3.异步操作
异步操作例如我们平时发短信:发送方可以不考虑接收方是否在线,任何时候可以发送。发送过去之后可以存在消息队列,例如聊天记录,等再次上线可以接收。
4.通过API创建阻塞队列


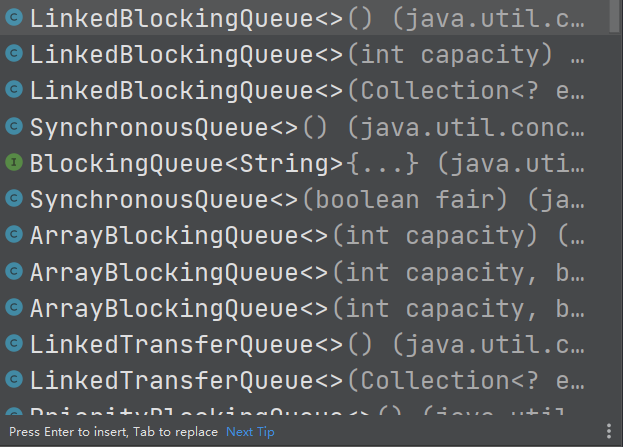
其中的实现类

示例:
public static void main(String[] args) throws InterruptedException {
        BlockingQueue<Integer> queue = new LinkedBlockingQueue<>(3);
        queue.put(1);
        queue.put(2);
        queue.put(3);
        System.out.println("添加三个数字");
        System.out.println(queue.take());
        System.out.println(queue.take());
        System.out.println(queue.take());
    }
注:阻塞队列没有查看队首元素的方法
5.自定义实现一个阻塞队列
和实现普通的队列一样,底层使用数组来完成,要实现阻塞功能,就要加入synchronized,wait和notify.
public class MyBlockingQueue {
    //需要一个数组来保存数据
    private Integer[] elementData = new Integer[100];
    //队尾与队首下标
    private volatile int head = 0;
    private volatile int tail = 0;
    //有效个数元素
    private volatile int size = 0;

    public void put(Integer value) throws InterruptedException {
        synchronized(this){
            //判断队列是否已满,如果满了则阻塞
            while(size >= elementData.length) {
                this.wait();
            }
            //从队尾入队
            elementData[tail] = value;
            //tail往后走
            tail++;
            //循环处理
            if(tail >= elementData.length){
                tail = 0;
            }
            //有效元素加一
            size++;
            //唤醒其他线程
            this.notifyAll();
        }
    }

    public int take() throws InterruptedException {
        synchronized(this){
            //先判断队列是否为空
            while(size == 0){
                //队列为空,出队阻塞
                this.wait();
            }
            //取出队头元素
            Integer value = elementData[head];
            //head往后走一步
            head++;
            //循环判断
            if(head >= elementData.length){
                head = 0;
            }
            //有效元素减一
            size--;
            //出队时唤醒其他线程
            this.notifyAll();
            //返回出队的值
            return value;
        }
    }
}
1.在普通队列的基础上加上了等待操作,在入队时如果队列已满就要等待,出队时队列为空就要等待
2.在普通队列的基础上加上了唤醒操作,执行完入队操作唤醒出队线程,执行完出队唤醒入队线程
3.阻塞队列不可能出现即是空又是满的状态,所以不可能互相等待
6.生产消费者模型的实现
public static void main(String[] args) {
        MyBlockingQueue queue = new MyBlockingQueue();
        //创建生产者
        Thread producer = new Thread(() ->{
            int num = 0;
            while(true){
                try {
                    queue.put(num);
                    System.out.println("生产了元素 " + num);
                    num++;
                    TimeUnit.MILLISECONDS.sleep(10);//生产间隔时间
                } catch (InterruptedException e) {
                    e.printStackTrace();
                }
            }
        });
        producer.start();

        Thread consumer = new Thread(() ->{
            while (true) {
                try {
                    Integer result = queue.take();
                    System.out.println("消费了元素 " + result);
                    TimeUnit.MILLISECONDS.sleep(1000);//消费间隔时间
                } catch (InterruptedException e) {
                    e.printStackTrace();
                }
            }
        });
        consumer.start();
    }
此时生产的快,消费的慢,所生成的元素就在阻塞队列中,如果队列已满,就等待消费,之后再生产。
2.定时器(Timer)
1.什么是定时器
定时器也是软件开发中的一个重要组件. 类似于一个 "闹钟". 达到一个设定的时间之后, 就执行某个指定好的代码.
2.标准库中的定时器
public static void main(String[] args) {
        Timer timer = new Timer();
        timer.schedule(new TimerTask() {
            @Override
            public void run() {

            }//定时器实现的任务
        }, 1000);//等待的时间
    }
定时器的使用示例:
public static void main(String[] args) throws InterruptedException {
        MyTimer myTimer = new MyTimer();
        myTimer.schedule(() -> {
            System.out.println("任务1");
        },10000);
        myTimer.schedule(() -> {
            System.out.println("任务4");
        },1000);
        myTimer.schedule(() -> {
            System.out.println("任务3");
        },3000);
        myTimer.schedule(() -> {
            System.out.println("任务5");
        },4000);
        myTimer.schedule(() -> {
            System.out.println("任务2");
        },5000);
}
指定的任务到时间,开始执行任务,然后执行下一个时间等待完成的任务。
3.自定义实现定时器
实现一个定时器,所需如下:
描述任务:具体逻辑Runnable表示,执行时间可以用long型的time实现
class MyTask implements Comparable<MyTask>{
    //描述定时器任务
    private Runnable runnable;
    //记录定时器的时间
    private long time;

    public Runnable getRunnable() {
        return runnable;
    }

    public long getTime() {
        return time;
    }

    public MyTask(Runnable runnable, long time) {
        if(time < 0){
            throw  new RuntimeException("延迟时间不能小于0");
        }
        this.runnable = runnable;
        //time记录的是任务的具体执行时间  等待时间加上系统当前时间
        this.time = time + System.currentTimeMillis();
    }

    @Override
    public int compareTo(MyTask o) {//实现小根堆的比较
        if(this.time == o.getTime()){
            return 0;
        }
        if(this.time > o.getTime()){
            return 1;
        }else {
            return -1;
        }
    }
组织任务:用一个阻塞队列去组织任务
 //使用优先级队列来保存任务
    private BlockingQueue<MyTask> queue = new PriorityBlockingQueue<>();
选用优先级队列实现,是因为当把任务添加到队列时,按照time大小排序,让执行时间越早的越靠前,保证队首元素是要第一个要执行的任务。
一个提交任务的方法
 public void schedule(Runnable runnable,long time) throws InterruptedException {
        MyTask myTask = new MyTask(runnable,time);
        queue.put(myTask);
//封装任务对象,并加入到队列当中
    }
创建一个线程,一直扫描线程中是否有任务,在构造方法中创建
  public MyTimer() throws InterruptedException {
            Thread thread = new Thread(() -> {
                while (true) {
                try {
                        MyTask result = queue.take();
                    if (System.currentTimeMillis() >= result.getTime()) {
                        result.getRunnable().run();
                    } else {
                        queue.put(result);
                        long waitTime = result.getTime() - System.currentTimeMillis();
                        synchronized (locker){
                            locker.wait(waitTime);
                        }
                    }
                } catch (InterruptedException e) {
                    e.printStackTrace();
                }
            }
            });
            thread.start();
注意:
定时器的延迟时间不能为负数
虽说写负数可以完成执行顺序,但是不符合实际,最快也得0,表示当前时间

long类型转向int防止溢出
不依赖转换的结果,自己手动比较判断
 @Override
    public int compareTo(MyTask o) {
        if(this.time == o.getTime()){
            return 0;
        }
        if(this.time > o.getTime()){
            return 1;
        }else {
            return -1;
        }
//        return (int) (this.time - o.getTime());  不推荐使用
    }
忙等问题
取出任务判断没有到执行时间,计算以下与当前时间差
把任务重新加入到队列中
执行等待时间wait(时间差)
  Thread thread = new Thread(() -> {
                while (true) {
                try {
                        MyTask result = queue.take();
                    if (System.currentTimeMillis() >= result.getTime()) {
                        result.getRunnable().run();
                    } else {
                        queue.put(result);
                        long waitTime = result.getTime() - System.currentTimeMillis();
                        synchronized (locker){
                            locker.wait(waitTime);//解决忙等问题
                        }
                    }
                } catch (InterruptedException e) {
                    e.printStackTrace();
                }
            }
            });
如果最新的线程是等待10秒后执行,此时加入一个一秒之后的任务,此时无法及时唤醒,所以就错过这个任务,无法执行此任务。
因此,设置一个后台线程,专门来唤醒扫描线程
      //创建一个后台线程专门来唤醒
        Thread daemonThread = new Thread(() ->{
            while (true){
                synchronized (locker){
                    locker.notifyAll();
                }
                try {
                    TimeUnit.SECONDS.sleep(1);
                } catch (InterruptedException e) {
                    e.printStackTrace();
                }
            }
        });
        daemonThread.setDaemon(true);
        daemonThread.start();
    }
完整代码:
import java.util.concurrent.BlockingQueue;
import java.util.concurrent.PriorityBlockingQueue;
import java.util.concurrent.TimeUnit;

public class MyTimer {
    //使用优先级队列来保存任务
    private BlockingQueue<MyTask> queue = new PriorityBlockingQueue<>();
    //定义一个锁
    Object locker = new Object();
    //定义一个添加任务的方法
    public void schedule(Runnable runnable,long time) throws InterruptedException {
        MyTask myTask = new MyTask(runnable,time);
        queue.put(myTask);
        synchronized (locker){
            locker.notifyAll();
        }
    }

    public MyTimer() throws InterruptedException {
            Thread thread = new Thread(() -> {
                while (true) {
                try {
                        MyTask result = queue.take();
                    if (System.currentTimeMillis() >= result.getTime()) {
                        result.getRunnable().run();
                    } else {
                        queue.put(result);
                        long waitTime = result.getTime() - System.currentTimeMillis();
                        synchronized (locker){
                            locker.wait(waitTime);
                        }
                    }
                } catch (InterruptedException e) {
                    e.printStackTrace();
                }
            }
            });
            thread.start();

            //创建一个后台线程专门来唤醒
        Thread daemonThread = new Thread(() ->{
            while (true){
                synchronized (locker){
                    locker.notifyAll();
                }
                try {
                    TimeUnit.SECONDS.sleep(1);
                } catch (InterruptedException e) {
                    e.printStackTrace();
                }
            }
        });
        daemonThread.setDaemon(true);
        daemonThread.start();
    }
}
//描述定时器的任务
class MyTask implements Comparable<MyTask>{
    //描述定时器任务
    private Runnable runnable;
    //记录定时器的时间
    private long time;

    public Runnable getRunnable() {
        return runnable;
    }

    public long getTime() {
        return time;
    }

    public MyTask(Runnable runnable, long time) {
        if(time < 0){
            throw  new RuntimeException("延迟时间不能小于0");
        }
        this.runnable = runnable;
        //time记录的是任务的具体执行时间  等待时间加上系统当前时间
        this.time = time + System.currentTimeMillis();
    }

    @Override
    public int compareTo(MyTask o) {
        if(this.time == o.getTime()){
            return 0;
        }
        if(this.time > o.getTime()){
            return 1;
        }else {
            return -1;
        }
//        return (int) (this.time - o.getTime());
    }
}
3.线程池(ThreadPool)
1.什么是线程池
字面意思,一次创建很多个线程,放在一个池子里(集合类),用的时候拿出来一个,用完放回去
2.为什么使用线程池
由于实际业务中需要用到许多线程,虽然创建线程和创建进程相比资源消耗小很多,但是频繁的创建线程也是会消耗很多的资源。线程池最大的好处就是减少每次启动,销毁线程的损耗。
3.jdk中默认线程池
  public static void main(String[] args) {
        // 1. 用来处理大量短时间工作任务的线程池,如果池中没有可用的线程将创建新的线程,如果线程空闲60秒将收回并移出缓存
        ExecutorService cachedThreadPool = Executors.newCachedThreadPool();
        // 2. 创建一个操作无界队列且固定大小线程池
        ExecutorService fixedThreadPool = Executors.newFixedThreadPool(3);
        // 3. 创建一个操作无界队列且只有一个工作线程的线程池
        ExecutorService singleThreadExecutor = Executors.newSingleThreadExecutor();
        // 4. 创建一个单线程执行器,可以在给定时间后执行或定期执行。
        ScheduledExecutorService singleThreadScheduledExecutor = Executors.newSingleThreadScheduledExecutor();
        // 5. 创建一个指定大小的线程池,可以在给定时间后执行或定期执行。
        ScheduledExecutorService scheduledThreadPool = Executors.newScheduledThreadPool(3);
        // 6. 创建一个指定大小(不传入参数,为当前机器CPU核心数)的线程池,并行地处理任务,不保证处理顺序
        Executors.newWorkStealingPool();
    }
上面的这些方法所创建的线程池开发当中并不实用,明白默认的有几种创建方法就行,而使用最多的就是系统自带的线程池。
4.系统自带的线程池
创建系统自带的线程池,使用ThreadPoolExecutor类来创建,并且其中的参数非常多,对于实际开发非常灵活。

ThreadPoolExecutor  threadPoolExecutor = new ThreadPoolExecutor(
                5,//核心线程数
                10,//最大线程数
                1,//临时线程存活的时间
                TimeUnit.SECONDS,//时间单位
                new LinkedBlockingQueue<>(20),//阻塞队列类型
                };
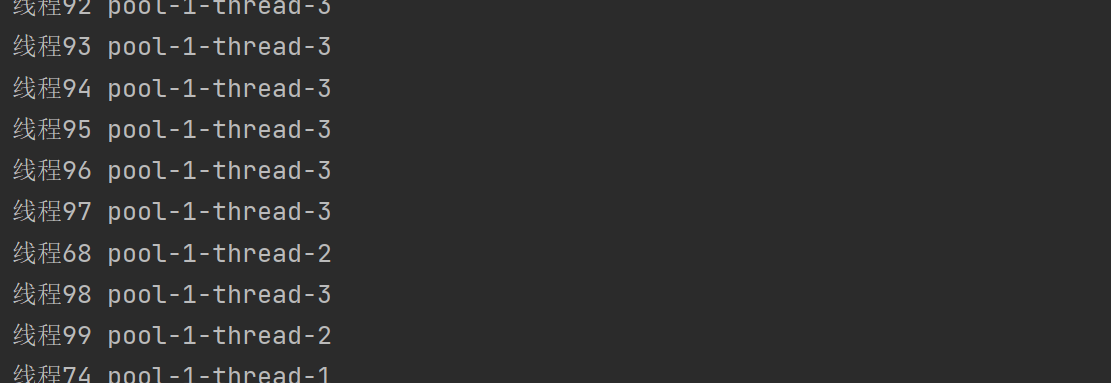
此处就是使用系统自带的创建了一个简单的线程池,具体执行任务如下:使用submit具体实现任务
for (int i = 0; i < 100; i++) {
int  taskId = i;
threadPoolExecutor.submit(() -> {
System.out.println("线程" + taskId + " " +Thread.currentThread().getName());
    });
}
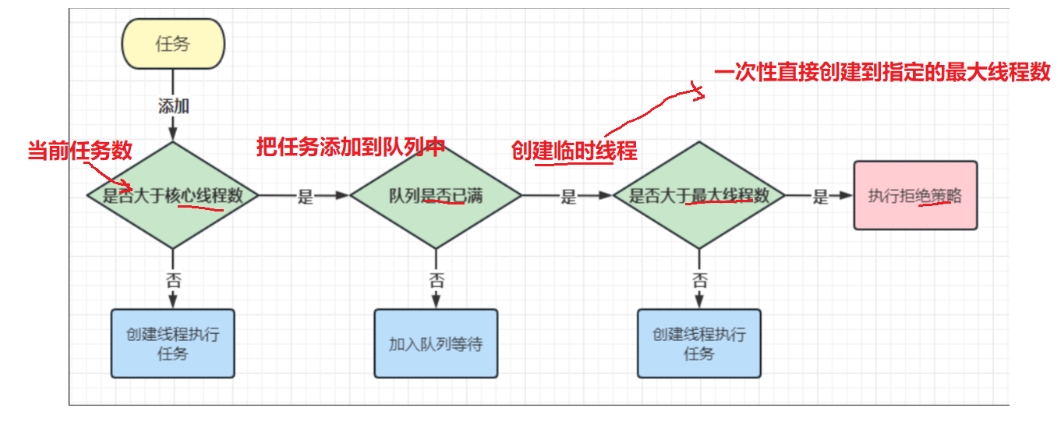
5.线程池的工作流程

6.拒绝策略
线程池的拒绝策略提供有四种策略:

ThreadPoolExecutor.AbortPolicy,这个策略是直接拒绝,也是默认的策略

ThreadPoolExecutor.CallerRunsPolicy,将任务返回给调用者(调用的线程)

ThreadPoolExecutor.DiscardOldestPolicy,放弃最早等待的任务
ThreadPoolExecutor.DiscardPolicy,放弃最新的任务
7.实现一个线程池
使用一个阻塞队列来管理任务,使用阻塞队列的好处是,如果没有任务,就阻塞等待,不会造成CPU的资源消耗
//使用一个阻塞队列来管理任务
BlockingQueue<Runnable> queue = new LinkedBlockingQueue<>();
提供一个往队列添加任务的方法
public void submit(Runnable runnable) throws InterruptedException {
queue.put(runnable);
}
创建多个线程,循环扫描执行任务
  public MyThreadPool(int num) {
        if(num <= 0){
            throw new RuntimeException("创建线程数不能小于0");
        }
        for (int i = 0; i < num; i++) {
            Thread thread = new Thread(() ->{
                while (true){
                    try {
                        Runnable result = queue.take();
                        result.run();
                    } catch (InterruptedException e) {
                        e.printStackTrace();
                    }
                }
            });
            thread.start();
        }
    }
完整代码:
package lesson07.threadpool;
import java.util.concurrent.BlockingQueue;
import java.util.concurrent.LinkedBlockingQueue;

public class MyThreadPool {
        //使用一个阻塞队列来管理任务
        BlockingQueue<Runnable> queue = new LinkedBlockingQueue<>();

        public void submit(Runnable runnable) throws InterruptedException {
            queue.put(runnable);
        }

    public MyThreadPool(int num) {
        if(num <= 0){
            throw new RuntimeException("创建线程数不能小于0");
        }
        for (int i = 0; i < num; i++) {
            Thread thread = new Thread(() ->{
                while (true){
                    try {
                        Runnable result = queue.take();
                        result.run();
                    } catch (InterruptedException e) {
                        e.printStackTrace();
                    }
                }
            });
            thread.start();
        }
    }
}


 2961
2961


 被折叠的 条评论
为什么被折叠?


