yolov8推理过程中,将未检测到目标的图片保存到一个文件夹

文章描述了一个如何在目标检测过程中,当未检测到目标时,自动将图片保存到特定no_detections_img文件夹的技术,通过检查文件名并使用正则表达式处理。作者提到没有在默认配置文件中找到相应的设置,而是通过代码实现这一功能。
摘要由CSDN通过智能技术生成

我想将未检测到目标的图片找出来,在推理的文件夹李一个一个找太慢。我也没有在default.yaml文件中找到相关的修改参数。可能是我没有找到。

下面的是修改文件的位置,高亮部分为插入代码片段。

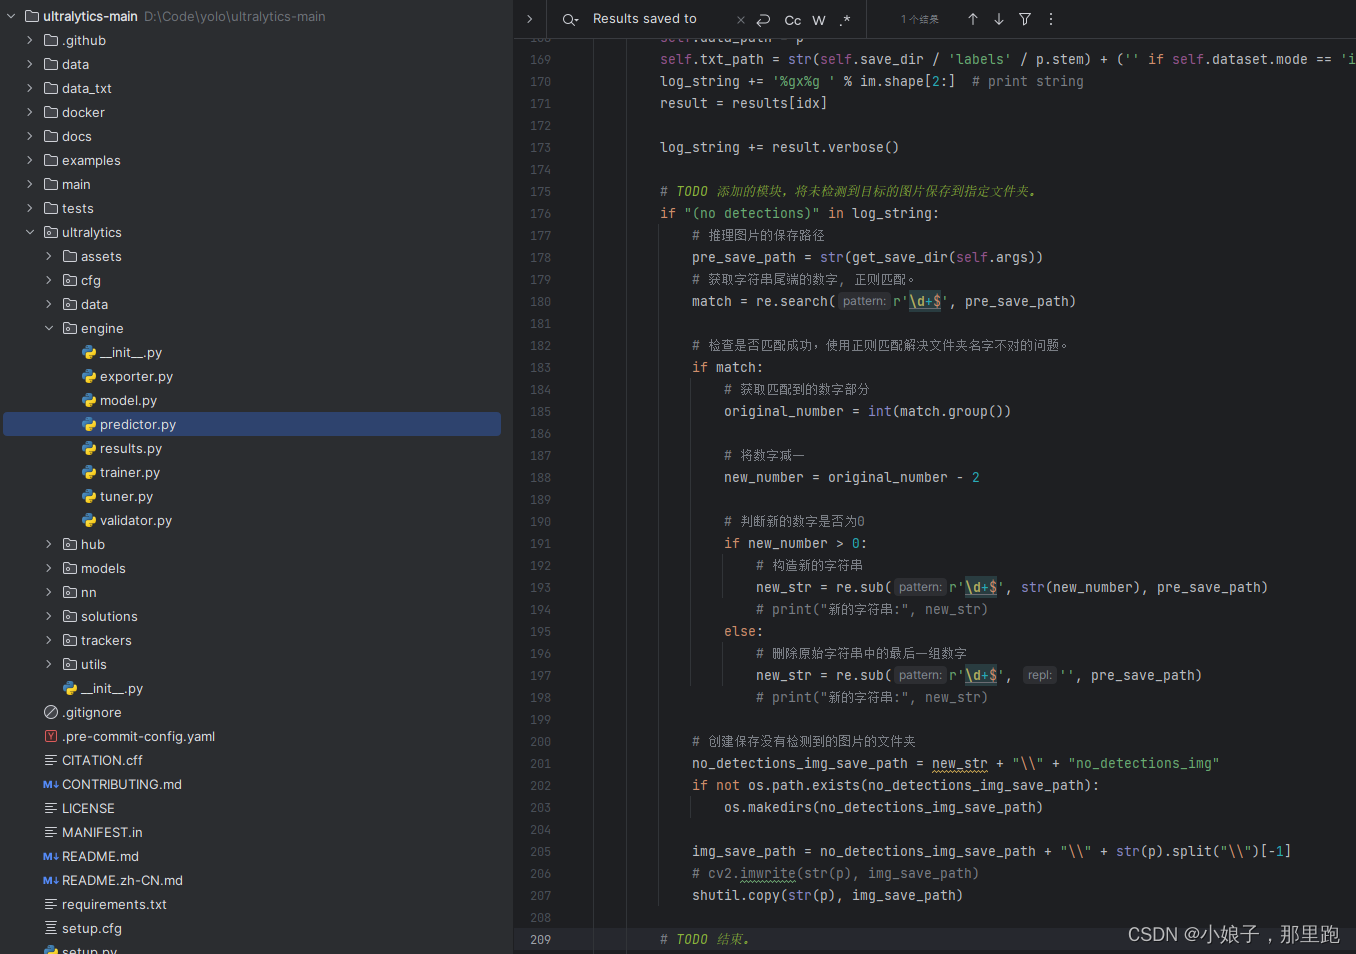
 # TODO 添加的模块,将未检测到目标的图片保存到指定文件夹。
        if "(no detections)" in log_string:
            # 推理图片的保存路径
            pre_save_path = str(get_save_dir(self.args))
            # 获取字符串尾端的数字, 正则匹配。
            match = re.search(r'\d+$', pre_save_path)

            # 检查是否匹配成功,使用正则匹配解决文件夹名字不对的问题。
            if match:
                # 获取匹配到的数字部分
                original_number = int(match.group())

                # 将数字减一
                new_number = original_number - 2

                # 判断新的数字是否为0
                if new_number > 0:
                    # 构造新的字符串
                    new_str = re.sub(r'\d+$', str(new_number), pre_save_path)
                    # print("新的字符串:", new_str)
                else:
                    # 删除原始字符串中的最后一组数字
                    new_str = re.sub(r'\d+$', '', pre_save_path)
                    # print("新的字符串:", new_str)

            # 创建保存没有检测到的图片的文件夹
            no_detections_img_save_path = new_str + "\\" + "no_detections_img"
            if not os.path.exists(no_detections_img_save_path):
                os.makedirs(no_detections_img_save_path)

            img_save_path = no_detections_img_save_path + "\\" + str(p).split("\\")[-1]
            # cv2.imwrite(str(p), img_save_path)
            shutil.copy(str(p), img_save_path)

        # TODO 结束。

  • 9
    点赞
  • 11
    收藏
    觉得还不错? 一键收藏
  • 3
    评论
要将识别出来的图片保存到新文件夹,需要在yolov5-7.0detect.py源码添加一些代码。具体步骤如下: 1. 在detect.py源码找到以下代码段: ``` # Inference t1 = time_synchronized() pred = model(imgs, augment=opt.augment)[0] # Apply NMS pred = non_max_suppression(pred, opt.conf_thres, opt.iou_thres, classes=opt.classes, agnostic=opt.agnostic_nms) t2 = time_synchronized() ``` 这是模型推理的部分,我们需要在这里添加保存识别出来的图片的代码。 2. 在这段代码下面添加以下代码段: ``` # Save images that are not detected for i, det in enumerate(pred): if len(det): det[:, :4] = scale_coords(imgs[i].shape[1:], det[:, :4], im0s[i].shape).round() # Write results for *xyxy, conf, cls in reversed(det): c = int(cls) label = f'{names[c]} {conf:.2f}' plot_one_box(xyxy, im0s[i], label=label, color=colors(c, True), line_thickness=3) else: cv2.imwrite(f"undetected_images/{os.path.basename(img_files[i])}", im0s[i]) ``` 这段代码会遍历所有的预测结果,如果没有检测目标,则将对应的图片保存一个名为“undetected_images”的文件夹。 3. 在detect.py的开头添加以下代码: ``` import os import cv2 ``` 这是为了导入cv2和os模块,以便在代码使用。 4. 创建一个名为“undetected_images”的文件夹,用来保存检测出的图片。 完成以上步骤后,重新运行detect.py,检测出的图片将会被保存到“undetected_images”文件夹

“相关推荐”对你有帮助么?

  • 非常没帮助
  • 没帮助
  • 一般
  • 有帮助
  • 非常有帮助
提交
评论 3
添加红包

请填写红包祝福语或标题

红包个数最小为10个

红包金额最低5元

当前余额3.43前往充值 >
需支付:10.00
成就一亿技术人!
领取后你会自动成为博主和红包主的粉丝 规则
hope_wisdom
发出的红包
实付
使用余额支付
点击重新获取
扫码支付
钱包余额 0

抵扣说明:

1.余额是钱包充值的虚拟货币,按照1:1的比例进行支付金额的抵扣。
2.余额无法直接购买下载,可以购买VIP、付费专栏及课程。

余额充值