


原文链接
上一篇【Next.js 入门教程系列】08-发送邮件
优化技巧
本篇包括以下内容:
- Optimizing images
- Using third-party JS libraries
- Using custom fonts
- Search engine optimizaion
- Lazy loading
优化 image
在 Next.js 中需要加载静态图片时,可以使用 next/image 中的 Image 组件。其导入的图片也是以对象的形式 import 进来。同样也可以使用 url 的形式获取网络资源。在 Nextjs Image 页面可以看到它的更多用法
import Image from "next/image";
import RDR2 from "@/public/RDR2.png";

export default async function Home() {
  const session = await getServerSession(authOptions);
  return (
    <>
      ...
      <Image src={RDR2} alt="An image of RDR2" />
      <Image src="https://bit.ly/react-cover" alt="React cover" />
      ...
    </>
  );
}
如果想要使用 url 的形式获取网络资源,出于安全原因,需要先在 next.config.js 中添加对应的域名才可以正常获取。添加好后需要重新运行项目就可以正常获取网络资源了
/** next.config.js*/

/** @type {import('next').NextConfig} */
const nextConfig = {
  images: {
    remotePatterns: [
      {
        protocol: "https",
        hostname: "bit.ly",
      },
    ],
  },
};

module.exports = nextConfig;
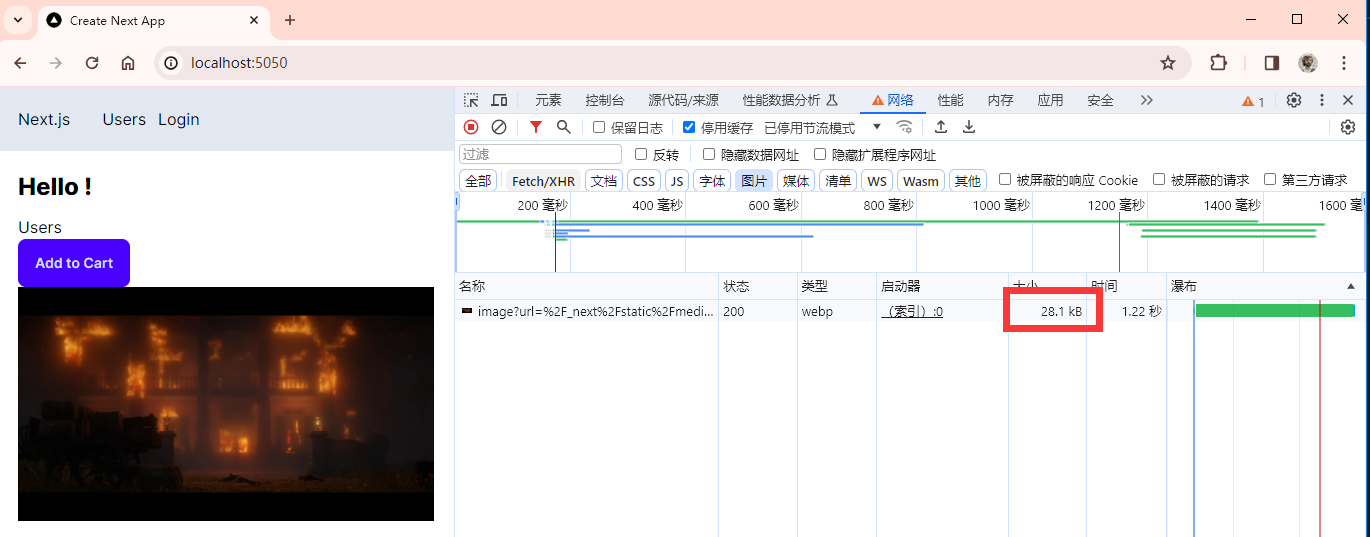
使用 <Image> 标签的好处是,可以将图片转为 webp 格式,极大的减少 Size,比如这张图原图大小为 2.08MB,可以看到实际上网页里的只有 28.1KB
使用第三方脚本
在使用第三方 js 脚本的时候,我们可以将其封装为一个 component,然后在对应的 layout.tsx 中直接使用即可。注意应使用 Next 的 <Script> 标签。若有识别不出 js 语法的问题,可以用 {``} 将 js 代码包裹起来
字体
网络字体
想要使用其他的官方字体,我们只需要在 layout.tsx 中从 "next/font" 中导入,并在对应标签的 className 中设置即可。比如下面就是使用 Roboto 字体的演示。在Google Fonts这里可以找到各种 Google 字体。在使用这种官方字体库时,仅在第一次使用时会去下载这个字体文件,后面会一直使用下载好的文件,不必担心由于网络问题导致字体出错
# layout.tsx

import "./globals.css";
import type { Metadata } from "next";
// import 字体
import { Inter, Roboto } from "next/font/google";
import NavBar from "./NavBar";
import AuthProvider from "./auth/Provider";

const inter = Inter({ subsets: ["latin"] });
// 调用字体
const roboto = Roboto({ subsets: ["latin"], weight: ["400", "500"] });

export const metadata: Metadata = {
  title: "Create Next App",
  description: "Generated by create next app",
};

export default function RootLayout({
  children,
}: {
  children: React.ReactNode;
}) {
  return (
    <html lang="en" data-theme="winter">
      {/* 设置字体 */}
      <body className={roboto.className}>
        <AuthProvider>
          <NavBar />
          <main className="p-5">{children}</main>
        </AuthProvider>
      </body>
    </html>
  );
}
本地字体
同样的,我们也可以使用本地字体。这里以 poppings 字体为例。首先将下载好的文件放到 "public/fonts" 中。然后和官方字体一样,在 layout.tsx 中调用
# layout.tsx

import "./globals.css";
import type { Metadata } from "next";
import { Inter, Roboto } from "next/font/google";
// import 字体
import localFont from "next/font/local";
import NavBar from "./NavBar";
import AuthProvider from "./auth/Provider";

const inter = Inter({ subsets: ["latin"] });
const roboto = Roboto({ subsets: ["latin"], weight: ["400", "500"] });
// 设置source和变量名(用于TailWind)
const poppins = localFont({
  src: "../public/fonts/Poppins-Regular.ttf",
  variable: "--font-poppings",
});

export const metadata: Metadata = {
  title: "Create Next App",
  description: "Generated by create next app",
};

export default function RootLayout({
  children,
}: {
  children: React.ReactNode;
}) {
  return (
    <html lang="en" data-theme="winter">
      {/* 设置字体,注意使用 .variable 而不是 .className */}
      <body className={poppins.variable}>
        <AuthProvider>
          <NavBar />
          <main className="p-5">{children}</main>
        </AuthProvider>
      </body>
    </html>
  );
}
除此之外,我们可以将自定义字体注册到 TailWind 中:
  # tailwind.config.ts

  import type { Config } from "tailwindcss";

  const config: Config = {
    content: [
      "./pages/**/*.{js,ts,jsx,tsx,mdx}",
      "./components/**/*.{js,ts,jsx,tsx,mdx}",
      "./app/**/*.{js,ts,jsx,tsx,mdx}",
    ],
    theme: {
      extend: {
        backgroundImage: {
          "gradient-radial": "radial-gradient(var(--tw-gradient-stops))",
          "gradient-conic":
            "conic-gradient(from 180deg at 50% 50%, var(--tw-gradient-stops))",
        },
        // 注册字体,其 var 就是刚刚设置的 variable
+       fontFamily: {
+         poppins: "var(--font-poppings)",
+       },
      },
    },
    plugins: [require("daisyui")],
    daisyui: ["winter"],
  };
  export default config;
注册好之后,就可以像下面这样使用
<h1 className="font-poppins">Hello World!</h1>
同样也可以直接应用到 global.css 中 来覆盖所有的 h1 标签
@layer base {
  h1 {
    @apply font-extrabold text-2xl mb-3 font-poppins;
  }
}
搜索引擎优化
我们可以在每个 pag.tsx 中添加以下内容,包括每页的题目和描述等内容
import { Metadata } from "next";

export const metadata: Metadata = {
  title: "...",
  description: "...",
};
我们也可以根据某些数据来自动生成 metadata,比如从 API 或者数据库中获取数据
import { Metadata } from "next";

export async function generateMetada(): Promise<Metadata> {
  const metaData = await fetch("");
  return {
    title: "metaData.title",
    description: "...",
  };+
}
Lazy Loading
在某些页面可能存在过多的组件,而且这些组件并不是一进到页面就会显示的,比如点击某个 button 才会显示,此时如果组件的数据量过于庞大(比如一个富文本编辑器),就会导致加载十分缓慢,此时就可以用到 Lazy Loading。在下面的演示中,我们的 HeavyComponent 不用一开始就 import 进来,而是使用 dynamic 函数进行导入,会自动在需要的时候导入,我们还可以设置 loading 函数,让其在加载时有占位符
- import HeavyComponent from "./components/HeavyComponent";
+ import dynamic from "next/dynamic";
+ const HeavyComponent = dynamic(() => import("./components/HeavyComponent"), {
+   ssr: false,
+   loading: () => <p>Loading...</p>,
+ });
  export default async function Home() {
    const [show, setShow] = useState(false);
    return (
      ...
        <button onClick={() => setShow(true)}>Show</button>
        Show && <HeavyComponent />
      ...
    );
  }
同样的,比如我们需要用到某个函数,我们也可以使用 import 函数来进行 Lazy Loading
<button onClick={()=>{
  _ = import("./components/sort");
  const item = []
  _.sort(item,asec);
}}>Sort<>
下一篇讲部署


 182
182

 被折叠的 条评论
为什么被折叠?
被折叠的 条评论
为什么被折叠?
 到【灌水乐园】发言


