


目录
1.简介
首先本文主要是将先前个人学习到JavaWeb技术并结合MySQL来编写的基于Jsp+Servlet+纯(HTML+CSS+JavaScript)实现的学生成绩管理系统,项目结构划分为:
- dao:主要内容包括学生和用户的CRUD方法实现接口和具体的方法实现类。
- factory:主要内容包括学生和用户的工厂创建,封装对象的创建过程,并提供一个统一的接口来获取对象实例,从而实现对象的创建与使用的解耦。
- pojo:主要内容包括学生和用户的实体类。
- service:主要内容包括学生和用户的业务层接口及其实现方法。
- utils:工具类。
- filter:过滤器存储(登录验证、拦截等等)。
- web:学生和用户的servlet(控制层)。
- resource:资源存储。
- web(根目录下,原生J2EE项目生成):内容包括WEB-INF和CSS以及JSP页面。
本文的以学生的CRUD实现为例进行介绍,如果需要源代码请联系博主本人。
2.后端功能实现
2.1 Student(学生实体类)
一个基本具体功能的CRUD实现首先得有自己的实体类,来作为所要展示及其数据转存映射的存在。而实体类型中需要基本的实现方法,例如set、get方法用来实现数据的获取和存储等等,如果学习到后面建议使用lombok包中的@Data方法来实现一键生成。
以下为学生实体类的代码:
package com.edu.xsgl.pojo;

import java.util.Objects;

public class Student {
    private String no;
    private String age;
    private String name;
    private String gender;
    private String major;
    private String grade;

    public Student(){

    }

    public String getNo() {
        return no;
    }

    public void setNo(String no) {
        this.no = no;
    }

    public String getAge() {
        return age;
    }

    public void setAge(String age) {
        this.age = age;
    }

    public String getName() {
        return name;
    }

    public void setName(String name) {
        this.name = name;
    }

    public String getMajor() {
        return major;
    }

    public void setMajor(String major) {
        this.major = major;
    }

    public String getGrade() {
        return grade;
    }

    public void setGrade(String grade) {
        this.grade = grade;
    }

    public String getGender() {
        return gender;
    }

    public void setGender(String gender) {
        this.gender = gender;
    }

    @Override
    public int hashCode() {
        return Objects.hash(no,name,age,gender,major,grade);
    }

    @Override
    public boolean equals(Object o) {
        if (this == o) return true;
        if (o == null || getClass() != o.getClass()) return false;
        Student dept = (Student) o;
        return Objects.equals(no, dept.no) && Objects.equals(name, dept.name) && Objects.equals(age, dept.age)
                && Objects.equals(gender, dept.gender)&& Objects.equals(major, dept.major)&&
                Objects.equals(grade, dept.grade);
    }

    @Override
    public String toString() {
        return "user_info{" +
                "no='" + no + '\'' +
                ", name='" + name + '\'' +
                ", age='" + age + '\'' +
                ", gender='" + gender + '\'' +
                ", major='" + major + '\'' +
                ", grade='" + grade + '\'' +
                '}';
    }
}
2.2 StudentDao及其impl(JDBC的CRUD实现)
StudentDao主要是学生CRUD实现方法的接口,而其对应的impl为其实现类,以下使用最基本的JDBC来进行对学生数据进行CRUD操作,并返回对应的响应体。
代码如下:
StudentDao:
package com.edu.xsgl.dao;

import com.edu.xsgl.pojo.Student;

import java.util.List;

public interface StudentDao {

    int insert(Student stu);

    int deleteByno(String no);

    int update(Student stu);

    Student selectByno(String no);

    List<Student> selectAll();
}
StudentImpl:
package com.edu.xsgl.dao.impl;

import com.edu.xsgl.dao.StudentDao;
import com.edu.xsgl.pojo.Student;

import java.sql.Connection;
import java.sql.PreparedStatement;
import java.sql.ResultSet;
import java.sql.SQLException;
import java.util.ArrayList;
import java.util.List;

public class StudentDaoimpl implements StudentDao {


    private Connection conn =null;

    public StudentDaoimpl(Connection conn) {
        this.conn = conn;
    }

    /**
     * 实现对学生进行增加
     * @param stu
     * @return 1 表示成功
     */
    public int insert(Student stu){
        // 连接数据库执行insert语句
        PreparedStatement ps = null;
        int count = 0;
        try {
            String sql = "insert into students(no , name , major, gender , age, grade) values(?,?,?,?,?,?)";
            ps = this.conn.prepareStatement(sql);
            ps.setString(1, stu.getNo());
            ps.setString(2, stu.getName());
            ps.setString(3, stu.getMajor());
            ps.setString(4, stu.getGender());
            ps.setString(5, stu.getAge());
            ps.setString(6, stu.getGrade());
            count = ps.executeUpdate();
            ps.close();

        } catch (SQLException e) {
            e.printStackTrace();
        }

        return count;
    }


    /**
     * 实现对学生信息进行删除
     * @param no
     * @return
     */
    public int deleteByno(String no){
        // 连接数据库,删除用户
        PreparedStatement ps = null;
        int count = 0;
        try {
            String sql = "delete from students where no = ?";
            ps = this.conn.prepareStatement(sql);
            ps.setString(1, no);
            count = ps.executeUpdate();
            ps.close();
        } catch (SQLException e) {
            e.printStackTrace();
        }
        return count;
    }


    /**
     * 实行对学生信息进行修改
     * @param stu
     * @return
     */
    public int update(Student stu){
        // 连接数据库执行更新语句
        PreparedStatement ps = null;
        int count = 0;
        try {
            String sql = "update students set name = ?, major = ? , gender = ?,age = ?, grade = ?  where no = ?";
            ps = this.conn.prepareStatement(sql);
            ps.setString(1, stu.getName());
            ps.setString(2, stu.getMajor());
            ps.setString(3, stu.getGender());
            ps.setString(4, stu.getAge());
            ps.setString(5, stu.getGrade());
            ps.setString(6, stu.getNo());
            count = ps.executeUpdate();
            ps.close();
        } catch (SQLException e) {
            e.printStackTrace();
        }
        return count;
    }


    /**
     * 实现对单个学生信息进行查找
     * @param no
     * @return
     */
    public Student selectByno(String no){

        PreparedStatement ps = null;
        ResultSet rs = null;
        Student stu= null;
        try {
            String sql = "select * from students where no = ? ";
            ps = this.conn.prepareStatement(sql);
            ps.setString(1, no);
            rs = ps.executeQuery();
            // 这个结果集当中只有一条数据,不需要while循环
            if (rs.next()) {
                // 封装对象(创建豆子)
                stu=new Student();
                stu.setNo(no);
                stu.setName(rs.getString("name"));
                stu.setMajor(rs.getString("major"));
                stu.setGender(rs.getString("gender"));
                stu.setAge(rs.getString("age"));
                stu.setGrade(rs.getString("grade"));

            }
            rs.close();
            ps.close();
        } catch (SQLException e) {
            e.printStackTrace();
        }
        return stu;
    }


    /**
     * 实现对所有学生进行查找
     * @return 1
     */
    public List<Student> selectAll(){
        PreparedStatement ps = null;
        ResultSet rs = null;
        List<Student> students = new ArrayList<>();
        try {
            // 执行查询语句
            String sql = "select * from students";
            ps = this.conn.prepareStatement(sql);
            rs = ps.executeQuery();
            // 遍历结果集
            while (rs.next()) {
                // 将以上的零散的数据封装成java对象。
                Student stu = new Student();
                stu.setNo(rs.getString("no"));
                stu.setName(rs.getString("name"));
                stu.setMajor(rs.getString("major"));
                stu.setGender(rs.getString("gender"));
                stu.setAge(rs.getString("age"));
                stu.setGrade(rs.getString("grade"));
                // 将用户对象放到list集合当中
                students.add(stu);
            }
            rs.close();
            ps.close();
        } catch (SQLException e) {
            e.printStackTrace();
        }
        return students;
    }


}
2.3 StudentFactory以及StudentServiceFactory
- StudentFactory:主要为StudentDao的工厂创建,getStudentDaoImpl 方法用于获取一个 StudentDaoimpl 对象,该对象依赖于传入的 Connection 对象。
- StudentServiceFactory:主要为StudentService的impl实现类的工厂,用于创建实现类对象。
代码如下:
StudentFactory:
package com.edu.xsgl.factory;

import com.edu.xsgl.dao.impl.StudentDaoimpl;

import java.sql.Connection;


public class StudentFactory {
    public static StudentDaoimpl getStudentDaoImpl(Connection conn){
        return new StudentDaoimpl(conn);
    }
}
StudentServiceFactory:
package com.edu.xsgl.factory;

import com.edu.xsgl.service.impl.StudentServiceimpl;

public class StudentServiceFactory {
    public static StudentServiceimpl getStudentServiceInstance() {
        return new StudentServiceimpl();
    }
}
如果不需要可以按照需求来进行移除。
2.4 StudentService及其impl
- StudentService:主要是对于前面StudentDao层的方法进行同样编写的接口(目的:降低其耦合程度)
- StudentServiceImpl:主要是定义数据库连接工具类后,并通过学生类工厂创建一个新的数据库连接,然后通过调用到其Dao实现类中的方法来实现业务层的处理。
代码如下:
StudentService:
package com.edu.xsgl.service;

import com.edu.xsgl.pojo.Student;

import java.util.List;


public interface StudentService {

     int inserts(Student us);

     int delete(String no);

     int updates(Student us);

     Student selectgetno(String no);

     List<Student> listall();

}
StudentServiceImpl:
package com.edu.xsgl.service.impl;

import com.edu.xsgl.factory.StudentFactory;
import com.edu.xsgl.dao.impl.StudentDaoimpl;
import com.edu.xsgl.pojo.Student;
import com.edu.xsgl.service.StudentService;
import com.edu.xsgl.utils.DBUtil;

import java.util.List;

public class StudentServiceimpl implements StudentService {

    private DBUtil dbUtil=new DBUtil();


    @Override
    public int inserts(Student us)  {
        StudentDaoimpl sd=null;
        try {
             sd=StudentFactory.getStudentDaoImpl(this.dbUtil.getConnection());
        }catch(Exception e){
            e.printStackTrace();
        }finally {
            this.dbUtil.close();
        }
        return sd.insert(us);

    }

    @Override
    public int delete(String no) {
        StudentDaoimpl sd=null;
        try {
            sd=StudentFactory.getStudentDaoImpl(this.dbUtil.getConnection());
        }catch(Exception e){
            e.printStackTrace();
        }finally {
            this.dbUtil.close();
        }
        return sd.deleteByno(no);
    }

    @Override
    public int updates(Student us) {
        StudentDaoimpl sd=null;
        try {
            sd=StudentFactory.getStudentDaoImpl(this.dbUtil.getConnection());
        }catch(Exception e){
            e.printStackTrace();
        }finally {
            this.dbUtil.close();
        }
        return sd.update(us);
    }

    @Override
    public Student selectgetno(String no) {
        StudentDaoimpl sd=null;
        try {
             sd=StudentFactory.getStudentDaoImpl(this.dbUtil.getConnection());
        }catch(Exception e){
            e.printStackTrace();
        }finally {
            this.dbUtil.close();
        }
        return sd.selectByno(no);
    }

    @Override
    public List<Student> listall() {
        StudentDaoimpl sd=null;
        try {
             sd=StudentFactory.getStudentDaoImpl(this.dbUtil.getConnection());
        }catch(Exception e){
            e.printStackTrace();
        }finally {
            this.dbUtil.close();
        }
        return sd.selectAll();
    }
}
2.5 DBUtil(数据连接工具类)
为了不让每次在Dao实现类中进行数据库访问的时候都编写输入数据库的连接信息,这会造成很多的重复连接代码,而且我们为了降低其对数据库的连接次数,可以通过实现一个专门的数据库连接工具类来进行在最开始需要连接的数据库的时候进行请求连接,并及时的关闭数据库防止数据丢失。
代码实现如下:
package com.edu.xsgl.utils;

import java.sql.*;
import java.util.ResourceBundle;

/**
 * JDBC的工具类
 */
public class DBUtil {

    // 静态变量:在类加载时执行。
    // 并且是有顺序的。自上而下的顺序。
    // 属性资源文件绑定
    private static ResourceBundle bundle = ResourceBundle.getBundle("resources.jdbc");
    // 根据属性配置文件key获取value
    private static String driver = bundle.getString("driver");
    private static String url = bundle.getString("url");
    private static String user = bundle.getString("user");
    private static String password = bundle.getString("password");
    private static Connection conn =null;

    static {
        // 注册驱动(注册驱动只需要注册一次,放在静态代码块当中。DBUtil类加载的时候执行。)
        try {
            // "com.mysql.jdbc.Driver" 是连接数据库的驱动,不能写死。因为以后可能还会连接Oracle数据库。
            // 如果连接oracle数据库的时候,还需要修改java代码,显然违背了OCP开闭原则。
            // OCP开闭原则:对扩展开放,对修改关闭。(什么是符合OCP呢?在进行功能扩展的时候,不需要修改java源代码。)
            //Class.forName("com.mysql.jdbc.Driver");

            Class.forName(driver);
        } catch (ClassNotFoundException e) {
            e.printStackTrace();
        }
    }

    /**
     * 获取数据库连接对象
     * @return conn 连接对象
     * @throws SQLException
     */
    public static Connection getConnection() throws SQLException {
        // 获取连接
        Connection conn = DriverManager.getConnection(url, user, password);
        return conn;
    }

    /**
     * 释放资源
     *
     *
     */
    public static void close(){

        if (conn != null) {
            try {
                conn.close();
            } catch (SQLException e) {
                e.printStackTrace();
            }
        }
    }

//根据需求转换资源释放的方式
    /**
     * 释放资源
     * @param conn 连接对象
     * @param ps 数据库操作对象
     * @param rs 结果集对象
     */
//    public static void close(Connection conn, Statement ps, ResultSet rs){
//        if (rs != null) {
//            try {
//                rs.close();
//            } catch (SQLException e) {
//                e.printStackTrace();
//            }
//        }
//        if (ps != null) {
//            try {
//                ps.close();
//            } catch (SQLException e) {
//                e.printStackTrace();
//            }
//        }
//        if (conn != null) {
//            try {
//                conn.close();
//            } catch (SQLException e) {
//                e.printStackTrace();
//            }
//        }
//    }

}
jdbc.properties
driver=com.mysql.cj.jdbc.Driver
url=jdbc:mysql://localhost:3306/student?serverTimezone=GMT
user=用户名
password=用户密码
2.6 StudentServlet
以下来到了最为关键的Servlet层(控制器层)。
首先相较于传统的Servlet层的实现,以下主要是通过使用@WebServlet注解来定义服务器中的请求路径,如何通过编写service方法来实现请求了那个路径便调用到该请求路径对应的方法控制器。
代码如下:
package com.edu.xsgl.web;


import com.edu.xsgl.factory.StudentServiceFactory;
import com.edu.xsgl.pojo.Student;

import jakarta.servlet.ServletException;
import jakarta.servlet.annotation.WebServlet;
import jakarta.servlet.http.HttpServlet;
import jakarta.servlet.http.HttpServletRequest;
import jakarta.servlet.http.HttpServletResponse;

import java.io.IOException;
import java.util.List;

@WebServlet({"/StudentList", "/StudentAdd", "/StudentDetail", "/StudentDel", "/StudentModify"})
public class StudentServlet extends HttpServlet {

    @Override
    protected void service(HttpServletRequest request, HttpServletResponse response) throws ServletException, IOException {
        // 获取servlet path
        String servletPath = request.getServletPath();
        if ("/StudentList".equals(servletPath)) {
            doList(request, response);   //显示全部学生信息
        } else if("/StudentAdd".equals(servletPath)){
            doSave(request, response);   //添加学生信息
        } else if("/StudentDetail".equals(servletPath)){
            doDetail(request, response);  //单独获取学生详细信息
        } else if("/StudentDel".equals(servletPath)){
            doDel(request, response);    //删除学生信息
        } else if("/StudentModify".equals(servletPath)){
            doModify(request, response);    //修改学生信息
        }
    }


    /**
     * 查询所有的学生信息,将学生信息收集好,然后跳转到JSP做页面展示。
     * @param request
     * @param response
     * @throws ServletException
     * @throws IOException
     */
    private void doList(HttpServletRequest request, HttpServletResponse response)
            throws ServletException, IOException {
        // 准备一个容器,用来专门存储学生
//        DBUtil dbUtil=new DBUtil();
//        StudentDaoimpl sd=null;
//        try {
//          sd=StudentFactory.getStudentDaoImpl(dbUtil.getConnection());
//
//        } catch (SQLException e) {
//            e.printStackTrace();
//        }


        List<Student> students1 ;
        students1= StudentServiceFactory.getStudentServiceInstance().listall();
            // 将一个集合放到请求域当中
        request.setAttribute("deptList", students1);
        // 转发(不要重定向)
        request.getRequestDispatcher("/list.jsp").forward(request, response);
    }


    /**
     * 保存学生信息
     * @param request
     * @param response
     * @throws ServletException
     * @throws IOException
     */
    private void doSave(HttpServletRequest request, HttpServletResponse response)
            throws ServletException, IOException {
        // 获取学生的信息
        // 注意乱码问题(Tomcat10不会出现这个问题)
        request.setCharacterEncoding("UTF-8");
        int count = 0;
        // 将以上的零散的数据封装成java对象。
        Student dept = new Student();
        dept.setNo(request.getParameter("no"));
        dept.setName(request.getParameter("name"));
        dept.setMajor(request.getParameter("major"));
        dept.setGender(request.getParameter("gender"));
        dept.setAge(request.getParameter("age"));
        dept.setGrade(request.getParameter("grade"));

            count= StudentServiceFactory.getStudentServiceInstance().inserts(dept);


        if (count == 1) {
            response.sendRedirect(request.getContextPath() + "/StudentList");
        }
    }

    /**
     * 根据学生学号删除学生
     * @param request
     * @param response
     * @throws ServletException
     * @throws IOException
     */
    private void doDel(HttpServletRequest request, HttpServletResponse response)
            throws ServletException, IOException {
        // 获取学生学号
        String no = request.getParameter("no");

        int count = 0;

            count= StudentServiceFactory.getStudentServiceInstance().delete(no);
        if (count == 1) {
            // 删除成功
            // 重定向到列表页面
            String contextPath = request.getContextPath();
            response.sendRedirect(contextPath + "/StudentList");
        }
    }

    /**
     * 根据学生学号获取学生的信息。
     * @param request
     * @param response
     * @throws ServletException
     * @throws IOException
     */
    private void doDetail(HttpServletRequest request, HttpServletResponse response)
            throws ServletException, IOException {
        // 获取学生编号
        String no = request.getParameter("no");

        // 创建用户对象
        Student dept= null;

            dept = StudentServiceFactory.getStudentServiceInstance().selectgetno(no);
        // 这个豆子只有一个,所以不需要袋子,只需要将这个咖啡豆放到request域当中即可。
        request.setAttribute("dept", dept);

        request.getRequestDispatcher("/" + request.getParameter("f") + ".jsp").forward(request, response);

    }


    /**
     * 修改用户
     * @param request
     * @param response
     * @throws ServletException
     * @throws IOException
     */
    private void doModify(HttpServletRequest request, HttpServletResponse response)
            throws ServletException, IOException {
        // 解决请求体的中文乱码问题。
        request.setCharacterEncoding("UTF-8");
        int count = 0;
        Student uc =new Student();
        uc.setNo(request.getParameter("no"));
        uc.setName(request.getParameter("name"));
        uc.setMajor(request.getParameter("major"));
        uc.setGender(request.getParameter("gender"));
        uc.setAge(request.getParameter("age"));
        uc.setGrade(request.getParameter("grade"));

            count= StudentServiceFactory.getStudentServiceInstance().updates(uc);

        if (count == 1) {
            response.sendRedirect(request.getContextPath() + "/StudentList");
        }
    }


}
2.7 LoginCheckFilter
主要为登录过滤器,防止用户进行跨路径进行越级访问。
package com.edu.xsgl.filter;

import jakarta.servlet.*;
import jakarta.servlet.http.HttpServletRequest;
import jakarta.servlet.http.HttpServletResponse;
import jakarta.servlet.http.HttpSession;

import java.io.IOException;

public class LoginCheckFilter implements Filter {

    @Override
    public void doFilter(ServletRequest req, ServletResponse resp, FilterChain chain)
            throws IOException, ServletException {

        /**
         * 什么情况下不能拦截
         *      目前写的路径是:/* 表示所有的请求均拦截。
         *
         *      用户访问 index.jsp的时候不能拦截
         *      用户已经登录了,这个需要放行,不能拦截。
         *      用户要去登录,这个也不能拦截。
         *      WelcomeServlet也不能拦截。
         */

        HttpServletRequest request = (HttpServletRequest)req;
        HttpServletResponse response = (HttpServletResponse) resp;

        // 获取请求路径
        String servletPath = request.getServletPath();


        HttpSession session = request.getSession(false);

        if("/index.jsp".equals(servletPath) || "/welcome".equals(servletPath) ||
                "/user/login".equals(servletPath) || "/user/exit".equals(servletPath)
                || (session != null && session.getAttribute("user") != null)){

            // 继续往下走
//            request.setCharacterEncoding("UTF-8");
            chain.doFilter(request, response);
        }else{
            response.sendRedirect(request.getContextPath() + "/index.jsp");
        }
    }
}
3.前端功能实现(JSP+前端三件套)
页面的基本实现主要还是通过前端三件套配合上JSP以及EL表达式来进行实现。
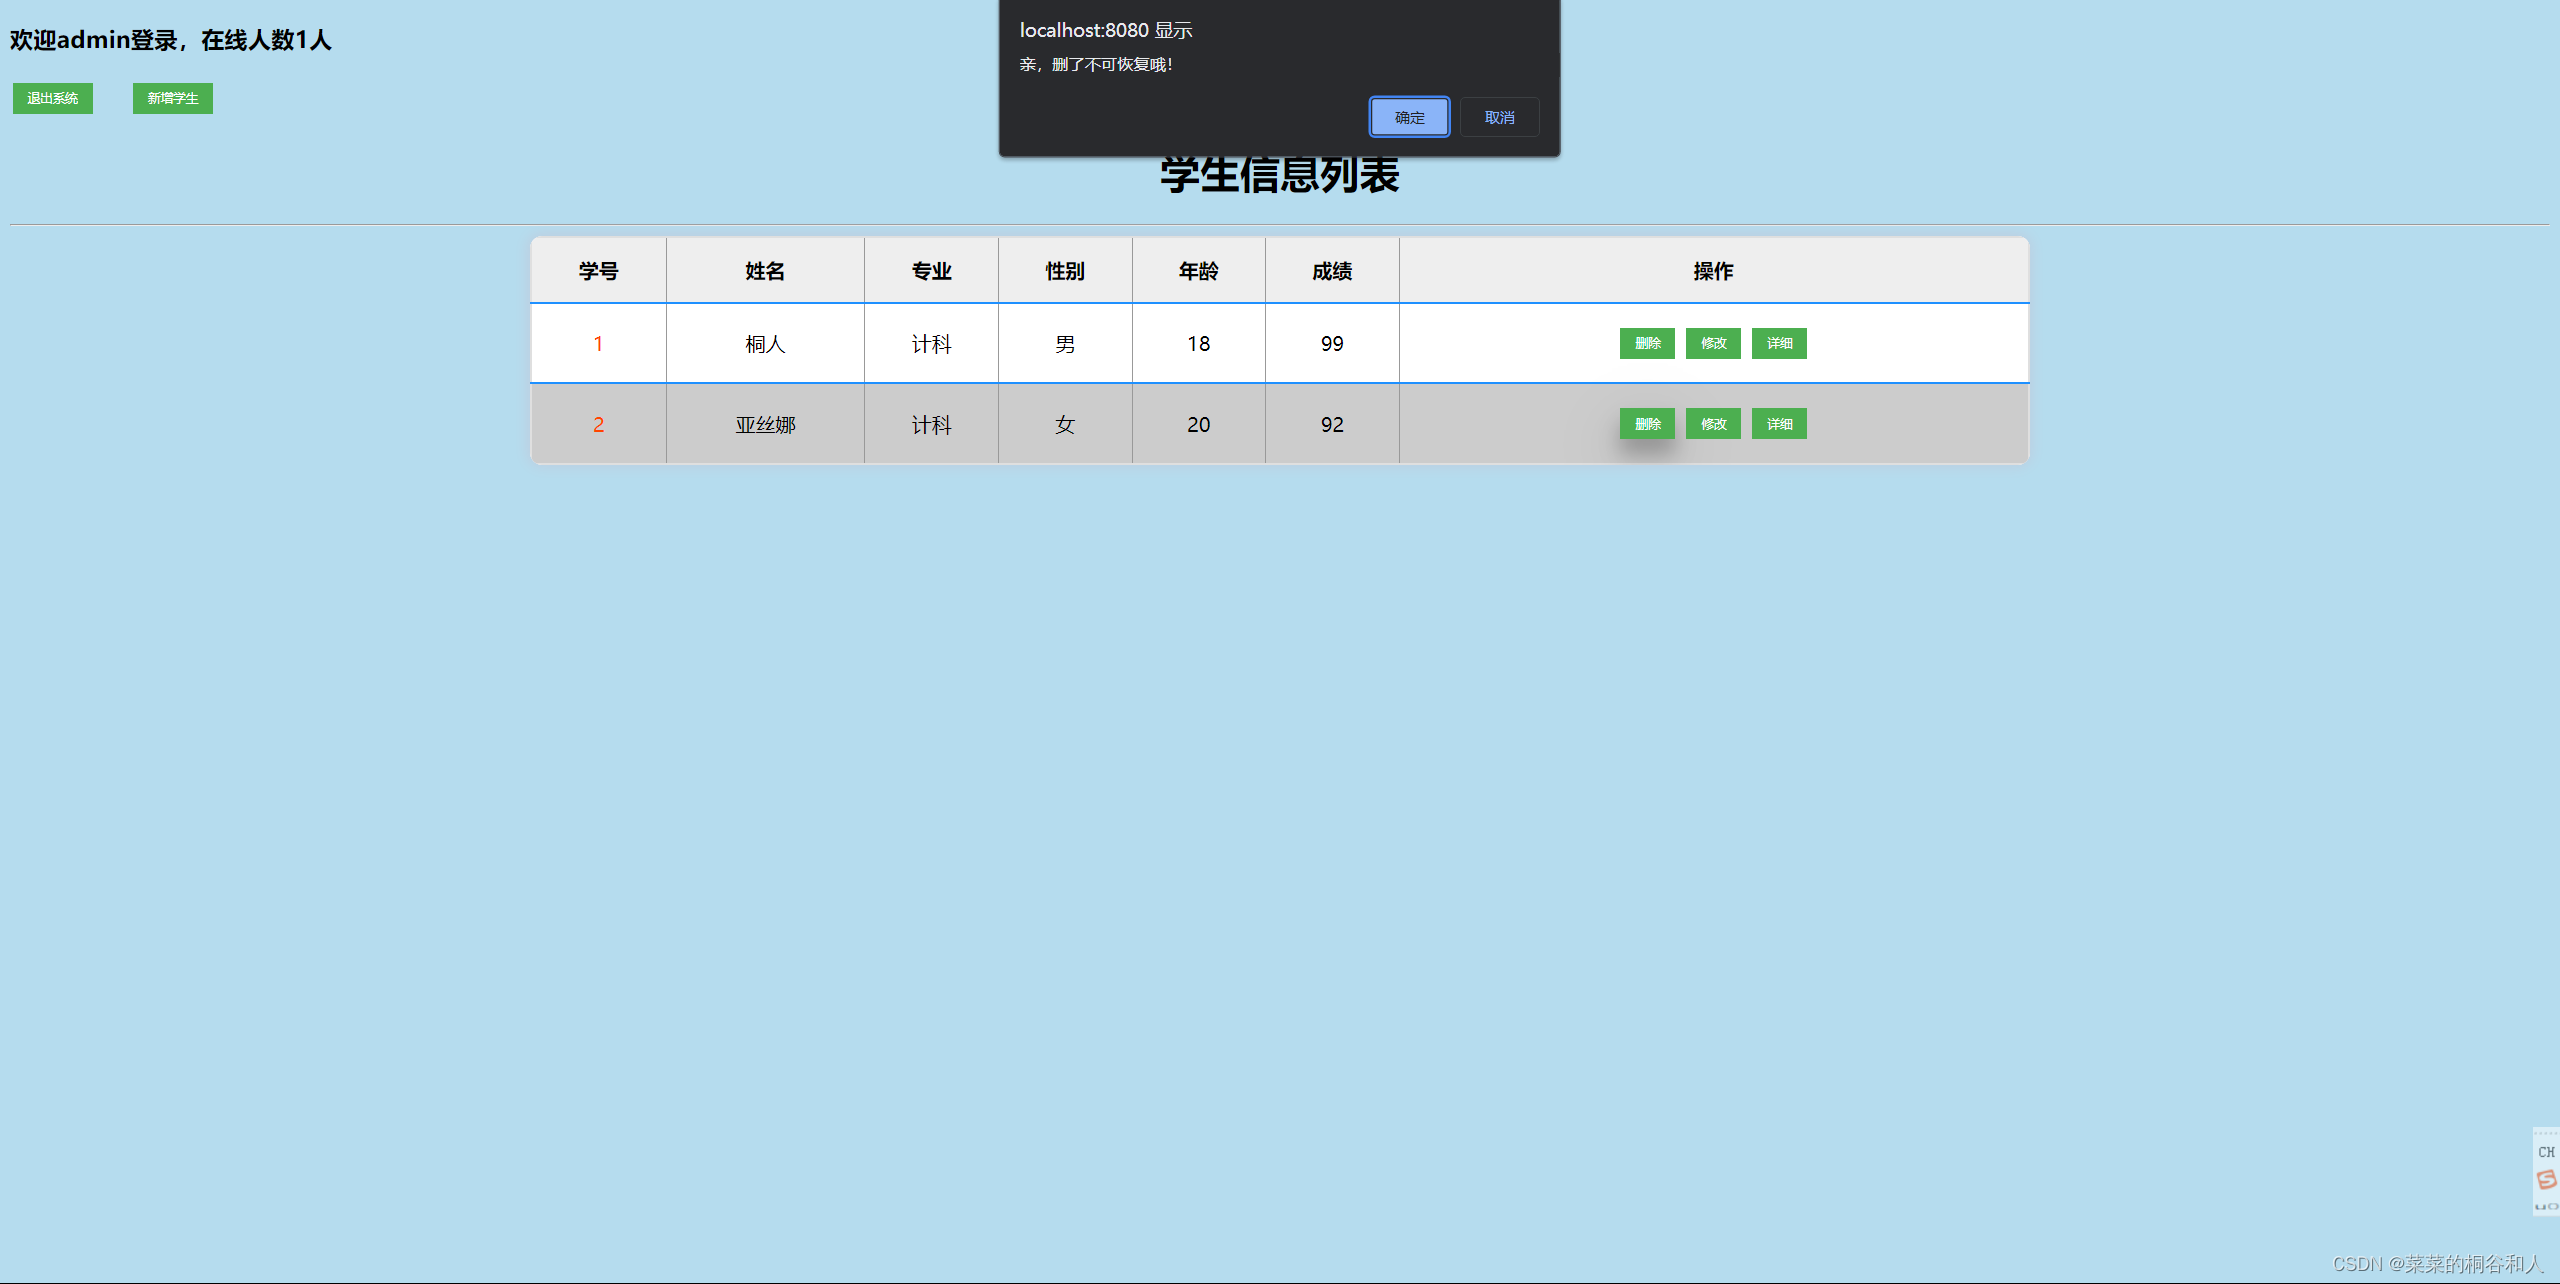
3.1 登录后首页学生列表信息显示
由于还涉及到用户的功能模块,以下简略的进行描述,在登录成功之后请求response.sendRedirect(request.getContextPath() + “/StudentList”);
将页面跳转到学生列表页面。
中间使用了EL表达式来进行参数的封装获取,并通过forEach来进行列表获取展示。(这里不过多进行JSP的技术方法技术描述,请自行去进行学习)
代码如下:
list.jsp:
<%@ taglib prefix="c" uri="http://java.sun.com/jsp/jstl/core"%>
<%@ page import="com.edu.xsgl.pojo.Student" %>
<%@ page import="java.util.List" %>
<%@ page contentType="text/html;charset=UTF-8" language="java" %>
<%@page contentType="text/html;charset=UTF-8"%>
<!DOCTYPE html>
<html>
<head>
<meta charset="utf-8">
<title>学生信息列表页面</title>
<link rel="stylesheet" href="css/list.css">
<base href="${pageContext.request.scheme}://${pageContext.request.serverName}:${pageContext.request.serverPort}${pageContext.request.contextPath}/">
</head>
<body bgcolor="#b5dcee">
<h3>欢迎${user.username}登录,在线人数${onlinecount}人</h3>
<button type="submit" class="button button1" onclick="window.location.href='user/exit'">退出系统</button>
<%--<a href="user/exit">[退出系统]</a>--%>
<button type="submit" class="button button1" onclick="window.location.href='add.jsp'">新增学生</button>
<%--<a href="add.jsp">[新增学生]</a>--%>
<script type="text/javascript">
function del(no){
var ok = window.confirm("亲,删了不可恢复哦!");
if(ok){
document.location.href = "${pageContext.request.contextPath}/StudentDel?no=" + no;
}
}
</script>
<h1 align="center">学生信息列表</h1>
<hr>
<div class="list">
<table border="1px" align="center" width="50%">
<tr>
<th>学号</th>
<th>姓名</th>
<th>专业</th>
<th>性别</th>
<th>年龄</th>
<th>成绩</th>
<th>操作</th>
</tr>
<c:forEach items="${deptList}" var="dept">
<tr>
<td>${dept.no}</td>
<td>${dept.name}</td>
<td>${dept.major}</td>
<td>${dept.gender}</td>
<td>${dept.age}</td>
<td>${dept.grade}</td>
<td>
<button type="submit" class="button button1" onclick="del(${dept.no})">删除</button>
<%-- <a href="javascript:void(0)" onclick="del(${dept.no})">删除</a>--%>
<button type="submit" class="button button1" onclick="window.location.href='StudentDetail?f=edit&no=${dept.no}'">修改</button>
<%-- <a href="StudentDetail?f=edit&no=${dept.no}">修改</a>--%>
<button type="submit" class="button button1" onclick="window.location.href='StudentDetail?f=detail&no=${dept.no}'">详细</button>
<%-- <a href="StudentDetail?f=detail&no=${dept.no}">详情</a>--%>
</td>
</tr>
</c:forEach>
</table>
</div>
</body>
</html>
3.2 剩余的JSP页面
由于剩下的JSP的页面功能大致基本相同,下面不过多的进行描述,简单演示新增、详情、修改的JSP页面。
代码如下:
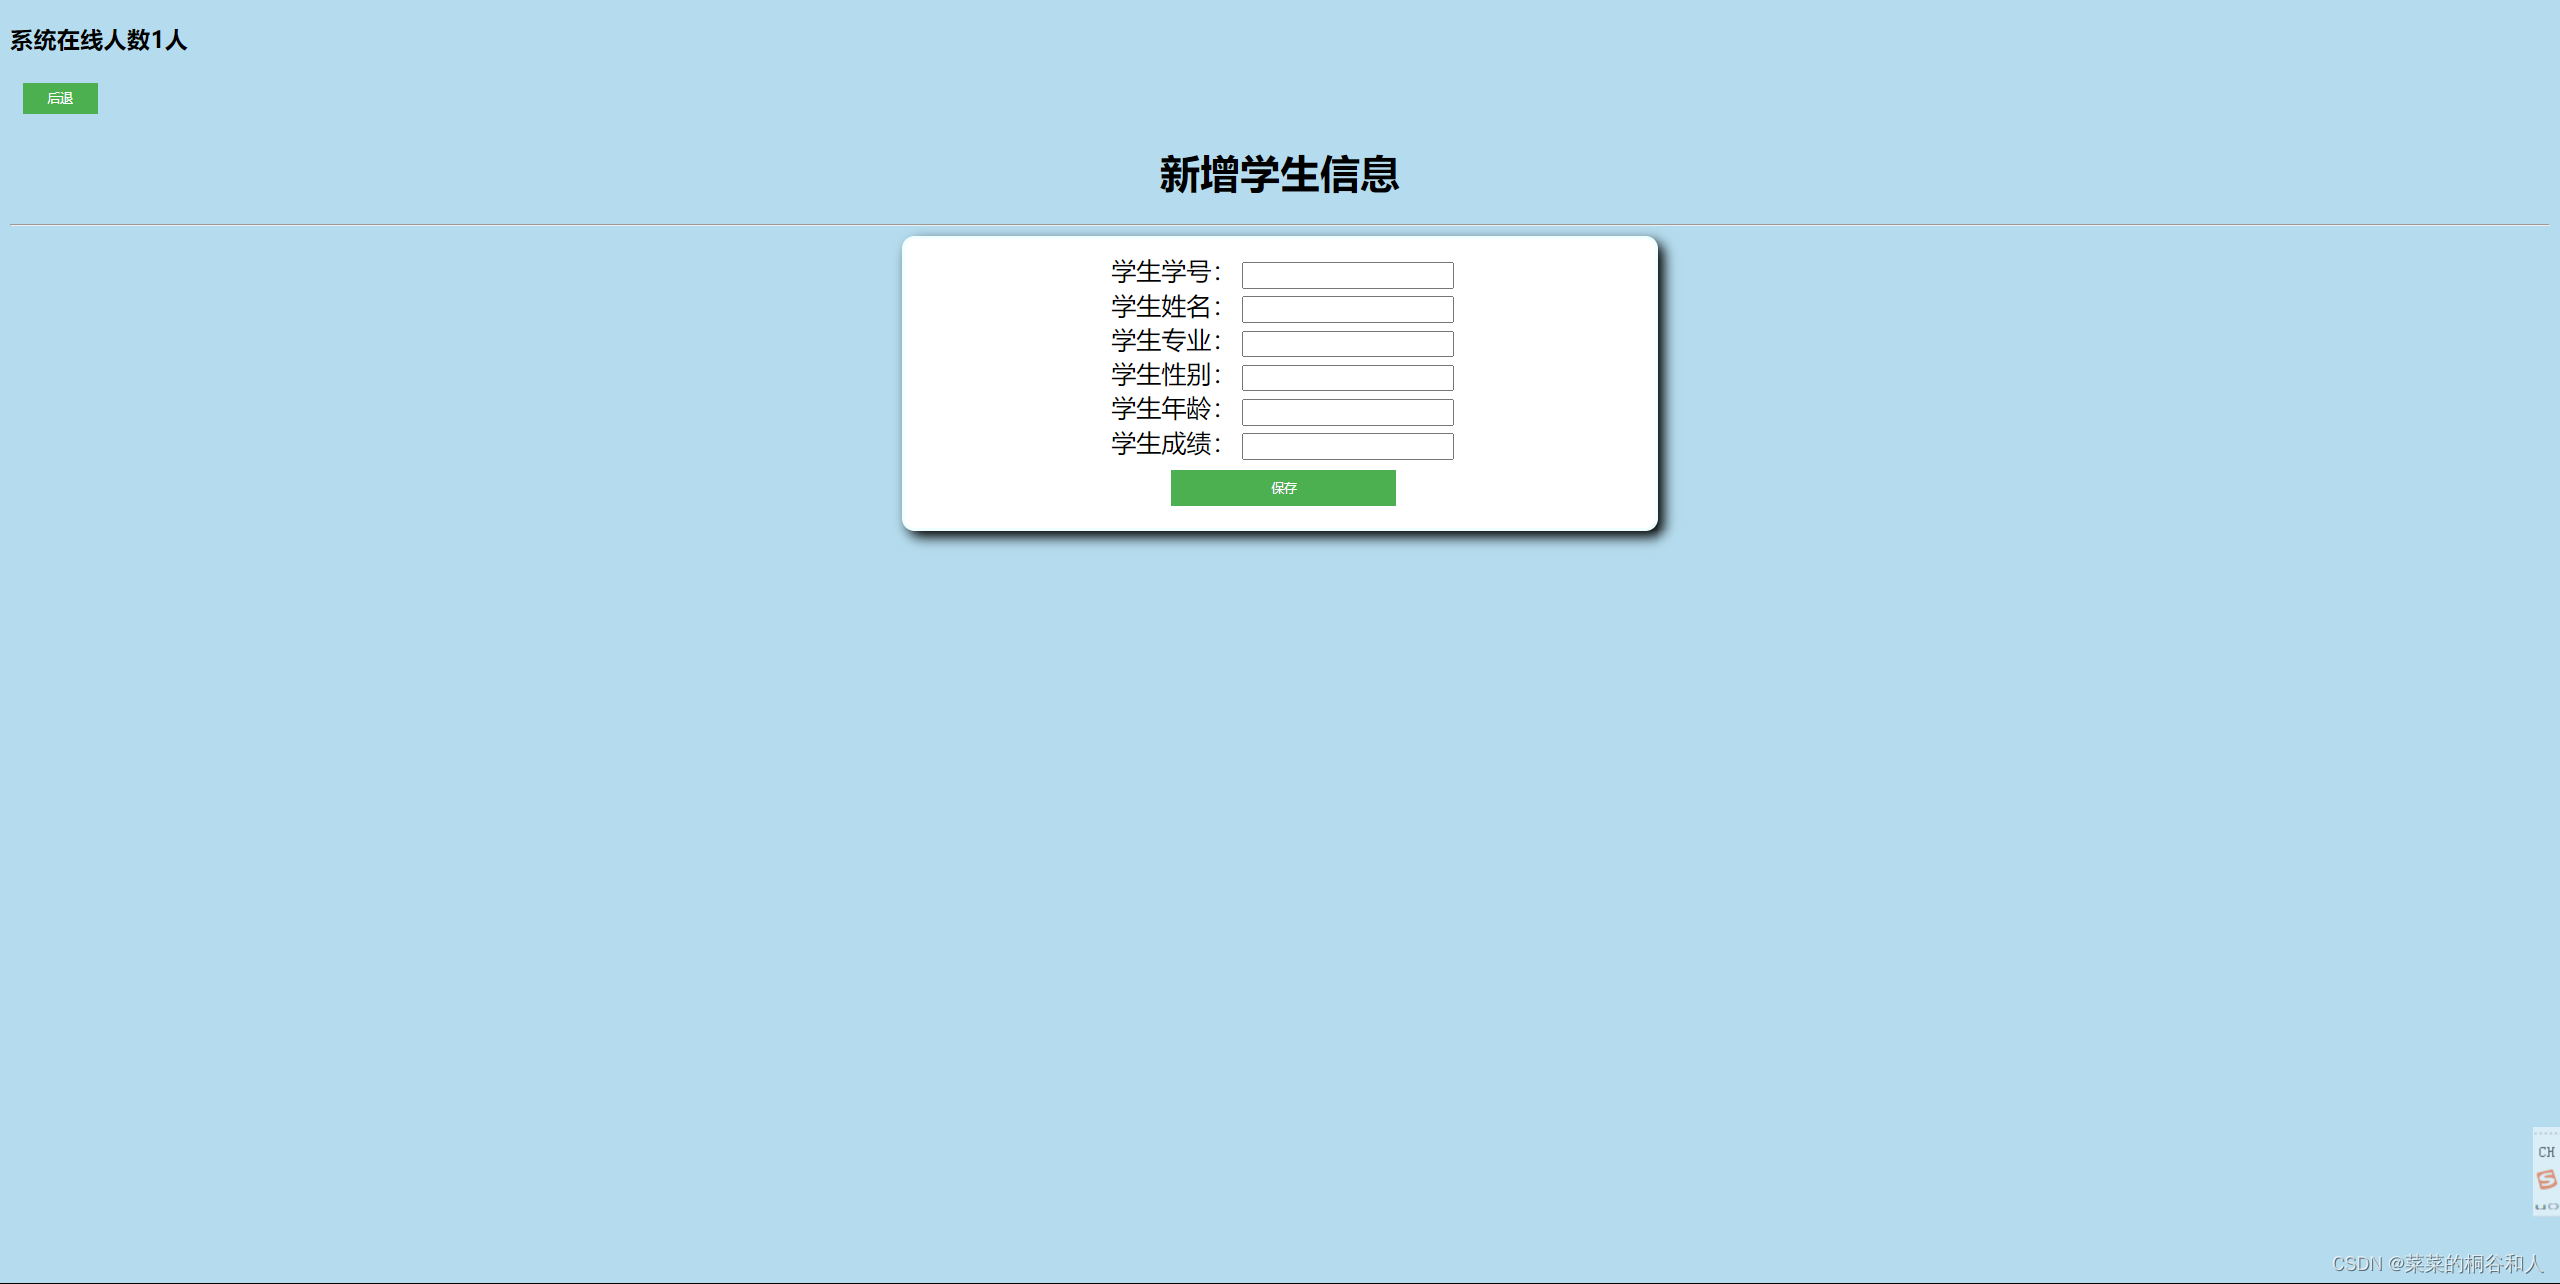
add.jsp:
<%@page contentType="text/html;charset=UTF-8"%>

<!DOCTYPE html>
<html>
	<head>
		<meta charset="utf-8">
		<title>新增学生信息</title>
		<link rel="stylesheet" href="css/edit.css">
	</head>
	<body bgcolor="#b5dcee">
	<h3>系统在线人数${onlinecount}人</h3>
	<input type="button" value="后退" onclick="window.history.back()" class="button2 button3"/>
		<h1 align="center">新增学生信息</h1>
		<hr>
	<div class="edit">
		<form action="${pageContext.request.contextPath}/StudentAdd" method="post">
			<div class="text">学生学号:</div> <input type="text" name="no"/><br>
			<div class="text">学生姓名:</div> <input type="text" name="name"/><br>
			<div class="text">学生专业:</div> <input type="text" name="major"/><br>
			<div class="text">学生性别:</div> <input type="text" name="gender"/><br>
			<div class="text">学生年龄:</div> <input type="text" name="age"/><br>
			<div class="text">学生成绩:</div> <input type="text" name="grade"/><br>
			<div class="text1"><input type="submit" value="保存" class="button button1"/></div><br>
		</form>
	</div>
	</body>
</html>
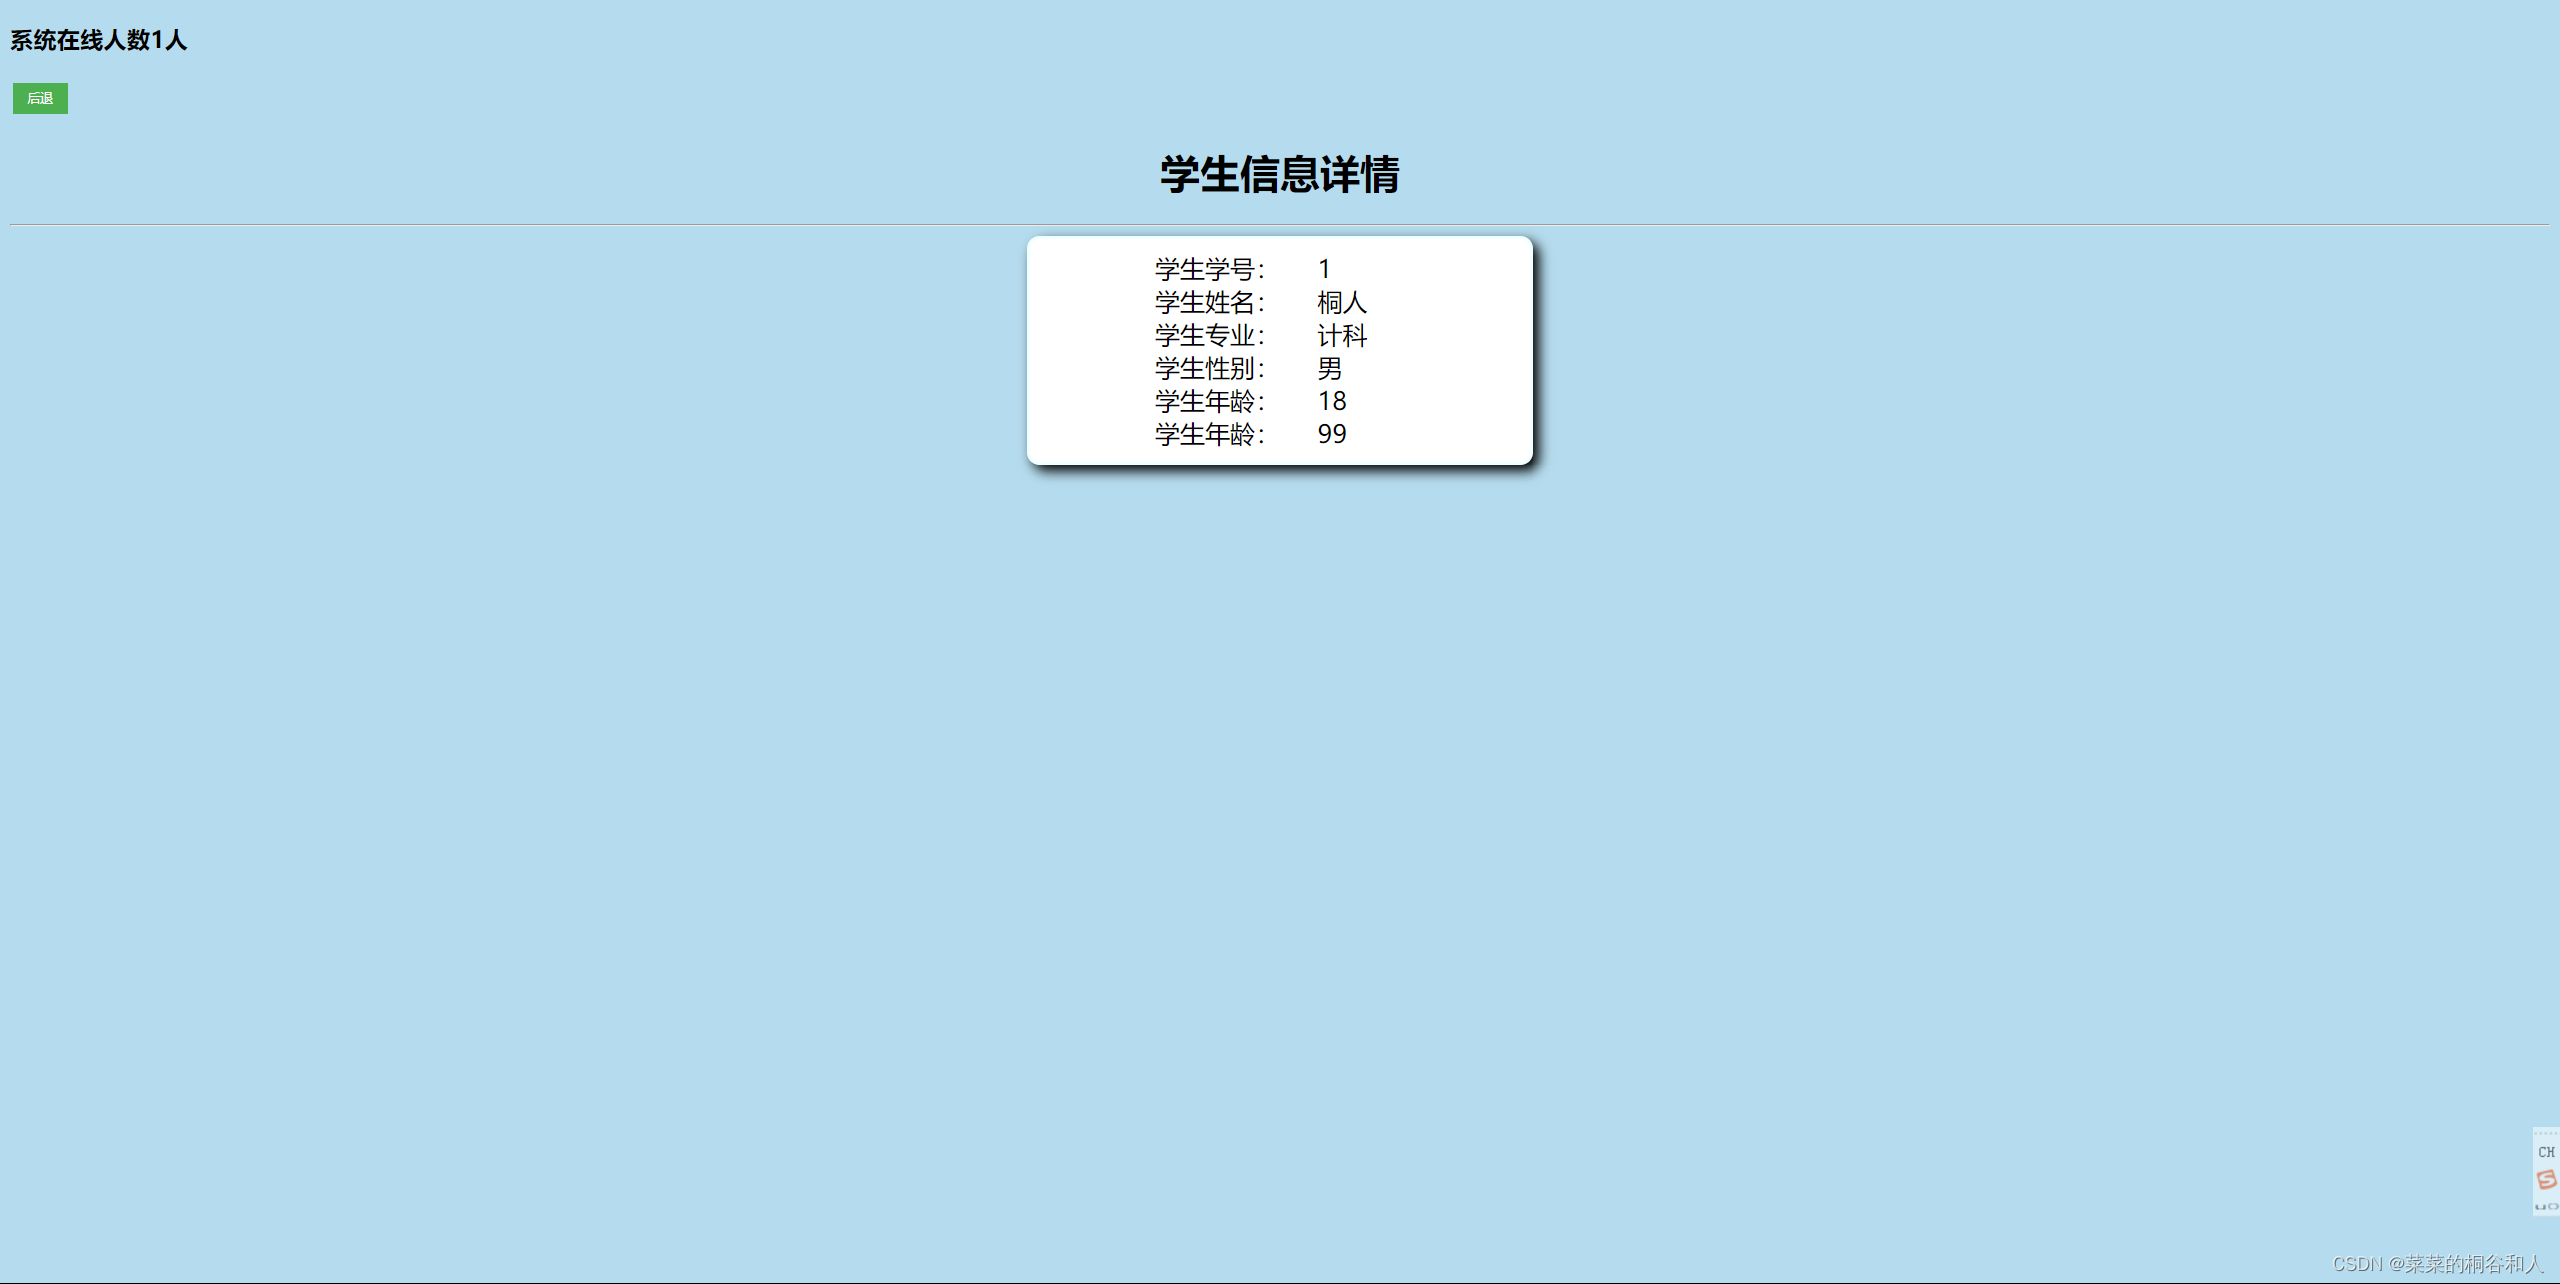
detail.jsp:
<%@ page import="com.edu.xsgl.pojo.Student" %>
<%@page contentType="text/html;charset=UTF-8"%>

<%--<%--%>
<%--	// 从request域当中取出数据--%>
<%--	user_class d = (user_class) request.getAttribute("dept");--%>
<%--%>--%>
<!DOCTYPE html>
<html>
	<head>
		<meta charset="utf-8">
		<title>学生信息详情</title>
		<link rel="stylesheet" href="css/detail.css">
	</head>
	<body bgcolor="#b5dcee">
	<h3>系统在线人数${onlinecount}人</h3>
	<input type="button" value="后退" onclick="window.history.back()" class="button button1"/>
		<h1 align="center">学生信息详情</h1>
		<hr>
	<div class="detail">
		<div class="text">学生学号:</div><div class="text1">${dept.no}</div><br>
		<div class="text">学生姓名:</div><div class="text1">${dept.name}</div><br>
		<div class="text">学生专业:</div><div class="text1">${dept.major}</div><br>
		<div class="text">学生性别:</div><div class="text1">${dept.gender}</div><br>
		<div class="text">学生年龄:</div><div class="text1">${dept.age}</div><br>
		<div class="text">学生年龄:</div><div class="text1">${dept.grade}</div><br>
	</div>


	</body>
</html>
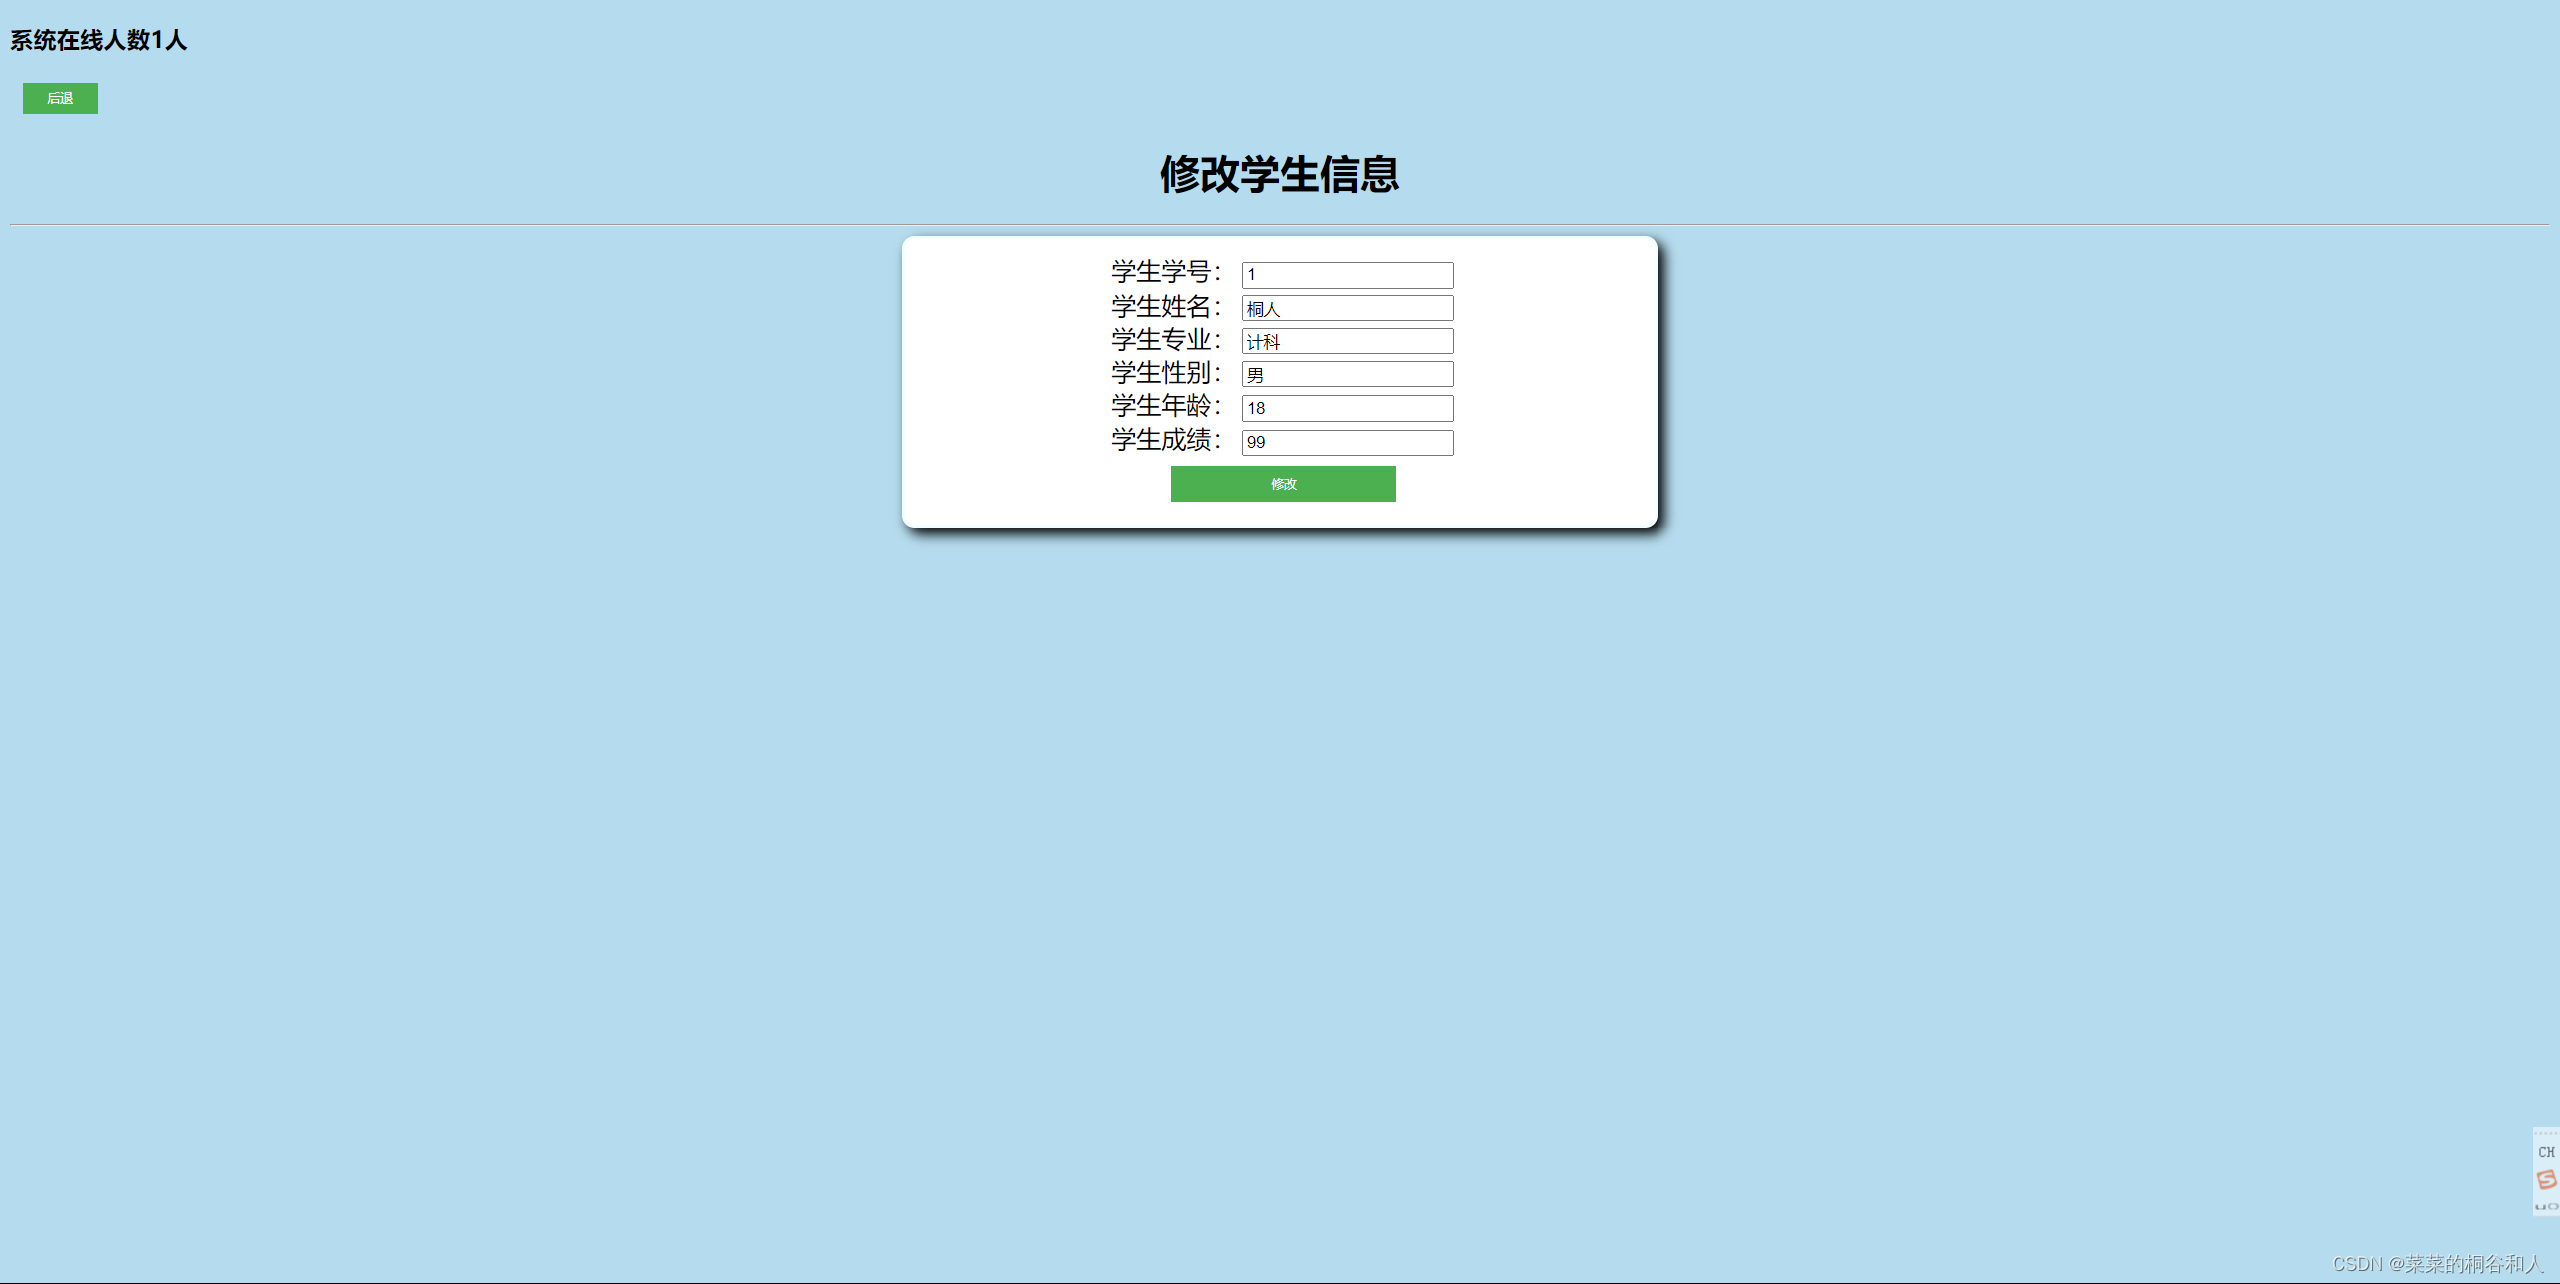
edit.jsp:
<%@ page import="com.edu.xsgl.pojo.Student" %>
<%@page contentType="text/html;charset=UTF-8"%>

<%--<%--%>
<%--	user_class d = (user_class)request.getAttribute("dept");--%>
<%--%>--%>
<!DOCTYPE html>
<html>
	<head>
		<meta charset="utf-8">
		<title>修改学生信息</title>
		<link rel="stylesheet" href="css/edit.css">
	</head>
	<body bgcolor="#b5dcee">
	<h3>系统在线人数${onlinecount}人</h3>
	<input type="button" value="后退" onclick="window.history.back()" class="button2 button3"/>
		<h1 align="center">修改学生信息</h1>
		<hr>
	<div class="edit">

		<form action="${pageContext.request.contextPath}/StudentModify" method="post">
			<div class="text">学生学号:</div> <input type="text" name="no" value="${dept.no}" readonly />  <br>
			<div class="text">学生姓名:</div> <input type="text" name="name" value="${dept.name}"/>  <br>
			<div class="text">学生专业:</div> <input type="text" name="major" value="${dept.major}"/>  <br>
			<div class="text">学生性别:</div> <input type="text" name="gender" value="${dept.gender}"/>  <br>
			<div class="text">学生年龄:</div> <input type="text" name="age" value="${dept.age}"/>  <br>
			<div class="text">学生成绩:</div> <input type="text" name="grade" value="${dept.grade}"/>  <br>
			<div class="text1"><input type="submit" value="修改" class="button button1"/></div>
		</form>
	</div>
	</body>
</html>
4.系统演示
4.1 环境部署
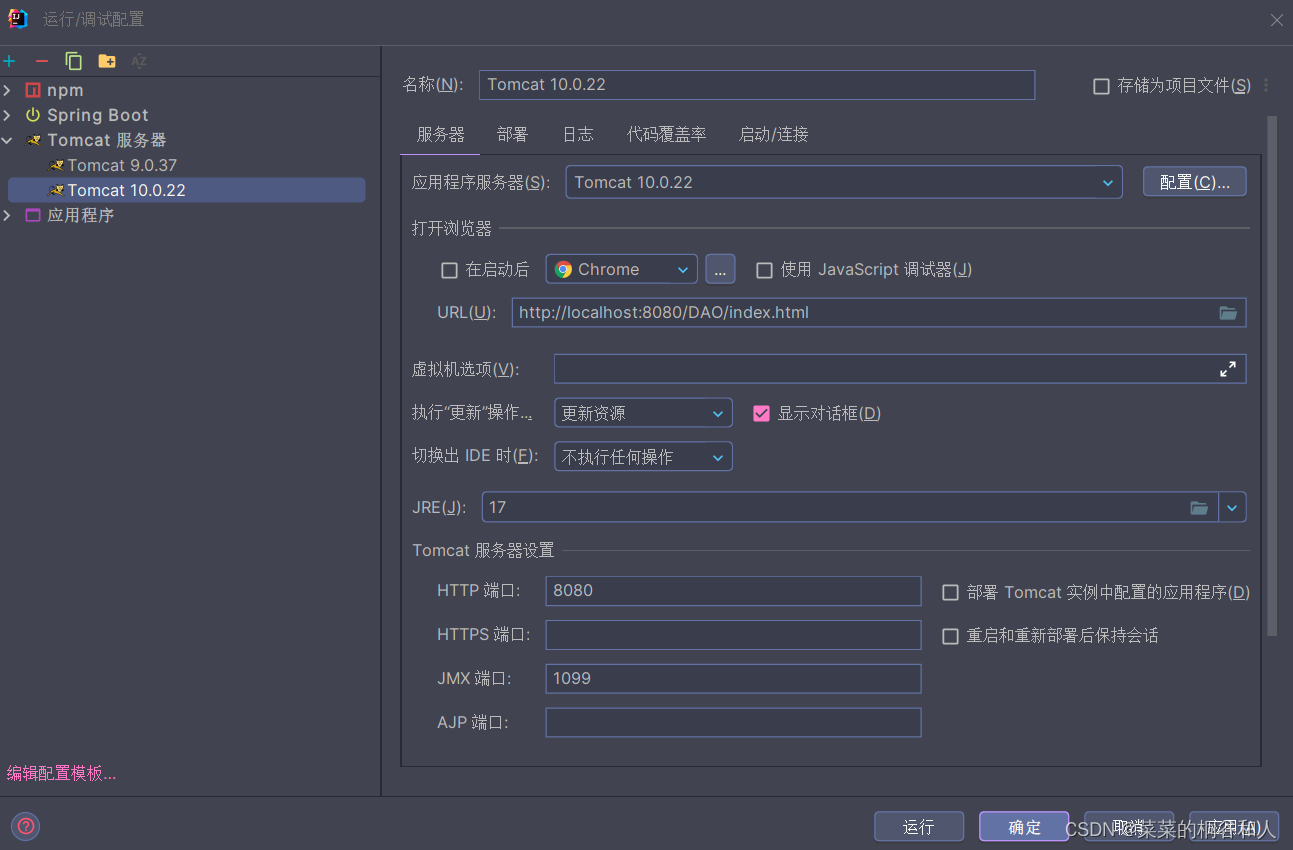
首先力推编辑器IDEA(Java编辑神器,也可以使用NetBeans,不建议使用eclipse,血的教训),Java版本作者使用的Java17(可以用8),然后Tomcat服务器建议用10.0.22(因为10版本以上可以避免字符转换乱码)。
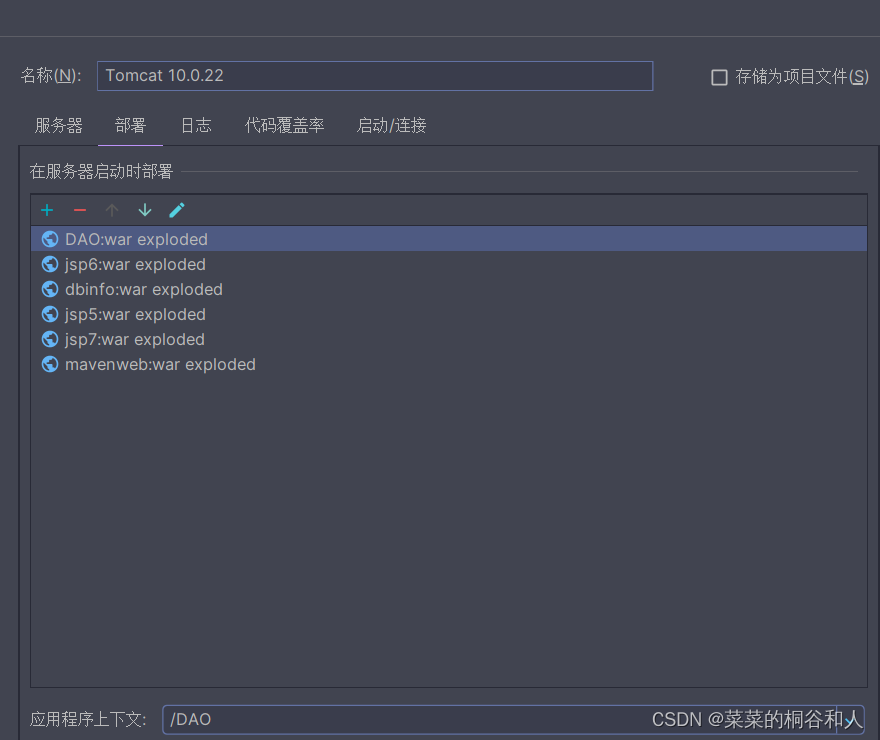
在此部署自己项目的工件,并在这里进行Tomcat版本的默认配置
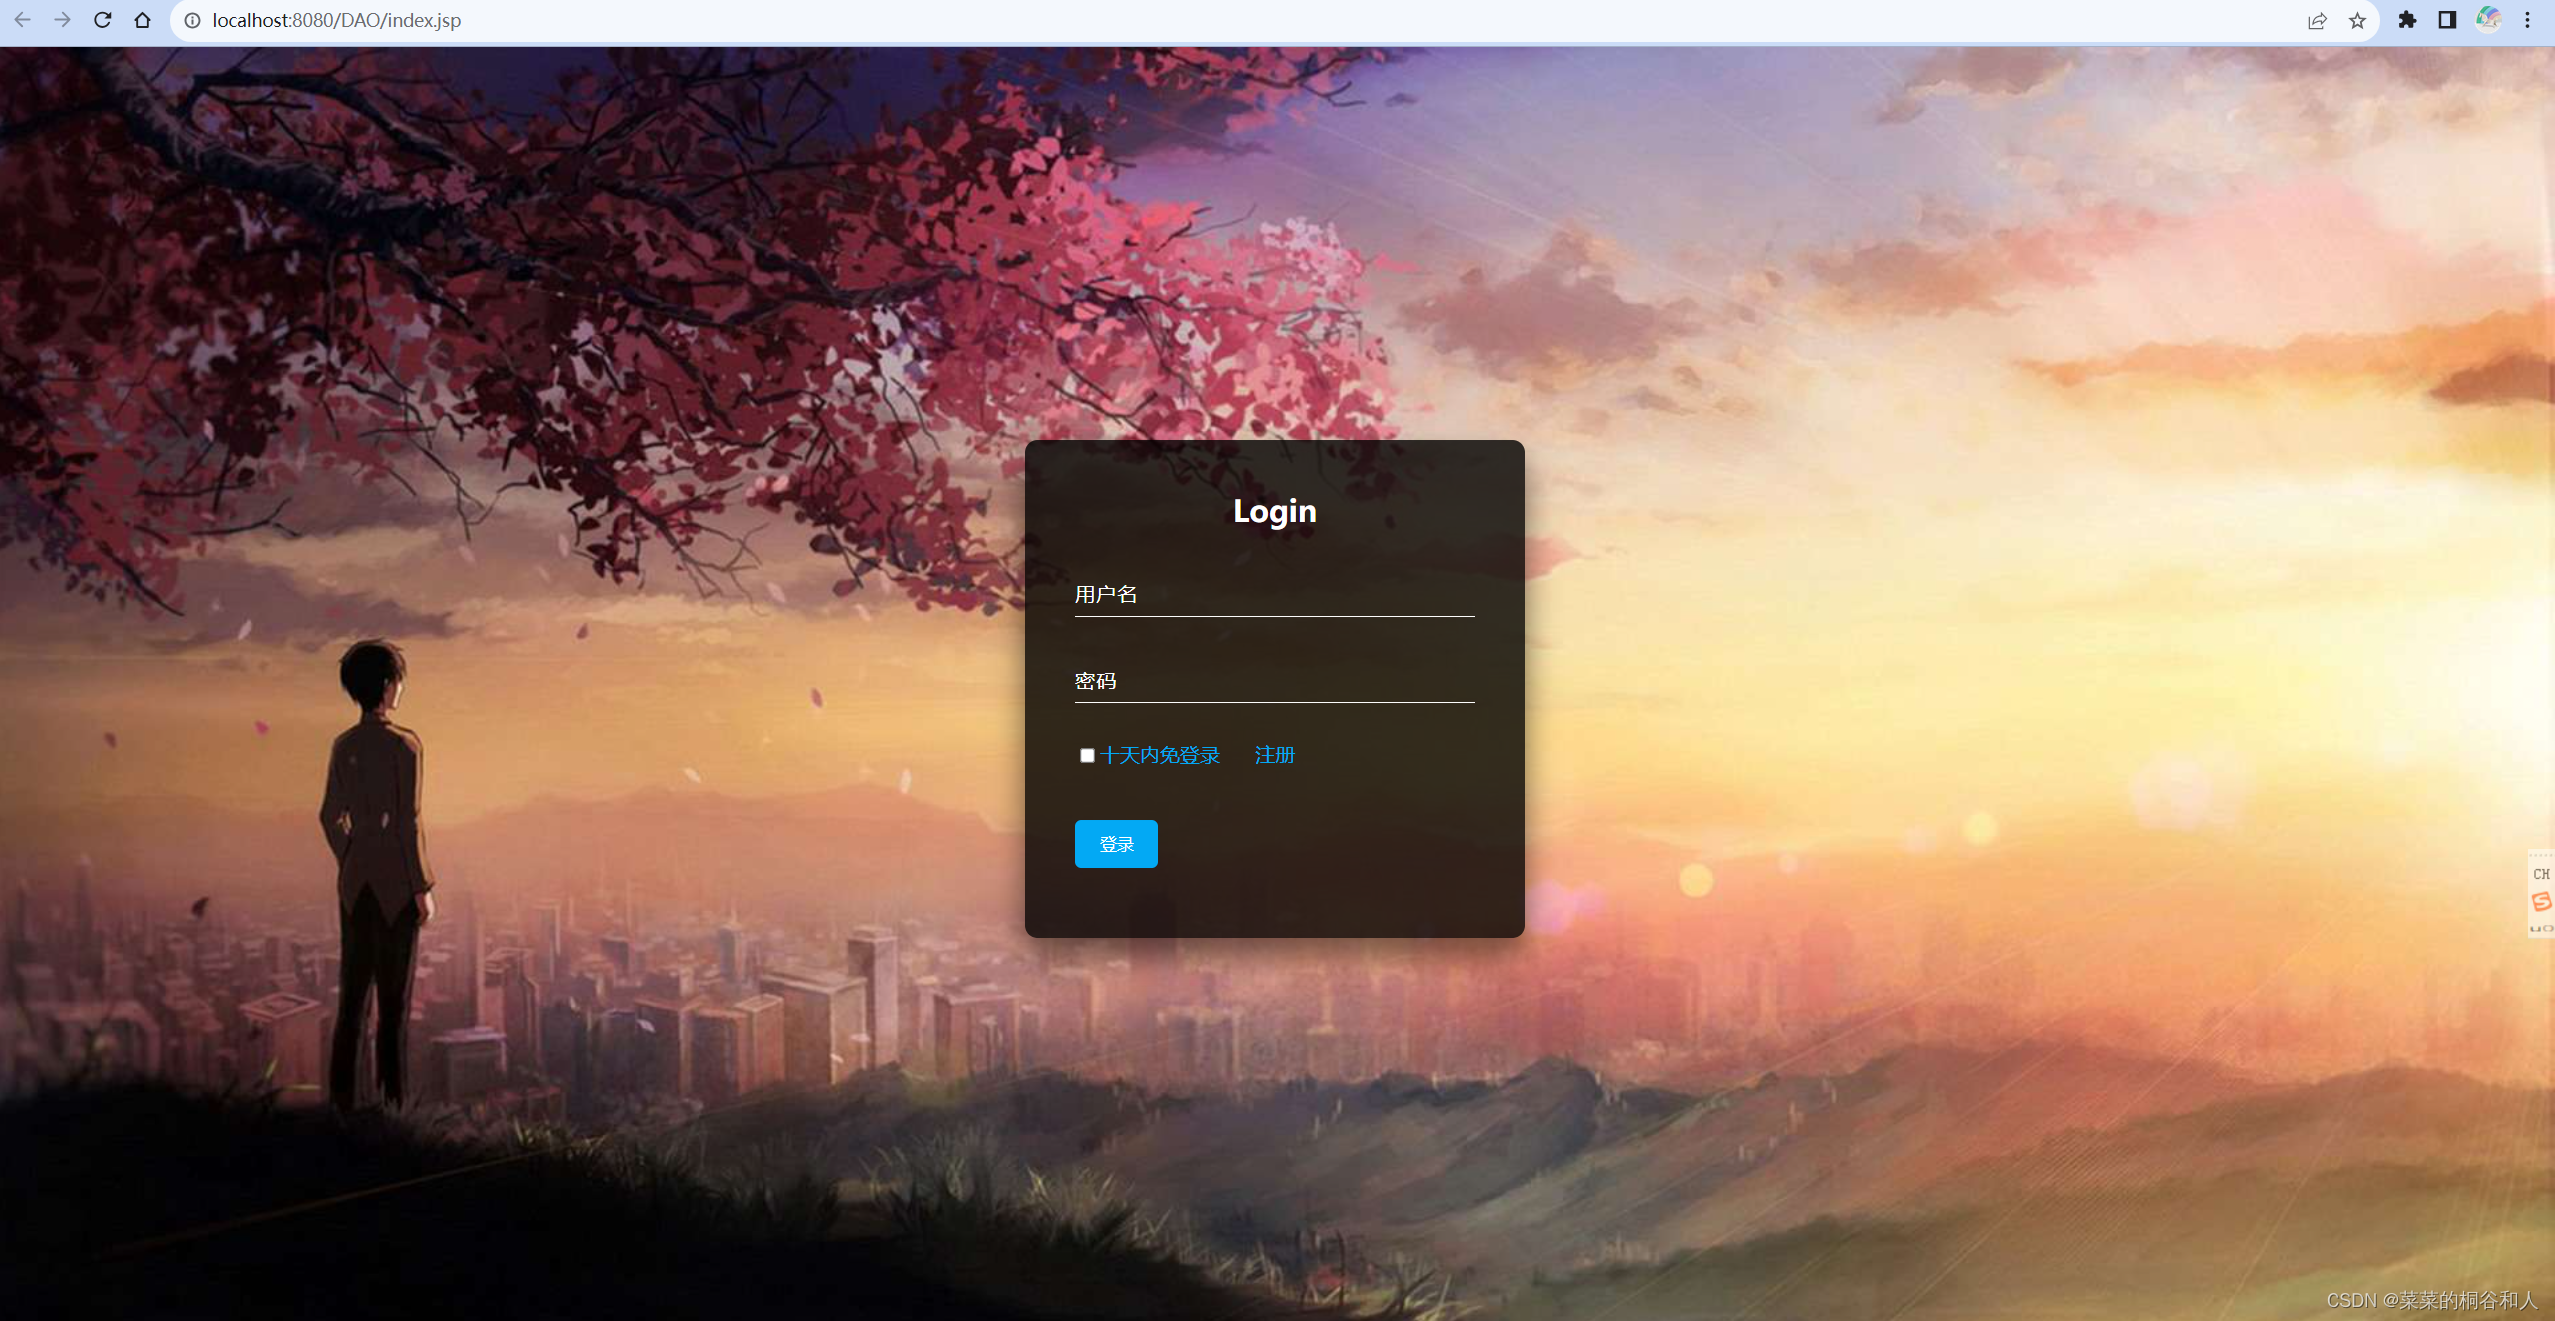
然后在浏览器中访问该链接即可进入到登录界面:http://localhost:8080/DAO/index.html
4.2 功能演示
登录界面:
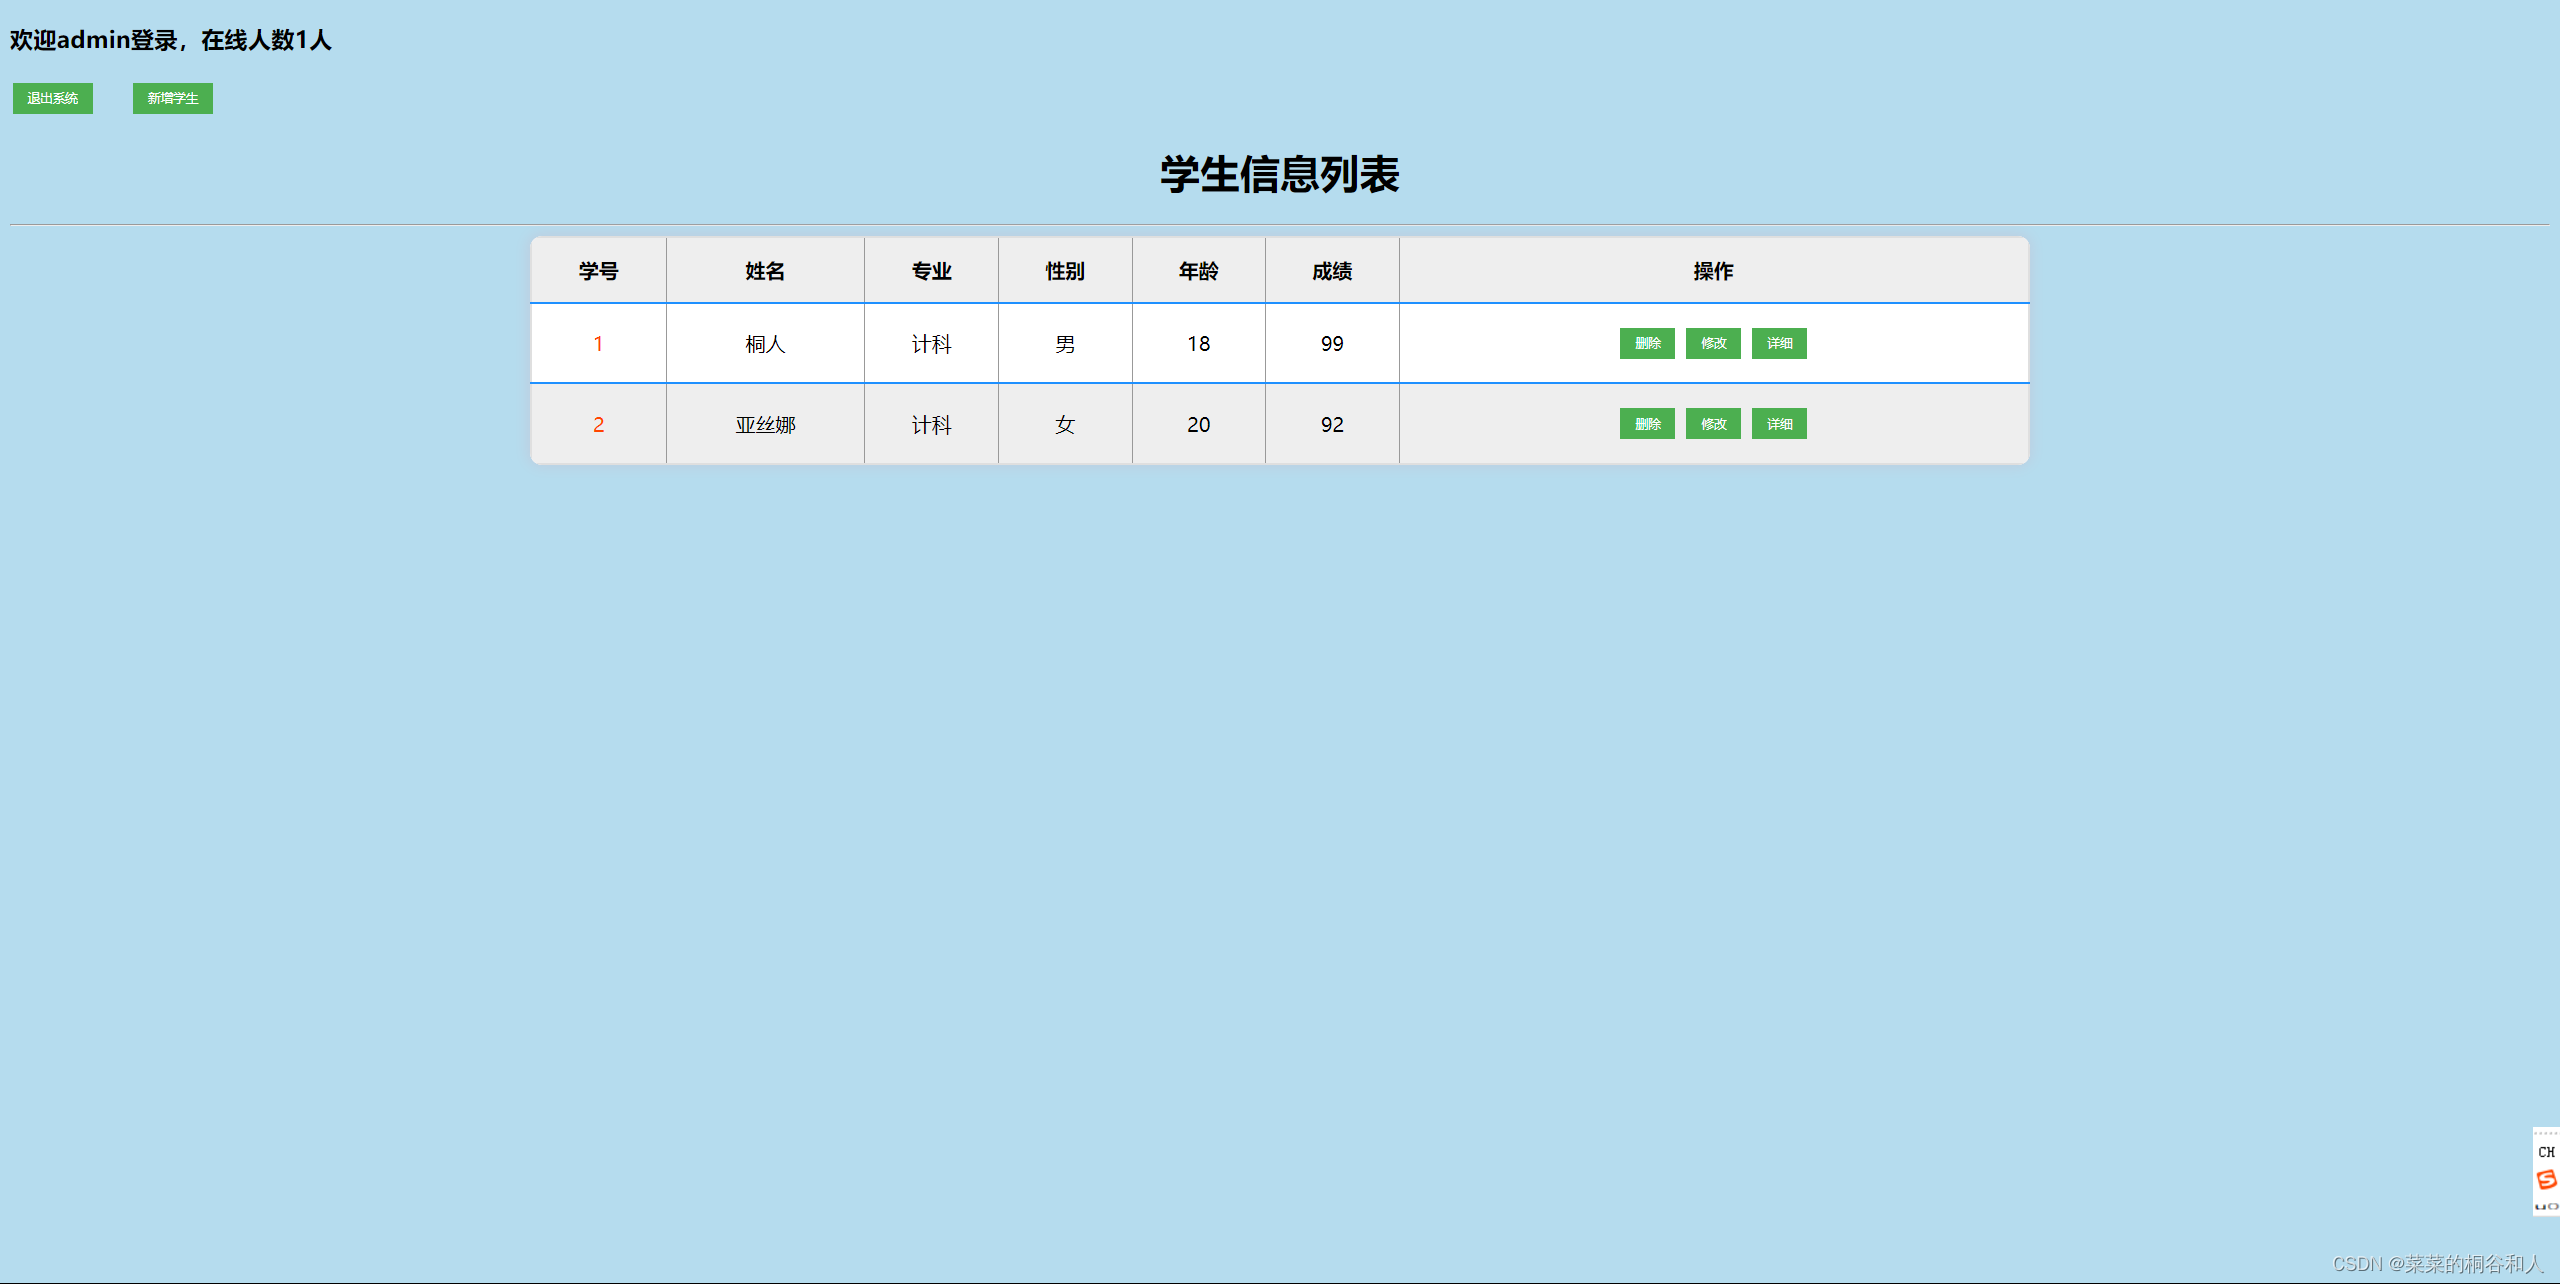
首页列表:
详情功能:
修改功能:
新增功能:
删除功能:
然后用户的的注册和登录功能我就不再逐一演示了,想了解看自信翻看完整版代码。
5.总结
以上便是本篇文章的全部内容,以及给出了大部分的实现代码,登录注册功能等逻辑代码需要的话请在评论在评论区留言并私信我,或者直接点击以下链接(源代码)跳转自行购买。如果对于你们有帮助请多多点赞收藏!!!


 1232
1232


 被折叠的 条评论
为什么被折叠?
被折叠的 条评论
为什么被折叠?
 到【灌水乐园】发言


