


Android 发展历程
Android 是一个基于Linux 内核的自由及开发源代码的操作系统
- 2005 年 8 月由Google收购注资
- 2007年11月发布Android的源代码
- 2008 年10月第一部Android智能手机发布,HTC公司制造
- 2011年 Android 位于世界第一
- 2013 Android 系统数量达到10亿台
App运行日志
SDK :软件开发工具包,将App源码编译为可执行的App应用
日志级别
- Log.e:表示错误信息,比如可能导致程序崩溃的异常
- Log.w:表示警告信息
- Log.i:表示一般消息
- Log.d:表示调试(debug)信息,可把程序运行时的变量值打印出来,方便跟踪调试
- Log.v:表示冗余信息
Android App 基础
XML:布局文件
- id:控件编号
- layout_width:控件宽度
- layout_height:控件高度
- text:文本
内置了SQlite 数据库
工程结构
项目:一个项目下可以有多个模块
模块:编译运行App
- app(app模块)
- Gradle Scripts
工程目录
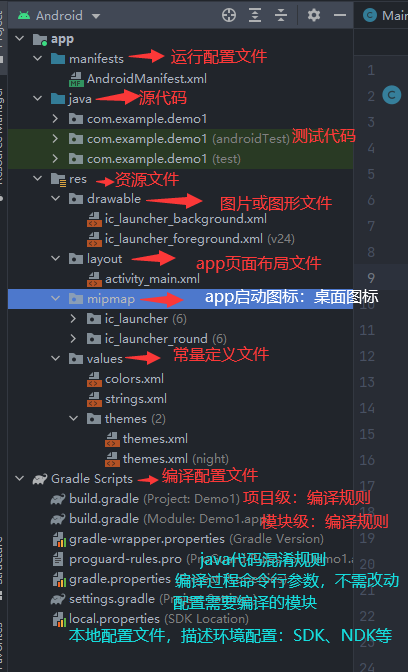
gradle :自动化构建工具,依赖、打包、部署、发布、各种渠道的差异管理工作
build.gradle
-
工程级别
-
模块级别
build.gradle (Module: Demo1.app)// 插件的包 plugins { id 'com.android.application' } android { // 指定SDk版本号 33 就是Android API 33.0编译 compileSdk 33 defaultConfig { //app包名 applicationId "com.example.demo1" //app运行的最小SDK版本,28最少要到9.0以上运行 minSdk 28 //目标设备的版本号,最希望app运行在哪个版本上 targetSdk 33 //指定app的应用版本号 versionCode 1 //应用版本名称 versionName "1.0" //单元测试 testInstrumentationRunner "androidx.test.runner.AndroidJUnitRunner" } buildTypes { release { minifyEnabled false proguardFiles getDefaultProguardFile('proguard-android-optimize.txt'), 'proguard-rules.pro' } } compileOptions { sourceCompatibility JavaVersion.VERSION_1_8 targetCompatibility JavaVersion.VERSION_1_8 } } //app的依赖信息 dependencies { //appcompat兼容库 版本号 implementation 'androidx.appcompat:appcompat:1.3.0' implementation 'com.google.android.material:material:1.4.0' implementation 'androidx.constraintlayout:constraintlayout:2.0.4' //单元测试编译的junit版本号 testImplementation 'junit:junit:4.13.2' androidTestImplementation 'androidx.test.ext:junit:1.1.3' androidTestImplementation 'androidx.test.espresso:espresso-core:3.4.0' }
AndroidManifest.xml 清单文件
- 每个应用必须具有,文件名一模一样
- APP的配置信息
<?xml version="1.0" encoding="utf-8"?>
<manifest xmlns:android="http://schemas.android.com/apk/res/android"
    package="com.example.demo1"> <!--包名-->

    <application
        android:allowBackup="true"  是否备份
        android:icon="@mipmap/ic_launcher"  指定显示的图标
        android:label="@string/app_name" 指定显示的名称
        android:roundIcon="@mipmap/ic_launcher_round" app的圆角图标
        android:supportsRtl="true" 是否支持阿拉伯语言 / 波斯语 ,从左往右的文字排序
        android:theme="@style/Theme.Demo1">  <!--显示的风格,材料设计-->
        <activity
            android:name=".MainActivity"
            android:exported="true">
            <intent-filter>
                <action android:name="android.intent.action.MAIN" />

                <category android:name="android.intent.category.LAUNCHER" />
            </intent-filter>
        </activity>
    </application>

</manifest>
- activity 是一个应用程序组件,提供一个屏幕,交互完成某个任务
- 活动页面的注册声明
设计规范
界面显示与逻辑处理
利用 XML (activity_main.xml)标记描绘应用界面,实用Java(MainActivity.class)代码写程序逻辑
创建完整页面:
- layout目录下创建XML文件
- 创建与 XML 文件队友的java代码
- 在AndroidManifest.xml 中注册页面配置
活动页面
简单的页面调整
-
布局文件,两个布局文件 ,从 2 跳到 1
文本内容可以在string.xml 文件中设置,在布局文件中调用链接过来就可以完成
<resources> <string name="app_name">Demo1</string> <string name="demo02">Android DEV</string> </resources> -
创建Java代码,在1 的Java代码中设置跳转代码
Button button = findViewById(R.id.dragPage); button.setOnClickListener(new View.OnClickListener() { @Override public void onClick(View v) { // 页面跳转 Intent intent = new Intent(); // 结合上下文 intent.setClass(MainActivity.this,MainActivity2.class); startActivity(intent); } }); -
注册页面
AndroidManifest.xml添加一个activity标签<activity android:name=".MainActivity2" />
简单控件
文本显示
设置文本内容
-
XML 布局文件中:android :text 设置文本
<TextView android:id="@+id/view1" android:layout_width="wrap_content" android:layout_height="wrap_content" android:text="@string/hello"/> -
Java代码中调用文本视图对象的 setText 方法设置文本
@Override protected void onCreate(@Nullable Bundle savedInstanceState) { super.onCreate(savedInstanceState); //设置掌控的页面 setContentView(R.layout.activity_text_view); TextView view1 = findViewById(R.id.view1); view1.setText(R.string.hello); }在两种方式中都尽量不要直接写文本内容
可以在 string.xml 文件中定义一个文本常量,再进行调用
<resources>
    <string name="app_name">SimpleControl</string>
    <string name="hello">你好世界未来与你相伴!!!</string>
</resources>
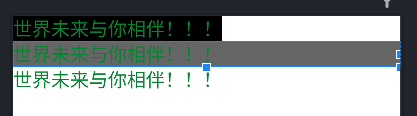
设置文本大小
-
XML 布局文件中:android :textSize 设置文本大小
<LinearLayout xmlns:android="http://schemas.android.com/apk/res/android" android:layout_width="match_parent" android:layout_height="match_parent" android:orientation="vertical"> 垂直布局 <TextView android:id="@+id/tv_px" android:layout_width="wrap_content" android:layout_height="wrap_content" android:text="@string/hello" android:textSize="30px"/> <TextView android:id="@+id/tv_dp" android:layout_width="wrap_content" android:layout_height="wrap_content" android:text="@string/hello" android:textSize="30dp"/> <TextView android:id="@+id/tv_sp" android:layout_width="wrap_content" android:layout_height="wrap_content" android:text="@string/hello" android:textSize="30sp"/> </LinearLayout> -
Java代码中调用文本视图对象的 setTextSize 方法设置文本大小
@Override
protected void onCreate(Bundle savedInstanceState) {
    super.onCreate(savedInstanceState);
    setContentView(R.layout.activity_text_size);
    TextView s1 = findViewById(R.id.tv_dp);
    s1.setTextSize(50);
}
单位
- px:手机屏幕最小显示单位,与设备的显示屏有关
- 图像元素,单个像素并不固定
- dp(Dip):与设备无关的显示单位,只与屏幕的尺寸有关
- 长度单位
- dp的UI 效果只在相同尺寸的屏幕上相同,如果屏幕尺寸差异过大,需要重新组dp适配
- Dpi:像素密度
- Density(密度):每平方英寸(2.542 cm2)的像素点数量
- sp:专门设置字体大小,系统设置中可以调整字体大小
设置文本颜色
-
XML 布局文件中:android :textSize 设置文本颜色
<LinearLayout xmlns:android="http://schemas.android.com/apk/res/android" android:layout_width="match_parent" android:layout_height="match_parent" android:orientation="vertical"> <TextView android:id="@+id/tv_color1" android:layout_width="wrap_content" android:layout_height="wrap_content" android:text="@string/hello" android:textColor="@color/black" android:background="@color/purple_500" android:textSize="32sp" /> <TextView android:id="@+id/tv_color2" android:layout_width="wrap_content" android:layout_height="wrap_content" android:text="@string/hello" android:textColor="@color/green" android:background="@color/gray" android:textSize="30dp" /> </LinearLayout> -
Java代码中调用文本视图对象的 setTextColor 方法设置文本颜色
import android.annotation.SuppressLint;
import android.graphics.Color;
import android.os.Bundle;
import android.widget.TextView;

public class TextColorActivity extends AppCompatActivity {

    @SuppressLint("ResourceAsColor")
    @Override
    protected void onCreate(Bundle savedInstanceState) {
        super.onCreate(savedInstanceState);
        setContentView(R.layout.activity_text_color);

        // 从布局文件获取id
        TextView viewColor1 = findViewById(R.id.tv_color1);

        // 设置系统自带的颜色
        viewColor1.setTextColor(Color.RED);

        //设置文本背景颜色
        viewColor1.setBackgroundColor(R.color.gray);
        //设置文本,是系统的颜色
        viewColor1.setBackgroundColor(Color.GREEN);
    }
}
颜色常量
<resources>
    <color name="purple_200">#FFBB86FC</color>
    <color name="purple_500">#FF6200EE</color>
    <color name="purple_700">#FF3700B3</color>
    <color name="teal_200">#FF03DAC5</color>
    <color name="teal_700">#FF018786</color>
    <color name="black">#FF000000</color>
    <color name="white">#FFFFFFFF</color>
    <color name="green">#058531</color>
    <color name="gray">#666666</color>

</resources>
视图基础
视图的宽高
-
布局文件中设置宽:android:layout_with 高:android:layout_height
取值
- match_parent:表示与上级视图保持一致 (填充式)
- wrap_content:表示与内容自适应 (文本内容是多少就多大)
- 以dp为单位尺寸
<LinearLayout xmlns:android="http://schemas.android.com/apk/res/android"
    android:layout_width="match_parent"
    android:layout_height="match_parent"
    android:orientation="vertical">


    <TextView
        android:layout_width="wrap_content"
        android:layout_height="wrap_content"
        android:background="@color/black"
        android:text="@string/hello"
        android:textColor="@color/green"
        android:textSize="20sp" />

    <TextView
        android:layout_width="match_parent"
        android:layout_height="wrap_content"
        android:background="@color/gray"
        android:text="@string/hello"
        android:textColor="@color/green"
        android:textSize="20sp" />

    <TextView
        android:layout_width="250dp"
        android:layout_height="50dp"
        android:background="@color/white"
        android:text="@string/hello"
        android:textColor="@color/green"
        android:textSize="20sp" />

</LinearLayout>
效果图:
-
Java代码设置宽高,确保 xml 布局文件中的 wrap_content
- 调用控件对象的 getLayoutParams() 方法,获取该控件的布局参数。
- 布局参数的 width 属性表示宽度,height 属性表示高度,修改这两个属性值。
- 调用控件对象的 setLayoutParams 方法,填入修改后的布局参数使之生效。
public class ViewBorderActivity extends AppCompatActivity {

    @Override
    protected void onCreate(Bundle savedInstanceState) {
        super.onCreate(savedInstanceState);
        setContentView(R.layout.activity_view_border);
        TextView tv_wh = findViewById(R.id.wh);
        //获取布局参数
        ViewGroup.LayoutParams params = tv_wh.getLayoutParams();
        //修改布局参数中的宽高,默认dp,需要把dp转换为px数值
        params.width = Util.dip2px(this,300);

        //设置布局参数
        tv_wh.setLayoutParams(params);
    }
}
Util.java 类
public class Util {

    // 根据手机分辨率 从 dp 转换 为px像素 ,通过上下文
    public static int dip2px(Context context, float dpValue) {
        // 获取当前手机的像素密度(1dp = ?px)
        float scale = context.getResources().getDisplayMetrics().density;
        //四舍五入
        return (int) (dpValue * scale + 0.5f);
    }
}
设置视图间距
视图依赖继承关系
间距fang’shi
-
采用 layout_margin(外间距)属性,它指定了当前视图与周围平级视图之间的距离。
- layout_margin、layout_marginLeft、layout_marginTop、layout_marginRight、layout_marginBottom
-
采用 padding(内间距)属性,它指定了当前视图与内部下级视图之间的距离。
- padding、paddingLeft、paddingTop、 paddingRight、paddingBottom
<LinearLayout xmlns:android="http://schemas.android.com/apk/res/android"
    android:layout_width="match_parent"
    android:layout_height="300dp"
    android:background="#00AAF0"
    android:orientation="vertical">


    <!--中间层布局背景颜色为黄色-->
    <LinearLayout
        android:layout_width="match_parent"
        android:layout_height="match_parent"
        android:layout_margin="30dp"
        android:background="@color/yellow"
        android:padding="30dp"> 内层的视图与这个视图的间距

        <!--最内层背景颜色-->
        <View
            android:layout_width="match_parent"
            android:layout_height="match_parent"
            android:background="@color/red">

        </View>

    </LinearLayout>

</LinearLayout>

设置视图的对齐方式
对齐方式
- 采用 layout_gravity 属性,它指定了当前视图相对于上级视图的对齐方式。
- 采用 gravity 属性,它指定了下级视图相对于当前视图的对齐方式。
两者的取值:
- left、top、right、bottom
- left | top :靠左靠上(左上角)
<LinearLayout xmlns:android="http://schemas.android.com/apk/res/android"
    android:layout_width="match_parent"
    android:layout_height="300dp"
    android:background="@color/red"
    android:orientation="horizontal">

    <!--第一个子布局背景为黄色色,它在上级视图中朝下对齐,它的下级视图则靠左下对齐-->
    <LinearLayout
        android:layout_width="0dp"
        android:layout_height="200dp"
        android:layout_gravity="bottom"
        android:layout_margin="15dp"
        android:layout_weight="1"
        android:background="@color/yellow"
        android:gravity="left|bottom"
        android:padding="10dp">

        <View
            android:layout_width="100dp"
            android:layout_height="100dp"
            android:background="@color/teal_200">

        </View>
    </LinearLayout>

    <!--第一个子布局背景为黄色色,它在上级视图中朝上对齐,它的下级视图则靠右上下对齐-->
    <LinearLayout
        android:layout_width="0dp"
        android:layout_height="200dp"
        android:layout_gravity="top"
        android:layout_margin="15dp"
        android:layout_weight="1"
        android:background="@color/yellow"
        android:gravity="right|top"  在外层设置内层的位置
        android:padding="10dp">

        <View
            android:layout_width="100dp"
            android:layout_height="100dp"
            android:background="@color/teal_200">
        </View>
    </LinearLayout>
</LinearLayout>

常用布局
线性布局 LinearLayout
排列方式
- orientation属性值为 horizontal 时,内部视图在水平方向从左往右排列。
- orientation属性值为 vertical 时,内部视图在垂直方向从上往下排列。
不指定orientation 的属性,默认为水平布局
权重布局 layout_weight
指的是线性布局的下级视图各自拥有多大比例的宽高
-
不是在LinearLayout节点设置,而在线性布局的直接下级视图设置,该下级视图占据的宽高比例
-
layout_width = 0dp :表示水平方向宽高比例
-
layout_height =0dp:表示垂直方向的宽高比例
<?xml version="1.0" encoding="utf-8"?>
<LinearLayout xmlns:android="http://schemas.android.com/apk/res/android"
    android:layout_width="match_parent"
    android:layout_height="match_parent"
    android:orientation="vertical">
    <!--水平布局-->
    <LinearLayout
        android:layout_width="match_parent"
        android:layout_height="wrap_content"
        android:orientation="horizontal">

        <TextView
            android:layout_width="50dp"
            android:layout_height="wrap_content"
            android:layout_margin="5dp"
            android:background="@color/green">

        </TextView>

        <TextView
            android:layout_width="50dp"
            android:layout_height="wrap_content"
            android:layout_margin="5dp"
            android:background="@color/green">

        </TextView>
    </LinearLayout>

    <!--垂直布局-->
    <LinearLayout
        android:layout_width="match_parent"
        android:layout_height="wrap_content"
        android:orientation="vertical">

        <TextView
            android:layout_width="50dp"
            android:layout_height="wrap_content"
            android:layout_margin="5dp"
            android:background="@color/red">

        </TextView>

        <TextView
            android:layout_width="50dp"
            android:layout_height="wrap_content"
            android:layout_margin="5dp"
            android:background="@color/red">

        </TextView>
    </LinearLayout>

    <!--水平权重布局-->
    <LinearLayout
        android:layout_width="match_parent"
        android:layout_height="wrap_content">

        <!--1/6-->
        <TextView
            android:layout_width="0dp"
            android:layout_height="wrap_content"
            android:layout_margin="5dp"
            android:layout_weight="1"
            android:background="@color/yellow">
        </TextView>

        <!--5/6-->
        <TextView
            android:layout_width="0dp"
            android:layout_height="wrap_content"
            android:layout_margin="5dp"
            android:layout_weight="5"
            android:background="@color/yellow">
        </TextView>
    </LinearLayout>

    <!--垂直权重布局-->
    <LinearLayout
        android:layout_width="match_parent"
        android:layout_height="wrap_content"
        android:orientation="vertical">

        <TextView
            android:layout_width="200dp"
            android:layout_height="0dp"
            android:layout_margin="5dp"
            android:layout_weight="1"
            android:background="@color/red">
        </TextView>

        <TextView
            android:layout_width="200dp"
            android:layout_height="0dp"
            android:layout_margin="5dp"
            android:layout_weight="1"
            android:background="@color/red">

        </TextView>
    </LinearLayout>
</LinearLayout>
效果图

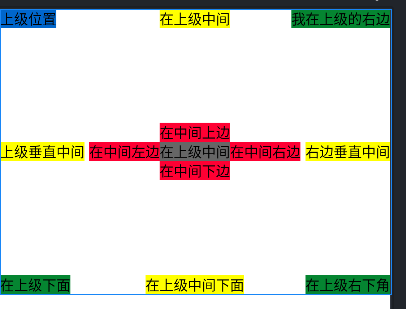
相对布局RelativeLayout
-
相对布局的下级视图位置有其他视图决定,确定下级视图的参照物
- 与该视图自身平级的视图
- 该视图的上级视图(也就是RelativeLayout)
-
默认在 RelativeLayout 内部左上角
位置:

<TextView
    android:id="@+id/parent1"
    android:layout_width="wrap_content"
    android:layout_height="wrap_content"
    android:background="@color/blue"
    android:text="上级位置"
    android:textColor="@color/black"
    android:textSize="15sp" />

<TextView
    android:id="@+id/Re_center"
    android:layout_width="wrap_content"
    android:layout_height="wrap_content"
    android:layout_centerInParent="true"
    android:background="@color/gray"
    android:text="在上级中间"
    android:textColor="@color/black"
    android:textSize="15sp" />

<TextView
    android:id="@+id/parent1_right"
    android:layout_width="wrap_content"
    android:layout_height="wrap_content"
    android:layout_alignParentRight="true"
    android:background="@color/green"
    android:text="我在上级的右边"
    android:textColor="@color/black"
    android:textSize="15sp" />


<TextView
    android:id="@+id/parent_bottom"
    android:layout_width="wrap_content"
    android:layout_height="wrap_content"
    android:layout_alignParentBottom="true"
    android:background="@color/green"
    android:text="在上级下面"
    android:textColor="@color/black"
    android:textSize="15sp" />

<TextView
    android:id="@+id/parent_bottom_center"
    android:layout_width="wrap_content"
    android:layout_height="wrap_content"
    android:layout_alignParentBottom="true"
    android:layout_centerInParent="true"
    android:background="@color/yellow"
    android:text="在上级中间下面"
    android:textColor="@color/black"
    android:textSize="15sp" />

<TextView
    android:id="@+id/bottom_right"
    android:layout_width="wrap_content"
    android:layout_height="wrap_content"
    android:layout_alignParentRight="true"
    android:layout_alignParentBottom="true"
    android:layout_centerInParent="true"
    android:background="@color/green"
    android:text="在上级右下角"
    android:textColor="@color/black"
    android:textSize="15sp" />

<TextView
    android:id="@+id/center_left"
    android:layout_width="wrap_content"
    android:layout_height="wrap_content"
    android:layout_alignTop="@id/Re_center"
    android:layout_toLeftOf="@id/Re_center"
    android:background="@color/red"
    android:text="在中间左边"
    android:textColor="@color/black"
    android:textSize="15sp" />

<TextView
    android:id="@+id/center_right"
    android:layout_width="wrap_content"
    android:layout_height="wrap_content"
    android:layout_alignTop="@id/Re_center"
    android:layout_toRightOf="@id/Re_center"
    android:background="@color/red"
    android:text="在中间右边"
    android:textColor="@color/black"
    android:textSize="15sp" />

<TextView
    android:id="@+id/center_top"
    android:layout_width="wrap_content"
    android:layout_height="wrap_content"
    android:layout_above="@id/Re_center"
    android:layout_alignLeft="@id/Re_center"
    android:background="@color/red"
    android:text="在中间上边"
    android:textColor="@color/black"
    android:textSize="15sp" />

<TextView
    android:id="@+id/center_bottom"
    android:layout_width="wrap_content"
    android:layout_height="wrap_content"
    android:layout_below="@id/Re_center"
    android:layout_alignRight="@id/Re_center"
    android:background="@color/red"
    android:text="在中间下边"
    android:textColor="@color/black"
    android:textSize="15sp" />

<TextView
    android:id="@+id/parent_vertical"
    android:layout_width="wrap_content"
    android:layout_height="wrap_content"
    android:layout_centerVertical="true"
    android:background="@color/yellow"
    android:text="上级垂直中间"
    android:textColor="@color/black"
    android:textSize="15sp" />

<TextView
    android:id="@+id/parent_horizontal"
    android:layout_width="wrap_content"
    android:layout_height="wrap_content"
    android:layout_centerHorizontal="true"
    android:background="@color/yellow"
    android:text="在上级中间"
    android:textColor="@color/black"
    android:textSize="15sp" />

<TextView
    android:id="@+id/right_vertical"
    android:layout_width="wrap_content"
    android:layout_height="wrap_content"
    android:layout_alignRight="@id/parent1_right"
    android:layout_centerVertical="true"
    android:background="@color/yellow"
    android:text="右边垂直中间"
    android:textColor="@color/black"
    android:textSize="15sp" />
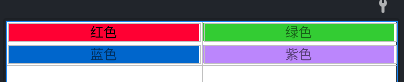
网格布局 GridLayout
- 网格布局多行多列的表格布局
- 默认从左往右、从上往下
- columnCount 属性:网格列数,每行能放多少个视图
- rowCount属性:网格行数,每列能放多少个视图
设置一个两行两列的
<GridLayout xmlns:android="http://schemas.android.com/apk/res/android"
    android:layout_width="match_parent"
    android:layout_height="match_parent"
    android:columnCount="2"
    android:rowCount="2">

    <TextView
        android:layout_width="0dp" 列的对齐权重
        android:layout_height="wrap_content"
        android:layout_columnWeight="1"  列的权重
        android:layout_margin="2dp"
        android:background="@color/red"
        android:gravity="center"
        android:text="红色"
        android:textColor="@color/black" />

    <TextView
        android:layout_width="0dp"
        android:layout_height="wrap_content"
        android:layout_columnWeight="1"
        android:layout_margin="2dp"
        android:background="@color/green"
        android:gravity="center"
        android:text="绿色" />

    <TextView
        android:layout_width="0dp"
        android:layout_height="wrap_content"
        android:layout_columnWeight="1"
        android:layout_margin="2dp"
        android:background="@color/blue"
        android:gravity="center"
        android:text="蓝色" />

    <TextView
        android:layout_width="0dp"
        android:layout_height="wrap_content"
        android:layout_columnWeight="1"
        android:layout_margin="2dp"
        android:background="@color/purple_200"
        android:gravity="center"
        android:text="紫色" />
</GridLayout>
滚动布局 ScrollLayout
- ScrollView :
- 垂直方向滚动视图
- layout_width = match_content
- android:layout_height=“wrap_content”
- HorizontalScrollView:
- 水平方向滚动视图
- layout_width = “wrap_content”
- android:layout_height = match_content
<LinearLayout xmlns:android="http://schemas.android.com/apk/res/android"
    android:layout_width="match_parent"
    android:layout_height="match_parent"
    android:orientation="vertical">

    <!--水平方向滑动-->
    <HorizontalScrollView
        android:layout_width="wrap_content"
        android:layout_height="200dp">

        <!--水平线性布局,设置两个子视图-->
        <LinearLayout
            android:layout_width="wrap_content"
            android:layout_height="match_parent">

            <View
                android:layout_width="500dp"
                android:layout_height="match_parent"
                android:background="@color/green" />

            <View
                android:layout_width="50dp"
                android:layout_height="match_parent"
                android:background="@color/yellow"
                />

        </LinearLayout>
    </HorizontalScrollView>

    <!--垂直方向滑动-->
    <ScrollView
        android:layout_width="250dp"
        android:layout_height="wrap_content">

        <!--水平线性布局,设置两个子视图-->
        <LinearLayout
            android:layout_width="wrap_content"
            android:layout_height="match_parent"
            android:orientation="vertical">

            <View
                android:layout_width="match_parent"
                android:layout_height="500dp"
                android:background="@color/blue"
                />
            <View
                android:layout_width="match_parent"
                android:layout_height="500dp"
                android:background="@color/purple_200"
                />
        </LinearLayout>
    </ScrollView>

</LinearLayout>
按钮触控
Button
由TextView演变而来
- Button拥有默认的按钮背景,而TextView默认无背景
- Button的内部文本默认居中对齐,而TextView的内部文本默认靠左对齐
- Button会默认将英文字母转为大写,而TextView保持原始的英文大小写
Button新增属性
- textAllCaps属性,它指定了是否将英文字母转为大写,为true是表示自动转为大写,为false表示不做大写转换。
- onClick属性,它用来接管用户的点击动作,指定了点击按钮时要触发哪个方法
<TextView
android:layout_width="match_parent"
android:layout_height="wrap_content"
android:background="@color/blue"
android:gravity="center"
android:text="原始的TextView"
android:textColor="@color/red"
android:textSize="20sp">
</TextView>
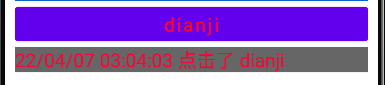
<Button
android:layout_width="match_parent"
android:layout_height="wrap_content"
android:onClick="doClick"
android:text="dianji"
android:textAllCaps="false"
android:textColor="@color/red"
android:textSize="20sp" />
<TextView
android:id="@+id/view_time"
android:layout_width="match_parent"
android:layout_height="wrap_content"
android:background="@color/gray"
android:text="点击结果"
android:textColor="@color/red"
android:textSize="20sp">
</TextView>
获取当前时间工具类
public class DataUtil {

    public static String getNowTime(){
        //获取当前的时间
        SimpleDateFormat sdf = new SimpleDateFormat("yy/mm/dd HH:mm:ss");
        return sdf.format(new Date());
    }
}
public class ButtomStyleActivity extends AppCompatActivity {

    private TextView time_result;

    @Override
    protected void onCreate(Bundle savedInstanceState) {
        super.onCreate(savedInstanceState);
        setContentView(R.layout.activity_buttom_style);
        time_result = findViewById(R.id.view_time);
    }

    /**
     * 点击的方法
     * @param view
     */
    public void doClick(View view){
        String str = String.format("%s 点击了 %s", DataUtil.getNowTime(), ((Button) view).getText());
        time_result.setText(str);
    }
}
时间不是本机时间,二十虚拟手机时间
点击事件和长按事件
-
监听器,意思是专门监听控件的动作行为。只有控件发生了指定的动作,监听器才会触发开关去执行对应的代码逻辑。
-
按钮控件两种常用的监听器
-
点击监听器,通过 setOnClickListener 方法设置。按钮被按住少于500毫秒时,会触发点击事件。
public class ButtonClickActivity extends AppCompatActivity implements View.OnClickListener{ private TextView result; @Override protected void onCreate(Bundle savedInstanceState) { super.onCreate(savedInstanceState); setContentView(R.layout.activity_button_click); result = findViewById(R.id.tv_result); Button b1 = findViewById(R.id.single_button); b1.setOnClickListener(new MyOnClickListener(result)); Button public_button = findViewById(R.id.public_button); public_button.setOnClickListener(this); } @Override public void onClick(View v) { if (v.getId() == R.id.public_button){ String str = String.format("%s 点击了 %s", DataUtil.getNowTime(), ((Button) v).getText()); result.setText(str); } } /** * 实现监听方法 静态内部类:减少内存泄露 */ static class MyOnClickListener implements View.OnClickListener{ private final TextView result; public MyOnClickListener(TextView result) { this.result = result; } @Override public void onClick(View v) { String str = String.format("%s 点击了 %s", DataUtil.getNowTime(), ((Button) v).getText()); result.setText(str); } } }<Button android:id="@+id/single_button" android:layout_width="match_parent" android:layout_height="wrap_content" android:text="公共事件" android:background="@color/blue" android:layout_margin="5dp" android:textSize="20sp" /> <Button android:id="@+id/public_button" android:layout_width="match_parent" android:layout_height="wrap_content" android:background="@color/blue" android:layout_margin="5dp" android:text="指定点击监听器" android:textSize="20sp" /> <TextView android:id="@+id/tv_result" android:layout_width="match_parent" android:layout_height="wrap_content" android:gravity="center" android:padding="2dp" android:text="显示内容结果" android:textColor="@color/black" android:textSize="20sp" /> -
长按监听器,通过 setOnLongClickListener 方法设置。按钮被按住超过500毫秒时,会触发长按事件。
public class ButtonLongClickActivity extends AppCompatActivity {


    @SuppressLint("WrongViewCast")
    @Override
    protected void onCreate(Bundle savedInstanceState) {
        super.onCreate(savedInstanceState);
        setContentView(R.layout.activity_button_long_click);


        Button long_click = findViewById(R.id.long_click);
        TextView result = findViewById(R.id.tv_result);
        //lambda表达式
        long_click.setOnLongClickListener(v -> {
            String str = String.format("%s 点击了 %s", DataUtil.getNowTime(), ((Button) v).getText());
            result.setText(str);
            return true;
        });
    }
}
-
按钮恢复与禁用
两种状态
- 可以状态按钮:按钮允许点击,点击按钮会触发点击事件,同时按钮文字为正常的黑色
- 不可以状态按钮:按钮不允许点击,即使点击也没反应,同时按钮文字为灰色
是否允许点击
- enable属性:true:可以点击,false:不可以点击
public class ButtonEanbleActivity extends AppCompatActivity implements View.OnClickListener {

    private Button btn_test;
    private TextView tv_result1;

    @Override
    protected void onCreate(Bundle savedInstanceState) {
        super.onCreate(savedInstanceState);
        setContentView(R.layout.activity_button_eanble);
        Button btn_enable = findViewById(R.id.btn_enable);
        Button btn_disable = findViewById(R.id.btn_disable);
        btn_test = findViewById(R.id.btn_test);
        tv_result1 = findViewById(R.id.tv_result1);

        //监控事件
        btn_enable.setOnClickListener(this);
        btn_disable.setOnClickListener(this);
        btn_test.setOnClickListener(this);

    }

    @Override
    public void onClick(View v) {
        switch (v.getId()){
            //启动按钮
            case R.id.btn_enable:
                btn_test.setEnabled(true);
                btn_test.setTextColor(Color.BLACK);
                break;

            //禁用按钮
            case R.id.btn_disable:
                btn_test.setEnabled(false);
                btn_test.setTextColor(Color.GRAY);
                break;

            //测试按钮
            case R.id.btn_test:
                String str = String.format("%s 点击了 %s", DataUtil.getNowTime(), ((Button) v).getText());
                tv_result1.setText(str);
                break;
        }

    }
}
<LinearLayout xmlns:android="http://schemas.android.com/apk/res/android"
    android:layout_width="match_parent"
    android:layout_height="match_parent"
    android:orientation="vertical">

    <LinearLayout
        android:layout_width="match_parent"
        android:layout_height="wrap_content"
        android:orientation="horizontal">

        <Button
            android:id="@+id/btn_enable"
            android:layout_width="0dp"
            android:layout_height="wrap_content"
            android:layout_margin="5dp"
            android:layout_weight="1"
            android:text="启动测试按钮"
            android:textColor="@color/black"
            android:textSize="20sp" />

        <Button
            android:id="@+id/btn_disable"
            android:layout_width="0dp"
            android:layout_height="wrap_content"
            android:layout_margin="5dp"
            android:layout_weight="1"
            android:text="禁用测试按钮"
            android:textColor="@color/black"
            android:textSize="20sp" />

    </LinearLayout>

    <Button
        android:id="@+id/btn_test"
        android:layout_width="match_parent"
        android:layout_height="wrap_content"
        android:layout_margin="5dp"
        android:enabled="false"
        android:text="测试按钮"
        android:textColor="@color/gray"
        android:textSize="20sp" />

    <TextView
        android:id="@+id/tv_result1"
        android:layout_width="match_parent"
        android:layout_height="wrap_content"
        android:layout_margin="5dp"
        android:gravity="center"
        android:text="查看测试结果"
        android:textColor="@color/black"
        android:textSize="20sp" />

</LinearLayout>
图像显示
ImageView
图片位置: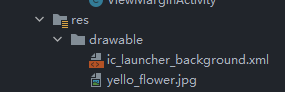
设置方式
- 在XML文件中,通过属性 android:src 设置图片资源,属性值格式形如:@drawable/ 不含扩展名的图片名称
- 在Java代码中,调用 setlmageResource 方法设置图片资源,方法参数格式形如:R.drawable.不含扩展名的图片名称
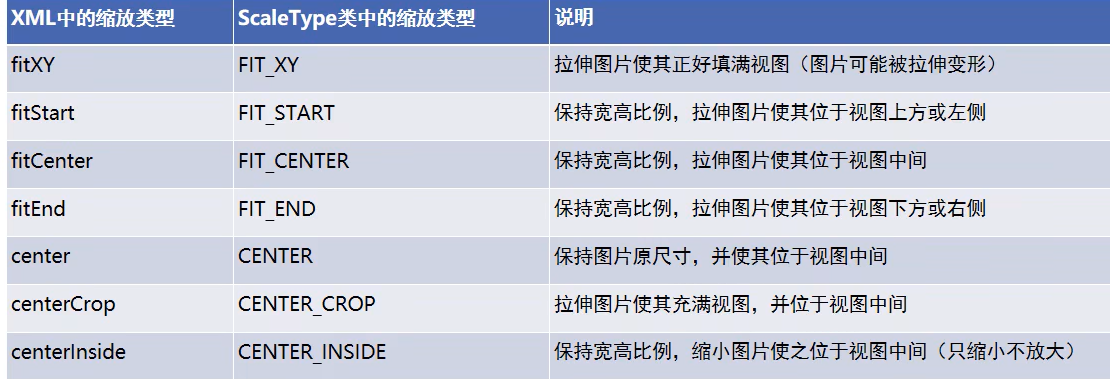
scaleType属性
- 默认是居中显示
ImageButton
- 图片显示按钮,继承于ImageVIew
ImageButton与Button区别
- Button 既可显示文本也可显示图片,lmageButton 只能显示图片不能显示文本
- ImageButton 上的图像可按比例缩放,而 Button 通过背景设置的图像会拉伸变形
- Button 只能靠背景显示一张图片,而 lmageButton 可分别在前景和背景显示图片,从而实现两张图片叠加的效果
imageButton与ImageView区别
- lmageButton有默认的按钮背景,ImageView默认无背景。
- lmageButton默认的缩放类型为center,而ImageView默认的缩放类型为fitCenter。
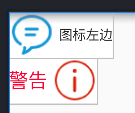
同时展示文本和图像
- 利用LinearLayout对 ImageView 和 TextView 组合布局。
- 通过按钮控件Button的 drawable *** 属性设置文本周围的图标
- drawableTop:指定文字上方的图片
- drawableBottom:指定文字下方的图片
- drawableLeft:指定文字左边的图片
- drawableRight:指定文字右边的图片
- drawablePadding:指定图片与文字的间距。
取消掉按钮的默认背景颜色

<Button
    android:layout_width="wrap_content"
    android:layout_height="wrap_content"
    android:background="@color/white"
    android:drawableLeft="@drawable/info"
    android:drawablePadding="5dp"
    android:text="图标左边" />

<Button
    android:layout_width="wrap_content"
    android:layout_height="wrap_content"
    android:background="@color/white"
    android:drawableRight="@drawable/waring"
    android:drawablePadding="5dp"
    android:text="警告"
    android:textColor="@color/red"
    android:textSize="20sp" />
计算器项目实战
计算器的界面分为两大部分,第一部分是上方的计算表达式,既包括用户的按键输入,也包括计算结果数字;第二部分是下方的各个按键,例如:从0到9的数字按钮、加减乘除与等号、正负号按钮、小数点按钮、求倒数按钮、平方按钮、开方按钮以及退格、清空、取消等控制按钮
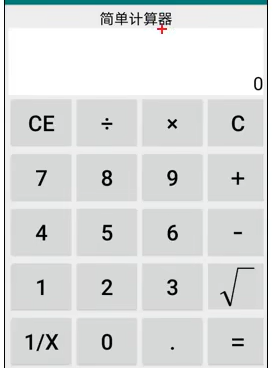
分析
- 线性布局LinearLayout:计算器的整体布局是从上到下排列着的
- 网格布局GridLayout:计算器下半部分的几排按钮,正好成五行四列表格分布,适合采用GridLayout
- 滚动视图ScrollView:计算器界面如果超出屏幕大小,就要支持滚动
- 文本视图TextView:计算结果文本需要使用TextView,且文字靠下靠右显示
- 按钮Button:用于0-9的数字按键,以及加减乘除等运算按键
- 图像按钮ImageButton:开根号的运算符虽然能够打出来,但是右上角少了一横,所以该按钮要用一张标准的开根号图片显示
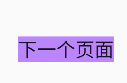
Activity
启停活动
-
从当前页面跳转到新页面
startActivity(new Intent(源页面.this,目标页面.class)) -
从当前页面回到上一个页面,相当于关闭当前页面
finish();结束当前活动页面
public class ActStartActivity extends AppCompatActivity implements View.OnClickListener {

    @Override
    protected void onCreate(Bundle savedInstanceState) {
        super.onCreate(savedInstanceState);
        setContentView(R.layout.activity_act_start);
        findViewById(R.id.next_page).setOnClickListener(this);
    }

    @Override
    public void onClick(View v) {
        startActivity(new Intent(this, ActFinishActivity.class));
    }
}
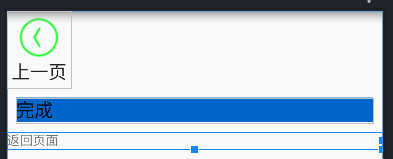
public class ActFinishActivity extends AppCompatActivity implements View.OnClickListener {

    @Override
    protected void onCreate(Bundle savedInstanceState) {
        super.onCreate(savedInstanceState);
        setContentView(R.layout.activity_act_finish);
        findViewById(R.id.back_button).setOnClickListener(this);
        findViewById(R.id.back_jiantou).setOnClickListener(this);
    }

    @Override
    public void onClick(View v) {
        if (v.getId() == R.id.back_button ||v.getId() == R.id.back_jiantou ){
            finish();
        }
    }
}
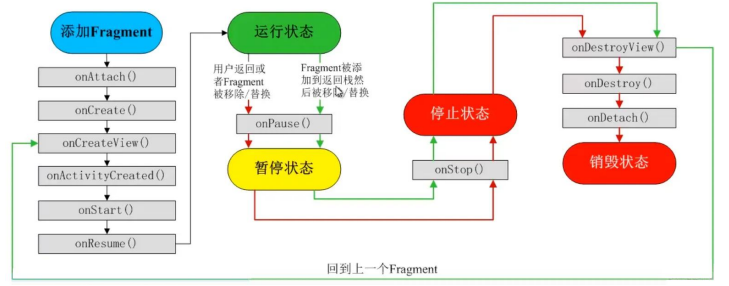
Activity 生命周期
生命周期图
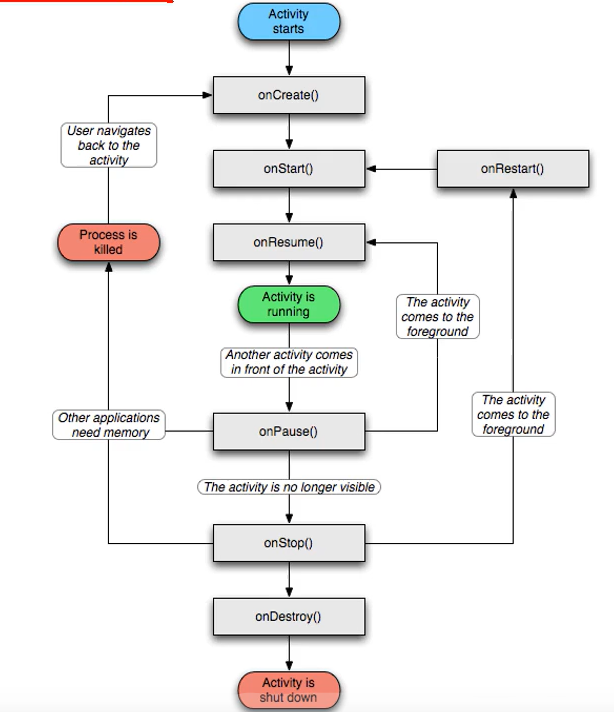
- onCreate:创建活动。把页面布局加载进内存,进入了初始状态。
- onStart:开始活动。把活动页面显示在屏幕上,进入了就绪状态。
- onResume:恢复活动。活动页面进入活跃状态,能够与用户正常交互,例如允许响应用尸的点击动作、允许用户输入文字等等。
- onPause:暂停活动。页面进入暂停状态,无法与用户正常交互。
- onStop:停止活动。页面将不在屏幕上显示。
- onDestroy:销毁活动。回收活动占用的系统资源,把页面从内存中清除。
- onRestart:重启活动。重新加载内存中的页面数据。
- onNewlntent:重用已有的活动实例。
如果一个Activity已经启动过,并且存在当前应用的Activity任务栈中,启动模式为singleTask,singleInstance或singleTop(此时已在任务栈顶端),那么在此启动或回到这个Activity的时候,不会创建新的实例,也就是不会执行onCreate方法,而是执行
onNewlntent方法。
活动状态变迁

- 打开新页面流程
- onCreate ==> onStrat ==> onResume
- 关闭页面流程图
- onPause ==> onStop ==> onDestroy
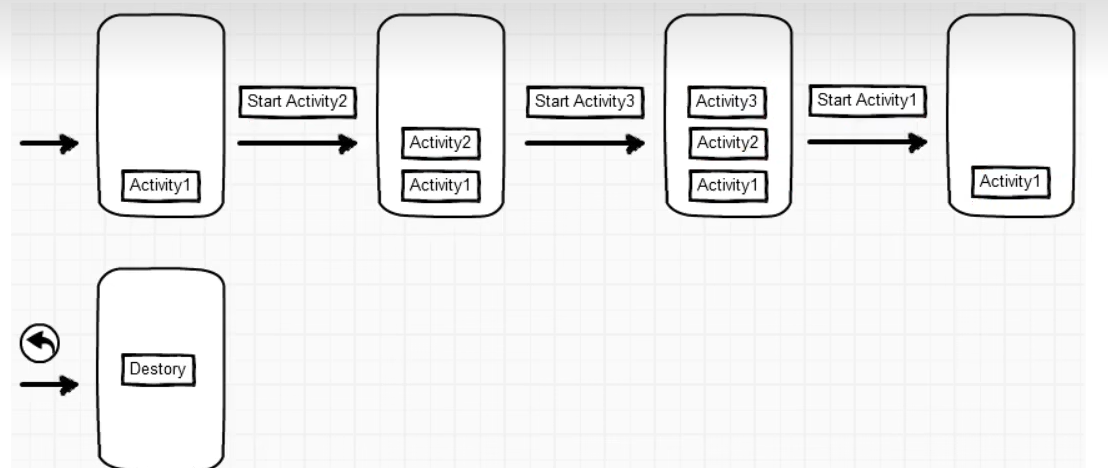
Activity 启动模式
-
打开两个活动,活动栈的变动(先进后出)
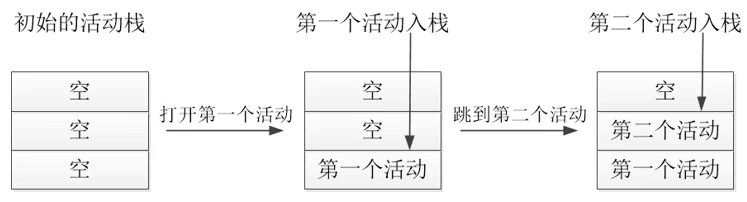
-
依次结束已打开的两个活动,活动栈变动情况
启动模式在清单文件中设置
<android:launchMode="standard">
[外链图片转存失败,源站可能有防盗链机制,建议将图片保存下来直接上传(img-4VSomPsh-1668325437844)(AndroidApp.assets/image-20220808105436837.png)]
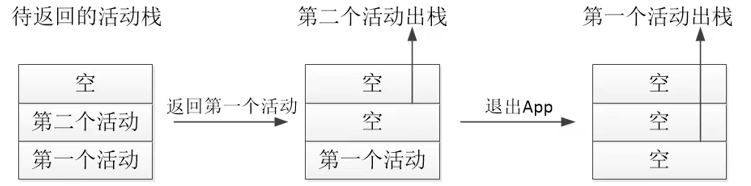
默认启动模式 standard
- Activity 依次启动,依次被压入栈中
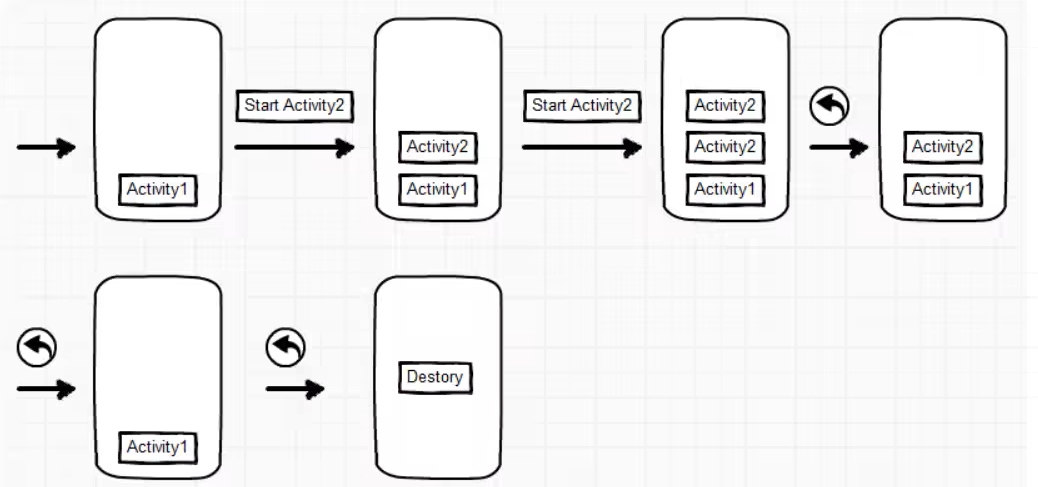
栈顶复用模式 singleTop
-
栈顶新建Activity(目标Activity),就不会复建新的Activity
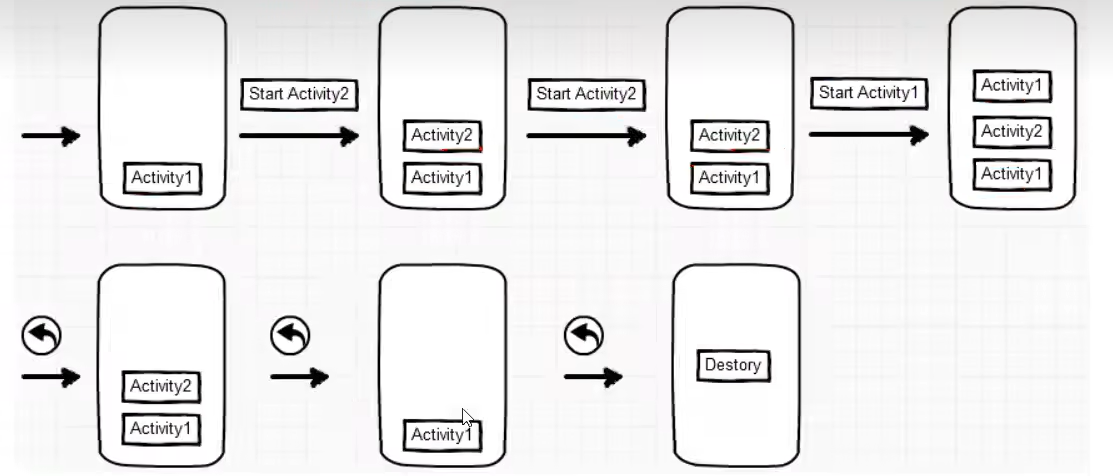
应用场景
- 开启渠道多,多应用开启调用的 Activity ,可以避免已建的Activity被复用。
栈内复用模式 singleTask
- singleTask模式下,如果 task栈内存在目标Activity实例,则将task内的对应Activity实例之上的所有Activity 弹出栈,并将对应Activity置于栈顶,获得焦点。
应用场景
- 程序主页面,比希望被创建多次
- 耗费系统资源的Activity
全局唯一模式 singleInstance
- 在该模式下,我们会为目标Activity创建一个新的Task栈,将目标Activity放入新的Task,并让目标Activity获得焦点。新的Task有且只有这一个Activity 实例。
如果已经创建过目标Activity实例,则不会创建新的Task,而是将以前创建过的Activity 唤醒。

动态启动模式
- Intent.FLAG_ACTIVITY_NEW_TASK:开辟一个新的任务栈
- Intent.FLAG_ACTIVITY_SINGLE_TOP:当栈顶为待跳转的活动实例之时,则重用栈顶的实例
- Intent.FLAG_ACTIVITY_CLEAR_TOP:当栈中存在待跳转的活动实例时,则重新创建一个新实例, 并清除原实例上方的所有实例 l
- Intent.FLAG_ACTIVITY_NO_HISTORY:栈中不保存新启动的活动实例
- Intent.FLAG_ACTIVITY_CLEAR_TASK:跳转到新页面时,栈中的原有实例都被清空
传递信息
Intent
- Intent是各个组件之间信息沟通的桥梁,用于组件之间进行通信
- 标明本次通信请求从哪里来、到哪里去、要怎么走。
- 发起方携带本次通信需要的数据内容,接收方从收到的意图中解析数据。
- 发起方若想判断接收方的处理结果,意图就要负责让接收方传回应答的数据内容
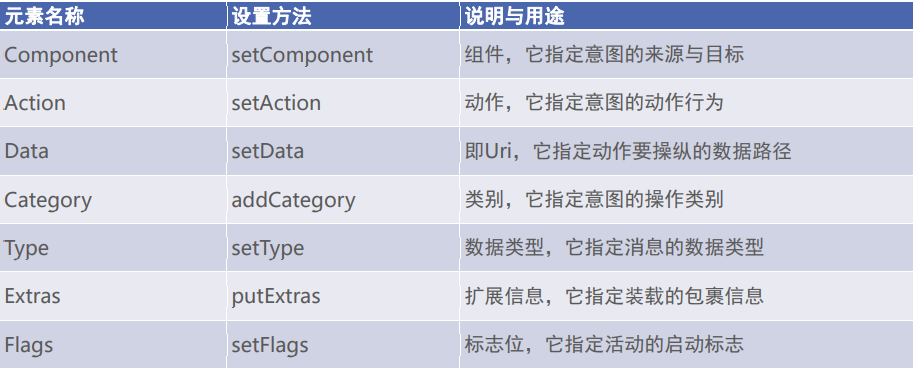
Inten组成部分
显示Intent
三种构造方法:
- 在Intent的构造函数中指定
- 调用意图对象的setClass方法指定
- 调用意图对象的setComponent方法指定
@Override
public void onClick(View v) {
    //1.
    startActivity(new Intent(this, ActFinishActivity.class));
    //2.
    Intent intent = new Intent();
    intent.setClass(this,ActFinishActivity.class);
    //3.
    Intent intent = new Intent();
    ComponentName componentName = new ComponentName(this, ActFinishActivity.class);
    intent.setComponent(componentName);
    startActivity(intent);

}
隐式Intent
- 没有明确指定跳转目标,给出动作字符系统自动匹配:模糊匹配
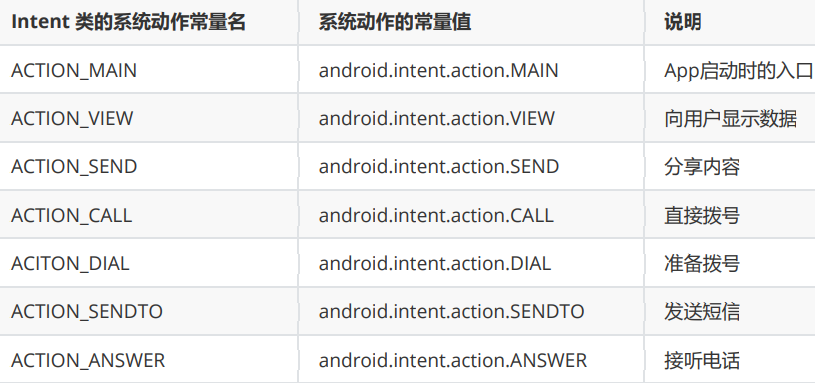
常用动作
@Override
public void onClick(View v) {
    String phoneNo = "11112515";
    Intent intent = new Intent();
    switch (v.getId()) {
        case R.id.jump_call_page:
            //设置意图作为动作准备拨号
            intent.setAction(Intent.ACTION_DIAL);
            //声明一个拨号的Uri
            Uri uri = Uri.parse("tel" + phoneNo);
            intent.setData(uri);
            startActivity(intent);
            break;

        case R.id.jump_info_page:
            //设置意图作为动作准备拨号
            intent.setAction(Intent.ACTION_SENDTO);
            //声明一个拨号的Uri
            Uri uri_sen_info = Uri.parse("info" + phoneNo);
            intent.setData(uri_sen_info);
            startActivity(intent);
            break;
        case R.id.jump_accpect_info_page:
            //设置意图作为动作准备拨号
            intent.setAction(Intent.ACTION_ANSWER);
            //声明一个拨号的Uri
            Uri uri_answer = Uri.parse("info" + phoneNo);
            intent.setData(uri_answer);
            startActivity(intent);
            break;

    }
}
向下一个发送数据
-
Intent使用Bundle对象存放待传递的数据信息
-
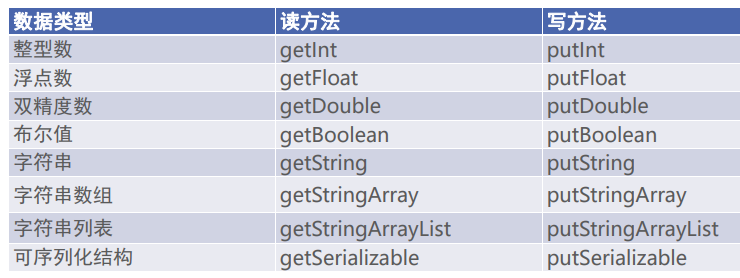
Bundle 对象的数据类型
-
在代码中发送消息包裹,调用意图对象的putExtras方法,即可存入消息包裹。
-
在代码中接收消息包裹,调用意图对象的getExtras方法,即可取出消息包裹。
@Override
public void onClick(View v) {
    Intent intent = new Intent(this, ActReceiveActivity.class);
    Bundle bundle = new Bundle();
    //发送的数据
    bundle.putString("request_time", DataUtil.getNowTime());
    bundle.putString("request_content",sent_text.getText().toString());

    //存入包裹
    intent.putExtras(bundle);
    startActivity(intent);
}
@Override
protected void onCreate(Bundle savedInstanceState) {
    super.onCreate(savedInstanceState);
    setContentView(R.layout.activity_act_receive);
    TextView receive_text = findViewById(R.id.receive_text);

    //从上一个页面中传来的意图中获取包裹
    Bundle bundle = getIntent().getExtras();
    String request_time = bundle.getString("request_time");
    String request_content = bundle.getString("request_content");
    String format = String.format("收到消息:\n请求时间:%s\n请求内容:%s", request_time, request_content);
    receive_text.setText(format);
}
向上一个Activity 返回数据
- 上一个页面打包好请求数据,调用 startActivityForResult 方法执行跳转动作
- 下一个页面接收并解析请求数据,进行相应处理
- 下一个页面在返回上一个页面时,打包应答数据并调用 setResult 方法返回数据包裹
- 上一个页面重写方法 onActivityResult,解析获得下一个页面的返回数据
请求信息
import androidx.activity.result.ActivityResultLauncher;
import androidx.activity.result.contract.ActivityResultContracts;
import androidx.appcompat.app.AppCompatActivity;

import android.app.Activity;
import android.content.Intent;
import android.os.Bundle;
import android.view.View;
import android.widget.TextView;

import com.example.activity.utils.DataUtil;

public class ActRequestActivity extends AppCompatActivity implements View.OnClickListener {

    private String Request = " 可以去你家睡吗?";
    private ActivityResultLauncher<Intent> register;
    private TextView response_show;

    @Override
    protected void onCreate(Bundle savedInstanceState) {
        super.onCreate(savedInstanceState);
        setContentView(R.layout.activity_act_request);
        TextView request_text = findViewById(R.id.request_text);
        request_text.setText("待发送的消息:" + Request);

        response_show = findViewById(R.id.response_show);


        //按钮监听
        findViewById(R.id.request_but).setOnClickListener(this);

        //response回调方法
        register = registerForActivityResult(new ActivityResultContracts.StartActivityForResult(), result -> {
            if (result != null) {
                Intent intent = result.getData();
                if (intent != null && result.getResultCode() == Activity.RESULT_OK) {
                    Bundle bundle = intent.getExtras();
                    String request_time = bundle.getString("request_time", DataUtil.getNowTime());
                    String request_content = bundle.getString("request_content");
                    String desc = String.format("request收到的消息:\n请求时间:%s\n请求内容:%s", request_time, request_content);
                    //把返回消息的详细信息显示
                    response_show.setText(desc);
                }
            }
        });
    }

    @Override
    public void onClick(View v) {
        //构建显示意图
        Intent intent = new Intent(this, ActResponseActivity.class);
        Bundle bundle = new Bundle();
        //发送的数据
        bundle.putString("request_time", DataUtil.getNowTime());
        bundle.putString("request_content", Request);

        intent.putExtras(bundle);
        //存入包裹
        intent.putExtras(bundle);
        register.launch(intent);
    }
}
响应信息
public class ActResponseActivity extends AppCompatActivity implements View.OnClickListener {

    private static final String Response_back = "不可以!!";

    @Override
    protected void onCreate(Bundle savedInstanceState) {
        super.onCreate(savedInstanceState);
        setContentView(R.layout.activity_act_response);
        TextView request_text = findViewById(R.id.request_text);

        //从上一个页面中传来的意图中获取包裹
        Bundle bundle = getIntent().getExtras();
        String request_time = bundle.getString("request_time");
        String request_content = bundle.getString("request_content");
        String format = String.format("response收到的消息:\n请求时间:%s\n请求内容:%s", request_time, request_content);
        //请求的信息显示在指定的文本上
        request_text.setText(format);


        findViewById(R.id.response_but).setOnClickListener(this);

        TextView back_text = findViewById(R.id.response_back);
        back_text.setText("要返回给request的消息:" + Response_back);
    }

    @Override
    public void onClick(View v) {
        Intent intent = new Intent();
        Bundle bundle = new Bundle();
        bundle.putString("request_time", DataUtil.getNowTime());
        bundle.putString("request_content", Response_back);
        intent.putExtras(bundle);
        setResult(Activity.RESULT_OK, intent);
        //结束
        finish();
    }
}
附加信息
资源文件配置字符串
- res\values\strings.xml 可用来配置字符串形式的参数。
- 在活动页面的Java代码中,调用 getString 方法即可根据 R.string.参数名称 获得指定 参数的字符串值。
@Override
protected void onCreate(Bundle savedInstanceState) {
    super.onCreate(savedInstanceState);
    setContentView(R.layout.activity_read_sourse_striing);
    TextView resource_string = findViewById(R.id.string_source);
    //从string.xml文件中获取字符串值
    String go_home = getString(R.string.go_home);
    resource_string.setText(go_home);
}
<resources>
    <string name="app_name">Activity</string>
    <string name="go_home">我想和你回家!!!</string>
</resources>
利用元数据传递配置信息
- 在activity节点内部添加meta-data标签,通过属性name指定元数据的名称,通过属性 value 指定元数据的值
<meta-data android:name="go" android:value="和你回家"/>
- 调用 getPackageManager 方法获得当前应用的包管理器;
- 调用包管理器的 getActivityInfo 方法获得当前活动的信息对象;
- 活动信息对象的 metaData 是 Bundle 包裹类型,调用包裹对象的 getString 即可获得指 定名称的参数值;
@Override
protected void onCreate(Bundle savedInstanceState) {
    super.onCreate(savedInstanceState);
    setContentView(R.layout.activity_meta_data);
    TextView meta_source_value = findViewById(R.id.meta_source_value);

    //获取包管理器
    PackageManager packageManager = getPackageManager();

    //
    try {
        ActivityInfo packageInfo = packageManager.getActivityInfo(getComponentName(), PackageManager.GET_META_DATA);
        Bundle bundle = packageInfo.metaData;
        String go = bundle.getString("go");
        meta_source_value.setText(go);
    } catch (PackageManager.NameNotFoundException e) {
        e.printStackTrace();
    }
}
创建图标长安快捷菜单
新建 xml文件夹
shortcut.xml
<?xml version="1.0" encoding="utf-8"?>
<shortcuts xmlns:android="http://schemas.android.com/apk/res/android">

    <shortcut
        android:enabled="true"
        android:icon="@mipmap/ic_launcher"
        android:shortcutId="first"
        android:shortcutLongLabel="@string/first_long"
        android:shortcutShortLabel="@string/first_short">

        <intent
            android:action="android.intent.action.VIEW"
            android:targetClass="com.example.activity.ActStartActivity"
            android:targetPackage="com.example.activity" />
        <categories android:name="android:shortcuts.conversation" />
    </shortcut>


    <shortcut
        android:enabled="true"
        android:icon="@mipmap/ic_launcher"
        android:shortcutId="second"
        android:shortcutLongLabel="@string/second_long"
        android:shortcutShortLabel="@string/second_short">

        <intent
            android:action="android.intent.action.VIEW"
            android:targetClass="com.example.activity.ActSentActivity"
            android:targetPackage="com.example.activity" />
        <categories android:name="android:shortcuts.conversation" />
    </shortcut>

    <shortcut
        android:enabled="true"
        android:icon="@mipmap/ic_launcher"
        android:shortcutId="third"
        android:shortcutLongLabel="@string/third_long"
        android:shortcutShortLabel="@string/third_short">

        <intent
            android:action="android.intent.action.VIEW"
            android:targetClass="com.example.activity.JumpFirstActivity"
            android:targetPackage="com.example.activity" />
        <categories android:name="android:shortcuts.conversation" />
    </shortcut>
</shortcuts>
strings.xml
<string name="first_short">first</string>
<string name="first_long">启停活动</string>
<string name="second_short">second</string>
<string name="second_long">发送数据</string>
<string name="third_short">third</string>
<string name="third_long">跳转页面</string>
需要的页面必须存在(配置文件中,列表清单文件 AndroidManifest.xml),才可以进行操作
中级控件
系统框架
图形定制 Drawable
- 图片文件一般存放在 drawable 目录下
- 视图的 background 属性、ImageView 和 ImageButton 的 src 属性、TextView 和 Button 四个方向的 drawable 系列属性都可以引用图形文件
形状图形
几何图形
Shape的主要包括四种图形
- rectangle:矩形。默认值
- oval:椭圆。此时corners节点会失效
- line:直线。此时必须设置stroke节点,不然会报错
- ring:圆环
图形的规格定义
-
size(尺寸),它描述了形状图形的宽高尺寸。
- height:像素类型,图形高度。
- width:像素类型,图形宽度。
-
stroke(边框),它描述了形状图形的描边规格
- color:颜色类型,描边的颜色。 dashGap:像素类型,每段虚线之间的间隔。
- dashWidth:像素类型,每段虚线的宽度。若dashGap和dashWidth有一个值为0,则描边为实 线。
- width:像素类型,描边的厚度。
-
corners(圆角),它描述了形状图形的圆角大小。
- bottomLeftRadius:像素类型,左下圆角的半径。
- bottomRightRadius:像素类型,右下圆角的半径。
- topLeftRadius:像素类型,左上圆角的半径。
- topRightRadius:像素类型,右上圆角的半径。
- radius:像素类型,4个圆角的半径(若有上面4个圆角半径的定义,则不需要radius定义)
-
solid(填充),它描述了形状图形的填充色彩。
- color:颜色类型,内部填充的颜色。
-
padding(间隔),它描述了形状图形与周围边界的间隔
- top:像素类型,与上方的间隔。
- bottom:像素类型,与下方的间隔
- left:像素类型,与左边的间隔
- right:像素类型,与右边的间隔
-
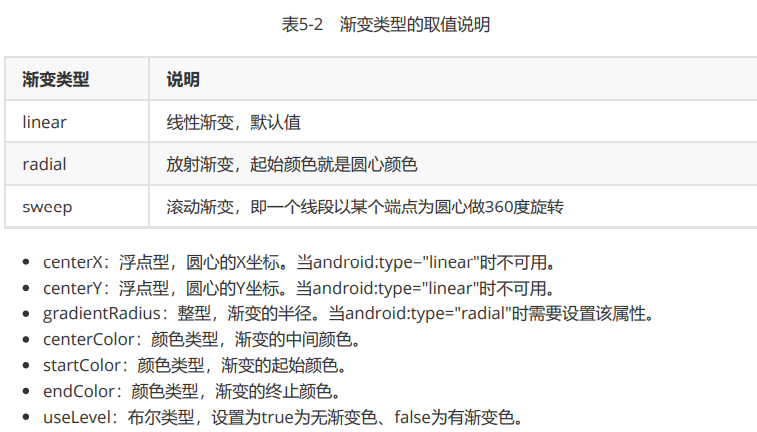
gradient(渐变),它描述了形状图形的颜色渐变。
-
angle:整型,渐变的起始角度:为0时表示时钟的9点位置,值增大表示往逆时针方向旋转。
-
type:字符串类型,渐变类型
-
public class DrawableShapeActivity extends AppCompatActivity implements View.OnClickListener {

    private View view;

    @Override
    protected void onCreate(Bundle savedInstanceState) {
        super.onCreate(savedInstanceState);
        setContentView(R.layout.activity_drawable_shape);
        view = findViewById(R.id.v_content);
        findViewById(R.id.circular).setOnClickListener(this);
        findViewById(R.id.ellipse).setOnClickListener(this);

        //默认情况下,为圆角矩形
        view.setBackgroundResource(R.drawable.shape_circular);

    }

    @Override
    public void onClick(View v) {
        switch (v.getId()) {
            case R.id.circular:
                view.setBackgroundResource(R.drawable.shape_circular);
                break;
            case R.id.ellipse:
                view.setBackgroundResource(R.drawable.shape_ellipse);
                break;
        }
    }
}
shape_circular.xml
<shape xmlns:android="http://schemas.android.com/apk/res/android">
    <!--指定形状内部的填充颜色-->
    <solid android:color="@color/gold"/>
    <!--指定形状轮廓(边框大小、颜色)的颜色-->
    <stroke
        android:width="2dp"
        android:color="@color/red"
        />
    <!--指定圆角半径-->
    <corners android:radius="50dp"/>

</shape>
shape_ellispce.xml
<?xml version="1.0" encoding="utf-8"?>
<shape xmlns:android="http://schemas.android.com/apk/res/android"
    android:shape="oval">

    <!--指定形状内部的填充颜色-->
    <solid android:color="@color/purple_500" />
    <!--指定形状轮廓(边框大小、颜色)的颜色-->
    <stroke
        android:width="2dp"
        android:color="@color/red" />
</shape>
九宫格图片
- 尺寸太小,则系统会自动拉伸图片使之填满背景
- 防止拉伸图片变形变模糊
必须的 .png 格式的图片
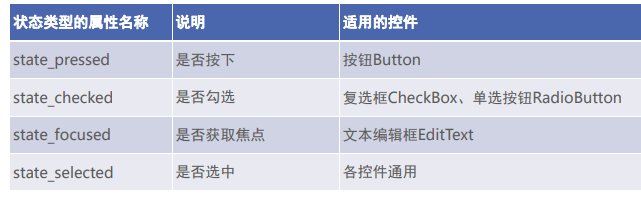
状态列表图形
- 按钮按下形状、颜色改变
- 不仅适用于Button,还有其它的控件也可以
<selector xmlns:android="http://schemas.android.com/apk/res/android">
    <!--按钮按下之后改变的样式-->
    <item android:drawable="@drawable/view1" android:state_pressed="true" />
    <!--没按时显示的样式-->
    <item android:drawable="@drawable/btn1" />
</selector>
选择按钮
复选框 CheckBox
继承关系
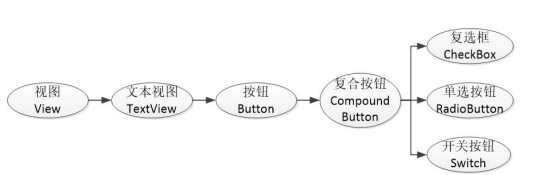
CompoundButton
CompoundButton 在 XML 文件中主要使用下面两个属性。
- checked:指定按钮的勾选状态,true表示勾选,false表示未勾选。默认未勾选
- button:指定左侧勾选图标的图形资源。如果不指定就使用系统的默认图标
CompoundButton 在 Java 代码中主要使用下列4种方法。
- setChecked:设置按钮的勾选状态。
- setButtonDrawable:设置左侧勾选图标的图形资源。
- setOnCheckedChangeListener:设置勾选状态变化的监听器。
- isChecked:判断按钮是否勾
设置股癣状态的监听器,并且设置内容显示
public class CheckBoxActivity extends AppCompatActivity implements CompoundButton.OnCheckedChangeListener {

    @Override
    protected void onCreate(Bundle savedInstanceState) {
        super.onCreate(savedInstanceState);
        setContentView(R.layout.activity_check_box);
        CheckBox system_checkbox = findViewById(R.id.system_checkbox);
        CheckBox custom_checkbox = findViewById(R.id.custom_checkbox);
        system_checkbox.setOnCheckedChangeListener(this);
        custom_checkbox.setOnCheckedChangeListener(this);
    }

    @Override
    public void onCheckedChanged(CompoundButton buttonView, boolean isChecked) {
        String desc = String.format("你%s了这个CheckBox", isChecked ? "勾选" : "取消勾选");
        buttonView.setText(desc);
    }
}
开关按钮 switch
Switch 控件属性
- extOn:设置右侧开启时的文本。
- textOff:设置左侧关闭时的文本。
- track:设置开关轨道的背景。
- thumb:设置开关标识的图标
单选按钮 RedioButton
RadioGroup 实质上是个布局,同一组RadioButton都要放在同一个 RadioGroup 节点下
RadioGroup的常用方法
- check:选中指定资源编号的单选按钮。
- getCheckedRadioButtonId:获取选中状态单选按钮的资源编号。
- setOnCheckedChangeListener:设置单选按钮勾选变化的监听器
<?xml version="1.0" encoding="utf-8"?>
<LinearLayout xmlns:android="http://schemas.android.com/apk/res/android"
    android:layout_width="match_parent"
    android:layout_height="match_parent"
    android:orientation="vertical"
    android:padding="5dp">

    <TextView
        android:layout_width="match_parent"
        android:layout_height="wrap_content"
        android:text="请选择你的性别" />

    <RadioGroup
        android:id="@+id/select_gender"
        android:layout_width="match_parent"
        android:layout_height="wrap_content"
        android:orientation="horizontal"
        android:padding="10dp">

        <RadioButton
            android:id="@+id/sex_male"
            android:layout_width="wrap_content"
            android:layout_height="wrap_content"
            android:layout_weight="1"
            android:text="男" />

        <RadioButton
            android:id="@+id/sex_female"
            android:layout_width="wrap_content"
            android:layout_height="wrap_content"
            android:layout_weight="1"
            android:text="女" />

    </RadioGroup>

    <TextView
        android:id="@+id/show_sex"
        android:layout_width="match_parent"
        android:layout_height="wrap_content"
        android:layout_marginTop="10dp" />

</LinearLayout>
public class RadioHorizaontalActivity extends AppCompatActivity implements RadioGroup.OnCheckedChangeListener {

    private TextView show_sex;

    @Override
    protected void onCreate(Bundle savedInstanceState) {
        super.onCreate(savedInstanceState);
        setContentView(R.layout.activity_radio_horizaontal);
        RadioGroup select_gender = findViewById(R.id.select_gender);
        show_sex = findViewById(R.id.show_sex);

        select_gender.setOnCheckedChangeListener(this);
    }

    @Override
    public void onCheckedChanged(RadioGroup group, int checkedId) {
        switch (checkedId){
            case R.id.sex_male:
                show_sex.setText("你是一个man");
                break;
            case R.id.sex_female:
                show_sex.setText("你是一个women");
                break;
        }
    }
}
文本输入
编辑框 EditText
文本编辑框
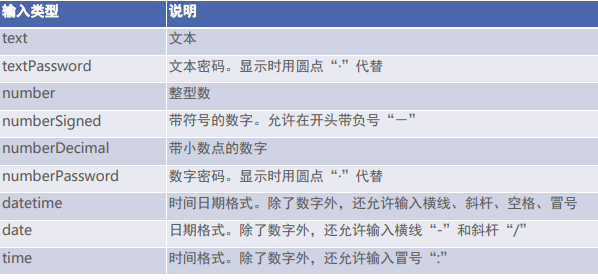
EditText 一些方法
- inputType:指定输入的文本类型。若同时使用多种文本类型,则可使用竖线“|”把多种文本类 型拼接起来。
- l maxLength:指定文本允许输入的最大长度。
- hint:指定提示文本的内容。
- textColorHint:指定提示文本的颜色。
监听焦点变更事件
- 编辑框点击两次后才会触发点击事件,因为第一次点击只触发焦点变更事件,第二次点击 才触发点击事件
- 若要判断是否切换编辑框输入,应当监听焦点变更事件,而非监听点击事件。
- 调用编辑框对象的setOnFocusChangeListener方法,即可在光标切换之时(获得光标和 失去光标)触发焦点变更事件
监听输入手机号码
- 必须要满11 位,不够就不通过校验,一遍弹出提示文件,一边把焦点拉回手机框
<?xml version="1.0" encoding="utf-8"?>
<LinearLayout xmlns:android="http://schemas.android.com/apk/res/android"
    android:layout_width="match_parent"
    android:layout_height="match_parent"
    android:orientation="vertical"
    android:padding="5dp">

    <EditText
        android:id="@+id/phone_num"
        android:layout_width="match_parent"
        android:layout_height="wrap_content"
        android:layout_margin="5dp"
        android:background="@drawable/edittext_slelect"
        android:hint="请输入手机号码"
        android:inputType="number"
        android:maxLength="11" />


    <EditText
        android:id="@+id/input_password"
        android:layout_width="match_parent"
        android:layout_height="wrap_content"
        android:layout_margin="5dp"
        android:background="@drawable/edittext_slelect"
        android:hint="请输入6位密码"
        android:inputType="numberPassword"
        android:textColor="@color/green"
        android:maxLength="6"/>


    <Button
        android:id="@+id/btn_login"
        android:layout_width="match_parent"
        android:layout_height="wrap_content"
        android:text="登录" />


</LinearLayout>
public class EditFocusActivity extends AppCompatActivity implements View.OnFocusChangeListener {

    private TextView input_phone;

    @Override
    protected void onCreate(Bundle savedInstanceState) {
        super.onCreate(savedInstanceState);
        setContentView(R.layout.activity_edit_focus);
        input_phone = findViewById(R.id.phone_num);
        EditText password = findViewById(R.id.input_password);

        password.setOnFocusChangeListener(this);
    }

    @Override
    public void onFocusChange(View v, boolean hasFocus) {
        if (hasFocus) {
            String phone = input_phone.getText().toString();
            //提示手机号码不足11位
            if (TextUtils.isEmpty(phone) || phone.length() < 11){
                input_phone.requestFocus();
                Toast.makeText(this, "请输入11位手机号码", Toast.LENGTH_SHORT).show();
            }
        }
    }
}
文本变化监听器
文本位数自动关闭键盘
调用编辑框对象的 addTextChangedListener 方法即可注册文本监听器。
文本监听器的接口名称为 TextWatcher,该接口提供了3个监控方法,如下。
- beforeTextChanged:在文本改变之前触发。
- onTextChanged:在文本改变过程中触发。
- afterTextChanged:在文本改变之后触发
public class EditHideActivity extends AppCompatActivity {


    @Override
    protected void onCreate(Bundle savedInstanceState) {
        super.onCreate(savedInstanceState);
        setContentView(R.layout.activity_edit_hind);

        EditText input_phone1 = findViewById(R.id.phone_num1);
        EditText password1 = findViewById(R.id.input_password1);

        input_phone1.addTextChangedListener(new HideTextWather(input_phone1, 11));
        password1.addTextChangedListener(new HideTextWather(password1, 6));
    }

    //编辑框监听器,输入文本达到要求自动隐藏输入法
    private class HideTextWather implements TextWatcher {
        //编辑框对象
        private EditText mView;

        //最大长度变量
        private int mMaxLenght;

        public HideTextWather(EditText mView, int mMaxLenght) {
            this.mView = mView;
            this.mMaxLenght = mMaxLenght;
        }

        @Override
        public void beforeTextChanged(CharSequence s, int start, int count, int after) {

        }

        @Override
        public void onTextChanged(CharSequence s, int start, int before, int count) {

        }

        //编辑框输入文本变化之后触发
        @Override
        public void afterTextChanged(Editable s) {
            //获得输入的文本字符串
            String str =s.toString();

            //输入文本达到11 位或者 6 位时关闭输入法
            if (str.length() == mMaxLenght){
                //就隐藏输入法键盘
                ViewUtil.hideOneInputMethod(EditHideActivity.this,mView);
            }

        }
    }
}
工具类:
public class ViewUtil {

    public static void hideOneInputMethod(Activity act, View v) {
        // 从系统服务中获取输入法管理器
        InputMethodManager imm = (InputMethodManager) act.getSystemService(Context.INPUT_METHOD_SERVICE);
        // 关闭屏幕上的输入法软键盘
        imm.hideSoftInputFromWindow(v.getWindowToken(), 0);
    }

}
对话框
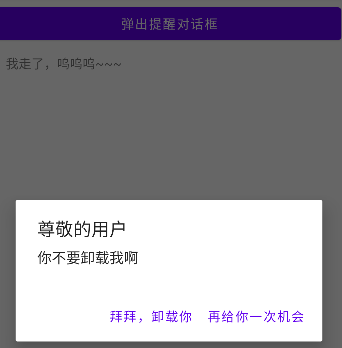
提醒对话框 AlertDialog
AlertDialog 可以完成常见的交互操作:提示、确定等。
- AlertDialog借 助建造器 AlertDialog.Builder 才能完成参数设置
- 调用建造器的 create 方法生成对话框实例,再调用对话框实例的show方法,在页面上弹 出提醒对话框
public class AlertDialogActivity extends AppCompatActivity implements View.OnClickListener {

    private TextView tv_alert;

    @Override
    protected void onCreate(Bundle savedInstanceState) {
        super.onCreate(savedInstanceState);
        setContentView(R.layout.activity_alert_dialog);
        findViewById(R.id.btn_alert).setOnClickListener(this);
        tv_alert = findViewById(R.id.tv_alert);
    }

    @Override
    public void onClick(View v) {

        //创建提醒对话框的建造器
        AlertDialog.Builder builder = new AlertDialog.Builder(this);
        //设置对话框标题
        builder.setTitle("尊敬的用户");

        //设置对话框文本
        builder.setMessage("你不要卸载我啊");

        //设置对话框肯定按钮文本及其监听器
        builder.setNegativeButton("拜拜,卸载你", ((dialog, which) -> {
            tv_alert.setText("我走了,呜呜呜~~~");
        }));
        //设置对话框否定按钮文本及其监听器
        builder.setPositiveButton("再给你一次机会", ((dialog, which) -> {
            tv_alert.setText("我会变好的~~~");
        }));

        // 根据构建起对话框提醒对话框对象
        AlertDialog alertDialog = builder.create();
        //显示提醒对话框
        alertDialog.show();

    }
}
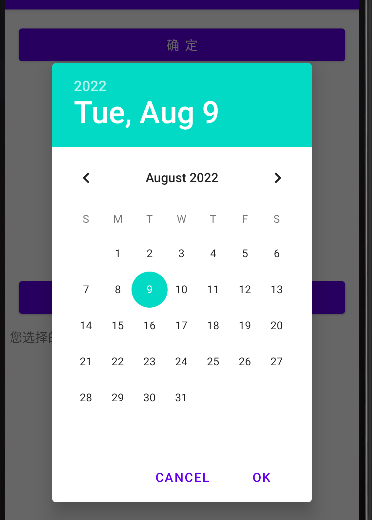
日期对话框 DatePickerDialog
- 日期选择器 DatePicker 可以让用户选择具体的年月日。
- DatePicker 并非弹窗模式,而是在当前页面占据一块区域,并且不会自动关闭。
- DatePickerDialog 相当于在 AlertDialog 上装载了 DatePicker,日期选择事件则由监听器OnDateSetListener负责响应,在该监听器的onDateSet方法中,开发者获取用户选择 的具体日期,再做后续处理
public class DatePickerActivity extends AppCompatActivity implements View.OnClickListener, DatePickerDialog.OnDateSetListener {

    private DatePicker date;
    private TextView tv_date_text;

    @Override
    protected void onCreate(Bundle savedInstanceState) {
        super.onCreate(savedInstanceState);
        setContentView(R.layout.activity_date_picker);
        findViewById(R.id.tv_btn_date).setOnClickListener(this);
        findViewById(R.id.tv_btn_date_alert).setOnClickListener(this);
        tv_date_text = findViewById(R.id.tv_date_text);
        date = findViewById(R.id.date_picker1);
    }

    @Override
    public void onClick(View v) {
        switch (v.getId()) {
            case R.id.tv_btn_date:
                String desc = String.format("您选择的日期是 %d 年 %d 月 %d 日", date.getYear(), date.getMonth() + 1, date.getDayOfMonth());
                tv_date_text.setText(desc);
                break;

            case R.id.tv_btn_date_alert:
                //获取日历的当前时间
                Calendar ca = Calendar.getInstance();

                DatePickerDialog dialog = new DatePickerDialog(this, this,
                        ca.get(Calendar.YEAR), ca.get(Calendar.MONTH), ca.get(Calendar.DAY_OF_MONTH));

                //显示日期对话框
                dialog.show();
                break;
        }
    }

    @Override
    public void onDateSet(DatePicker view, int year, int month, int dayOfMonth) {
        String desc = String.format("您选择的日期是 %d 年 %d 月 %d 日", year, month + 1, dayOfMonth);
        tv_date_text.setText(desc);
    }
}
时间对话框 TimePickerDialog
- 时间选择器 TimePicker 可以让用户选择具体的小时和分钟
- TimePickerDialog 的用法类似 DatePickerDialog
public class TimePickerActivity extends AppCompatActivity implements View.OnClickListener, DatePickerDialog.OnDateSetListener, TimePickerDialog.OnTimeSetListener {
    private TimePicker time;
    private TextView tv_time_text;

    @Override
    protected void onCreate(Bundle savedInstanceState) {
        super.onCreate(savedInstanceState);
        setContentView(R.layout.activity_time_picker);
        findViewById(R.id.tv_btn_time).setOnClickListener(this);
        findViewById(R.id.tv_btn_time_alert).setOnClickListener(this);
        tv_time_text = findViewById(R.id.tv_time_text);
        time = findViewById(R.id.time_picker1);
        //设置24 小时
        time.setIs24HourView(true);
    }

    @Override
    public void onClick(View v) {
        switch (v.getId()) {
            case R.id.tv_btn_time:
                String desc = String.format("您选择的时间是 %d 时 %d 分 ", time.getHour(), time.getMinute());
                tv_time_text.setText(desc);
                break;

            case R.id.tv_btn_time_alert:
                //获取日历的当前时间
                Calendar ca = Calendar.getInstance();
                TimePickerDialog dialog = new TimePickerDialog(this, android.R.style.Theme_Holo_Light_DarkActionBar,this,
                        ca.get(Calendar.HOUR_OF_DAY), ca.get(Calendar.MINUTE), true);
                //显示日期对话框
                dialog.show();
                break;
        }
    }

    @Override
    public void onTimeSet(TimePicker view, int hourOfDay, int minute) {
        String desc = String.format("您选择的时间是 %d 时 %d 分 ", hourOfDay, minute);
        tv_time_text.setText(desc);

    }

    @Override
    public void onDateSet(DatePicker view, int year, int month, int dayOfMonth) {

    }
}
实战项目:找回密码
-
登录方式
- 用户名与密码组合登录
- 手机号与验证码组合登录
-
区别
-
密码输入框和验证码输入框的左侧标题以及输入框内部的提示语各不相同
-
如果是密码登录,则需要支持找回密码;如果是验证码登录,则需要支持向用户手机发送 验证码;
-
密码登录可以提供记住密码功能,而验证码的数值每次都不一样,无需也没法记住验证码
-
-
找回密码
- 如果用户忘记密码,则需跳到单独的找回密码页面,在该页面输入和确认新密码,并校验 找回密码的合法性(通过短信验证码检查)
界面设计
- 单选按钮 RadioButton:用来区分是密码登录还是验证码登录。
- 文本视图 TextView:输入框左侧要显示此处应该输入什么信息。
- 编辑框 EditText:用来输入手机号码、密码和验证码。
- 复选框 CheckBox:用于判断是否记住密码。
- 按钮 Button:包含“登录” 、 “忘记密码”和“获取验证码”三个按钮。
- 线性布局 LinearLayout:界面从上往下排列,用到了垂直方向的线性布局。
- 相对布局 RelativeLayout:忘记密码的按钮与密码输入框是叠加的,且“忘记密码”与上级视图右对齐。
- 单选组 RadioGroup:放置密码登录和验证码登录这两个单选按钮。
- 提醒对话框 AlertDialog:通过提醒对话框向用户反馈结果
整个登录模块由登录页面和找回密码页面组成,因此这两个页面之间需要进行数据交互。
- 从登录页面跳到找回密码页面,要携带唯一标识的手机号码作为请求参数;
- 从找回密码页面回到登录页面,要将修改之后的新密码作为应答参数传回去
数据存储
共享参数SharedPreferences
- Android的轻量级存储工具,采用 Key-Value 的键值对方式的存储结构
- 共享参数的存储介质是符合XML规范的配置文件,保存位置:/data/data/应用包名/s hared_prefs/文件名.xml
使用场景
- 简单且孤立的数据。若是复杂且相互间有关的数据,则要保存在数据库中
- 文本形式的数据。若是二进制数据,则要保存在文件中
- 需要持久化存储的数据。在App退出后再次启动时,之前保存的数据仍然有效
实际开发中,共享参数经常存储的数据有App的个性化配置信息、用户使用App的行为信息、临时需要保存的片段信息等
实现记住密码
- 声明一个共享参数对象,并在onCreate函数中调用 getSharedPreferences 方法获取共享参数的实例
- 登录成功时,如果用户勾选了“记住密码” ,就使用共享参数保存手机号码与密码。
- 再次打开登录页面时,App从共享参数中读取手机号码与密码,并展示在界面上
package com.example.datastorage;

import androidx.appcompat.app.AppCompatActivity;

import android.content.Context;
import android.content.SharedPreferences;
import android.os.Bundle;
import android.view.View;
import android.view.contentcapture.ContentCaptureSession;
import android.widget.CheckBox;
import android.widget.EditText;

public class ShareWriteActivity extends AppCompatActivity implements View.OnClickListener {
    private EditText et_name;
    private EditText et_age;
    private EditText et_height;
    private EditText et_weight;
    private CheckBox ck_married;
    private SharedPreferences preferences;

    @Override
    protected void onCreate(Bundle savedInstanceState) {
        super.onCreate(savedInstanceState);
        setContentView(R.layout.activity_share_write);
        et_name = findViewById(R.id.et_name);
        et_age = findViewById(R.id.et_age);
        et_height = findViewById(R.id.et_height);
        et_weight = findViewById(R.id.et_weight);
        ck_married = findViewById(R.id.ck_married);

        findViewById(R.id.btn_save).setOnClickListener(this);

        preferences = getSharedPreferences("config", Context.MODE_PRIVATE);
        reload();
    }

    private void reload() {
        String name = preferences.getString("name", null);
        if (name != null) {
            et_name.setText(name);
        }

        int age = preferences.getInt("age", 0);
        if (age != 0) {
            et_age.setText(String.valueOf(age));
        }

        float height = preferences.getFloat("height", 0f);
        if (height != 0f) {
            et_height.setText(String.valueOf(height));
        }

        float weight = preferences.getFloat("weight", 0f);
        if (weight != 0f) {
            et_weight.setText(String.valueOf(weight));
        }

        boolean married = preferences.getBoolean("married", false);
        ck_married.setChecked(married);
    }

    @Override
    public void onClick(View v) {
        String name = et_name.getText().toString();
        String age = et_age.getText().toString();
        String height = et_height.getText().toString();
        String weight = et_weight.getText().toString();

        //编辑器
        SharedPreferences.Editor editor = preferences.edit();
        editor.putString("name", name);
        editor.putInt("age", Integer.parseInt(age));
        editor.putFloat("height", Float.parseFloat(height));
        editor.putFloat("weight", Float.parseFloat(weight));
        editor.putBoolean("married", ck_married.isChecked());
        editor.commit();
    }
}
<LinearLayout xmlns:android="http://schemas.android.com/apk/res/android"
    android:layout_width="match_parent"
    android:layout_height="match_parent"
    android:orientation="vertical"
    android:padding="5dp">

    <LinearLayout
        android:layout_width="match_parent"
        android:layout_height="40dp"
        android:orientation="horizontal">

        <TextView
            android:id="@+id/tv_name"
            android:layout_width="wrap_content"
            android:layout_height="match_parent"
            android:gravity="center"
            android:text="姓名:"
            android:textColor="@color/black"
            android:textSize="17sp" />

        <EditText
            android:id="@+id/et_name"
            android:layout_width="0dp"
            android:layout_height="match_parent"
            android:layout_marginTop="3dp"
            android:layout_marginBottom="3dp"
            android:layout_weight="1"
            android:background="@drawable/edittext_select"
            android:hint="请输入姓名"
            android:inputType="text"
            android:maxLength="12"
            android:textColor="@color/black"
            android:textSize="17sp" />
    </LinearLayout>

    <LinearLayout
        android:layout_width="match_parent"
        android:layout_height="40dp"
        android:orientation="horizontal">

        <TextView
            android:id="@+id/tv_age"
            android:layout_width="wrap_content"
            android:layout_height="match_parent"
            android:gravity="center"
            android:text="年龄:"
            android:textColor="@color/black"
            android:textSize="17sp" />

        <EditText
            android:id="@+id/et_age"
            android:layout_width="0dp"
            android:layout_height="match_parent"
            android:layout_marginTop="3dp"
            android:layout_marginBottom="3dp"
            android:layout_weight="1"
            android:background="@drawable/edittext_select"
            android:hint="请输入年龄"
            android:inputType="number"
            android:maxLength="2"
            android:textColor="@color/black"
            android:textSize="17sp" />
    </LinearLayout>

    <LinearLayout
        android:layout_width="match_parent"
        android:layout_height="40dp"
        android:orientation="horizontal">

        <TextView
            android:id="@+id/tv_height"
            android:layout_width="wrap_content"
            android:layout_height="match_parent"
            android:gravity="center"
            android:text="身高:"
            android:textColor="@color/black"
            android:textSize="17sp" />

        <EditText
            android:id="@+id/et_height"
            android:layout_width="0dp"
            android:layout_height="match_parent"
            android:layout_marginTop="3dp"
            android:layout_marginBottom="3dp"
            android:layout_weight="1"
            android:background="@drawable/edittext_select"
            android:hint="请输入身高"
            android:inputType="number"
            android:maxLength="3"
            android:textColor="@color/black"
            android:textSize="17sp" />
    </LinearLayout>

    <LinearLayout
        android:layout_width="match_parent"
        android:layout_height="40dp"
        android:orientation="horizontal">

        <TextView
            android:id="@+id/tv_weight"
            android:layout_width="wrap_content"
            android:layout_height="match_parent"
            android:gravity="center"
            android:text="体重:"
            android:textColor="@color/black"
            android:textSize="17sp" />

        <EditText
            android:id="@+id/et_weight"
            android:layout_width="0dp"
            android:layout_height="match_parent"
            android:layout_marginTop="3dp"
            android:layout_marginBottom="3dp"
            android:layout_weight="1"
            android:background="@drawable/edittext_select"
            android:hint="请输入体重"
            android:inputType="numberDecimal"
            android:maxLength="5"
            android:textColor="@color/black"
            android:textSize="17sp" />
    </LinearLayout>

    <CheckBox
        android:id="@+id/ck_married"
        android:layout_width="wrap_content"
        android:layout_height="wrap_content"
        android:checked="false"
        android:gravity="center"
        android:text="已婚"
        android:textColor="@color/black"
        android:textSize="17sp" />

    <Button
        android:id="@+id/btn_save"
        android:layout_width="match_parent"
        android:layout_height="wrap_content"
        android:text="保存到共享参数"
        android:textColor="@color/black"
        android:textSize="17sp" />

</LinearLayout>
edittext_select
<?xml version="1.0" encoding="utf-8"?>
<selector xmlns:android="http://schemas.android.com/apk/res/android">
    <item android:state_focused="true" android:drawable="@drawable/shape_edit_focus"/>
    <item android:state_focused="false" android:drawable="@drawable/shape_edit_nofocus"/>
</selector>
数据库SQLite
与MySQL一样的操作
SQLiteDatabase
管理类,用于数据库层面的操作。
- openDatabase:打开指定路径的数据库。
- isOpen:判断数据库是否已打开。
- close:关闭数据库。
- getVersion:获取数据库的版本号。
- setVersion:设置数据库的版本号。
事务类,用于事务层面的操作。
- beginTransaction:开始事务。
- setTransactionSuccessful:设置事务的成功标志。
- endTransaction:结束事务。
数据处理类,用于数据表层面的操作。
- execSQL:执行拼接好的SQL控制语句。
- delete:删除符合条件的记录。
- update:更新符合条件的记录。
- insert:插入一条记录。
- query:执行查询操作,返回结果集的游标。
- rawQuery:执行拼接好的SQL查询语句,返回结果集的游标
SQLiteOpenHelper
新建一个继承自 SQLiteOpenHelper 的数据库操作类,提示重写 onCreate 和 onUpgrade 两个方 法。
- 封装保证数据库安全的必要方法。
- 提供对表记录进行增加、删除、修改、查询的操作方法
游标Curious
调用SQLiteDatabase的query和rawQuery方法时,返回的都是Cursor对象,因此获取 查询结果要根据游标的指示一条一条遍历结果集合
游标控制类方法,用于指定游标的状态。
- close:关闭游标。
- isClosed:判断游标是否关闭。
- isFirst:判断游标是否在开头。
- isLast:判断游标是否在末尾
游标移动类方法,把游标移动到指定位置。
- moveToFirst:移动游标到开头。
- moveToLast:移动游标到末尾。
- moveToNext:移动游标到下一条记录。
- moveToPrevious:移动游标到上一条记录。
- move:往后移动游标若干条记录。
- moveToPosition:移动游标到指定位置的记录。
获取记录类方法,可获取记录的数量、类型以及取值。
- getCount:获取结果记录的数量。
- getInt:获取指定字段的整型值。
- getLong:获取指定字段的长整型值。
- getFloat:获取指定字段的浮点数值。
- getString:获取指定字段的字符串值。
- getType:获取指定字段的字段类型
优化记住密码功能
- 利用共享参数实现记住密码,只能记住一个用户的登录信息,并且手机号码跟密码不存在 从属关系,如果换个手机号码登录,前一个用户的登录信息就被覆盖了。
- 真正的记住密码功能是先输入手机号码,然后根据手机号匹配保存的密码,一个密码对应 一个手机号码,从而实现具体手机号码的密码记忆功能。
- 运用SQLite技术分条存储不同用户的登录信息,并提供根据手机号码查找登录信息的方 法,这样可以同时记住多个手机号码的密码
SQLite记住密码:
- 声明一个用户数据库的帮助器对象,然后在活动页面的onResume方法中打开数据库连接,在on Pasue方法中关闭数据库连接。
- 登录成功时,如果用户勾选了“记住密码” ,就使用数据库保存手机号码与密码在内的登录信息。
- 再次打开登录页面,用户输入手机号完毕后点击密码输入框时,App到数据库中根据手机号查找 登录记录,并将记录结果中的密码填入密码框。
存储卡的文件操作
私有存储空间与公有存储空间
外部存储空间:
- 公共空间
- 私有空间

存储卡上读写图片文件
-
Android 的位图工具是Bitmap,App读写Bitmap可以使用性能更好的BufferedOutputS tream和BufferedInputStream
-
Android还提供了BitmapFactory工具用于读取各种来源的图片,相关方法如下:
decodeResource:该方法可从资源文件中读取图片信息。
decodeFile:该方法可将指定路径的图片读取到Bitmap对象。
decodeStream:该方法从输入流中读取位图数据
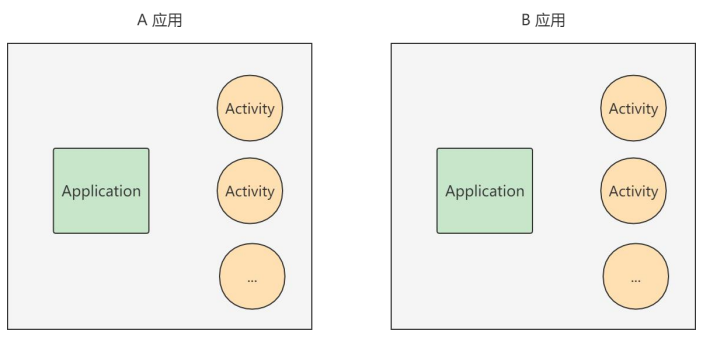
应用组件Application
Application生命周期
- 有且只有一个Aplication对象
Application操作全局变量
适合在Application中保存的全局变量主要有下面3类数据:
- 会频繁读取的信息,如用户名、手机号等。
- 不方便由意图传递的数据,例如位图对象、非字符串类型的集合对象等。
- 容易因频繁分配内存而导致内存泄漏的对象,如Handler对象等
实现
用自定义Application的静态成员变量实现全局变量的功能
- 写一个继承自Application的类MainApplication。该类要采用单例模式,内部声明自身类的一个 静态成员对象,然后提供该静态对象的获取方法getInstance。
- 在Activity中调用MainApplication的getInstance方法,获得MainApplication的一个静态对象, 通过该对象访问MainApplication的公共变量和公共方法。
- 不要忘了在AndroidManifest.xml中注册新定义的Application类名,即在application节点中增 加android:name属性,值为“.MainApplication”
Room简化数据库操作
使用数据库帮助器编码的时候,开发者每次都得手工实现以下代码逻辑:
- 重写数据库帮助器的onCreate方法,添加该表的建表语句;
- 在插入记录之时,必须将数据实例的属性值逐一赋给该表的各字段;
- 在查询记录之时,必须遍历结果集游标,把各字段值逐一赋给数据实例;
- 每次读写操作之前,都要先开启数据库连接;读写操作之后,又要关闭数据库连接
Room框架的导入
在使用Room之前,要先修改模块的 build.gradle 文件,往 dependencies 节点添加下面两行配置,表示导入指定版本的Room库:
- implementation ‘androidx.room:room-runtime:2.3.0’
- annotationProcessor ‘androidx.room:room-compiler:2.’
Room框架编码步骤
以录入书籍信息为例,使用Room框架的编码过程分为下列五步:
- 编写书籍信息表对应的实体类,该类添加“@Entity”注解。
- 编写书籍信息表对应的持久化类,该类添加“@Dao”注解。
- 编写书籍信息表对应的数据库类,该类从RoomDatabase派生而来,并添加“@Database”注 解。
- 在自定义的Application类中声明书籍数据库的唯一实例。
- 在操作书籍信息表的地方获取数据表的持久化对象
实战项目:购物车
功能需求
- 购物车存放着用户准备购买的商品,一开始是空的,随着商品被加入购物车,购物车中就会显示已添加的商品列表。
- 除了购物车页面,其它页面(如商场频道页面、商品详情页面),都可能在右上角或者右 下角找到购物车图标。购物车图标上会显示已添加的商品数量,且商品数量是实时更新的。
- 购物车页面、商场频道页面、商品详情页面多处都会显示商品的小图或者大图
界面设计
- 线性布局LinearLayout:购物车界面从上往下排列,垂直方向的线性布局
- 网格布局GridLayout:商场页面的陈列橱柜,允许分行分列展示商品
- 相对布局RelativeLayout:页面右上角的购物车图标,图标右上角又有数字标记,按照指定方位排列控件
- 其他常见控件尚有文本视图TextView、图像视图ImageView,按钮控件Button等
存储技术
- 数据库SQLite:最直观的是数据库,购物车里的商品列表一定放在SQLite中,增删改查
- 全局内存:购物车图标右上角的数字表示购物车中的商品数量,该数值建议保存在全局内存中,这样不必每次都到数据库中执行count操作。
- 存储卡文件:App把下载的商品图片保存在存储卡中,这样下次就能直接从存储卡获取商品图片,加快浏览速度。
- 共享参数SharedPreferences:是否首次访问网络图片,这个标志位推荐放在共享参数中, 需要持久化存储,并且只有一个参数信息
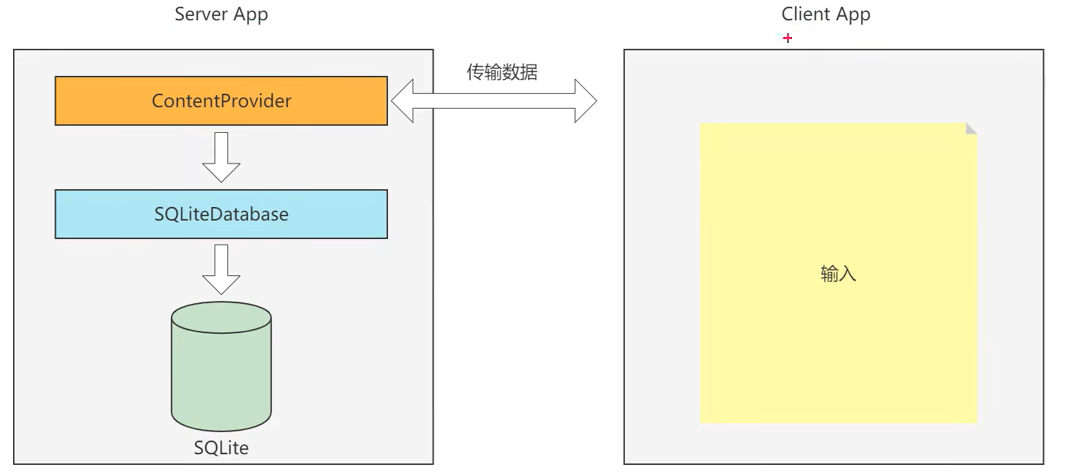
内容共享
应用之间共享数据
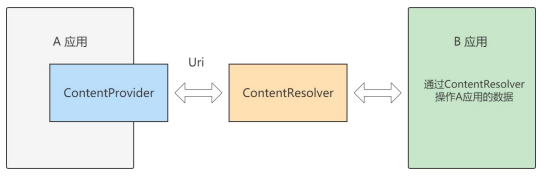
ContentProvider
ContentProvider 为App内部数据提供统一的外部接口,让不同的应用之间得以共享数据

案例
Client App 讲用户输入内容,通过ContenetProvider跨进程通信传递给Server App
共享参数使用场景
ContentProvider只是服务端App存取数据的抽象类,需要在其基础上实现一个完整的内容提供器,并重写下列方法。
- onCreate:创建数据库并获得数据库连接。
- insert:插入数据。
- delete:删除数据。
- update:更新数据。
- query:查询数据,并返回结果集的游标。
- getType:获取内容提供器支持的数据类型
Uri
Uri(通用资源标识符 Universal Resource Identifer),代表数据操作的地址,每一个Cont entProvider 都会有唯一的地址。ContentProvider 使用的Uri 语法结构如下:
content://authority/data_path/id
- 「content://」 是通用前缀,表示该Uri用于ContentProvider定位资源。
- 「authority」 是授权者名称,用来确定具体由哪一个ContentProvider提供资源。因此一般authority都由 类的小写全称组成,以保证唯一性。
- 「data_path」 是数据路径,用来确定请求的是哪个数据集。
- 「id」 是数据编号,用来请求单条数据。如果是多条这个字段忽略
ContentResovler访问数据
ContentProvider只实现服务端App的数据封装,如果客户端App想访问对方的内部 数据,就要通过内容解析器ContentResolver访问
内容组件获取通讯信息
动态申请权限
防止某些App滥用权限,允许App在运行时动态检查是否拥有某些权限,没有则会弹出权限访问窗口获取权限
步骤
- 检查App是否开启了指定权限
- 调用ContextCompat的checkSelfPermission方法。
- 请求系统弹窗,以便用户选择是否开启权限
- 调用ActivityCompat的requestPermissions方法,即可命令系统自动弹出权限申请窗口。
- 判断用户的权限选择结果
- 重写活动页面的权限请求回调方法onRequestPermissionsResult,在该方法内部处理用户的权限选择结果。
ContentResoler读写联系人
- 因为一个联系人可能有多个电话号码,还可能有多个邮箱,所以系统通讯录将其设计为三 张表,分别是联系人基本信息表、联系号码表、联系邮箱表,于是每添加一位联系人,就 要调用至少三次insert方法。
- 联系人读取代码也分成三个步骤,先查出联系人的基本信息,再依次查询联系人号 码和联系人邮箱
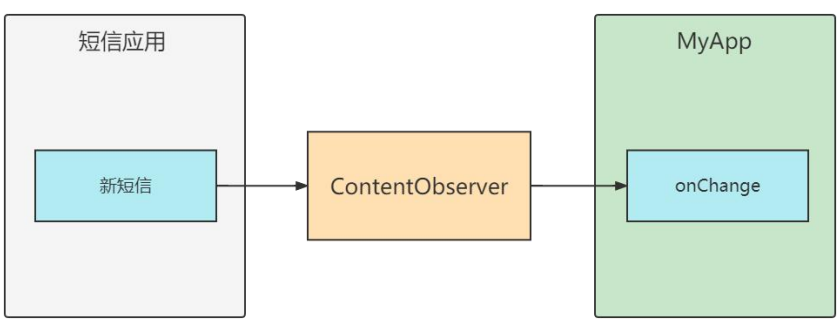
ContentObserver监听信息
内容观察器ContentObserver给目标内容注册一个观察器,目标内容的数据一旦发生变 化,观察器规定好的动作马上触发,从而执行开发者预先定义的代码
应用之间共享文件
使用相册图片发送彩信
FileProvider发送彩信
继承与ContentProvider,对第三方应用暴露文件,授予文件读写权限
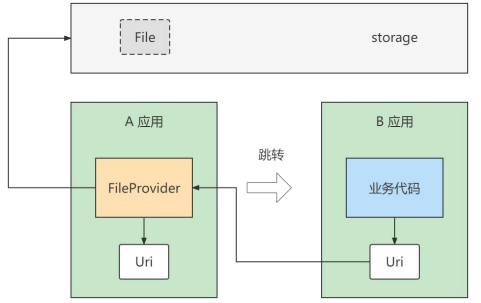
FileProvider的配置步骤
- 在res/xml下创建file_paths.xml。
- 给AndroidManifest.xml的application节点添加provider标签。
- 在Java代码中根据字符串路径构建Uri对象
高级控件
下拉列表
下拉框Spinner
- Spinner 用于从一串列表中选择某项,功能类似于单选按钮的组合
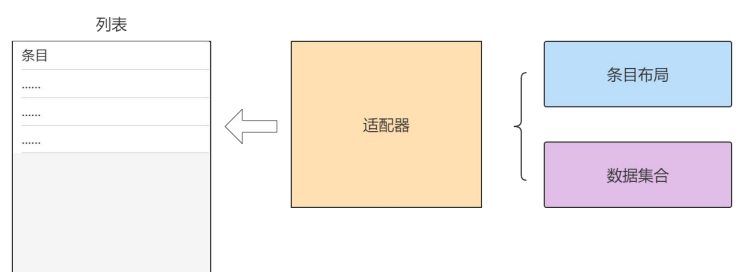
Adapter 适配器
继承结构
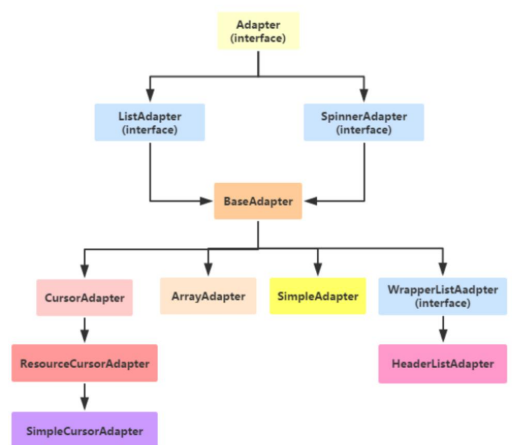
- 适配器负责从数据集合中取出对应的数据显示到条目布局上
数组适配器ArrayAdapter
最简单的适配器,只展示一行文字
数组适配器分成下列步骤
- 编写列表项的XML文件,内部布局只有一个TextView标签
- 调用ArrayAdapter的构造方法,填入待展现的字符串数组,以及列表项的XML文件(R.layout.item_select)
- 调用下拉框控件的setAdapter方法,传入第二步得到的适配器实例
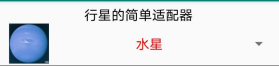
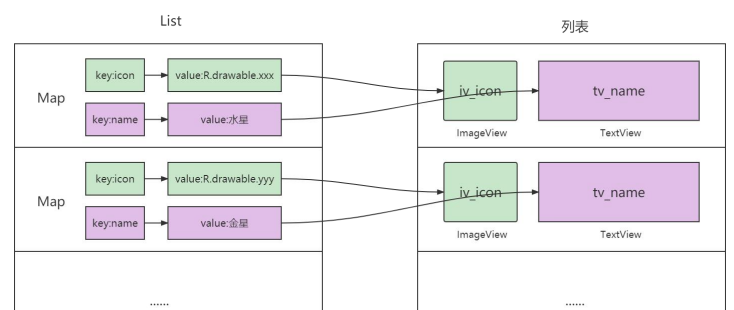
简单适配器SimpleAdaper
- SimpleAdapter 允许在列表项中同时展示文本与图片
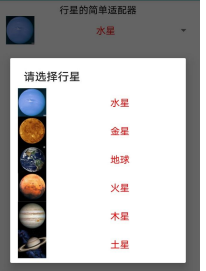
集合当中的数据与条目布局的对应关系
列表类视图
基本适配器BaseAdapter
- BaseAdapter 是一种适应性更强的基本适配器
条目与数据集合对应关系

复用convertView
当列表的Item从上方滚出屏幕视角之外时

列表视图ListView
- ListView 允许在页面上分行展示数据列表,例如新闻列表、商品列表等,方便用户浏览 与操作
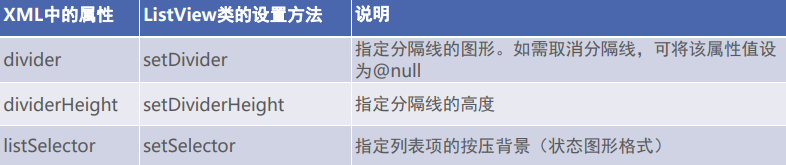
ListView 新增属性
- 修改分隔线样式要在XML文件中同时设置 divider 与 dividerHeight 两个属性
- 取消按压列表项之时默认的水波背景,可在XML文件中设置也可在Java代码中设置
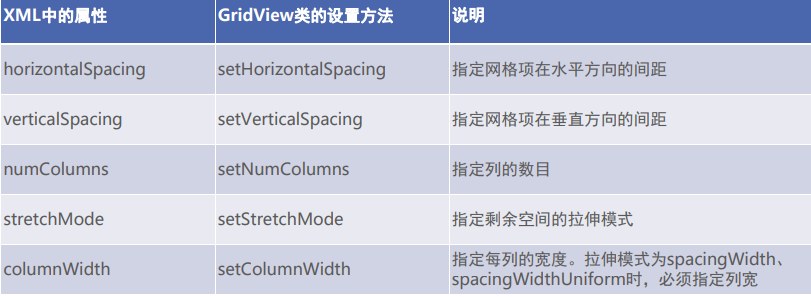
网格视图 GridView
- 网格视图用于分行分列显示表格信息
新增属性方法
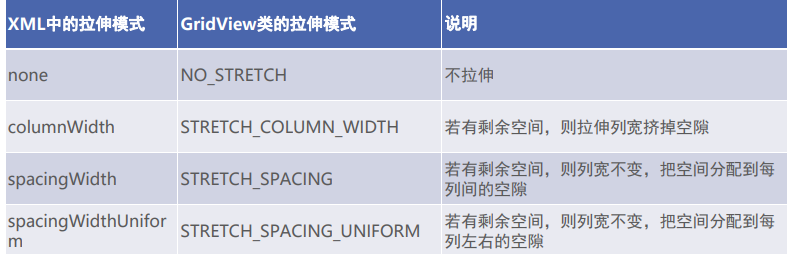
GridView拉伸效果
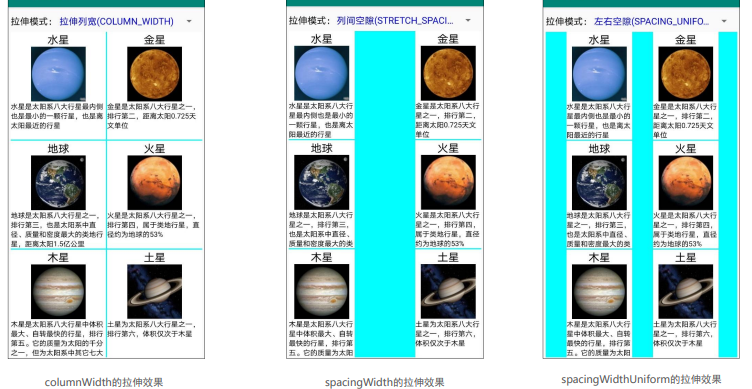
GridView 拉伸模式取值
翻页类视图
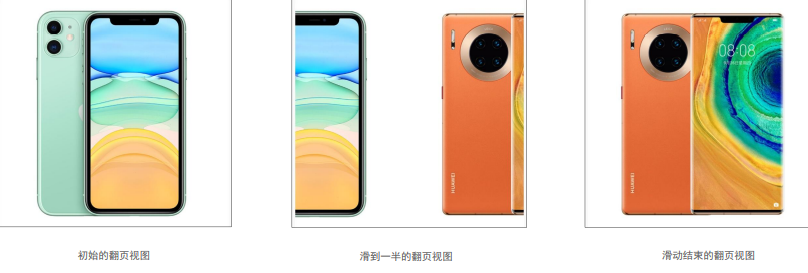
翻译视图 ViewPaper
- 翻页视图允许页面在水平方向左右滑动
翻页视图3个常用方法
-
setAdapter:设置页面项的适配器。适配器用的是PagerAdapter及其子类。
-
setCurrentItem:设置当前页码,也就是要显示哪个页面。
-
addOnPageChangeListener:添加翻页视图的页面变更监听器。该监听器需实现接
OnPageChangeListener下的3个方法,
-
onPageScrollStateChanged:在页面滑动状态变化时触发。
-
onPageScrolled:在页面滑动过程中触发。
-
onPageSelected:在选中页面时,即滑动结束后触发。
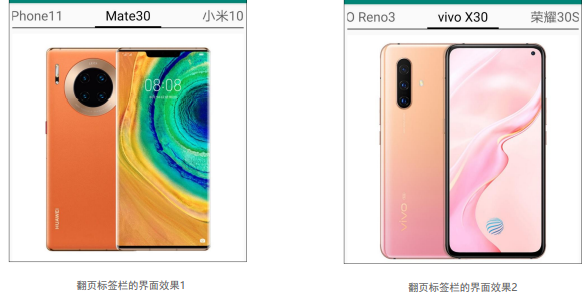
翻页标签栏 PaperTabStrip
- 翻页标签栏能够在翻页视图上方显示页面标题,点击页面标题即可切换到对应页面
简单的启动引导页
- 当用户安装一个新应用时,首次启动大多出现欢迎页面,这个引导页要往右翻好几页,才会进入应用主页,这种启动引导页就是通过翻页视图实现的
- 引导页由两部分组成,一部分是背景图;另一部分是页面下 方的一排圆点,其中高亮的圆点表示当前位于第几页
- 除了背景图与一排圆点之外,最后一页往往有个按钮,它便是进入应用主页的入口
适配器
启动引导页的适配器
- 根据页面项的XML文件构造每页的视图。
- 让当前页码的圆点高亮显示。
- 如果翻到了最后一页,就显示中间的入口按钮
页面xml布局
- 引导页的背景图(采用ImageView)
- 底部的一排圆点(采用RadioGroup)
- 最后一页的入口按钮(采用Button)
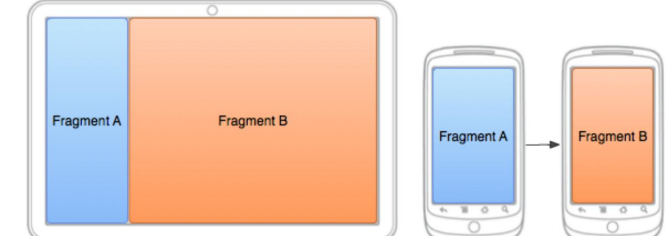
碎片Fragment
- 传统的Activity并不能很好的处理大屏问题,所以急需一个碎片化的东西能够划区域的展 示内容,且有属于自己的独立可操作空间,所以就出现了Fragment
碎片的静态注册
- 静态注册在布局文件中直接指定Fragment,而动态注册直到在代码中才动态添加Fragment
碎片的动态注册(改进启动引导页)
- 与之前的启动引导页比较,改进后的启动引导页采用Fragment搭配ViewPager
- 一旦发生页面切换,相邻页面就被加载,非相邻页面就被回收。只有用户正在浏览与将要 浏览的Fragment才会加载,避免所有页面项一起加载造成资源浪费
- 引入碎片之后有以下两个好处
- 加快启动速度
- 低耦合
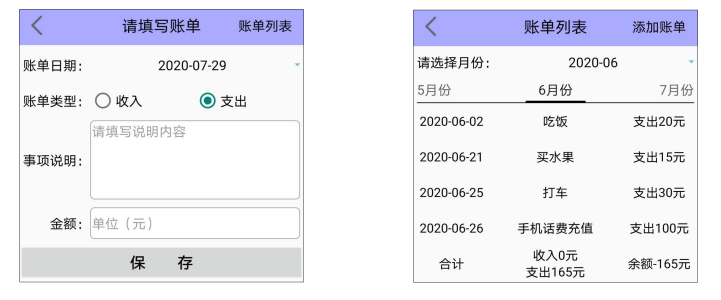
实战项目:记账本
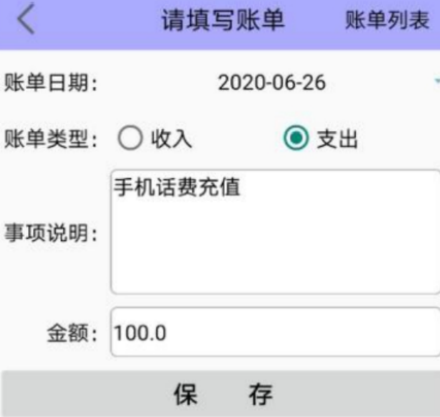
好用的记账本必须具备两项基本功能,一项是记录新账单,另一项是查看账单列表。其中账单的记录操 作要求用户输入账单的明细要素,包括账单的发生时间、账单的收支类型(收入还是支出)、账单的交 易金额、账单的事由描述等,据此勾勒简易的账单添加界面如图8-30所示。账单列表页通常分月展示, 每页显示单个月份的账单数据,还要支持在不同月份之间切换。每月的账单数据按照时间从上往下排 列,每行的账单明细则需依次展示账单日期、事由描述、交易金额等信息,然后列表末尾展示当月的账 单合计情况(总共收入多少、总共支出多少)。根据这些要求描绘的账单列表界面原型如图8-31所示。 账单的填写功能对应数据库记录的添加操作,账单的展示功能对应数据库记录的查询操作,数据库记录 还有修改和删除操作,分别对应账单的编辑功能和删除功能。账单的编辑页面原型如图8-32所示,至于 删除操作则由如图8-33所示的提示窗控制,点击“是”按钮表示确定删除,点击“否”按钮表示取消删除。
账单填写页面、账单列表页面
账单编辑页面
伤处账单提示窗
界面设计
- 翻页视图ViewPager:每页一个月份,一年12个月,支持左右滑动,用到了ViewPager。
- 翻页标签栏PagerTabStrip:每个账单页上方的月份标题来自PagerTabStrip。
- 碎片适配器FragmentPagerAdapter:把12个月份的Fragment组装到ViewPager中,用到了碎片 适配器。
- 碎片Fragment:12个月份对应12个账单页,每页都是一个碎片Fragment。
- 列表视图ListView:每月的账单明细从上往下排列,采用了ListView。
- 基本适配器BaseAdapter:每行的账单项依次展示账单日期、事由描述、交易金额等信息,需要列 表视图搭档基本适配器。
- 提醒对话框AlertDialog:删除账单项的提示窗用到了AlertDialog。
- 日期选择对话框DatePickerDialog:填写账单信息时,要通过DatePickerDialog选择账单日期。
账单列表页面的控件嵌套关系
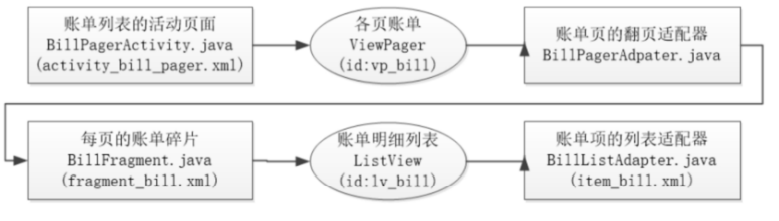
关键代码
-
实现日期下拉框
填写账单时间的时候,输入界面默认展示当天日期,用户若想修改账单时间,就要点击日期文本,此时 界面弹出日期选择对话框,待用户选完具体日期,再回到主界面展示选定日期的文本。这种实现方式类 似于下拉框控件Spinner,可是点击Spinner会弹出文本列表对话框,而非日期选择对话框。尽管 Android未提供现成的日期下拉框,但是结合文本视图与日期选择对话框,也能实现类似Spinner的日期 下拉框效果
-
编辑与删除账单项
需求描述提到既要支持账单的编辑功能,又要支持账单的删除功能,因为账单明细位于列表视图当中, 且列表视图允许同时设置列表项的点击监听器和长按监听器,所以可考虑将列表项的点击监听器映射到 账单的编辑功能,将列表项的长按监听器映射到账单的删除功能,也就是点击账单项时跳到账单的编辑 页面,长按账单项时弹出删除账单的提醒对话框。
-
合并账单的添加与编辑功能
账单编辑页面仍然跳到了BillAddActivity,然而该页面原本用作账单填写,若想让它同时 支持账单编辑功能,则需从意图包裹取出名为xuhao的字段,得到上个页面传来的序号数值,通过判断 该字段是否为-1,再分别对应处理
广播
Android 中的广播: 发送一条广播,可以被不同的广播接收者所接收,广播接收者收到广播之后,再进行逻辑 处理

应用广播
广播与活动的区别
(1)活动只能一对一通信;而广播可以一对多,一人发送广播,多人接收处理。
(2)对于发送方来说,广播不需要考虑接收方有没有在工作,接收方在工作就接收广播,不在工作就丢 弃广播。
(3)对于接收方来说,因为可能会收到各式各样的广播,所以接收方要自行过滤符合条件的广播,之后 再解包处理。
广播的3个方法
- sendBroadcast:发送广播。
- registerReceiver:注册广播的接收器,可在onStart或onResume方法中注册接收器。
- unregisterReceiver:注销广播的接收器,可在onStop或onPause方法中注销接收器。
广播的收发过程
- 发送标准广播
- 定义广播接收器
- 开关广播接收器
收发标准广播
-
先创建意图对象,再调用sendBroadcast方法发送广播
-
广播发出来之后,还得有设备去接收广播,也就是需要广播接收器。接收器主要规定两个事情,一个是 接收什么样的广播,另一个是收到广播以后要做什么。由于接收器的处理逻辑大同小异,因此Android 提供了抽象之后的接收器基类BroadcastReceiver,开发者自定义的接收器都从BroadcastReceiver派生 而来。新定义的接收器需要重写onReceive方法,方法内部先判断当前广播是否符合待接收的广播名 称,校验通过再开展后续的业务逻辑
-
通过意图过滤器挑选动作名称一致的广播
收发有序广播
(1)一个广播存在多个接收器,这些接收器需要排队收听广播,这意味着该广播是条有序广播。
(2)先收到广播的接收器A,既可以让其他接收器继续收听广播,也可以中断广播不让其他接收器收听。
- 优先级,级别越大,数字越大
- 优先级大截断了优先级小的广播
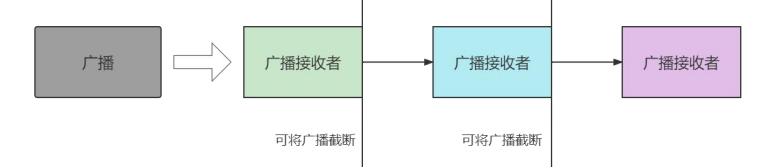
收发静态广播
- 在代码中注册接收器,该方式被称作动态注册
- 在AndroidManifest.xml中注册接收器,该方式被称作静态注册
系统广播
接收分钟到达广播
Intent.ACTION_TIME_TICK
-
定义一个分钟广播的接收器,并重写接收器的onReceive方法,补充收到广播之后的处理逻 辑。
-
重写活动页面的onStart方法,添加广播接收器的注册代码,注意要让接收器过滤分钟到达广播 Intent.ACTION_TIME_TICK
-
重写活动页面的onStop方法,添加广播接收器的注销代码
接收网络变更广播
步骤一,定义一个网络广播的接收器,并重写接收器的onReceive方法,补充收到广播之后的处理逻 辑。
步骤二,重写活动页面的onStart方法,添加广播接收器的注册代码,注意要让接收器过滤网络变更广播 android.net.conn.CONNECTIVITY_CHANGE。
步骤三,重写活动页面的onStop方法,添加广播接收器的注销代码
详细的网络信息
getType:获取网络类型

getTypeName:获取网络类型的名称。
getSubtype:获取网络子类型。当网络类型为数据连接时,子类型为2G/3G/4G的细分类型,如 CDMA、EVDO、HSDPA、LTE等
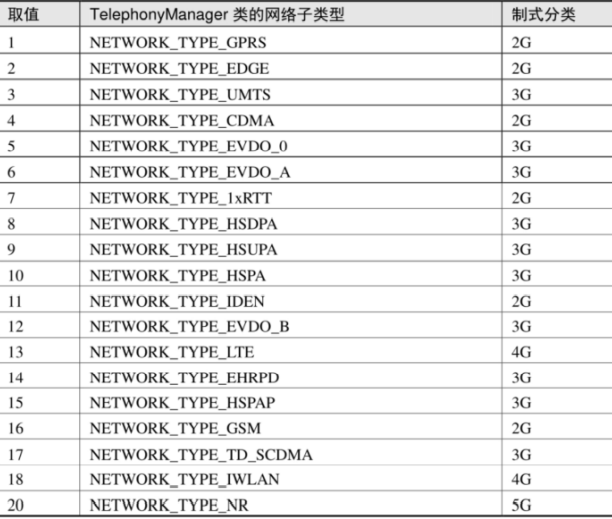
getSubtypeName:获取网络子类型的名称。
getState:获取网络状态
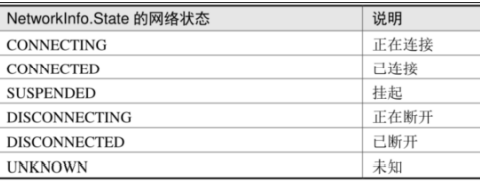
定时管理器
系统闹钟定时发送广播,常见的方法:
- set:设置一次性定时器。
- setAndAllowWhileIdle:设置一次性定时器,即使设备处于空闲状态,也会保证执行定时器。
- setRepeating:设置重复定时器,但系统不保证按时发送广播。
- cancel:取消指定延迟意图的定时器。
延迟意图
定时管理器使用了PendingIntent,它与Intent之间的差异主要有下列三点:
- PendingIntent代表延迟的意图,它指向的组件不会马上激活;而Intent代表实时的意图,它指 向的组件会马上激活。
- PendingIntent是一类消息的组合,不但包含目标的Intent对象,还包含请求代码、请求方式等 信息。
- PendingIntent对象在创建之时便已知晓将要用于活动还是广播
屏幕变更实践
竖屏与横屏切换
手机有竖屏与横屏两种模式,两种屏幕方向不但造成App界面的展示差异,而且竖屏和横 屏切换之际,甚至会打乱App的生命周期
系统配置变更的处理机制
为了避免横竖屏切换时重新加载界面的情况,Android设计了一种配置变更机制,在指定 的环境配置发生变更之时,无需重启活动页面,只需执行特定的变更行为。该机制的实现 过程分为两步:
- 修改AndroidManifest.xml,给activity节点增加 android:configChanges 属性
- 修改活动页面的Java代码,重写活动的 onConfigurationChanged 方法,补充对应的代码处理 逻辑
配置变更的豁免情况
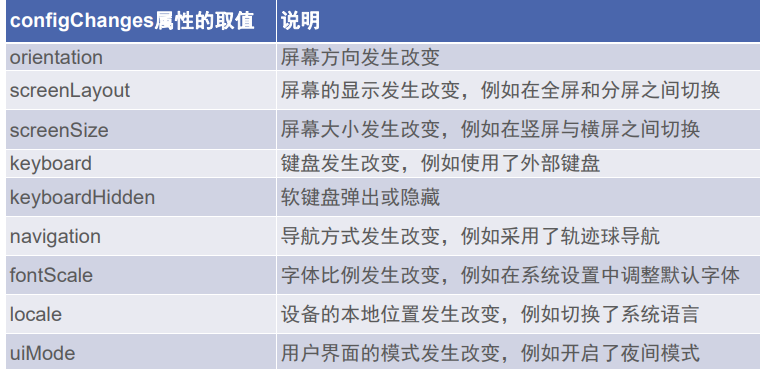
回到桌面与切到任务列表
- 按下主页键会回到桌面,按下任务键会打开任务列表,这两个操作并未提供相应的按键处理方法,而是通过广播发出事件信息。
- 若想知晓是否回到桌面,以及是否打开任务列表,均需收听系统广播Intent.ACTION_CL OSE_SYSTEM_DIALOGS。
- 从收到的广播意图中获取原因reason字段,该字段值为homekey时表示回到桌面,值为r ecentapps时表示打开任务列表
应用的画中画
- 监听回到桌面与打开任务列表的广播;
- 收到广播之后,调用 enterPictureInPictureMode 方法进入画中画模式;
- 重写活动页面的 onPictureInPictureModeChanged 方法,补充进入画中画模式或退出
自定义控件
视图的构建过程
简述
-
自定义View的实现方式有以下几种
类型 定义 自定义组合控件 多个控件组合成为一个新的控件,方便多处复用 继承系统View控件 继承自TextView等系统控件,在系统控件的基础功能上进行扩展 继承View 不复用系统控件逻辑,继承View进行功能定义 继承系统ViewGroup 继承自LinearLayout等系统控件,在系统控件的基础功能上进行扩展 继承ViewViewGroup 不复用系统控件逻辑,继承ViewGroup进行功能定义 -
Android中的任何一个布局、任何一个控件其实都是直接或间接继承自View的,如TextView、Button、ImageView、ListView等
-
每一个视图的绘制过程都必须经历三个最主要的阶段,即初始化、onMeasure()、onLayout()和onDraw()
-
View坐标

-
View获取自身高度
由上图可算出View的高度:
- width = getRight() - getLeft();
- height = getBottom() - getTop();
View的源码当中提供了getWidth()和getHeight()方法用来获取View的宽度和高度,其内部方法和上文所示是相同的,我们可以直接调用来获取View得宽高。
-
View自身的坐标
通过如下方法可以获取View到其父控件的距离。
-
getTop();获取View到其父布局顶边的距离。
-
getLeft();获取View到其父布局左边的距离。
-
getBottom();获取View到其父布局顶边的距离。
-
getRight();获取View到其父布局左边的距离
视图构造方法
无论是我们继承系统View还是直接继承View,都需要对构造函数进行重写,构造函数有多个,至少要重写其中一个才行。
package com.kcs.customview;

import android.content.Context;
import android.util.AttributeSet;
import android.view.View;

import androidx.annotation.Nullable;

public class CustomView extends View {

    /**
     * 构造函数会在new的时候调用
     * @param context
     */
    public CustomView(Context context) {
        super(context);
    }

    /**
     * 在xml布局文件中使用时自动调用
     * @param context
     * @param attrs
     */
    public CustomView(Context context, @Nullable AttributeSet attrs) {
        super(context, attrs);
    }

    /**
     * 不会自动调用,如果有默认style时,在第二个构造函数中调用
     * @param context
     * @param attrs
     * @param defStyleAttr
     */
    public CustomView(Context context, @Nullable AttributeSet attrs, int defStyleAttr) {
        super(context, attrs, defStyleAttr);
    }

    /**
     * 只有在API版本>21时才会用到
     * 不会自动调用,如果有默认style时,在第二个构造函数中调用
     * @param context
     * @param attrs
     * @param defStyleAttr
     * @param defStyleRes
     */
    public CustomView(Context context, @Nullable AttributeSet attrs, int defStyleAttr, int defStyleRes) {
        super(context, attrs, defStyleAttr, defStyleRes);
    }
}
视图测量方法
-
onMeasure()方法用于测量视图的大小
-
一个界面的展示可能会涉及到很多次的measure,因为一个布局中一般都会包含多个子视图,每个视图都需要经历一次measure过程。ViewGroup中定义了一个measureChildren()方法来去测量子视图的大小
-
MeasureSpec是View的内部类,它封装了一个View的尺寸,在onMeasure()当中会根据这个MeasureSpec的值来确定View的宽高。MeasureSpec的值保存在一个int值当中。一个int值有32位,前两位表示模式mode后30位表示大小size。即MeasureSpec=mode+size。在
MeasureSpec当中一共存在三种mode:UNSPECIFIED、EXACTLY和
AT_MOST。对于View来说,
MeasureSpec的mode和Size有如下意义模式 意义 对应 EXACTLY 精准模式,View需要一个精确值,这个值即为MeasureSpec当中的Size match_parent AT_MOST 最大模式,View的尺寸有一个最大值,View不可以超过MeasureSpec当中的Size值 wrap_content UNSPECIFIED 无限制,View对尺寸没有任何限制,View设置为多大就应当为多大 一般系统内部使用 // 获取测量模式(Mode) int specMode = MeasureSpec.getMode(measureSpec) // 获取测量大小(Size) int specSize = MeasureSpec.getSize(measureSpec) // 通过Mode 和 Size 生成新的SpecMode int measureSpec=MeasureSpec.makeMeasureSpec(size, mode);
视图定位方法
-
View中的onLayout()方法就是一个空方法,因为onLayout()过程是为了确定视图在布局中所在的位置,而这个操作应该是由布局来完成的,即父视图决定子视图的显示位置
-
ViewGroup中的onLayout()方法竟然是一个抽象方法,这就意味着所有ViewGroup的子类都必须重写这个方法。像LinearLayout、RelativeLayout等布局,都是重写了这个方法,然后在内部按照各自的规则对子视图进行布局的。
/** * 这里的四个参数l、t、r、b分别代表View的左、上、右、下四个边界相对于其父View的距离。 * */ public void layout(int l, int t, int r, int b) { if ((mPrivateFlags3 & PFLAG3_MEASURE_NEEDED_BEFORE_LAYOUT) != 0) { onMeasure(mOldWidthMeasureSpec, mOldHeightMeasureSpec); mPrivateFlags3 &= ~PFLAG3_MEASURE_NEEDED_BEFORE_LAYOUT; } int oldL = mLeft; int oldT = mTop; int oldB = mBottom; int oldR = mRight; //这里通过setFrame或setOpticalFrame方法确定View在父容器当中的位置。 boolean changed = isLayoutModeOptical(mParent) ? setOpticalFrame(l, t, r, b) : setFrame(l, t, r, b); //调用onLayout方法。onLayout方法是一个空实现,不同的布局会有不同的实现。 if (changed || (mPrivateFlags & PFLAG_LAYOUT_REQUIRED) == PFLAG_LAYOUT_REQUIRED) { onLayout(changed, l, t, r, b); } }layout()方法中已经通过setOpticalFrame(l, t, r, b)或setFrame(l, t, r, b)方法对View自身的位置进行了设置,所以onLayout(changed, l, t, r, b)方法主要是ViewGroup对子View的位置进行计算。
视图绘制方法
- 如果需要,绘制背景。
- 有过有必要,保存当前canvas。
- 绘制View的内容。
- 绘制子View。
- 如果有必要,绘制边缘、阴影等效果。
- 绘制装饰,如滚动条等等
    public void draw(Canvas canvas) {
        int saveCount;
        // 1. 如果需要,绘制背景
        if (!dirtyOpaque) {
            drawBackground(canvas);
        }

        // 2. 有过有必要,保存当前canvas。
        final int viewFlags = mViewFlags;

        if (!verticalEdges && !horizontalEdges) {
            // 3. 绘制View的内容。
            if (!dirtyOpaque) onDraw(canvas);

            // 4. 绘制子View。
            dispatchDraw(canvas);

            drawAutofilledHighlight(canvas);

            // Overlay is part of the content and draws beneath Foreground
            if (mOverlay != null && !mOverlay.isEmpty()) {
                mOverlay.getOverlayView().dispatchDraw(canvas);
            }

            // 6. 绘制装饰,如滚动条等等。
            onDrawForeground(canvas);

            // we're done...
            return;
        }
    }

    /**
    *  1.绘制View背景
    */
    private void drawBackground(Canvas canvas) {
        //获取背景
        final Drawable background = mBackground;
        if (background == null) {
            return;
        }

        setBackgroundBounds();

        //获取便宜值scrollX和scrollY,如果scrollX和scrollY都不等于0,则会在平移后的canvas上面绘制背景。
        final int scrollX = mScrollX;
        final int scrollY = mScrollY;
        if ((scrollX | scrollY) == 0) {
            background.draw(canvas);
        } else {
            canvas.translate(scrollX, scrollY);
            background.draw(canvas);
            canvas.translate(-scrollX, -scrollY);
        }
    }

    /**
    * 3.绘制View的内容,该方法是一个空的实现,在各个业务当中自行处理。
    */
    protected void onDraw(Canvas canvas) {
    }

    /**
    * 4. 绘制子View。该方法在View当中是一个空的实现,在各个业务当中自行处理。
    *  在ViewGroup当中对dispatchDraw方法做了实现,主要是遍历子View,并调用子类的draw方法,一般我们不需要自己重写该方法。
    */
    protected void dispatchDraw(Canvas canvas) {

    }
改造已有的控件
自定义月份选择器
给翻页标签蓝添加新标签
不滚动的列表视图
通过持续绘制实现简单动画
Handller 的延迟机制
重新绘制视图界面
自定义饼图动画
实战项目:广告轮播
需求描述
界面设计
实现代码
自定义按钮圆角样式
首先在drawable文件中创建一个按钮样式文件,选择这个跟元素标签
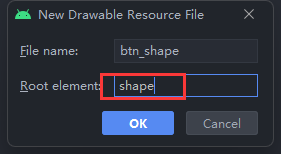
对文件进行设置
<?xml version="1.0" encoding="utf-8"?>
<shape xmlns:android="http://schemas.android.com/apk/res/android">
    <!--    设置按钮圆角按钮的步骤-->
    <!--    1.设置圆角的半径-->
    <corners android:radius="180dp"/>
    <!--    2.设置按钮的颜色-->
    <solid android:color="@color/btnColor"/>
    <!--    3.设置边框大粗细和颜色-->
    <stroke android:width="2dp"
        android:color="@color/purple_200"/>
</shape>
然后给对应的按钮设置背景,即可实现圆角按钮效果,在对应的按钮属性下添加对应配置文件
android:background="@drawable/btn_shape"
通知与服务
消息通知
通知推送 Notification
通知渠道 NotificationChannel
桌面应用添加消息图标
服务Service
服务的启动和停止
服务的绑定与 解绑
推送服务到前台
多线程
分线程通过Handler 操作界面
异步任务 AsyncTask
异步服务 IntentService
组合控件
底部标签栏
BottomNavigationView 实现底部标签栏
自定义标签栏
结合RadioGroup和ViewPager自定义底部标签栏
顶部导航栏
工具栏 Toolbar
溢出菜单OverflowMenu
标签布局TabLayout
增强型列表
循环视图RecycleView
布局管理器LayoutManager
动态更新循环视图
升级版翻页
下拉刷新布局SwipeRefreshLayout
第二代翻页视图ViewPager2
给ViewPager2集成标签布局
实战项目:电商首页
需求
界面
代码
多媒体
图片
使用相机拍摄照片
从相册中选取图片
对图片进行简单加工
图像解码器ImageDecoder
音频
使用录音机录制音频
利用MediaPlayer播放音频
利用MediaRecorder录制音频
视频
使用摄像机录制视频
从视频库中选取视频
利用视频视图(VideoView)播放视频
项目实战:评价晒单
需求
界面设计
实现代码
网络通信
HTTP 接口访问
HTTP接口访问
GET方式调用HTTP接口
POST方式调用HTTP接口
下载管理器DownloadManager
通知栏显示下载进度
主动轮询当前的下载进度
利用POST方式上传文件
图片加载框架Glide
图片地址获取图像数据
使用Glide加载网络图片
利用Glide实现图片的三级缓存
实战项目:猜你不喜欢
需求
界面设计
代码
打造安装包
应用打包
导出APK安装包
-
若是直接将以下文件的apk发送到手机,是不能安装成功的

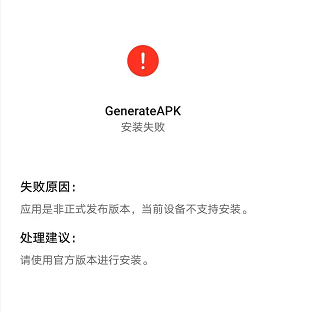
-
通过签名 jks
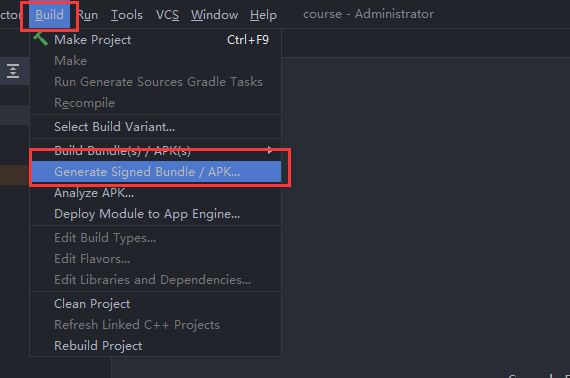

-
这里需要一个商店的key,因为没有,所以创建一个新的,点击Create new

-
首先指明生成的jks文件的路径,点击这个文件夹图标,个人习惯放在D盘的Apk目录下,然后命名jks的名称为Test,然后ok
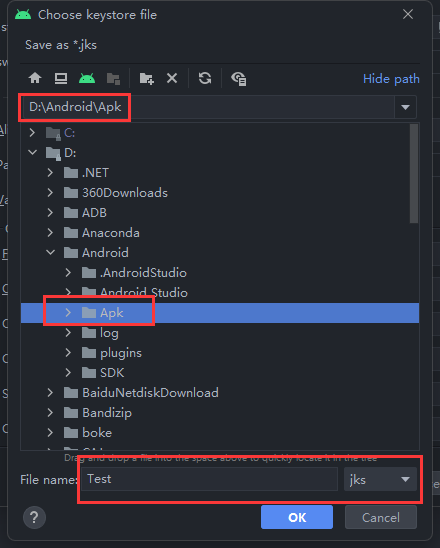
-
然后输入这个jks和别名的一些相关信息,上方的商店密码和别名密码可以设置为一样的,这样便于记忆,只不过安全系数就降低了。我上面设置的是123456,信息都设置好了之后,点击OK。
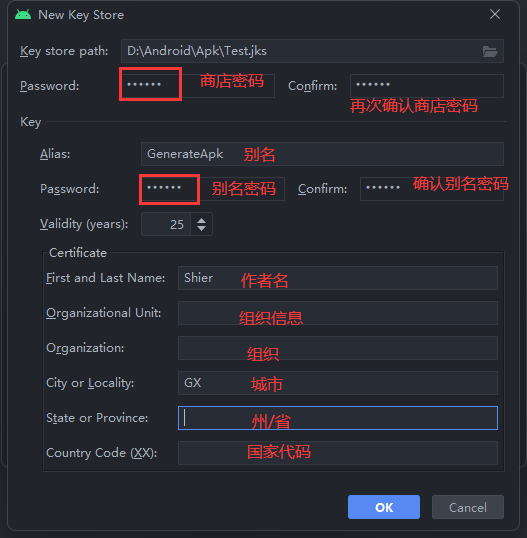
-
若是出现以下弹窗,直接ok,无影响

-
勾选记住密码,点击next
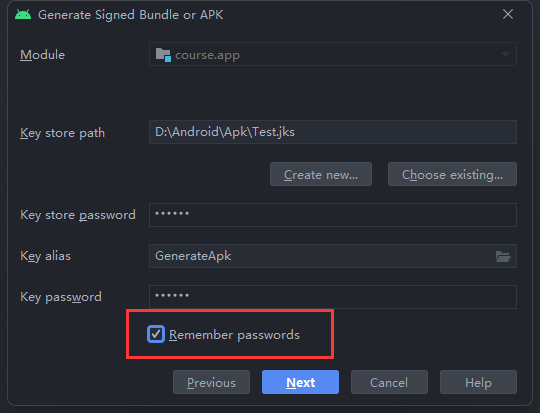
-
选择release 版本,既是发布版本,然后点击Finnish ;debug为测试版本 ,我的apk位置默认是工程下的
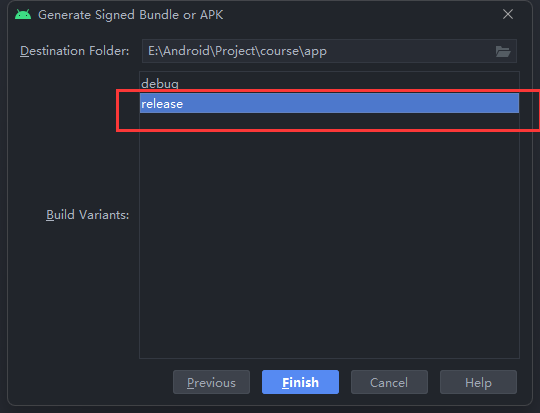
-
当你看到屏幕的右下角的进度条完成了,说明你的APK已经生成了,你可以在你的app下看到多了一个release的文件夹,里面就是app-release.apk包,下面你可以复制发到手机上,然后下载,手机上是可以安装的


-
然后在你刚刚选择的文件下就会看到一个jks
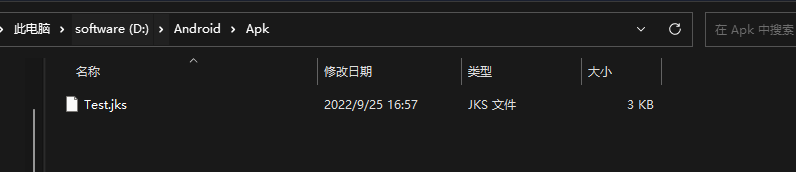
-
在工程目录下,就可以找到qpk文件
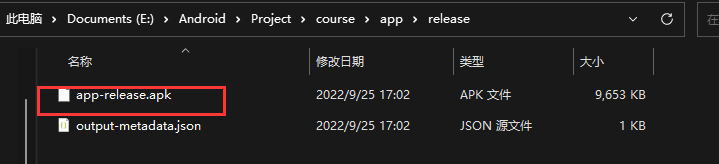
-
若是在第 8 步时选择debug 版本 测试版本,可能会安装成功,这是为什么呢?
那个这种方式生成的包在实际开发中起到什么作用呢?
在实际开发中,如果是自己测试,那么通过就直接用usb安装在手机上,此时就是文中第一种情况。
而如果当项目要上线或者上应用市场时,就需要用jks来生成release包上传到应用市场上。
实际开发中还有一点就是你的应用自己自己测试的并不是很到位,因此产品和测试会需要让你打包给他们做进一步测试,此时你可以给通过jks生成的debug包,也可以给release包,但是通常是debug包。
打包的细节优化
从上面的操作中,知道了一些内容,而在基本的开发中也是会用到的,而为了更好区别不同的包名,常用会给apk进行一个重命名,见名知意。
修改名称
-
修改app下的build.gradle
// 自定义打包名称
android.applicationVariants.all { variant ->
    variant.outputs.all {
        outputFileName = "apk名.apk"
    }
}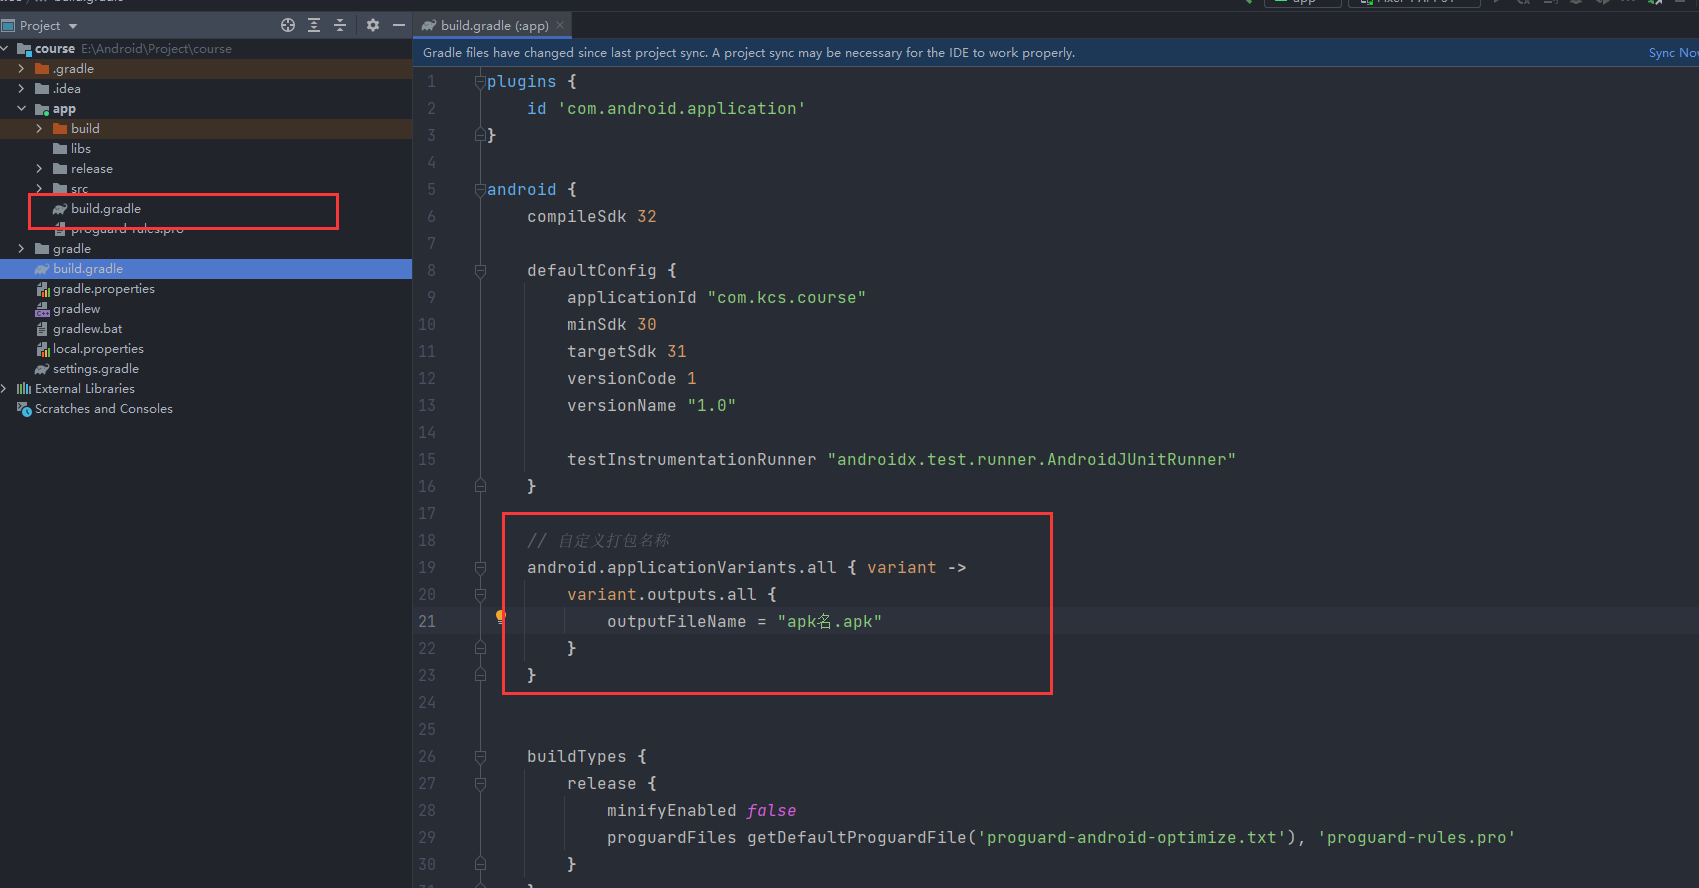
-
每次添加后记得Sync(同步)一下,然后重新打一个包,修改了生成apk的位置,如下下图所示

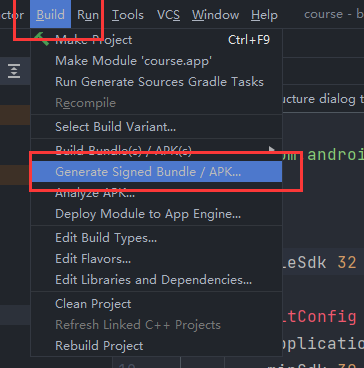
然后next 两次,使用之前是jks签名即可,最后这里我修改了apk位置
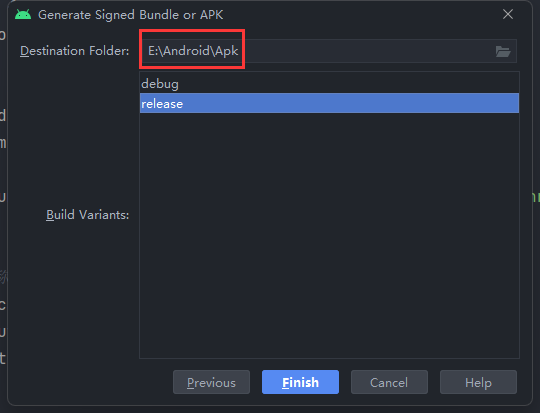
-
在Apk目录下查看你apk文件 release版本
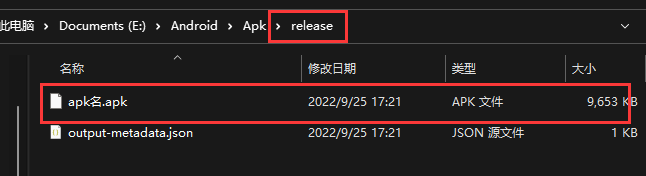
增加构建类型
outputFileName = "apk名_${buildType.name}.apk"
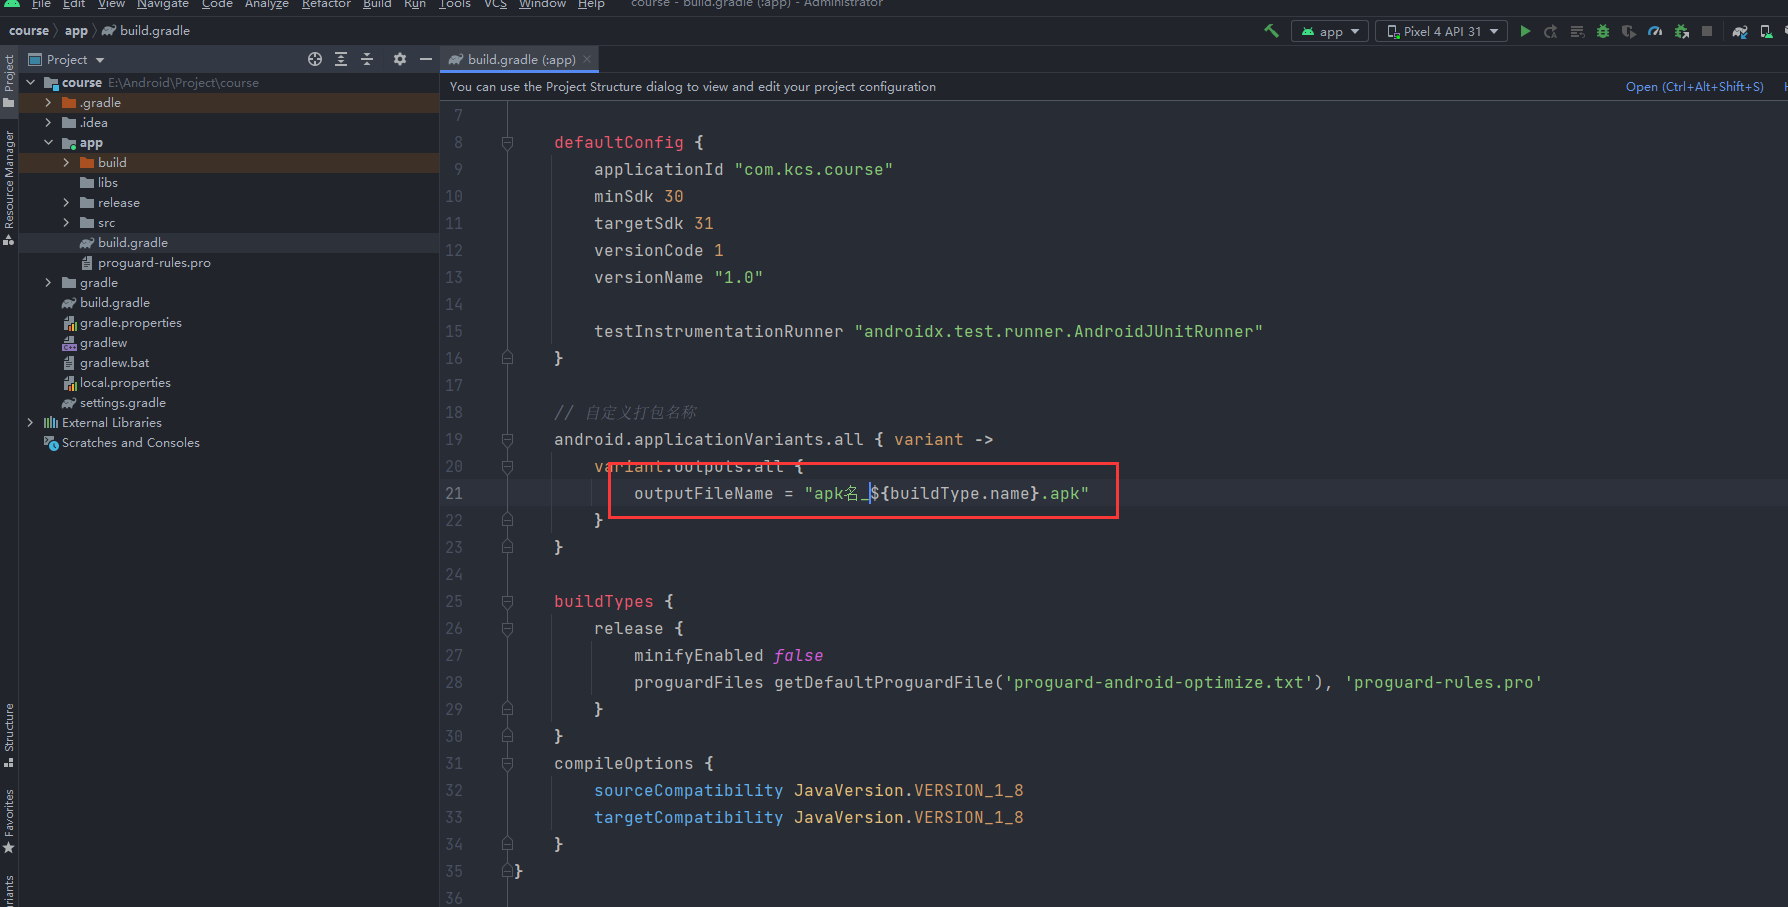
借用别人的图片:
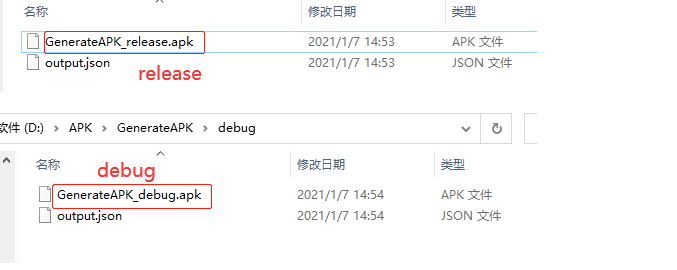
增加版本名
outputFileName = "apk名_${buildType.name}_v${versionName}.apk"
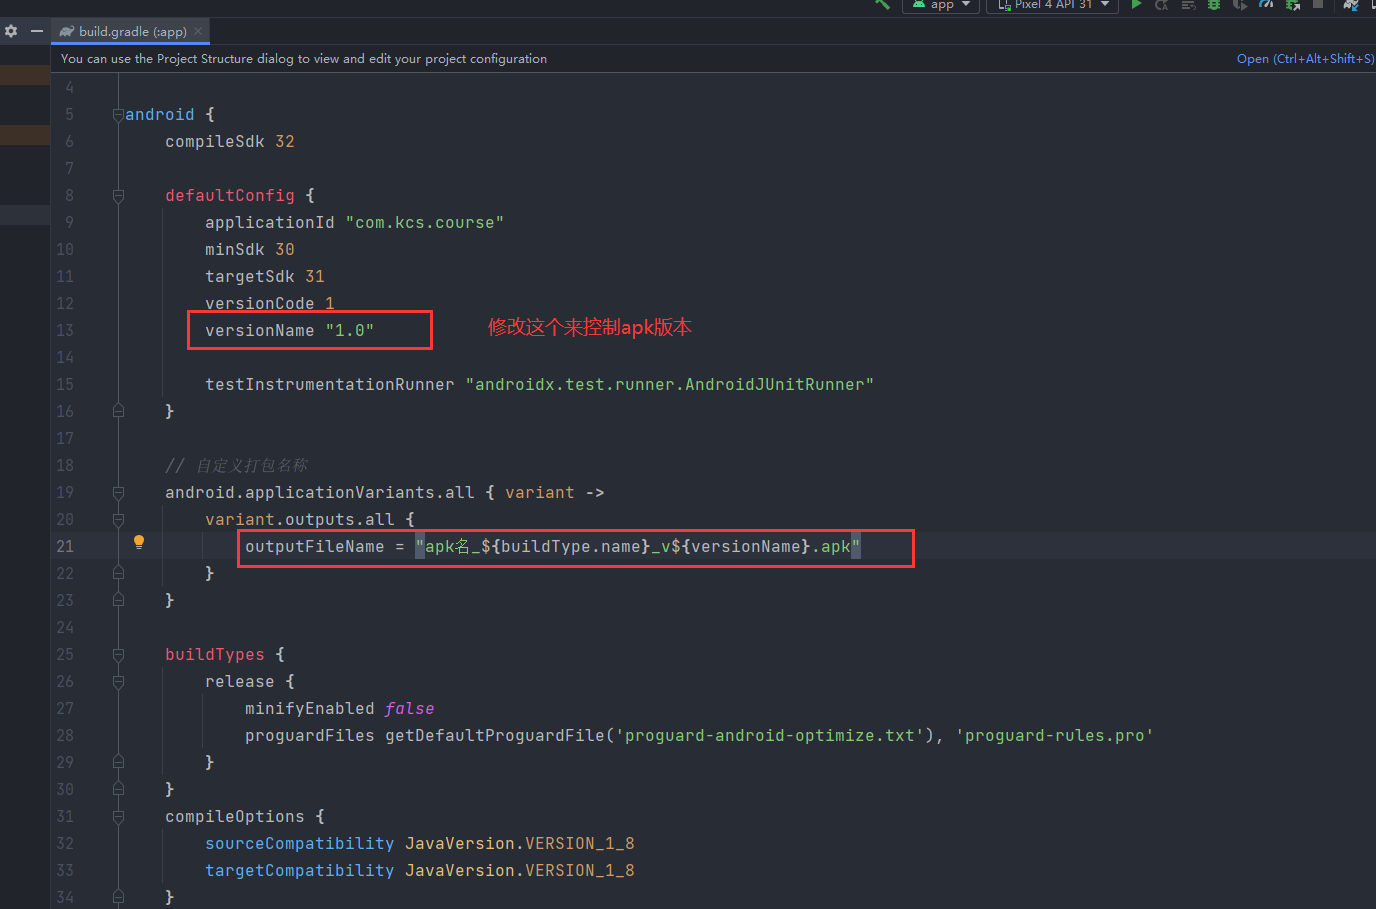
再次借用别人的图片:
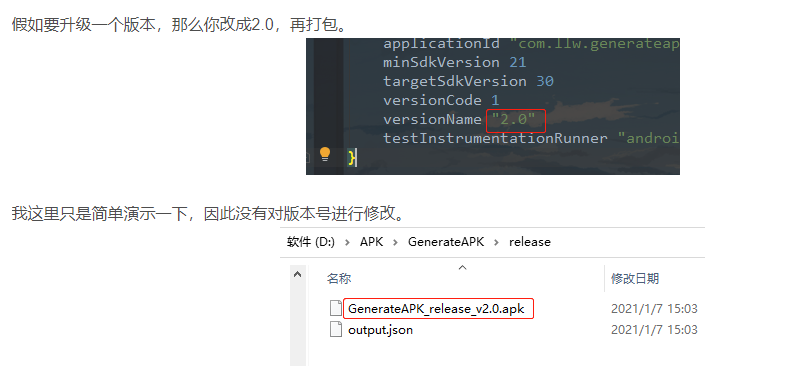
增加日期时间
在android{}闭包外增加
构建年月日时分秒
def generateTime() {
    return new Date().format("yyyy_MM_dd_HH_mm_ss")
}
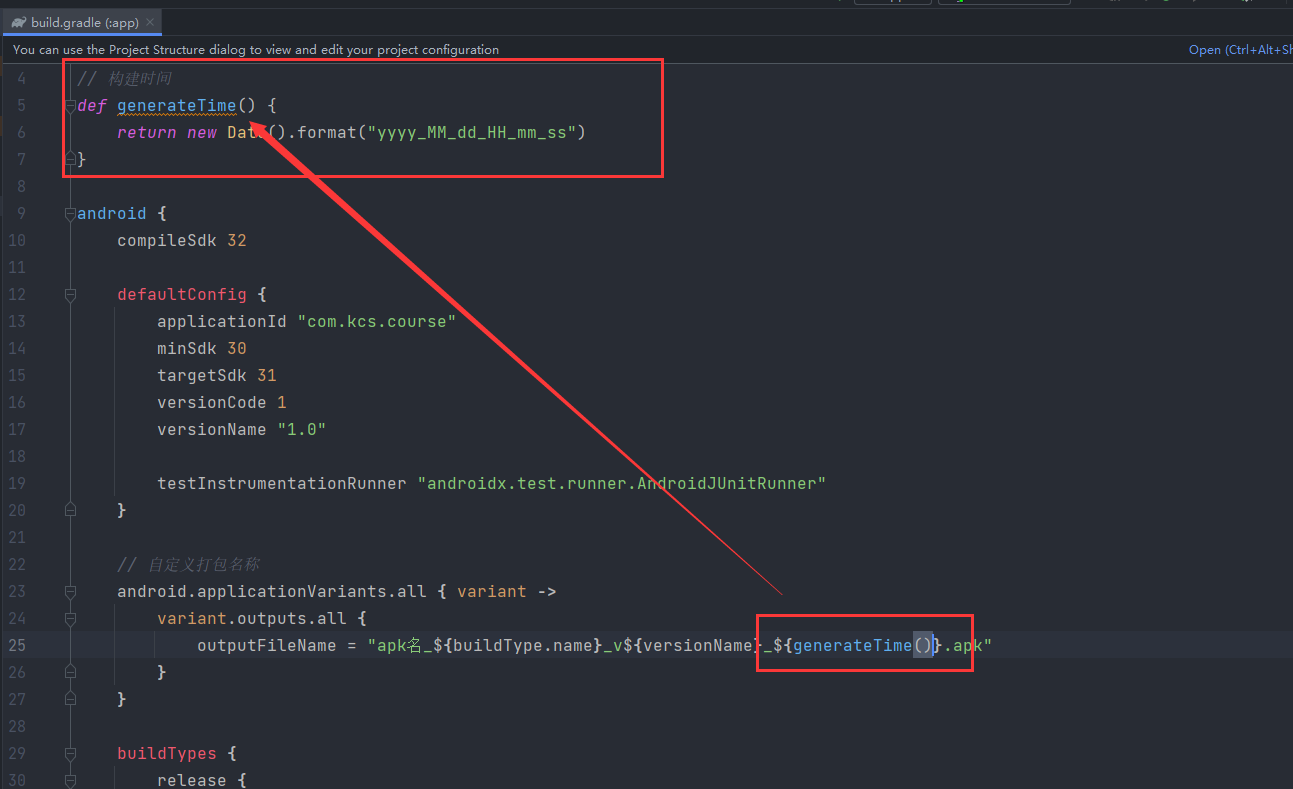
最后打包来看看修改之后的效果
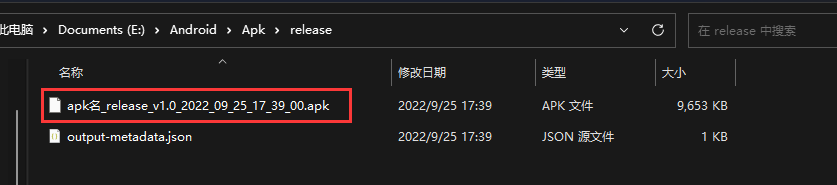
制作App图片
APK瘦身
规范处理
版本设置
发布模式
数据库加密
安全加固
反编译
代码混淆
第三方加固及重前面
修改主题颜色
方式一
进入项目,找到theme.xml文件在 res 下
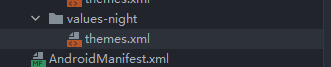
进入主题文件:
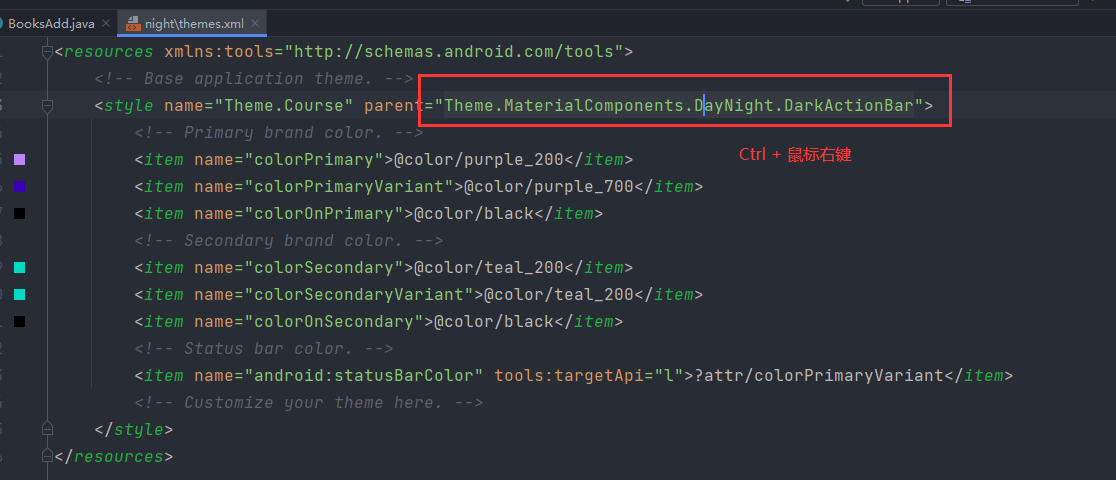
主要修改的代码:
<!--Appbar背景色,应用的主要色调,actionBar默认使用该颜色-->
<item name="android:colorPrimary">@color/material_animations_primary</item>

<!--状态栏颜色,应用的主要暗色调,statusBarColor默认使用该颜色-->
<item name="android:colorPrimaryDark">@color/material_animations_primary_dark</item>

<!--状态栏颜色,默认使用colorPrimaryDark-->
<item name="android:statusBarColor">@color/material_animations_primary_dark</item>

<!--页面背景色-->
<item name="android:windowBackground">@color/light_grey</item>

<!--底部导航栏颜色-->
<item name="android:navigationBarColor">@color/navigationColor</item>

<!--应用的主要文字颜色,actionBar的标题文字默认使用该颜色-->
<item name="android:textColorPrimary">@android:color/black</item>

<!--ToolBar上的Title颜色-->
<item name="android:textColorPrimaryInverse">@color/text_light</item>

<!--应用的前景色,ListView的分割线,switch滑动区默认使用该颜色-->
<item name="android:colorForeground">@color/colorForeground</item>

<!--应用的背景色,popMenu的背景默认使用该颜色-->
<item name="android:colorBackground">@color/colorForeground</item>

<!--一般控件的选种效果默认采用该颜色-->
<item name="android:colorAccent">@color/colorAccent</item>

<!--控件选中时的颜色,默认使用colorAccent-->
<item name="android:colorControlActivated">@color/colorControlActivated</item>

<!--各个控制控件的默认颜色-->
<item name="android:colorControlNormal">@color/colorControlNormal</item>

<!--Button,textView的文字颜色-->
<item name="android:textColor">@color/text_dark</item>

<!--RadioButton checkbox等控件的文字-->
<item name="android:textColorPrimaryDisableOnly">@color/text_dark</item>

<!--默认按钮的背景颜色-->
<item name="android:colorButtonNormal">@color/text_dark</item>

<!--控件按压时的色调-->
<item name="android:colorControlHighlight">@color/colorControlHighlight</item>


 <!--title 标题栏字体设置-->
<item name="android:titleTextAppearance">@style/MaterialAnimations.TextAppearance.Title</item>


<item name="android:windowContentTransitions">true</item>
<item name="android:windowAllowEnterTransitionOverlap">false</item>
<item name="android:windowAllowReturnTransitionOverlap">false</item>
修改对应的位置颜色
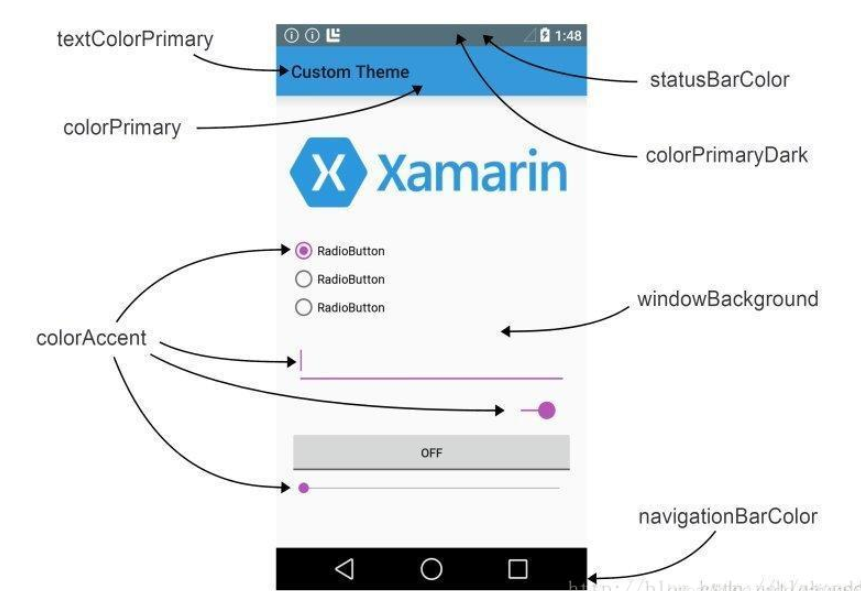
最后修改theme.xml里面对应的颜色即可
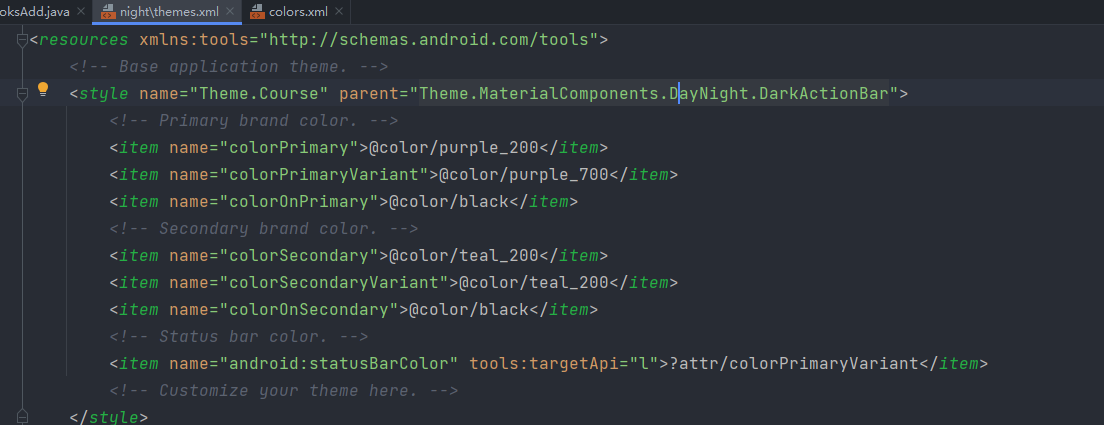
方式二
修改清单文件中的androi:theme 属性
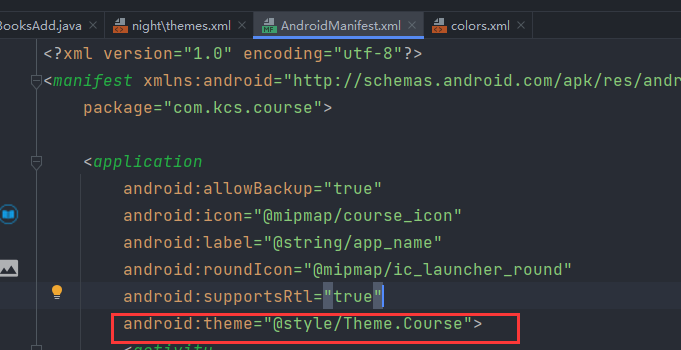
系统自带的theme
	 @android:style/Theme.Black  //背景黑色-有标题-非全屏
   @android:style/Theme.Black.NoTitleBar //背景黑色-无标题-非全屏
   @android:style/Theme.Black.NoTitleBar.Fullscreen //背景黑色-无标题-全屏显示
   @android:style/Theme.Dialog //对话框显示
   @android:style/Theme.InputMethod
   @android:style/Theme.Light    //背景白色-有标题-非全屏
   @android:style/Theme.Light.NoTitleBar //背景白色-无标题-非全屏
   @android:style/Theme.Light.NoTitleBar.Fullscreen //背景白色-无标题-全屏显示
   @android:style/Theme.Light.Panel
   @android:style/Theme.Light.WallpaperSettings //背景透明
   @android:style/Theme.NoDisplay
   @android:style/Theme.Translucent.NoTitleBar.Fullscreen //半透明、无标题栏、全屏
   @android:style/Theme.Wallpaper.NoTitleBar.Fullscreen
pplicationVariants.all { variant ->
variant.outputs.all {
outputFileName = “apk名.apk”
}
}
[外链图片转存中...(img-4I11L824-1668325437895)]

2. 每次添加后记得Sync(同步)一下,然后重新打一个包,修改了生成apk的位置,如下下图所示

[外链图片转存中...(img-dtNrCgvX-1668325437896)]

[外链图片转存中...(img-lMLQeoJW-1668325437897)]

然后next 两次,使用之前是jks签名即可,最后这里我修改了apk位置

[外链图片转存中...(img-KRXlOoYN-1668325437898)]

3. 在Apk目录下查看你apk文件 release版本

[外链图片转存中...(img-MJSKhzsG-1668325437898)]

### 增加构建类型

```gradle
outputFileName = "apk名_${buildType.name}.apk"
[外链图片转存中…(img-7rxGiQCx-1668325437899)]
借用别人的图片:
[外链图片转存中…(img-XhVATcGv-1668325437900)]
增加版本名
outputFileName = "apk名_${buildType.name}_v${versionName}.apk"
[外链图片转存中…(img-0Fj0w5OR-1668325437902)]
再次借用别人的图片:
[外链图片转存中…(img-WO37dGS6-1668325437903)]
增加日期时间
在android{}闭包外增加
构建年月日时分秒
def generateTime() {
    return new Date().format("yyyy_MM_dd_HH_mm_ss")
}
[外链图片转存中…(img-CW3LgVXE-1668325437904)]
最后打包来看看修改之后的效果
[外链图片转存中…(img-n2ALxDH5-1668325437905)]
制作App图片
APK瘦身
规范处理
版本设置
发布模式
数据库加密
安全加固
反编译
代码混淆
第三方加固及重前面
修改主题颜色
方式一
进入项目,找到theme.xml文件在 res 下
[外链图片转存中…(img-rxXeSMcD-1668325437905)]
进入主题文件:
[外链图片转存中…(img-xfa87Ijg-1668325437906)]
主要修改的代码:
<!--Appbar背景色,应用的主要色调,actionBar默认使用该颜色-->
<item name="android:colorPrimary">@color/material_animations_primary</item>

<!--状态栏颜色,应用的主要暗色调,statusBarColor默认使用该颜色-->
<item name="android:colorPrimaryDark">@color/material_animations_primary_dark</item>

<!--状态栏颜色,默认使用colorPrimaryDark-->
<item name="android:statusBarColor">@color/material_animations_primary_dark</item>

<!--页面背景色-->
<item name="android:windowBackground">@color/light_grey</item>

<!--底部导航栏颜色-->
<item name="android:navigationBarColor">@color/navigationColor</item>

<!--应用的主要文字颜色,actionBar的标题文字默认使用该颜色-->
<item name="android:textColorPrimary">@android:color/black</item>

<!--ToolBar上的Title颜色-->
<item name="android:textColorPrimaryInverse">@color/text_light</item>

<!--应用的前景色,ListView的分割线,switch滑动区默认使用该颜色-->
<item name="android:colorForeground">@color/colorForeground</item>

<!--应用的背景色,popMenu的背景默认使用该颜色-->
<item name="android:colorBackground">@color/colorForeground</item>

<!--一般控件的选种效果默认采用该颜色-->
<item name="android:colorAccent">@color/colorAccent</item>

<!--控件选中时的颜色,默认使用colorAccent-->
<item name="android:colorControlActivated">@color/colorControlActivated</item>

<!--各个控制控件的默认颜色-->
<item name="android:colorControlNormal">@color/colorControlNormal</item>

<!--Button,textView的文字颜色-->
<item name="android:textColor">@color/text_dark</item>

<!--RadioButton checkbox等控件的文字-->
<item name="android:textColorPrimaryDisableOnly">@color/text_dark</item>

<!--默认按钮的背景颜色-->
<item name="android:colorButtonNormal">@color/text_dark</item>

<!--控件按压时的色调-->
<item name="android:colorControlHighlight">@color/colorControlHighlight</item>


 <!--title 标题栏字体设置-->
<item name="android:titleTextAppearance">@style/MaterialAnimations.TextAppearance.Title</item>


<item name="android:windowContentTransitions">true</item>
<item name="android:windowAllowEnterTransitionOverlap">false</item>
<item name="android:windowAllowReturnTransitionOverlap">false</item>
修改对应的位置颜色
[外链图片转存中…(img-7KhkoyLp-1668325437907)]
最后修改theme.xml里面对应的颜色即可
[外链图片转存中…(img-cmWaLiDW-1668325437909)]
方式二
修改清单文件中的androi:theme 属性
[外链图片转存中…(img-IwSizKbD-1668325437910)]
系统自带的theme
	 @android:style/Theme.Black  //背景黑色-有标题-非全屏
   @android:style/Theme.Black.NoTitleBar //背景黑色-无标题-非全屏
   @android:style/Theme.Black.NoTitleBar.Fullscreen //背景黑色-无标题-全屏显示
   @android:style/Theme.Dialog //对话框显示
   @android:style/Theme.InputMethod
   @android:style/Theme.Light    //背景白色-有标题-非全屏
   @android:style/Theme.Light.NoTitleBar //背景白色-无标题-非全屏
   @android:style/Theme.Light.NoTitleBar.Fullscreen //背景白色-无标题-全屏显示
   @android:style/Theme.Light.Panel
   @android:style/Theme.Light.WallpaperSettings //背景透明
   @android:style/Theme.NoDisplay
   @android:style/Theme.Translucent.NoTitleBar.Fullscreen //半透明、无标题栏、全屏
   @android:style/Theme.Wallpaper.NoTitleBar.Fullscreen


 1688
1688

 被折叠的 条评论
为什么被折叠?
被折叠的 条评论
为什么被折叠?
 到【灌水乐园】发言


