


一、数据预处理
1、数据操作
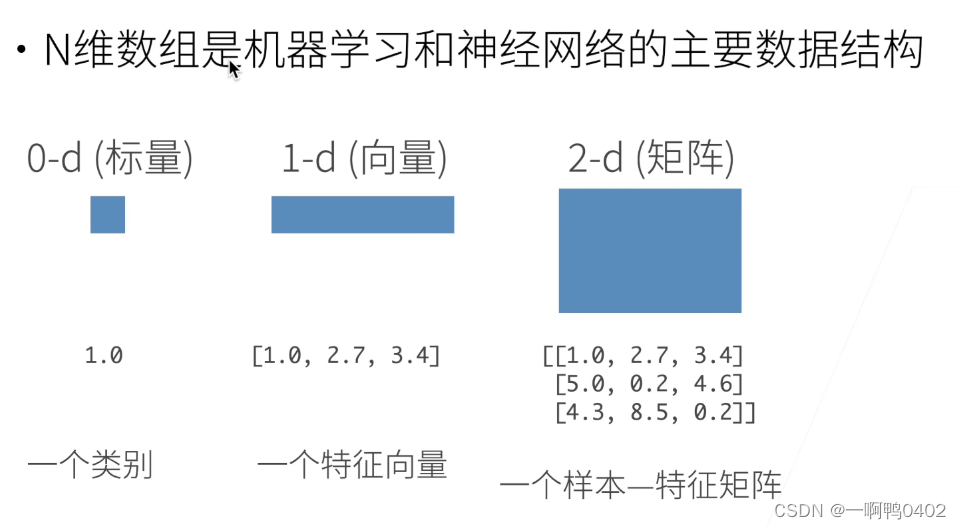
1)n维数组
 2)创建数组
三要素“形状、数据类型、值
3)访问数组
***这里的一列错了,应该是[:,1]

子区域这里是1:3,实际意义是前闭后开,表示包括第一行、第一行,不包括第三行
[::3,::2]的含义是,行的访问每次跳三个,例如:第0行、第3行、第6行等等。列的访问每次跳两个,例如第0列、第2列、第4列等等。
2、相关代码
1)生成矩阵
x=torch.arange(12)
print(x)
# tensor([ 0,  1,  2,  3,  4,  5,  6,  7,  8,  9, 10, 11])
# 生成一个0-11的数组成的的向量
print(x.shape)
# x的形状 torch.Size([12]) 因为是个向量,所以只有一个维度,这个维度的长是12
print(x.numel())
# x的元素的个数,是个标量 12
x=x.reshape(3,4)
print(x)
#tensor([[ 0,  1,  2,  3],
#        [ 4,  5,  6,  7],
#        [ 8,  9, 10, 11]])  改变tensor的形状,生成一个3*4的矩阵  torch.Size([3, 4])
y=torch.zeros((2,3,4))
print(y)
'''
tensor([[[0., 0., 0., 0.],
         [0., 0., 0., 0.],
         [0., 0., 0., 0.]],
        [[0., 0., 0., 0.],
         [0., 0., 0., 0.],
         [0., 0., 0., 0.]]])  形状是(2,3,4)的全0矩阵,由两个3*4的矩阵组成
'''
y=torch.ones((3,2,3))
print(y)
'''
tensor([[[1., 1., 1.],
         [1., 1., 1.]],
        [[1., 1., 1.],
         [1., 1., 1.]],
        [[1., 1., 1.],
         [1., 1., 1.]]])
'''
y=torch.tensor([
    [2,1,2],
    [3,2,1],
    [3,3,3]

])
print(y)
'''
tensor([[2, 1, 2],
        [3, 2, 1],
        [3, 3, 3]])
'''
2)运算
# 常见的标准算数运算符都可以被升级为按元素运算
x=torch.tensor([1.0,2,4,8])
y=torch.tensor([2,2,2,2])
print(x+y,x-y,x*y,x/y,x**y)
'''
tensor([ 3.,  4.,  6., 10.]) tensor([-1.,  0.,  2.,  6.])
tensor([ 2.,  4.,  8., 16.]) tensor([0.5000, 1.0000, 2.0000, 4.0000])
tensor([ 1.,  4., 16., 64.])
'''
3)张量的连接
x=torch.arange(12,dtype=torch.float32).reshape(3,4)
y=torch.tensor([[2.0,1,4,3],[1,2,2,3],[4,3,2,1]])
m=torch.cat((x,y),dim=0)
print(m)
'''
按行合并在一起
tensor([[ 0.,  1.,  2.,  3.],
        [ 4.,  5.,  6.,  7.],
        [ 8.,  9., 10., 11.],
        [ 2.,  1.,  4.,  3.],
        [ 1.,  2.,  2.,  3.],
        [ 4.,  3.,  2.,  1.]])
'''
n=torch.cat((x,y),dim=1)
print(n)
'''
按列合并在一起
tensor([[ 0.,  1.,  2.,  3.,  2.,  1.,  4.,  3.],
        [ 4.,  5.,  6.,  7.,  1.,  2.,  2.,  3.],
        [ 8.,  9., 10., 11.,  4.,  3.,  2.,  1.]])
'''
4)通过逻辑运算符构建二元张量
print(x.sum())
'''tensor(66.)'''
5)广播机制
a=torch.arange(3).reshape((3,1))
b=torch.arange(2).reshape((1,2))
print(a,b)
'''
tensor([[0],
        [1],
        [2]]) tensor([[0, 1]])
'''
print(a+b)
'''
a和b的维度不同,但是可以通过广播机制相加,
a通过复制一列,变成(3,2)
[[0,0]
 [1,1]
 [2,2]]
 b通过复制两行,变成(3,2)
[[0,1]
 [0,1]
 [0,1]]
 在相加就可以变成后面
tensor([[0, 1],
        [1, 2],
        [2, 3]])
'''
6)元素访问
'''可以用【-1】访问最后一个元素,可以用【1:3】选择第二个和第三个'''
'''元素:最外层的就是元素,例如(2,3,2)的一个元素是(3,2);(3,4)的一个元素是(4)'''
x=torch.arange(12)
print(x[-1],x[1:3])
'''tensor(11) tensor([1, 2]) '''
x=x.reshape(3,4)
print(x[-1],x[1:3])
'''
tensor([ 8,  9, 10, 11])
tensor([[ 4,  5,  6,  7],
       [ 8,  9, 10, 11]])
'''
x=x.reshape(2,3,2)
print(x)
print(x[-1])
print(x[0:2])
'''
print(x[-1])
tensor([[ 6,  7],
        [ 8,  9],
        [10, 11]])
'''
'''
print(x[0:2])
tensor([[[ 0,  1],
         [ 2,  3],
         [ 4,  5]],
        [[ 6,  7],
         [ 8,  9],
         [10, 11]]])
'''
7)通过指定元素将元素写入矩阵
x[1,1,1]=99
print(x)
'''
tensor([[[ 0,  1],
         [ 2,  3],
         [ 4,  5]],
        [[ 6,  7],
         [ 8, 99],
         [10, 11]]])
'''
x=x.reshape(3,4)
x[0:2,:]=100
print(x)
'''
tensor([[100, 100, 100, 100],
        [100, 100, 100, 100],
        [  8,  99,  10,  11]])
'''
8)类别转换
#tensor和numpy的相互转换
A=x.numpy()
B=torch.tensor(A)
print(type(A),type(B))
'''
<class 'numpy.ndarray'> <class 'torch.Tensor'>
'''
#将大小为1的张量转换为python标量
a=torch.tensor([3.5])
print(a,a.item(),float(a),int(a))
'''
tensor([3.5000]) 3.5 3.5 3
'''
3、实战(将一个csv文件转换为pytorch可以用的tensor)
1)创建一个存放数据的目录和文件
import os
os.makedirs(os.path.join('..','data230915'),exist_ok=True)
data_file=os.path.join('..','data230915','house_tiny.csv')
知识拓展
os.path.join()的作用
os.path.join()的作用:将参数中的几个字符串拼接在一起,具体来说会接收多个路径参数,并返回一个拼接后的路径字符串。它会根据当前操作系统的规范自动选择合适的路径分隔符,并将这些路径片段连接在一起。这样可以确保生成的路径在不同操作系统上都是有效的。若该目录在当前环境中没有,则会自动创建
import os

# 创建一个具有多个路径组件的路径
path = os.path.join('dir1', 'dir2', 'file.txt')
print(path)
# Output: dir1/dir2/file.txt (在 UNIX 或类 UNIX 系统上)
#         dir1\dir2\file.txt (在 Windows 系统上)

# 使用绝对路径和相对路径进行拼接
base_dir = '/home/user'
relative_path = 'dir/file.txt'
full_path = os.path.join(base_dir, relative_path)
print(full_path)
# Output: /home/user/dir/file.txt (在 UNIX 或类 UNIX 系统上)
#         C:\Users\user\dir\file.txt (在 Windows 系统上)

# 拼接路径时会自动处理多余的路径分隔符
path = os.path.join('dir1/', '/dir2/', 'file.txt')
print(path)
# Output: dir1/dir2/file.txt (在 UNIX 或类 UNIX 系统上)
#         dir1\dir2\file.txt (在 Windows 系统上)
os.makedirs()的作用
根据文件路径创建目录
目录的层次关系

1)..表示回到上层目录
2).表示在本层目录
3)前面什么都没有默认在本层目录
2)读取文件的内容
data=pd.read_csv(data_file)data的类型是DataFrame
3)数据处理
data中有缺失值,首先要对缺失值进行处理,并且分出input和output来
分出input和output
inputs,outputs = data.iloc[:,0:2],data.iloc[:,2]处理数值的缺失---用平均数代替
inputs = inputs.fillna(inputs.mean())
#将空值中填上平均值
print(inputs)
'''
   NumRooms Alley
0       3.0  Pave
1       2.0   NaN
2       4.0   NaN
3       3.0   NaN
'''
处理字符串的缺失--使用独热编码
inputs = pd.get_dummies(inputs,dummy_na=True)
# 用于将分类变量进行独热编码(One-Hot Encoding)处理。
print(inputs)
'''
   NumRooms  Alley_Pave  Alley_nan
0       3.0           1          0
1       2.0           0          1
2       4.0           0          1
3       3.0           0          1
'''
转换为tensor
现在input和output都是数值形式,可以转换为张量格式了
#现在inputs和outputs中的所有条目都是数值类型,可以转换为张量格式
x, y = torch.tensor(inputs.values),torch.tensor(outputs.values)
print(x,y)
'''
tensor([[3., 1., 0.],
        [2., 0., 1.],
        [4., 0., 1.],
        [3., 0., 1.]], dtype=torch.float64) tensor([127500, 106000, 178100, 140000])
'''
知识拓展
data.iloc()的作用
data.iloc 是 Pandas 中的一个方法,用于按位置(即整数索引)提取 DataFrame 或 Series 中的数据。
iloc 是一个用于索引位置的属性,可以与方括号 [] 结合使用来指定要提取的行和列的位置。它的一般语法是 data.iloc[行位置, 列位置]。
import pandas as pd

data = pd.DataFrame([[1, 2, 3], [4, 5, 6], [7, 8, 9]], columns=['A', 'B', 'C'])

# 提取第一行和第二列的值
value = data.iloc[0, 1]
print(value)
# Output: 2

# 提取前两行和所有列的数据
subset = data.iloc[:2, :]
print(subset)
# Output:
#    A  B  C
# 0  1  2  3
# 1  4  5  6
pd.get_dummies(inputs,dummy_na=True)的作用
pd.get_dummies(inputs, dummy_na=True) 是 Pandas 中的一个函数,用于将分类变量进行独热编码(One-Hot Encoding)处理。
独热编码是一种常用的特征编码方法,用于将分类变量表示为二进制向量,以便在机器学习模型中使用。get_dummies() 函数可以将分类变量转换为多个二进制特征列,每个特征表示一个可能的分类值,并根据输入数据中的分类值进行编码。
下面是对 pd.get_dummies(inputs, dummy_na=True) 的解释:
inputs:要进行独热编码的输入数据,可以是一个 Series 或 DataFrame。dummy_na:一个布尔值,表示是否为缺失值(NaN)创建额外的列。当设置为True时,如果输入数据中存在缺失值,将为缺失值创建一个额外的列,并将其编码为 1 或 0。默认值为True。
DataFrame和Series举例
当涉及到数据处理和分析时,Pandas 是一个常用的 Python 库。它提供了两个主要的数据结构,即 DataFrame 和 Series。
- DataFrame: DataFrame 是 Pandas 中最常用和最重要的数据结构之一,类似于一个二维表格或电子表格。它由多个行和列组成,每一列可以包含不同的数据类型(整数、浮点数、字符串等)。下面是一个 DataFrame 的示例:
mport pandas as pd

data = {'Name': ['Alice', 'Bob', 'Charlie'],
        'Age': [25, 30, 35],
        'City': ['New York', 'London', 'Paris']}

df = pd.DataFrame(data)
print(df)
#输出
      Name  Age      City
0    Alice   25  New York
1      Bob   30    London
2  Charlie   35     Paris
该dataFrame包含三个列,每一个列对应一个series对象
2.Series: Series 是 Pandas 中另一个重要的数据结构,类似于一维数组或列表。它由一列数据和与之关联的索引组成。下面是一个 Series 的示例:
import pandas as pd

data = [10, 20, 30, 40, 50]
s = pd.Series(data)
print(s)
#输出
0    10
1    20
2    30
3    40
4    50
dtype: int64
这个 Series 包含了一个整数类型的一维数组。自动分配的默认索引是从 0 到 4,对应着每个元素的位置。
4)总代码
import os
import pandas as pd
import torch
os.makedirs(os.path.join('..','data230915'),exist_ok=True)
data_file=os.path.join('..','data230915','house_tiny.csv')
print(data_file)
with open(data_file,'w') as f:
    f.write('NumRooms,Alley,Price\n') #列名
    f.write('NA,Pave,127500\n') #每行表示一个数据样本
    f.write('2,NA,106000\n')
    f.write('4,NA,178100\n')
    f.write('NA,NA,140000\n')

#读取文件中的内容
data=pd.read_csv(data_file)
print(data)

#为了处理缺失的数据,典型的方法包括插值和删除,这里我们将考虑插值
inputs,outputs = data.iloc[:,0:2],data.iloc[:,2]
#将第一、二列拿出来放到inputs中,将第三列放入到outputs中
inputs = inputs.fillna(inputs.mean())
#将空值中填上平均值
print(inputs)
'''
   NumRooms Alley
0       3.0  Pave
1       2.0   NaN
2       4.0   NaN
3       3.0   NaN
'''
inputs = pd.get_dummies(inputs,dummy_na=True)
# 用于将分类变量进行独热编码(One-Hot Encoding)处理。
print(inputs)
'''
   NumRooms  Alley_Pave  Alley_nan
0       3.0           1          0
1       2.0           0          1
2       4.0           0          1
3       3.0           0          1
'''
#现在inputs和outputs中的所有条目都是数值类型,可以转换为张量格式
x, y = torch.tensor(inputs.values),torch.tensor(outputs.values)
print(x,y)
'''
tensor([[3., 1., 0.],
        [2., 0., 1.],
        [4., 0., 1.],
        [3., 0., 1.]], dtype=torch.float64) tensor([127500, 106000, 178100, 140000])
'''
二、线性代数
1、基础知识
1)向量


2)矩阵


矩阵可以将一个空间扭曲,大多数空间中的向量都会改变方向,但是对于一些向量来说,不会被改变方向,这个向量就叫做特征向量
2、相关代码
1)访问张量的长度
注意:
对于形状不是一维的张量来说,长度就是有几个第二级别的元素‘
x=torch.arange(4)
print(x)
print(x[3])
print(x[3].item())
'''
tensor([0, 1, 2, 3])
tensor(3)
3
'''
#访问张量的长度
print(len(x))
y=torch.arange(12).reshape(4,3)
print(len(y))
'''
4
3  对于形状不是一维的张量来说,长度就是有几个第二级别的元素
'''
2)矩阵的转置
A=torch.arange(20).reshape(5,4)
print(A)
print(A.T)
'''
tensor([[ 0,  1,  2,  3],
        [ 4,  5,  6,  7],
        [ 8,  9, 10, 11],
        [12, 13, 14, 15],
        [16, 17, 18, 19]])
tensor([[ 0,  4,  8, 12, 16],
        [ 1,  5,  9, 13, 17],
        [ 2,  6, 10, 14, 18],
        [ 3,  7, 11, 15, 19]])
'''
#对称矩阵的转置等于自己
B=torch.tensor([[1,2,3],[2,0,4],[3,4,5]])
print(B)
print(B==B.T)
'''
tensor([[1, 2, 3],
        [2, 0, 4],
        [3, 4, 5]])
tensor([[True, True, True],
        [True, True, True],
        [True, True, True]])
'''
3)在指定维度上求和、均值等
注意:可以指定多个维度
#在指定维度上求和
A.sum_axis0 = A.sum(axis=0)
print(A.sum_axis0)
'''
A的形状是[5,4],有5行,4列,第0维即把5行对应元素求和,即每一列加起来
tensor([40, 45, 50, 55])
'''
A.sum_axis1 = A.sum(axis=1)
print(A.sum_axis1)
'''
第1维即把四列的对应元素求和,即每一行加起来
tensor([ 6, 22, 38, 54, 70])
'''
#也可以对两个维度求和
A = torch.arange(2*20,dtype=float).reshape(2,4,5)
A.sum_axis01=A.sum(axis=[0,1])
print(A.sum_axis01)
print(A.sum_axis01.shape)
'''
tensor([140, 148, 156, 164, 172])
torch.Size([5])
'''
#同样的也可以求均值
print(A.mean())
print(A.mean(axis=0))
'''
tensor(19.5000, dtype=torch.float64)
tensor([[10., 11., 12., 13., 14.],
        [15., 16., 17., 18., 19.],
        [20., 21., 22., 23., 24.],
        [25., 26., 27., 28., 29.]], dtype=torch.float64)
注意在创建tensor时一定要指定是int或者是float,否则会报错
could not infer output dtype. Input dtype must be either a floating point or complex dtype. Got: Long
'''
#计算总和或均值时保持轴不变
A=torch.arange(20).reshape(4,5)
sum_A=A.sum(axis=1,keepdims=True)
print(sum_A)
'''
tensor([[10],
        [35],
        [60],
        [85]])
'''
#某个轴计算A元素的累加总和
print(A.cumsum(axis=0))
'''
tensor([[ 0,  1,  2,  3,  4],
        [ 5,  7,  9, 11, 13],
        [15, 18, 21, 24, 27],
        [30, 34, 38, 42, 46]])
'''
4)向量乘以向量,点积 torch.dot(x,y)
x=torch.arange(4,dtype=torch.float32)
y=torch.ones(4,dtype=torch.float32)
print(x)
print(y)
print(torch.dot(x,y))
'''
torch.dot只对一维向量做乘积
tensor([0., 1., 2., 3.])
tensor([1., 1., 1., 1.])
tensor(6.)
'''
5)矩阵乘以向量 torch.mv(A,x)
A=torch.arange(20,dtype=torch.float32).reshape(5,4)
m=torch.mv(A,x)
print(A.shape,x.shape,m)
'''torch.Size([5, 4]) torch.Size([4]) tensor([ 14.,  38.,  62.,  86., 110.])'''
6)矩阵乘以矩阵 torch.mm(A,B)
B=torch.ones(4,3)
n=torch.mm(A,B)
print(A.shape,B.shape,n,n.shape)
'''
torch.Size([5, 4]) torch.Size([4, 3])
tensor([[ 6.,  6.,  6.],
        [22., 22., 22.],
        [38., 38., 38.],
        [54., 54., 54.],
        [70., 70., 70.]]) torch.Size([5, 3])
'''
7)范数
#范数
u=torch.tensor([3.0,-4.0])
u=torch.norm(u)
print(u)
'''
norm表示对每个元素平方相加再开方
tensor(5.)
'''
# 最常用的是F范数
q=torch.norm(torch.ones(4,9))
print(q)
'''
tensor(6.)
'''


 24万+
24万+

 被折叠的 条评论
为什么被折叠?
被折叠的 条评论
为什么被折叠?
 到【灌水乐园】发言


