


 本文介绍了如何使用STM32CubeMX配置STM32F401CCU6芯片的USART中断,以便从STP-23激光传感器接收数据。作者提供了代码修改步骤,包括普通USART的打印验证和中断服务函数的修改,以及数据处理函数的实现,用于计算并打印平均距离。
前言
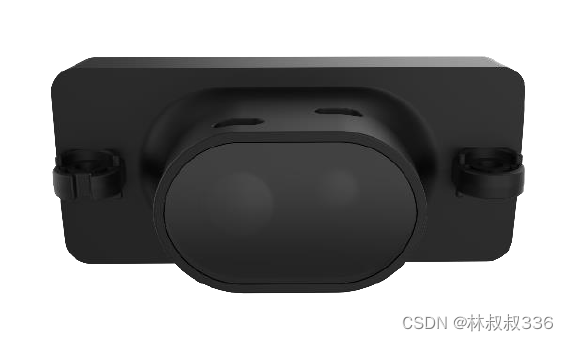
在一个项目中使用到了一个激光模块,使用的是轮趣科技的STP-23激光传感器,这个模块采用的usart串口,不过只需要收就可以 了,不需要给它发送数据。
例程中使用的芯片是stm32f401ccu6
本文使用的cubemx生成的HAL库
本文并未对各个函数进行讲解,只是如何应用,小白勿喷!!
一、CUBEMX的配置
首先最基础的配置这里就不进行演示了,直接是usart的配置。
要将波特率改为921600,
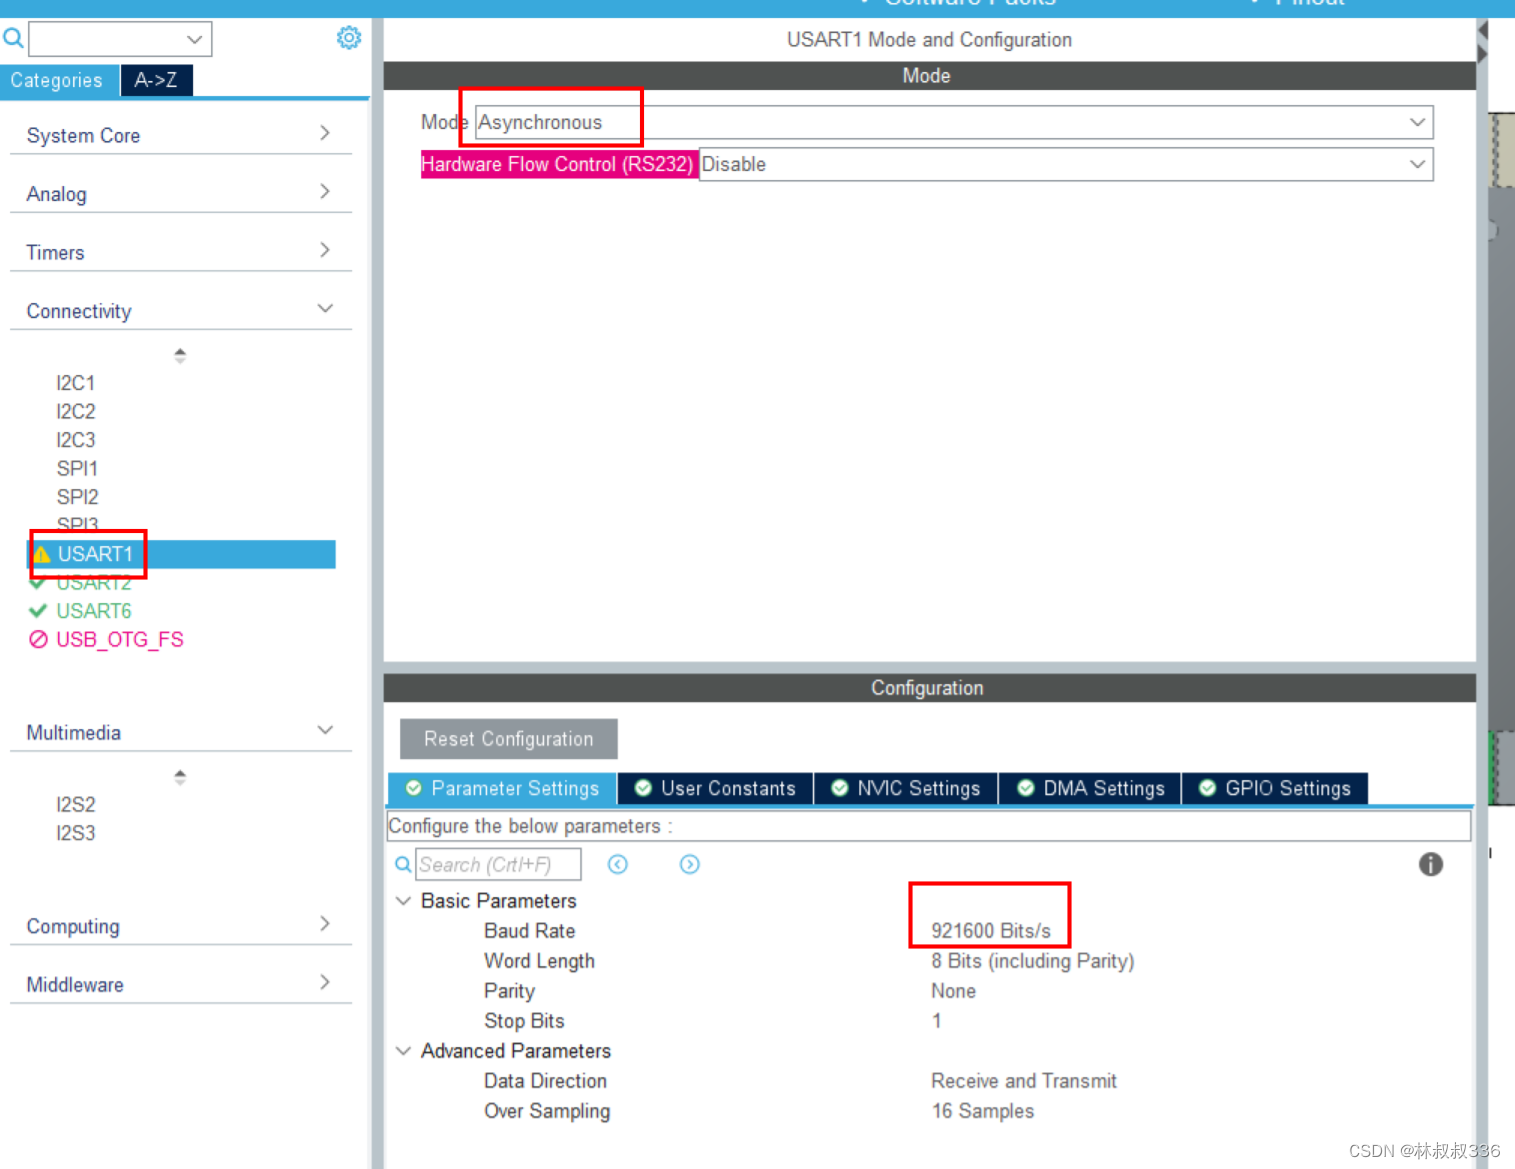
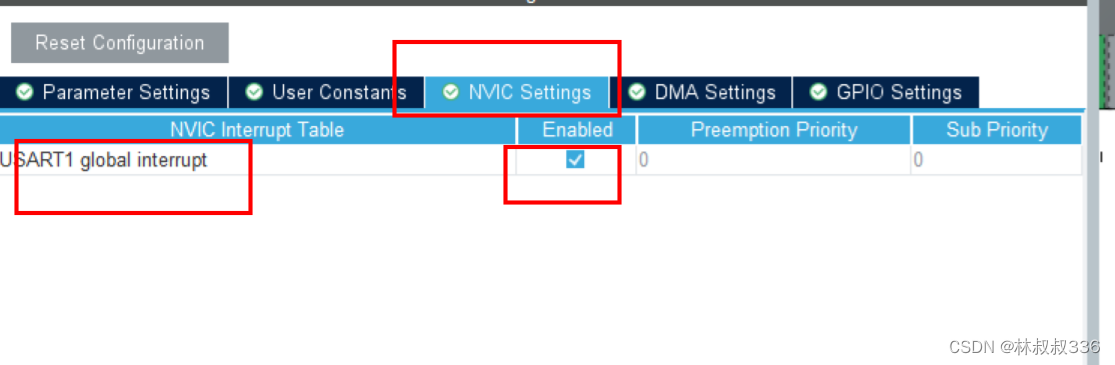
然后就是开启中断
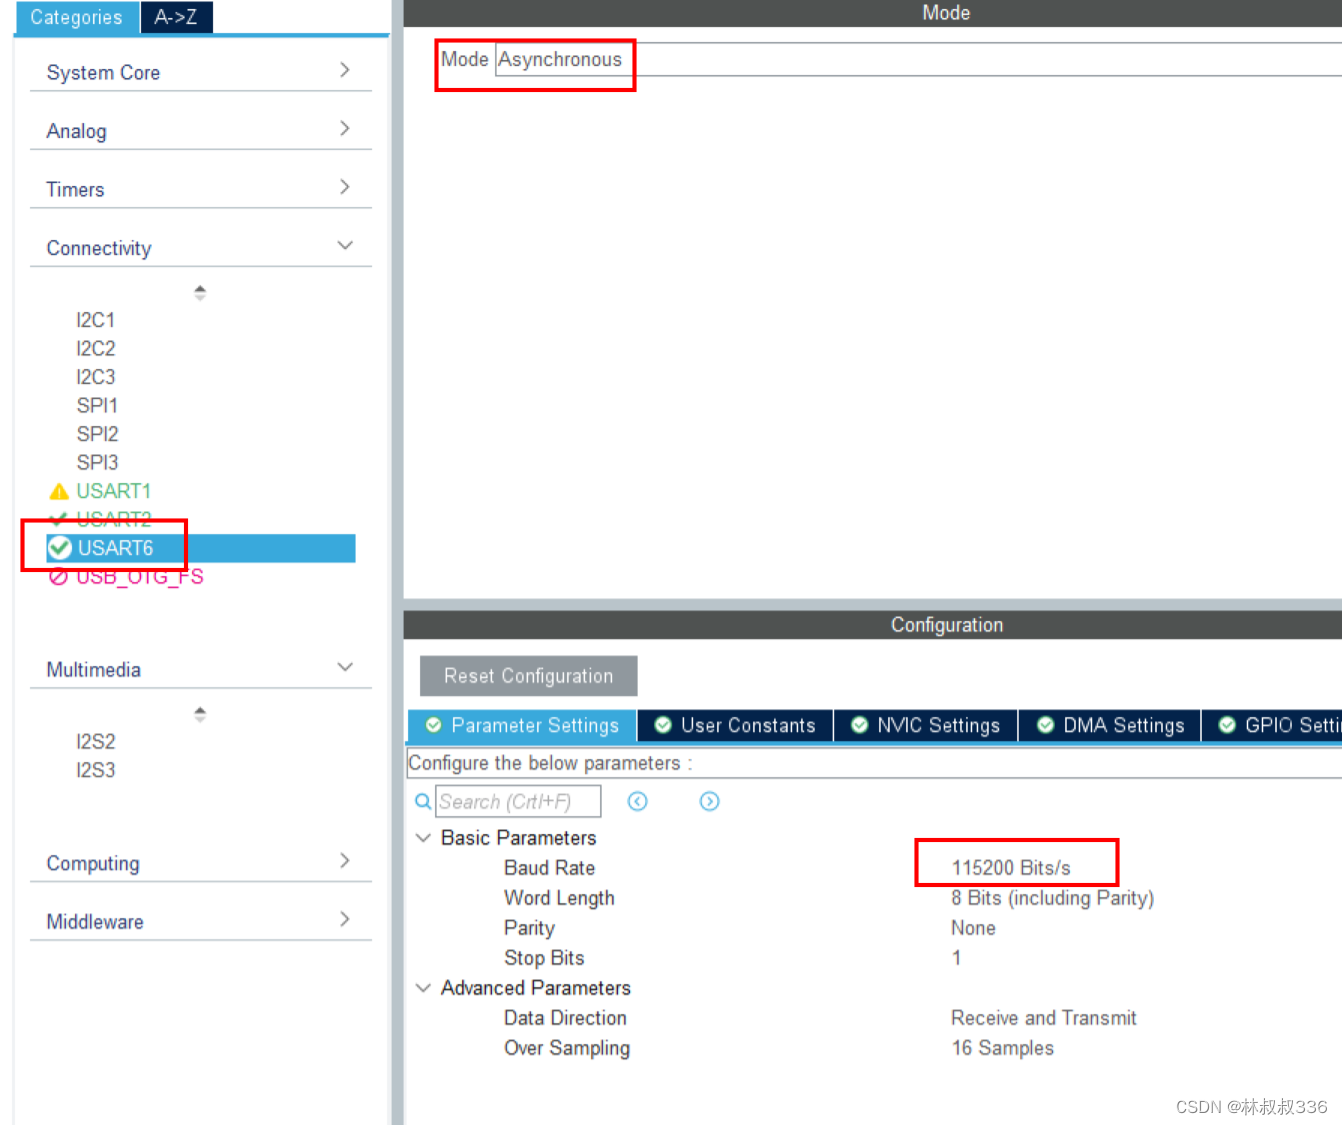
还需要再开一个usart把数据通过串口模块打印在电脑上。
二、代码修改
配置完成以后使用cubemx生成代码随后我们进行代码的修改
1.普通usart的打印验证(这段要是确保无误的话可以跳过)
在usart.c文件中需要添加
/* USER CODE BEGIN 0 */
#include <stdio.h>
/* USER CODE END 0 */
随后在此文件的文末添加
/* USER CODE BEGIN 1 */
int fputc(int ch,FILE *f)
{
	/*发送一个字节到串口*/

	HAL_UART_Transmit(&huart6,(uint8_t*)&ch,1,1000);

	return (ch);

}
int fgetc(FILE *f)
{
	uint8_t ch;
	HAL_UART_Receive(&huart6,(uint8_t *)&ch,sizeof(ch),0xFFFF);
	return ch;
}
/* USER CODE END 1 */
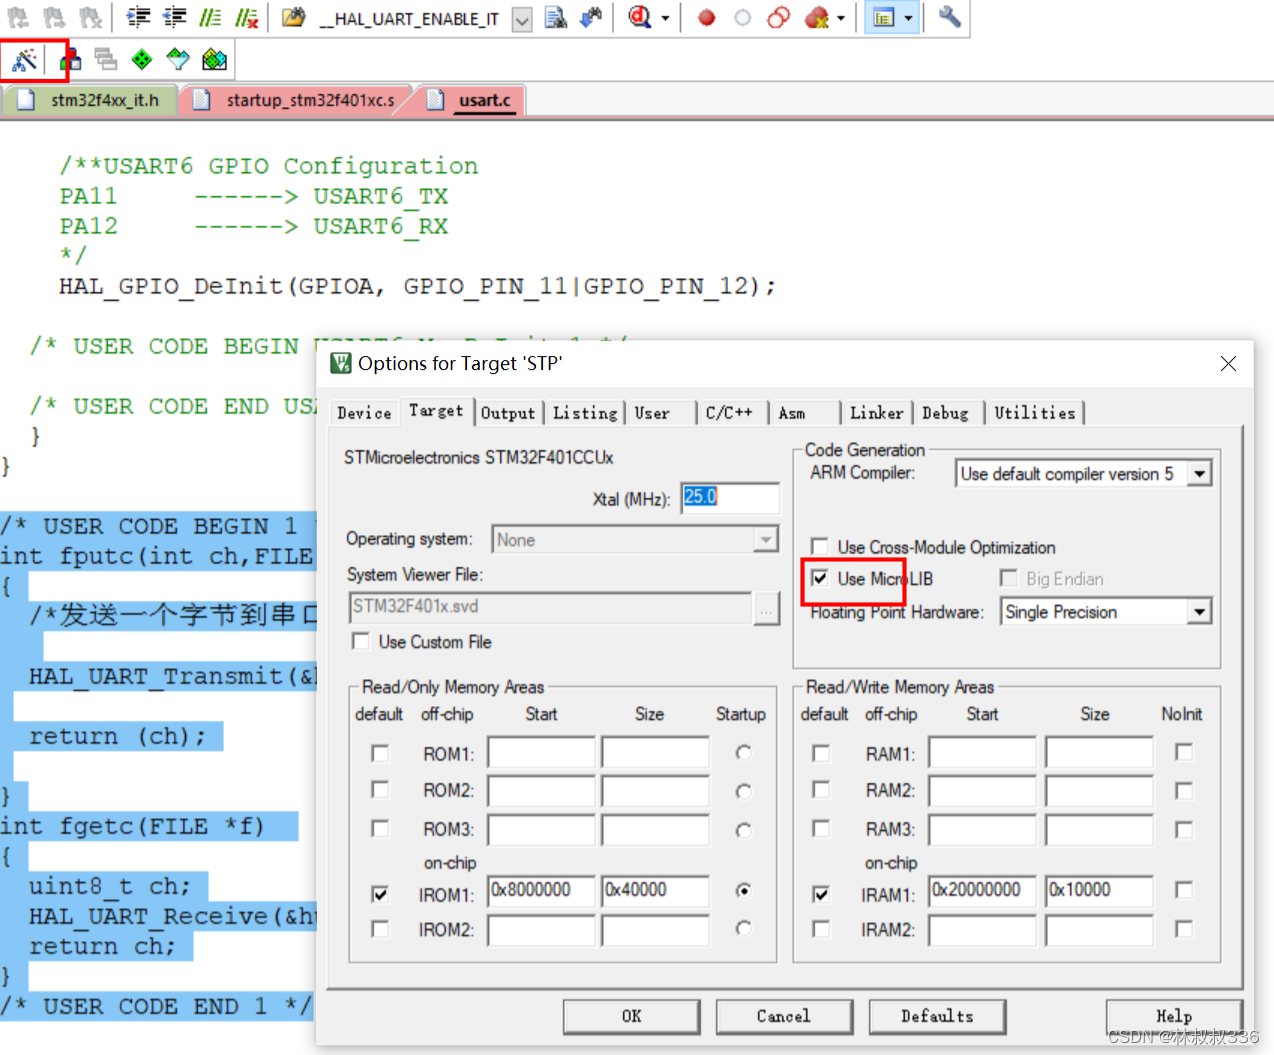
还需要勾选微库
随后在主函数 main.c中去验证
先包含微库
/* USER CODE BEGIN Includes */
#include <stdio.h>
/* USER CODE END Includes */
随后在主循环中进行打印测试
		printf("hello world!\n");
		HAL_Delay(100);
2.中断服务函数的修改
首先是在main.c 中添加两个全局变量。
/* USER CODE BEGIN PM */
uint16_t  receive_cnt;
uint16_t distance;
/* USER CODE END PM */
随后在初始化的时候打开中断(这里很重要,不打开没有值~!!!!)
  /* USER CODE BEGIN 2 */
	__HAL_UART_ENABLE_IT(&huart1, UART_IT_RXNE);
  /* USER CODE END 2 */
最后我们去修改It.c和.h文件
先改.h文件
最开始要定义几个变量和常量以及宏定义:
/* USER CODE BEGIN EC */
typedef unsigned char uint8_t;
typedef unsigned short uint16_t;
typedef unsigned int uint32_t;
typedef signed char int8_t;
typedef signed short int16_t;
typedef signed int int32_t;
/* USER CODE END EC */

/* Exported macro ------------------------------------------------------------*/
/* USER CODE BEGIN EM */
#define ANGLE_PER_FRAME 12
#define HEADER 0x54
#define POINT_PER_PACK 12
#define VERLEN  0x2C 	//低五位是一帧数据接收到的点数,目前固定是12,高三位固定为1

typedef struct __attribute__((packed)) Point_Data
{
	uint16_t distance;//距离
	uint8_t intensity;//置信度

}LidarPointStructDef;

typedef struct __attribute__((packed)) Pack_Data
{
	uint8_t header;
	uint8_t ver_len;
	uint16_t temperature;
	uint16_t start_angle;
	LidarPointStructDef point[POINT_PER_PACK];
	uint16_t end_angle;
	uint16_t timestamp;
	uint8_t crc8;
}LiDARFrameTypeDef;
/* USER CODE END EM */
然后是申明函数:
/* USER CODE BEGIN EFP */
void data_process(void);
/* USER CODE END EFP */
现在去改.c文件
先定义变量和常量以及申明外部变量
/* USER CODE BEGIN PD */
LiDARFrameTypeDef Pack_Data;//雷达接收的数据储存在这个变量之中
extern uint16_t receive_cnt;
extern uint16_t distance;
static const uint8_t CrcTable[256] =
{
0x00, 0x4d, 0x9a, 0xd7, 0x79, 0x34, 0xe3,
0xae, 0xf2, 0xbf, 0x68, 0x25, 0x8b, 0xc6, 0x11, 0x5c, 0xa9, 0xe4, 0x33,
0x7e, 0xd0, 0x9d, 0x4a, 0x07, 0x5b, 0x16, 0xc1, 0x8c, 0x22, 0x6f, 0xb8,
0xf5, 0x1f, 0x52, 0x85, 0xc8, 0x66, 0x2b, 0xfc, 0xb1, 0xed, 0xa0, 0x77,
0x3a, 0x94, 0xd9, 0x0e, 0x43, 0xb6, 0xfb, 0x2c, 0x61, 0xcf, 0x82, 0x55,
0x18, 0x44, 0x09, 0xde, 0x93, 0x3d, 0x70, 0xa7, 0xea, 0x3e, 0x73, 0xa4,
0xe9, 0x47, 0x0a, 0xdd, 0x90, 0xcc, 0x81, 0x56, 0x1b, 0xb5, 0xf8, 0x2f,
0x62, 0x97, 0xda, 0x0d, 0x40, 0xee, 0xa3, 0x74, 0x39, 0x65, 0x28, 0xff,
0xb2, 0x1c, 0x51, 0x86, 0xcb, 0x21, 0x6c, 0xbb, 0xf6, 0x58, 0x15, 0xc2,
0x8f, 0xd3, 0x9e, 0x49, 0x04, 0xaa, 0xe7, 0x30, 0x7d, 0x88, 0xc5, 0x12,
0x5f, 0xf1, 0xbc, 0x6b, 0x26, 0x7a, 0x37, 0xe0, 0xad, 0x03, 0x4e, 0x99,
0xd4, 0x7c, 0x31, 0xe6, 0xab, 0x05, 0x48, 0x9f, 0xd2, 0x8e, 0xc3, 0x14,
0x59, 0xf7, 0xba, 0x6d, 0x20, 0xd5, 0x98, 0x4f, 0x02, 0xac, 0xe1, 0x36,
0x7b, 0x27, 0x6a, 0xbd, 0xf0, 0x5e, 0x13, 0xc4, 0x89, 0x63, 0x2e, 0xf9,
0xb4, 0x1a, 0x57, 0x80, 0xcd, 0x91, 0xdc, 0x0b, 0x46, 0xe8, 0xa5, 0x72,
0x3f, 0xca, 0x87, 0x50, 0x1d, 0xb3, 0xfe, 0x29, 0x64, 0x38, 0x75, 0xa2,
0xef, 0x41, 0x0c, 0xdb, 0x96, 0x42, 0x0f, 0xd8, 0x95, 0x3b, 0x76, 0xa1,
0xec, 0xb0, 0xfd, 0x2a, 0x67, 0xc9, 0x84, 0x53, 0x1e, 0xeb, 0xa6, 0x71,
0x3c, 0x92, 0xdf, 0x08, 0x45, 0x19, 0x54, 0x83, 0xce, 0x60, 0x2d, 0xfa,
0xb7, 0x5d, 0x10, 0xc7, 0x8a, 0x24, 0x69, 0xbe, 0xf3, 0xaf, 0xe2, 0x35,
0x78, 0xd6, 0x9b, 0x4c, 0x01, 0xf4, 0xb9, 0x6e, 0x23, 0x8d, 0xc0, 0x17,
0x5a, 0x06, 0x4b, 0x9c, 0xd1, 0x7f, 0x32, 0xe5, 0xa8
};//用于crc校验的数组
/* USER CODE END PD */
然后我们需要对USART1_IRQHandler()函数进行修改,这里使用回调函数!!!而是直接修改的中断服务函数。
void USART1_IRQHandler(void)
{
  /* USER CODE BEGIN USART1_IRQn 0 */
	static uint8_t state = 0;//状态位
	static uint8_t crc = 0;//校验和
	static uint8_t cnt = 0;//用于一帧12个点的计数
	uint8_t temp_data;
  /* USER CODE END USART1_IRQn 0 */
  HAL_UART_IRQHandler(&huart1);
  /* USER CODE BEGIN USART1_IRQn 1 */
  if (__HAL_UART_GET_FLAG(&huart1, UART_FLAG_RXNE) != RESET) //接收到数据
  {
    temp_data = (uint8_t)(huart1.Instance->DR & 0xFF);

    //if(state == 1)receive_cnt = temp_data;
    __HAL_UART_CLEAR_FLAG(&huart1, UART_FLAG_RXNE);
		if (state > 5)
		{
			if(state < 42)
			{
				if(state%3 == 0)//一帧数据中的序号为6,9.....39的数据,距离值低8位
				{
					Pack_Data.point[cnt].distance = (uint16_t)temp_data;
					state++;
					crc = CrcTable[(crc^temp_data) & 0xff];
				}
				else if(state%3 == 1)//一帧数据中的序号为7,10.....40的数据,距离值高8位
				{
					Pack_Data.point[cnt].distance = ((uint16_t)temp_data<<8)+Pack_Data.point[cnt].distance;
					state++;
					crc = CrcTable[(crc^temp_data) & 0xff];
				}
				else//一帧数据中的序号为8,11.....41的数据,置信度
				{
					Pack_Data.point[cnt].intensity = temp_data;
					cnt++;
					state++;
					crc = CrcTable[(crc^temp_data) & 0xff];
				}
			}
			else
			{
				switch(state)
				{
					case 42:
						Pack_Data.end_angle = (uint16_t)temp_data;//结束角度低8位
						state++;
						crc = CrcTable[(crc^temp_data) & 0xff];
						break;
					case 43:
						Pack_Data.end_angle = ((uint16_t)temp_data<<8)+Pack_Data.end_angle;//结束角度高8位
						state++;
						crc = CrcTable[(crc^temp_data) & 0xff];
						break;
					case 44:
						Pack_Data.timestamp = (uint16_t)temp_data;//时间戳低8位
						state++;
						crc = CrcTable[(crc^temp_data) & 0xff];
						break;
					case 45:
						Pack_Data.timestamp = ((uint16_t)temp_data<<8)+Pack_Data.timestamp;//时间戳高8位
						state++;
						crc = CrcTable[(crc^temp_data) & 0xff];
						break;
					case 46:
						Pack_Data.crc8 = temp_data;//雷达传来的校验和
						if(Pack_Data.crc8 == crc)//校验正确
						{
							data_process();//接收到一帧且校验正确可以进行数据处理
							receive_cnt++;//输出接收到正确数据的次数
						}
						else
						{
						//校验不正确
						}
							//memset(&Pack_Data,0,sizeof(Pack_Data)*);//清零
						crc = 0;
						state = 0;
						cnt = 0;//复位
					default: break;
				}
			}
		}
		else
		{
			switch(state)
			{
				case 0:
					if(temp_data == HEADER)//头固定
					{
						Pack_Data.header = temp_data;
						state++;
						crc = CrcTable[(crc^temp_data) & 0xff];//开始进行校验
					} else state = 0,crc = 0;
					break;
				case 1:
					//receive_cnt = temp_data;
					if(temp_data == VERLEN)//测量的点数,目前固定
					{
						//receive_cnt++;
						Pack_Data.ver_len = temp_data;
						state++;
						crc = CrcTable[(crc^temp_data) & 0xff];
					} else state = 0,crc = 0;
					break;
				case 2:
					Pack_Data.temperature = (uint16_t)temp_data;//温度低8位,一共16位ADC,0--4096,无量纲
					state++;
					crc = CrcTable[(crc^temp_data) & 0xff];
					break;
				case 3:
					Pack_Data.temperature = ((uint16_t)temp_data<<8)+Pack_Data.temperature;//温度高8位
					state++;
					crc = CrcTable[(crc^temp_data) & 0xff];
					break;
				case 4:
					Pack_Data.start_angle = (uint16_t)temp_data;//开始角度低8位,放大了100倍
					state++;
					crc = CrcTable[(crc^temp_data) & 0xff];
					break;
				case 5:
					Pack_Data.start_angle = ((uint16_t)temp_data<<8)+Pack_Data.start_angle;
					state++;
					crc = CrcTable[(crc^temp_data) & 0xff];
					break;
				default: break;
			}
		}
	}
  /* USER CODE END USART1_IRQn 1 */
}
最后我们只需要定义数据处理函数就可以:
/* USER CODE BEGIN 1 */
void data_process(void)//数据处理函数,完成一帧之后可进行数据处理
{
	//计算距离
	static uint8_t cnt = 0;
	uint8_t i;
	static uint16_t count = 0;
	static uint32_t sum = 0;
	for(i=0;i<12;i++)//12个点取平均
	{
		if(Pack_Data.point[i].distance != 0)//去除0的点
		{
			count++;
			sum += Pack_Data.point[i].distance;
		}
	}
	if(++cnt == 100)//100个数据帧计算一次距离
	{
		distance = sum/count;
		sum = 0;
		count = 0;
		cnt = 0;
	}
}
/* USER CODE END 1 */
回到主循环进行距离的打印即可:
  while (1)
  {
		printf("1--%d次\n",receive_cnt);
		printf("1--%dmm\n",distance);
		HAL_Delay(100);
  }
总结
本文只简述了配置和代码修改并未对具体函数进行讲解。其官方提供的是标准库,需要标准库的直接找官方资料就可。


 3856
3856

 被折叠的 条评论
为什么被折叠?
被折叠的 条评论
为什么被折叠?
 到【灌水乐园】发言


