| 如果对深度学习与神经网络不太了解可以参考--计算机视觉深度学习入门笔记文章浏览阅读294次,点赞3次,收藏3次。深度学习是一种机器学习的分支,致力于模拟人脑神经网络的工作原理。通过构建具有多层次结构的神经网络模型,深度学习可以从大量数据中学习和提取特征,以解决各种复杂的任务。在过去的几年中,AI在各个领域都有突飞猛进的发展。就如同追求物理学中大统一,对于各式的AI模型,人们希望建立一个统一的通用人工智能(AGI)。在自然语言模型中,ChatGPT或许已经具有在部分领域AGI的雏形,尽管其仍然存在很多问题,对于某些交互存在胡言乱语的情况。但不可否认的是,我们或许能够在有生之年见证真正的AGI的诞生。_视觉深度学习笔记 https://blog.csdn.net/qq_60818566/article/details/132354233?spm=1001.2014.3001.5501 https://blog.csdn.net/qq_60818566/article/details/132354233?spm=1001.2014.3001.5501 一 实验目的 1. 设计LabVIEW界面与Python交互,结合LabVIEW图形化编程与Python兼容性的优势,设计一个跨平台的具有优秀的可视化,交互UI,以及强大兼容性的深度学习图像程序。 2. 掌握深度学习的基本原理以及CNN在图像处理中的应用。了解LeNet-5模型的架构和核心组件,如卷积层、池化层和全连接层,并了解它们在图像分类任务中的作用。 3. 掌握LabVIEW的可视化化界面与互动UI设计。 二 实验原理 本实验使用的相关软件:Python3.9、LabView2022Q3(含Vision2022) 代码详见附录。 2.1 LeNet-5模型构建 1.数据集和预处理:实验使用手写数字数据集(MNIST),如图1所示。包含了60,000个样本的训练集以及10,000个样本的测试集。每张图片的大小都是28x28像素。这些图片都是从真实世界中获取的手写数字,并且已经被预处理和标记,本实验预处理过程将图像比例放缩到32x32像素(LeNet-5要求输入图片格式为32x32)。 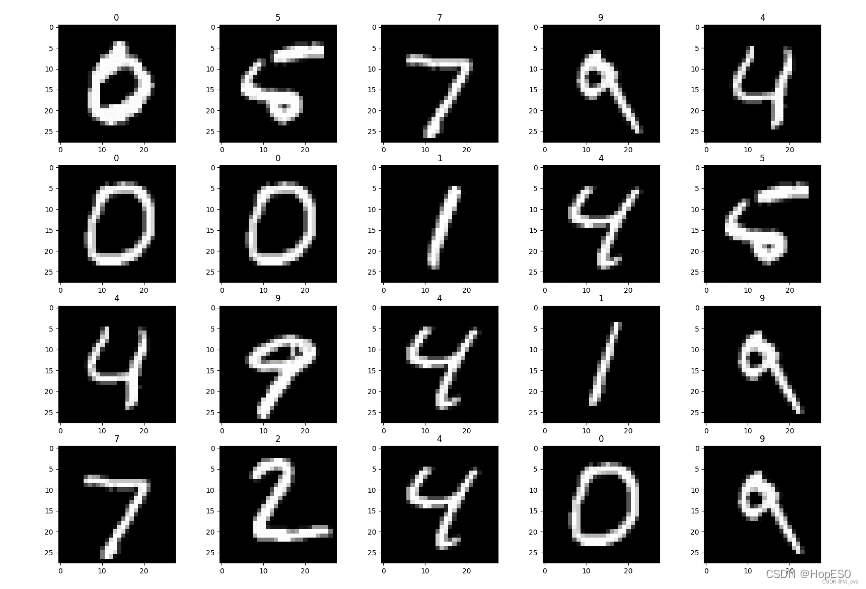
图1 MNIST数据集 2.模型搭建与训练: LeNet-5的网络结构如图2所示,神经网络一共有3个卷积层和两个全连接层。激活函数为Relu,每一个卷积层后使用最大池化进行下采样。具体细节如图3所示。 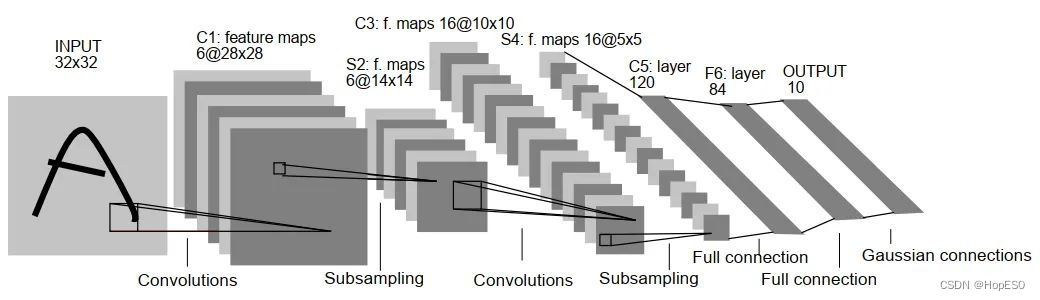
图2 LeNet-5网络结构示意
| 输入维度 | 输出维度 | 层设置 | | 卷积层1 | 32x32x1 | 28x28x6 | 卷积核尺寸:(5,5) 卷积核个数:6 卷积步长:1 | | 最大池化 | 28x28x6 | 14x14x6 | 采样窗口:(2,2) 采样步长:2 | | 卷积层2 | 14x14x6 | 10x10x16 | 卷积核尺寸:(5,5) 卷积核个数:16 卷积步长:1 | | 最大池化 | 10x10x16 | 5x5x16 | 采样窗口:(2,2) 采样步长:2 | | 卷积层3 | 5x5x16 | 1x1x120 | 卷积核尺寸:(5,5) 卷积核个数:120 卷积步长:1 | | 一维展开 | 1x1x120 | 120 | | | 全连接层1 | 120 | 84 | 84个神经元 | | 全连接层2 | 84 | 10 | 10个神经元 |
图3 LeNet-5网络细节图 经过网络训练后,最终一张图片转化为10个特征输出。选择最大的特征输出对应的数组标签作为预测值,损失函数选择交叉熵损失。使用BP反向传播更新权重参数,训练过程使用自适应矩阵优化,增加训练速度防止过拟合。 2.2 LabView手写板与数字识别 1.LabVIEW手写板编译逻辑:使用事件结构来编写鼠标移动和按键的控件事件。当按下按键时,利用移动画笔程序将鼠标与画笔绑定在一起。鼠标移动事件发生时,通过使用绘制直线函数,在画板上进行直线绘制,实现鼠标移动绘制线条的效果。如图4、5所示。 2.数字识别使用python节点调用.py文件识别画板上的数字,如图6所示。 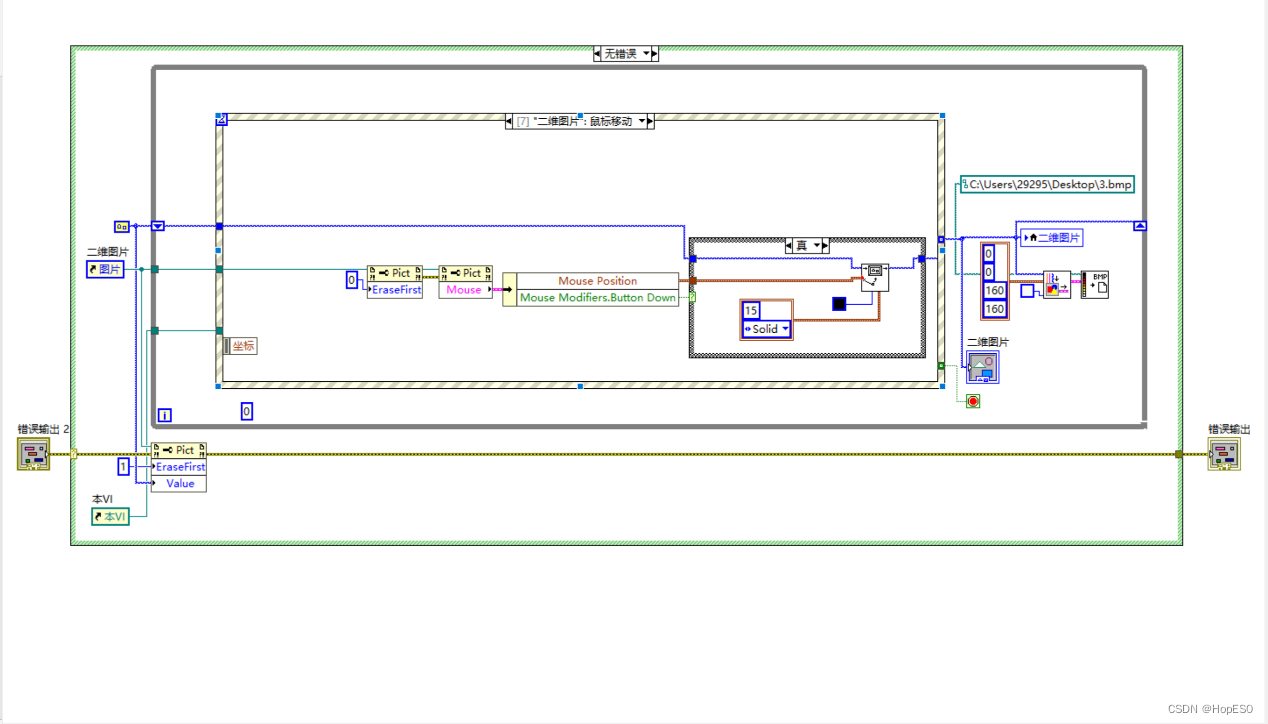
图4 鼠标移动事件 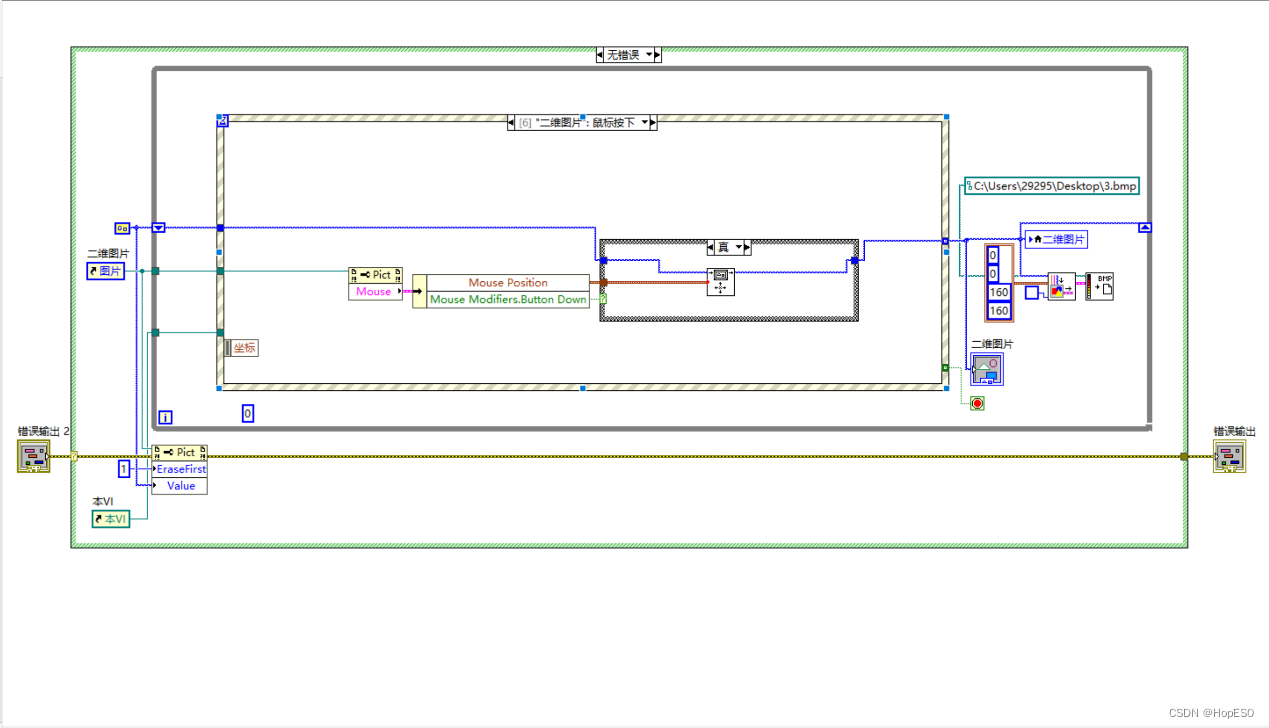
图5 鼠标按下事件 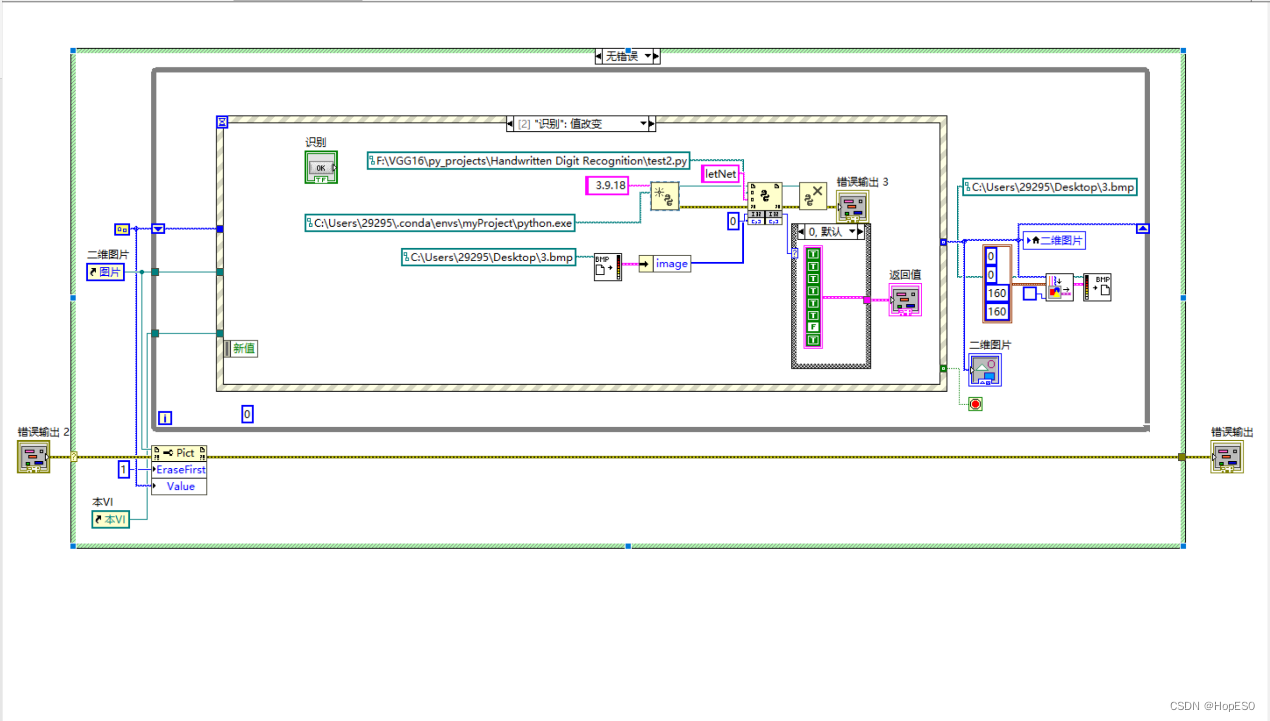
图6 识别程序 三 实验内容 3.1 技术路线 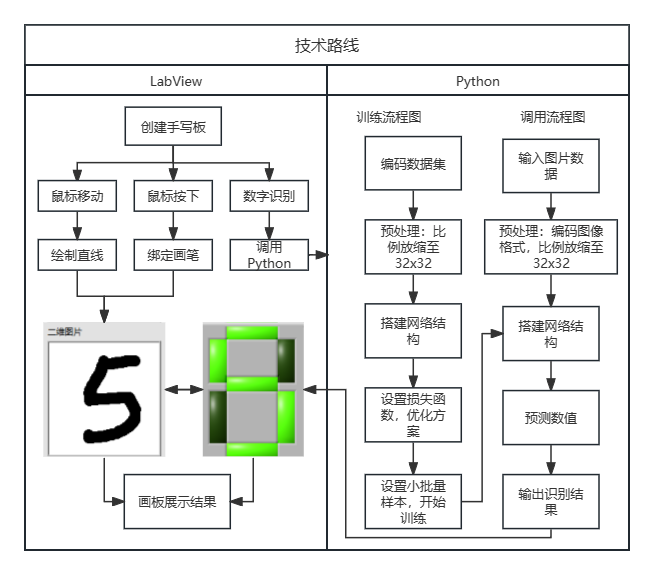
图7 实验技术路线图 3.2 LeNet-5模型训练结果 迭代时间为8h,部分迭代准确率趋势如下图8所示: 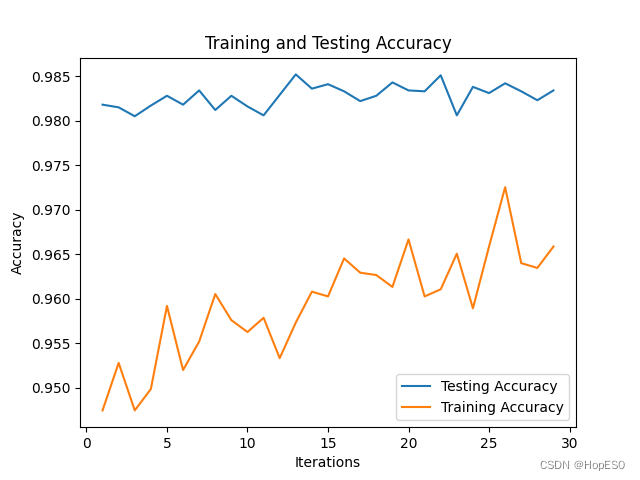
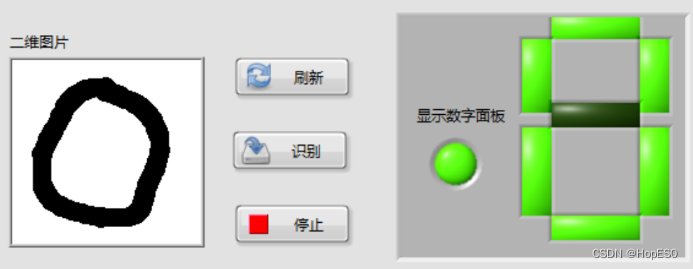
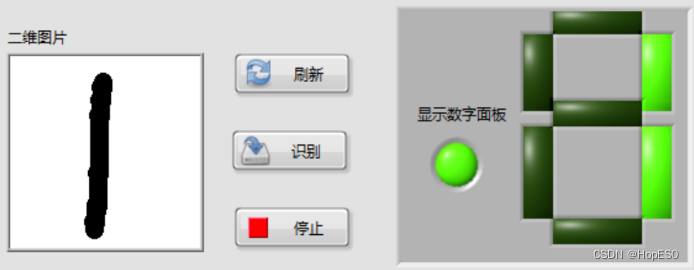
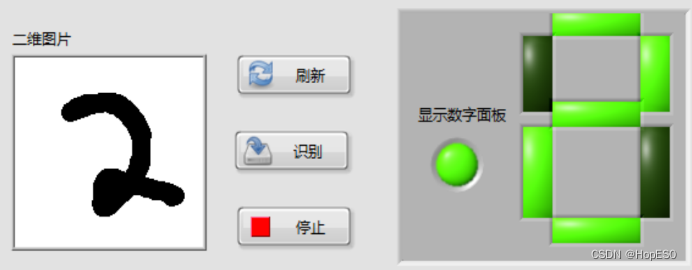
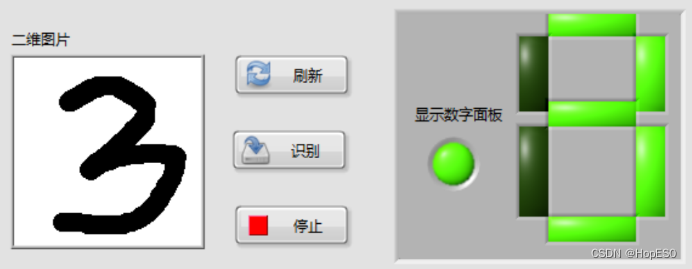
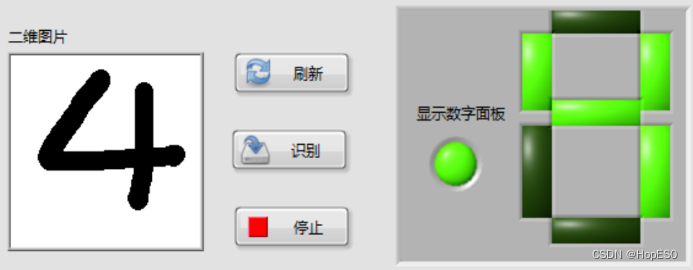
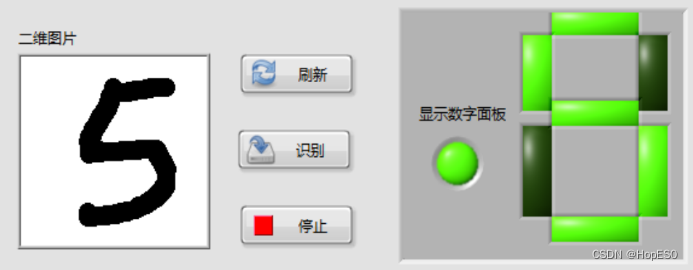
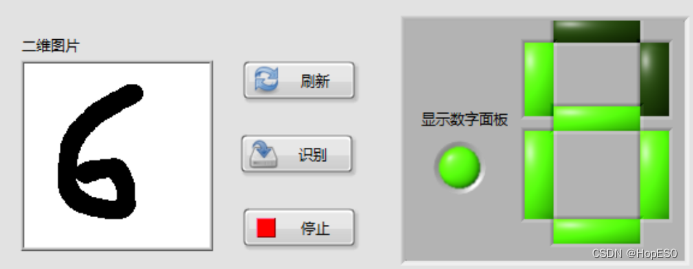
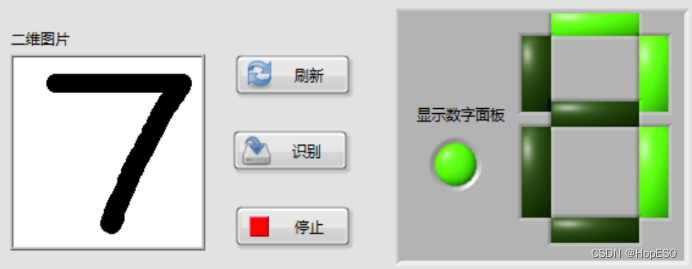
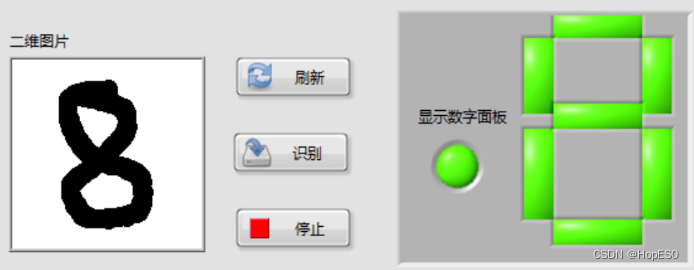
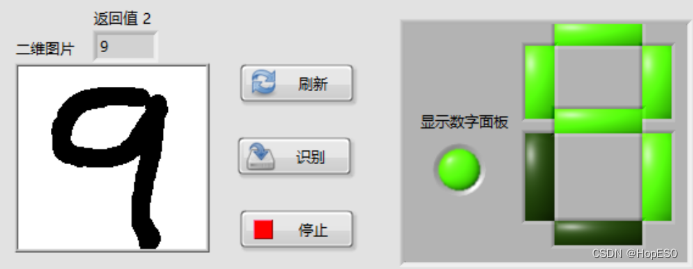
图8 准确率迭代趋势 最终迭代结果: 训练集【迭代次数:99,误差损失:22.897212369791667】 训练集预测准确率:98.77% 测试集预测准确率:97.65% 3.3 手写板数字识别
图9 手写数字识别结果 四:实验总结与心得 1.总结: (1)本次实验中,通过搭建LabVIEW界面设计手写板,并实现鼠标移动和按键控件事件的捕获。利用事件结构,可以将用户绘制的数字数据发送到Python模块中进行处理和识别。 (2)在Python环境中,我们使用LENET5卷积神经网络模型来对手写数字进行训练和识别。该模型通过输入用户绘制的数字图像数据,并将其传递给LENET5模型进行推理,最终返回数字识别结果。 2.心得: (1)联合使用LabVIEW和Python能够充分发挥各自的优势,LabVIEW提供了友好的图形化界面和事件处理功能,而Python则提供了强大的机器学习库和深度学习框架。 (2)LENET5模型在手写数字识别任务上表现出色,它能够准确地识别用户绘制的数字。在LabVIEW和Python之间进行数据传递时,需要确保数据格式和类型的一致性,以确保模型的正常运行和正确的识别结果。 (3)在实验过程中,调试是必不可少的。由于涉及到许多环节和技术,可能会出现各种问题,因此耐心地进行调试和故障排除非常重要。 附录
| 程序1:LENET5训练程序 Python3.9 | | import torch
import os
import struct
import numpy as np
import matplotlib.pyplot as plt
from PIL import Image
os.environ['KMP_DUPLICATE_LIB_OK'] = 'TRUE'
# 加载MNIST数据集
def load_mnist(path, kind="train"):
# label与image数据存储路径
labels_path = os.path.join(path, '%s-labels.idx1-ubyte' % kind)
images_path = os.path.join(path, '%s-images.idx3-ubyte' % kind)
with open(labels_path, 'rb') as lbpath:
magic, n = struct.unpack('>II', lbpath.read(8))
labels = np.fromfile(lbpath, dtype=np.uint8)
with open(images_path, 'rb') as imgpath:
magic, num, rows, cols = struct.unpack('>IIII', imgpath.read(16))
images = np.fromfile(imgpath, dtype=np.uint8).reshape(len(labels), rows, cols)
resized_images = []
for img in images:
img_pil = Image.fromarray(img)
resized_img = img_pil.resize((32, 32))
resized_img_gray = resized_img.convert('L')
resized_images.append(np.array(resized_img_gray))
return np.stack(resized_images), labels
# 检查是否已存在保存的数据文件
if all([os.path.exists(file) for file in ['X_train.npy', 'y_train.npy', 'X_test.npy', 'y_test.npy']]):
X_train = np.load('X_train.npy')
y_train = np.load('y_train.npy')
X_test = np.load('X_test.npy')
y_test = np.load('y_test.npy')
else:
X_train, y_train = load_mnist("F:/VGG16/py_projects/Handwritten Digit Recognition/", kind="train")
X_test, y_test = load_mnist("F:/VGG16/py_projects/Handwritten Digit Recognition/", kind="t10k")
X_train = X_train.reshape(-1, 1, 32, 32)
X_test = X_test.reshape(-1, 1, 32, 32)
np.save('X_train.npy', X_train)
np.save('y_train.npy', y_train)
np.save('X_test.npy', X_test)
np.save('y_test.npy', y_test)
class LENET_5(torch.nn.Module):
def __init__(self):
super(LENET_5, self).__init__()
self.cov1 = torch.nn.Conv2d(1, 6, (5, 5), 1, 0)
self.cov2 = torch.nn.Conv2d(6, 16, (5, 5), 1, 0)
self.cov3 = torch.nn.Conv2d(16, 120, (5, 5), 1, 0)
self.liner1 = torch.nn.Linear(120, 84)
self.liner2 = torch.nn.Linear(84, 10)
def forward(self, x):
x = torch.nn.functional.relu(self.cov1(x))
x = torch.nn.functional.max_pool2d(x, (2, 2), 2)
x = torch.nn.functional.relu(self.cov2(x))
x = torch.nn.functional.max_pool2d(x, (2, 2), 2)
x = torch.nn.functional.relu(self.cov3(x))
x = x.view(x.size(0), -1)
x = torch.nn.functional.relu(self.liner1(x))
x = self.liner2(x)
return x
device = torch.device("cuda" if torch.cuda.is_available() else "cpu")
model1 = LENET_5().to(device)
if os.path.exists("LENET_5.pth"):
# 加载已保存的模型
model1.load_state_dict(torch.load('LENET_5.pth'))
params = model1.parameters()
print("已加载已保存的模型")
#损失函数与优化器
loss_function = torch.nn.CrossEntropyLoss(reduction='mean')
loss_1 = np.zeros(100)
accuracy_list = [] # 用于存储每次迭代后的准确率
training_accuracy_list = [] # 用于存储训练过程中每次迭代后的准确率
optimizer = torch.optim.Adam(model1.parameters(), lr=0.001, betas=(0.9, 0.999), eps=1e-08, weight_decay=0, amsgrad=False)
batch_size = 16#小批量样本个数
# 训练集
train_dataset = torch.utils.data.TensorDataset(torch.FloatTensor(X_train), torch.LongTensor(y_train))
train_data_loader = torch.utils.data.DataLoader(train_dataset, batch_size=batch_size, shuffle=True)
# 测试集
test_dataset = torch.utils.data.TensorDataset(torch.FloatTensor(X_test), torch.LongTensor(y_test))
test_data_loader = torch.utils.data.DataLoader(test_dataset, batch_size=batch_size, shuffle=False)
#plt.ion() # 开启交互模式
for i in range(100):
loss_2 = np.zeros(len(train_data_loader))
model1.train() # 设置模型为训练模式
for j, (images, labels) in enumerate(train_data_loader):
images = images.to(device)
labels = labels.to(device)
optimizer.zero_grad()
pred = model1(images)
loss = loss_function(pred, labels)
loss.backward()
optimizer.step()
loss_2[j] = loss.item()
loss_1[i] = np.mean(loss_2)
print("训练集【迭代次数:{},误差损失:{}】".format(i + 1, loss_1[i]))
# 校验准确率
model1.eval()
correct = 0
total = len(test_data_loader.dataset)
with torch.no_grad():
for images, labels in test_data_loader:
images = images.to(device)
labels = labels.to(device)
preds = model1(images)
_, preds_class = torch.max(preds, dim=1)
correct += (preds_class == labels).sum().item()
accuracy = correct / total
accuracy_list.append(accuracy)
training_accuracy_list.append((loss_2 == 0).sum() / len(loss_2)) # 计算每次迭代后的训练集准确率
print("训练集预测准确率:{:.2f}%".format(accuracy * 100))
print("测试集预测准确率:{:.2f}%".format(training_accuracy_list[0] * 100))
# 绘制并更新可视化图表
# plt.clf() # 清除当前图形
# plt.plot(range(1, i + 2), accuracy_list, label='Testing Accuracy')
# plt.plot(range(1, i + 2), training_accuracy_list, label='Training Accuracy')
# plt.xlabel("Iterations")
# plt.ylabel("Accuracy")
# plt.title("Training and Testing Accuracy")
# plt.legend()
# plt.draw()
# plt.pause(0.1) # 暂停一定时间以刷新图表
torch.save(model1.state_dict(), "LENET_5.pth")
print("保存模型完成")
# plt.ioff() # 关闭交互模式
# plt.show() # 显示最终的图表 | | 程序2:LENET5调用程序 Python3.9 | | import numpy as np
from PIL import Image
import torch
import os
def letNet(image_data):
# 将一维list转换为numpy数组
image_data = np.array(image_data)
image = image_data.reshape(160, 160, 3)
image = image.astype(np.uint8)
image = Image.fromarray(image)
image = image.resize((32, 32))
grayscale_image = image.convert("L")
grayscale_image = 255 - np.array(grayscale_image)
resized_array = np.expand_dims(grayscale_image, axis=0)
image_tensor = torch.tensor(resized_array, dtype=torch.float32)
class LENET_5(torch.nn.Module):
def __init__(self):
super(LENET_5, self).__init__()
self.cov1 = torch.nn.Conv2d(1, 6, (5, 5), 1, 0)
self.cov2 = torch.nn.Conv2d(6, 16, (5, 5), 1, 0)
self.cov3 = torch.nn.Conv2d(16, 120, (5, 5), 1, 0)
self.liner1 = torch.nn.Linear(120, 84)
self.liner2 = torch.nn.Linear(84, 10)
def forward(self, x):
x = torch.nn.functional.relu(self.cov1(x))
x = torch.nn.functional.max_pool2d(x, (2, 2), 2)
x = torch.nn.functional.relu(self.cov2(x))
x = torch.nn.functional.max_pool2d(x, (2, 2), 2)
x = torch.nn.functional.relu(self.cov3(x))
x = x.view(x.size(0), -1)
x = x.transpose(0, 1)
x = torch.nn.functional.relu(self.liner1(x))
x = self.liner2(x)
return x
model1 = LENET_5()
model_path = r"F:\VGG16\py_projects\Handwritten Digit Recognition\LENET_5.pth"
if os.path.exists(model_path):
# 加载已保存的模型
model1.load_state_dict(torch.load(model_path))
# 使用GPU进行推断(如果可用)
device = torch.device("cuda" if torch.cuda.is_available() else "cpu")
model1.to(device)
image_tensor = image_tensor.to(device)
with torch.no_grad():
model1.eval()
pred = model1(image_tensor)
_, preds_class = torch.max(pred, dim=1)
return preds_class |
|


 4488
4488

 被折叠的 条评论
为什么被折叠?
被折叠的 条评论
为什么被折叠?
 到【灌水乐园】发言


