


提示:本篇文章为学校项目实训的记录,所以可能会写的没头没尾的,不具有实际指导意义,因为是小组共同开发,所以不是自己负责的部分会在别的小组成员博客里。
前言
上次说到完成了打卡页面的一级页面的渲染,今天来说说我的饭友的二级页面。
一、我的饭友列表
我的饭友列表主要显示与我关联的饭友列表。有点类似于微信联系人页面。
同时包含搜索,添加,删除,以及点击所在行后跳转到对应饭友的主页的功能。
二、效果详述
1.我的饭友列表详述
这里主要使用了uView的索引列表组件。优点是可以快速定位联系人所在位置,与搜索功能类似,但方便查看。
效果图如下
在下面的图中,对应饭友会显示在对应首字母下方,滑动右侧字母列表会快速定位到所在区域。这里的难点主要在于对该组件的理解和后端返回数据处理。

前端template代码如下:
<u-index-list :index-list="indexList" class="custom-index-list">
<template v-for="(items, index) in itemArr">
<!-- #ifdef APP-NVUE -->
<u-index-anchor :text="indexList[index]"></u-index-anchor>
<!-- #endif -->
<u-index-item>
<!-- #ifndef APP-NVUE -->
<u-index-anchor :text="indexList[index]"></u-index-anchor>
<!-- #endif -->
<view v-for="(item, idx) in items" :key="idx">
<u-swipe-action>
<u-swipe-action-item
:options="options1"
@click="showDeleteConfirmModal(item.follow_user_id)">
<view class="swipe-action u-border-top u-border-bottom">
<view class="swipe-action__content" @click="goToContactPage(item)">
<u-line></u-line>
<view class="list-cell">
<u-row >
<u-avatar :src="item.avatar" shape="square" size="52"></u-avatar>
<text class="nick-name">{{ ' ' + item.nick_name }}</text>
</u-row>
</view>
<u-line></u-line>
</view>
</view>
</u-swipe-action-item>
</u-swipe-action>
</view>
</u-index-item>
</template>
</u-index-list>
相对应的script方法如下
主要涉及到获取数据的方法和数据处理的方法。
		fetchContactList() {
            const data = {
                userId: this.userId,
                nickName: this.searchQuery,
                name: ''
            };

            this.ajax(this.api.myFollowList, 'POST', data, (resp) => {
				console.log("获取关注人列表",resp)
                if (resp.data.code === 200 && resp.data.result) {
					// 将联系人数据进行预处理
					const { itemArr, indexList } = this.processContactList(resp.data.result);
					this.itemArr = itemArr;
					this.indexList = indexList;
				console.log('itemArr',this.itemArr)
				console.log('indexList', this.indexList);
                } else {
                    uni.showToast({
                        icon: 'error',
                        title: resp.msg || '加载失败'
                    });
                }
            });
        },
		processContactList(result) {
	        const itemArr = [];
            const indexList = [];

            // 遍历结果,按首字母分类
            Object.keys(result).forEach(key => {
                if (result[key].length > 0) {
                    indexList.push(key);
                    itemArr.push(result[key]);
                }
            });

            return { itemArr, indexList };
		},
2.饭友搜索功能
代码如下:
<!-- 顶部搜索框 -->
        <view class="u-demo-block__content">
            <u-row customStyle="margin-bottom: 10px">
				<u-col span="0.3">
				    <view></view>
				</u-col>
                <u-col span="9">
                    <u-input v-model="searchQuery" placeholder="搜索联系人" class="search-input"></u-input>
                </u-col>
                <u-col span="0.2">
                    <view></view>
                </u-col>
                <u-col span="1">
                    <view @tap="fetchContactList">
                        <u-icon name="search" color="#919191" size="38"></u-icon>
                    </view>
                </u-col>
                <u-col span="0.5">
                    <view></view>
                </u-col>
                <u-col span="1">
                    <view @tap="showAddContactModal">
                        <u-icon name="plus-circle" color="#919191" size="32"></u-icon>
                    </view>
                </u-col>
            </u-row>
        </view>
该处与页面初始化使用同一个接口。
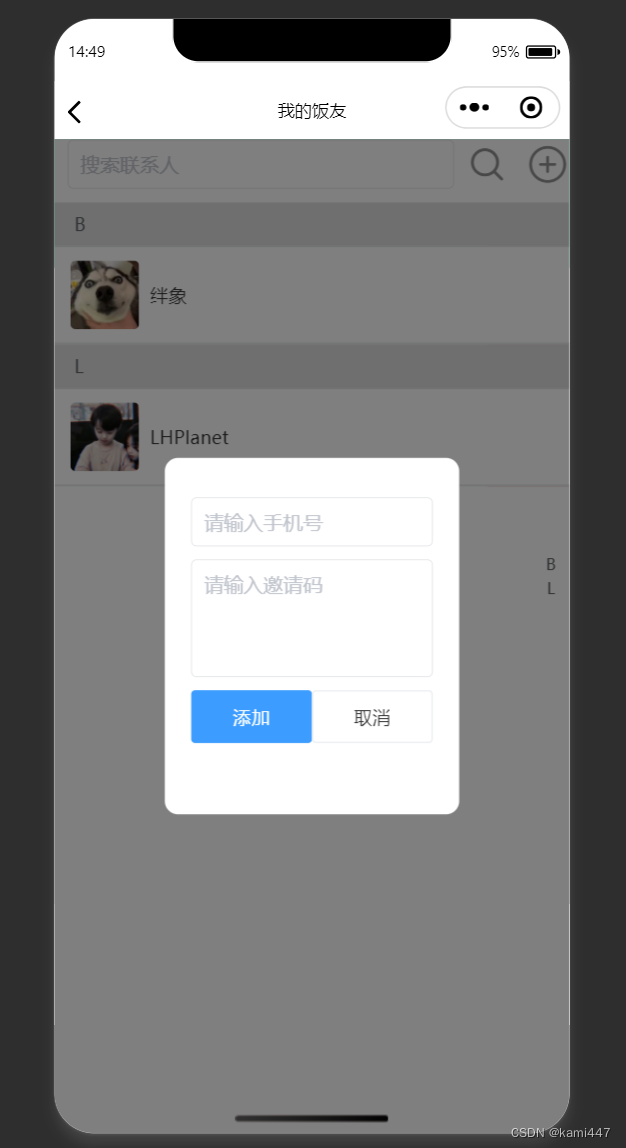
3.添加饭友页面
在这里点击右上角加号后会显示弹窗,输入手机号和邀请码即可添加饭友。
效果图如下:
前端template代码如下:
		<!-- 添加联系人弹窗 -->
        <u-popup :show="showAddContactPopup" mode="center" :round="10">
            <view class="add-contact-popup">
                <view class="input-container">
                    <u-input v-model="newContact.phone" placeholder="请输入手机号"></u-input>
                </view>
                <view class="input-container">
                    <u-textarea v-model="newContact.invitedCode" placeholder="请输入邀请码"></u-textarea>
                </view>
                <view class="input-container">
                    <u-row>
                        <u-button type="primary" @click="addContact">添加</u-button>
                        <u-button type="info" @click="hideAddContactPopup">取消</u-button>
                    </u-row>
                </view>
            </view>
        </u-popup>
addContact方法显示如下:
		addContact() {
            const data = {
                userId: this.userId,
                phone: this.newContact.phone,
                invitedCode: this.newContact.invitedCode
            };

            this.ajax(this.api.addContact, 'POST', data, (resp) => {
                if (resp.data.code === 200) {
                    uni.showToast({
                        icon: 'success',
                        title: '添加成功'
                    });
                    this.showAddContactPopup = false;
                    this.fetchContactList();
                } else {
                    uni.showToast({
                        icon: 'error',
                        title: resp.data.msg || '添加失败'
                    });
                }
            });
        },
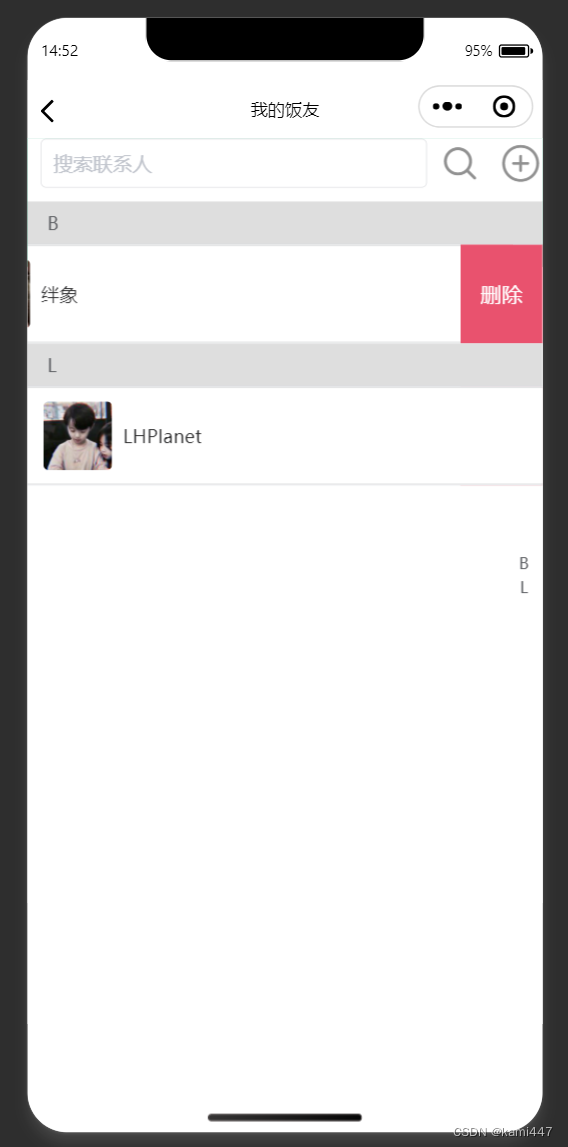
4.删除饭友
在这里对应饭友所在行左滑显示删除按钮,点击即可唤出确认弹窗。
效果图如下:
前端template代码如下:
		<!-- 确认删除弹窗 -->
        <u-popup :show="showDeleteConfirmPopup" mode="center">
            <view class="confirm-delete-popup">
                <text>确定要删除此联系人吗?</text>
                <view class="button-container">
                    <u-button type="default" @click="hideDeleteConfirmPopup">取消</u-button>
                    <u-button type="primary" @click="confirmDelete">确认</u-button>
                </view>
            </view>
        </u-popup>
addContact方法显示如下:
		confirmDelete() {
            const data = {
                userId: this.userId,
                followUserId: this.followUserIdToDelete
            };
			console.log('删除时返回',data)
            this.ajax(this.api.deleteContact, 'POST', data, (resp) => {
                if (resp.data.code === 200) {
                    uni.showToast({
                        icon: 'success',
                        title: '删除成功'
                    });
                    this.showDeleteConfirmPopup = false;
                    this.fetchContactList();
                } else {
                    uni.showToast({
                        icon: 'error',
                        title: resp.data.msg || '删除失败'
                    });
                }
            });
        },
总结
这次开发的难度核心在索引列表的应用以及后端数据的处理。


 被折叠的 条评论
为什么被折叠?
被折叠的 条评论
为什么被折叠?
 到【灌水乐园】发言


