


提示:本篇文章为学校项目实训的记录,所以可能会写的没头没尾的,不具有实际指导意义,因为是小组共同开发,所以不是自己负责的部分会在别的小组成员博客里。
前言
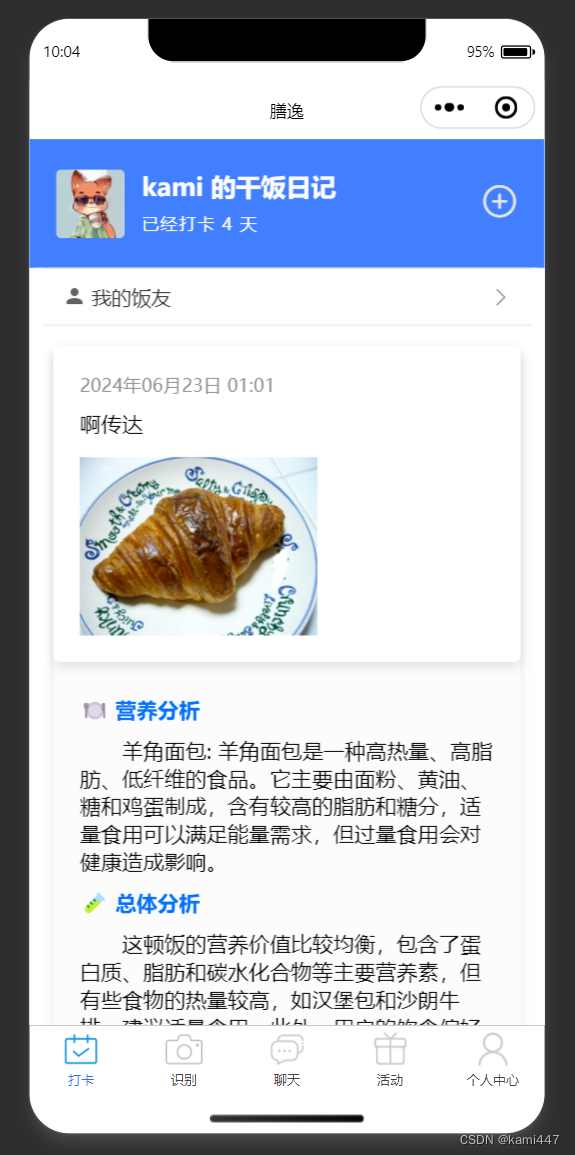
上次说到完成了我的饭友主页的二级页面,今天来说说发布打卡页面的渲染。这中间又夹了一个考试周。终于忙完后有时间来写博客了,其实在这期间还做了前端的样式修改,小程序变得更好看了。下面是重新调整样式后的打卡一级页面。
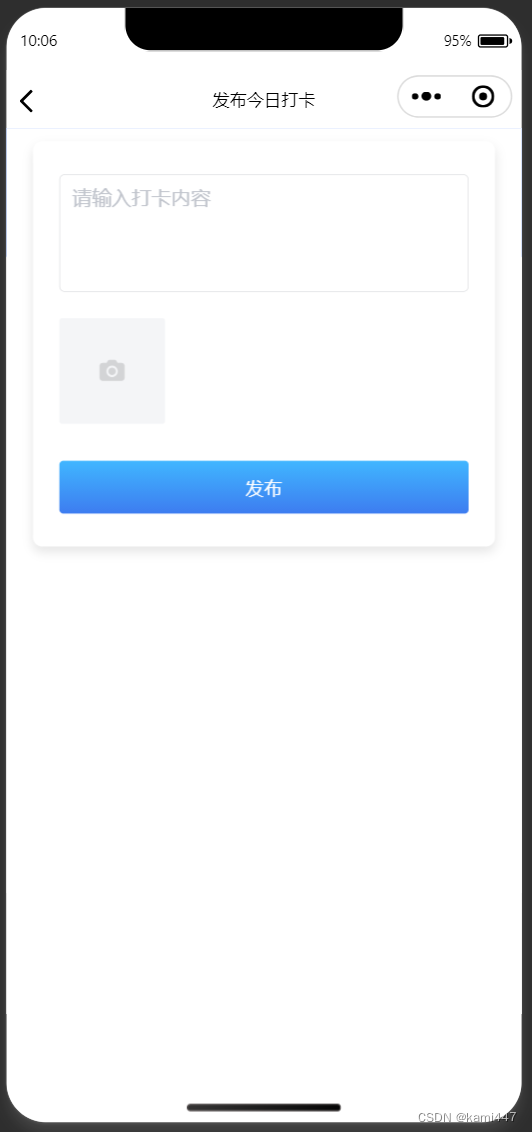
一、发布打卡页面
点击右上角加号就会进入打卡页面,在这个页面输入打卡内容文本和图片后,点击发布按钮,就可以进行发布啦。具体页面样式如下图。
二、效果详述
1.表单详述
这里使用了文本域输入组件textarea和图片上传组件u-upload,图片通过max-count限制总最大上传图片张数为3,并设置图片修改和删除动作的处理方法。
前端template代码如下:
		<u-form :model="form">
            <u-form-item class="u-form-item">
                <u-textarea v-model="form.text" placeholder="请输入打卡内容" class="u-textarea"></u-textarea>
            </u-form-item>
            <!-- <u-form-item class="u-form-item">
                <u-input v-model="form.time" :disabled="true" class="u-input"></u-input>
            </u-form-item> -->

            <u-form-item class="u-form-item">
                <u-upload
                    :file-list="form.images"
                    @after-read="handleImageChange"
					@delete="handleImageRemove"
                    :max-count="3"
                    multiple
                    class="u-upload">
                    <!-- <u-button type="primary" class="u-button" custom-style="background-color: rgba(255, 255, 255, 0.8); color: black;">选择图片</u-button> -->
                </u-upload>
                <!-- <view class="uploaded-images">
                    <image v-for="(image, index) in form.images" :key="index" :src="image.url" style="width: 100rpx; height: 100rpx;" />
                </view> -->
            </u-form-item>

            <u-form-item class="submit-button">
                <u-button @click="handleSubmit" class="u-button" color="linear-gradient(to top, rgb(61, 124, 240), rgb(64, 182, 255))">发布</u-button>
            </u-form-item>
        </u-form>
相对应的script方法如下
主要涉及到图像变动方法和图像删除方法。
		handleImageChange(event) {
            const newFiles = event.file.map(file => ({
                ...file,
                name: `${Date.now()}_${file.url.split('/').pop()}` // 使用时间戳和文件名作为唯一名称
            }));
            this.form.images = [...this.form.images, ...newFiles].slice(0, 3); // 确保最多3张图片
        },
        handleImageRemove(event) {
			console.log('调用到handleImageRemove方法:',event)
            const { index } = event;
            this.form.images.splice(index, 1);
			console.log('此时的images:', this.form.images)
        },
2.点击发布后进行的系列动作
代码如下:
		handleSubmit() {
            if (!this.form.text) {
                uni.showToast({
                    icon: 'none',
                    title: '请填写打卡内容'
                });
                return;
            }
            if (this.form.images.length === 0) {
                uni.showToast({
                    icon: 'none',
                    title: '请上传图片'
                });
                return;
            }
            this.uploadImages(this.form.images, (uploadedUrls) => {
                this.analyzeImages(uploadedUrls, (foods) => {
                    this.analyzeEmotion(foods, this.form.text, (analysis) => {
                        this.form.analysis = this.sanitizeAnalysis(analysis);
						console.log('分析结果',analysis)
						console.log('form.analysis',this.form.analysis)
                        const data = {
                            userId: this.userId,
                            text: this.form.text,
                            time: this.form.time,
                            images: uploadedUrls.join(','),
                            analysis: this.form.analysis
                        };
                        let url = this.api.myCheckIn;
                        this.ajax(url, 'POST', data, (resp) => {
                            if (resp.data.code === 200) {
                                uni.showToast({
                                    icon: 'success',
                                    title: '打卡成功',
                                    duration: 2000,
                                });
								this.$bus.$emit('refreshCheck');
                                setTimeout(function() {
                                    uni.switchTab({
                                        url: '/pages/check_in/check_in'
                                    });
                                }, 1500);
                            } else {
                                uni.showToast({
                                    icon: 'error',
                                    title: resp.msg || '打卡失败'
                                });
                            }
                        });
                    });
                });
            });
        },
其中使用到uploadImages、analyzeImages、analyzeEmotion方法分别负责将图片上传到腾讯云、分析图片内的食物、分析食物的营养。具体的实现代码如下:
		uploadImages(files, callback) {
			console.log('调用到uploadImages:', files)
            const uploadedUrls = [];
            files.forEach((file, index) => {
                cos.postObject({
                    Bucket: 'lhplanet-1316168555', /* 必须 */
                    Region: 'ap-beijing',     /* 必须 */
                    Key: `${Date.now()}_${file.name}`,              /* 必须 */
                    FilePath: file.url,
                    onProgress: function (progressData) {
                        console.log(JSON.stringify(progressData));
                    }
                }, function(err, data) {
                    if(err) {
                        console.error(err);
                        uni.showToast({
                            icon: 'none',
                            title: '图片上传失败'
                        });
                        return;
                    }
					let newLocation = 'https://'+data.Location;
                    uploadedUrls.push(newLocation);
                    if (uploadedUrls.length === files.length) {
                        callback(uploadedUrls);
						console.log('此时的uploadUrls',uploadedUrls)
                    }
                });
            });
        },
		analyzeImages(urls, callback) {
            const imageUrls = urls.join(',');
			uni.showLoading({
                title: '正在分析图片...'
            });
            uni.request({
                url: 'https://u404380-823d-afb374ad.westb.seetacloud.com:8443/v1/object-detection/custom',
                method: 'POST',
                data: { image_urls: imageUrls },
                success: (res) => {
					uni.hideLoading()
					console.log('调用到图片分析方法',imageUrls,res)
                    if (res.statusCode === 200) {
                        callback(res.data.foods);
                    } else {
                        uni.showToast({
                            icon: 'none',
                            title: '图像分析失败'
                        });
                    }
                },
                fail: () => {
                    uni.showToast({
                        icon: 'none',
                        title: '图像分析请求失败'
                    });
                }
            });
        },
		analyzeEmotion(foods, text, callback) {
			uni.showLoading({
                title: '正在分析食物...'
            });
            uni.request({
                url: 'https://u404380-b1e7-5555557b.westc.gpuhub.com:8443/analyze_emotion',
                method: 'POST',
                data: { user_id: this.userId, foods: foods, text: text },
                success: (res) => {
					uni.hideLoading()
					console.log('调用到情绪分析方法',res)
                    if (res.statusCode === 200) {
						const analysis = `---营养分析: ${res.data.营养分析}\n---总体分析: ${res.data.总体分析}\n---健康风险: ${res.data.健康风险}\n---饮食建议: ${res.data.饮食建议}`;
                        callback(analysis);
                    } else {
                        uni.showToast({
                            icon: 'none',
                            title: '情绪分析失败'
                        });
                    }
                },
                fail: () => {
                    uni.showToast({
                        icon: 'none',
                        title: '情绪分析请求失败'
                    });
                }
            });
        },
3.存储打卡内容并回显
当图片上传和分析均成功后,前端会接收分析结果并和打卡内容一并存储到后端。并且自动返回刷新后的打卡页面。
下面为打卡页面的加载代码,监听到时间后会自动调用刷新方法:
		onShow: function() {
        let that = this;
        let token = uni.getStorageSync('token');
		let userId = uni.getStorageSync('userId');
        if (token != null) {
            that.ajax(that.api.searchUserSimpleInfoById, 'GET', {}, function(resp) {
                if (resp.data.hasOwnProperty('result')) {
                    that.flag = 'login';
                    let result = resp.data.result;
                    that.user.username = result.nick_name;
                    that.user.avatar = result.avatar;
                    that.user.phone = result.phone;
                }
            }, false);
        }
        that.page = 1;
        that.hasMore = true;
        that.list = [];
        this.fetchData();  // 初次加载数据
        this.fetchCheckInDays();  // 加载连续打卡天数
		this.$bus.$on('refreshCheck', this.refreshPage);
    },
    onUnload() {
        // 组件销毁时,移除事件监听
        this.$bus.$off('refreshCheck', this.refreshPage);
    }
refreshPage方法显示如下:
		refreshPage() {
			this.fetchData();  // 初次加载数据
			this.fetchCheckInDays();  // 加载连续打卡天数
		}
总结
这次开发的难度核心在:
1.图片上传到腾讯云,以正确方式接收图片URL并合并;
2.三个方法之间的联调,对于每个方法的接收和返回的梳理与运用;
3.事件的监听与更新。
另外进行了打卡页面的样式调整,使得更加美观。
分析结果的渲染更加规范,图片显示更加美观。


 被折叠的 条评论
为什么被折叠?
被折叠的 条评论
为什么被折叠?
 到【灌水乐园】发言


