


前言
glsl语言通常由通道组成,每一个色彩通道由r,g,b,a颜色和透明度通道组成,取值范围1到0,
而着色位置由x,y和z三个坐标组成,这个取值比较随意。
由于空间表示过于抽象,我先介绍色彩通道,然后再介绍空间坐标。
首先请看上篇文章的色彩部分
const fragment = `
${ShaderChunk.logdepthbuf_pars_fragment}
precision mediump float;
varying vec2 vUv;
uniform float uTime;

void main() {
    gl_FragColor =vec4(0.0,1.0,1.0,.5);
  ${ShaderChunk.logdepthbuf_fragment}
}
    `;
此时每个通道的颜色都是固定的颜色,我们并没有拿到什么特殊的参数去改变它的颜色,所以他的颜色就是他本来的样子:
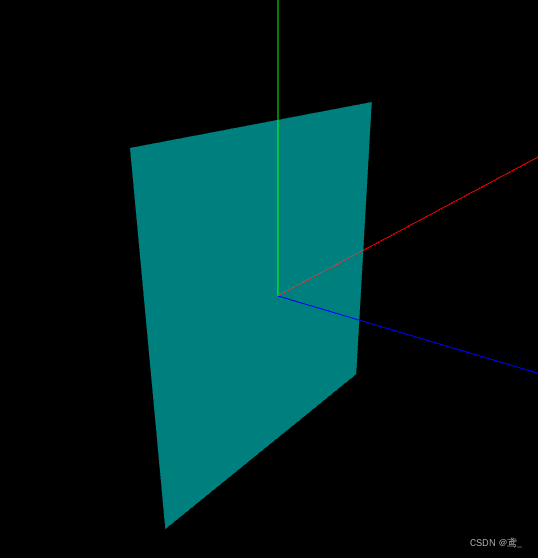
gl_FragColor =vec4(0.0,1.0,1.0,.5);
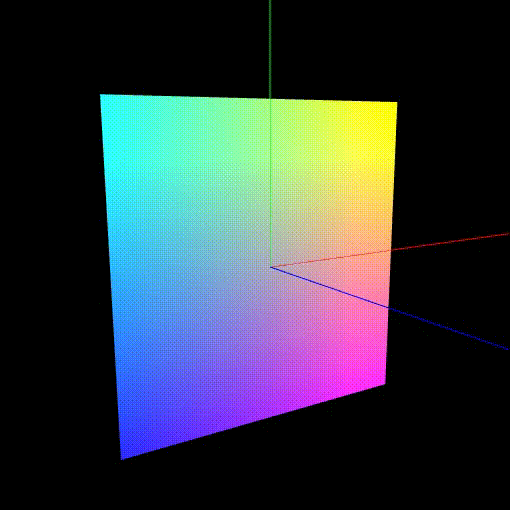
我们来尝试输入一些参数,让色彩变化起来 ,比如随着画布位置的改变调整它的颜色。这里我需要介绍一下我代码里面的vUv参数,他是由顶点着色器uv参数继承而来,
varying vec2 vUv;
在顶点函数中我们只要使用uv获取,并不需要额外声明,因为他是原生变量,反应的是着色器每个点的位置,从(0,0)到(1,1)的值,也就是画布最中心的坐标是(0.5,0.5)。
现在我们让红色r,黄色g,和蓝色b随着x,y的变动变化起来,只需要替换原来的数字就行了,然后透明通道alpha给1,表示透明度为0
const fragment = `
${ShaderChunk.logdepthbuf_pars_fragment}
precision mediump float;
varying vec2 vUv;
uniform float uTime;

void main() {
    vec2 uv = vUv;
    gl_FragColor =vec4(uv.x,uv.y,1.-uv.x*uv.y,1.);
  ${ShaderChunk.logdepthbuf_fragment}
}
    `;

现在看起来是不是比刚才好看一点,现在我们再尝试使用time参数实时修改他的xy值,同事使用fract函数获取time的小数点后几位,保证变化值在0-1之间循环。
void main() {
    vec2 uv = vUv;
    gl_FragColor =vec4(uv.x+fract(uTime/10.),uv.y+fract(uTime/10.),1.-uv.x*uv.y,1.);
  ${ShaderChunk.logdepthbuf_fragment}
}
现在我想你已经为glsl的空间坐标,色彩等等工作方式有一定了解来,我们可以加入更多“规律”点的东西来调整画面,比如画一些函数:
y=x
没有比这个更简单的一元函数了。但为了表示他我们需要在主函数main外重新声明一个函数
	float plot(vec2 st, float pct){
  		return  smoothstep( pct-0.05, pct, st.y) -
          			smoothstep( pct, pct+0.05, st.y);
}
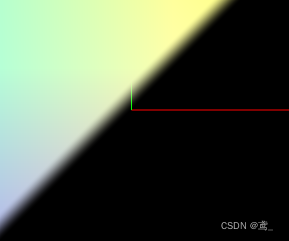
smoothstep函数可以返回他参数1和参数2之间对于参数3的差值,如果超过了这个范围参数1,返回0,超过了参数2则返回1,而这里plot返回的两个数相减和反转参数1和2,则是为了输出当前数与st.y±0.05之间的数。这样线条就有了一定的宽度,当然没有宽度的线条是看不到的。
	float plot(vec2 st, float pct){
  			return  smoothstep( pct-0.05, pct, st.y) -
          			smoothstep( pct, pct+0.05, st.y);
	}
void main() {
    vec2 uv = vUv;
    float y = uv.y;
    float x = uv.x;
    y=x;
    float pct = plot(uv,y);
    gl_FragColor =vec4(uv.x+fract(uTime/10.),uv.y+fract(uTime/10.),1.-uv.x*uv.y,pct);
  ${ShaderChunk.logdepthbuf_fragment}
}
只要将透明通道上的值替换为当前线段y的值这样我们就看到了一个y关于参数x的函数出现在屏幕上,

当然你看到了。线条两边是发虚的,这就是smoothstep的作用,如果还不明白可以观察下面两个截图,第一个是plot前半段的图像,第二个是后半段的图像,我们可以看到他们分别从
正向左到右y=x+.5衰减
和
反向右往左y=x-.5增强
他们的差就最终形成了一个中间深两边浅的线条

在你掌握了这些内容后,你已经可以随心所欲的创建自己的图形了,在下一章我会讨论更多关于函数和图形混合的信息,毕竟透明通道不是万能的。


 3928
3928


 被折叠的 条评论
为什么被折叠?
被折叠的 条评论
为什么被折叠?
 到【灌水乐园】发言


