


前言
上一章代码中最后一段代码有一行注释,这里其实是我引用来uniforms中的变量,我想你如果还记得第一章的内容,那你应该知道他是怎么来的,
float x = st.x;
  // ${uFormula};
  y=x;
自定义变量
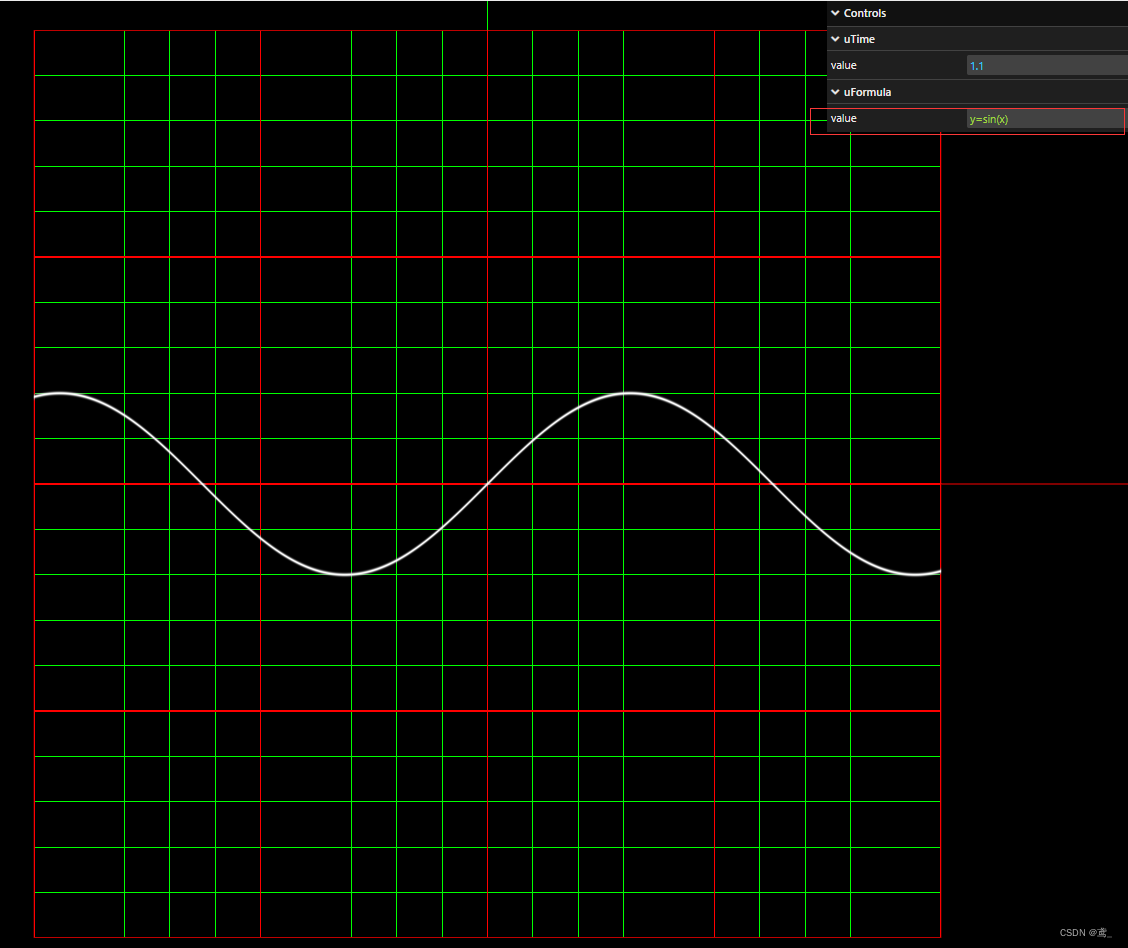
这里我再次说明一下,threejs创建ShaderMaterial的时候可以创建一个uniforms的对象存储我们更新glsl视图的参数,比如这里的uFormula,他的意思就是公式。我们可以将片源着色器改成一个箭头函数返回glsl字符串,并且在上述位置获取window上的uFormula变量(前提你取消了注释)。
// 片元着色器代码
const getFragment = () => {
  const fragment = `
······
void main() {
  vec2 st = vUv;
  // 扩大坐标系 现在整个uv的 xy在0-10之间来变化来
  st*=10.;
  float y = st.y;
  float x = st.x;
 ······

  // ${uFormula};
  y=x;

  ······
}
    `;
准备好后我们将创建shaderMaterial的代码稍作修改
const _04_lines = new ShaderMaterial({
  uniforms: {
    uTime: { value: 1.0 },
    uFormula: {
      value: 'y=sin(x)', onFinishChange: (e) => {

        window.uFormula = e
        changefrag()
      }
    }
  },
  vertexShader: vertex,
  fragmentShader: getFragment(),
  side: DoubleSide,
  transparent: true,
});

const changefrag = () => {
  console.log(_04_lines);
  _04_lines.fragmentShader = getFragment();
  _04_lines.needsUpdate = true;
}
export default _04_lines
然后在ui框架对应渲染部分 initPannel(该处使用vue3)对gui做一修改
	const initPanel = (uniforms) => {
  const panel = new GUI({ width: 310 });

  for (let k in uniforms) {
    let item = uniforms[k];
    const folder = panel.addFolder(k);
    const contorller = folder.add(item, "value", item.min, item.max);
    contorller.onChange((e) => {
      if (item.onChange) item.onChange(e);
    });
    contorller.onFinishChange((e) => {
      if (item.onFinishChange) item.onFinishChange(e);
    });
  }
};

....
重复代码不做赘述
...
const init = () => {
  const { renderer, camera, scene } = initThree(threeRef.value);

  const geometry = new PlaneGeometry(2, 2, 200, 200);
  const material = shaderMaterials[props.id];

  initAnimate(material);

  let uniforms = material.uniforms;

  if (props.panel == "addpanel") initPanel(uniforms);

  const plane = new Mesh(geometry, material);
  scene.add(plane);
};
onMounted(() => {
  init();
});
再次运行代码,你就可以通过这个参数修改函数了,这可以方便你构建想要的图像。
完整的shadermaterial代码
import { DoubleSide, ShaderChunk, ShaderMaterial } from "three";
window.uFormula = 'y=sin(x)'
const vertex = `
${ShaderChunk.logdepthbuf_pars_vertex}
bool isPerspectiveMatrix(mat4) {
    return true;
}

varying vec4 m_pos;
varying vec2 vUv;

void main () {
    vUv = uv;
    // 从贴图中采样颜色值
    vec3 newPosition = normal*vec3(0,0,0)+position;
    gl_Position = projectionMatrix * modelViewMatrix * vec4(newPosition, 1.0);

      ${ShaderChunk.logdepthbuf_vertex}
}
    `;

// 片元着色器代码
const fragment = `
${ShaderChunk.logdepthbuf_pars_fragment}
precision mediump float;
varying vec2 vUv;
uniform float uTime;
uniform float uFormula;
float plot(vec2 st, float pct){
  return  smoothstep( pct-0.05, pct, st.y) -
          smoothstep( pct, pct+0.05, st.y);
}


float grid(in vec2 st,in vec2 start,in vec2 end,in float step,in float width){
  float gr = 0.;
  //
  float sx = start.x;
  float sy = start.y;
  float ex = end.x;
  float ey = end.y;
  //
  for(float i = sx;i<=ex;i+=step){
    if(i-width<st.x&&i+width>st.x) gr=1.;
  }
  for(float i = sy;i<=ey;i+=step){
    if(i-width<st.y&&i+width>st.y) gr=1.;
  }

  return gr;

}
void main() {
  vec2 st = vUv;
  st-=vec2(.5);
  st*=10.;
  float y = st.y;
  float x = st.x;


  ${uFormula};

  float pct = plot(st,y);
  vec4 base = vec4(0.,0.,0.,0.);

  float gr = grid(st,vec2(-10.,-10),vec2(10.,10.),.5,0.005);
  float gr2 = grid(st,vec2(-10.,-10),vec2(10.,10.),2.5,0.01);
  vec4 g = vec4(0.,1.,0.,gr);
  vec4 g2 = vec4(1.,0.,0.,gr2);
  base = mix(base,g,g.a);
  base = mix(base,g2,g2.a);

  vec4 line = vec4(1.,1.,1.,pct) ;


  gl_FragColor =mix(base,line,line.a);
  ${ShaderChunk.logdepthbuf_fragment}
}
    `;
const getFragment = () => {
  const fragment = `
${ShaderChunk.logdepthbuf_pars_fragment}
precision mediump float;
varying vec2 vUv;
uniform float uTime;
uniform float uFormula;
float plot(vec2 st, float pct){
  return  smoothstep( pct-0.05, pct, st.y) -
          smoothstep( pct, pct+0.05, st.y);
}


float grid(in vec2 st,in vec2 start,in vec2 end,in float step,in float width){
  float gr = 0.;
  //
  float sx = start.x;
  float sy = start.y;
  float ex = end.x;
  float ey = end.y;
  //
  for(float i = sx;i<=ex;i+=step){
    if(i-width<st.x&&i+width>st.x) gr=1.;
  }
  for(float i = sy;i<=ey;i+=step){
    if(i-width<st.y&&i+width>st.y) gr=1.;
  }

  return gr;

}
void main() {
  vec2 st = vUv;
  st-=vec2(.5);
  st*=10.;
  float y = st.y;
  float x = st.x;

  // Smooth interpolation between 0.1 and 0.9


  // float grid =


  // y = mod(x,0.5); // 返回 x 对 0.5 取模的值
  // y = fract(y); // 仅仅返回数的小数部分
  // y = ceil(x);  // 向正无穷取整
  // y = floor(x); // 向负无穷取整
  // y = sign(x);  // 提取 x 的正负号
  // y = abs(x);   // 返回 x 的绝对值
  // y = clamp(x,0.0,1.0); // 把 x 的值限制在 0.0 到 1.0
  // y = min(0.0,x);   // 返回 x 和 0.0 中的较小值
  // y = max(0.0,x);   // 返回 x 和 0.0 中的较大值
  // y = 1.0-pow(abs(x),.5);  // 返回 x 和 0.0 中的较大值
  ${uFormula};

  float pct = plot(st,y);
  vec4 base = vec4(0.,0.,0.,0.);

  float gr = grid(st,vec2(-10.,-10),vec2(10.,10.),.5,0.005);
  float gr2 = grid(st,vec2(-10.,-10),vec2(10.,10.),2.5,0.01);
  vec4 g = vec4(0.,1.,0.,gr);
  vec4 g2 = vec4(1.,0.,0.,gr2);
  base = mix(base,g,g.a);
  base = mix(base,g2,g2.a);

  vec4 line = vec4(1.,1.,1.,pct) ;


  gl_FragColor =mix(base,line,line.a);
  ${ShaderChunk.logdepthbuf_fragment}
}
    `;
  return fragment
}
const uniforms = {
  uTime: { value: 1.0 },
  uFormula: { value: 'y=sin(x)' }
};
const _04_lines = new ShaderMaterial({
  uniforms: {
    uTime: { value: 1.0 },
    uFormula: {
      value: 'y=sin(x)', onFinishChange: (e) => {

        window.uFormula = e
        changefrag()
      }
    }
  },
  vertexShader: vertex,
  fragmentShader: getFragment(),
  side: DoubleSide,
  transparent: true,
});

const changefrag = () => {
  console.log(_04_lines);
  _04_lines.fragmentShader = getFragment();
  _04_lines.needsUpdate = true;
}
export default _04_lines
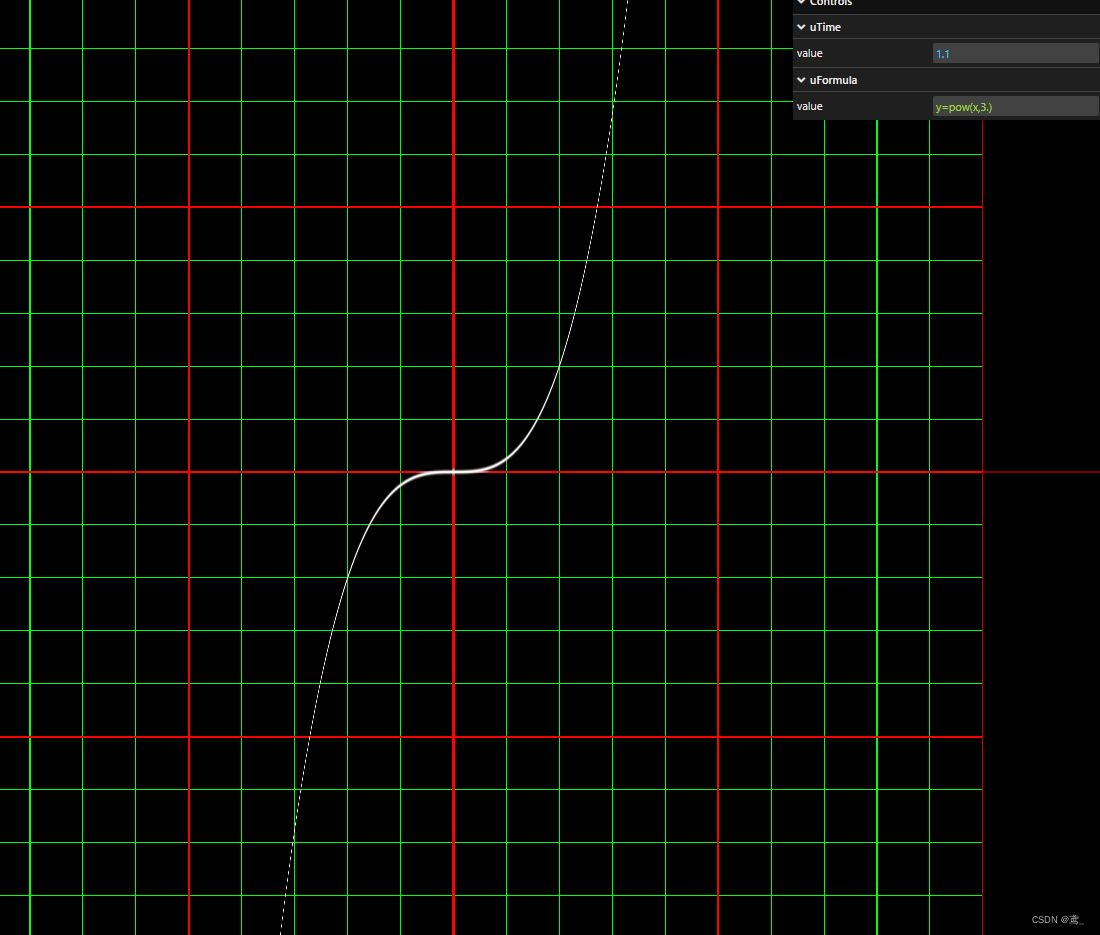
你可以 尝试不同的代码,改一个试试吧,比如x的三次方?
  // y = mod(x,0.5); // 返回 x 对 0.5 取模的值
  // y = fract(y); // 仅仅返回数的小数部分
  // y = ceil(x);  // 向正无穷取整
  // y = floor(x); // 向负无穷取整
  // y = sign(x);  // 提取 x 的正负号
  // y = abs(x);   // 返回 x 的绝对值
  // y = clamp(x,0.0,1.0); // 把 x 的值限制在 0.0 到 1.0
  // y = min(0.0,x);   // 返回 x 和 0.0 中的较小值
  // y = max(0.0,x);   // 返回 x 和 0.0 中的较大值
  // y = 1.0-pow(abs(x),.5);  // 返回 x 和 0.0 中的较大值
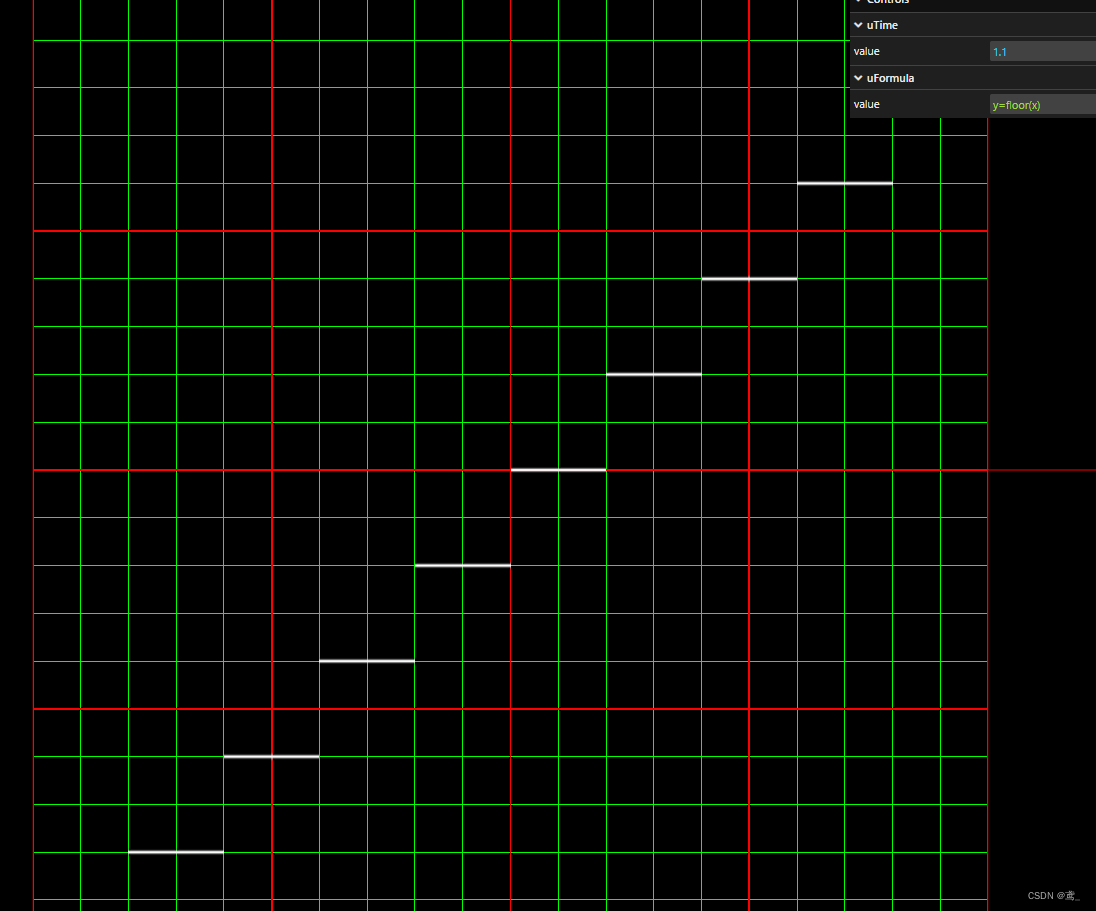
又或者其他什么的floor
现在我们换回sin函数,做一些有趣的事情y=sin(x*10.)
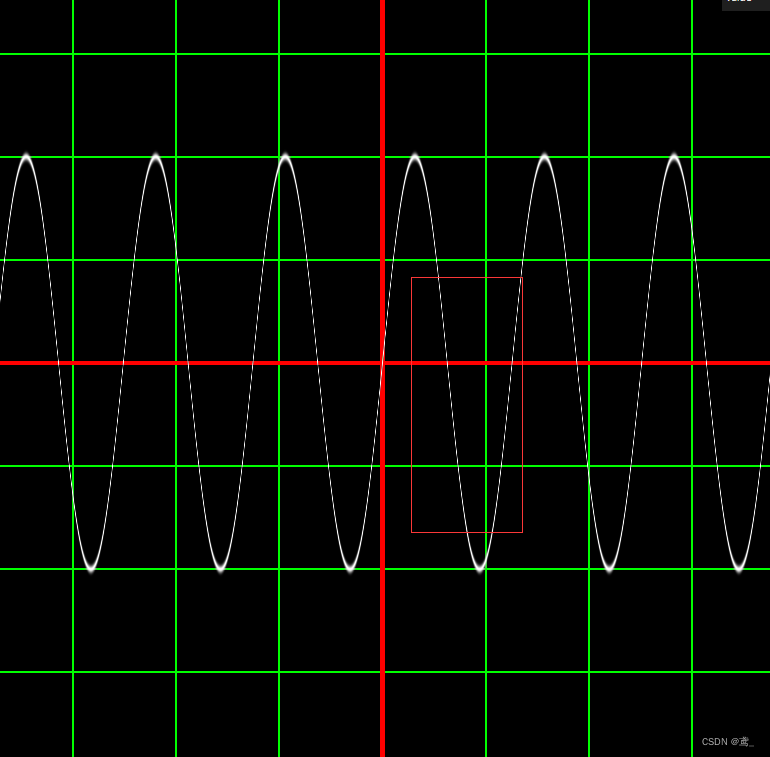
从数学角度来说图像只是被沿着x轴压缩了十倍,但我么可以注意到一些小细节,比如x一次倒数最小的时候,线条的变化,变成了dashline,其实这个现象你应该早就发现了,在远处看栅格或者x三次方的曲线,都有这种虚化现象,我们试着压缩更多一些,比如把10变成1000 10000或更大,是不是出现了和我一样的现象
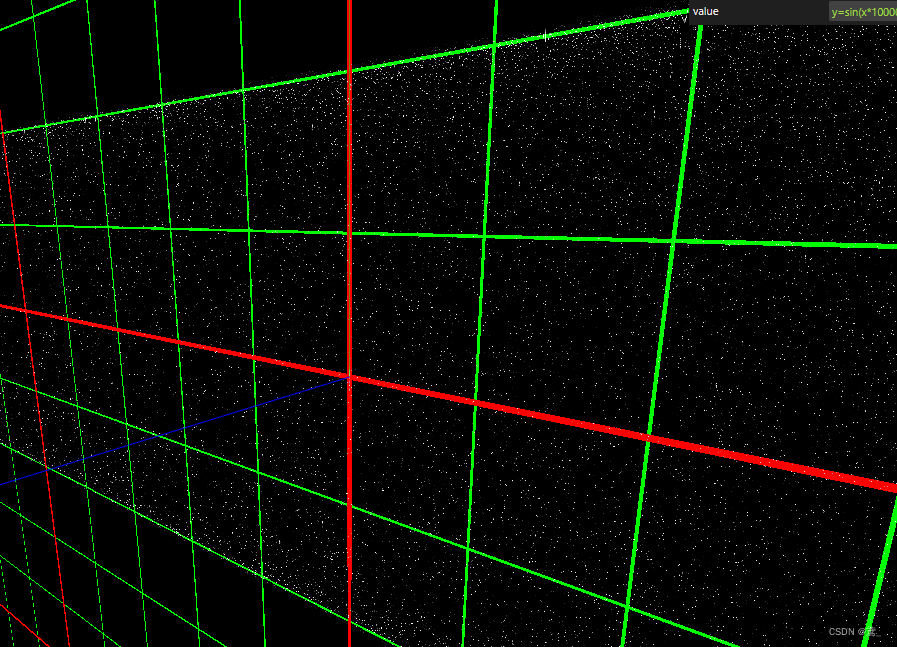
如果出现了不妨和我一样,加入时间参数,就像我们之前对单一颜色所做的,让他随着时间变化而变化
看起来像电视信号不好,像是···en 宇宙背景辐射??虽然这是卡了个图像处理的bug,不过我们仍然乐意给他一个专业点的名称————噪声(noise),如果你看见他了,并在你的电脑上复现了他,恭喜你!你将开启关于美的无垠之门,而我,也将陪你一路前行!


 871
871


 被折叠的 条评论
为什么被折叠?
被折叠的 条评论
为什么被折叠?
 到【灌水乐园】发言


