


妆容迁移+人脸迁移=妆造迁移
还在纠结画什么样的妆,做什么样的造型吗?还在因为时间问题而遗憾没办法去簪花和穿汉服吗?赶紧来试一下吧!!!
1.下载PaddleGAN,安装第三方库
# 要安装paddlegan到根目录,所以先要切换目录
%cd /home/aistudio/
# 使用git克隆addleGAN仓库到当前目录
!git clone https://gitee.com/paddlepaddle/PaddleGAN.git
# 下载好后切换目录到PaddleGAN的
%cd /home/aistudio/PaddleGAN
!pip install --upgrade pip!pip install -r requirements.txt下载dlib库时由于下载困难我们选择下载dlib-bin,它是dlib库的二进制分发版本,已经为特定平台或环境进行了预编译和优化,用户可以直接安装使用,无需自行编译。两者在功能上基本相同,dlib-bin较容易进行下载。
!pip install dlib-bin2.妆容迁移
2.1人脸识别并裁剪
对于某些角度不太好的或者人脸位置不太好的源图片和预设图片,可以先通过下面的步骤来进行人脸识别和裁剪。
#预设图片

# 裁剪人脸
import cv2
import dlib
from matplotlib import pyplot as plt
# 裁剪前后的路径
cut_before_img="/home/aistudio/data1/11.jpg"
cut_after_img="/home/aistudio/work/ref/1_1_face.jpg"
img = cv2.imread(cut_before_img)
height, width = img.shape[:2]
face_detector = dlib.get_frontal_face_detector()
gray = cv2.cvtColor(img, cv2.COLOR_BGR2GRAY)
faces = face_detector(gray, 1)
def get_boundingbox(face, width, height, scale=1.6, minsize=None):
    """
    Expects a dlib face to generate a quadratic bounding box.
    :param face: dlib face class
    :param width: frame width
    :param height: frame height
    :param scale: bounding box size multiplier to get a bigger face region
    :param minsize: set minimum bounding box size
    :return: x, y, bounding_box_size in opencv form
    """
    x1 = face.left()
    y1 = face.top()
    x2 = face.right()
    y2 = face.bottom()
    size_bb = int(max(x2 - x1, y2 - y1) * scale)
    if minsize:
        if size_bb < minsize:
            size_bb = minsize
    center_x, center_y = (x1 + x2) // 2, (y1 + y2) // 2
    x1 = max(int(center_x - size_bb // 2), 0)
    y1 = max(int(center_y - size_bb // 2), 0)
    # Check for too big bb size for given x, y
    size_bb = min(width - x1, size_bb)
    size_bb = min(height - y1, size_bb)
    return x1, y1, size_bb
if len(faces):
    face = faces[0]
x,y,size = get_boundingbox(face, width, height)
cropped_face = img[y-50:y+size,x:x+size]
cv2.imwrite(cut_after_img, cropped_face)
# 改变图像大小
im1 = cv2.imread(cut_after_img)
im2 = cv2.resize(im1,(im1.shape[1],im1.shape[1]),)  # 为图片重新指定尺寸
cv2.imwrite(cut_after_img,im2)
# 裁剪对比显示
%matplotlib inline
# 裁剪前路径
before = cv2.imread(cut_before_img)
after = cv2.imread(cut_after_img)
plt.figure(figsize=(10, 10))
plt.subplot(1, 2, 1)
plt.title('cut-before')
plt.imshow(before[:, :, ::-1])
plt.subplot(1, 2, 2)
plt.title('cut-after')
plt.imshow(after[:, :, ::-1])
plt.show()

2.2妆容迁移
下方代码参数说明:
-
config-file: PSGAN网络到参数配置文件,格式为yaml
-
model_path: 训练完成保存下来网络权重文件的路径(可以不设置,也可点击下载权重)
-
source_path: 未化妆的原始图片文件全路径,包含图片文件名字
-
reference_dir: 化妆的参考图片文件路径,不包含图片文件名字
-
结果自动保存至/home/aistudio/PaddleGAN/output/
# 妆容迁移代码
%cd /home/aistudio/PaddleGAN
!python tools/psgan_infer.py \
--config-file configs/makeup.yaml \
--source_path  ~/work/22.png   \
--reference_dir   ~/work/ref \
--evaluate-only
# 有下方提示代表运行成功
# Transfered image output/transfered_ref_ps_ref.png has been saved!
# done!!!
2.3妆容迁移结果展示

3.人脸迁移
import cv2
import dlib
import numpy as np
import matplotlib.pyplot as plt
import matplotlib.image as mpimg
from matplotlib.path import Path
3.1人脸关键点检测
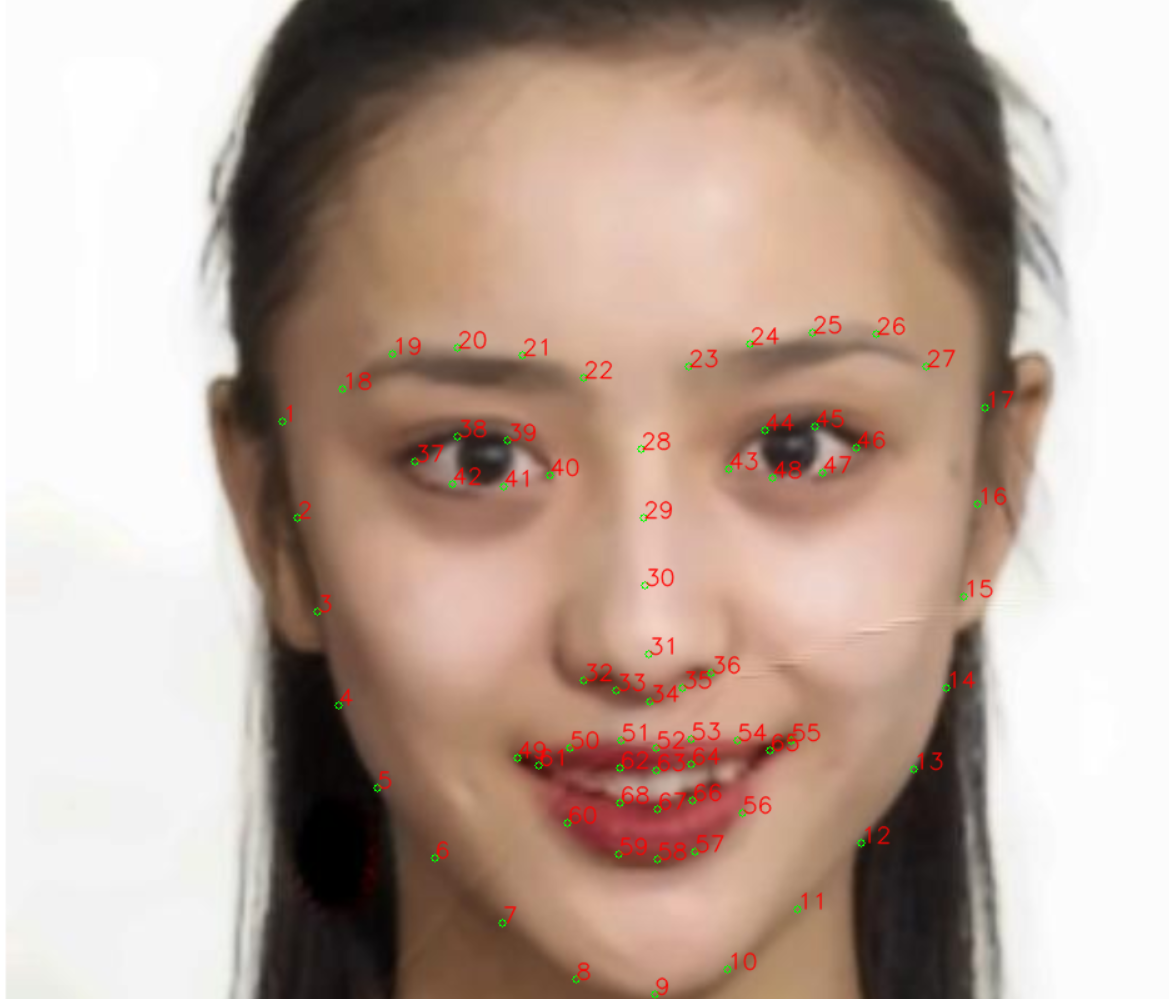
首先使用Dlib库中的shape_predictor_68_face_landmarks.dat文件来提取脸部的68个关键点,并基于回归树算法预测人脸的68个关键点位置(如眼睛、鼻子、嘴巴等)。这些关键点以浮点数坐标形式给出,随后被转换为整数坐标并绘制在原始图像上,以可视化人脸的轮廓。
# 读取图像
src_img = cv2.imread('/home/aistudio/PaddleGAN/output/transfered_ref_1_1_face.jpg')
if src_img is None:
    raise ValueError("无法读取图像")
# 转换为灰度图像,因为dlib的人脸检测器需要灰度图像
gray = cv2.cvtColor(src_img, cv2.COLOR_BGR2GRAY)
# 加载预训练的人脸检测器
detector = dlib.get_frontal_face_detector()
# 加载人脸关键点检测器
predictor = dlib.shape_predictor('/home/aistudio/shape_predictor_68_face_landmarks.dat')
# 检测人脸
faces = detector(gray)
# 遍历检测到的每个人脸
for rect in faces:
    # 计算关键点
    shape = predictor(gray, rect)
    shape = np.array([(shape.part(i).x, shape.part(i).y) for i in range(0, 68)])
    # 将坐标转换为整数(因为它们是浮点数)
    shape = shape.astype(int)
    # 在原始图像上绘制关键点
    for (x, y) in shape:
        cv2.circle(src_img, (x, y), 2, (0, 0, 255), -1)
# 保存结果图像
res_img_path = 'face_landmark.jpg'
cv2.imwrite(res_img_path, src_img)
img0 = mpimg.imread(res_img_path)
plt.figure(figsize=(5,5))
plt.imshow(img0)
plt.axis('off')
plt.show()
检测人脸的68个点的位置如图所示(为了显示更清楚,我在在自己的pycharm上进行运行)
3.2提取人脸并改变人脸大小
首先,get_face函数通过给定的人脸关键点(face_landmark)创建一个多边形路径,并检查图像中哪些点位于该路径内,从而提取出人脸区域。接着,change_size函数找出人脸区域的最左、最右、最底和最顶部边缘,然后基于这些边缘裁剪图像,以去除背景并保留仅包含人脸的区域。最后,通过plt.imshow展示提取并裁剪后的人脸图像。
def get_face(img):
    face_landmark=np.array(shape[0:18])  #这里经过我自己的实验我发现18个点不包含眉毛,28个点包含眉毛,大家可以自行选择和调试
    facepoint=[]
    img_row=img.shape[0]
    img_column=img.shape[1]
    point=np.array([[i,j] for i in range(img_row) for j in range(img_column)])
    pth=Path(face_landmark,closed=False)
    mask=pth.contains_points(point)
    newimage=np.zeros((img_row,img_column,3))
    for k in range(3):
        for i,j in zip(point[mask,:][:,1],point[mask,:][:,0]):
            newimage[i,j,k]=img[i,j,k]
    newimage,pos=change_size(newimage)
    return newimage,pos
def change_size(img):
    image=img[:,:,0]
    x=image.shape[0]
    y=image.shape[1]
    edges_x=[]
    edges_y=[]
    for i in range(x):
        for j in range(y):
            if image[i][j]!=0:
             edges_x.append(i)
             edges_y.append(j)

    left=min(edges_x)               #左边界
    right=max(edges_x)              #右边界
    width=right-left                #宽度
    bottom=min(edges_y)             #底部
    top=max(edges_y)                #顶部
    height=top-bottom               #高度
    pre1_picture=img[left:left+width,bottom:bottom+height]        #图片截取
    return pre1_picture,(left,bottom,width,height)

img1,pos1=get_face(src_img)
plt.figure(figsize=(5,5))
plt.imshow(img1)
plt.axis('off')
plt.show()
3.3进行人脸迁移并展示
首先将预设图片复制一份,然后根据pos位置参数指定的人脸位置和大小,将源图片中对应区域的人脸像素复制到预设的图片上,从而实现人脸交换。最终返回处理后的预设图片图像。
def tranplant(img1,img2,pos):
    img2_copy=img2.copy()
    margin=[]
    for i1,i2 in enumerate(range(pos[0],pos[0]+pos[2])):
        for j1,j2 in enumerate(range(pos[1],pos[1]+pos[3])):
            if img1[i1,j1,0]==0:
                pass
            else:
                img2_copy[i2,j2]=img1[i1,j1]
    return img2_copy,np.array(margin)

img3,margin=tranplant(img1,src_img2,pos2)
res_img_path = 'tran.jpg'
cv2.imwrite(res_img_path,img3)
img4 = mpimg.imread(res_img_path)
# 展示预测68个关键点结果
plt.figure(figsize=(5,5))
plt.imshow(img4)
#plt.axis('off')
plt.show()
4.效果展示
左边为选取人脸前18个点不包含眉毛,右边为选取人脸28个点包含眉毛

 https://aistudio.baidu.com/projectdetail/8050980?contributionType=1


 1562
1562

 被折叠的 条评论
为什么被折叠?
被折叠的 条评论
为什么被折叠?
 到【灌水乐园】发言


