


目录
第一章:Vue脚手架配置代理
方法一:
在vue.config.js中添加如下配置:
devServer:{
proxy: "http://localhost:5000"
}
说明:
1. 优点:配置简单,请求资源时直接发给前端(8080)即可
2. 缺点:不能配置多个代理,不能灵活的控制请求是否走代理
3. 工作方式:若按照上述配置代理,当请求了前端不存在的资源时,那么 该请求会转发给服务器(优先匹配前端资源)
方法二:
编写vue.config.js配置具体代理规则:
module.exports = {
  devServer: {
    proxy: {
      '/api1': { // 匹配所有以'/api1'开头的请求路径
        target: 'http://localhost:5000', // 代理目标的基础路径
        pathRewrite: {'^/api1': ''}, // 将以'/api1'开头的前缀替换成空字符串
        ws: true, // 用于支持websocket
        changeOrigin: true // 用于控制请求头中host的值
      },
      '/api2': { // 匹配所有以'/api2'开头的请求路径
        target: 'http://localhost:5001', // 代理目标的基础路径
        pathRewrite: {'^/api2': ''},// 将以'/api2'开头的前缀替换成空字符串
        ws: true, // 用于支持websocket
        changeOrigin: true // 用于控制请求头中host的值
      },
    }
  }
}
/*
    changeOrigin设置为true时,服务器接收到的请求头中的host为:localhost:5000
    changeOrigin设置为false时,服务器接受的请求头中的host为:localhost:8080
    changeOrigin默认值为true

*/
说明:
1. 优点:可以配置多个代理,且可以灵活控制请求是否走代理
2. 缺点:配置略微繁琐,请求资源时必须加前缀
下面这个案例中,在vue.config.js中配置了两个请求路径的代理,一个是5000端口的,前面加前缀'/vue',另一个是5001端口的,前面加前缀'/demo',分别在pathRewrite中把这个请求前缀去掉,在App.vue中发送请求,因为是在8080端口上开启的,所以会存在跨域问题,配置了vue.config.js后就可以正常请求到了
// vue.config.js
const { defineConfig } = require('@vue/cli-service')
module.exports = defineConfig({
  transpileDependencies: true,
  lintOnSave: false,
  pages: {
    index: {
      // 入口
      entry: 'src/main.js',
    }
  }
  devServer: {
    proxy: {
      '/vue': {
        target: 'http://localhost:5000',
        pathRewrite: {'^/vue': ''},
        ws: true, // 用于支持websocket
        changeOrigin: true // 用于控制请求头中host的值
      },
      '/demo': {
        target: 'http://localhost:5001',
        pathRewrite: {'^/demo': ''},
        ws: true, // 用于支持websocket
        changeOrigin: true // 用于控制请求头中host的值
      },
    }
  }
})
// App.vue
<template>
  <div>
    <button @click="getStudents">获取学生信息</button>
    <button @click="getCars">获取汽车信息</button>
  </div>
</template>

<script>
import axios from 'axios'
export default {
  name: 'App',
  methods:{
    getStudents(){
      axios.get('http://localhost:8080/vue/students').then(
        response => {
          console.log('请求成功了', response.data);
        },
        error => {
          console.log('请求失败了', error.message);
        }
      )
    },
    getCars(){
      axios.get('http://localhost:8080/demo/cars').then(
        response => {
          console.log('请求成功了', response.data);
        },
        error => {
          console.log('请求失败了', error.message);
        }
      )
    }
  }
}
</script>

第二章:slot插槽
2.1 默认插槽
在组件的标签中写代码,如果在这个组件里面写了插槽“<slot></slot>”,此时组件标签中写的代码就会被解析放到插槽中,如果指定了插槽,但是在组件标签中没有写代码,此时渲染到页面上的就是插槽内部默认的内容
// App.vue
<template>
  <div class="container">
    <MyCategory title="美食" :listData="foods">
      <img src="https://s3.ax1x.com/2021/01/16/srJlq0.jpg" alt="" />
    </MyCategory>
    <MyCategory title="游戏" :listData="games">
      <ul>
        <li v-for="(g, index) in games" :key="index">{{ g }}</li>
      </ul>
    </MyCategory>
    <MyCategory title="电影" :listData="films">
      <video autoplay src="http://clips.vorwaerts-gmbh.de/big_buck_bunny.mp4"></video>
    </MyCategory>
  </div>
</template>

<script>
import MyCategory from './components/Category.vue'
export default {
  name: 'App',
  components: { MyCategory },
  data() {
    return {
      foods: ['火锅', '烧烤', '小龙虾', '牛排'],
      games: ['红色警戒', '穿越火线', '劲舞团', '超级玛丽'],
      films: ['《教父》', '《拆弹专家》', '《你好,李焕英》', '《复仇者联盟》'],
    }
  },
}
</script>

<style>
.container {
  display: flex;
  justify-content: space-around;
}
</style>
// Category.vue
<template>
  <div class="cateory">
    <h3>{{title}}分类</h3>
    <slot>默认插槽</slot>
  </div>
</template>

<script>
export default {
  name: 'MyCategory',
  props: ['title', 'listData']
}
</script>

<style>
  .cateory{
    width: 200px;
    height: 300px;
    background-color: skyblue;
  }

  h3{
    text-align: center;
    background-color: pink;
  }

  img, video{
    width: 100%;
  }
</style>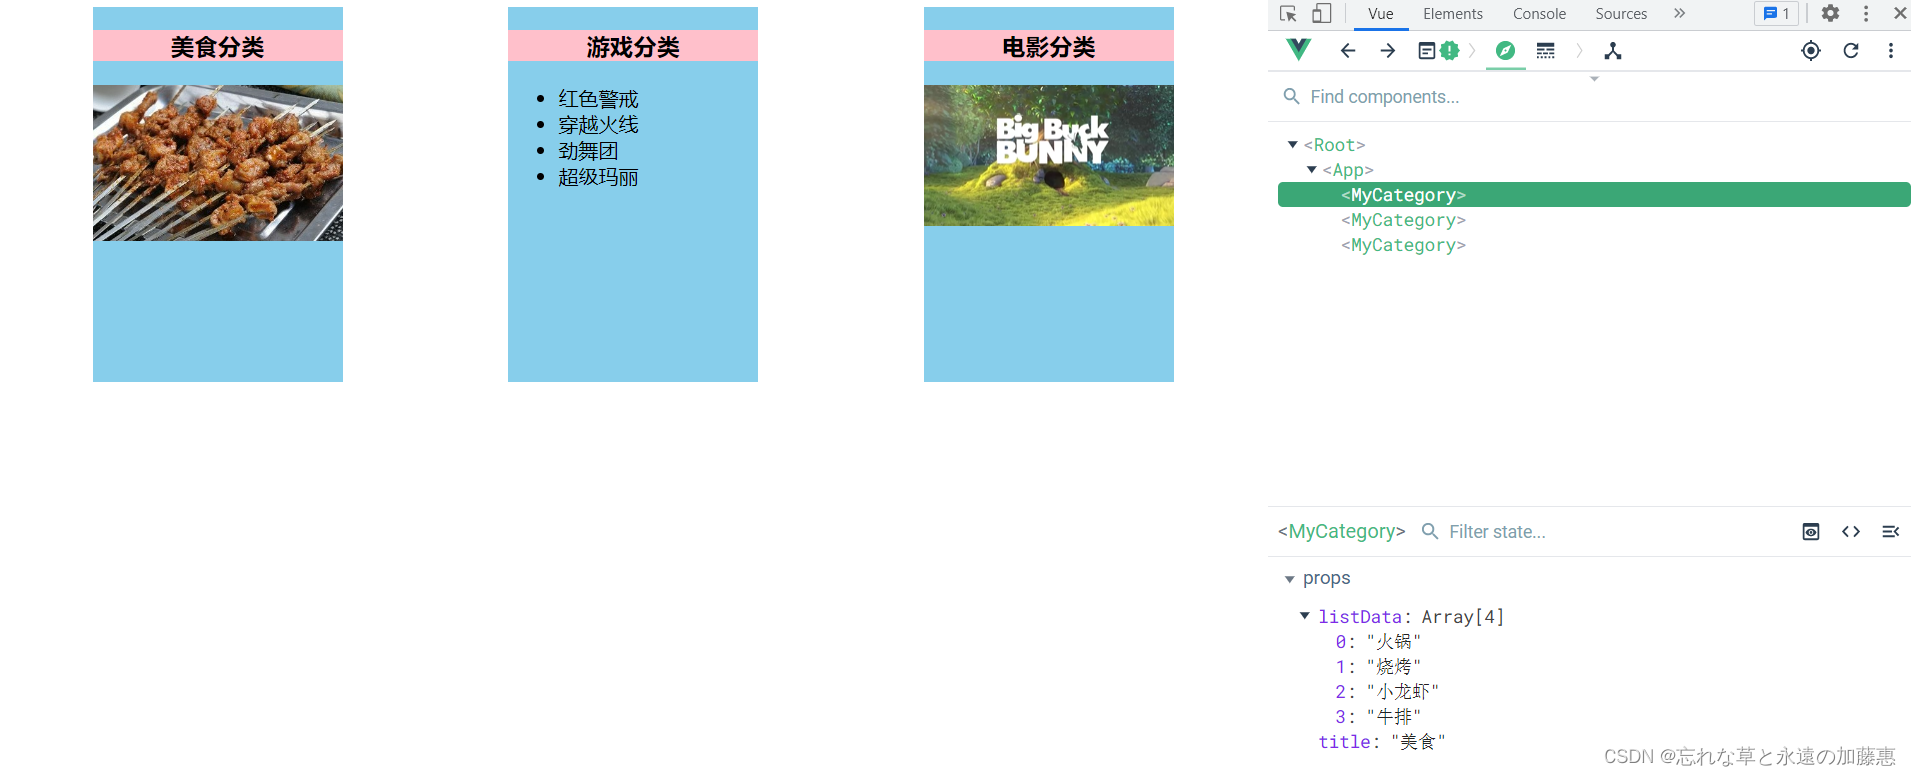
2.2 具名插槽
具名插槽就是给slot添加name属性,然后别的组件使用Category组件时可以向组件中放东西,默认的插槽名字是default,要让指定的代码可以添加到插槽中,需要加上“slot=插槽名”,这样就可以把对应的代码放到插槽了,如果有多个根节点,可以用template模板标签把代码包起来,此时指定放入插槽可以写成“v-slot:插槽名”,这是引用法
// App.vue
<template>
  <div class="container">
    <MyCategory title="美食" :listData="foods">
      <img slot="center" src="https://s3.ax1x.com/2021/01/16/srJlq0.jpg" alt="" />
      <a slot="footer" href="javascript:;">更多美食</a>
    </MyCategory>
    <MyCategory title="游戏" :listData="games">
      <ul slot="center">
        <li v-for="(g, index) in games" :key="index">{{ g }}</li>
      </ul>
      <div slot="footer" class="foot">
        <a href="javascript:;">单机游戏</a>
        <a href="javascript:;">网络游戏</a>
      </div>
    </MyCategory>
    <MyCategory title="电影" :listData="films">
      <video autoplay slot="center" src="http://clips.vorwaerts-gmbh.de/big_buck_bunny.mp4"></video>
      <template v-slot:footer>
        <div class="foot">
          <a href="javascript::">经典</a>
          <a href="javascript::">热门</a>
          <a href="javascript::">推荐</a>
        </div>
        <h2>欢迎前来观看</h2>
      </template>
    </MyCategory>
  </div>
</template>

<script>
import MyCategory from './components/Category.vue'
export default {
  name: 'App',
  components: { MyCategory },
  data() {
    return {
      foods: ['火锅', '烧烤', '小龙虾', '牛排'],
      games: ['红色警戒', '穿越火线', '劲舞团', '超级玛丽'],
      films: ['《教父》', '《拆弹专家》', '《你好,李焕英》', '《复仇者联盟》'],
    }
  },
}
</script>

<style>
.container, .foot {
  display: flex;
  justify-content: space-around;
}

h2{
  text-align: center;
}
</style>
// Category.vue
<template>
  <div class="cateory">
    <h3>{{title}}分类</h3>
    <slot name="center">第一个插槽</slot>
    <slot name="footer">第二个插槽</slot>
  </div>
</template>

<script>
export default {
  name: 'MyCategory',
  props: ['title', 'listData']
}
</script>

<style>
  .cateory{
    width: 200px;
    height: 300px;
    background-color: skyblue;
  }

  h3{
    text-align: center;
    background-color: pink;
  }

  img, video{
    width: 100%;
  }
</style>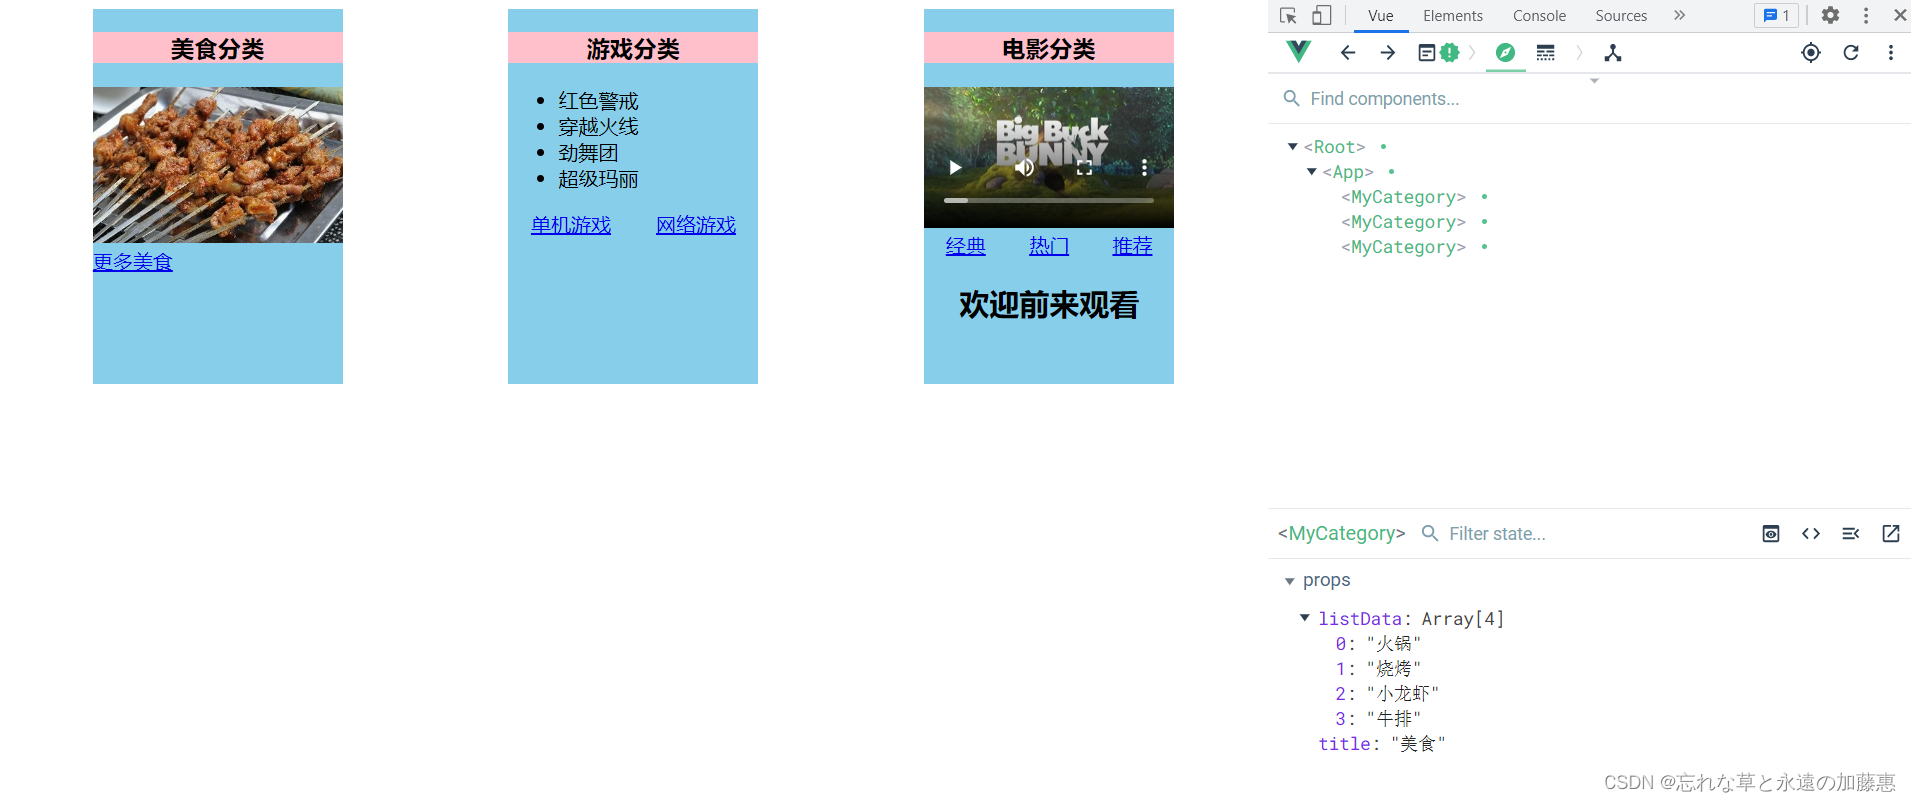
2.3作用域插槽
在下面这个场景中,子组件中存在数据,但是要在父组件中定义结构并使用数据,所以需要通过作用域插槽的方式获取子组件中的数据,Category组件通过“:games='games'”的方式传送数据到父组件,父组件在template标签中用scope获取数据,因为可能会有多份数据,所以传过来的是对象,要使用games里面的数据,可以通过youxi.games或者解构赋值来获取数据,除了使用scpoe外,新的API也支持slot-scope来获取数据
// App.vue
<template>
  <div class="container">
    <MyCategory title="游戏">
      <template scope="youxi">
        <ul>
          <li v-for="(g, index) in youxi.games" :key="index">{{ g }}</li>
        </ul>
      </template>
    </MyCategory>
    <MyCategory title="游戏">
      <template scope="{games}">
        <ul>
          <li v-for="(g, index) in games" :key="index">{{ g }}</li>
        </ul>
      </template>
    </MyCategory>
    <MyCategory title="游戏">
      <template slot-scope="{games}">
        <h4 v-for="(g, index) in games" :key="index">{{ g }}</h4>
      </template>
    </MyCategory>

  </div>
</template>

<script>
import MyCategory from './components/Category.vue'
export default {
  name: 'App',
  components: { MyCategory },

}
</script>

<style>
.container, .foot {
  display: flex;
  justify-content: space-around;
}

h2, h4{
  text-align: center;
}
</style>
// Category.vue
<template>
  <div class="cateory">
    <h3>{{title}}分类</h3>
    <slot :games="games">第一个插槽</slot>
  </div>
</template>

<script>
export default {
  name: 'MyCategory',
  props: ['title', 'listData'],
  data() {
    return {
      games: ['红色警戒', '穿越火线', '劲舞团', '超级玛丽']
    }
  },
}
</script>

<style>
  .cateory{
    width: 200px;
    height: 300px;
    background-color: skyblue;
  }

  h3{
    text-align: center;
    background-color: pink;
  }

  img, video{
    width: 100%;
  }
</style>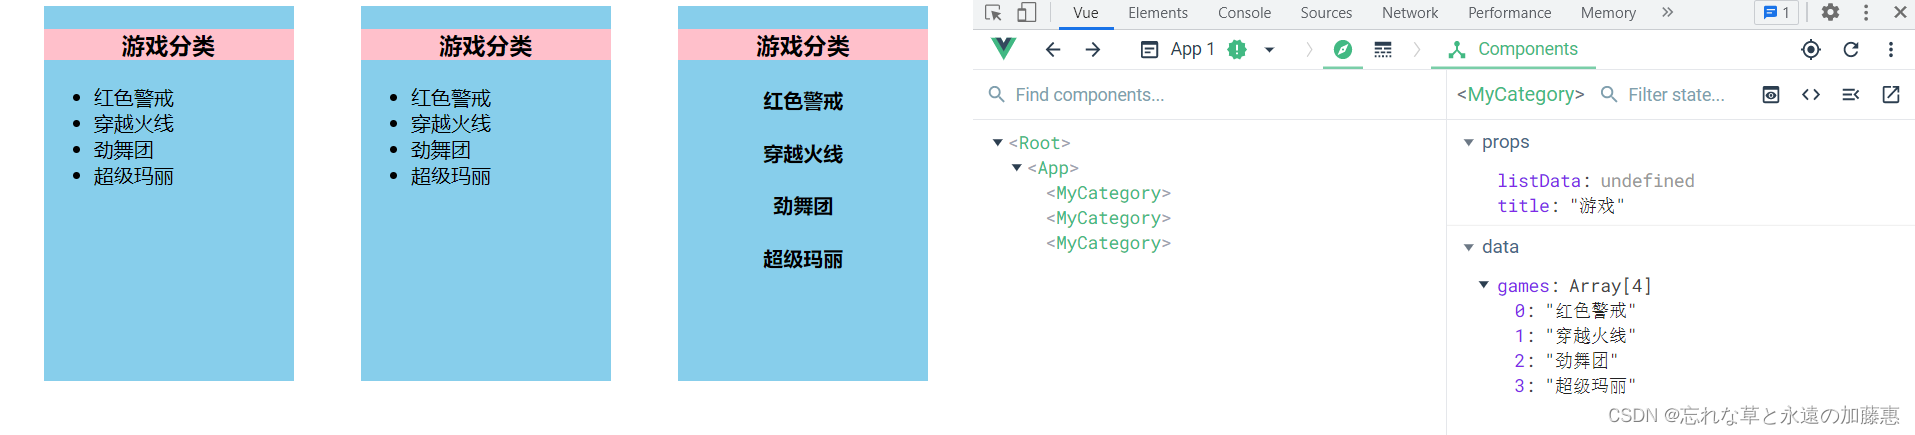
2.4 总结
1. 作用:让父组件可以向子组件指定位置插入html结构,也是一种组件间通信的方式,适用于:父组件 ===> 子组件
2. 分类:默认插槽、具名插槽、作用于插槽
3. 使用方式:
1)默认插槽
父组件中:
<Category>
<div>html结构1</div>
</Category>
子组件中:
<template>
<div>
<!-- 定义插槽 -->
<slot>插槽默认内容...</slot>
</div>
</template>
2)具名插槽
父组件中:
<Category>
<template slot="center">
<div>html结构1</div>
</template><template v-slot:footer>
<div>html结构2</div>
</template>
</Category>
子组件中:
<template>
<div>
<!-- 定义插槽 -->
<slot name="center">插槽默认内容...</slot>
<slot name="footer">插槽默认内容...</slot>
</div>
</template>
3)作用域插槽
理解:数据在组件的自身,但根据数据生成的结构需要组件的使用者来决定。(games数据在Category数组中,但使用数据所遍历出来的结构由App组件决定)
具体编码:
父组件中:
<Category>
<template scope="scopeData">
<!-- 生成的是ul列表 -->
<ul>
<li v-for="g in scopeData.games" :key="g">{{g}}</li>
</ul>
</template>
</Category><Category>
<template slot-scope="scopeData">
<!-- 生成的是h4标题 -->
<h4 v-for="g in scopeData.games" :key="g">{{g}}</h4>
</template>
</Category>
子组件中:
<template>
<div>
<slot :games="games"></slot>
</div>
</template>
<script>
export default {
name:'Category',
props:['title'],
//数据在子组件自身
data() {
return {
games:['红色警戒','穿越火线','劲舞团','超级玛丽']
}
},
}
</script>
第三章:vuex
3.1 理解vuex
3.1.1 vuex是什么
1. 概念:专门在Vue中实现集中式状态(数据)管理的一个Vue插件,对vue应用中多个组件状态进行集中式的管理(读/写),也是一种组件间通信的方式,且适用于任意组件间通信
2. GitHub地址:https://github.com/vuejs/vuex
3.1.2 什么时候使用Vuex
1. 多个组件依赖于同一状态
2. 来自不同组件的行为需要变更同一状态
3.1.3 搭建vuex环境
1. 创建文件src/store/index.js
//引入Vue核心库
import Vue from 'vue'
//引入Vuex
import Vuex from 'vuex'
//应用Vuex插件
Vue.use(Vuex)//准备actions对象——响应组件中用户的动作
const actions = {}
//准备mutations对象——修改state中的数据
const mutations = {}
//准备state对象——保存具体的数据
const state = {}//创建并暴露store
export default new Vuex.Store({
actions,
mutations,
state
})
2. 在main.js中创建vm时传入store配置项
......
//引入store
import store from './store'
......//创建vm
new Vue({
el:'#app',
render: h => h(App),
store
})
3.2 基本使用
1. 初始化数据、配置 actions、配置mutations,操作文件 store.js
//引入Vue核心库
import Vue from 'vue'
//引入Vuex
import Vuex from 'vuex'
//引用Vuex
Vue.use(Vuex)

const actions = {
    //响应组件中加的动作
	jia(context,value){
		// console.log('actions中的jia被调用了',miniStore,value)
		context.commit('JIA',value)
	},
}

const mutations = {
    //执行加
	JIA(state,value){
		// console.log('mutations中的JIA被调用了',state,value)
		state.sum += value
	}
}

//初始化数据
const state = {
   sum:0
}

//创建并暴露store
export default new Vuex.Store({
	actions,
	mutations,
	state,
})
2. 组件中读取vuex中的数据:$store.state.sum
3. 组件中修改vuex中的数据:$store.diapatch('action中的方法名',数据)或 $store.commit('mutations中的方法名,数据')
备注:若没有网络请求或其它业务逻辑,组件中也可以越过actions,即可不写 dispatch,直接编写 commit
3.3 案例
下面这个案例,通过几个按钮对sum进行操作,这个sum保存在store的state中,在点击加1这个按钮后,不是执行dispatch,而是直接使用commit,加1这个函数会被后续几个按钮同样执行,没有逻辑方面的操作,所以可以直接使用commit,减1也是如此;但是“和为奇数再加”以及“等一会再加”这两个都有一些逻辑方面的操作,所以先通过dispatch调用相应的函数,执行逻辑代码,然后再转到commit
// index.js
// 引入Vue
import Vue from 'vue'
// 引入Vuex
import Vuex from 'vuex'
// 应用Vuex插件
Vue.use(Vuex)

// 准备actions对象——响应组件中用户的动作
const actions = {
  jia(context, value){
    console.log('jia被调用了');
    context.commit('JIA', value)
  },
  jian(context, value){
    console.log('jian被调用了');
    context.commit('JIAN', value)
  },
  jiaOdd(context, value){
    console.log('jiaOdd被调用了');
    if(context.state.sum % 2){
      context.commit('JIA', value)
    }
  },
  jiaWait(context, value){
    console.log('jiaWait被调用了');
    setTimeout(() => {
      context.commit('JIA', value)
    }, 500)
  }
}
// 准备mutations对象——修改state中的数据
const mutations = {
  JIA(state, value){
    // console.log('JIA被调用了');
    state.sum += value
  },
  JIAN(state, value){
    // console.log('JIAN被调用了');
    state.sum -= value
  }
}
// 准备state对象——存储数据
const state = {
  sum: 0,
}

// 创建并暴露store
export default new Vuex.Store({
  actions,
  mutations,
  state
})
// count.vue
<template>
<div>
<h1>当前和为:{{$store.state.sum}}</h1>
<select v-model.number="n">
<option value="1">1</option>
<option value="2">2</option>
<option value="3">3</option>
</select>
<button @click="increment">+</button>
<button @click="decrement">-</button>
<button @click="incrementOdd">当前和为奇数再加</button>
<button @click="incrementWait">等一会再加</button>
</div>
</template>
<script>
export default {
name: 'MyCount',
data() {
return {
n: 1,
}
},
methods: {
increment() {
this.$store.commit('JIA', this.n)
},
decrement() {
this.$store.commit('JIAN', this.n)
},
incrementOdd() {
this.$store.dispatch('jiaOdd', this.n)
},
incrementWait() {
this.$store.dispatch('jiaWait', this.n)
},
}
}
</script>
<style>
button{
margin-left: 5px;
}
</style>
3.4 getters的使用
1. 概念:当state中的数据需要经过加工后再使用时,可以使用getters加工
2. 在store.js 中追加 getters 配置
......
const getters = {
bigSum(state){
return state.sum * 10
}
}//创建并暴露store
export default new Vuex.Store({
......
getters
})
3. 组件中读取数据:$store.getters.bigSum
3.5 map的使用方法
1. mapState方法:用于帮助我们映射 state 中的数据为计算属性
computed: {
    //借助mapState生成计算属性:sum、school、subject(对象写法)
     ...mapState({sum:'sum',school:'school',subject:'subject'}),

    //借助mapState生成计算属性:sum、school、subject(数组写法)
    ...mapState(['sum','school','subject']),
},
2. mapGetters方法:用于帮助我们映射 getters 中的数据为计算属性
computed: {
    //借助mapGetters生成计算属性:bigSum(对象写法)
    ...mapGetters({bigSum:'bigSum'}),

    //借助mapGetters生成计算属性:bigSum(数组写法)
    ...mapGetters(['bigSum'])
},
3. mapActions方法:用于帮助我们生成与 actions 对话的方法,即:包含$store.dispatch(xxx)的函数
methods:{
    //靠mapActions生成:incrementOdd、incrementWait(对象形式)
    ...mapActions({incrementOdd:'jiaOdd',incrementWait:'jiaWait'})

    //靠mapActions生成:incrementOdd、incrementWait(数组形式)
    ...mapActions(['jiaOdd','jiaWait'])
}
4. mapMutations方法:用于帮助我们生成与 mutations 对话的方法,即:包含$store.commit(xxx)的函数
methods:{
    //靠mapActions生成:increment、decrement(对象形式)
    ...mapMutations({increment:'JIA',decrement:'JIAN'}),

    //靠mapMutations生成:JIA、JIAN(对象形式)
    ...mapMutations(['JIA','JIAN']),
}
备注:mapActions 与 mapMutations使用时,若需要传递参数需要:在模板中绑定事件时传递好参数,否则参数是事件对象
3.6 模块化+命名空间
1. 目的:让代码更好维护,让多种数据分类更加明确
2. 修改store.js
const countAbout = {
  namespaced:true,//开启命名空间
  state:{x:1},
  mutations: { ... },
  actions: { ... },
  getters: {
    bigSum(state){
       return state.sum * 10
    }
  }
}

const personAbout = {
  namespaced:true,//开启命名空间
  state:{ ... },
  mutations: { ... },
  actions: { ... }
}

const store = new Vuex.Store({
  modules: {
    countAbout,
    personAbout
  }
})
3. 开启命名空间后,组件中读取state数据:
//方式一:自己直接读取
this.$store.state.personAbout.list
//方式二:借助mapState读取:
...mapState('countAbout',['sum','school','subject']),
4. 开启命名空间后,组件中读取getters数据:
//方式一:自己直接读取
this.$store.getters['personAbout/firstPersonName']
//方式二:借助mapGetters读取:
...mapGetters('countAbout',['bigSum'])
5. 开启命名空间后,组件中调用dispatch
//方式一:自己直接dispatch
this.$store.dispatch('personAbout/addPersonWang',person)
//方式二:借助mapActions:
...mapActions('countAbout',{incrementOdd:'jiaOdd',incrementWait:'jiaWait'})
6. 开启命名空间后,组件中调用commit
//方式一:自己直接commit
this.$store.commit('personAbout/ADD_PERSON',person)
//方式二:借助mapMutations:
...mapMutations('countAbout',{increment:'JIA',decrement:'JIAN'}),


 2万+
2万+


 被折叠的 条评论
为什么被折叠?
被折叠的 条评论
为什么被折叠?
 到【灌水乐园】发言


