


最全最详细的PyTorch神经网络创建~
话不多说直接开始~
神经网络的创建步骤
- 定义模型类,需要继承
nn.Module - 定义各种层,包括卷积层、池化层、全连接层、激活函数等等
- 编写前向传播,规定信号是如何传输的
可以用 torchsummary 查看网络结构,如果没有的话,使用pip命令进行安装
Module: 神经网络的模板
import torch.nn as nn
import torch.nn.functional as F

class Model(nn.Module):
    def __init__(self):
        super().__init__()
        self.conv1 = nn.Conv2d(1,20, 5)
        self.conv2 = nn.Conv2d(20, 50, 5)

    def forward(self, x):
        x = F.relu(self.conv1(x))
        return  F.relu(self.conv2(x))
神经网络中常见的各种层
常见的层包括:卷积层,池化层,全连接层,正则化层,激活层
导入层有两种方法:
一种是将其看作一个类,在
torch.nn里面另一种是将其看作一个函数,在
torch.nn.functional里面可以调用
全连接层
全连接层又称为线性层,所以函数名叫 Linear,执行的操作是𝑦=𝑥𝐴𝑇+𝑏
torch.nn.Linear(in_features, out_features, bias=True, device=None, dtype=None)- in_feature代表输入数
- out_features代表输出数,即神经元数量
m = nn.Linear(2,3)
input = torch.randn(5, 2)
ouput = m(input)
print(ouput.size())

输出:torch.Size([5, 3])
先搭建个只有一层的网络,用 torchsummry 查看网络结构
from torch import nn
from torchsummary import summary
class NeuralNetwork( nn . Module):
    def _init_( self) :
        super()._init___()
        self.fc = nn.Linear(10,1,bias=False)# 如果 bias=True(默认),则有11个参数
def forward(self, x):
    x = self.fc(x)
    return x
if _name_ == '_main__':
    network = NeuralNetwork()# print( network)
    summary ( network,(10,))
自定义输入到网络中,得到输出
import torch
from torch import nn
from torchsummary import summary
class NeuralNetwork ( nn.Module):
    def _init_( self):
        super()._init___()
        self.fc = nn.Linear( 10,1)
    def forward(self,x ):
        x = self.fc(x)
        return x
if _name_ == '_main_':
    network = NeuralNetwork()

    input = torch.randn(10)
    print("input = " ,input)
    output = network( input)
    print( "output = ", output)
    result = output. detach( ) .numpy()
    print( "result = " , result)
多个 FC 层之间可以连接起来
class NeuralNetwork( nn.Module) :
    def _init_( self):
        super()._init_()
        self.fc_1 = nn.Linear ( 1000, 100)
        self.fc_2 = nn.Linear ( 100,10)
        self.fc_3 = nn.Linear( 10,5)
    def forward( self,x):
        ×= self.fc_1(x)
        ×= self.fc_2(x)
        x= self.fc_3(x)
        return x
激活函数
常见的激活函数包括 sigmoid,relu,以及softmax
Sigmoid
sigmoid是早期的激活函数
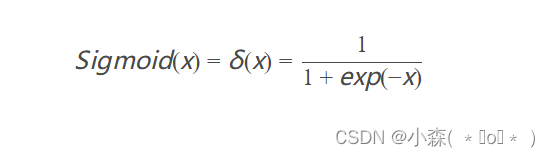
- 将所有值压缩到0-1之间
ReLU
ReLU激活函数常放在全连接层、以及卷积层后面

调用方法都放在 nn.ReLU()
Softmax
softmax是在分类当中经常用到的激活函数,用来放在全连接网络的最后一层,Softmax函数通常用于多类分类问题的输出层,将输出转换为概率分布的形式。

import torch
import torch.nn as nn
m=nn.Softmax( dim=1)
input = torch.randn(4,3)
output = m( input)
- nn.softmax的dim参数表示在哪个维度上进行softmax操作。默认值为1,表示在输入张量的第二个维度(即列)上进行softmax操作。
随机失活方法Dropout
当 FC层过多,容易对其中某条路径产生依赖,从而使得某些参数未能训练起来
为了防止上述问题,在 FC层之间通常还会加入随机失活功能,也就是Dropout层
它通过在训练过程中随机失活一部分神经元,从而增强模型的泛化能力。
m=nn.Dropout( p=0.5)
input = torch.randn(6,8)
output = m( input)
- 将一个列表,随机将一些值变为0
全连接网络处理一维信息

搭建以上的网络结构 ,组合全连接层,dropout层,激活函数,我们就可以构建出一个完整的全连接网络结构:
import torch
from torch import nn
from torchsummary import summary
class NeuralNetwork( nn.Module):
    def _init_( self):
        super()._init_()
        self.relu = nn.ReLU()
        self.softmax = nn.softmax(dim=1)
        self.dropout = nn.Dropout(0.5)
        self.fc_1 = nn.Linear(1000, 100)
        self.fc_2 = nn.Linear(100,10)
        self.fc_3 = nn.Linear(10, 5)
    def forward(self, x):
        x = x.view(-1,1000)# view的存在,可以自动适应batchsize
        x = self.dropout( self.relu( self.fc_1(x) ) )
        x = self.dropout( self.relu( self.fc_2(x) ) )
        x= self.softmax ( self.fc_3(x))
        return x
全连接网络处理二维图像
使用全连接网络处理二维图像信息,当二维特征(Feature Map)转为一维特征时,需要从高维压缩成一维,这时候可以用 tensor.view(),或者用nn.Flatten(start_dim=1)
import torch
import torch.nn as nn

# 创建一个输入张量
input_tensor = torch.randn(2, 3, 4)

# 创建Flatten层
flatten_layer = nn.Flatten(start_dim=1)

# 对输入张量进行展平操作
output_tensor = flatten_layer(input_tensor)

print("Input Tensor:")
print(input_tensor)
print("Output Tensor:")
print(output_tensor)


# 输出
Input Tensor:
tensor([[[-0.5968, -0.0790,  0.0597, -0.2250],
         [ 0.1564, -0.1564, -0.0790, -0.1564],
         [-0.1564, -0.1564, -0.1564, -0.1564]],

        [[ 0.1564, -0.1564, -0.1564, -0.1564],
         [-0.1564, -0.1564, -0.1564, -0.1564],
         [-0.1564, -0.1564, -0.1564, -0.1564]]])
Output Tensor:
tensor([[-0.5968, -0.0790,  0.0597, -0.2250,  0.1564, -0.1564, -0.0790, -0.1564],
        [-0.1564, -0.1564, -0.1564, -0.1564, -0.1564, -0.1564, -0.1564, -0.1564]])
卷积层
二维卷积
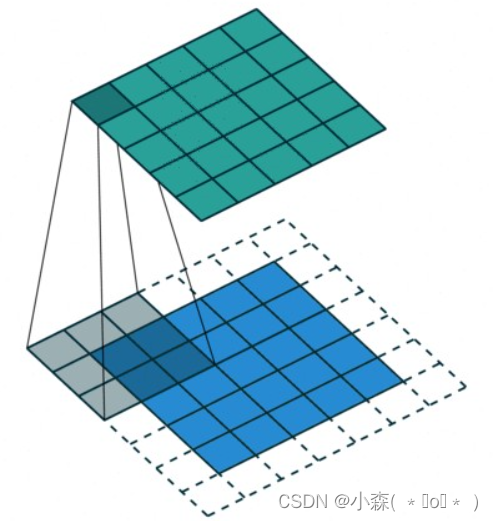
torch.nn.Conv2d(in_channels, out_channels, kernel_size, stride=1, padding=0, dilation=1, groups=1, bias=True, padding_mode=‘zeros’, device=None, dtype=None)
- in_channels: 输入通道数
- out_channels: 输出通道数(卷积核数量)
- kernel_size: 卷积核大小
- stride: 卷积步长
- padding: 边缘补零
- dilation: 扩散卷积
- group: 分组卷积
- bias: 是否带有偏置
import torch
import torch.nn as nn
#使用方形卷积核,以及相同的步长
m = nn.conv2d(16,33,3, stride=2)
#使用非方形的卷积核,以及非对称的步长和补零
m = nn.conv2d(16,33,(3,5),stride=(2,1),padding=(4,2))
#使用非方形的卷积核,以及非对称的步长,补零和膨胀系数
m = nn.Conv2d(16,33,(3,5),stride=(2,1),padding=(4,2),dilation=(3,1))
input = torch.randn(20,16,50,100)
output = m( input)
print(output.shape)
转置卷积就是卷积的逆操作,也称为逆卷积、反卷积
torch.nn.ConvTranspose2d(in_channels, out_channels, kernel_size, stride=1, padding=0, output_padding=0, groups=1, bias=True, dilation=1, padding_mode=‘zeros’, device=None, dtype=None)
- 输入:(𝑁,𝐶𝑖𝑛,𝐻𝑖𝑛,𝑊𝑖𝑛)或者(𝐶𝑖𝑛,𝐻𝑖𝑛,𝑊𝑖𝑛)
- 输出:(𝑁,𝐶𝑜𝑢𝑡,𝐻𝑜𝑢𝑡,𝑊𝑜𝑢𝑡)或者(𝐶𝑜𝑢𝑡,𝐻𝑜𝑢𝑡,𝑊𝑜𝑢𝑡)
转置卷积是一种卷积神经网络中的操作,它的作用是将输入的特征图进行上采样,从而增加特征图的尺寸。转置卷积通常用于生成器网络中,将低分辨率的图像转换为高分辨率的图像。
import torch
import torch.nn as nn

# 定义一个转置卷积层
transposed_conv = nn.ConvTranspose2d(in_channels=3, out_channels=64, kernel_size=4, stride=2, padding=1)

# 创建一个输入张量,形状为 (batch_size, in_channels, height, width)
input_tensor = torch.randn(1, 3, 32, 32)

# 使用转置卷积层处理输入张量
output_tensor = transposed_conv(input_tensor)

print("输入张量的形状:", input_tensor.shape)
print("输出张量的形状:", output_tensor.shape)
搭建全卷积网络结构案例
import torch.nn as nn
import torch.nn.functional as F
import torch
from torchsummary import summary

class FCN(nn.Module):
    def __init__(self,num_classes):
        super(FCN,self).__init__()
        self.conv1 = nn.Conv2d(in_channels=3, out_channels=32, kernel_size=3).cuda()  # kernel_size=3, 卷积核大小
        self.conv2 = nn.Conv2d(in_channels=32, out_channels=64, kernel_size=3).cuda()
        self.conv3 = nn.Conv2d(in_channels=64, out_channels=128, kernel_size=3).cuda()

        self.upsample1 = nn.ConvTranspose2d(in_channels=128, out_channels=64, kernel_size=3).cuda()
        self.upsample2 = nn.ConvTranspose2d(in_channels=64, out_channels=32, kernel_size=3).cuda()
        self.upsample3 = nn.ConvTranspose2d(in_channels=32, out_channels=num_classes, kernel_size=3).cuda()
        # 最后的upsample3 输出通道数和标签类别一致

    def forward(self, x):
        x = F.relu(self.conv1(x))
        x = F.relu(self.conv2(x))
        x = F.relu(self.conv3(x))
        x = F.relu(self.upsample1(x))
        x = F.relu(self.upsample2(x))
        x = F.relu(self.upsample3(x))
        return  x

# 10个类别的图像分割
num_classes = 10
# 每个像素都会得到一个10维的特征向量,表示它属于每个类别的概率
fcn_model = FCN(num_classes)

print(fcn_model)
summary(fcn_model, (3, 224, 224))
输出:
FCN(
  (conv1): Conv2d(3, 32, kernel_size=(3, 3), stride=(1, 1))
  (conv2): Conv2d(32, 64, kernel_size=(3, 3), stride=(1, 1))
  (conv3): Conv2d(64, 128, kernel_size=(3, 3), stride=(1, 1))
  (upsample1): ConvTranspose2d(128, 64, kernel_size=(3, 3), stride=(1, 1))
  (upsample2): ConvTranspose2d(64, 32, kernel_size=(3, 3), stride=(1, 1))
  (upsample3): ConvTranspose2d(32, 10, kernel_size=(3, 3), stride=(1, 1))
)
----------------------------------------------------------------
        Layer (type)               Output Shape         Param #
================================================================
            Conv2d-1         [-1, 32, 222, 222]             896
            Conv2d-2         [-1, 64, 220, 220]          18,496
            Conv2d-3        [-1, 128, 218, 218]          73,856
   ConvTranspose2d-4         [-1, 64, 220, 220]          73,792
   ConvTranspose2d-5         [-1, 32, 222, 222]          18,464
   ConvTranspose2d-6         [-1, 10, 224, 224]           2,890
================================================================
Total params: 188,394
Trainable params: 188,394
Non-trainable params: 0
----------------------------------------------------------------
Input size (MB): 0.57
Forward/backward pass size (MB): 121.57
Params size (MB): 0.72
Estimated Total Size (MB): 122.86
----------------------------------------------------------------
搭建卷积+全连接的网络结构
import torch.nn as nn
import torch.nn.functional as F
import torch
from torchsummary import summary

class ConvNet(nn.Module):
    def __init__(self,num_classes=10):
        super(ConvNet,self).__init__()
        self.conv1 = nn.Conv2d(in_channels=3, out_channels=32, kernel_size=3).cuda()  # kernel_size=3, 卷积核大小
        self.conv2 = nn.Conv2d(in_channels=32, out_channels=64, kernel_size=3).cuda()

        # 全连接层
        self.flatten = nn.Flatten(start_dim=1).cuda()
        # 将输入张量从第1个维度开始展平
        self.fc1 = nn.Linear(64*28*28, 50).cuda()
        # 输入图像的大小为64x28x28,输出特征数为50
        self.fc2 = nn.Linear(50, num_classes).cuda()
        # 输入特征数为512,输出特征数为num_classes

    def forward(self, x):
        x = self.conv1(x)
        x = self.conv2(x)
        x = self.flatten(x)
        x = self.fc1(x)
        x = self.fc2(x)
        return  x

# 10个类别的图像分割
num_classes = 10
# 每个像素都会得到一个10维的特征向量,表示它属于每个类别的概率
conv_net = ConvNet(num_classes)

bacth_size = 4
input_tensor = torch.randn(bacth_size, 3, 32, 32).cuda()    # 输入是4张32x32的RGB图像
output = conv_net(input_tensor)

print(output.shape)
summary(conv_net, (3, 32, 32))
输出:
torch.Size([4, 10])
----------------------------------------------------------------
        Layer (type)               Output Shape         Param #
================================================================
            Conv2d-1           [-1, 32, 30, 30]             896
            Conv2d-2           [-1, 64, 28, 28]          18,496
           Flatten-3                [-1, 50176]               0
            Linear-4                   [-1, 50]       2,508,850
            Linear-5                   [-1, 10]             510
================================================================
Total params: 2,528,752
Trainable params: 2,528,752
Non-trainable params: 0
----------------------------------------------------------------
Input size (MB): 0.01
Forward/backward pass size (MB): 0.99
Params size (MB): 9.65
Estimated Total Size (MB): 10.64
----------------------------------------------------------------

Process finished with exit code 0
池化层
池化包含最大池化和平均池化,有一维池化,二维池化,三维池化,在这里以二维池化为例
最大池化就是求一个区域中的最大值,来代替该区域。
torch.nn.MaxPool2d(kernel_size, stride=None, padding=0, dilation=1, return_indices=False, ceil_mode=False)

输入参数 kernel_size,stride,padding,dilation可以是
- 一个 int :代表长宽使用同样的参数
- 两个int组成的元组:第一个int用在H维度,第二个int用在W维度
#长宽一致的池化,核尺寸为3x3,池化步长为2
m1 = nn.MaxPool2d( 3,stride=2)
#长宽不一致的池化
m2 = nn.MaxPool2d(( 3,2), stride=(2,1))
input = torch.randn(4,3,24,24)
output1 = m1( input)
output2 = m2(input)
print( "input.shape = " ,input.shape)
print( "output1.shape = ", output1.shape)
print( "output2.shape = " , output2.shape)
input.shape = torch.size( [4,3,24,24])
output1.shape = torch.size([4,3,11,11])
output2.shape = torch.size([4,3,11,23])
平均池化
平均池化就是用一个区域中的平均数来代替本区域
torch.nn.AvgPool2d(kernel_size, stride=None, padding=0, ceil_mode=False, count_include_pad=True, divisor_override=None)
import torch
import torch.nn as nn
#长宽一致的池化,核尺寸为3x3,池化步长为2
m1 = nn.AvgPool2d( 3, stride=2)
#长宽不一致的池化
m2 = nn.AvgPool2d((3,2), stride=(2,1))
input = torch.randn( 4,3,24,24)
output1 = m1( input)
output2 = m2(input)
print( "input.shape = " , input. shape)
print( "output1.shape = ", output1.shape)
print( "output2.shape = " , output2.shape)
input.shape = torch.size([4,3,24,24])
output1.shape = torch.size([4,3,11,11])
output2.shape = torch.size([4,3,11,23])
BN层
BN,即Batch Normalization,是对每一个batch的数据进行归一化操作,可以使得网络训练更稳定,加速网络的收敛。

#批量归一化层(具有可学习参数)
m_learnable = nn.BatchNorm2d( 100)
#批量归一化层(不具有可学习参数>
m_non_learnable = nn.BatchNorm2d(100,affine=False)
#随机生成输入数据
input = torch.randn(20,100,35,45)
#应用具有可学习参数的批量归一化层
output_learnable = m_learnable( input)
# 应用不具有可学习参数的批量归一化层
output_non_learnable = m_non_learnable(input)
print( "input.shape = ", input.shape)
print( "output_learnable.shape = ", output_learnable.shape)
print( "output_non_learnable.shape = ", output_non_learnable.shape)
input.shape = torch.size( [20,100,35,45])
output_learnable.shape = torch.size( [20,100,35,45])output_non_learnable.shape = torch.size([20,100,35,45])
最后,欢迎大家来到知识星球「易编橙·终身成长社群」与业内大佬一起交流学习,定期分析专业资料知识~
「易编橙·终身成长社群」


 2871
2871


 被折叠的 条评论
为什么被折叠?
被折叠的 条评论
为什么被折叠?
 到【灌水乐园】发言


