


提示:文章写完后,目录可以自动生成,如何生成可参考右边的帮助文档
文章目录
前言
一、项目介绍
项目名称:博客笔记项目
主要操作的对象是:文章和用户,用户可在该系统上发表自己的博客,查看自己或别人已经发表的文章
需要用到两张表:userinfo(用户表)、articleinfo(文章表)
需要实现的功能:
登录+注册
博客的分页列表功能
新增发表博客
修改、删除自己的博客
项目亮点
- 手动对用户密码实现随机加盐
- 统一异常处理、拦截器
- 用户登录持久化(session内存)
- 分页功能
项目技术栈
SSM(SpringBoot + SpringMVC + MyBatis)
MySQL
jQuery

二、项目的整体框架
2.1 数据库模块
两张表:用户表 + 文章表
2.2 前端模块
前端设计到7个页面
- login.html登录页
- reg.html注册页
- blog_list.html总的博客列表页——》用到了blog_l
- myblog_list.html个人博客列表页
- blog_content.html博客详情页
- blog_edit.html博客编辑页
- blog_update.html博客修改页

2.3 后端模块
后端模块:
- 控制层(controller包)——》控制器
- 服务层(service包)——》服务类
- 持久层--数据访问层(mapper类 + mapper.xml)——》mapper
- 实体层(model包)——》实体类
- 工具层(config包+util包)——》统一异常处理、统一返回、随机加盐


三、项目具体展示

四、项目的实现
4.1 准备工作
首先我们新建一个springboot项目,项目具体的创建流程我这里就不在赘述。
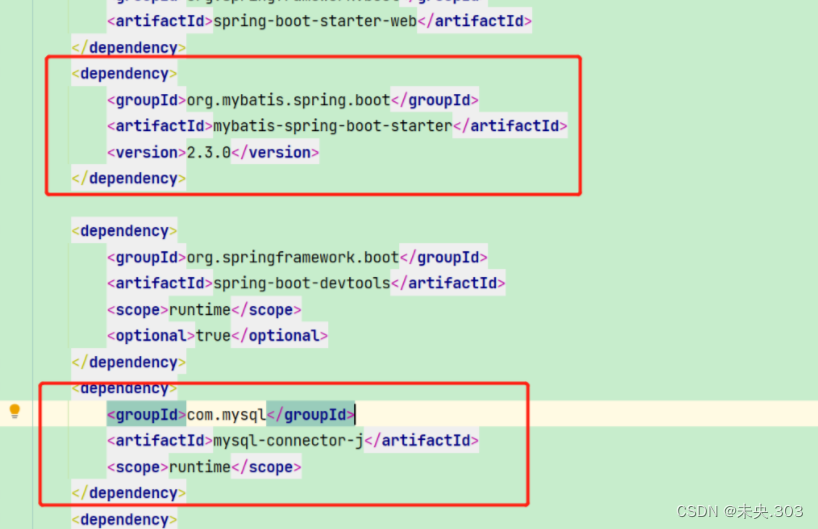
引入需要的依赖pom.xml代码:
<?xml version="1.0" encoding="UTF-8"?>
<project xmlns="http://maven.apache.org/POM/4.0.0" xmlns:xsi="http://www.w3.org/2001/XMLSchema-instance"
	xsi:schemaLocation="http://maven.apache.org/POM/4.0.0 https://maven.apache.org/xsd/maven-4.0.0.xsd">
	<modelVersion>4.0.0</modelVersion>
	<parent>
		<groupId>org.springframework.boot</groupId>
		<artifactId>spring-boot-starter-parent</artifactId>
		<version>2.7.8</version>
		<relativePath/> <!-- lookup parent from repository -->
	</parent>
	<groupId>com.example</groupId>
	<artifactId>demo</artifactId>
	<version>0.0.1-SNAPSHOT</version>
	<name>demo</name>
	<description>Demo project for Spring Boot</description>
	<properties>
		<java.version>1.8</java.version>
	</properties>
	<dependencies>
		<dependency>
			<groupId>org.springframework.boot</groupId>
			<artifactId>spring-boot-starter-web</artifactId>
		</dependency>
		<dependency>
			<groupId>org.mybatis.spring.boot</groupId>
			<artifactId>mybatis-spring-boot-starter</artifactId>
			<version>2.3.0</version>
		</dependency>

		<dependency>
			<groupId>org.springframework.boot</groupId>
			<artifactId>spring-boot-devtools</artifactId>
			<scope>runtime</scope>
			<optional>true</optional>
		</dependency>
		<dependency>
			<groupId>com.mysql</groupId>
			<artifactId>mysql-connector-j</artifactId>
			<scope>runtime</scope>
		</dependency>
		<dependency>
			<groupId>org.projectlombok</groupId>
			<artifactId>lombok</artifactId>
			<optional>true</optional>
		</dependency>
		<dependency>
			<groupId>org.springframework.boot</groupId>
			<artifactId>spring-boot-starter-test</artifactId>
			<scope>test</scope>
		</dependency>
		<dependency>
			<groupId>cn.hutool</groupId>
			<artifactId>hutool-all</artifactId>
			<version>5.8.10</version>
		</dependency>
	</dependencies>

	<build>
		<plugins>
			<plugin>
				<groupId>org.springframework.boot</groupId>
				<artifactId>spring-boot-maven-plugin</artifactId>
				<configuration>
					<excludes>
						<exclude>
							<groupId>org.projectlombok</groupId>
							<artifactId>lombok</artifactId>
						</exclude>
					</excludes>
				</configuration>
			</plugin>
		</plugins>
		<finalName>sxy_blog_system</finalName>
	</build>

</project>
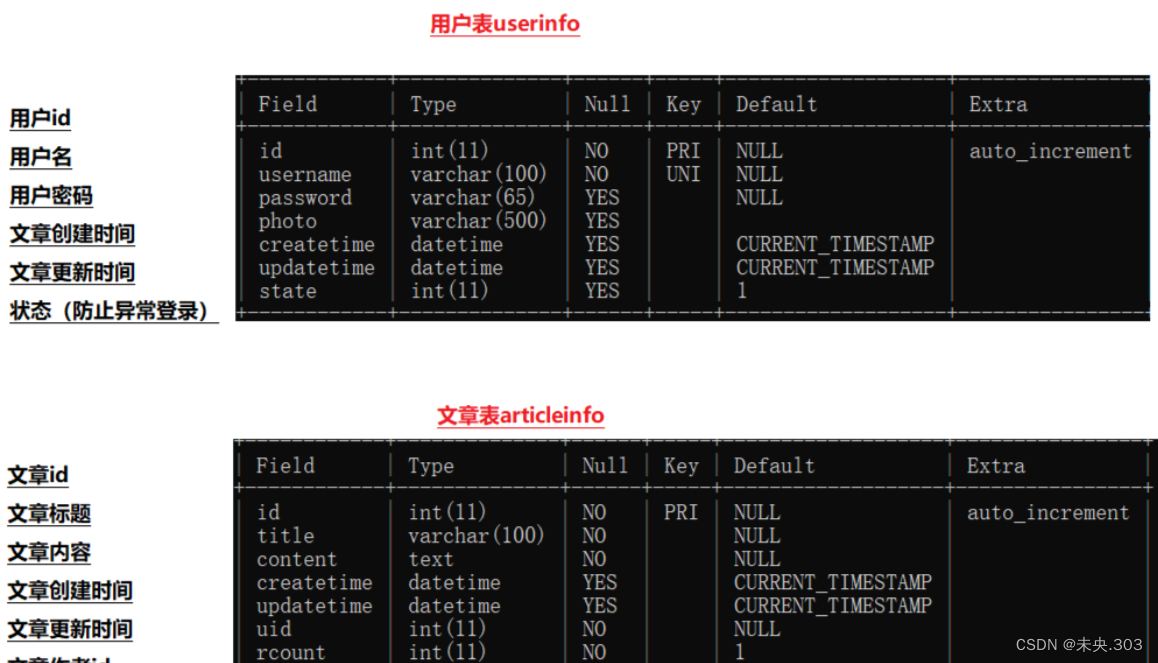
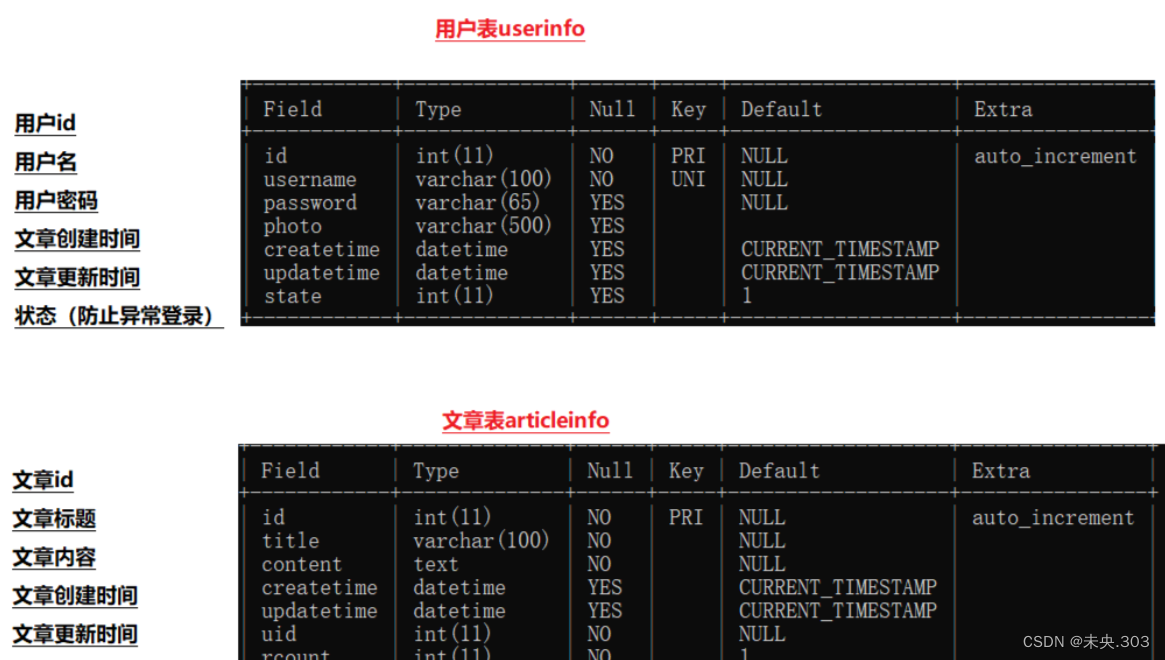
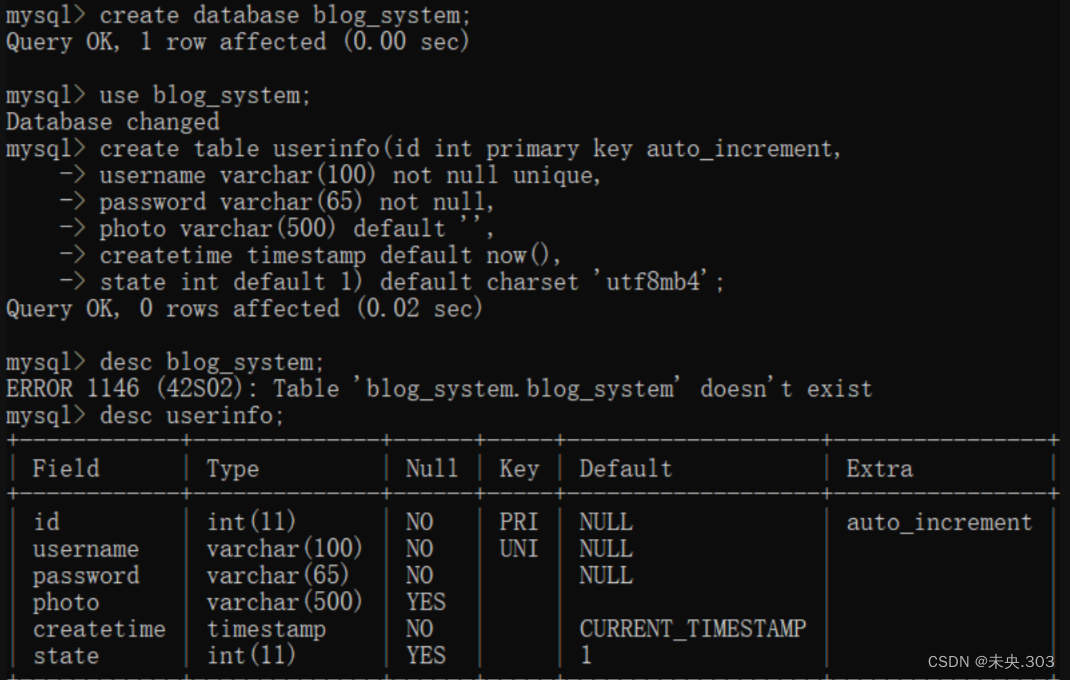
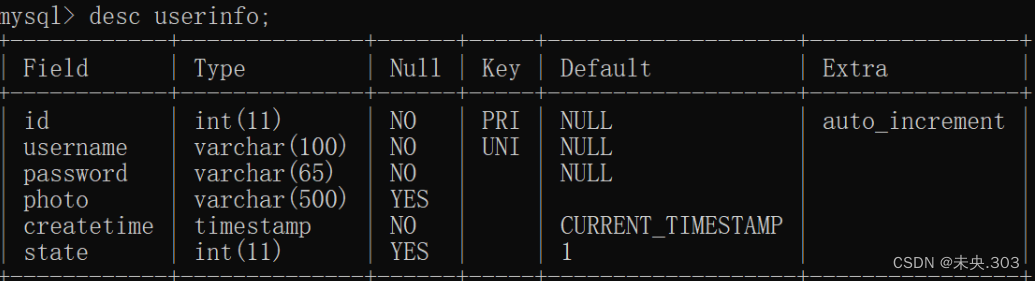
4.1.1 数据库,表的创建
1.用户表的创建
2.文章表的创建

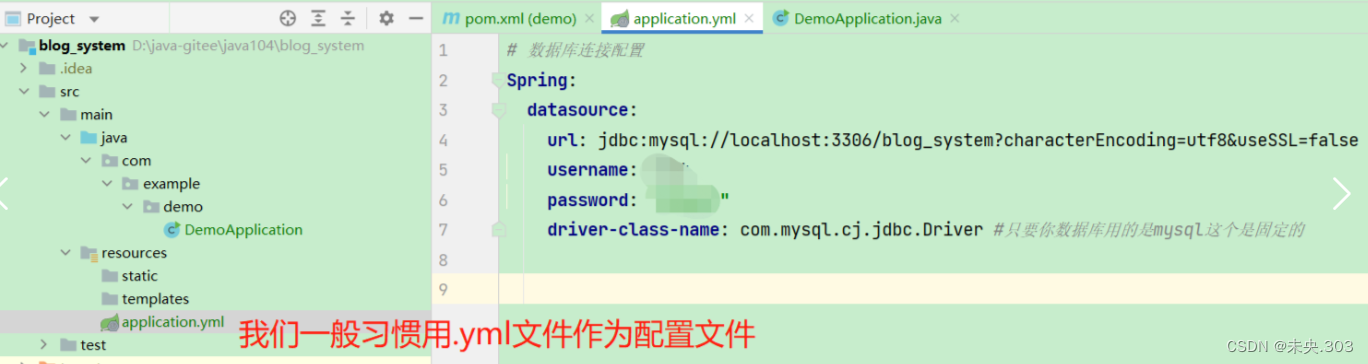
4.1.2 配置数据库和MyBatis
1.配置数据库的连接信息
注意: 这里的很多内容是固定的
# 数据库连接配置
Spring:
  datasource:
    url: jdbc:mysql://localhost:3306/你要连接的数据库名?characterEncoding=utf8&useSSL=false
    username: 用户名
    password: 自己的密码
    driver-class-name: com.mysql.cj.jdbc.Driver #只要你数据库用的是mysql这个是固定的
2.配置MyBatis XML存放规则和命名规则
此时我们已经在通过maven将MySQL Driver和MyBatis Framework这两个包导入了进来,此时启动项目,项目依然能够正常运行,说明我们数据库连接是正常的。

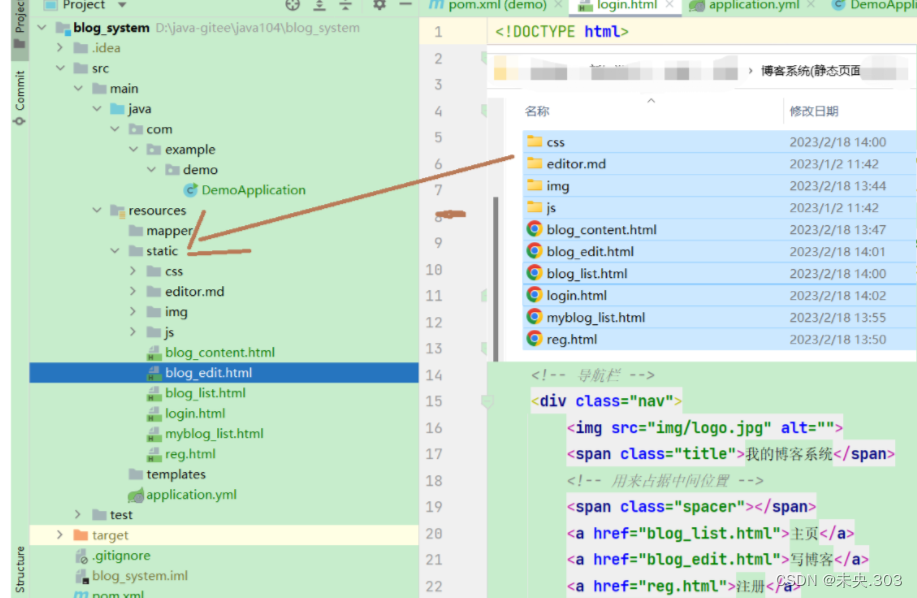
4.1.3 引入前端项目
下面的前端的静态资源复制到我们resource/static目录下面:
4.2 统一功能处理
上面我们说了,当程序出现了异常获取其他情况,我们不统一处理。
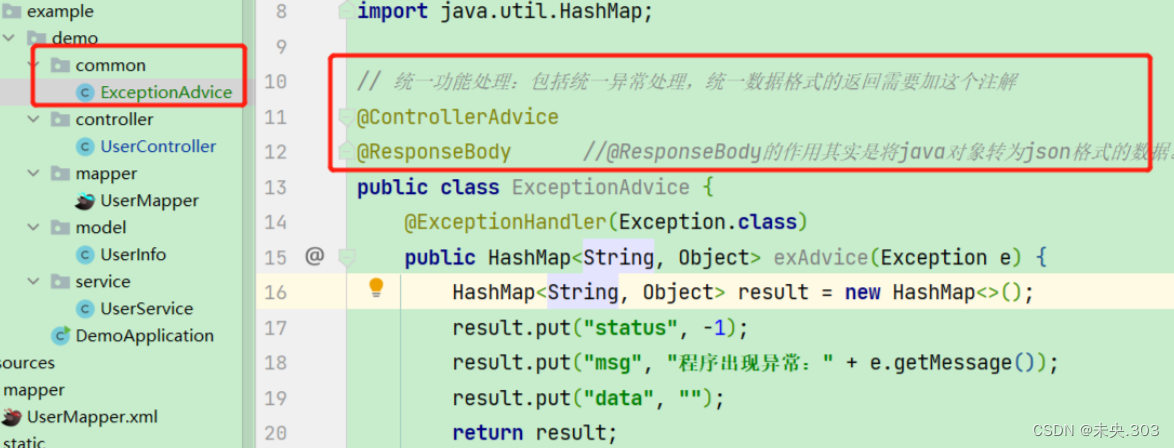
4.2.1 统一异常功能处理
所以我们需要单独在工具层中(我们的common包下面,建一个统一异常处理的类)
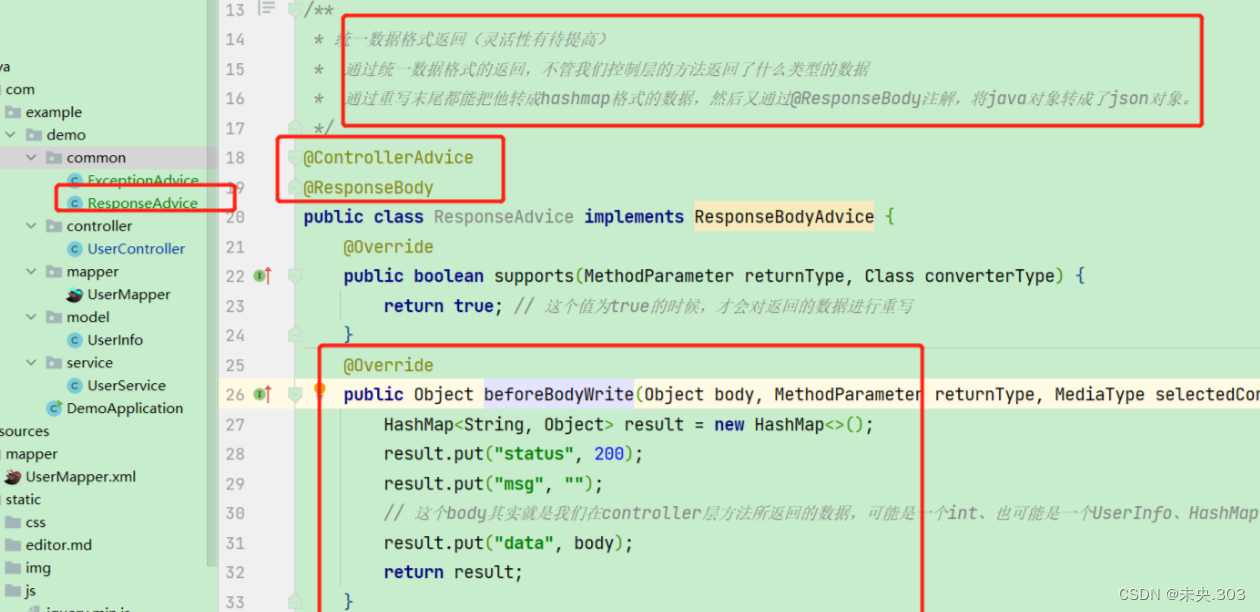
4.2.2 统一数据格式返回
一般在web项目中,我们前后端都是通过json这种数据格式来交换数据格式
——》我们后端需要给前端返回json格式的数据。
我们前后端用户交互的数据个数一般是统一的,不会出现你一个接口用一种数据格式,而那个接口又换了,这样就会有很多问题,不利于开发。
统一数据的优点:
- 方便前端程序员更好的接受和解析后端数据接口返回的数据。
- 降低前端程序员和后端程序员的沟通成本,按照某个格式实现就可以了,因为所有接口都是这样返回的。
- 有利于项目统一数据的维护和修改。
- 有利于后端技术部门的统一规范的标准制定,不会出现稀奇古怪的返回内容。
统一数据格式的返回有两种实现方式,返回一个公共对象或者重写。
这里我们采用第二种重写(不过他的灵活性有待提升)
具体的我们可以使用@ControllerAdvice+ResponseBodyAdvice的方式实现,
具体实现代码如下:
但是正如我们上面所说的,通过重写来进行统一数据格式的返回,他的灵活性的确有待提高。你看我们上面只是处理了成功的情况,但要是失败的情况呢?——》并且即使失败,也是分好几种情况呢!!!
我们不如再创建一个工具类,用来自定义返回hashmap数据(再通过@ResponseBody转成json格式)

那么对应的我们的统一数据格式返回类就发生了变化
package com.example.demo.common;

import com.fasterxml.jackson.databind.ObjectMapper;
import org.springframework.core.MethodParameter;
import org.springframework.http.MediaType;
import org.springframework.http.server.ServerHttpRequest;
import org.springframework.http.server.ServerHttpResponse;
import org.springframework.web.bind.annotation.ControllerAdvice;
import org.springframework.web.bind.annotation.ResponseBody;
import org.springframework.web.servlet.mvc.method.annotation.ResponseBodyAdvice;

import java.util.HashMap;

/**
 * 统一数据格式返回(灵活性有待提高)
 *  通过统一数据格式的返回,不管我们控制层的方法返回了什么类型的数据
 *  通过重写末尾都能把他转成hashmap格式的数据,然后又通过@ResponseBody注解,将java对象转成了json对象。
 */
@ControllerAdvice
@ResponseBody
public class ResponseAdvice implements ResponseBodyAdvice {
    @Override
    public boolean supports(MethodParameter returnType, Class converterType) {
        return true; // 这个值为true的时候,才会对返回的数据进行重写
    }
    @Override
    public Object beforeBodyWrite(Object body, MethodParameter returnType, MediaType selectedContentType, Class selectedConverterType, ServerHttpRequest request, ServerHttpResponse response) {
        // 在有了我们自定义数据返回后,我们的这个统一数据格式返回类就像是一个托地的。
        // 因为controller层可以直接调用AjaxResult,来返回hashmap(通过@ResponseBody转成json)
        // 但如果controller没有调用AjaxResult,直接返回了
        if (body instanceof HashMap) {
            return body;  // 此时已经是hashmap格式了
        }
        if (body instanceof Integer){ // 当controller层中的方法直接返回int类型时候
            int num = (int) body;
            if (num <= 0) {
                // 应对int类型错误返回(查询文章列表,新增和删除博客可能会用到)——》也可能用不到,如果新增或查询失败,我直接就在controller就返回了(通过调用AjaxResult)
                // 新增、删除或查询失败(非得在controller返回int值,再通过这里返回json对象的话,不灵活(出错信息显示的不具体
                // 所以说这里我们只是以防万一,我们还是选择再controller层直接返回json对象,这样更信息具体,更有怎针对性)
                return AjaxResult.fail("抱歉,本次操作失败,请稍后再试!"); // 这里无法区分是新增失败还是删除失败
                // 这里我们本来返回的是一个hashmap格式的对象,但加了@ResponseBody,把我们的java对象转成的了json格式
            }
        }

        if (body == null) { // (比如查询操作,直接返回查询到的UserInfo对象,然后直接返回该对象)
            // 这里我们本来返回的是一个hashmap格式的对象,但加了@ResponseBody,把我们的java对象转成的了json格式
            return AjaxResult.fail("抱歉,查询失败!"); // 这时对查询当前用户的特判
        }
        // 这里我们本来返回的是一个hashmap格式的对象,但加了@ResponseBody,把我们的java对象转成的了json格式
        return AjaxResult.success("操作成功", body);
        // 前端是通过result中的status值来判断操作是否成功的,这个类用来处理操作成功的情况(为操作成功的情况兜底)
        // 但这可能存在问题,如果操作失败,并且在controller层没有调用AjaxResult中的fail方法(而是直接返回,通过这个类来返回统一的数据格式,就会出现问题——》在这个类我们都是按成功的处理的)
        // 解决方案,在该类中提前判断body(判断操作失败的情况)--->我们约定如果操作失败就返回负数(在controller层调用AjaxResult的情况)
    }
}
那么与之对应的我们在controller层的类也就发生了改变
package com.example.demo.controller;

import com.example.demo.common.AjaxResult;
import com.example.demo.model.UserInfo;
import com.example.demo.service.UserService;
import org.springframework.beans.factory.annotation.Autowired;
import org.springframework.util.StringUtils;
import org.springframework.web.bind.annotation.RequestMapping;
import org.springframework.web.bind.annotation.RestController;

import javax.jws.soap.SOAPBinding;
import javax.servlet.http.HttpSession;
import java.util.HashMap;
/**
 * 而Spring Boot框架项目接口返回 JSON格式的数据比较简单:
 * 在 Controller 类中使用@RestController注解即可返回 JSON格式的数据。
 *  @RestController是@Controller和@ResponseBody两者的结合,使用这个注解后该controller的所有方法都会返回json格式的数据,
 *  因为@ResponseBody的作用就是把返回的对象转换为json格式,并把json数据写入response的body中,前台收到response时就可以获取其body中的json数据了。
 * 如果在整个controller类上方添加@RestController,其作用就相当于把该controller下的所有方法都加上@ResponseBody,使每个方法直接返回response对象。
 */
@RestController
@RequestMapping("/user")
public class UserController {
    @Autowired
    public UserService userService;
    @RequestMapping("/reg")
    public Object reg(String username, String password1, String password2) {
        HashMap<String, Object> result = new HashMap<>();
        if (!StringUtils.hasLength(username) || !StringUtils.hasLength(password1) || !StringUtils.hasLength(password2)) {

            return AjaxResult.fail("你输入的参数有误,请重新输入!");
        }
        else {
            if (!password1.equals(password2)) {
                return AjaxResult.fail("前后密码不一致,请重新输入!");
            }
            else {
                UserInfo userInfo = new UserInfo();
                userInfo.setUsername(username);
                userInfo.setPassword(password1);
                int ret = userService.reg(userInfo);
                if (ret != 1) {
                   return AjaxResult.fail("数据库添加用户失败,请稍后再试!");
                }
                else {
                    return AjaxResult.success("恭喜,注册成功!", ret);
                }
            }
        }
    }
    @RequestMapping("/login")
    public Object login(String username, String password) {
        HashMap<String, Object> result = new HashMap<>();
        if (!StringUtils.hasLength(username) || !StringUtils.hasLength(password)) {
            return AjaxResult.fail("你输入的参数有误,请重新输入!");
        }
        else {
            // 需要在数据库中查询当前登录的用户是否存在
            UserInfo userInfo = userService.selectByUsername(username);
            if (userInfo == null || !password.equals(userInfo.getPassword())) {
               return AjaxResult.fail("你当前的用户名或密码错误,请重新输入!");
            }
            else  {
                return AjaxResult.success("恭喜,登录成功!", "");
            }
        }
    }
}
4.2.3 统一用户登录验证
spring拦截器
对于以上问题Spring中提供了具体的实现拦截器:HandlerInterceptor,
拦截器的实现分为以下两个步骤:
1、创建自定义拦截器,实现 HandlerInterceptor 接口的perHandle(执行具体方法之前的预处理)方法。
2、将自定义拦截器加入 WebMvcConfiger的 addInterceptors方法中。
步骤1:创建用户登录拦截器
步骤2:
将该自定义拦截器放到系统的配置文件中
(将自定义拦截器加入 WebMvcConfiger的 addInterceptors方法中)
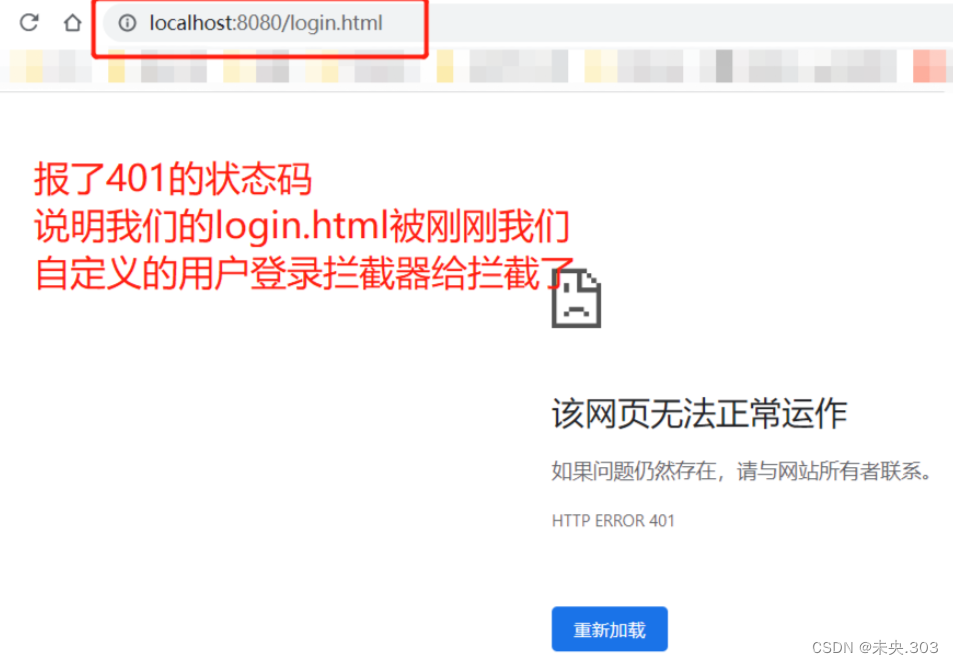
检验:用浏览器测试一下是否真的拦截了


4.3 博客登录页的实现
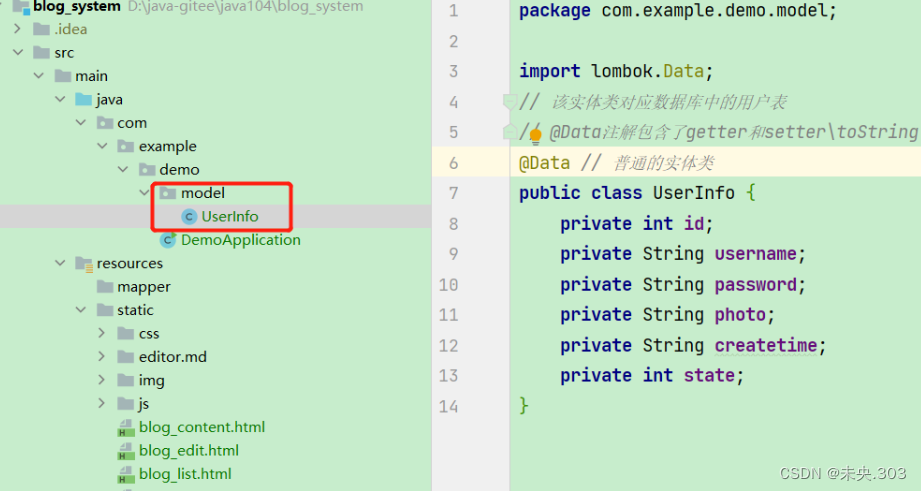
4.3.1 实体类的创建
首先根据我们数据库的表,在我们的程序中创建想对应的实体类——我们的MyBatis是ORM框架,我们的程序对象与关系数据库数据之间有响应的映射关系
只有在启动类的同级目录下,springboot才会对该目录下的类进行扫描,配合类注解存到spring容器中。
4.3.2 前后端交互
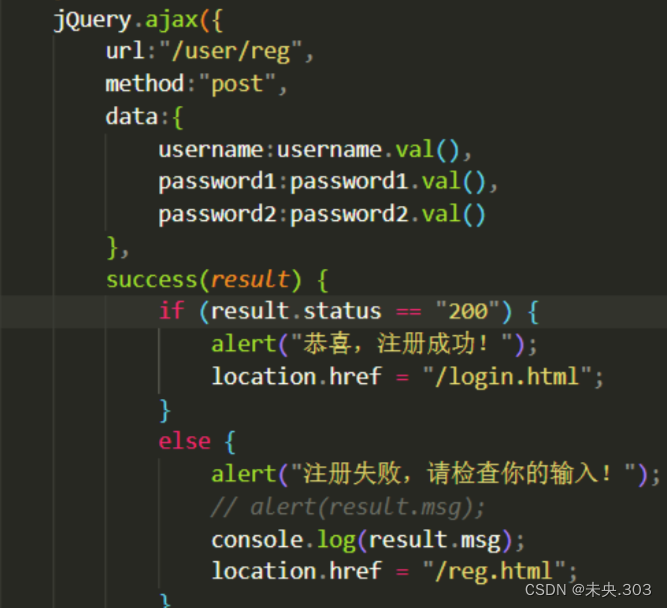
1.首先用户在前端页面输入了用户信息
2.然后前端紧接着就把用户输入的信息传递给后端(提交到后端指定的接口上,比如登录提交的就是/user/reg
3.后端接收到用户信息,存到数据库中,并返回注册的结果(成功了?还是失败了?)
4.前端接受到后端返回的结果后做进一步的处理


4.3.3 后端代码实现
后端流程图:
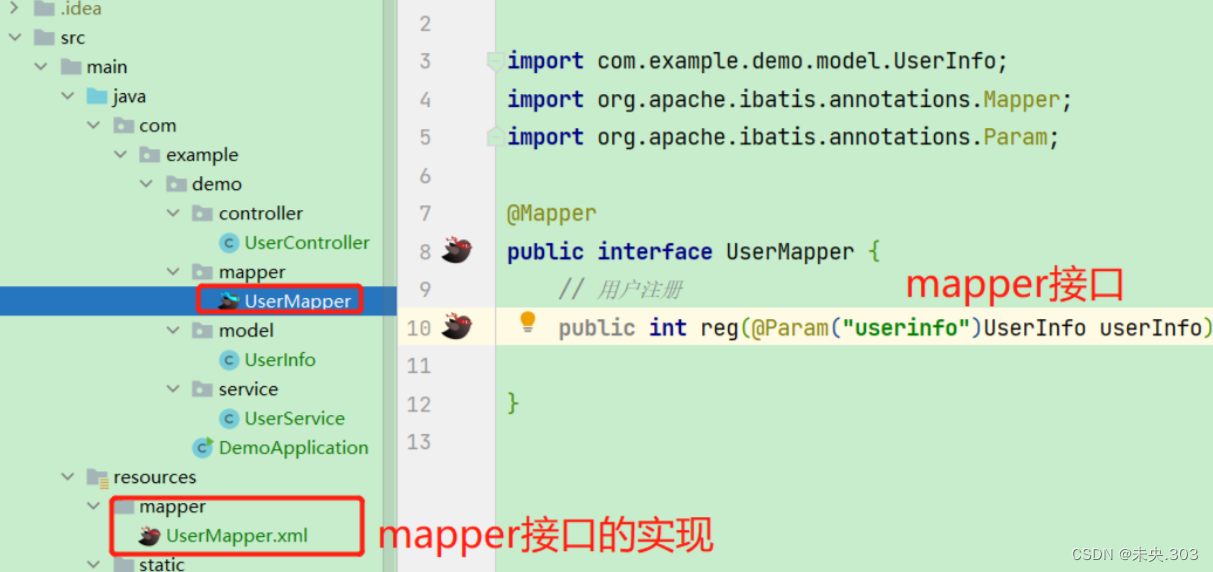
下面是根据上图流程构建的目录

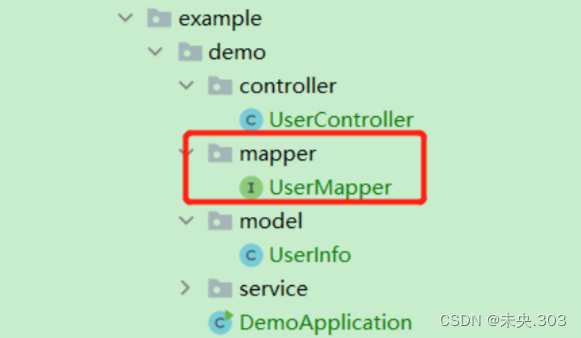
在controller层中调用了service服务层的reg方法
service服务层又调用了持久层中的mapper接口
mapper接口的实现:UserMapper.xml文件
注册前后端流程交互


4.4 博客列表页的实现
controller层代码:
1.ArticleController代码实现:
package com.example.demo.controller;

import com.example.demo.config.AjaxResult;
import com.example.demo.model.ArticleInfo;
import com.example.demo.model.UserInfo;
import com.example.demo.service.ArticleService;
import com.example.demo.service.UserService;
import com.example.demo.util.ConstVariable;

import lombok.SneakyThrows;
import org.apache.ibatis.annotations.ResultMap;
import org.springframework.beans.factory.annotation.Autowired;
import org.springframework.util.StringUtils;
import org.springframework.web.bind.annotation.RequestMapping;
import org.springframework.web.bind.annotation.RestController;

import javax.servlet.http.HttpServletRequest;
import javax.servlet.http.HttpServletResponse;
import javax.servlet.http.HttpSession;
import java.util.*;

/**
 * 而Spring Boot框架项目接口返回 JSON格式的数据比较简单:
 * 在 Controller 类中使用@RestController注解即可返回 JSON格式的数据。
 */
@RestController
@RequestMapping("/article")
public class ArticleController {
    @Autowired
    private ArticleService articleService;// 属性注入


    // 新增操作(发表博客)
    @RequestMapping("/add")
    public Object add(HttpServletRequest request, String title, String content) {
        // todo 非空校验
        HttpSession session = request.getSession(false);
        if (session == null || session.getAttribute(ConstVariable.USER_SESSION_KEY) == null) {
            return AjaxResult.fail(-1, "当前用户未登录,博客发表失败!");
        }
        UserInfo userInfo = (UserInfo) session.getAttribute(ConstVariable.USER_SESSION_KEY);
        int uid = userInfo.getId(); // 标记当前博客是那个用户发布的
        int rcount = 1; // 表示当前博客的阅读量,初始值(新发表的博客阅读量)==1
        int state = 1; // state表示当前博客状态 1 ==>已发布, 2==》编辑中,保存草稿
        // 新增博客
        ArticleInfo articleInfo = new ArticleInfo();
        articleInfo.setTitle(title);
        articleInfo.setContent(content);
        articleInfo.setUid(uid);
        articleInfo.setRcount(rcount);
        articleInfo.setState(state);
        int result = articleService.add(articleInfo);
        if (result == 1) {
            return AjaxResult.success("博客发表成功!", 1);
        }
        else {
            return AjaxResult.fail(-1, "数据库插入失败,博客发表失败,请稍后再试!");
        }
    }
    // 查询指定用户id的所有博客
    @SneakyThrows
    @RequestMapping("/get_mylist")
    public Object getMyBlogList(Integer uid, HttpServletResponse response) {
//        if (uid == null) {
//            response.sendRedirect("/login.html"); // 当前用户未登录
//        }
//        int uid = Integer.parseInt(id);
        if (uid <= 0) {
            // response.sendRedirect("/lolgin.html"); // 当前用户未登录
            return AjaxResult.fail(401, "当前用户未登录");
        }
        return AjaxResult.success("查找成功",articleService.getMyBlogList(uid));
    }

    // 查看指定博客id的博客详情-->博客详情页,此id为blogId,形参名称要和前端传过来的参数一致
    @RequestMapping("/get_by_blog_id")
    public Object selectByBlogId(int id) {
        if (id <= 0) {
            return AjaxResult.fail(-1, "参数出错,无法找到指定博客的相关信息!");
        }
        ArticleInfo articleInfo = articleService.selectByBlogId(id);
        if (articleInfo == null) {
            return AjaxResult.fail(-1, "数据库查询出错");
        }
        return AjaxResult.success("查找博客详情成功", articleInfo);
    }

    // 获取总的博客列表_无分页功能
    @RequestMapping("/get_list")
    public List<ArticleInfo> getBlogList() {
        return articleService.getBlogList();
    }
    // 获取总的博客列表(实现分页功能)
    @RequestMapping("/get_list_by_page")
    public Object getListByPage(Integer pindex, Integer psize) {
        HashMap<String, Object> data = new HashMap<>();
        // 登录进去后,第一次初始化页面时候url = list.html,即pindex是空的,username等也是空的
        if (pindex == null || pindex < 1) {
            pindex = 1;
        }
        if (psize == null || psize <= 0) {
            psize = 2;
        }
        // 上面这些特殊情况的处理,很重要(就是应对url = list.html这种情况,如果没有特判,会出错(查询不到数据)
        // 我们前后端都对这些特殊情况做了处理——不多余(双重保障,你进入公司后前端可不是你写的,所以我们就要把我们负责的后端写的扎实(不管前端怎么传,我后端都能应对)
        int offset = (pindex - 1) * psize;
        List<ArticleInfo> list = articleService.getListByPage(psize, offset);
        // 得出用户名为username,地址为address,邮箱为email的所有用户个数
        // getPageCount函数————》得到总的博客条数
        int totalCount = articleService.getPageCount();
        data.put("list", list);
        data.put("count", totalCount);
        return AjaxResult.success("分页功能的实现", data);

    }
    // 删除指定博客id的博客
    @SneakyThrows
    @RequestMapping("/del")
    public Object del(HttpServletRequest request, int id, HttpServletResponse response) {
        ArticleInfo articleInfo = articleService.selectByBlogId(id);
        HttpSession session = request.getSession(false);
        if (session == null || session.getAttribute(ConstVariable.USER_SESSION_KEY) == null) {
            // response.sendRedirect("/login.html");
            return AjaxResult.fail(401, "当前用户未登录!");
        }
        // 这篇博客的作者(uid)和当前登录的用户id相同才有权限删除
        UserInfo userInfo = (UserInfo) session.getAttribute(ConstVariable.USER_SESSION_KEY);
        if (articleInfo.getUid() != userInfo.getId()) {
//            response.sendRedirect("/blog_list.html");
            return AjaxResult.fail(-1, "你不是该篇博客的作者,你无权限进行删除操作");
        }
        if (id <= 0) {
            return AjaxResult.fail(-1, "找不到要删除的博客,删除失败");
        }
        int result = articleService.del(id);
        if (result <= 0) {
            return AjaxResult.fail(-1, "数据库删除操作失败!");
        }
        // 获取该篇博客的作者id

        Queue<Integer> queue = new LinkedList<>();
        ArrayList<Integer> list = new ArrayList<>();
        ArrayList<ArrayList<Integer>> lists = new ArrayList<>();
        // response.sendRedirect("/blog_list.html");
        return AjaxResult.success("删除博客成功!", result);
    }
    /**
     * 修改指定id的博客内容或标题
     */
    @RequestMapping("/update")
    public Object update(HttpServletRequest request, int id, String title, String content) {
        if (id <= 0) return AjaxResult.fail(-1, "你指定的博客id有误,稍后再试!");

        ArticleInfo articleInfo = articleService.selectByBlogId(id);
        HttpSession session = request.getSession(false);
        if (session == null || session.getAttribute(ConstVariable.USER_SESSION_KEY) == null) {
            // response.sendRedirect("/login.html");
            return AjaxResult.fail(401, "当前用户未登录!");
        }
        // 这篇博客的作者(uid)和当前登录的用户id相同才有权限删除
        UserInfo userInfo = (UserInfo) session.getAttribute(ConstVariable.USER_SESSION_KEY);
        if (articleInfo.getUid() != userInfo.getId()) {
//            response.sendRedirect("/blog_list.html");
            return AjaxResult.fail(-1, "你不是该篇博客的作者,你无权限进行修改操作");
        }
        else {
            int ret = articleService.update(id, title, content);
            if (ret <= 0) {
                return AjaxResult.fail(-1, "数据库更新操作失败!");
            }
            else {
                return AjaxResult.success("更新博客成功", ret);
            }
        }
    }

}
2.UserController代码实现:
package com.example.demo.controller;

import com.example.demo.config.AjaxResult;
import com.example.demo.model.UserInfo;
import com.example.demo.service.UserService;
import com.example.demo.util.ConstVariable;
import com.example.demo.util.PasswordUtil;

import lombok.SneakyThrows;
import org.apache.ibatis.annotations.ResultMap;
import org.springframework.beans.factory.annotation.Autowired;
import org.springframework.util.StringUtils;
import org.springframework.web.bind.annotation.RequestMapping;
import org.springframework.web.bind.annotation.RestController;

import javax.servlet.http.HttpServletRequest;
import javax.servlet.http.HttpServletResponse;
import javax.servlet.http.HttpSession;

@RestController
@RequestMapping("/user")
public class UserController {
    @Autowired
    private UserService userService;

    /**
     * 用户注册
     * @param username
     * @param password1
     * @param password2
     * @return
     */
    @RequestMapping("/reg")
    public Object reg(String username, String password1, String password2) {
        if (!StringUtils.hasLength(username) || !StringUtils.hasLength(password1) || !StringUtils.hasLength(password2)) {
            return AjaxResult.fail(-1, "参数输入错误");
        }
        else {
            if (!password1.equals(password2)) {
                return AjaxResult.fail(-1, "前后密码不一致");
            }
            else {
                int result = userService.reg(username, PasswordUtil.encrypt(password1));
                if (result != 1) {
                    return AjaxResult.fail(-1, "数据库添加出错");
                }
                return AjaxResult.success("注册成功", "1");
            }
        }
    }

    /**
     * 用户登录
     * @param request
     * @param username
     * @param password
     * @return
     */
    @RequestMapping("/login")
    public Object login(HttpServletRequest request, String username, String password) {

        if (!StringUtils.hasLength(username) || !StringUtils.hasLength(password)) {
            return AjaxResult.fail(-1, "参数输入错误,登录失败");
        }
        UserInfo userInfo = userService.selectByUsername(username);
        // 随机加盐算法,未加密的密码用同样的加密算法和数据库中的加密算法进行比较
        if (userInfo == null || ! PasswordUtil.decrypt(password, userInfo.getPassword()) || userInfo.getId() <= 0) {

            return AjaxResult.fail(-1, "账号或密码错误,登录失败");
        }
        // 如果程序走到这里,说明登陆成功了
        // 每次登录成功都要对数据库中的密码进行重新生成,这样才符合随机加密
        // userService.passwordRefresh()
        HttpSession session = request.getSession(); // 获取session,如果没有就创建一个

        session.setAttribute(ConstVariable.USER_SESSION_KEY, userInfo);
        return AjaxResult.success("登录成功", 1);
    }
    /**
     *   获取当前登录的用户名
     */
    @RequestMapping("/get_user")
    public Object getUser(HttpServletRequest request) {
        HttpSession session = request.getSession(false);
        if (session == null) {
            return AjaxResult.fail(401, "当前用户未登录");
        }
        UserInfo userInfo = (UserInfo) session.getAttribute(ConstVariable.USER_SESSION_KEY);
        if (userInfo == null) {
            return AjaxResult.fail(401, "当前用户未登录");
        }
        return userInfo; // 这里我们可以直接用AjaxResult自定义统一格式返回,也可以传统的统一格式返回
    }

    /**
     * 退出登录
     * @param request
     * @param response
     */
    @SneakyThrows
    @RequestMapping("/logout")
    public Object logout(HttpServletRequest request, HttpServletResponse response) {
        HttpSession session = request.getSession(false);
        if (session == null || session.getAttribute(ConstVariable.USER_SESSION_KEY) == null) {
            // response.sendRedirect("/login.html"); // 当前用户未登录
            return AjaxResult.fail(401, "当前用户未登录!");
        }
        session.setAttribute(ConstVariable.USER_SESSION_KEY, null);
        //response.sendRedirect("/login.html");
        return AjaxResult.success("当前状态正常,可以正常退出!", "true");
    }

    /**
     * 通过个人id(uid)查询个人详细信息
     * @param authorId
     * @return
     */
    @RequestMapping("/get_detail_by_uid")
    public Object selectByUid(Integer authorId) {
        int uid = authorId;
        if (uid <= 0) {
            return AjaxResult.fail(-1, "uid《=0,查询出错!");
        }
        UserInfo userInfo = userService.selectByUid(uid);
        if (userInfo == null) {
            return AjaxResult.fail(-1, "在数据库中查询不到指定用户id的详细信息,请稍后再试!");
        }
        return AjaxResult.success("通过uid查询个人详细信息成功", userInfo);
    }
}
在controller层中调用了service服务层的reg方法
service服务层又调用了持久层中的mapper接口

4.5 博客修改删除功能实现
mapper层代码:
1.Articlemapper:
package com.example.demo.mapper;

import com.example.demo.model.ArticleInfo;
import org.apache.ibatis.annotations.Mapper;
import org.apache.ibatis.annotations.Param;

import java.util.List;

@Mapper
public interface ArticleMapper {
    // 发布新文章
    public int add(@Param("articleinfo")ArticleInfo articleinfo);
    // 查询指定博客id的博客详情--》用于博客详情页
    public ArticleInfo selectByBlogId(@Param("blogId") int blogId);

    // 查询个人的博客列表——》个人博客详情页
    public List<ArticleInfo> getMyBlogList(@Param("uid") int uid);
    // 查询总的博客列表(无分页功能)
    public List<ArticleInfo> getBlogList();

    // 删除指定博客id的博客
    public int del(@Param("id") int id);

    // 得到当前的博客总数目
    public int getPageCount();

    // 查询总的博客列表(分页功能的实现)_>注意limit和offset的位置(相对位置(参数的相对位置,不要弄反——》查询数据库会出错
    public List<ArticleInfo> getListByPage(@Param("limit") int psize, @Param("offset") int offset);
    // psize对应limit--》表示每页显示的记录条数。pindex对应offset——》表示当前查看的是第几页的数据

    // 修改指定博客id的博客title和content----------->注意形参的顺序
    public int update(@Param("title") String title, @Param("content") String content, @Param("id") int id);

}
2.Usermapper代码实现:
package com.example.demo.mapper;

import com.example.demo.model.UserInfo;
import org.apache.ibatis.annotations.Mapper;
import org.apache.ibatis.annotations.Param;

@Mapper
public interface UserMapper {
    // 用户注册
    public int reg(@Param("username") String username, @Param("password") String password);


    // 通过名称查询用户-->用于登录的验证
    public UserInfo selectByUsername(@Param("username") String username);

    // 通过个人id(uid)查询个人详细信息
    public UserInfo selectByUid(@Param("uid") int uid);
}
1.AjaxResult代码:
用户登录拦截器,自定义拦截器添加到系统的配置文件中。
package com.example.demo.config;


import org.springframework.stereotype.Controller;

import java.util.HashMap;

/**
 * 自定义返回数据(我们通过AjaxResult类返回的都是hashmap格式的对象
 * 之后还有通过@ResponseBody将java对象转成json格式的数据
 */
public class AjaxResult {
    /**
     * 操作成功(无msg)
     * @param data
     * @return
     */
    public static Object  success(Object data) {
        HashMap<String, Object> result = new HashMap<>();
        result.put("state", 200);
        result.put("msg", "");
        result.put("data", data);
        return result;
    }

    /**
     * 操作成功,有msg
     * @param msg
     * @param data
     * @return
     */
    public static Object success(Object msg, Object data) {
        HashMap<String, Object> result = new HashMap<>();
        result.put("state", 200);
        result.put("msg", msg);
        result.put("data", data);
        return result;
    }

    /**
     * 操作失败(无data
     * @param state
     * @param msg
     * @return
     */
    public static Object fail(int state, Object msg) {
        HashMap<String, Object> result = new HashMap<>();
        result.put("state", state);
        result.put("msg", msg);
        result.put("data", "");
        return result;
    }

    /**
     * 操作失败(有data)
     * @param state
     * @param msg
     * @param data
     * @return
     */
    public static Object fail(int state, Object msg,  Object data) {
        HashMap<String, Object> result = new HashMap<>();
        result.put("state", state);
        result.put("msg", msg);
        result.put("data", data);
        return result;
    }
}
2.Logininterception代码:
用户登录拦截器(查看当前用户是否登录)
package com.example.demo.config;

import com.example.demo.util.ConstVariable;
import org.springframework.stereotype.Component;
import org.springframework.web.bind.annotation.ControllerAdvice;
import org.springframework.web.bind.annotation.ResponseBody;
import org.springframework.web.servlet.HandlerInterceptor;

import javax.servlet.http.HttpServletRequest;
import javax.servlet.http.HttpServletResponse;
import javax.servlet.http.HttpSession;
import java.util.HashSet;

/**
 * 用户登录拦截器(查看当前用户是否登录)
 */
@Component
public class LoginInterception implements HandlerInterceptor {
    @Override
    public boolean preHandle(HttpServletRequest request, HttpServletResponse response, Object handler) throws Exception {
        HttpSession session = request.getSession(false);
        if (session == null || session.getAttribute(ConstVariable.USER_SESSION_KEY) == null) {
            // 当前用户未登录,进行拦截--->跳转到登录页面--->后端我们只用给前端返回状态和数据,我们后端不用管页面怎么,跳转工作是前端的事情
            // response.sendRedirect("/login.html");
            // 401表示未登录,没有权限,403不是因为没有登录而没有权限,而是该用户没有权限,管理员和普通用户的区别
            response.setStatus(401);
            response.sendError(401, "当前用户为登录,没有权限访问该接口");
            return false;
        }
        return true;
    }
}
3.ResponseAdvice代码:
数据格式同样返回(这个是兜底的,即使controller层返回的是int或string类型的数据,也可以转换成json格式)
注意:只能兜底int类的返回(可以应对操作成功和失败两种情况)
如果是String或其他格式的返回(可以应对操作成功的情况,但无法应对操作失败的情况,要继续对body进行特判)
package com.example.demo.config;

import com.fasterxml.jackson.databind.ObjectMapper;
import lombok.SneakyThrows;
import org.springframework.beans.factory.annotation.Autowired;
import org.springframework.core.MethodParameter;
import org.springframework.http.MediaType;
import org.springframework.http.server.ServerHttpRequest;
import org.springframework.http.server.ServerHttpResponse;
import org.springframework.web.bind.annotation.ControllerAdvice;
import org.springframework.web.bind.annotation.ResponseBody;
import org.springframework.web.servlet.mvc.method.annotation.ResponseBodyAdvice;

import java.beans.PropertyEditorSupport;
import java.util.HashMap;

/**
 * 数据格式同样返回(这个是兜底的,即使controller层返回的是int或string类型的数据,也可以转换成json格式)
 * 注意:只能兜底int类的返回(可以应对操作成功和失败两种情况)
 * 如果是String或其他格式的返回(可以应对操作成功的情况,但无法应对操作失败的情况,要继续对body进行特判)
 *
 * 这里我们只是以防万一,我们尽量还是选择再controller层直接返回json对象,这样更信息具体,更有怎针对性)
 */
@ControllerAdvice // 统一功能处理需要加这个注解
@ResponseBody
// @ResponseBody的作用就是把返回的对象转换为json格式,并把json数据写入response的body中,前台收到response时就可以获取其body中的json数据了。
public class ResponseAdvice implements ResponseBodyAdvice {
    @Override
    public boolean supports(MethodParameter returnType, Class converterType) {
        return true; // 返回true才会继续执行下面的代码
    }

    @SneakyThrows
    @Override
    public Object beforeBodyWrite(Object body, MethodParameter returnType, MediaType selectedContentType, Class selectedConverterType, ServerHttpRequest request, ServerHttpResponse response) {
        if (body instanceof HashMap) {
            return body;  // 此时已经是hashmap格式了
        }
//        HashMap<String, Object> result = new HashMap<>();
//        result.put("state", 200);
//        result.put("msg", "");
//        result.put("data", body);
        if (body instanceof Integer){
            int num = (int) body;
            if (num <= 0) {
                // 应对int类型错误返回(查询文章列表,新增和删除博客可能会用到)——》也可能用不到,如果新增或查询失败,我直接就在controller就返回了(通过调用AjaxResult)
                // 新增、删除或查询失败(非得在controller返回int值,再通过这里返回json对象的话,不灵活(出错信息显示的不具体
                // 所以说这里我们只是以防万一,我们还是选择再controller层直接返回json对象,这样更信息具体,更有怎针对性)
                return AjaxResult.fail(-1,"抱歉,本次操作失败,请稍后再试!"); // 这里无法区分是新增失败还是删除失败
                // 这里我们本来返回的是一个hashmap格式的对象,但加了@ResponseBody,把我们的java对象转成的了json格式
            }
        }

        if (body == null) { // 应对String类型错误返回
            // 这里我们本来返回的是一个hashmap格式的对象,但加了@ResponseBody,把我们的java对象转成的了json格式
            return AjaxResult.fail(-1,"抱歉,查询失败!"); // 这时对查询当前用户的特判
        }
        if (body instanceof String) { // 以String类型正确返回
            ObjectMapper objectMapper = new ObjectMapper();
            return objectMapper.writeValueAsString(body); // 用jackson中的工具类返回(没弄明白)——》直接返回String吧(不序列化了,详见https://zhuanlan.zhihu.com/p/196372502)
        }
        // 这里我们本来返回的是一个hashmap格式的对象,但加了@ResponseBody,把我们的java对象转成的了json格式
        return AjaxResult.success(body);
        // 前端是通过result中的state值来判断操作是否成功的,这个类用来处理操作成功的情况(为操作成功的情况兜底)
        // 但这可能存在问题,如果操作失败,并且在controller层没有调用AjaxResult中的fail方法(而是直接返回,通过这个类来返回统一的数据格式,就会出现问题——》在这个类我们都是按成功的处理的)
        // 解决方案,在该类中提前判断body(判断操作失败的情况)--->我们约定如果操作失败就返回负数(在controller层调用AjaxResult的情况)

    }
}
4.6 博客分页功能实现
1.ExcptionAdvice代码:
统一异常处理
@ResponseBody的作用就是把返回的对象转换为json格式,并把json数据写入response的body中,前台收到response时就可以获取其body中的json数据了
package com.example.demo.config;

import org.springframework.web.bind.annotation.ControllerAdvice;
import org.springframework.web.bind.annotation.ExceptionHandler;
import org.springframework.web.bind.annotation.ResponseBody;

import java.util.HashMap;

/**
 * 统一异常处理
 */
@ControllerAdvice
@ResponseBody
// @ResponseBody的作用就是把返回的对象转换为json格式,并把json数据写入response的body中,前台收到response时就可以获取其body中的json数据了。
public class ExceptionAdvice {
    @ExceptionHandler(Exception.class)
    public Object exceptionAdvice(Exception e) {
        // 这里我们本来返回的是一个hashmap格式的对象,但加了@ResponseBody,把我们的java对象转成的了json格式
        return AjaxResult.fail(-1, e.getMessage());
    }
    // 你这里的统一异常处理,并不完整

}
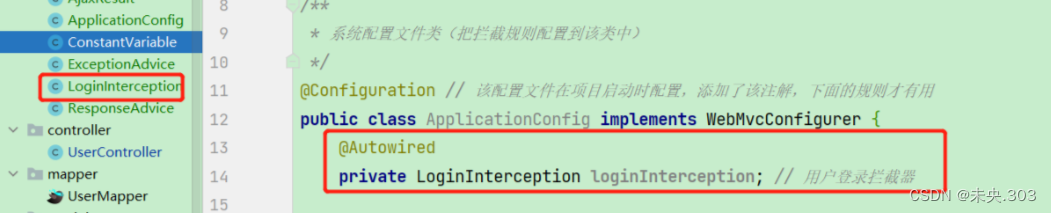
2.ApplicationConfig代码:
package com.example.demo.config;

import org.springframework.beans.factory.annotation.Autowired;
import org.springframework.context.annotation.Configuration;
import org.springframework.web.servlet.config.annotation.InterceptorRegistry;
import org.springframework.web.servlet.config.annotation.WebMvcConfigurer;

// 系统配置文件类
@Configuration // 该配置文件在项目启动时配置
public class ApplicationConfig implements WebMvcConfigurer {
    @Autowired
    private LoginInterception loginInterception; // 用户登录拦截器
    // 自定义拦截器添加到系统的配置文件中

    @Override
    public void addInterceptors(InterceptorRegistry registry) {
        registry.addInterceptor(loginInterception)
                .addPathPatterns("/**")       // 设置拦截规则
//                .excludePathPatterns("/login.html")// 下面这些指定的url,不会检查是否登录——进行拦截
//                .excludePathPatterns("/reg.html")
                .excludePathPatterns("/**/*.html")
                .excludePathPatterns("/user/login")
                .excludePathPatterns("/user/reg")
                // 总的博客的列表,和博客详情,我们需要开放权限,即使用户未登录也可以查看
                .excludePathPatterns("/article/get_list_by_page") // 放行总博客列表
                .excludePathPatterns("/article/get_by_blog_id") // 放行博客详情页面
                .excludePathPatterns("/user/get_detail_by_uid")
                //.excludePathPatterns("/css/**")--->和下一行的作用是一样的
                //.excludePathPatterns("/**/*.css")
                .excludePathPatterns("/css/**")
                .excludePathPatterns("/js/**")
                .excludePathPatterns("/editor.md/**")
                .excludePathPatterns("/img/**"); // 直接img目录下的所有都放行

    }
}


 1196
1196


 被折叠的 条评论
为什么被折叠?
被折叠的 条评论
为什么被折叠?
 到【灌水乐园】发言


