


八股一图流
一图流

OkHttp中使用的设计模式
- 建造者模式:创建Request时使用的是建造者模式。
- 工厂模式:Call接口,和事件监听EventListener的创建方法。工厂模式更注重把产品创建出来就行。
- 责任链模式:
- 优点:降低,客户端与处理者之间,还有各个处理者间耦合度。(客户端不知道请求由哪个处理者处理,处理者也不知道处理者之间的传递关系,由系统灵活组织分配)。良好扩展性(增加处理者的实现很简单,只需要重写处理请求业务逻辑的方法即可)。
- 缺点:请求会从链头开始,直到有处理者响应,在责任链较长时影响系统性能。请求递归(调试排错比较麻烦)。
- 观察者模式:两个观察者,EventListener和WebSocketListener。都可以看作是生命周期监听器。
- EventListener监听请求/响应,监听耗时、响应时间、请求时间、请求顺序等等。可以用它来监听请求和响应的全过程。
- WebSocketListener监听web socket。
OkHttp与Retrofit 的区别与联系
- 封装和功能两个角度:
Retrofit使用代理,外观,策略模式对okhttp进行了封装 - 职责不同:
Retrofit封装的是应用层面,方便开发者使用,如注解请求参数,处理Response,处理错误,具体的请求,线程切换以及数据转换。
OkHttp封装优化了socket部分的网络访问、多路复用、buffer缓存、数据压缩等等,基于Http协议。
OkHttp拦截器概述
每个拦截器大概有三个工作:前置工作、中置工作和后置工作。
- 前置工作:完成本拦截器需要处理的一些事情。
- 中置工作:向下一个拦截器传接力棒,让下一个拦截器工作。
- 后置工作:服务器已响应Reponse,处理Reponse时本连接器做的一些工作。
1. RetryAndFollowUpInterceptor(client)重定向拦截器
请求失败后重新进行请求以及连接的重定向。
2. BridgeInterceptor桥拦截器
作用:为Request和Response的Header做一些处理。
3. CacheInterceptor缓存拦截器
读写缓存并根据策略决定是否使用缓存。
4. ConnectInterceptor连接拦截器
建立或获取和服务器的连接。
5. networkInterceptor自定义网络拦截器
自定义网络拦截器是整个链条中开发者所能插入自定义拦截器的最后一个地方,与之前的那个开发者准备的拦截器位置不同,意味这个拦截器可以看到每个请求和响应的数据(包含重定向及重试的中间请求和响应),并且看到的是完整的原始数据,这个拦截器是让开发者做一些网络调试用的。
6. ## CallServerInterceptor请求拦截器
通过okio写入请求并获取返回的响应数据
为什么最好只使用一个OKHttpClient?
OkHttpClient是OkHttp框架的客户端,用户使用Client来进行各种设置以及发起网络请求。每个OkHttpClient内部都会维护一个任务队列、连接池、Cache、拦截器等,所以应该全局共享一个OkHttpClient实例,避免重复创建连接池和线程池了。
如果我们需要配置一个特殊的client时,通过Client.newBuilder再配置局部属性。
优点
支持HTTP/2协议,可提高效率和速度;
支持连接池,减少请求延迟;
支持透明的GZIP压缩,减少数据量;
支持响应缓存,避免重复网络请求;
可在网络不稳定时自动恢复连接;
请求/响应API设计简洁易用,支持同步阻塞调用和异步回调调用;
基于传输层实现应用层协议的网络框架,比HttpUrlConnection更高效和灵活;
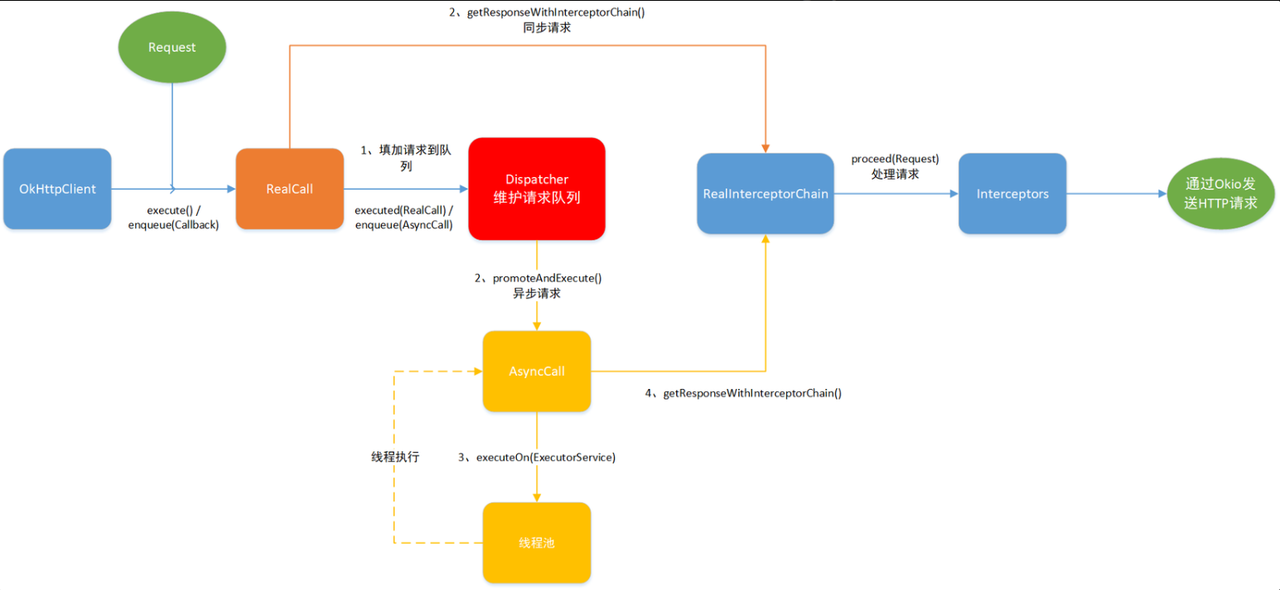
异步请求示例
RealCall 的 enqueue方法会将外部传入的 Callback 包装为一个 AsyncCall 对象后传给 dispatcher
const val URL01 = "https://publicobject.com/helloworld.txt"

//OKhttp的异步请求
fun main(){
    val client = OkHttpClient()
    val request = Request.Builder()
        .url(URL01)
        .build()
    val call = client.newCall(request)
    call.enqueue(object : Callback{
        override fun onFailure(call: Call, e: IOException) {
            //异步请求失败
            println("异步请求失败")
        }

        override fun onResponse(call: Call, response: Response) {
            //异步请求成功
            println("异步请求成功")
            val responseBody = response.body?.string()
            println(responseBody + "这是什么")
        }
    })
}
进入enqueue方法
override fun enqueue(responseCallback: Callback) {
  check(executed.compareAndSet(false, true)) { "Already Executed" }

  callStart()
  client.dispatcher.enqueue(AsyncCall(responseCallback))
}
- 调用check()方法来确保该请求尚未执行,如果请求已经被执行过,则抛出异常。
- 调用callStart()方法,表示请求开始执行。
- 将异步请求放入Dispatcher线程池中执行。这里使用了AsyncCall类来封装异步请求,它实现了Runnable接口,可以在Dispatcher线程池中执行。
学习AsyncCall非静态内部类
由于 enqueue对应的是异步请求,所以 OkHttp 内部就需要自己构造一个线程来执行请求,在请求结束后再通过 Callback 来将结果值回调给外部,异步请求逻辑对应的载体就是 AsyncCall 这个类
AsyncCall 是 RealCall 的非静态内部类,所以 AsyncCall 可以访问到 RealCall 的所有变量和方法。此外,AsyncCall 继承了 Runnable 接口,其 executeOn 方法就用于传入一个线程池对象来执行run 方法。run 方法内还是调用了 getResponseWithInterceptorChain()方法来获取 response,并通过 Callback 来将执行结果(不管成功还是失败)回调出去,在请求结束后也会将自身从 dispatcher 中移除
internal inner class AsyncCall(
  private val responseCallback: Callback
) : Runnable {
  @Volatile var callsPerHost = AtomicInteger(0)
    private set

  fun reuseCallsPerHostFrom(other: AsyncCall) {
    this.callsPerHost = other.callsPerHost
  }

  val host: String
    get() = originalRequest.url.host

  val request: Request
      get() = originalRequest

  val call: RealCall
      get() = this@RealCall

  /**
   * Attempt to enqueue this async call on [executorService]. This will attempt to clean up
   * if the executor has been shut down by reporting the call as failed.
   */
  fun executeOn(executorService: ExecutorService) {
    client.dispatcher.assertThreadDoesntHoldLock()

    var success = false
    try {
      executorService.execute(this)
      success = true
    } catch (e: RejectedExecutionException) {
      val ioException = InterruptedIOException("executor rejected")
      ioException.initCause(e)
      noMoreExchanges(ioException)
      responseCallback.onFailure(this@RealCall, ioException)
    } finally {
      if (!success) {
        client.dispatcher.finished(this) // This call is no longer running!
      }
    }
  }

  override fun run() {
    threadName("OkHttp ${redactedUrl()}") {
      var signalledCallback = false
      timeout.enter()
      try {
        val response = getResponseWithInterceptorChain()
        signalledCallback = true
        responseCallback.onResponse(this@RealCall, response)
      } catch (e: IOException) {
        if (signalledCallback) {
          // Do not signal the callback twice!
          Platform.get().log("Callback failure for ${toLoggableString()}", Platform.INFO, e)
        } else {
          responseCallback.onFailure(this@RealCall, e)
        }
      } catch (t: Throwable) {
        cancel()
        if (!signalledCallback) {
          val canceledException = IOException("canceled due to $t")
          canceledException.addSuppressed(t)
          responseCallback.onFailure(this@RealCall, canceledException)
        }
        throw t
      } finally {
        client.dispatcher.finished(this)
      }
    }
  }
}
- AsyncCall类有一个构造函数参数:
- responseCallback: Callback对象,表示异步请求的回调函数。
- AsyncCall类实现了Runnable接口,并重写了run()方法。
- 在run()方法内部,它会做以下几件事情:
- 调用getResponseWithInterceptorChain()方法获取请求响应。
- 调用getResponseWithInterceptorChain()方法可能会抛出异常,因此需要在try-catch块中捕获异常,并将异常传递给responseCallback对象的onFailure()方法。
- 如果没有抛出异常,则将响应传递给responseCallback对象的onResponse()方法。
- getResponseWithInterceptorChain()方法是AsyncCall的核心方法,它会执行整个请求的拦截器链,并返回最终的响应结果。在方法内部,它会做以下几件事情:
- 调用client.dispatcher()方法获取Dispatcher对象,表示请求的调度器。
- 调用client.interceptors()方法获取拦截器列表。
- 创建一个RealInterceptorChain对象,并将拦截器列表和当前请求的索引传递给它,表示当前请求的拦截器链。
- 调用RealInterceptorChain.proceed()方法,执行拦截器链并返回最终的响应结果。
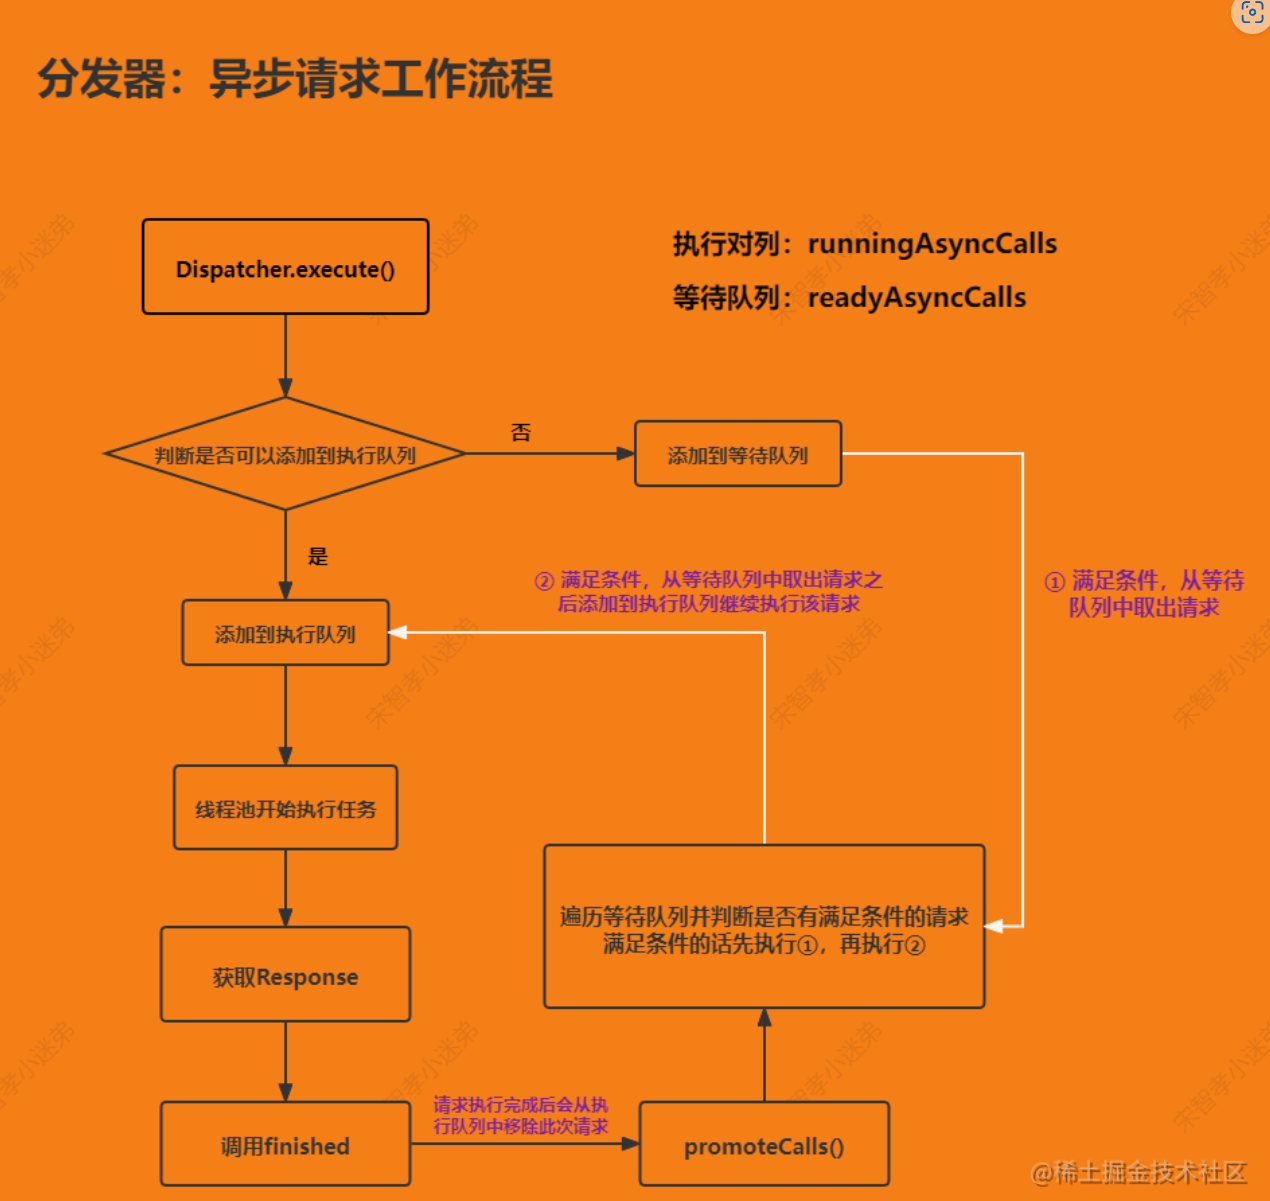
学习Dispatcher怎么管理HTTP请求的调度和执行
Dispatcher 在拿到 AsyncCall 对象后,会先将其存到 readyAsyncCalls 中,然后通过 findExistingCallWithHost方法来查找当前是否有指向同一 Host 的异步请求,有的话则交换 callsPerHost 变量,该变量就用于标记当前指向同一 Host 的请求数量,最后调用 promoteAndExecute 方法来判断当前是否允许发起请求
由于当前正在执行的网络请求总数可能已经达到限制,或者是指向同一 Host 的请求也达到限制了,所以 promoteAndExecute()方法就用于从待执行列表 readyAsyncCalls 中获取当前符合运行条件的所有请求,将请求存到 runningAsyncCalls 中,并调用线程池来执行
class Dispatcher constructor() {

   internal fun enqueue(call: AsyncCall) {
    synchronized(this) {
      readyAsyncCalls.add(call)

      if (!call.call.forWebSocket) {
        //查找当前是否有指向同一 Host 的异步请求
        val existingCall = findExistingCallWithHost(call.host)
        if (existingCall != null) call.reuseCallsPerHostFrom(existingCall)
      }
    }
    promoteAndExecute()
  }

  private fun promoteAndExecute(): Boolean {
  this.assertThreadDoesntHoldLock()

  val executableCalls = mutableListOf<AsyncCall>()
  val isRunning: Boolean
  synchronized(this) {
    val i = readyAsyncCalls.iterator()
    while (i.hasNext()) {
      val asyncCall = i.next()

      if (runningAsyncCalls.size >= this.maxRequests) break // Max capacity.
      if (asyncCall.callsPerHost.get() >= this.maxRequestsPerHost) continue // Host max capacity.

      i.remove()
      asyncCall.callsPerHost.incrementAndGet()
      executableCalls.add(asyncCall)
      runningAsyncCalls.add(asyncCall)
    }
    isRunning = runningCallsCount() > 0
  }

  for (i in 0 until executableCalls.size) {
    val asyncCall = executableCalls[i]
    asyncCall.executeOn(executorService)
  }

  return isRunning
}
}
总结
- 异步请求,该请求会先存到待执行列表 readyAsyncCalls 中,该请求是否可以立即发起受 maxRequests 和 maxRequestsPerHost 两个条件的限制。如果符合条件,那么就会从 readyAsyncCalls 取出并存到 runningAsyncCalls 中,然后交由 OkHttp 内部的线程池来执行
- 不管外部是同步请求还是异步请求,内部都是通过调用getResponseWithInterceptorChain()方法来拿到 Response 的
- Dispatcher 内部的线程池本身允许同时运行 Int.MAX_VALUE 个线程,但是实际上的线程数量还是受 maxRequests 的控制
学习ReallnterceptorChain方法怎么通过拦截器来完成整个网络请求过程(拦截器)
我们跟着ReallneterceptorChain方法跟进去看一下,发现了很多个我们没有见过的类,各种的XXXXInterceptor.这就是OK的拦截器
@Throws(IOException::class)
internal fun getResponseWithInterceptorChain(): Response {
  // Build a full stack of interceptors.
  val interceptors = mutableListOf<Interceptor>()
  interceptors += client.interceptors
  interceptors += RetryAndFollowUpInterceptor(client)
  interceptors += BridgeInterceptor(client.cookieJar)
  interceptors += CacheInterceptor(client.cache)
  interceptors += ConnectInterceptor
  if (!forWebSocket) {
    interceptors += client.networkInterceptors
  }
  interceptors += CallServerInterceptor(forWebSocket)

  val chain = RealInterceptorChain(
      call = this,
      interceptors = interceptors,
      index = 0,
      exchange = null,
      request = originalRequest,
      connectTimeoutMillis = client.connectTimeoutMillis,
      readTimeoutMillis = client.readTimeoutMillis,
      writeTimeoutMillis = client.writeTimeoutMillis
  )

  var calledNoMoreExchanges = false
  try {
    val response = chain.proceed(originalRequest)
    if (isCanceled()) {
      response.closeQuietly()
      throw IOException("Canceled")
    }
    return response
  } catch (e: IOException) {
    calledNoMoreExchanges = true
    throw noMoreExchanges(e) as Throwable
  } finally {
    if (!calledNoMoreExchanges) {
      noMoreExchanges(null)
    }
  }
}
我们忽视这些专有名词,直接单纯的看代码,这就是一个链表,就是把拦截器add进去,形成一个拦截器链.
最后这个拦截器调用了proceed方法,我们可以猜到,核心的代码就是在proceed中
@Throws(IOException::class)
override fun proceed(request: Request): Response {
  check(index < interceptors.size)

  calls++

  if (exchange != null) {
    check(exchange.finder.sameHostAndPort(request.url)) {
      "network interceptor ${interceptors[index - 1]} must retain the same host and port"
    }
    check(calls == 1) {
      "network interceptor ${interceptors[index - 1]} must call proceed() exactly once"
    }
  }

  // Call the next interceptor in the chain.
  val next = copy(index = index + 1, request = request)
  val interceptor = interceptors[index]

  @Suppress("USELESS_ELVIS")
  val response = interceptor.intercept(next) ?: throw NullPointerException(
      "interceptor $interceptor returned null")

  if (exchange != null) {
    check(index + 1 >= interceptors.size || next.calls == 1) {
      "network interceptor $interceptor must call proceed() exactly once"
    }
  }

  check(response.body != null) { "interceptor $interceptor returned a response with no body" }

  return response
}
在方法实现中,首先会对当前拦截器的索引 index 进行检查,如果当前拦截器已经是拦截器链中的最后一个拦截器,则抛出异常。然后,会检查当前请求是否使用了已有的连接,如果不是则抛出异常。接着,会检查当前是否已经有了交换机(Exchange)对象,并且调用 proceed() 方法的次数是否超过了一次,如果是则同样抛出异常。
我们来看看这个核心代码,next的index是index+1,也就是拦截器中当前index的下一个拦截器,这个就是拦截器的实现.然后获取当前的
@Suppress("USELESS_ELVIS")
val response = interceptor.intercept(next) ?: throw NullPointerException(
    "interceptor $interceptor returned null")
然后,该方法会创建一个新的 RealInterceptorChain 对象,用于调用下一个拦截器,并调用当前拦截器的 intercept() 方法来处理请求并返回响应结果。最后,该方法会检查下一个拦截器是否已经调用了 proceed() 方法,并检查响应结果是否为 null 或者是否包含了响应体,如果不满足条件则抛出相应异常。
我们看一下intercept方法的实现。Interceptor是一个接口,我们看一下实现类的方法实现。在上面我们说过,拦截器有很多个,他们是链式调用的。第一个拦截器,其实就是RetryAndFollowUpInterceptor,它的intercept方法具体实现在这里,我们先不去关注具体实现,我们只看下面这么一行代码:
@Suppress("USELESS_ELVIS")
val response = interceptor.intercept(next) ?: throw NullPointerException(
    "interceptor $interceptor returned null")
是的,每个拦截器的intercept方法,其实又调用了proceed方法,而proceed方法,又去调用下一个拦截器的intercept方法。接下来,我们简单看一下每一种拦截器的作用。
拦截器
- RetryAndFollowUpInterceptor重试和跟踪拦截器
他的主要作用就是发起网络请求,如果该请求需要重定向,那么进行重定向请求,并且在请求失败的情况下,发起重试。 - BridgeInterceptor桥接拦截器
中文叫桥接拦截器,他的主要作用是添加头部信息(例如User-Agent,,Host,Cookie等),使请求成为一个标准的http请求并发起请求,并且处理返回给我们的response,使之转化为用户可用的response。 - CacheInterceptor缓存拦截器
中文叫缓存拦截器。试想一下,是不是我们每次发起网络请求都真正的去服务器请求呢?当然不是,Okhttp也有自己的缓存策略。当我们发起请求的时候,会去判断是否有缓存,如果有缓存则直接从缓存中拿这个请求。如果没有缓存,那么去使用网络发起请求。这些缓存功能的实现,就是缓存拦截器来做的。 - ConnectInterceptor网络拦截器
网络连接拦截器,在经过上面一系列拦截器的处理后(是否重试和重定向,拼接头部信息,是否使用缓存等),终于到了和服务器连接的时刻,网络连接拦截器就是和服务器进行连接的拦截器。 - CallServerInterceptor访问服务器拦截器
访问服务端拦截器。这个拦截器从名字可以看出,它是真正向服务端发起请求的拦截器。这里面都是和网络请求相关的一些方法和特殊情况的处理,最后会返回我们所需要的response。
自定义拦截器获取下载进度
import okhttp3.Interceptor
import okhttp3.MediaType
import okhttp3.OkHttpClient
import okhttp3.Request
import okhttp3.Response
import okhttp3.ResponseBody
import okio.Buffer
import okio.BufferedSource
import okio.ForwardingSource
import okio.Source
import okio.buffer

interface ProgressListener{
    fun updata(bytesRead: Long, contentLength: Long, done: Boolean)
}

fun main(){
    run()
}

fun run(){
    //封装请求报文的消息
    val request = Request.Builder()
        .url("https://images.pexels.com/photos/5177790/pexels-photo-5177790.jpeg")
        .build()

    //
    val progressListener :ProgressListener = object : ProgressListener{

        var fistUpdater = true

        override fun updata(bytesRead: Long, contentLength: Long, done: Boolean) {
            if(done){
                println("传输完成")
            }else{
                if (fistUpdater){
                    fistUpdater = false
                    if(contentLength == -1L){
                        println("不知道响应的数据长度")
                    }else{
                        println("获取的的响应数据的长度 " + contentLength)
                    }
                }

                println("现在字节数" + bytesRead + ".总字节数" + contentLength)

                if(contentLength != -1L){
                    println("进度" + (100*bytesRead)/contentLength + "%")
                }

            }

        }

    }

    //OK的http请求的客户端类,配置超时时间,缓存目录,拦截器等
    //这里只是添加了一个自定义的网络拦截器
    val okHttpClient = OkHttpClient.Builder()
        .addNetworkInterceptor(ProgressInterceptor(progressListener))
        .build()

    //封装了响应数据的报文信息
    val response = okHttpClient.newCall(request).execute()

    println(response.body?.string())

}

//自定义拦截器,我们把它放到网络拦截器上面,因为是和网络请求相关的
class ProgressInterceptor constructor(private val progressListener: ProgressListener) : Interceptor {
    override fun intercept(chain: Interceptor.Chain): Response {
        //自定义拦截器三步走
        val requestIntercept = chain.request()
        val response = chain.proceed(requestIntercept)
        //这里对获取的response进行封装然后返回一个新的response

        //这里有些问题
        val builder = response.newBuilder()
            .body(response.body?.let {  ProgressResponseBody(it, progressListener) })
        return builder.build()
    }
}

//对原始的responsebody进行封装,返回封装后的responsebody
class ProgressResponseBody constructor
    (private val responseBody: ResponseBody,
     private val progressListener: ProgressListener) : ResponseBody() {

    private var bufferedSource: BufferedSource? = null

    //响应数据的长度
    override fun contentLength(): Long {
        return responseBody.contentLength()
    }

    //响应数据的内容
    override fun contentType(): MediaType? {
        return responseBody.contentType()
    }

    //返回响应数据的来源bufferedSource
    override fun source(): BufferedSource {
        if(bufferedSource == null){
            bufferedSource = lister(responseBody.source()).buffer()
        }
        return bufferedSource!!
    }

    //创建一个自定义的ForwardingSource对象,用于监控从响应体源中读取的数据。
    private fun lister(source: Source): Source{
        return object :ForwardingSource(source){
            var totalBytesRead: Long = 0L;

            override fun read(sink: Buffer, byteCount: Long): Long {
                //调用了父类的 read() 方法来读取数据,并将返回值(即实际读取的字节数)保存到 bytesRead 变量中。
                // 然后,通过判断 bytesRead 是否等于 -1,来判断是否已经读取完了所有的数据。
                // 如果 bytesRead 等于 -1,说明已经读取完了所有数据,此时将 bytesRead 设置为 0,
                // 否则就将 bytesRead 的值累加到 totalBytesRead 变量中。
                val bytesRead = super.read(sink, byteCount)
                totalBytesRead += if(bytesRead != -1L) bytesRead else 0
                //将已经读取的字节数、响应数据的总长度以及是否已经读取完毕的状态信息传递给监听器
                progressListener.updata(totalBytesRead, responseBody.contentLength(),
                    bytesRead == -1L)
                return bytesRead
            }
        }

    }

}


 3982
3982

 被折叠的 条评论
为什么被折叠?
被折叠的 条评论
为什么被折叠?
 到【灌水乐园】发言


