


找到的工具:HapViewer 发行版 - Gitee.com
附件加解析文件:
链接:https://pan.baidu.com/s/1EVc7Q32AdMcixwgZEI0kFQ?pwd=giyh
提取码:giyh
查找鸿蒙.hap源码
鸿蒙逆向目前没有完整的逆向工具所以手动逆向:
先将.hap文件后缀更改为.zip解压后就可以看见.hap的文件结构了!
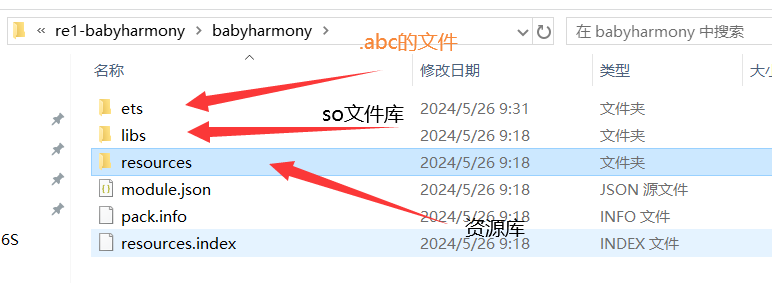
.abc文件类似于安卓的.dex文件,直接用txt文本打开发现并没有进行加密或者混淆源码直接在里面!

发现需要用utf-8可以解决部分中文乱码!
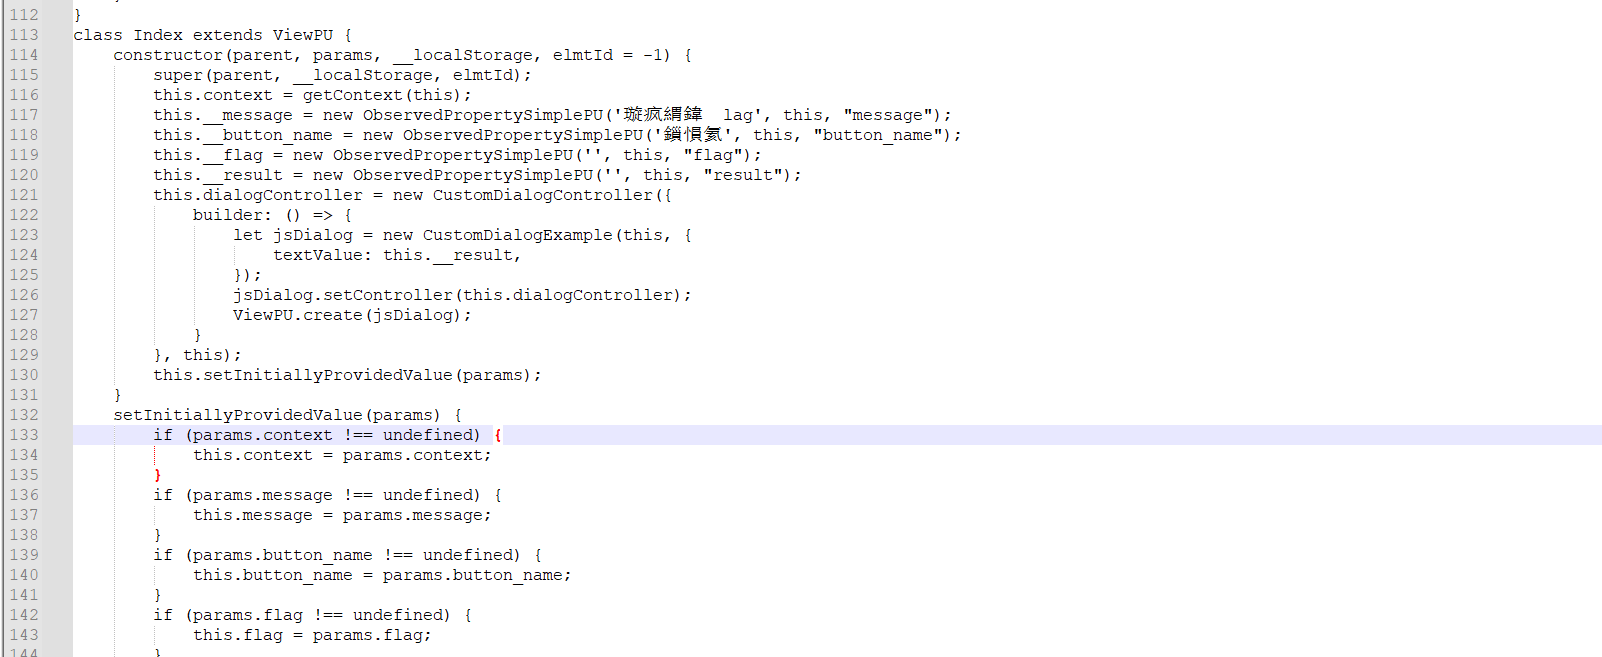
提取出主要的代码:
    constructor(parent, params, __localStorage, elmtId = -1) {
        super(parent, __localStorage, elmtId);
        this.context = getContext(this);
        this.__message = new ObservedPropertySimplePU('请输入flag', this, "message");
        this.__button_name = new ObservedPropertySimplePU('提交', this, "button_name");
        this.__flag = new ObservedPropertySimplePU('', this, "flag");
        this.__result = new ObservedPropertySimplePU('', this, "result");
        this.dialogController = new CustomDialogController({
            builder: () => {
                let jsDialog = new CustomDialogExample(this, {
                    textValue: this.__result,
                });
                jsDialog.setController(this.dialogController);
                ViewPU.create(jsDialog);
            }
        }, this);
        this.setInitiallyProvidedValue(params);
    }
这段代码初始化了一个flag提交框!!!
        this.observeComponentCreation((elmtId, isInitialRender) => {
            ViewStackProcessor.StartGetAccessRecordingFor(elmtId);
            Button.createWithLabel(this.button_name);
            Button.onClick(() => {
                this.context.resourceManager.getRawFileContent("bin").then((value) => {
                    var c = testNapi.check(this.flag, value);
                    if ((c & 0b100) === 0b100) {
                        this.result = '系统环境异常';
                    }
                    else if ((c & 0b10) === 0b10) {
                        this.result = 'flag格式错误';
                    }
                    else if ((c & 0b1) === 0b1) {
                        this.result = 'flag错误或系统环境异常';
                    }
                    else {
                        this.result = 'flag正确';
                    }
                    this.dialogController.open();
                });
            });
            if (!isInitialRender) {
                Button.pop();
            }
            ViewStackProcessor.StopGetAccessRecording();
        });
在txt里面找到了判断flag的按钮!!var c = testNapi.check(this.flag, value);
发现这里就有check函数可以判断flag!
锁定鸿蒙Native层方法check()
发现testNapi那么就可以对标安卓的Native层方法了:16.7:NAPI 加载原理(上) | 《ArkUI实战》
testNapi方法是写在libentry.so文件里!
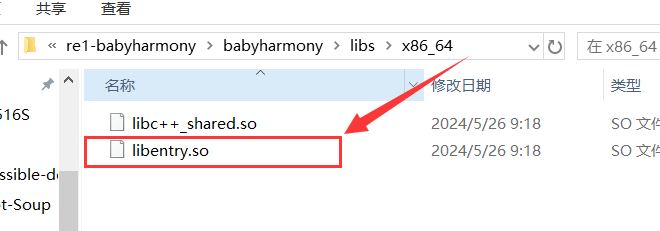
拖入ida直接开始查找!
先了解鸿蒙的Native层方法注册流程(鸿蒙用的是魔改后的Node.js的原生库ffi-napi):
注册方法:RegisterEntryModule-》napi_module_register-》要注册方法的结构体napi_module
typedef struct napi_module {
    int nm_version;
    unsigned int nm_flags;
    void* nm_filename;
    napi_addon_register_func nm_register_func;
    void* nm_modname;
    void* nm_priv;
    void* reserved[4];
} napi_module;


发现这个check方法是在这里!

找到check方法!!

鸿蒙开发知识提前了解
这里有很多api特别重要先提前了解一波:
这些api的来源都是js的Node-API,华为用ArkTS又封装了一遍:
问chatgpt就可以知道他们的作用:
napi_get_cb_info
napi_get_value_string_utf8
napi_get_typedarray_info
napi_get_reference_value
napi_call_function
napi_create_int32
napi_coerce_to_bool
napi_call_function函数和TS的testNapi.register回调函数
在之前找到的源码区:
aboutToAppear() {
    // 注册 testNapi 处理程序,针对不同的 batteryInfo 属性进行比较和返回结果
    // 电池剩余电量差值判断
    testNapi.register(0, (a) => {
        var t = batteryInfo.batterySOC - a;
        var f;
        if (t > 0)
            f = 1;
        else if (t == 0)
            f = 0;
        else
            f = -1;
        return f === 0;
    });
...
    // 直接返回电池温度
    testNapi.register(262, () => {
        return batteryInfo.batteryTemperature;
    });
    // 直接返回电池是否存在
    testNapi.register(263, () => {
        return batteryInfo.isBatteryPresent;
    });
    // 直接返回电池容量等级
    testNapi.register(264, () => {
        return batteryInfo.batteryCapacityLevel;
    });
}
这些代码就是在ArkTS源码区注册的回调函数,Native层的napi_call_function函数可以通过序号调用这些ArkTs层的代码!
开始分析Native层方法check()方法
先进行部分分析,最后再汇总分析所有伪代码!
重点关注一下SO文件里的API函数
Native层的获取回调函数的函数:
// 通过bin_i的值获取注册在TS的代码,将注册的方法存放于reg_method_0
napi_get_reference_value(env, *(v29 + 40), ®_method_0);
// 通过bin_i_or_100的值获取注册在TS的代码,将函数存放在reg_method_1
napi_get_reference_value(env, *(v36 + 40), ®_method_1);
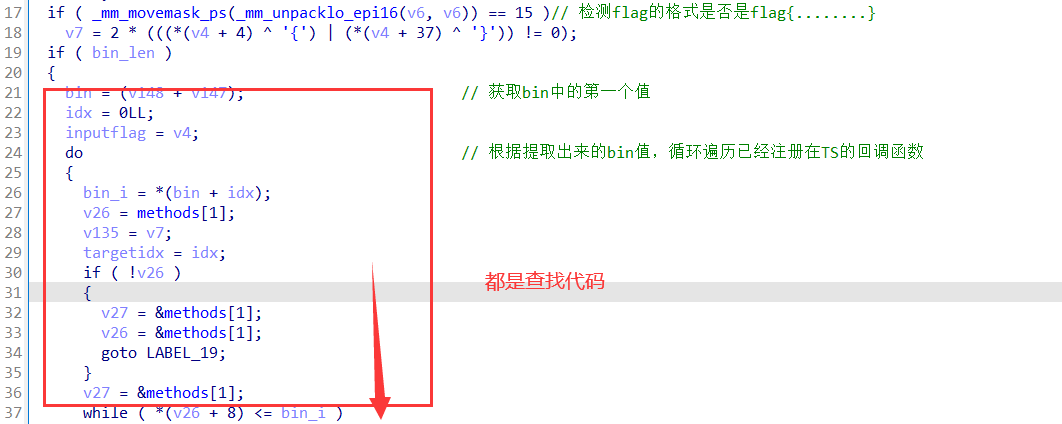
下面分析一下逻辑伪代码:
根据这个两个获取回调函数地址的函数我们可以猜测出check方法分为三个部分:
1. 根据bin[i]获取reg_method_0地址和reg_method_1地址的查找代码
2. 找到函数后根据bin[i+1]获取VM执行流程
bin[i+1]== 0

bin[i+1]== 1

bin[i+1]== 2
3. 在检查完环境问题后进行加密的重量级部分

根据bin[i+1]的值分析不同控制流所执行的逻辑
reg_method_1方法在被找到的那一刻就被执行了,返回值是method_1_ret:

1.当bin[i+1] == 0
else if ( !keyvalue )// keyvalue==0,method_1_ret被转为int32,传入一个参数
{
//VM整体操作流程序号加4
  v40 = targetidx + 4;
//获取bin[i+3]作为整数
  napi_create_int32(env, *(bin + targetidx + 3), &int_3_arg);
//调用reg_method_0(bin[i+3])得到返回值——》methodfun_0_ret
  napi_call_function(env,this,reg_method_0,1,&int_3_arg, &methodfun_0_ret);
//将reg_method_1函数的返回值作为switch_case_key
  napi_get_value_int32(env, method_1_ret, &method_1_ret_bool);// 转为int32
  LOBYTE(switch_case_key) = method_1_ret_bool;
}

1. VM整体操作流程序号加4
2. 获取bin[i+3]作为整数
3. 调用reg_method_0(bin[i+3])得到返回值——》methodfun_0_ret
4. 将reg_method_1函数的返回值作为switch_case_key
注:switch_case_key用来加密
2.当bin[i+1] == 1
v40 = targetidx + 3;//VM整体操作流程序号加上3
// keyvalue == 1,method_1_ret返回值被转为utf8,传入一个参数
if ( keyvalue == 1 )
  {
    //获取bin[i+2]的值作为size
     size = *(bin + targetidx + 2);
     //获取bin + v40中的字符串,其实就是bin[i+3]
     napi_create_string_utf8(env, bin + v40, size, &int_3_arg);
     v40 += size;//VM整体操作流程序号加上字符串的长度
     env_1 = env;
     //调用reg_method_0函数,将字符串int_3_arg传入reg_method_0函数
     napi_call_function(env, this, reg_method_0, 1LL, &int_3_arg, &methodfun_0_ret);
     //得到返回值reg_method_0函数的返回值
     napi_get_value_string_utf8(env, method_1_ret, buf, 128LL, &stringlen1);
     if ( stringlen1 )
     {
....
}
1. VM整体操作流程序号加上3
2. 获取bin[i+2]的值作为size
3. 获取bin + v40中的字符串,其实就是bin[i+3]
4. VM整体操作流程序号加上字符串的长度
5. 调用reg_method_0函数,将字符串int_3_arg传入reg_method_0函数
6. 得到返回值reg_method_0函数的返回值
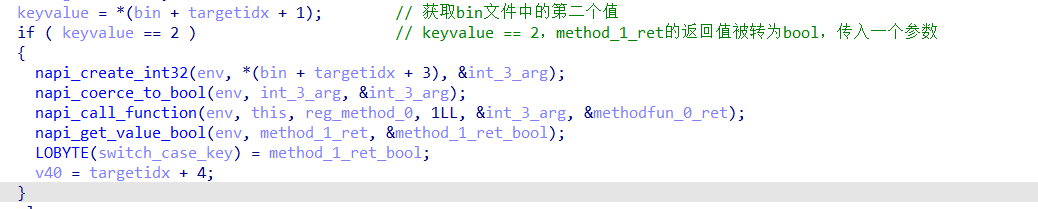
3.当bin[i+1] == 2
if ( keyvalue == 2 )// keyvalue == 2,method_1_ret的返回值被转为bool,传入一个参数
{
//获取bin[i+3]的值作为int_3_arg
  napi_create_int32(env, *(bin + targetidx + 3), &int_3_arg);
  //转换类型int32-》bool
  napi_coerce_to_bool(env, int_3_arg, &int_3_arg);
  //调用reg_method_0(int_3_arg)->返回值methodfun_0_ret
  napi_call_function(env, this, reg_method_0, 1LL, &int_3_arg, &methodfun_0_ret);
  //将reg_method_1函数的返回值作为switch_case_key
  napi_get_value_bool(env, method_1_ret, &method_1_ret_bool);
  LOBYTE(switch_case_key) = method_1_ret_bool;
  v40 = targetidx + 4;
}
1. 获取bin[i+3]的值作为int_3_arg
2. 转换类型int32-》bool
3. 调用reg_method_0(int_3_arg)
4. 将reg_method_1函数的返回值作为switch_case_key
注:switch_case_key用来加密
分析完执行流程通过Python来简化一下
def dump_bin(bin):
    d = []
    pc = 0
    while pc < len(bin):
        op = bin[pc]
        print('####################', pc, op)

        # 获取函数地址reg_method_0,通过bin[pc]查找
        # print('reg_method_0 = func[%d]' % (op))
        # 获取函数地址reg_method_1,通过bin[pc] | 0x100 查找
        #调用reg_method_1获得返回值
        print('method_1_ret = call func[%d]' % (op | 0x100))
        #获取操作类型
        type = bin[pc + 1]
        if type == 0 :
            print('method_0_ret = call func[%d](%d)' % (op, bin[pc + 3]))
            key = bin[pc + 3]
            pc += 4
        elif type == 1:
            #获取bin中字符串的长度
            size = bin[pc + 2]
            s = bin[pc + 3: pc + 3 + size]
            print('method_0_ret = call func[%d](%s)' % (op, repr(s)))
            pc += 3 + size
        elif type == 2 :
            print('method_0_ret = call func[%d](%d)' % (op, bin[pc + 3]))
            key = bin[pc + 3]
            pc += 4
        else:
            pc += 3
            assert False
        d.append((op, key))
    return d
with open(r'.\bin', 'rb') as file:
    encrypted_data = file.read()

print(dump_bin(encrypted_data))
得到执行流程:
#################### 0 3
method_1_ret = call func[259]
method_0_ret = call func[3](1)
#################### 4 0
method_1_ret = call func[256]
method_0_ret = call func[0](100)
#################### 8 4
method_1_ret = call func[260]
method_0_ret = call func[4](10)
#################### 12 7
method_1_ret = call func[263]
method_0_ret = call func[7](0)
#################### 16 5
method_1_ret = call func[261]
method_0_ret = call func[5](b'hackers')
#################### 26 8
method_1_ret = call func[264]
method_0_ret = call func[8](1)
#################### 30 1
method_1_ret = call func[257]
method_0_ret = call func[1](3)
#################### 34 6
method_1_ret = call func[262]
method_0_ret = call func[6](50)
#################### 38 2
method_1_ret = call func[258]
method_0_ret = call func[2](2)
绕过ArkTS层的环境异常检测
ArkTS层注册的回调函数有很多我就截取了部分:
aboutToAppear() {
        // 电池插入类型差值判断
        testNapi.register(3, (a) => {
            var t = batteryInfo.pluggedType - a;
            var f;
            if (t > 0)
                f = 1;
            else if (t == 0)
                f = 0;
            else
                f = -1;
            return f === 0;
        });
        ....
        // 直接返回电池插入类型
        testNapi.register(259, () => {
            return batteryInfo.pluggedType;
        });
}
这里是写在ArkTS层的回调函数代码!
发现这些回调函数的id:3,259;0,256;等等…
这里监测环境异常主要是通过检查电池信息是否和预定的数据一样不一样则判定环境异常:
根据跑出来的回调函数的注册码在ArkTS层找函数
method_1_ret = call func[259]
// 直接返回电池插入类型
testNapi.register(259, () => {
    return batteryInfo.pluggedType;
});

method_0_ret = call func[3](1)
// 电池插入类型差值判断
testNapi.register(3, (a) => {
    var t = batteryInfo.pluggedType - a;
    var f;
    if (t > 0)
        f = 1;
    else if (t == 0)
        f = 0;
    else
        f = -1;
    return f === 0;
});
再根据so层的代码分析可以知道:
method_0_ret的返回值必须是非0才可以通过环境监测,这里也就是要求:
batteryInfo.pluggedType 的值等于 1 就可以通过环境检查!!
依次类推也就可以知道如何绕过环境监测了!
知识连接:OpenHarmony4.0源码解析之电源管理子系统 - 文章 OpenHarmony开发者论坛
batteryInfo.batterySOC           256
batteryInfo.chargingStatus       257
batteryInfo.healthStatus         258
batteryInfo.pluggedType          259
batteryInfo.voltage              260
batteryInfo.technology           261
batteryInfo.batteryTemperature   262
batteryInfo.isBatteryPresent     263
batteryInfo.batteryCapacityLevel 264
写个脚本来看看需要的设置的电池数据,来绕过环境异常检测:
def dump_bin(bin):
    d = []
    pc = 0
    while pc < len(bin):
        op = bin[pc]
        print('------------->', pc, op)

        # 获取函数地址reg_method_0,通过bin[pc]查找
        # print('reg_method_0 = func[%d]' % (op))
        # 获取函数地址reg_method_1,通过bin[pc] | 0x100 查找
        #调用reg_method_1获得返回值
        print('method_1_ret = call func[%d]' % (op | 0x100))
        if (op | 0x100) == 256 :
            print("batteryInfo.batterySOC:",end="")
        elif (op | 0x100) == 257 :
            print("batteryInfo.chargingStatus:",end="")
        elif (op | 0x100) == 258 :
            print("batteryInfo.healthStatus:",end="")
        elif (op | 0x100) == 259 :
            print("batteryInfo.pluggedType:",end="")
        elif (op | 0x100) == 260 :
            print("batteryInfo.voltage:",end="")
        elif (op | 0x100) == 261 :
            print("batteryInfo.technology:",end="")
        elif (op | 0x100) == 262 :
            print("batteryInfo.batteryTemperature:",end="")
        elif (op | 0x100) == 263 :
            print("batteryInfo.isBatteryPresent:",end="")
        elif (op | 0x100) == 264 :
            print("batteryInfo.batteryCapacityLevel:",end="")
        #获取操作类型
        type = bin[pc + 1]
        if type == 0 :
            print(bin[pc + 3])
            print('method_0_ret = call func[%d](%d)' % (op, bin[pc + 3]))
            key = bin[pc + 3]
            pc += 4
        elif type == 1:
            #获取bin中字符串的长度
            size = bin[pc + 2]
            s = bin[pc + 3: pc + 3 + size]
            print(repr(s))
            print('method_0_ret = call func[%d](%s)' % (op, repr(s)))
            pc += 3 + size
        elif type == 2 :
            print(bin[pc + 3])
            print('method_0_ret = call func[%d](%d)' % (op, bin[pc + 3]))
            key = bin[pc + 3]
            pc += 4
        else:
            pc += 3
            assert False
        d.append((op, key))
    return d
with open(r'.\bin', 'rb') as file:
    encrypted_data = file.read()

print(dump_bin(encrypted_data))
要求的电池环境,成功绕过:
-------------> 0 3
batteryInfo.pluggedType:1
-------------> 4 0
batteryInfo.batterySOC:100
-------------> 8 4
batteryInfo.voltage:10
-------------> 12 7
batteryInfo.isBatteryPresent:0
-------------> 16 5
batteryInfo.technology:b'hackers'
-------------> 26 8
batteryInfo.batteryCapacityLevel:1
-------------> 30 1
batteryInfo.chargingStatus:3
-------------> 34 6
batteryInfo.batteryTemperature:50
-------------> 38 2
batteryInfo.healthStatus:2
分析Check函数的加密逻辑
do
{
  if valuekey == 0:
        switch_case_key...
  if valuekey == 1:
        switch_case_key...
  if valuekey == 2:
        switch_case_key...
    ....
  switch ( bin_i )
  {
    case 0:
        ....
        v54 = switch_case_key & 0x3F | (switch_case_key >> 1) & 0x40 | (2 * switch_case_key) & 0x80;
        ....
    case 1:
        .....
    case 8:
        ....
  }
}
while ( v40 < bin_len );
继续分析发现switch里面的加密和switch_case_key的关系特别大,根据交叉引用可以找到相关逻辑:
根据bin[i+1]的值不同导致switch_case_key的值也不同
reg_method_1方法在被找到的那一刻就被执行了,返回值是method_1_ret
1.当bin[i+1] == 0
        else if ( !keyvalue )   // keyvalue==0,method_1_ret被转为int32,传入一个参数
        {
          v40 = targetidx + 4;
          napi_create_int32(env, *(bin + targetidx + 3), &int_3_arg);
          napi_call_function(env, this, reg_method_0, 1LL, &int_3_arg, &methodfun_0_ret);
          napi_get_value_int32(env, method_1_ret, &method_1_ret_bool);// 转为int32
          LOBYTE(switch_case_key) = method_1_ret_bool;
        }
根据前面的ArkTS层函数的调用规则可以知道:
- reg_method_1函数就是用来返回当前电池状态信息的!
- 而reg_method_0函数就是用来检查电池信息是否符合要求的!
- 从而也就可以确定switch_case_key的值了!
*(bin + targetidx + 3)
用python脚本就是:
op = bin[pc]
type = bin[pc + 1]
if type == 0:
    key = bin[pc + 3]
    pc += 4
2.当bin[i+1] == 1
        if ( keyvalue == 1 ) // keyvalue == 1,method_1_ret返回值被转为utf8,传入一个参数
        {
          size = *(bin + targetidx + 2);
          napi_create_string_utf8(env, bin + v40, size, &int_3_arg);
          v40 += size;
          env_1 = env;
          napi_call_function(env, this, reg_method_0, 1LL, &int_3_arg, &methodfun_0_ret);
          napi_get_value_string_utf8(env, method_1_ret, buf, 128LL, &stringlen1);
          if ( stringlen1 )
          {
            if ( stringlen1 < 0x20 )
            {
              idx1 = 0LL;
              switch_case_key = 0;
              goto LABEL_56;
            }
            idx1 = stringlen1 & 0xFFFFFFFFFFFFFFE0LL;
            if ( (stringlen1 & 0xFFFFFFFFFFFFFFE0LL) - 32 >= 0x60 )
            {
....
            while ( stringlen1 != idx1 )
LABEL_56:
              LOBYTE(switch_case_key) = buf[idx1++] ^ switch_case_key;
          }
          else
          {
            switch_case_key = 0;
          }
        }
- 通过前面的python脚本可知:
bin[i+1]== 1的值会去检测:batteryInfo.technology:b’hackers’ *(bin + targetidx + 2)是字符串长度- 知道正确的电池信息后就可以知道 b’hackers’.len 等于 7 ,所以 stringlen1 < 0x20
- switch_case_key的计算流程就会进入LABEL_56
- 也就是下面的算法:
while ( stringlen1 != idx1 )
	LOBYTE(switch_case_key) = buf[idx1++] ^ switch_case_key;
用python脚本就是:
op = bin[pc]
type = bin[pc + 1]
elif type == 1:
    size = bin[pc + 2]
    s = bin[pc + 3: pc + 3 + size]
    key = 0
    for i in s: key ^= i
    pc += 3 + size
3.当bin[i+1] == 2
if ( keyvalue == 2 )   // keyvalue == 2,method_1_ret的返回值被转为bool,传入一个参数
{
  napi_create_int32(env, *(bin + targetidx + 3), &int_3_arg);
  napi_coerce_to_bool(env, int_3_arg, &int_3_arg);
  napi_call_function(env, this, reg_method_0, 1LL, &int_3_arg, &methodfun_0_ret);
  napi_get_value_bool(env, method_1_ret, &method_1_ret_bool);
  LOBYTE(switch_case_key) = method_1_ret_bool;
  v40 = targetidx + 4;
}
根据前面的ArkTS层函数的调用规则可以知道:
- reg_method_1函数就是用来返回当前电池状态信息的!
- 而reg_method_0函数就是用来检查电池信息是否符合要求的!
- 从而也就可以确定switch_case_key的值了!
*(bin + targetidx + 3)
用python脚本就是:
op = bin[pc]
type = bin[pc + 1]
if type == 2:
    key = bin[pc + 3]
    pc += 4
成功得到VMopcode的加密流程和加密密钥switch_case_key

def dump_bin(bin):
    d = []
    pc = 0
    while pc < len(bin):
        op = bin[pc]
        type = bin[pc + 1]
        if type == 2 or type == 0:
            key = bin[pc + 3]
            pc += 4
        elif type == 1:
            size = bin[pc + 2]
            s = bin[pc + 3: pc + 3 + size]
            key = 0
            for i in s: key ^= i
            pc += 3 + size
        else:
            pc += 3
            assert False
        d.append((op, key))
    return d

with open(r'.\bin', 'rb') as file:
    encrypted_data = file.read()

print(dump_bin(encrypted_data))
# [(3, 1), (0, 100), (4, 10), (7, 0), (5, 101), (8, 1), (1, 3), (6, 50), (2, 2)]
第一个值是opcode,第二个值是key
加密流程和密钥;[(3, 1), (0, 100), (4, 10), (7, 0), (5, 101), (8, 1), (1, 3), (6, 50), (2, 2)]
加密算法部分解析(未解决)
拜读大佬wp,但是奈何大佬的代码跑不起来,而且最终加密后的flag数据对比的位置和加密后的数据也不知道怎么来的,最后无奈放弃QAQ
拜读大佬wp:2024 05.27 jqctf 初赛 wp - LaoGong - 飞书云文档 (feishu.cn)
┌──(kali㉿kali)-[~/tools]
└─$ git clone https://github.com/IchildYu/load-elf.git
正克隆到 'load-elf'...
remote: Enumerating objects: 40, done.
remote: Counting objects: 100% (40/40), done.
remote: Compressing objects: 100% (37/37), done.
remote: Total 40 (delta 18), reused 0 (delta 0), pack-reused 0
接收对象中: 100% (40/40), 13.93 KiB | 6.97 MiB/s, 完成.
处理 delta 中: 100% (18/18), 完成.
python:
def dump_bin(bin):
    d = []
    pc = 0
    while pc < len(bin):
        op = bin[pc]
        # print('#', pc, op)
        # print('b = func[%d]()' % (op | 0x100))
        type = bin[pc + 1]
        if type == 2 or type == 0:
            # missing bin[pc + 2]
            # print('a = func[%d](%d)' % (op, bin[pc + 3]))
            key = bin[pc + 3]
            pc += 4
        elif type == 1:
            size = bin[pc + 2]
            s = bin[pc + 3: pc + 3 + size]
            # print('a = func[%d](%s)' % (op, repr(s)))
            # print('b = xor(b)')
            key = 0
            for i in s: key ^= i
            pc += 3 + size
        else:
            pc += 3
            assert False
        d.append((op, key))
    return d

def g(x, n):
    return (x >> n) & 1

def s(x, n):
    return (x & 1) << n

def swapbit(x, m, n):
    if m == n: return x
    return s(g(x, m), n) | s(g(x, n), m) | (x & ~(s(1, n) | s(1, m)))

def swapkeep(x, mask):
    swapbits = ~mask & 0xff
    m = swapbits.bit_length() - 1
    assert 0 <= m < 8
    swapbits ^= 1 << m
    n = swapbits.bit_length() - 1
    assert 0 <= n < 8
    swapbits ^= 1 << n
    assert swapbits == 0
    return swapbit(x, m, n)

def ror1(x, n):
    n &= 7
    if isinstance(x, int):
        x &= 0xff
        return (x >> n) | (x << (8 - n)) & 0xff
    else:
        return LShR(x, n) | (x << (8 - n)) & 0xff

entries = [
    0x2efa,
    0x42e9,
    0x3428,
    0x38fd,
    0x2522,
    0x480d,
    0x4cc6,
    0x3df6,
    0x51df
]

bin = open('./bin', 'rb').read()
_seq = dump_bin(bin)
# print(_seq)

import ctypes

lib = ctypes.cdll.LoadLibrary('./lib')
# extern void setup();
lib.setup()

def encrypt(array, seq):
    for op, key in seq:
        for i in range(38):
            v = lib.bf_round(key, entries[op], i)
            type, val0, val1 = v >> 16, (v >> 8) & 0xff, v & 0xff
            if type == 0:
                assert val0 == 0
                # print(i, 'c ^= 0x%x' % val1)
                array[i] ^= val1
            elif type == 1:
                # print(i, 'c = ror1(c, %d) ^ 0x%x' % (val0, val1))
                array[i] = ror1(array[i], val0) ^ val1
            elif type == 2:
                # print(i, 'c = swapkeep(c, 0x%x) ^ 0x%x' % (val0, val1))
                array[i] = swapkeep(array[i], val0) ^ val1
            else:
                assert False, type

from z3 import *
_array = [BitVec('x%d' % i, 8) for i in range(38)]
array = _array[:]
encrypt(array, _seq)

result = [226, 125, 77, 72, 55, 231, 235, 154, 118, 5, 125, 135, 49, 162, 160, 77, 248, 159, 61, 164, 56, 139, 225, 229, 136, 139, 89, 191, 4, 222, 40, 234, 126, 202, 215, 252, 133, 165]
# print(len(result))

s = Solver()
for i in range(38):
    s.add(array[i] == result[i])

assert s.check() == sat
model = s.model()
# print(model)
flag = []
for i in _array:
    flag.append(model[i].as_long())

print(bytes(flag))
# flag{3da8767cfb9424b9bbcc09008e36642d}
最终报错:

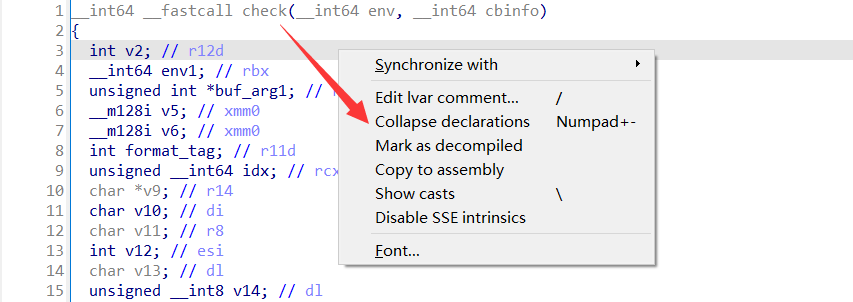
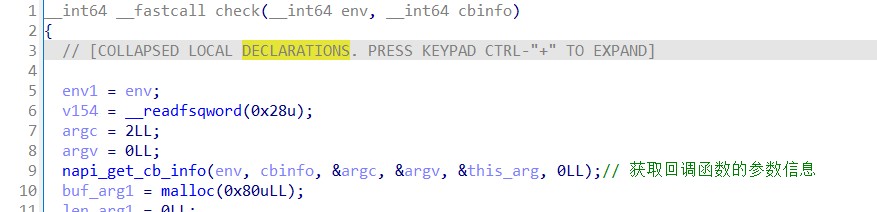
发现一个ida小技巧:


 516
516

 被折叠的 条评论
为什么被折叠?
被折叠的 条评论
为什么被折叠?
 到【灌水乐园】发言


