


一、单点登录
(代码demo09)
单点登录,英文是 Single Sign On(缩写为 SSO)。即多个站点共用一台认证授权服务器,用户在站点登录后,可以免登录访问其他所有站点。而且,各站点间可以通过该登录状态直接交互。
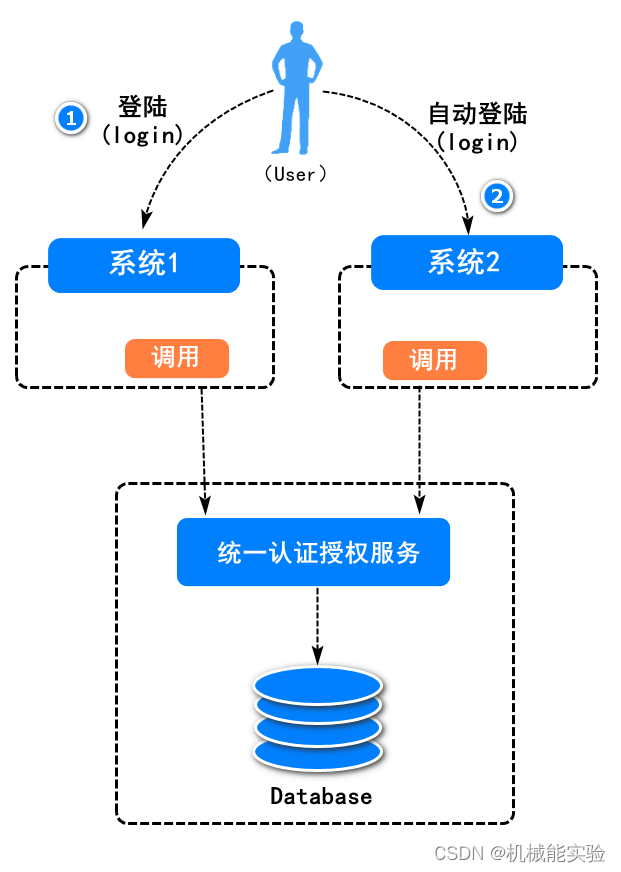

CAS 是 Central Authentication Service 的缩写 —— 中央认证服务,一种独立开放指令协议,是 Yale 大学发起的一个企业级开源项目,旨在为 Web 应用系统提供一种可靠的 SSO 解决方案。
SSO是一种思想,而CAS只是实现这种思想的一种框架而已
CAS支持oauth2 协议
SSO是一种思想,或者说是一种解决方案,是抽象的,我们要做的就是按照它的这种思想去实现它
OAuth2是用来允许用户授权第三方应用访问他在另一个服务器上的资源的一种协议,它不是用来做单点登录的,但我们可以利用它来实现单点登录。
二、OAuth2
1、介绍
OAuth2是目前最流行的授权机制,用来授权第三方应用,获取用户数据。允许用户授权B应用不提供帐号密码的方式去访问该用户在A应用服务器上的某些特定资源。
2、oauth2 的四个角色(重要)
resource owner:
资源所有者,这里可以理解为用户。 security (yyl-123456)
client:
客户端,可以理解为一个第三方的应用程序 即微博 CSDN。 (oauth admin 123456)
resource server:
资源服务器,它存储用户或其它资源。 (sso)
authorization server:
认证/授权服务器,它认证resource owner的身份,为 resource owner提供授权审批流程,并最终颁发授权令牌(Access Token)。
微服务项目里面 认证服务器只能有一台
资源服务器 多台
3、四种授权模式
* authorization_code 授权码模式 (一般用于提供给第三方使用)
* password 密码模式 (一般仅用于系统内部使用)
* client_credentials 客户端模式 (一般不会使用)
* implicit 简单模式 (一般不会使用)
* refresh_token 这个不是一种模式 是支持刷新令牌的意思
4、OAUTH2的spring cloud 微服务单点登录
用户:就是注册的用户
客户端:就是我们的前端项目
授权服务器:我们可以专门在后台创建一个专门管授权的微服务
资源微服务:像其他的订单微服务,什么搜索微服务拉都可以看做用户能够访问的资源
如果我们自己去用java实现OAUTH2.0标准,太麻烦了,幸好有spring-security-oauth2这个插件,就简单多了,spring-security-oauth2是基于spring-security框架完整实现oauth2协议的框架,具有oauth2中4种模式访问和第三方登录等功能。
5、四种模式测试
目的: 颁发token
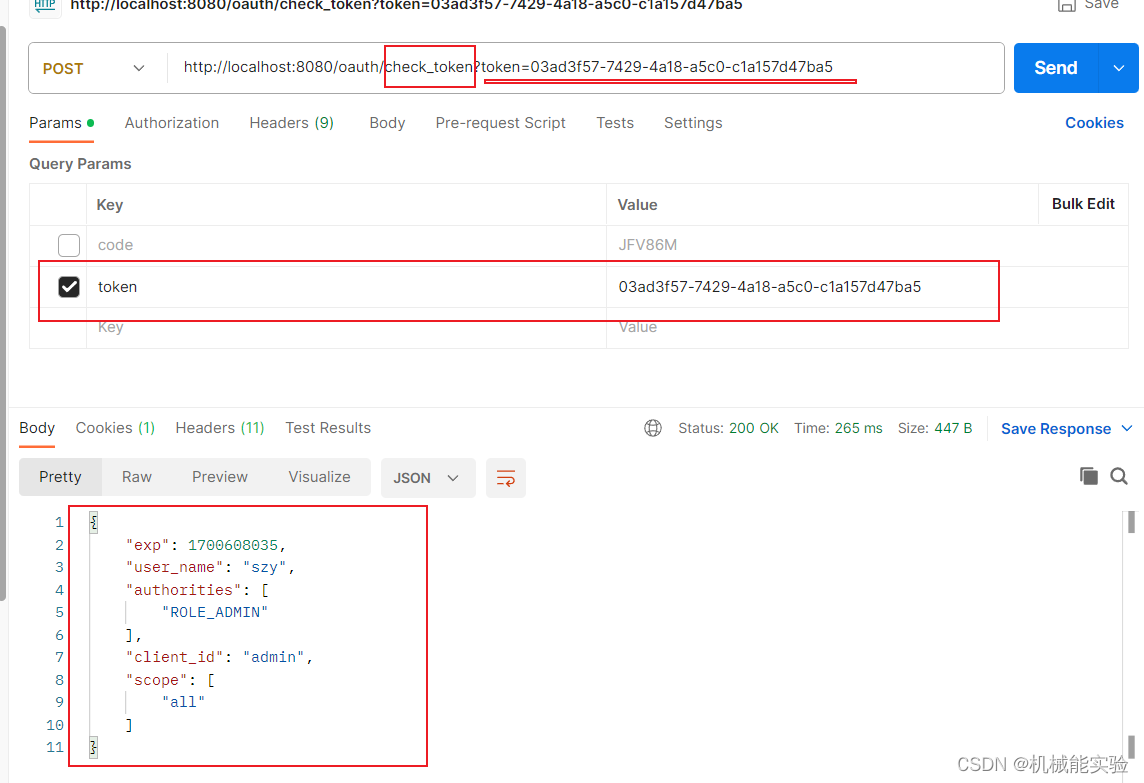
获取token 校验token 都是从认证服务器里边进行操作的
| 路径 | 说明 |
| /oauth/authoriz | 授权端点 |
| /oauth/token | 令牌端点 获取token |
| /oauth/confirm_access | 用户确认授权提交端点 |
| /oauth/error | 授权服务错误信息端点 |
| /oauth/check_token | 用于资源服务访问的令牌解析端点 |
| /oauth/token_key | 提供公有密匙的端点,如果你使用JWT(RSA)令牌的 |
6、认证服务器
Oauth2
spring-security-oauth2是基于spring-security框架完整实现oauth2协议的框架,具有oauth2中4种模式访问和第三方登录等功能。
只配置参数 引入jar包 就可以了
jar
<!--Oauth2-->
        <dependency>
            <groupId>org.springframework.security.oauth</groupId>
            <artifactId>spring-security-oauth2</artifactId>
            <version>2.3.5.RELEASE</version>
        </dependency>

        <dependency>
            <groupId>org.springframework.cloud</groupId>
            <artifactId>spring-cloud-starter-openfeign</artifactId>
        </dependency>
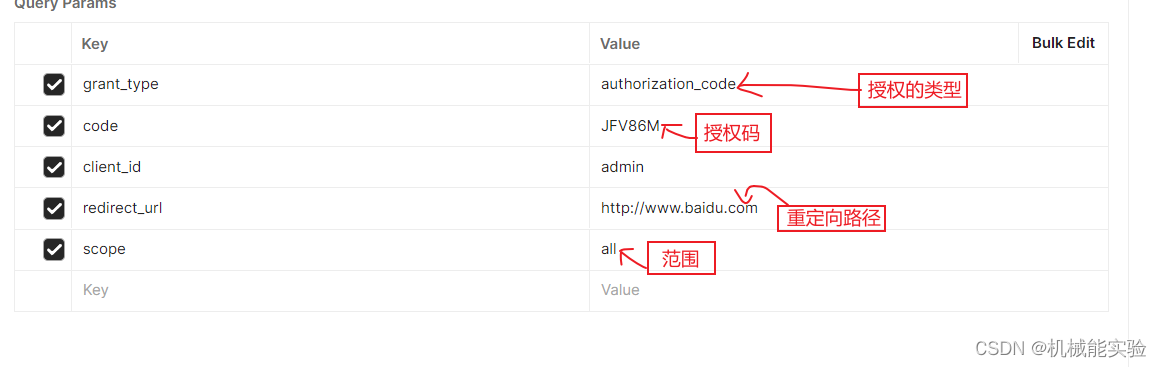
1、授权码模式
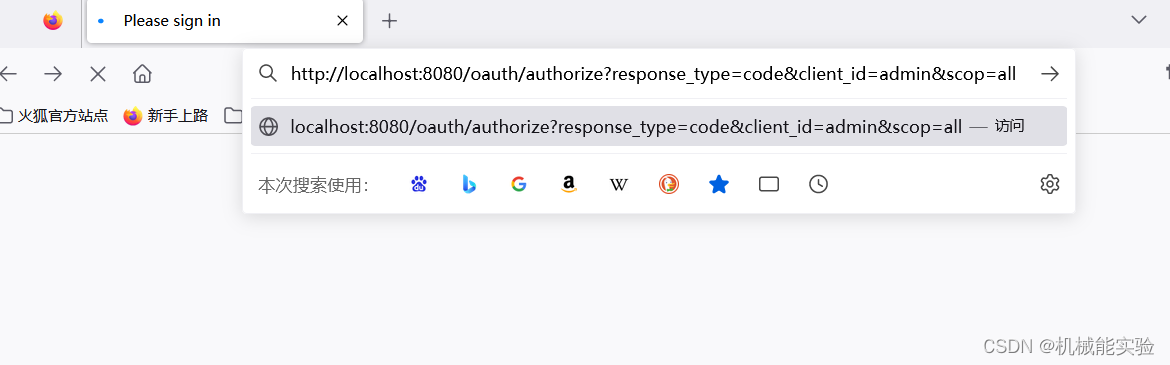
(1)访问授权站点 ,生成授权码
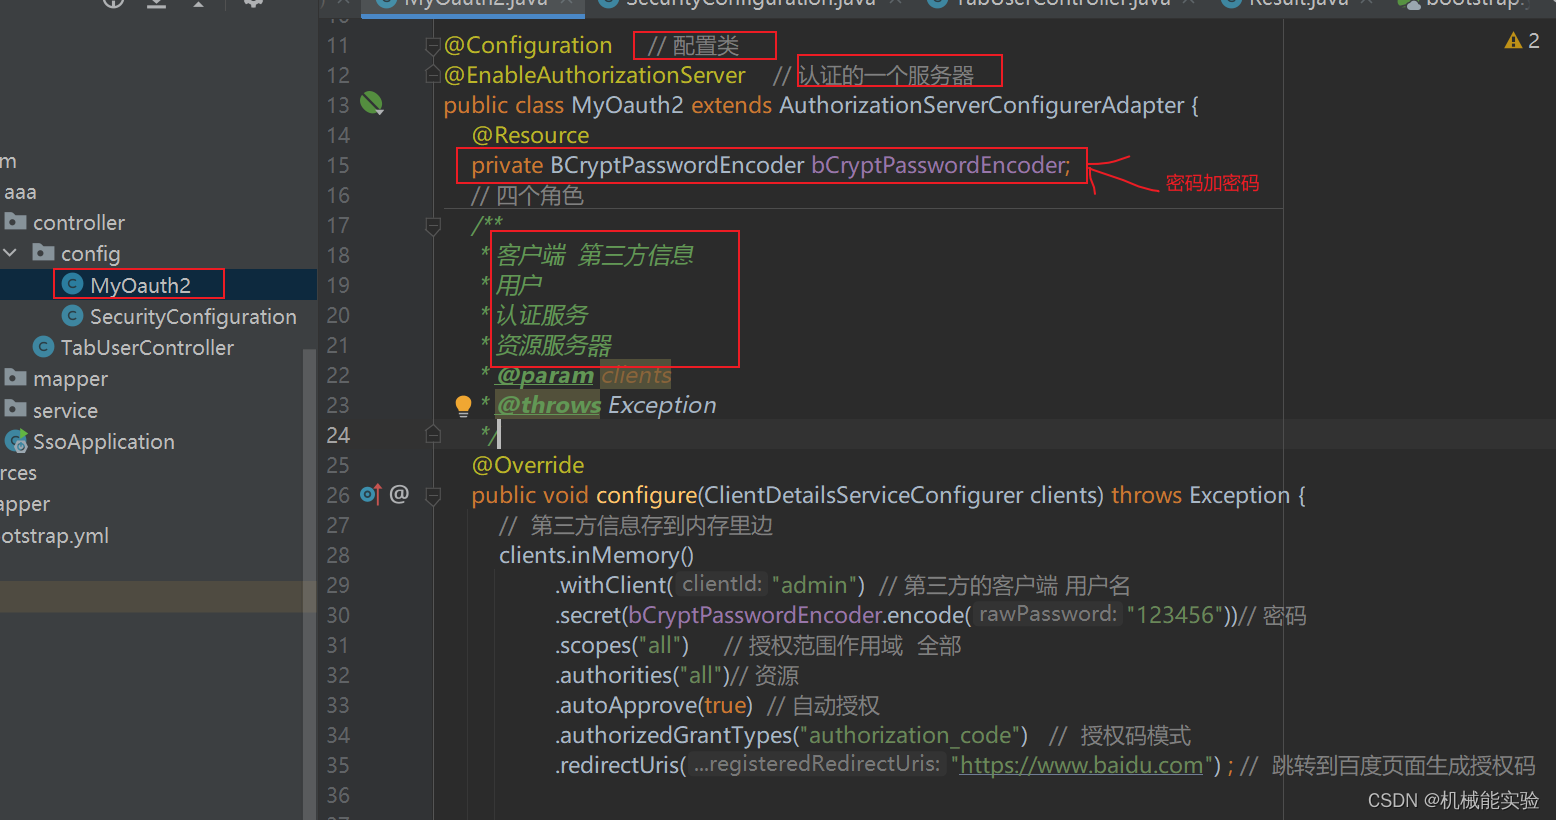
访问授权站点 生成一个授权码
localhost:8080 指的是认证服务器所在的地址
/oauth/authorize 授权站点 路径 (框架提供)
http://localhost:8081/oauth/authorize?response_type=code&client_id=admin&scop=all1

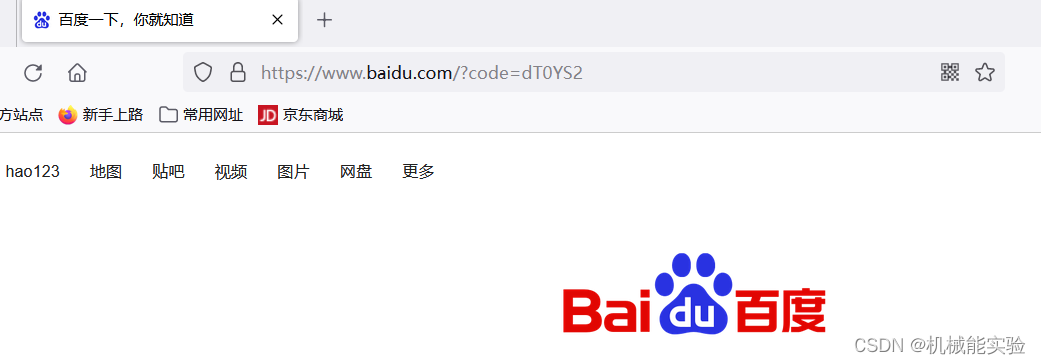
(2)根据授权码,生成token
生成的授权码为:JFV86M
localhost:8080/oauth/token?grant_type=authorization_code&code=JFV86M&client_id=admin&redirect_url=http://www.baidu.com&scope=all
2、简单模式
(1)修改授权的客户端的信息:

其他地方保持不变
(2)访问地址:
localhost:8500/oauth/authorize?response_type=token&client_id=admin&scope=all
点击回车 会跳转到指定的redirect_uri,回调路径会,回调路径携带着令牌 access_token 、 expires_in 、 scope 等

生成的结果:可以直接看到 token
https://www.baidu.com/#access_token=089ac2d6-0269-452b-bc5c-52f2ab1005a6&token_type=bearer&expires_in=431993、客户端模式
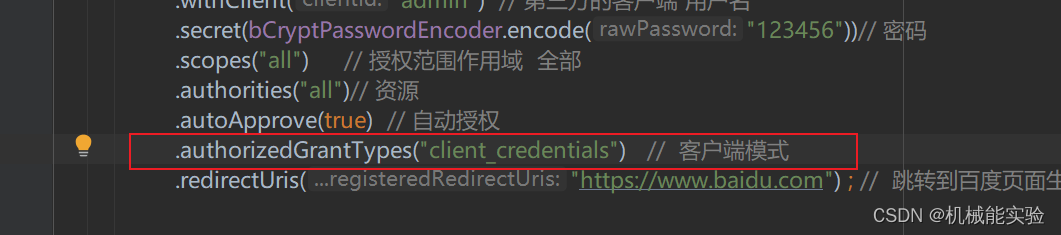
(1)修改为客户端模式
client_credentials
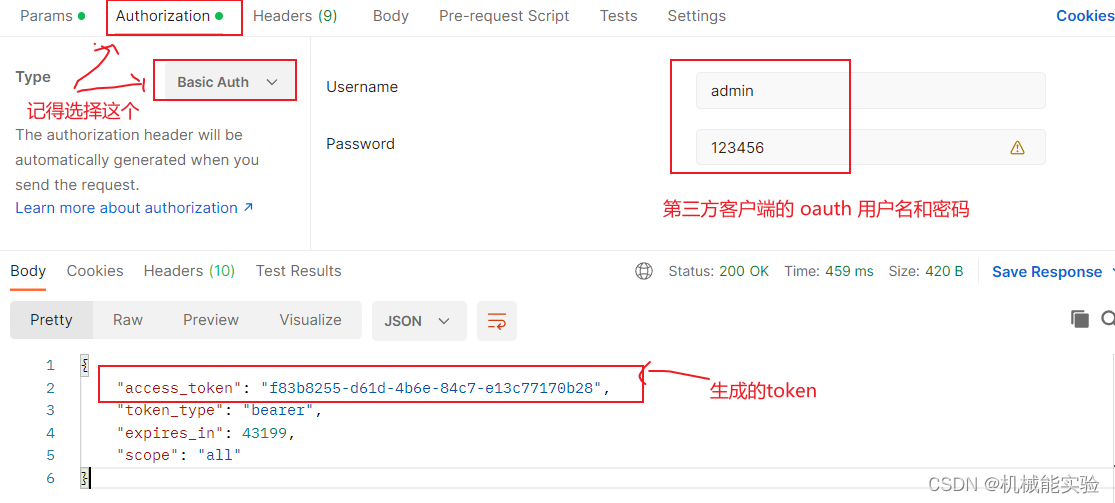
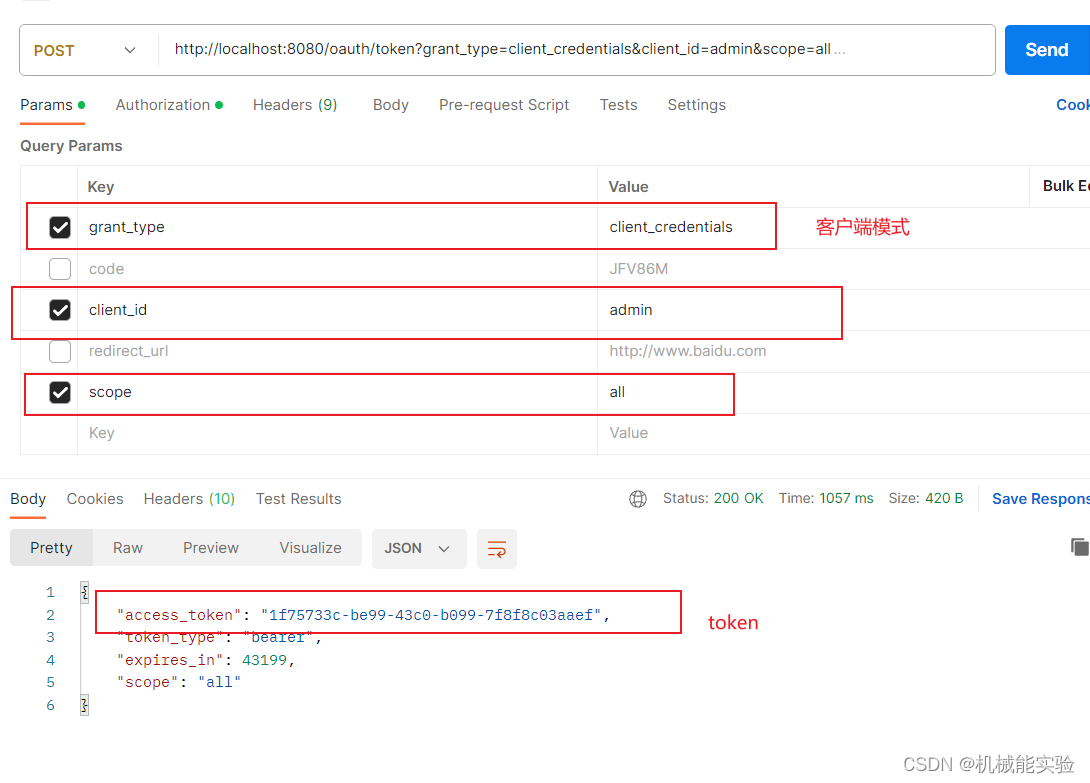
(2)使用 postman 进行访问
分两个步骤 Params 设置完成后, 设置 Authorization 最后进行访问

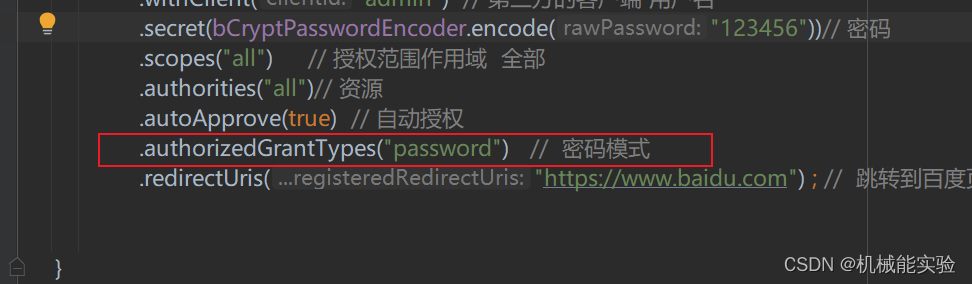
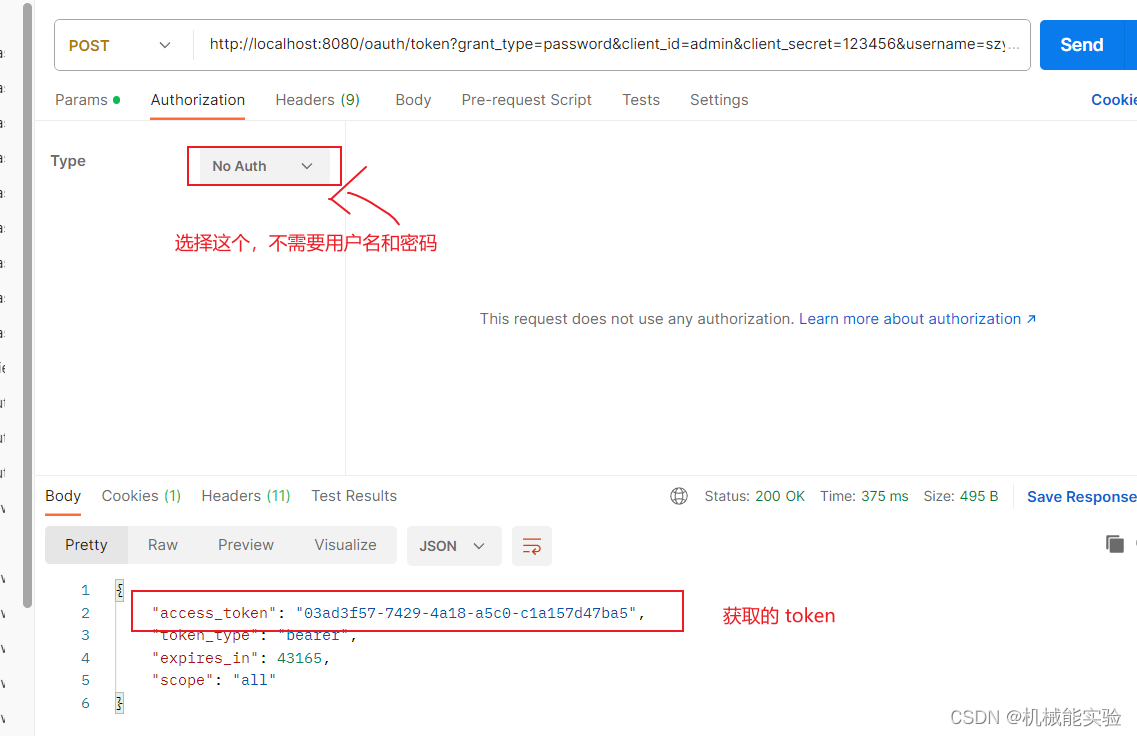
4、密码模式
不能只在 Oauth 上边加入 password 需要在 安全框架上加入 Bean
(1)在 Oauth 上 修改为 密码模式
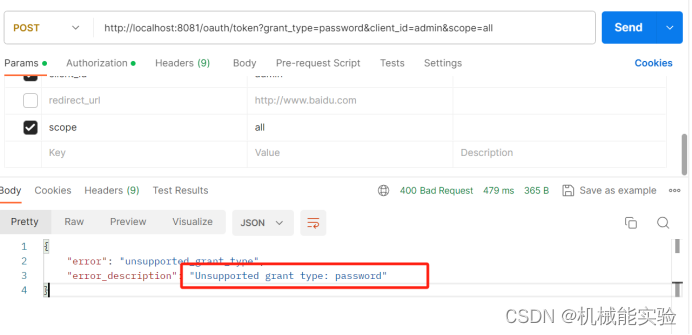
(2)进行访问,出现错误,少写了认证管理器
(3)写认证管理器
SecurityConfig 安全框架上加入 Bean
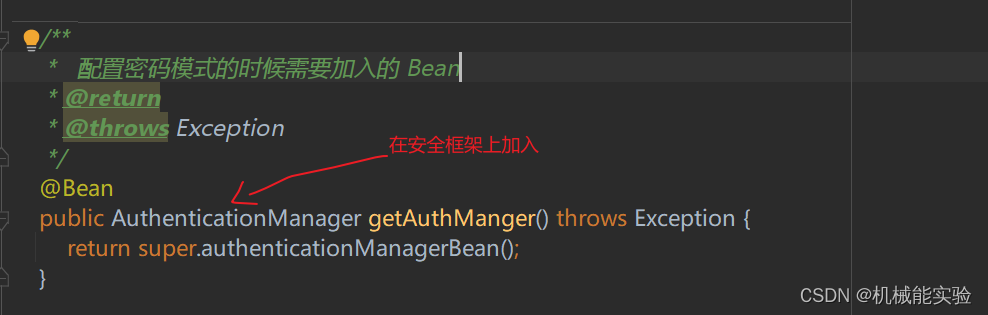
(4)然后引入 Bean 使用认证管理器
在 Oauth 中进行编写
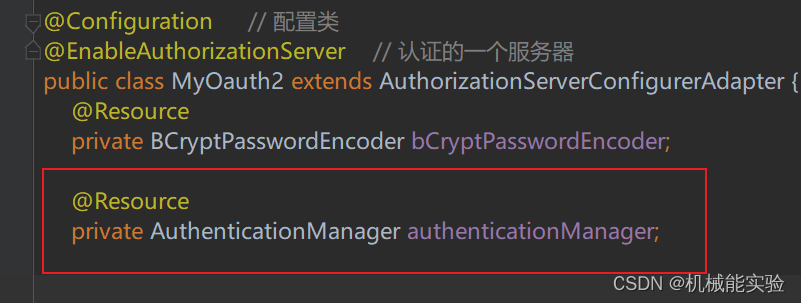
配置安全凭证 Oauth

重启服务

(5)不需要重复输入 用户名 和 密码
配置一个 安全配置 进行放行 Oauth进行配置

(6) 校验 token
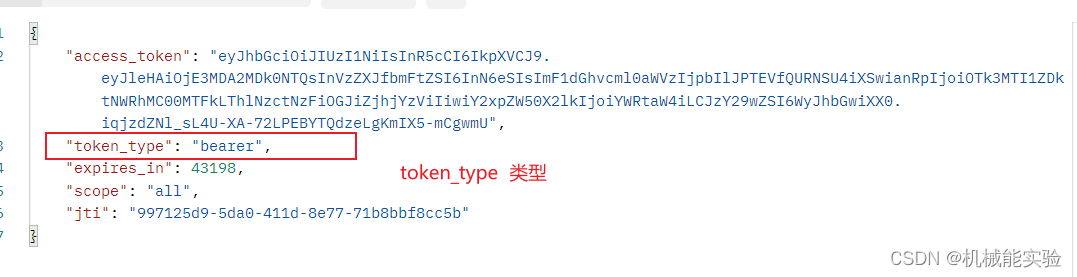
三、使用jwt类型的token
Jwt 类型 三段 头类型 sign的加密方式
载荷部分: username 资源的信息 过期的时间
签名部分 (自己来写 的)
1、加 jar 包
在资源服务器 sso 的 pom
<!--security使用的jwt-->
<dependency>
<groupId>org.springframework.security</groupId>
<artifactId>spring-security-jwt</artifactId>
<version>1.1.0.RELEASE</version>
</dependency>
2、配置bean
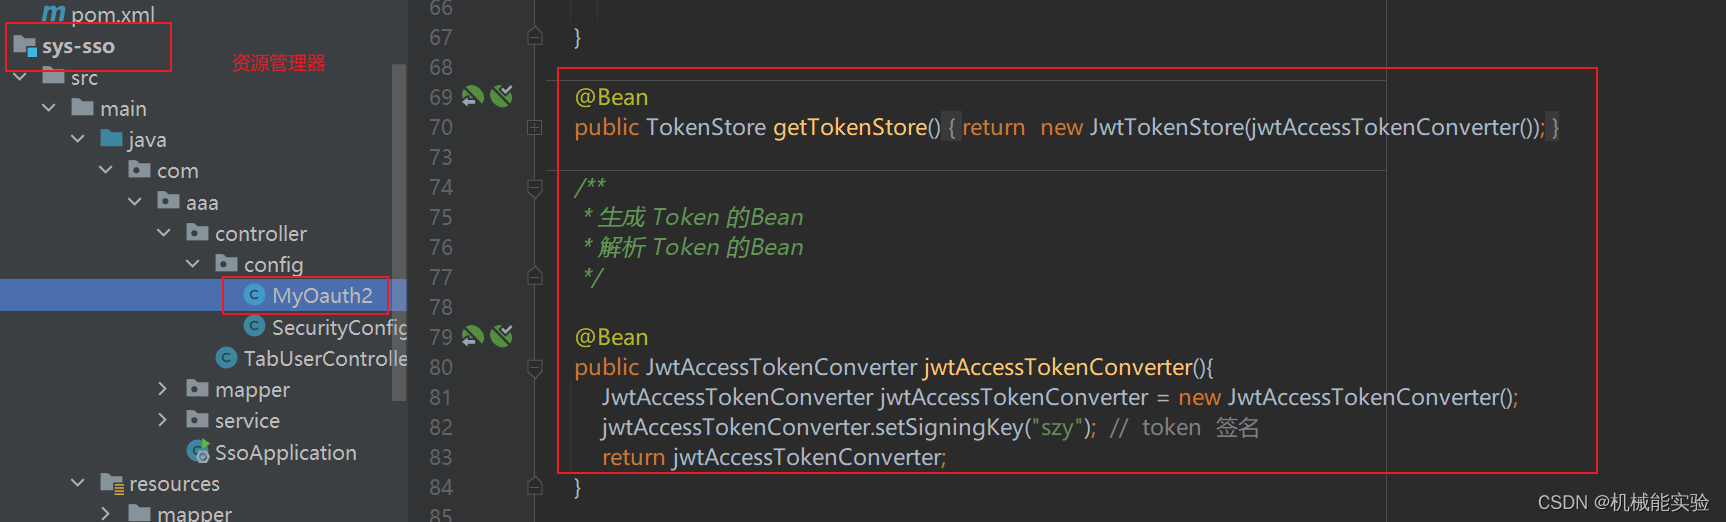
3、使用bean
配置凭证信息的时候使用bean
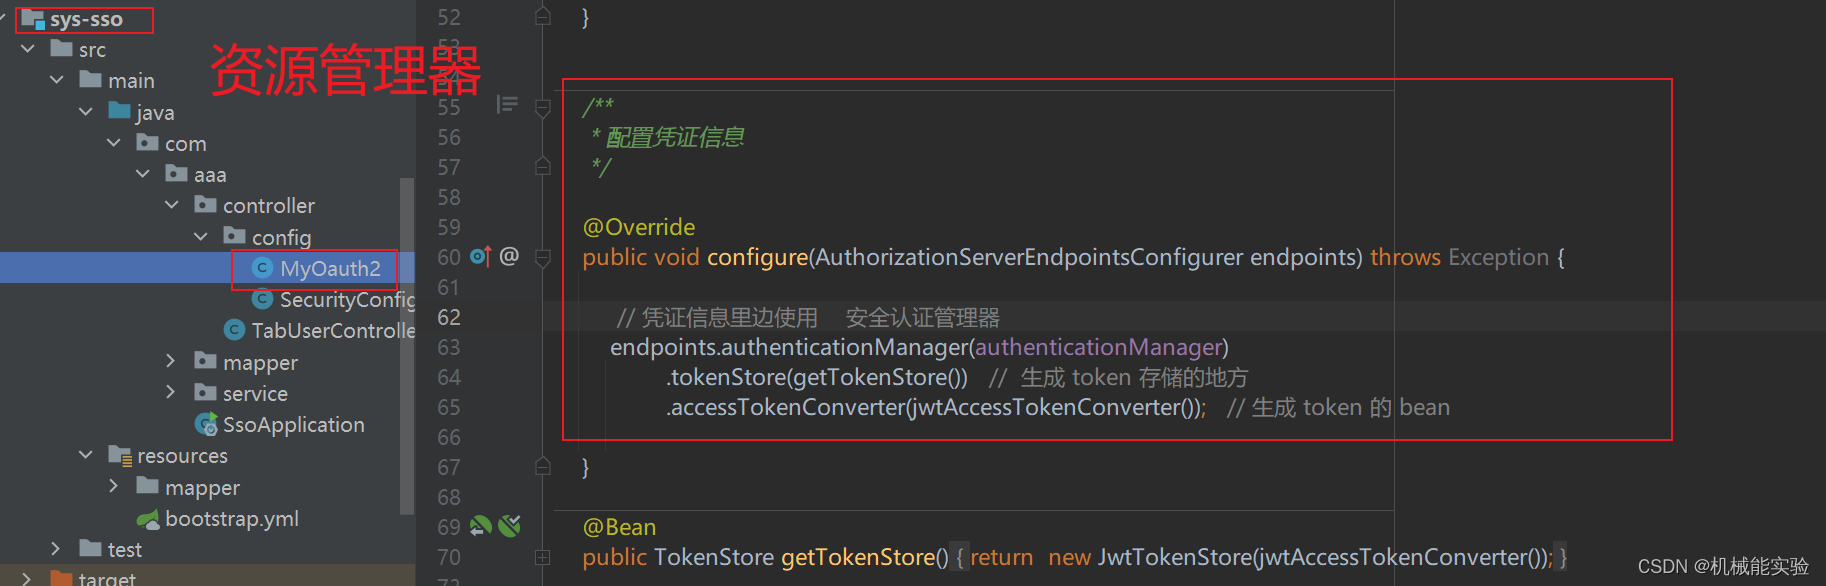
生成 token

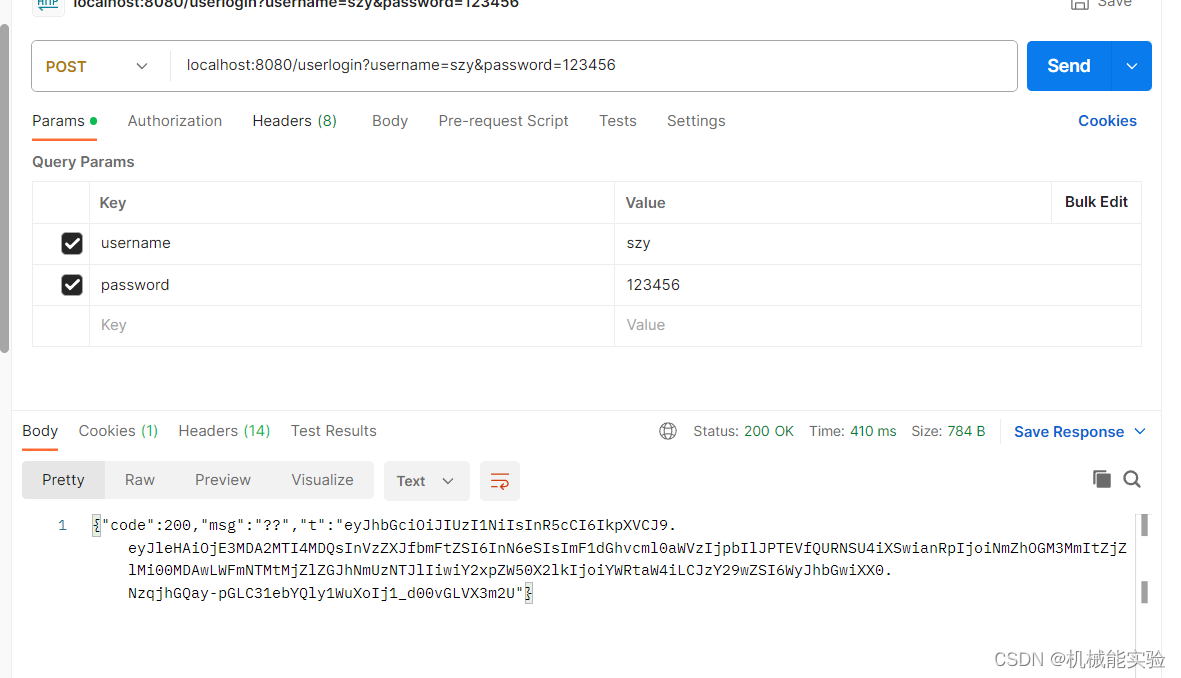
四、认证之后直接生成一个token
安全配置文件 (SecurityConfiguration) 中配置认证成功之后使用第三方工具
hutool 工具 直接发出一个 post 请求 生成token 返回客户端

package com.aaa.controller.config;
import cn.hutool.http.HttpRequest;
import cn.hutool.http.HttpResponse;
import cn.hutool.http.HttpUtil;
import cn.hutool.json.JSONObject;
import cn.hutool.json.JSONUtil;
import cn.hutool.jwt.JWTPayload;
import cn.hutool.jwt.JWTUtil;
import com.fasterxml.jackson.databind.ObjectMapper;
import com.util.Result;
import org.springframework.context.annotation.Bean;
import org.springframework.context.annotation.Configuration;
import org.springframework.security.authentication.AuthenticationManager;
import org.springframework.security.config.annotation.authentication.builders.AuthenticationManagerBuilder;
import org.springframework.security.config.annotation.web.builders.HttpSecurity;
import org.springframework.security.config.annotation.web.configuration.WebSecurityConfigurerAdapter;
import org.springframework.security.core.Authentication;
import org.springframework.security.core.GrantedAuthority;
import org.springframework.security.core.userdetails.UserDetailsService;
import org.springframework.security.crypto.bcrypt.BCryptPasswordEncoder;
import org.springframework.security.crypto.password.PasswordEncoder;
import org.springframework.security.web.authentication.AuthenticationSuccessHandler;
import javax.annotation.Resource;
import javax.servlet.ServletException;
import javax.servlet.http.HttpServletRequest;
import javax.servlet.http.HttpServletResponse;
import java.io.IOException;
import java.io.PrintWriter;
@Configuration
public class SecurityConfiguration extends WebSecurityConfigurerAdapter {
/**
* AuthenticationManagerBuilder 认证管理器的构建
* 安全框架 配置信息
*
* @param
* @throws Exception
*/
@Override
protected void configure(HttpSecurity http) throws Exception {
http.formLogin().loginProcessingUrl("/userlogin")
.successHandler((httpServletRequest, httpServletResponse, authentication) -> {
String username = httpServletRequest.getParameter("username");
String password = httpServletRequest.getParameter("password");
// hutool 工具 发出一个 Post 请求 获取 token
HttpRequest post = HttpUtil.createPost("http://localhost:8080/oauth/token");
post.form("grant_type" , "password");
post.form("client_id" , "admin");
post.form("client_secret","123456");
post.form("username" , username);
post.form("password" , password);
HttpResponse execute = post.execute();
String body = execute.body();
System.out.println(body);
// token 的值
// 字符串 转化为 map
JSONObject entries = JSONUtil.parseObj(body);
Object accessToken = entries.get("access_token");
// 返回一个token
printJsonData(httpServletResponse,new Result(200,"成功",accessToken));
});
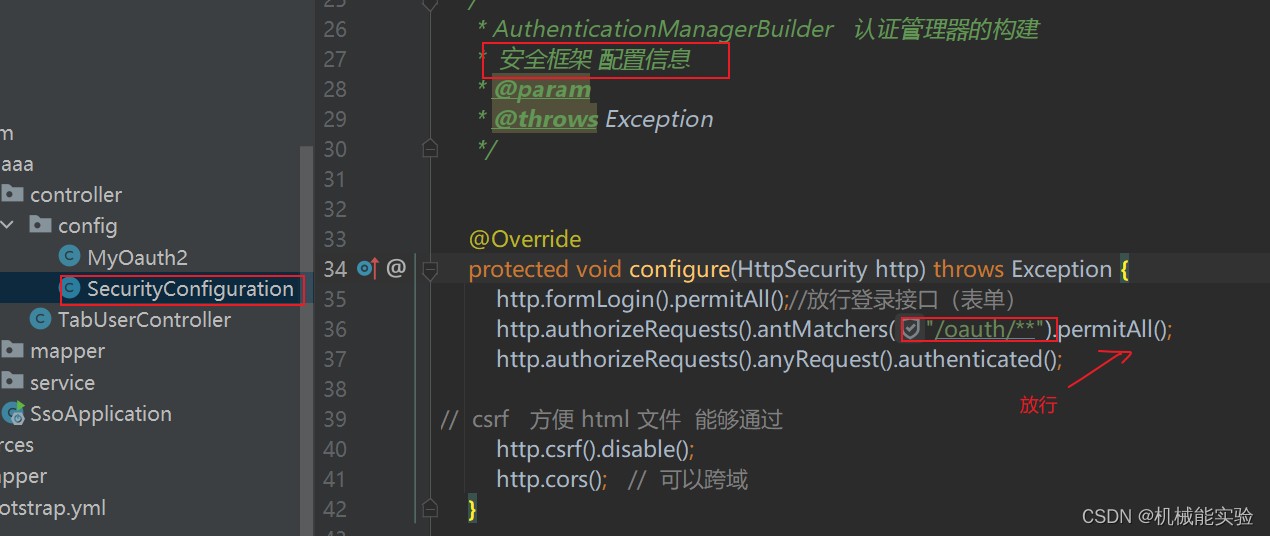
http.formLogin().permitAll();//放行登录接口(表单)
http.authorizeRequests().antMatchers("/userlogin","/oauth/**").permitAll();
http.authorizeRequests().anyRequest().authenticated();
// csrf 方便 html 文件 能够通过
http.csrf().disable();
http.cors(); // 可以跨域
}
// @Resource
// private UserDetailsService userDetailsService;
// @Bean
// public PasswordEncoder getPassword() {
// return new BCryptPasswordEncoder();
// }
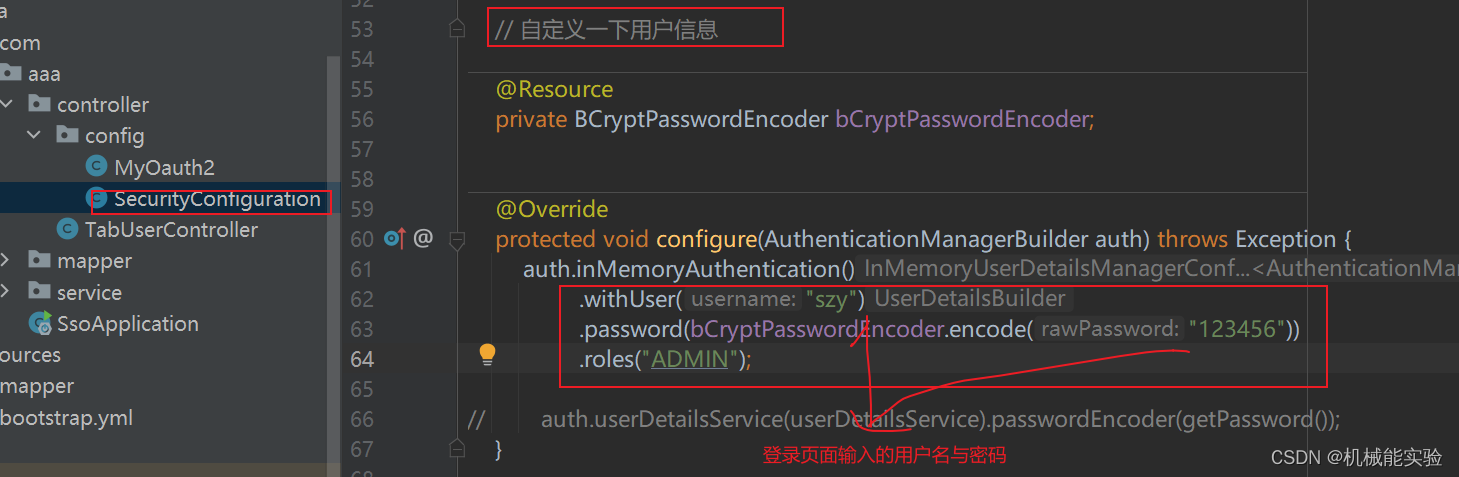
// 自定义一下用户信息
@Resource
private BCryptPasswordEncoder bCryptPasswordEncoder;
/**
* 配置密码模式的时候需要加入的 Bean
* @return
* @throws Exception
*/
@Bean
public AuthenticationManager getAuthManger() throws Exception {
return super.authenticationManagerBean();
}
@Override
protected void configure(AuthenticationManagerBuilder auth) throws Exception {
auth.inMemoryAuthentication()
.withUser("szy")
.password(bCryptPasswordEncoder.encode("123456"))
.roles("ADMIN");
// auth.userDetailsService(userDetailsService).passwordEncoder(getPassword());
}
public void printJsonData(HttpServletResponse response, Result result) throws IOException {
ObjectMapper objectMapper = new ObjectMapper();
String s = objectMapper.writeValueAsString(result); // 使用ObjectMapper 将result转化为json字符串
PrintWriter writer = response.getWriter();
writer.print(s);
writer.flush();
writer.close();
}
}
五、资源服务器
1、加 jar
<dependency>
<groupId>org.springframework.boot</groupId>
<artifactId>spring-boot-starter-web</artifactId>
</dependency>
<dependency>
<groupId>org.springframework.security.oauth</groupId>
<artifactId>spring-security-oauth2</artifactId>
<version>2.3.5.RELEASE</version>
</dependency>
<!-- https://mvnrepository.com/artifact/org.springframework.security.oauth.boot/spring-security-oauth2-autoconfigure -->
<dependency>
<groupId>org.springframework.security.oauth.boot</groupId>
<artifactId>spring-security-oauth2-autoconfigure</artifactId>
<version>2.3.5.RELEASE</version>
</dependency>
2、编写配置文件
(每个资源服务器都要有这个配置文件)
package com.aaa.config;


import org.springframework.context.annotation.Bean;
import org.springframework.context.annotation.Configuration;
import org.springframework.security.config.annotation.method.configuration.EnableGlobalMethodSecurity;
import org.springframework.security.config.annotation.web.builders.HttpSecurity;
import org.springframework.security.oauth2.config.annotation.web.configuration.EnableResourceServer;
import org.springframework.security.oauth2.config.annotation.web.configuration.ResourceServerConfigurerAdapter;
import org.springframework.security.oauth2.provider.token.TokenStore;
import org.springframework.security.oauth2.provider.token.store.JwtAccessTokenConverter;
import org.springframework.security.oauth2.provider.token.store.JwtTokenStore;

@Configuration
@EnableResourceServer
@EnableGlobalMethodSecurity(jsr250Enabled = true,prePostEnabled = true,securedEnabled=true)
public class MyResConfig extends ResourceServerConfigurerAdapter {

    @Override
    public void configure(HttpSecurity http) throws Exception {
        http.authorizeRequests()
                .anyRequest().authenticated()
                //.access("@RbacConfig.hasPermission(request,authentication)")
                .and()
                .csrf().disable();
    }
    @Bean
    public TokenStore tokenStore() {
        return new JwtTokenStore(jwtAccessTokenConverter());
    }
    @Bean
    public JwtAccessTokenConverter jwtAccessTokenConverter(){
        JwtAccessTokenConverter jwtAccessTokenConverter = new JwtAccessTokenConverter();
        jwtAccessTokenConverter.setSigningKey("szy");  //  token 解析器    签名应该保持一致  认证服务器和授权服务器
        return jwtAccessTokenConverter;
    }
}
3、写正常的代码
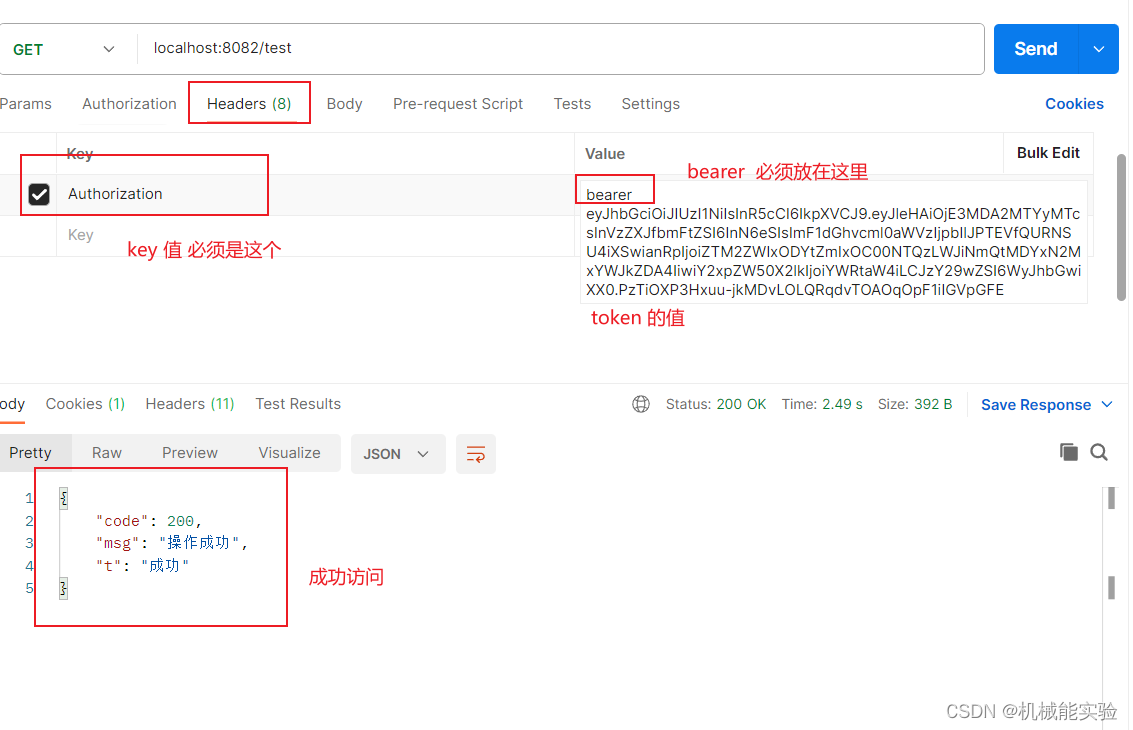
4、测试token是否生效
携带 token 访问 资源服务器
Authorization 放在headers里面的
Token的值 要求必须是bearer 类型的 token前面加上这个类型 bearer,否则解析不出来


 5555
5555


 被折叠的 条评论
为什么被折叠?
被折叠的 条评论
为什么被折叠?
 到【灌水乐园】发言


