


文章目录
1 k8s部署方式
- 二进制部署
- 每个组件都要自己手动安装,很繁琐,耗时长
- kubeadm部署
2 Kubernetes快速部署
kubeadm是官方社区推出的一个用于快速部署kubernetes集群的工具。
这个工具能通过两条指令完成一个kubernetes集群的部署:
# 创建一个 Master 节点
$ kubeadm init

# 将一个 Node 节点加入到当前集群中
$ kubeadm join <Master节点的IP和端口>
1. 安装要求
在开始之前,部署Kubernetes集群机器需要满足以下几个条件:
-至少3台机器,操作系统 CentOS7+
- 硬件配置:2GB或更多RAM,2个CPU或更多CPU,硬盘20GB或更多
- 集群中所有机器之间网络互通
- 可以访问外网,需要拉取镜像
- 禁止swap分区
2. 学习目标
- 在所有节点上安装Docker和kubeadm
- 部署Kubernetes Master
- 部署容器网络插件
- 部署 Kubernetes Node,将节点加入Kubernetes集群中
- 部署Dashboard Web页面,可视化查看Kubernetes资源
3. 准备环境

| 角色 | IP |
|---|---|
| master | 192.168.163.133 |
| node1 | 192.168.163.137 |
| node2 | 192.168.163.138 |
[root@localhost ~]# hostnamectl set-hostname k8s-master
[root@localhost ~]# bash
[root@k8s-master ~]#

[root@localhost ~]# hostnamectl set-hostname k8s-node1
[root@localhost ~]# bash
[root@k8s-node1 ~]#

[root@localhost ~]# hostnamectl set-hostname k8s-node2
[root@localhost ~]# bash
[root@k8s-node2 ~]#
关闭防火墙:
# systemctl disable --now firewalld

关闭selinux:
# sed -i 's/enforcing/disabled/' /etc/selinux/config  # 永久

关闭swap:
# free -m
              total        used        free      shared  buff/cache   available
Mem:           3709         237        3249           8         222        3245
Swap:          2047           0        2047
# vim /etc/fstab
注释掉swap分区

在master添加hosts:
# cat >> /etc/hosts << EOF
192.168.163.133 k8s-master
192.168.163.137 k8s-node1
192.168.163.138 k8s-node2
EOF

将桥接的IPv4流量传递到iptables的链:
# cat > /etc/sysctl.d/k8s.conf << EOF
net.bridge.bridge-nf-call-ip6tables = 1
net.bridge.bridge-nf-call-iptables = 1
EOF
# sysctl --system  # 生效

时间同步:
# dnf -y install chrony

# vim /etc/chrony.conf
pool 2.centos.pool.ntp.org iburst
改为:
pool time1.aliyum.com iburst

# systemctl enable --now chronyd

免密认证:
# ssh-keygen -t rsa
# ssh-copy-id k8s-master
# ssh-copy-id k8s-node1
# ssh-copy-id k8s-node2
4. 所有节点安装Docker/kubeadm/kubelet
Kubernetes默认CRI(容器运行时)为Docker,因此先安装Docker。
4.1 安装Docker
# wget https://mirrors.aliyun.com/docker-ce/linux/centos/docker-ce.repo -O /etc/yum.repos.d/docker-ce.repo
# ls
CentOS-Base.repo   epel.repo                  redhat.repo
docker-ce.repo     epel-testing-modular.repo
epel-modular.repo  epel-testing.repo
# dnf -y install docker-ce
# systemctl enable --now docker
# docker --version

配置加速器:
# cat > /etc/docker/daemon.json << EOF
{
  "registry-mirrors": ["https://b9pmyelo.mirror.aliyuncs.com"],
  "exec-opts": ["native.cgroupdriver=systemd"],
  "log-driver": "json-file",
  "log-opts": {
    "max-size": "100m"
  },
  "storage-driver": "overlay2"
}
EOF
4.2 添加kubernetes阿里云YUM软件源
# cat > /etc/yum.repos.d/kubernetes.repo << EOF
[kubernetes]
name=Kubernetes
baseurl=https://mirrors.aliyun.com/kubernetes/yum/repos/kubernetes-el7-x86_64
enabled=1
gpgcheck=0
repo_gpgcheck=0
gpgkey=https://mirrors.aliyun.com/kubernetes/yum/doc/yum-key.gpg https://mirrors.aliyun.com/kubernetes/yum/doc/rpm-package-key.gpg
EOF
4.3 安装kubeadm,kubelet和kubectl
由于版本更新频繁,这里指定版本号部署:
# yum install -y kubelet-1.25.0 kubeadm-1.25.0 kubectl-1.25.0
# systemctl enable kubelet
5. 部署Kubernetes Master
在192.168.163.133(Master)执行。
# kubeadm init \
  --apiserver-advertise-address=192.168.163.133 \
  --image-repository registry.aliyuncs.com/google_containers \
  --kubernetes-version v1.25.0 \
  --service-cidr=10.96.0.0/12 \
  --pod-network-cidr=10.244.0.0/16

若出问题,可以做以下步骤再重新执行上面命令:
# vim /etc/containerd/config.toml
注释掉#disabled_plugins = ["cri"]
# systemctl restart containerd

还报错,尝试以下步骤:
# cd /etc/kubernetes/manifests/
# rm -rf *
# systemctl stop kubelet

# containerd config default > /etc/containerd/config.toml
# sed -i 's/k8s.gcr.io/registry.aliyuncs.com/google_containers/' /etc/containerd/config.toml
# systemctl restart containerd
由于默认拉取镜像地址k8s.gcr.io国内无法访问,这里指定阿里云镜像仓库地址。
使用kubectl工具:
普通用户做以下步骤:
# mkdir -p $HOME/.kube
# sudo cp -i /etc/kubernetes/admin.conf $HOME/.kube/config
# sudo chown $(id -u):$(id -g) $HOME/.kube/config
# kubectl get nodes
管理员root用户做以下步骤:
[root@k8s-master ~]# kubeadm init   --apiserver-advertise-address=192.168.163.133   --image-repository registry.aliyuncs.com/google_containers   --kubernetes-version v1.25.0   --service-cidr=10.96.0.0/12   --pod-network-cidr=10.244.0.0/16
[init] Using Kubernetes version: v1.25.0
......
Your Kubernetes control-plane has initialized successfully!

To start using your cluster, you need to run the following as a regular user:

  mkdir -p $HOME/.kube
  sudo cp -i /etc/kubernetes/admin.conf $HOME/.kube/config
  sudo chown $(id -u):$(id -g) $HOME/.kube/config

Alternatively, if you are the root user, you can run:

  export KUBECONFIG=/etc/kubernetes/admin.conf

You should now deploy a pod network to the cluster.
Run "kubectl apply -f [podnetwork].yaml" with one of the options listed at:
  https://kubernetes.io/docs/concepts/cluster-administration/addons/

Then you can join any number of worker nodes by running the following on each as root:

kubeadm join 192.168.163.133:6443 --token ltt6vp.eoeehz0chuie5o50 \
	--discovery-token-ca-cert-hash sha256:f7071a5a0ef572aeb256f109292a6f5de38d7e1430d9551b1599c409321b7b5c

[root@k8s-master ~]# vim /etc/profile.d/k8s.sh
export KUBECONFIG=/etc/kubernetes/admin.conf
[root@k8s-master ~]# source /etc/profile.d/k8s.sh
[root@k8s-master ~]# echo $KUBECONFIG
/etc/kubernetes/admin.conf
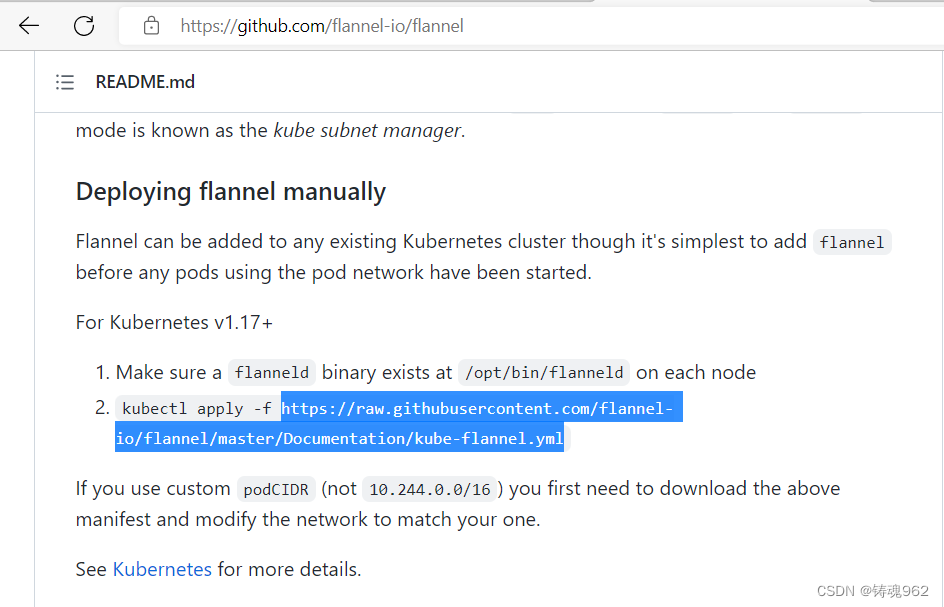
6. 安装Pod网络插件(CNI)
GitHub - flannel-io/flannel: flannel is a network fabric for containers, designed for Kubernetes

[root@k8s-master ~]# vim kube-flannel.yml
---
kind: Namespace
apiVersion: v1
metadata:
  name: kube-flannel
  labels:
    pod-security.kubernetes.io/enforce: privileged
---
kind: ClusterRole
apiVersion: rbac.authorization.k8s.io/v1
metadata:
  name: flannel
rules:
- apiGroups:
  - ""
  resources:
  - pods
  verbs:
  - get
- apiGroups:
  - ""
  resources:
  - nodes
  verbs:
  - list
  - watch
- apiGroups:
  - ""
  resources:
  - nodes/status
  verbs:
  - patch
---
kind: ClusterRoleBinding
apiVersion: rbac.authorization.k8s.io/v1
metadata:
  name: flannel
roleRef:
  apiGroup: rbac.authorization.k8s.io
  kind: ClusterRole
  name: flannel
subjects:
- kind: ServiceAccount
  name: flannel
  namespace: kube-flannel
---
apiVersion: v1
kind: ServiceAccount
metadata:
  name: flannel
  namespace: kube-flannel
---
kind: ConfigMap
apiVersion: v1
metadata:
  name: kube-flannel-cfg
  namespace: kube-flannel
  labels:
    tier: node
    app: flannel
data:
  cni-conf.json: |
    {
      "name": "cbr0",
      "cniVersion": "0.3.1",
      "plugins": [
        {
          "type": "flannel",
          "delegate": {
            "hairpinMode": true,
            "isDefaultGateway": true
          }
        },
        {
          "type": "portmap",
          "capabilities": {
            "portMappings": true
          }
        }
      ]
    }
  net-conf.json: |
    {
      "Network": "10.244.0.0/16",
      "Backend": {
        "Type": "vxlan"
      }
    }
---
apiVersion: apps/v1
kind: DaemonSet
metadata:
  name: kube-flannel-ds
  namespace: kube-flannel
  labels:
    tier: node
    app: flannel
spec:
  selector:
    matchLabels:
      app: flannel
  template:
    metadata:
      labels:
        tier: node
        app: flannel
    spec:
      affinity:
        nodeAffinity:
          requiredDuringSchedulingIgnoredDuringExecution:
            nodeSelectorTerms:
            - matchExpressions:
              - key: kubernetes.io/os
                operator: In
                values:
                - linux
      hostNetwork: true
      priorityClassName: system-node-critical
      tolerations:
      - operator: Exists
        effect: NoSchedule
      serviceAccountName: flannel
      initContainers:
      - name: install-cni-plugin
       #image: flannelcni/flannel-cni-plugin:v1.1.0 for ppc64le and mips64le (dockerhub limitations may apply)
        image: docker.io/rancher/mirrored-flannelcni-flannel-cni-plugin:v1.1.0
        command:
        - cp
        args:
        - -f
        - /flannel
        - /opt/cni/bin/flannel
        volumeMounts:
        - name: cni-plugin
          mountPath: /opt/cni/bin
      - name: install-cni
       #image: flannelcni/flannel:v0.19.2 for ppc64le and mips64le (dockerhub limitations may apply)
        image: docker.io/rancher/mirrored-flannelcni-flannel:v0.19.2
        command:
        - cp
        args:
        - -f
        - /etc/kube-flannel/cni-conf.json
        - /etc/cni/net.d/10-flannel.conflist
        volumeMounts:
        - name: cni
          mountPath: /etc/cni/net.d
        - name: flannel-cfg
          mountPath: /etc/kube-flannel/
      containers:
      - name: kube-flannel
       #image: flannelcni/flannel:v0.19.2 for ppc64le and mips64le (dockerhub limitations may apply)
        image: docker.io/rancher/mirrored-flannelcni-flannel:v0.19.2
        command:
        - /opt/bin/flanneld
        args:
        - --ip-masq
        - --kube-subnet-mgr
        resources:
          requests:
            cpu: "100m"
            memory: "50Mi"
          limits:
            cpu: "100m"
            memory: "50Mi"
        securityContext:
          privileged: false
          capabilities:
            add: ["NET_ADMIN", "NET_RAW"]
        env:
        - name: POD_NAME
          valueFrom:
            fieldRef:
              fieldPath: metadata.name
        - name: POD_NAMESPACE
          valueFrom:
            fieldRef:
              fieldPath: metadata.namespace
        - name: EVENT_QUEUE_DEPTH
          value: "5000"
        volumeMounts:
        - name: run
          mountPath: /run/flannel
        - name: flannel-cfg
          mountPath: /etc/kube-flannel/
        - name: xtables-lock
          mountPath: /run/xtables.lock
      volumes:
      - name: run
        hostPath:
          path: /run/flannel
      - name: cni-plugin
        hostPath:
          path: /opt/cni/bin
      - name: cni
        hostPath:
          path: /etc/cni/net.d
      - name: flannel-cfg
        configMap:
          name: kube-flannel-cfg
      - name: xtables-lock
        hostPath:
          path: /run/xtables.lock
          type: FileOrCreate
[root@k8s-master ~]# kubectl apply -f kube-flannel.yml
namespace/kube-flannel created
clusterrole.rbac.authorization.k8s.io/flannel created
clusterrolebinding.rbac.authorization.k8s.io/flannel created
serviceaccount/flannel created
configmap/kube-flannel-cfg created
daemonset.apps/kube-flannel-ds created
[root@k8s-master ~]# kubectl get node
NAME         STATUS   ROLES           AGE   VERSION
k8s-master   Ready    control-plane   13h   v1.25.0
确保能够访问到quay.io这个registery。
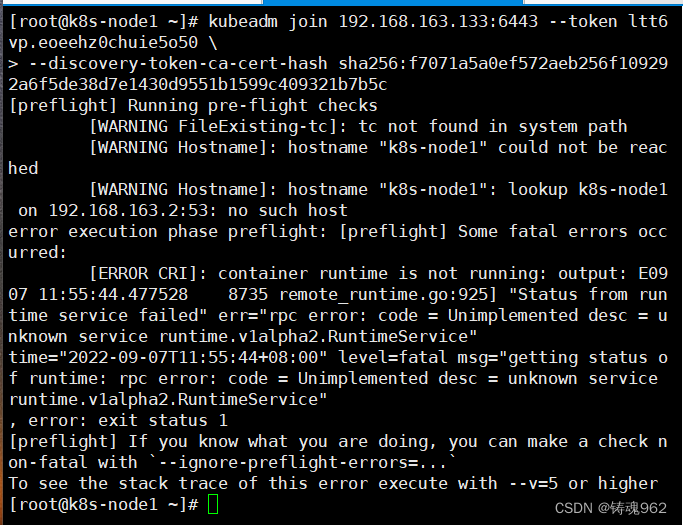
7. 加入Kubernetes Node
在192.168.163.137、192.168.163.138上(Node)执行。
向集群添加新节点,执行在kubeadm init输出的kubeadm join命令:
# kubeadm join 192.168.163.133:6443 --token ltt6vp.eoeehz0chuie5o50 \
> --discovery-token-ca-cert-hash sha256:f7071a5a0ef572aeb256f109292a6f5de38d7e1430d9551b1599c409321b7b5c
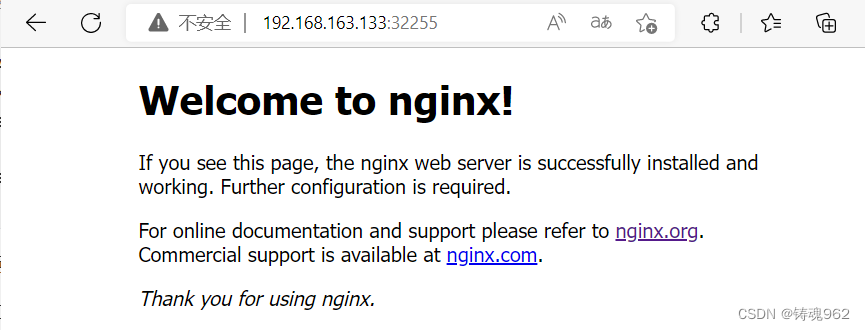
8. 测试kubernetes集群
在Kubernetes集群中创建一个pod,验证是否正常运行:
[root@k8s-master ~]# kubectl create deployment nginx --image=nginxdeployment.apps/nginx created
[root@k8s-master ~]# kubectl expose deployment nginx --port=80 --type=NodePort
service/nginx exposed
[root@k8s-master ~]# kubectl get pod,svc
NAME                        READY   STATUS    RESTARTS   AGE
pod/nginx-76d6c9b8c-dcp24   1/1     Running   0          108s

NAME                 TYPE        CLUSTER-IP     EXTERNAL-IP   PORT(S)        AGE
service/kubernetes   ClusterIP   10.96.0.1      <none>        443/TCP        20h
service/nginx        NodePort    10.104.87.42   <none>        80:32255/TCP   52s
访问地址:http://NodeIP:Port
例如:
9. kubectl命令使用
kubectl是kubernetes集群的命令行工具,通过它能够对集群本身进行管理,并能够在集群上进行容器化应用的安装部署。kubectl命令的语法如下:
kubectl [command] [type] [name] [flags]
comand:指定要对资源执行的操作,例如create、get、delete
type:指定资源类型,比如deployment、pod、service
name:指定资源的名称,名称大小写敏感
flags:指定额外的可选参数
# 查看所有pod
kubectl get pod

# 查看某个pod
kubectl get pod pod_name

# 查看某个pod,以yaml格式展示结果
kubectl get pod pod_name -o yaml
资源类型
kubernetes中所有的内容都抽象为资源,可以通过下面的命令进行查看:
kubectl api-resources
经常使用的资源有下面这些:
| 资源分类 | 资源名称 | 缩写 | 资源作用 |
|---|---|---|---|
| 集群级别资源 | nodes | no | 集群组成部分 |
| namespaces | ns | 隔离Pod | |
| pod资源 | pods | po | 装载容器 |
| pod资源控制器 | replicationcontrollers | rc | 控制pod资源 |
| replicasets | rs | 控制pod资源 | |
| deployments | deploy | 控制pod资源 | |
| daemonsets | ds | 控制pod资源 | |
| jobs | 控制pod资源 | ||
| cronjobs | cj | 控制pod资源 | |
| horizontalpodautoscalers | hpa | 控制pod资源 | |
| statefulsets | sts | 控制pod资源 | |
| 服务发现资源 | services | svc | 统一pod对外接口 |
| ingress | ing | 统一pod对外接口 | |
| 存储资源 | volumeattachments | 存储 | |
| persistentvolumes | pv | 存储 | |
| persistentvolumeclaims | pvc | 存储 | |
| 配置资源 | configmaps | cm | 配置 |
| secrets | 配置 |
操作
kubernetes允许对资源进行多种操作,可以通过–help查看详细的操作命令
kubectl --help
经常使用的操作有下面这些:
| 命令分类 | 命令 | 翻译 | 命令作用 |
|---|---|---|---|
| 基本命令 | create | 创建 | 创建一个资源 |
| edit | 编辑 | 编辑一个资源 | |
| get | 获取 | 获取一个资源 | |
| patch | 更新 | 更新一个资源 | |
| delete | 删除 | 删除一个资源 | |
| explain | 解释 | 展示资源文档 | |
| 运行和调试 | run | 运行 | 在集群中运行一个指定的镜像 |
| expose | 暴露 | 暴露资源为Service | |
| describe | 描述 | 显示资源内部信息 | |
| logs | 日志输出容器在 pod 中的日志 | 输出容器在 pod 中的日志 | |
| attach | 缠绕进入运行中的容器 | 进入运行中的容器 | |
| exec | 执行容器中的一个命令 | 执行容器中的一个命令 | |
| cp | 复制 | 在Pod内外复制文件 | |
| rollout | 首次展示 | 管理资源的发布 | |
| scale | 规模 | 扩(缩)容Pod的数量 | |
| autoscale | 自动调整 | 自动调整Pod的数量 | |
| 高级命令 | apply | rc | 通过文件对资源进行配置 |
| label | 标签 | 更新资源上的标签 | |
| 其他命令 | cluster-info | 集群信息 | 显示集群信息 |
| version | 版本 | 显示当前Server和Client的版本 |
下面以一个namespace / pod的创建和删除简单演示下命令的使用:
# 创建一个namespace
[root@master ~]# kubectl create namespace dev
namespace/dev created

# 获取namespace
[root@master ~]# kubectl get ns
NAME              STATUS   AGE
default           Active   21h
dev               Active   21s
kube-node-lease   Active   21h
kube-public       Active   21h
kube-system       Active   21h

# 在此namespace下创建并运行一个nginx的Pod
[root@master ~]# kubectl run pod --image=nginx:latest -n dev
kubectl run --generator=deployment/apps.v1 is DEPRECATED and will be removed in a future version. Use kubectl run --generator=run-pod/v1 or kubectl create instead.
deployment.apps/pod created

# 查看新创建的pod
[root@master ~]# kubectl get pod -n dev
NAME  READY   STATUS    RESTARTS   AGE
pod   1/1     Running   0          21s

# 删除指定的pod
[root@master ~]# kubectl delete pod pod-864f9875b9-pcw7x
pod "pod" deleted

# 删除指定的namespace
[root@master ~]# kubectl delete ns dev
namespace "dev" deleted
报错处理
初始化报错1
Kube init报错:
[wait-control-plane] Waiting for the kubelet to boot up the control plane as static Pods from directory "/etc/kubernetes/manifests". This can take up to 4m0s
[kubelet-check] Initial timeout of 40s passed.
一直卡在超时40s这里无法初始化
这里上网借鉴了这位大佬的报错处理方法,文章链接如下:
[k8s 初始化 kubelet-check] Initial timeout of 40s passed. - yy9knsg - 博客园 (cnblogs.com)
初始化报错2

[root@k8s-master ~]# rm -rf /var/lib/etcd
加入Kubernetes Node报错
[root@k8s-master ~]# scp /etc/containerd/config.toml k8s-node1:/etc/containerd/
config.toml                     100% 6949     3.8MB/s   00:00
[root@k8s-master ~]# scp /etc/containerd/config.toml k8s-node2:/etc/containerd/
config.toml                     100% 6949     5.4MB/s   00:00
[root@k8s-node1 ~]# systemctl restart containerd
[root@k8s-node2 ~]# systemctl restart containerd
添加新节点后报错

[root@k8s-master ~]# cat /etc/profile.d/k8s.sh
export KUBECONFIG=/etc/kubernetes/admin.conf
[root@k8s-master ~]# scp /etc/profile.d/k8s.sh k8s-node1:/etc/profile.d/
k8s.sh                          100%   45    42.2KB/s   00:00
[root@k8s-master ~]# scp /etc/profile.d/k8s.sh k8s-node2:/etc/profile.d/
k8s.sh                          100%   45    43.7KB/s   00:00
[root@k8s-master ~]# scp /etc/kubernetes/admin.conf k8s-node1:/etc/kubernetes/
admin.conf                      100% 5643     3.1MB/s   00:00
[root@k8s-master ~]# scp /etc/kubernetes/admin.conf k8s-node2:/etc/kubernetes/
admin.conf                      100% 5643     4.1MB/s   00:00
[root@k8s-node1 ~]# bash
[root@k8s-node1 ~]# echo $KUBECONFIG
/etc/kubernetes/admin.conf
[root@k8s-node1 ~]# kubectl get nodes
NAME         STATUS   ROLES           AGE     VERSION
k8s-master   Ready    control-plane   20h     v1.25.0
k8s-node1    Ready    <none>          6h48m   v1.25.0
k8s-node2    Ready    <none>          38m     v1.25.0
//node2同理


 1118
1118


 被折叠的 条评论
为什么被折叠?
被折叠的 条评论
为什么被折叠?
 到【灌水乐园】发言


