


前言
学习心得:C# 入门经典第8版书中的 第11章《集合、比较和转换》,文章的章节和部分介绍是引入书籍上的描述。如想多了解建议大家去购买书籍,进行阅读。
一、集合
C#中的集合一般用于处理对象列表,功能比简单的数组要多,功能大多数是通过System.Collection 名称空间中的接口而获得的,我们可以在对象浏览器中找到(快捷键 Ctrl+W+J)
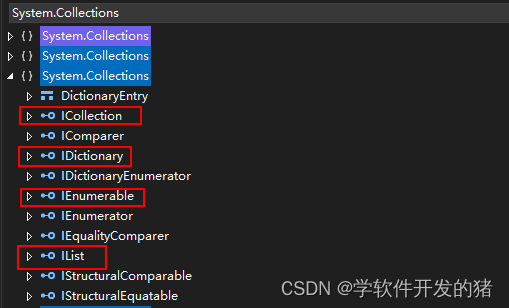
框出的几个接口,在 System.Collections 名称空间下,这几个接口提供了,基本的集合功能。我将解释框柱的四个接口,后文会介绍其他的。
| 名称 | 继承关系 | 功能 |
| IEnumerable | 迭代集合中的项 | |
| ICollection | 继承于IEnumerable | 获取集合中的项的个数 、并能把项复制到一个简单的数组类型中 |
| Ilist | 继承于IEnumerable和ICollection | 提供了项列表 允许访问这些项 并提供其他一些与项列表相关的基本功能 |
| IDictionary | 继承于IEnumerable和ICollection | 类似于IList 但提供了可通过键值(而不是索引)访问的项列表 |
1、使用集合(ArrayList)
    static void Main()
        {
            //创建一个数组
            int[] ints = new int[10];
            foreach (var item in ints)
            {
                //ints支持迭代 是因为 System.Array支持了接口 IEnumerable 接口中的唯一方法 IEnumerator GetEnumerator();
            }

            //创建ArrayList实例
            System.Collections.ArrayList arraylist = new ArrayList();

            //添加项
            arraylist.Add(new object());//IList 接口提供的方法

            //赋值
            arraylist[0] = "我可以是任何类型数据";

            //获取集合的长度 //数组获取是通过 Lenght属性
            int Arraylistlenght = arraylist.Count; //ICollection提供的属性  是接口的一部分

            //删除  方法是IList的一部分  注意:索引删除后会使索引移动一个位置
            arraylist.Remove("我可以是任何类型数据");//删除与参数第一个匹配的数据
            arraylist.RemoveAt(0);//删除索引位置的数据

            //一次性添加多个项 直接添加所有支持ICollection接口的任意对象
            arraylist.AddRange(ints);//AddRange 不是ArrayList提供的接口的一部分 这代表我们可以定制操作,而不是前面所提到的接口要求的操作 如接口规定只能传递object 参数我们就只能这么做

            //查找匹配项的索引
            arraylist.IndexOf(0);//IList 接口提供的方法

        }
2、定义集合
创建一个自己的集合,实现前面提到的集合的一些基本方法,属性。(部分功能 后文会加)
using static System.Console;

namespace 控制台
{
    class Program
    {
        static void Main()
        {
            MyCollection myCollection = new MyCollection() { new MyCollection(), new MyCollection() };
            //上面写的写法等同于 myCollection.Add(new MyCollection()); myCollection.Add(new MyCollection());
            foreach (var item in myCollection)
            {
                WriteLine(item); //能迭代这个集合 因为实现了IEnumerable 接口
            }

            //下面的方式不行
            //myCollection[0]. 没有实现索引符 需要定义索引符
            ReadKey();
        }
    }
    class MyCollection : System.Collections.CollectionBase
    {
        //实现的add方法  List这里不是System.Collections.Generic.List 的泛型集合
        public void Add(MyCollection myCollection) => List.Add(myCollection);
        public void Remove(MyCollection myCollection) => List.Remove(myCollection);
        public MyCollection() {  }
    }

}
3、索引符
索引符(indexer)是一种特殊的属性,可以把它添加到一个类中,以提供类似于数组的访问。实际上,可通过索引符提供更复杂的访问,因为我们可以用方括号语法来定义和使用复杂的参数类型。它最常见的一个用法是对项实现简单的数字索引。
如下代码我们再上面用到的MyCollection类中添加一个索引符。如下代码所示,我们可以自定义索引返回的类型,不一定要Mycollection类型,根据需求来变动。
class MyCollection : System.Collections.CollectionBase
    {
        //实现的add方法  List是 Ilist类型的变量
        public void Add(MyCollection myCollection) => List.Add(myCollection);
        public void Remove(MyCollection myCollection) => List.Remove(myCollection);
        public MyCollection this[int index]
        {
            get { return (MyCollection)List[index]; }
            set { List[index] = value; }
        }
        public MyCollection() { }
    }
4、键控集合和IDictionary
允许项通过键值(如字符串名)进行索引,而不是通过一个索引。这也可以使用索引符来完成,但这次使用的索引符参数是一个与存储的项相关联的键,而不是 int 索引,这样集合就更便于用户使用了。
如下代码我们创建一个我们自己的键控集合。注:键控集合的父类也是在 System.Collections名称空间下的 DictionaryBase
 class Program
    {
        static void Main()
        {
            MyDictionary myDictionary = new MyDictionary()
            {
                {"a",1 },
                {"b",2 }
            };
            var s = myDictionary[new int()];
            Console.WriteLine(s);

            //迭代集合
            foreach (var item in myDictionary.Keys)
            {
                Console.WriteLine($"键{item}");
            }

            foreach (var item in myDictionary.Values)
            {
                Console.WriteLine($"值{item}");
            }
            foreach (DictionaryEntry item in myDictionary)
            {
                Console.WriteLine($"键:{item.Key}");
                Console.WriteLine($"值: {item.Value}");
            }


            ReadKey();
        }
    }
    class MyDictionary : System.Collections.DictionaryBase
    {
        public void Add(object key, object value) { Dictionary.Add(key, value); }
        public void Remove(object key) { Dictionary.Remove(key); }

        public object this[object key]
        {
            get { return Dictionary[key]; }
            set { Dictionary[key] = value; }
        }
        //Dictionary 是父类属性 它实现了IDictionary接口 所有可以拿到IDictionary接口中的Keys
        public ICollection Keys => Dictionary.Keys;
        //InnerHashtable 是父类属性 它实现了Dictionary.Values  所有也可以这么写
        public ICollection Values => InnerHashtable.Values;
        public MyDictionary() { }

    }
5、迭代器
本文前面提到的forecah循环 并非是只能循环 集合类(如 ArrayList 集合)相反,我们在foreach中可以使用定制类。在我们定制类前,先了解一下foreach循环在迭代一个集合时的的执行过程
(1)调用collectionObject.GetEnumerator0,返回一个IEnumerator引用。这个方法可通过IEnumerablc接口的实现代码来获得,但这是可选的。
(2)调用所返回的IEnumerator 接口的MoveNext0)方法。
(3)如果MoveNext0方法返回true,就使用IEnumerator 接口的Current 属性来获取对象的一个引用,用于foreach 循环。
(4)重复前面两步,直到 MoveNext0)方法返回 false 为止,此时循环停止。
想要有一个简单替代方法就是迭代器。我们只需要写一些简单的代码,其他工作编译器会帮我们自动生成。
迭代器的两种可能的返回类型:IEnumerator 和IEnumerable
| IEnumerator | 如果要迭代一个类,则使用方法GetEnumerator() 返回类型是IEnumerator |
| IEnumerable | 如果要迭代一个类成员,例如一个方法,则使用IEnumerable |
迭代块中 使用 yield 关键字为foreach循环当中使用的值
yield return "返回的值"中断将信息返回时用
yield break;这是一个用于检查你对迭代器的理解的问题:
假设你有一个存储整数的自定义集合类
MyCollection,你希望能够使用foreach遍历该集合的元素。请编写一个GetEnumerator方法,使得可以使用迭代器来实现对集合的遍历。
using System;
using System.Collections;
using static System.Console;

namespace 控制台
{
    class Program
    {
        static void Main()
        {
            MyCollection myCollection = new MyCollection();
            foreach (var item in myCollection)
            {
                WriteLine(item);
            }
            ReadKey();
        }
    }
    class MyCollection
    {
        public IEnumerator GetEnumerator()
        {
            if (I == default)
            {
                yield break;
            }
            yield return I;
            yield return I2;
            yield return I3;

        }
        public int I { get; set; }
        public int I2 { get; set; }
        public int I3 { get; set; }
        public MyCollection():this(1, 2, 3)
        {

        }
        private MyCollection(int i,int i2,int i3)
        {
           this.I = i;
            this.I2 = i2;
            this.I3 = i3;
        }
    }
}
示例2 自定义一个集合并且创建一个迭代器。迭代value集合的值,返回value值。
using System.Collections;
using static System.Console;

namespace 控制台
{
    class Program
    {
        static void Main()
        {
            MYDictionary mYDictionary = new MYDictionary();
            mYDictionary.add("a", "1");
            mYDictionary.add("B", 2);
            foreach (var item in mYDictionary)
            {
                WriteLine(item);
            }
            foreach (var item in mYDictionary.L())
            {
                WriteLine(item);
            }
            ReadKey();
        }
    }
    class MYDictionary : DictionaryBase
    {
        //添加方法
        public void add(object key, object value) => Dictionary.Add(key, value);
        //移除方法
        public void remove(object key) => Dictionary.Remove(key);
        //索引器
        public object this[object key] => Dictionary[key];

        //迭代一个类 IEnumerator
        new public IEnumerator GetEnumerator()
        {
            foreach (var item in Dictionary.Values)
            {
                yield return item;
            }
        }
        //迭代类成员 IEnumerable,IEnumerable继承IEnumerator
        public IEnumerable L()
        {
            foreach (var item in Dictionary.Keys)
            {
                yield return item;
            }
        }

    }
}
6、深度复制
在Object中有这样一个方法,MemberwiseClone()我们称呼他为浅度复制。下面我拿个示例来解释浅度复制的效果
using System;
using System.Collections;
using static System.Console;

namespace 控制台
{
    class Program
    {
        static void Main()
        {
            //深度复制 前面我们提到了接口 ICollection 获取集合中的项的个数 、并能把项复制到一个简单的数组类型中
            //我们自定义一个复制方法 为Copyto
            Student student = new Student("学生1");
            Student student2 = checked((Student)student.CopyTo());
            student2.student_Detailed_Information.age = 10;
            WriteLine(student2.student_Detailed_Information.age);
            WriteLine(student.student_Detailed_Information.age);
            ReadKey();
        }
    }

    class Student : ICloneable
    {
        public string str { get; set; }
        public Student(string str)
        {
            this.str = str;
        }
        public Student_detailed_information student_Detailed_Information { get; set; } = new Student_detailed_information();
        /// <summary>
        /// 浅度复制
        /// </summary>
        /// <returns></returns>
        public object CopyTo() => MemberwiseClone();
        /// <summary>
        /// 深度复制
        /// </summary>
        /// <returns></returns>
        public object Clone()
        {
            Student student = new Student("学生");
            return student;
        }
    }
    public class Student_detailed_information
    {
        public int Name { get; set; }
        public int age { get; set; }
    }
}
上述代码的执行效果:输出了两个 “10”。为什么只改了一个类型的值 ,另一个类型却也改变了,这就是我们复制方法CopyTo()的效果。那我们不改动类的值,改动属性会怎么样?
static void Main()
        {
            Student student = new Student("学生1");
            Student student2 = checked((Student)student.CopyTo());
            student2.str = "学生";
            WriteLine(student2.str);
            WriteLine(student.str);
            ReadKey();
        }
输出结果:“学生“ ”学生1” 。为什么和上面的结果不一样?原因在于
浅复制:在C#中调用 MemberwiseClone() 方法即为浅复制。如果字段是值类型的,则对字段执行逐位复制,如果字段是引用类型的,则复制对象的引用,而不复制对象,因此:原始对象和其副本引用同一个对象!
我们接着使用深度复制,通常继承接口 ICloneable 实现方法Clone
 static void Main()
        {
            Student student = new Student("学生1");
            Student student2 = checked((Student)student.Clone());
            student2.student_Detailed_Information.age=10;
            WriteLine(student.student_Detailed_Information.age);
            WriteLine(student2.student_Detailed_Information.age);
            ReadKey();
        }
输出结果:“0” “10”
深复制:如果字段是值类型的,则对字段执行逐位复制,如果字段是引用类型的,则把引用类型的对象指向一个全新的对象!
二、比较
1、类型比较
类型比较确定类型是什么 或者类型继承了什么。如下代码所示。
//类型比较确定类型是什么 或者类型继承了什么
if (ints.GetType() == typeof(int))
{
//Getype是继承的父类 Object的方法 object是所有类的父类
//比较类型是否一致
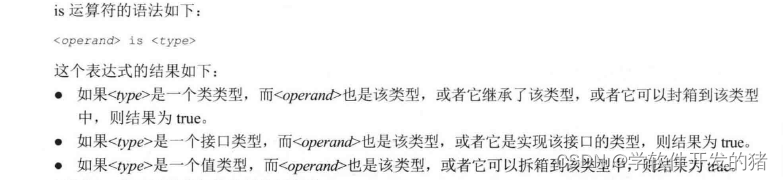
}另一种比较方法:使用 is运算符,在解释is前先解释 一下封箱和拆箱
1.1 封箱和拆箱
封箱:将一个值类型的对象转换为object类型(引用类型) 或是将值类转换为值类型所实现的接口类型
拆箱:则是相反。
这里就不做代码示例了。
1.2 is 运算符
检查对象是不是给定类型或者是可以转换为给定类型 如果是则返回True
   if (ints is int)
   {

   }
1.2.1 使用 is运算符进行模式匹配
   object[] data = { 1.1415926, null, new ArrayList(), "None" };
            foreach (var item in data)
            {
                if (item is 1.1415926) System.Console.WriteLine(item);
                else if (item is null) System.Console.WriteLine(item);
                else if (item is ArrayList) System.Console.WriteLine(item);
                else if (item is string s) System.Console.WriteLine(item);
            }
我们通过这个循环可以区分各种不同的数据类型。
2、值比较
1、运算符重载
说起这个我们先来看一段代码。
//值比较
int s = 10;
int s2 = 15;
//比较两个值我们可以
if (s > s2)
{

}
//加两个值我们可以
s += s2;
但下述代码就无法通过编译,错误原因 “运算符“>”无法应用于“Student”和“Student”类型的操作数"
//但下述代码就不行
Student student = new Student("龙傲天且无敌");
Student student2 = new Student("肖天地");
//我们想比较一下名字的长度 我们这样是不行的
if (student > student2)
{

}
我们添加一个自定义的运算符重载,来实现他的功能。关键字 operator
class Student
    {
        private Student() : this("默认数据")
        {

        }
        public Student(string name)
        {
            this.name = name;
        }
        public static Boolean operator >(Student student, Student student1)
        {
            if (student.name.Length > student1.name.Length)
            {
                return true;
            }
            else return false;
        }
        public static Boolean operator <(Student student, Student student1)
        {
            if (student.name.Length< student1.name.Length)
            {
                return true;
            }
            else return false;
        }
        public string name { get; set; }
    }
注意:
- 有些运算符的重载是需要成对出现的 如上面重载的>和<就是需要成对出现。
- 运算符的重载参数顺序不能传错
- 不要将签名相同的运算符添加到多个类中
- 我们可以在运算符中调用其他运算符如下代码
class Student
{
    private Student() : this("默认数据")
    {

    }
    public Student(string name)
    {
        this.name = name;
    }
    public static Boolean operator >(Student student, Student student1) => student.name.Length > student1.name.Length;
    public static Boolean operator <(Student student, Student student1)
    {
        if (student.name.Length < student1.name.Length)
        {
            return true;
        }
        else return false;
    }

    public static bool operator >=(Student student, Student student1) => student > student1;
    public static bool operator <=(Student student, Student student1) => student < student1;

    public string name { get; set; }
}
注意:
在我们重写==和!=时,我们通常需要重写Object.Equal和Object.GetHashCode因为这两个函数也是可以比较对象,重写这些方法,可以确保无论类的用户使用什么技术,都可以得到相同的结果。确保其完整性。
下面是可以重载的运算符
- 一元运算符:+, -, !,~, ++, -- ,true, false
- 二元运算符:+, -, *, /, %, &, |, ^, <<, >>
- 比较运算符:==, !=, <, >, <= ,>=
2、IComparable接口和IComparer接口
IComparable在要比较的类中实现,可以比较该对象和另一个对象。
IComparer在单独的一个类中实现,可以比较任意两个对象。
IComparable的示例
class Program : IComparable<AddClass1>
{
    static void Main(string[] args)
    {

    }

    public int Age { get; set; } = 20;

    /// <summary>
    ///
    /// </summary>
    /// <param name="other"></param>
    /// <returns>值 含义 小于零 此实例在排序顺序中位于other之前,零 此实例在排序中出现在与other相同位置,大于零 此实例在排序顺序中位于 other 之后</returns>
    public int CompareTo(AddClass1 other) => other.Age - Age;
}
public class AddClass1
{
    public int Age { get; set; } = 10;
}
IComparer 示例:
  internal class Program
    {
        static void Main(string[] args)
        {
            Student student = new Student(20, "zhang");
            Student student2 = new Student(15, "chang");

            if (student.Compare(student, student2) > 0)
            {
                Console.WriteLine(student.Name + "年纪大点");
            }
            else
            {
                Console.WriteLine(student.Name + "年纪小点");
            }

            //方法二我们可以直接调用 Comparer 提供的默认实现方法 我们这比较的是 Age
            if (Comparer.Default.Compare(student.Age, student2.Age) > 0)
            {
                Console.WriteLine(student.Name + "年纪大点");
            }
            else
            {
                Console.WriteLine(student.Name + "年纪小点");
            }
            Console.ReadKey();
        }

    }
    class Student : IComparer
    {
        public Student(int age, string name)
        {
            this.Age = age;
            Name = name;
        }
        public int Age { get; set; }

        public string Name { get; set; }

        public int Compare(object x, object y)
        {
            if (x is Student && y is Student)
            {
                return ((Student)x).Age - ((Student)y).Age;
            }
            else
            {
                throw new Exception("异常");
            }

        }


    }
实战示例 :自定义集合排序
using System;
using System.Collections;

class Program
{
    static void Main(string[] args)
    {
        ArrayList array = new ArrayList()
        {
           new Student(30,"张"),
           new Student(25,"暗流"),
           new Student(27,"霸屏"),
           new Student(44,"参数")
        };

        Console.WriteLine("默认排序");
        foreach (Student item in array)
        {
            Console.WriteLine($"{item.Age}({item.Name})");
        }
        //自定义排序
        Console.WriteLine("自定义排序");

        array.Sort();
        foreach (Student item in array)
        {
            Console.WriteLine($"{item.Age}({item.Name})");

        }
        //使用Comparer传递参数自定义排序
        array.Sort(PersonComparerName.Default); //传递了一个了实现了IComparer接口的实例类
        Console.WriteLine("传递了一个了实现了IComparer接口的实例排序");
        foreach (Student item in array)
        {
            Console.WriteLine($"{item.Age}({item.Name})");
        }
        Console.ReadKey();
    }
}
class Student : IComparable
{
    public Student(int age, string name)
    {
        this.Age = age;
        Name = name;
    }
    public int Age { get; set; }

    public string Name { get; set; }

    public int CompareTo(object obj)
    {
        if (obj is Student)
        {
            return this.Age-(obj as Student).Age  ;
        }
        else
        {
            throw new Exception("");
        }
    }
}

class PersonComparerName : IComparer
{
    public static IComparer Default = new PersonComparerName();
    public int Compare(object x, object y)
    {
        if (true)
        {
           return  Comparer.Default.Compare(  ((Student)y).Name,((Student)x).Name);
        }
        else
        {
            throw new Exception("");
        }
    }
}
示例解释:
在这个示例中,包含 Student对象的AmayList 用两种不同的方式排序。调用不带参数的 ArayList.Sort0方法,将使用默认的比较方式,也就是使用Student类中的CompareTo0方法(因为这个类实现了IComparable):
接着,使用实现了IComparer 的 PersonComparerName 类,执行非默认的比较排序。这个类有一个公共的静态字段,以方便使用 它可以用PersonComparerName.Default 获取一个实例,就像前面的Comparer 类一样。然后触发排序方法Compare()
三、转换
1、重载转换运算符
除了上面我们提到的重载运算符,我们还可以重载转换运算符,定义类型之间的隐式转换和显示转换。在类型之间没有继承关系,也没有共享接口的情况下,必须这么做。
重载隐式转换:
我们创建Student1类和Student2类,在当中分别添加一个int字段和Double字段。
 class Student1
 {
     public int Val { get; set; }
 }
 class Student2
 {
     public double Val { get; set; }
 }
在程序主入口中写下代码
 static void Main(string[] args)
 {
     Student1 student1 = new Student1();
     student1.Val = 10;
     Student2 student2 = student1;
     ReadKey();

 }
在上述代码中如果你不添加一个隐式转换那么将无法成功编译。下面是添加一段隐式转换的代码
 class Student1
 {
     public int Val { get; set; }
    public static implicit operator Student2(Student1 student1)=>new Student2 { Val = student1.Val };
 }
关键字 implicit 代表隐式转换,explicit 代表显示转换。
重载显示转换:
using static System.Console;
namespace 控制台
{
    public class Program
    {
        static void Main(string[] args)
        {
            Student2 student21= new Student2 ();
            student21.Val = 3e15;
            Student1 student11 =  (Student1)student21;
            ReadKey();
        }
    }
    class Student1
    {
        public int Val { get; set; }
       public static implicit operator Student2(Student1 student1)=>new Student2 { Val = student1.Val };
    }
    class Student2
    {
        public double Val { get; set; }
        public static explicit operator Student1(Student2 student2) => new Student1 { Val = checked((int)student2.Val) };

    }
}
注意:
这里的显示转换是在double转向int类型,所以在转换中需要显示转换。其中的checked是在转换过程中的值溢出检查 ,如果您没用添加checked那么,不会抛出异常,但如果加上则会抛出:值溢出的异常,因为我们的val值太大了,已经超出了int范围。
2、as运算符
as运算符,把一种类型转换为指定的引用类型。
using static System.Console;
namespace 控制台
{
    public class Program
    {


        static void Main()
        {
            classA classa = new classA();
            classB classb = new classB();
            object s = classa as classB;
            WriteLine(s);
            ReadKey();
            //有三种情况
            //1 classa可以隐式转换为ClassA
            //2 classa 的类型是 ClassA
            //3 classa可以封装到 ClassA类型中
        }
    }
    interface MyIInterface
    {

    }
    class classA : MyIInterface
    {

    }
    class classB : classA
    {

    }
}
上面代码中介绍了as使用的几种情况,如果都不满足则表达式的结果就是null。
其中 s的值是null 因为它三个条件都不满足。注意:ClassA转换为子类是需要显示转换的
static void Main()
{
classA classa = new classA();
classB classb = new classB();
classa = classb;
classB s = classa as classB;
WriteLine(s);
ReadKey();
}
这里的s不为Null,因为classa包含和classB相同对象的引用。也就满足了同类型这一条。表达式的结果则就不是Null了。
提示:
使用as运算符性能出奇的低,大部分情况下是没有什么问题但是依旧比先使用is运算符判断条件然后再进行强制类型转换性能低。


 232
232


 被折叠的 条评论
为什么被折叠?
被折叠的 条评论
为什么被折叠?
 到【灌水乐园】发言


