


UI学习(二)
文章目录
布局子视图
手动布局
这里我要实现的目的是当我们想让父视图变化的时候使子视图也随着进行相应的变化的时候,我们就可以采用这两种方法。
#import <UIKit/UIKit.h>
@interface ViewController ()

@end

@implementation ViewController

- (void)viewDidLoad {
    [super viewDidLoad];
    SuperView* sView = [[SuperView alloc] init];//创建一个子视图
    sView.frame = CGRectMake(20, 20, 100, 200);
    [sView creatSubView];
    sView.backgroundColor = [UIColor blueColor];
    [self.view addSubview:sView];
    UIButton* btn = [UIButton buttonWithType:UIButtonTypeRoundedRect];//设置一个按钮
    btn.frame = CGRectMake(240, 480, 80, 40);
    [btn setTitle:@"放大" forState:UIControlStateNormal];
    [btn addTarget:self action:@selector(pressLarge) forControlEvents:UIControlEventTouchUpInside];
    [self.view addSubview:btn];
    UIButton* btn1 = [UIButton buttonWithType:UIButtonTypeRoundedRect];
    btn1.frame = CGRectMake(240, 520, 80, 40);
    [btn1 setTitle:@"缩小" forState:UIControlStateNormal];
    [btn1 addTarget:self action:@selector(pressSmall) forControlEvents:UIControlEventTouchUpInside];
    [self.view addSubview:btn1];
    sView.tag = 101;
    // Do any additional setup after loading the view.
}
-(void) pressLarge {
    SuperView* sView = (SuperView*)[self.view viewWithTag:101];
    [UIView animateWithDuration: 1.0 animations:^{
        sView.frame = CGRectMake(20, 20, 300, 480);
    }];
}
-(void) pressSmall {
    SuperView* sView = (SuperView*)[self.view viewWithTag:101];//通过tag获取到图片的值
    [UIView animateWithDuration: 1.0 animations:^{
        sView.frame = CGRectMake(20, 20, 180, 280);
    }];//现在使用一个新的方法,我们的animation执行写在里面的代码块。
}

@end

NS_ASSUME_NONNULL_BEGIN

@interface SuperView : UIView {
    UIView* _view1;
    UIView* _view2;
    UIView* _view3;
    UIView* _view4;
    UIView* _view5;
}
-(void) creatSubView;
@end

NS_ASSUME_NONNULL_END
@implementation SuperView
-(void) creatSubView {
  	//设置四个视图
    _view1 = [[UIView alloc] initWithFrame:CGRectMake(0, 0, 40, 40)];
    _view2 = [[UIView alloc] initWithFrame:CGRectMake(self.bounds.size.width - 40, 0, 40, 40)];
    _view3 = [[UIView alloc] initWithFrame:CGRectMake(self.bounds.size.width - 40, self.bounds.size.height - 40, 40, 40)];
    _view4 = [[UIView alloc] initWithFrame:CGRectMake(0, self.bounds.size.height - 40, 40, 40)];

    _view1.backgroundColor = [UIColor orangeColor];
    _view2.backgroundColor = [UIColor orangeColor];
    _view3.backgroundColor = [UIColor orangeColor];
    _view4.backgroundColor = [UIColor orangeColor];


    [self addSubview:_view1];
    [self addSubview:_view2];
    [self addSubview:_view3];
    [self addSubview:_view4];
}
//layoutSubviews是UIView类的一个方法,用于对子视图进行布局和调整。当视图的布局需要更新时,系统会自动调用layoutSubviews方法。
//当视图的frame属性发生变化时,例如视图的大小或位置发生改变。
//当视图的bounds属性发生变化时,例如视图的内容区域发生改变。
//当视图的transform属性发生变化时,例如视图进行缩放、旋转等变换操作。
-(void)layoutSubviews {
    [UIView animateWithDuration: 1.0 animations:^{
        self->_view1.frame = CGRectMake(0, 0, 40, 40);
        self->_view2.frame = CGRectMake(self.bounds.size.width - 40, 0, 40, 40);
        self->_view3.frame = CGRectMake(self.bounds.size.width - 40, self.bounds.size.height - 40, 40, 40);
        self->_view4.frame = CGRectMake(0, self.bounds.size.height - 40, 40, 40);
    }];
}
/*
// Only override drawRect: if you perform custom drawing.
// An empty implementation adversely affects performance during animation.
- (void)drawRect:(CGRect)rect {
    // Drawing code
}
*/

@end
实现的一个效果:

自动布局
我们也可以直接使用OC语言中提供的方法直接实现一个改变父视图的同时改变子视图。
#import "ViewController.h"

@interface ViewController ()

@end

@implementation ViewController

- (void)viewDidLoad {
    [super viewDidLoad];
    _superView = [[UIView alloc] initWithFrame:CGRectMake(20, 29, 180, 280)];
    _superView.backgroundColor = [UIColor blueColor];
    _label1 = [[UILabel alloc] initWithFrame:CGRectMake(0, 0, 40, 40)];
    _label1.text = @"1";
    _label1.backgroundColor = [UIColor orangeColor];

    _label2 = [[UILabel alloc] initWithFrame:CGRectMake(180 - 40, 0, 40, 40)];
    _label2.text = @"2";
    _label2.backgroundColor = [UIColor orangeColor];

    _label3 = [[UILabel alloc] initWithFrame:CGRectMake(180 - 40, 280 - 40, 40, 40)];
    _label3.text = @"3";
    _label3.backgroundColor = [UIColor orangeColor];

    _label4 = [[UILabel alloc] initWithFrame:CGRectMake(0, 280 - 40, 40, 40)];
    _label4.text = @"4";
    _label4.backgroundColor = [UIColor orangeColor];
    // Do any additional setup after loading the view.
    [_superView addSubview:_label1];
    [_superView addSubview:_label2];
    [_superView addSubview:_label3];
    [_superView addSubview:_label4];
    [self.view addSubview: _superView];
    _viewCenter = [[UIView alloc] initWithFrame:CGRectMake(0, 0, _superView.bounds.size.width, 40)];
    _viewCenter.center = CGPointMake(180 / 2, 280 / 2);
    _viewCenter.backgroundColor = [UIColor orangeColor];
    [_superView addSubview: _viewCenter];

    //设置自动布局的属性
    _viewCenter.autoresizingMask = UIViewAutoresizingFlexibleWidth | UIViewAutoresizingFlexibleTopMargin | UIViewAutoresizingFlexibleBottomMargin;//自动调整到Width,自动调整对于顶部的距离,自动调整对于底部的距离
    _label2.autoresizingMask = UIViewAutoresizingFlexibleLeftMargin;
    _label3.autoresizingMask = UIViewAutoresizingFlexibleTopMargin | UIViewAutoresizingFlexibleLeftMargin;
    _label4.autoresizingMask = UIViewAutoresizingFlexibleTopMargin;
}
-(void)touchesBegan:(NSSet<UITouch *> *)touches withEvent:(UIEvent *)event {
    static BOOL isLarge = NO;//设置一个变量来控制这一次是变大还是变小
    [UIView animateWithDuration: 1.0 animations:^ {
        if (isLarge == NO) {
            self->_superView.frame = CGRectMake(10, 10, 350, 580);
            isLarge = YES;
        } else {
            self->_superView.frame = CGRectMake(20, 20, 180, 280);
            isLarge = NO;
        }
    }];
}

@end
实现的效果:

导航控制器
导航控制器(UINavigationController)是一种非常常用的容器视图控制器。它负责管理一个视图控制器的层次结构,提供导航栏、返回按钮等功能,让用户能够方便地在应用程序的各个页面之间进行导航,这里主要讲解一下有关导航控制器的使用。
导航控制器基础
#import "SceneDelegate.h"

@interface SceneDelegate ()

@end

@implementation SceneDelegate


- (void)scene:(UIScene *)scene willConnectToSession:(UISceneSession *)session options:(UISceneConnectionOptions *)connectionOptions {
    self.window.frame = [UIScreen mainScreen].bounds;
    VCRoot* vc = [[VCRoot alloc] init];
    //创建导航控制器,用于管理多个视图控制器的切换
    //采用层级的方式来管理多个视图的一个切换
    //创建的时候一定要有一个根视图控制器
    UINavigationController* nav = [[UINavigationController alloc] initWithRootViewController:vc];//设置一个根视图
    self.window.rootViewController = nav;
    [self.window makeKeyAndVisible];
    // Use this method to optionally configure and attach the UIWindow `window` to the provided UIWindowScene `scene`.
    // If using a storyboard, the `window` property will automatically be initialized and attached to the scene.
    // This delegate does not imply the connecting scene or session are new (see `application:configurationForConnectingSceneSession` instead).
}


- (void)sceneDidDisconnect:(UIScene *)scene {
    // Called as the scene is being released by the system.
    // This occurs shortly after the scene enters the background, or when its session is discarded.
    // Release any resources associated with this scene that can be re-created the next time the scene connects.
    // The scene may re-connect later, as its session was not necessarily discarded (see `application:didDiscardSceneSessions` instead).
}


- (void)sceneDidBecomeActive:(UIScene *)scene {
    // Called when the scene has moved from an inactive state to an active state.
    // Use this method to restart any tasks that were paused (or not yet started) when the scene was inactive.
}


- (void)sceneWillResignActive:(UIScene *)scene {
    // Called when the scene will move from an active state to an inactive state.
    // This may occur due to temporary interruptions (ex. an incoming phone call).
}


- (void)sceneWillEnterForeground:(UIScene *)scene {
    // Called as the scene transitions from the background to the foreground.
    // Use this method to undo the changes made on entering the background.
}


- (void)sceneDidEnterBackground:(UIScene *)scene {
    // Called as the scene transitions from the foreground to the background.
    // Use this method to save data, release shared resources, and store enough scene-specific state information
    // to restore the scene back to its current state.
}


@end
这里有关根视图部分的代码
#import "VCRoot.h"
@interface VCRoot ()
@end
@implementation VCRoot
- (void)viewDidLoad {
[super viewDidLoad];
self.view.backgroundColor = [UIColor yellowColor];
self.title = @"根视图";
//设置为一个标题内容,如果没设置下面的就显示上面的,否则显示下面的,
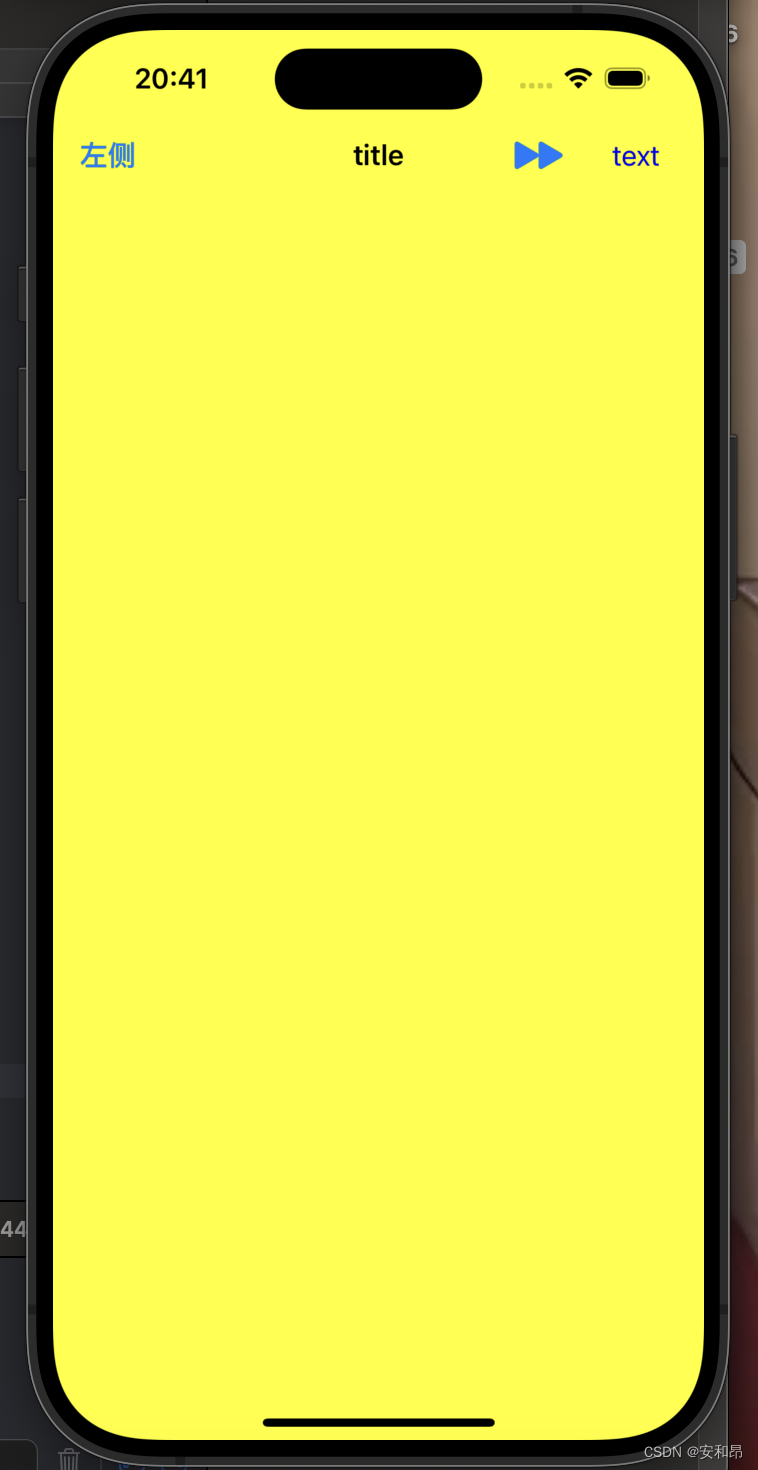
self.navigationItem.title = @"title";
//p1按钮上的文字
//p2按钮风格
//p3事件持有者
//p4按钮事件
UIBarButtonItem* leftBtn = [[UIBarButtonItem alloc] initWithTitle:@"左侧" style:UIBarButtonItemStyleDone target:self action:@selector(pressleft)];
//将导航元素项左侧按钮赋值
self.navigationItem.leftBarButtonItem = leftBtn;
//根据系统风格来创建按钮,系统风格的按钮内容或标题文字不能改变
UIBarButtonItem *rightBtn = [[UIBarButtonItem alloc] initWithBarButtonSystemItem: UIBarButtonSystemItemFastForward target: self action: @selector(pressRight)];
self.navigationItem.rightBarButtonItem = rightBtn;
UILabel* label = [[UILabel alloc] initWithFrame:CGRectMake(10, 10, 50, 40)];
label.text = @"text";
label.textAlignment = NSTextAlignmentCenter;
label.textColor = [UIColor blueColor];
//将任何类型的控件添加到导航按钮的方法
UIBarButtonItem * item3 = [[UIBarButtonItem alloc] initWithCustomView:label];
//创建一个按钮数组
NSArray* arryBtn = [NSArray arrayWithObjects:item3, rightBtn, nil];
//元素顺序决定如何呈现的
//将右侧按钮数组赋值
self.navigationItem.rightBarButtonItems = arryBtn;
// Do any additional setup after loading the view.
}
/*
#pragma mark - Navigation
// In a storyboard-based application, you will often want to do a little preparation before navigation
- (void)prepareForSegue:(UIStoryboardSegue *)segue sender:(id)sender {
// Get the new view controller using [segue destinationViewController].
// Pass the selected object to the new view controller.
}
*/
- (void) pressleft {
NSLog(@"left");
}
- (void) pressRight {
NSLog(@"right");
}
@end
实现的效果:
导航控制器的切换
这里就涉及到我们从一个界面推出到另一个界面的问题,这里有一个视图控制器堆栈的事情,我们需要了解一下这个视图控制器堆栈。
- 导航控制器维护一个视图控制器的栈结构,用于管理应用程序的导航层次。
- 用户在应用程序中导航时,新的视图控制器会被压入栈中,返回时则从栈中弹出。
我们主要通过两种方法来操控这部分内容:
- pushViewController:animated: 将一个视图控制器压入栈顶
- popViewController:animated: 将一个栈顶的视图控制器退出出这个栈中
#import "VCRoot.h"
#import "VCSecond.h"
@interface VCRoot ()

@end

@implementation VCRoot

- (void)viewDidLoad {
    [super viewDidLoad];
    //设置透明度,yes透明,no不透明
    self.navigationController.navigationBar.translucent = YES;
    self.title = @"title";
    self.navigationItem.title = @"根视图";
    self.view.backgroundColor = [UIColor blueColor];
    //设置导航栏的风格默认为Default
    self.navigationController.navigationBar.barStyle = UIBarStyleDefault;
    UIBarButtonItem* next = [[UIBarButtonItem alloc] initWithTitle:@"下一级别" style:UIBarButtonItemStylePlain target:self action:@selector(pressRight)];
    self.navigationItem.rightBarButtonItem = next;

    // Do any additional setup after loading the view.
}
#import "VCThird.h"

@interface VCThird ()

@end

@implementation VCThird

- (void)viewDidLoad {
    [super viewDidLoad];
    self.view.backgroundColor = [UIColor redColor];
    UIBarButtonItem* btnleft = [[UIBarButtonItem alloc] initWithTitle:@"返回" style:UIBarButtonItemStylePlain target:self action:@selector(press)];
    self.navigationItem.rightBarButtonItem = btnleft;

    // Do any additional setup after loading the view.
}
-(void) press {
    //弹回根视图
    [self.navigationController popToRootViewControllerAnimated:YES];
}

#import "VCSecond.h"
#import "VCThird.h"
@interface VCSecond ()

@end

@implementation VCSecond

- (void)viewDidLoad {
    [super viewDidLoad];
    self.view.backgroundColor = [UIColor greenColor];
    UIBarButtonItem* btnNext = [[UIBarButtonItem alloc] initWithTitle:@"next" style:UIBarButtonItemStylePlain target:self action:@selector(press)];
    self.navigationItem.rightBarButtonItem = btnNext;

    // Do any additional setup after loading the view.
}
- (void)press {
    VCThird* vc = [[VCThird alloc] init];
    [self.navigationController pushViewController:vc animated:YES];
}
这部分代码我们只是简单的设置了一下从一个视图控制器中推出另一个视图控制器:
实现的效果为:

导航栏
在新的iOS中我们对于导航栏要使用UINavigationBarAppearance* apperance来设置我们的一个导航栏的样式
- (void)viewDidLoad {
    [super viewDidLoad];
    self.view.backgroundColor = [UIColor yellowColor];
    //在iOS13之后我们需要通过下面的方式来设置空间外观样式
    UINavigationBarAppearance* apperance = [[UINavigationBarAppearance alloc] init];//设置该对象的背景风格
    apperance.backgroundColor = [UIColor whiteColor];//背景颜色
    apperance.shadowImage = [[UIImage alloc] init];//阴影图像
    apperance.shadowColor = nil;//阴影颜色
    self.title = @"title";
    //设置按钮的颜色
    self.navigationController.navigationBar.tintColor = [UIColor purpleColor];
    //设置普通样式的导航栏
    self.navigationController.navigationBar.standardAppearance = apperance;
    //设置滚动样式的导航栏
    self.navigationController.navigationBar.scrollEdgeAppearance = apperance;
    //隐藏导航栏的两个方法
    //1、下面这一条的hidden是继承于UIView的
    self.navigationController.navigationBar.hidden = NO;
    //2、下面这一条的navigationBarHidden是一个属性
    self.navigationController.navigationBarHidden = NO;

    // Do any additional setup after loading the view.
}
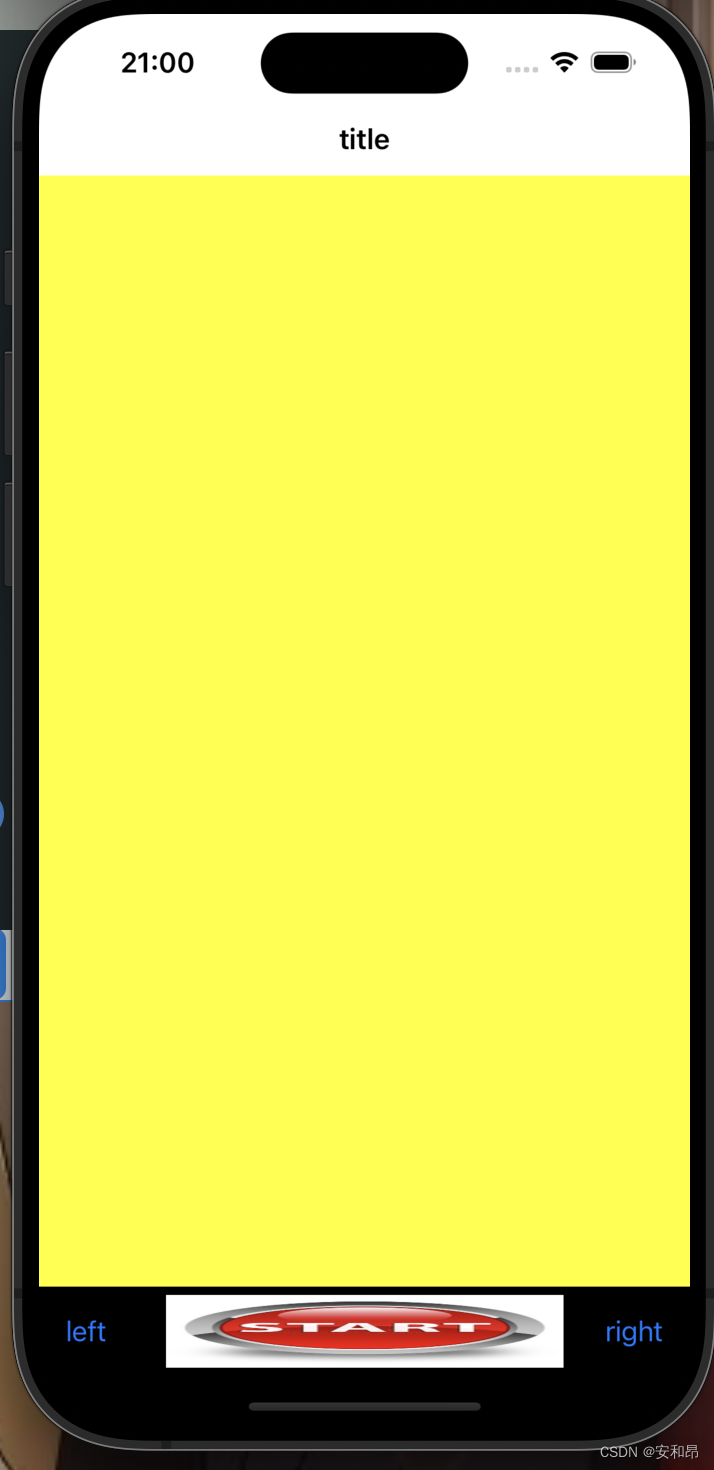
工具栏
/显示工具栏对象
    //隐藏工具栏,默认为YES:即隐藏;NO:不隐藏
    self.navigationController.toolbarHidden = NO;
    //设置工具栏是否透明,默认为YES:半透明
    self.navigationController.toolbar.translucent = NO;


    UIBarButtonItem *btn1 = [[UIBarButtonItem alloc] initWithTitle: @"left" style: UIBarButtonItemStylePlain target: nil action: nil];
    UIBarButtonItem *btn2 = [[UIBarButtonItem alloc] initWithTitle: @"right" style: UIBarButtonItemStylePlain target: self action: @selector(press)];

        //设置一个自定义类型的button,使用图片创建
    UIButton *btnC = [UIButton buttonWithType: UIButtonTypeCustom];
    [btnC setImage: [UIImage imageNamed: @"1.jpg"] forState: UIControlStateNormal];
    btnC.frame = CGRectMake(0, 0, 60, 60);

    UIBarButtonItem *btn3 = [[UIBarButtonItem alloc] initWithCustomView: btnC];

    //设置一个占位按钮,放到数组中可以用来分隔开各按钮
    //设置宽度固定的占位按钮,注:此处方法名为UIBarButtonSystemItemFixedSpace(FixedSpace!!!!!)
    UIBarButtonItem *btnF1 = [[UIBarButtonItem alloc] initWithBarButtonSystemItem: UIBarButtonSystemItemFixedSpace target: nil action: nil];
    btnF1.width = 110;
    UIBarButtonItem *btnF2 = [[UIBarButtonItem alloc] initWithBarButtonSystemItem: UIBarButtonSystemItemFlexibleSpace target: nil action: nil];

    NSArray *arrayBtn = [NSArray arrayWithObjects: btn1, btnF2, btn3, btnF2, btn2, nil];

    self.toolbarItems = arrayBtn;
实现的效果为:
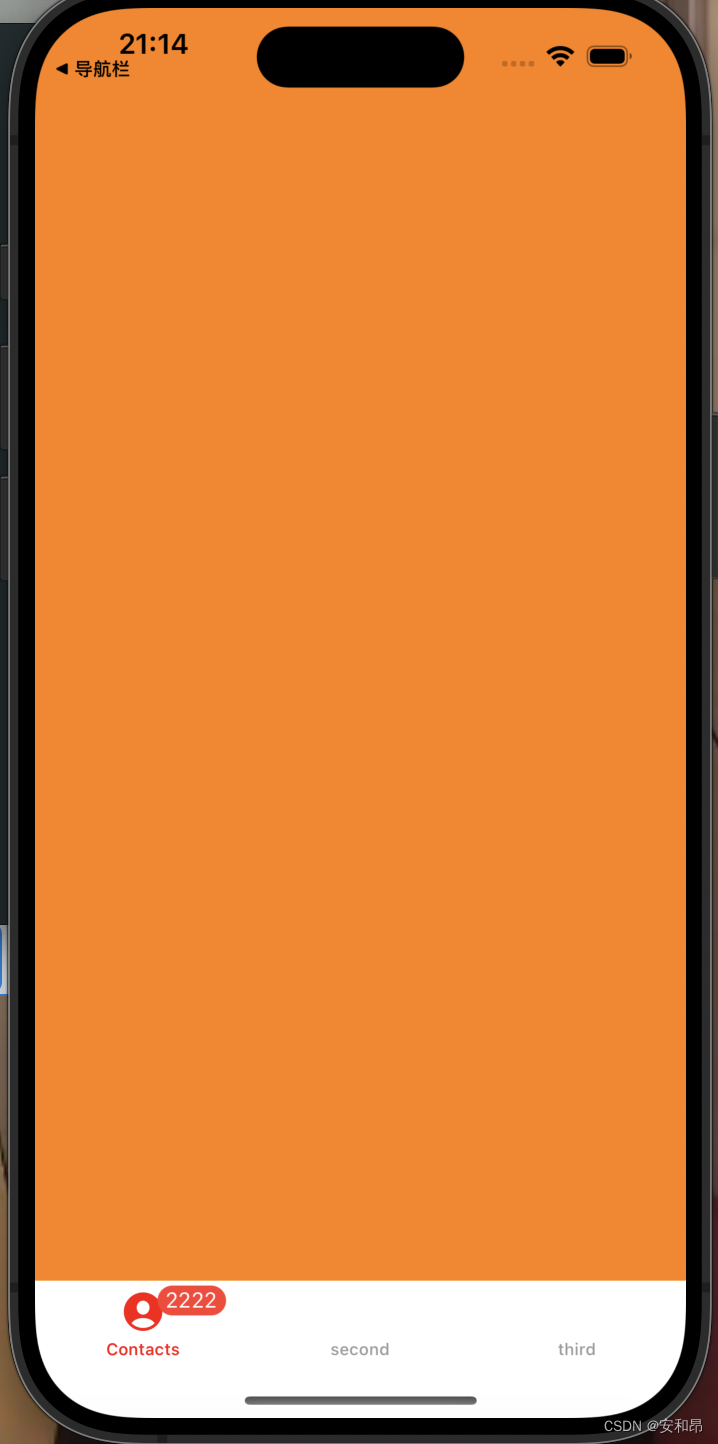
分栏控制器
分栏控制器(UITabBarController)是另一种常用的容器视图控制器,分栏控制器可以包含多个子视图控制器,并通过底部的分栏菜单(UITabBar)进行切换。
- (void)scene:(UIScene *)scene willConnectToSession:(UISceneSession *)session options:(UISceneConnectionOptions *)connectionOptions {
    self.window.frame = [UIScreen mainScreen].bounds;

    [self.window makeKeyAndVisible];
    VCFirst* vc1 = [[VCFirst alloc] init];
    VC_Second* vc2 = [[VC_Second alloc] init];
    VCThrid* vc3 = [[VCThrid alloc] init];
    vc1.view.backgroundColor = [UIColor orangeColor];
    vc2.view.backgroundColor = [UIColor blueColor];
    vc3.view.backgroundColor = [UIColor greenColor];
    vc1.title = @"first";
    vc2.title = @"second";
    vc3.title = @"third";
    UITabBarController* tbContoller = [[UITabBarController alloc] init];
    NSArray* arrayVC = @[vc1, vc2, vc3];//决定下面按钮的一个顺序
    tbContoller.viewControllers = arrayVC;

    tbContoller.tabBar.translucent = NO;//设置工具栏的透明度
    tbContoller.tabBar.backgroundColor = [UIColor whiteColor];//设置背景颜色
    tbContoller.tabBar.tintColor = [UIColor redColor];//设置一下按钮的

    self.window.rootViewController = tbContoller;
    tbContoller.selectedIndex = 2;//设置初始化时候显示的一个视图控制器
    NSLog(@"%d", tbContoller.selectedViewController == vc3);
    //将分栏控制器作为跟视图
    // Use this method to optionally configure and attach the UIWindow `window` to the provided UIWindowScene `scene`.
    // If using a storyboard, the `window` property will automatically be initialized and attached to the scene.
    // This delegate does not imply the connecting scene or session are new (see `application:configurationForConnectingSceneSession` instead).
}
实现的效果为:
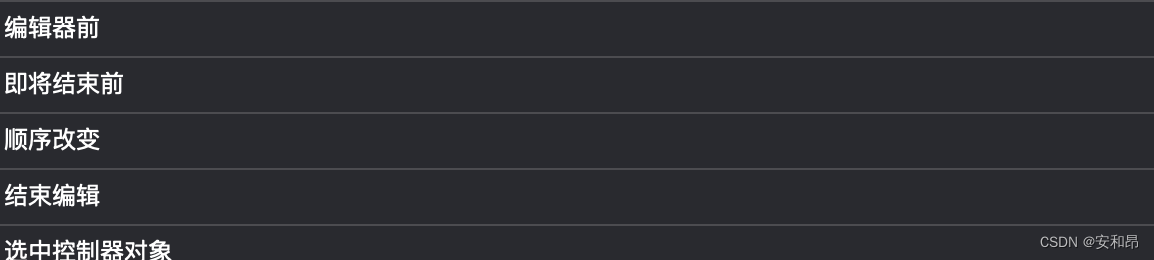
分栏控制器协议部分的内容
这部分内容主要是有关**< UITabBarControllerDelegate>**这个协议实现的相关函数,主要是因为当我们的视图多于5个时候他增加一个按钮也就是more按钮,这个按钮然后有编辑呈现在页面上的五个视图的顺序。
- (void)tabBarController:(UITabBarController *)tabBarController willBeginCustomizingViewControllers:(NSArray<__kindof UIViewController *> *)viewControllers 在编辑前
- (void)tabBarController:(UITabBarController *)tabBarController willEndCustomizingViewControllers:(NSArray<__kindof UIViewController *> *)viewControllers changed:(BOOL)changed //编辑即将结束
- -(void)tabBarController:(UITabBarController *)tabBarController didEndCustomizingViewControllers:(NSArray<__kindof UIViewController *> *)viewControllers changed:(BOOL)changed //编辑结束
- -(void) tabBarController:(UITabBarController *)tabBarController didSelectViewController:(UIViewController *)viewController //选中了那个视图控制器
这四个是协议里的相关函数
- (void)scene:(UIScene *)scene willConnectToSession:(UISceneSession *)session options:(UISceneConnectionOptions *)connectionOptions {
    self.window.frame = [UIScreen mainScreen].bounds;
    [self.window makeKeyAndVisible];
    VCFirst *vcFirst = [[VCFirst alloc] init];
    VCSecond *vcSecond = [[VCSecond alloc] init];
    VCThird *vcThird = [[VCThird alloc] init];
    VCFourth *vcFourth = [[VCFourth alloc] init];
    VCFifth *vcFifth = [[VCFifth alloc] init];
    VCSixth *vcSixth = [[VCSixth alloc] init];

    // 设置视图控制器的背景颜色
    vcFirst.view.backgroundColor = [UIColor redColor];
    vcSecond.view.backgroundColor = [UIColor orangeColor];
    vcThird.view.backgroundColor = [UIColor yellowColor];
    vcFourth.view.backgroundColor = [UIColor greenColor];
    vcFifth.view.backgroundColor = [UIColor blueColor];
    vcSixth.view.backgroundColor = [UIColor purpleColor];

    vcFirst.title = @"第一页";
    vcSecond.title = @"第二页";
    vcThird.title = @"第三页";
    vcFourth.title = @"第四页";
    vcFifth.title = @"第五页";
    vcSixth.title = @"第六页";
    NSArray* ary = @[vcFirst, vcSecond, vcThird, vcFourth, vcFifth, vcSixth];
    UITabBarController* tabContoller = [[UITabBarController alloc] init];
    tabContoller.viewControllers = ary;
    tabContoller.tabBar.translucent = NO;
    tabContoller.tabBar.backgroundColor = [UIColor whiteColor];
    tabContoller.tabBar.tintColor = [UIColor redColor];
    self.window.rootViewController = tabContoller;
    //设置代理!
    tabContoller.delegate = self;
    // Use this method to optionally configure and attach the UIWindow `window` to the provided UIWindowScene `scene`.
    // If using a storyboard, the `window` property will automatically be initialized and attached to the scene.
    // This delegate does not imply the connecting scene or session are new (see `application:configurationForConnectingSceneSession` instead).
}
- (void)tabBarController:(UITabBarController *)tabBarController willBeginCustomizingViewControllers:(NSArray<__kindof UIViewController *> *)viewControllers {
    NSLog(@"编辑器前");
}
- (void)tabBarController:(UITabBarController *)tabBarController willEndCustomizingViewControllers:(NSArray<__kindof UIViewController *> *)viewControllers changed:(BOOL)changed {
    NSLog(@"即将结束前");
}
-(void)tabBarController:(UITabBarController *)tabBarController didEndCustomizingViewControllers:(NSArray<__kindof UIViewController *> *)viewControllers changed:(BOOL)changed {
    if (changed == YES) {
        NSLog(@"顺序改变");
    }
    NSLog(@"结束编辑");
}
-(void) tabBarController:(UITabBarController *)tabBarController didSelectViewController:(UIViewController *)viewController {
    NSLog(@"选中控制器对象");
}
实现的一个效果:

控制台打印结果:
UITableView
基础部分
这个UI组件是非常重要的一个组件,在实际开发中有非常重要的作用,这里只做简单介绍,后面笔者会单独总结一下这部分的内容
在创建UITableView这个组件的时候,他的步骤比较多。这里来介绍一下他的相关步骤:
-
首先要继承两个协议<UITableViewDelegate, UITableViewDataSource>
-
设置两个代理`_tableView.delegate = self; _tableView.dataSource = self;
-
实现协议中必须实现的三个协议函数:1、-(NSInteger) tableView:(UITableView *)tableView numberOfRowsInSection:(NSInteger)section(获取每组元素的个数);2、numberOfSectionsInTableView(设置数据视图的组数);3、tableView: cellForRowAtIndexPath:(创建单元格对象函数)
#import "ViewController.h"
@interface ViewController ()
@end
@implementation ViewController
- (void)viewDidLoad {
[super viewDidLoad];
_tableView = [[UITableView alloc] initWithFrame:self.view.bounds style: UITableViewStyleGrouped];
//设置两个代理
_tableView.delegate = self;
_tableView.dataSource = self;
[self.view addSubview:_tableView];
// Do any additional setup after loading the view.
}
//获取每组元素的个数
//必须要实现的协议函数
//程序在显示数据视图会调用次函数
//p1:数据视图对象本身
//p2:那一组需要的行数
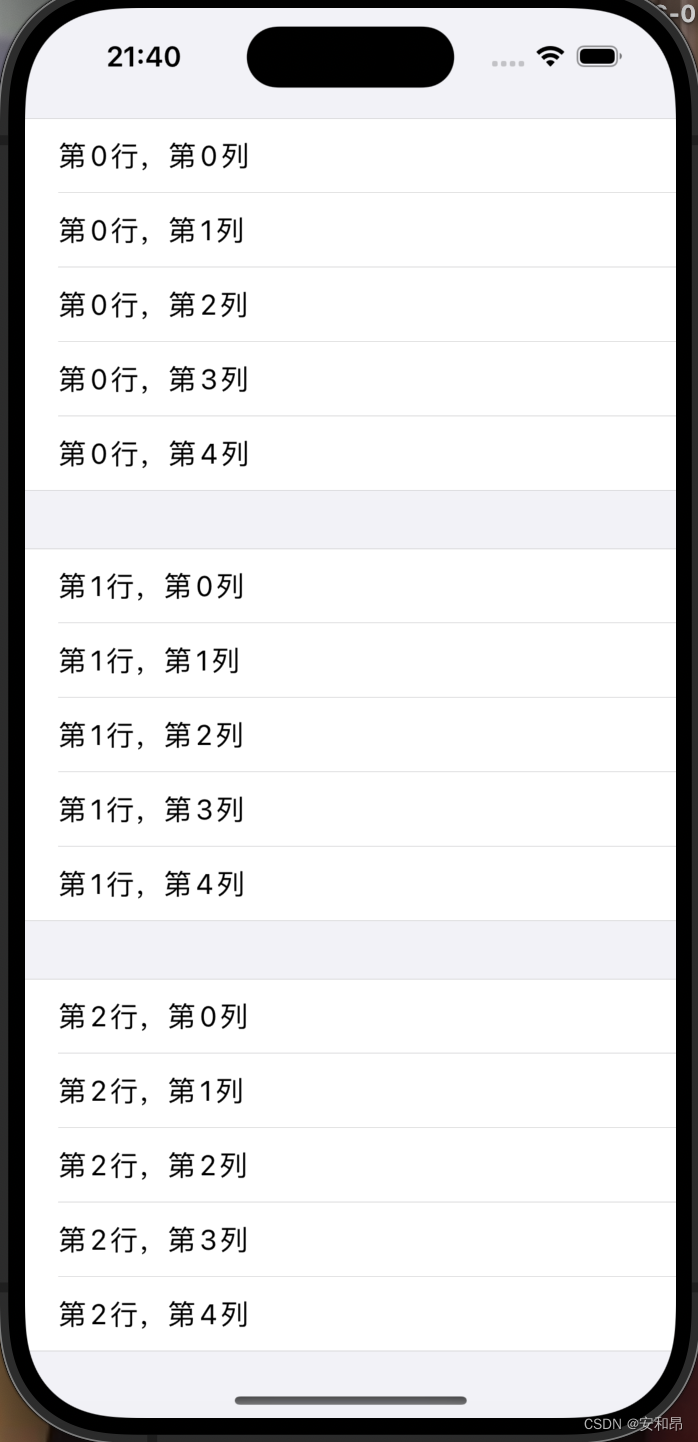
- (NSInteger)tableView:(UITableView *)tableView numberOfRowsInSection:(NSInteger)section {
return 5;
}
- (NSInteger)numberOfSectionsInTableView:(UITableView *)tableView {
return 3;
}
-(UITableViewCell*) tableView:(UITableView *)tableView cellForRowAtIndexPath:(NSIndexPath *)indexPath {
NSString* cellStr = @"cell";
UITableViewCell* cell = [tableView dequeueReusableCellWithIdentifier:cellStr];
if (cell == nil) {
//创建一个单元格
//参数一:单元格样式
//参数二:单元格的复用标记
cell = [[UITableViewCell alloc] initWithStyle:UITableViewCellStyleDefault reuseIdentifier:cellStr];
}
NSString* str = [NSString stringWithFormat:@"第%ld行,第%ld列", indexPath.section, indexPath.row];
//单于格的主文字部分
cell.textLabel.text = str;
return cell;
}
@end
实现效果:
相关的协议函数
这里我们可以通过相应的协议函数来修改单元格的样式来满足我们的
- -(CGFloat) tableView:(UITableView *)tableView heightForRowAtIndexPath:(NSIndexPath *)indexPath
- -(CGFloat)tableView:(UITableView *)tableView heightForFooterInSection:(NSInteger)section
- -(CGFloat) tableView:(UITableView *)tableView heightForHeaderInSection:(NSInteger)section
- -(NSString*) tableView:(UITableView *)tableView titleForHeaderInSection:(NSInteger)section
- -(NSString*) tableView:(UITableView *)tableView titleForFooterInSection:(NSInteger)section
实现效果:

高级协议与单元格
这部分重要的协议函数是:
- -(void) tableView:(UITableView *)tableView commitEditingStyle:(UITableViewCellEditingStyle)editingStyle forRowAtIndexPath:(NSIndexPath *)indexPath
- (void) tableView:(UITableView *)tableView didSelectRowAtIndexPath:(NSIndexPath *)indexPath 选中单元格
- (void) tableView:(UITableView *)tableView didDeselectRowAtIndexPath:(NSIndexPath *)indexPath 取消选中单元格
- tableView:(UITableView *)tableView commitEditingStyle:(UITableViewCellEditingStyle)editingStyle forRowAtIndexPath:(NSIndexPath *)indexPath 编辑单元格
- (void)viewDidLoad {
    [super viewDidLoad];
    [self creatBtn];
    _tableView = [[UITableView alloc] initWithFrame:self.view.bounds style:UITableViewStylePlain];
    _tableView.autoresizingMask = UIViewAutoresizingFlexibleHeight | UIViewAutoresizingFlexibleWidth;
    _tableView.delegate = self;
    _tableView.dataSource = self;
    _tableView.tableHeaderView = nil;
    _tableView.tableFooterView = nil;
    [self.view addSubview:_tableView];
    _arryData = [[NSMutableArray alloc] init];
    for (int i = 1; i < 20; i++) {
        NSString* str = [NSString stringWithFormat:@"A %d", i];
        [_arryData addObject:str];
    }
    //当数据的数据源发生变化时候
    //跟新数据视图,重新加载数据
    [_tableView reloadData];

}
-(NSInteger)tableView:(UITableView *)tableView numberOfRowsInSection:(NSInteger)section {
    return _arryData.count;
}
-(NSInteger)numberOfSectionsInTableView:(UITableView *)tableView {
    return  1;
}
-(UITableViewCell*) tableView:(UITableView *)tableView cellForRowAtIndexPath:(NSIndexPath *)indexPath {
    NSString* str = @"ID";
    UITableViewCell* cell = [tableView dequeueReusableCellWithIdentifier:str];//尝试获取可复用的单元格
    //有足够多的单元格
    if (cell == nil) {
        cell = [[UITableViewCell alloc] initWithStyle:UITableViewCellStyleSubtitle reuseIdentifier:str];
    }
    cell.textLabel.text = [_arryData objectAtIndex:indexPath.row];
    cell.detailTextLabel.text = @"子标题";
    NSString* str1 = [NSString stringWithFormat:@"1.jpg"];
    UIImage* image = [UIImage imageNamed:str1];
    cell.imageView.image = image;
    return cell;
}
-(CGFloat)tableView:(UITableView *)tableView heightForRowAtIndexPath:(NSIndexPath *)indexPath {
    return 60;
}
-(void) creatBtn {
    _isEdit = NO;
    _btnEdit = [[UIBarButtonItem alloc] initWithTitle:@"编辑" style:UIBarButtonItemStylePlain target:self action:@selector(press1)];
    _btnDelete = [[UIBarButtonItem alloc] initWithTitle:@"删除" style:UIBarButtonItemStylePlain target:self action:@selector(press2)];
    _btnFinish = [[UIBarButtonItem alloc] initWithTitle:@"完成" style:UIBarButtonItemStylePlain target:self action:@selector(press3)];
    self.navigationItem.rightBarButtonItem = _btnEdit;
}
-(void)press1 {
    _isEdit = YES;
    self.navigationItem.rightBarButtonItem = _btnFinish;
    [_tableView setEditing:YES];
    self.navigationItem.leftBarButtonItem = _btnDelete;
}
-(void)press2 {

}
//显示编辑状态,当手指在单元格上移动时候
-(void) tableView:(UITableView *)tableView commitEditingStyle:(UITableViewCellEditingStyle)editingStyle forRowAtIndexPath:(NSIndexPath *)indexPath {
    [_arryData removeObjectAtIndex:indexPath.row];
    [tableView reloadData];
    NSLog(@"delete");
}
-(void) tableView:(UITableView *)tableView didSelectRowAtIndexPath:(NSIndexPath *)indexPath {
    NSLog(@"选中单元格,%ld,%ld", indexPath.section,indexPath.row);
}
-(void) tableView:(UITableView *)tableView didDeselectRowAtIndexPath:(NSIndexPath *)indexPath {
    NSLog(@"取消选中,%ld,%ld", indexPath.section, indexPath.row);
}
//单元格显示效果协议
-(UITableViewCellEditingStyle)tableView:(UITableView *)tableView editingStyleForRowAtIndexPath:(NSIndexPath *)indexPath {
    return UITableViewCellEditingStyleDelete;//插入状态
    //默认为删除UITableViewCellEditingStyleDelete
    //默认为删除UITableViewCellEditingStyleNone
    //UITableViewCellEditingStyleDelete | UITableViewCellEditingStyleInsert;多选
}
-(void)press3 {
    _isEdit = YES;
    self.navigationItem.rightBarButtonItem = _btnEdit;
    [_tableView setEditing:NO];
    self.navigationItem.leftBarButtonItem = nil;
}
@end
实现的效果

多界面传值
这里主要是通过一个协议传值的方式去实现两个界面的传值
代码实现:
#import <UIKit/UIKit.h>
#import "ViewSecond.h"
NS_ASSUME_NONNULL_BEGIN

@interface ViewFirst : UIViewController<VCSecondDelegate>
-(void) changeColor:(UIColor*) color;
@end

NS_ASSUME_NONNULL_END
#import "ViewFirst.h"

@interface ViewFirst ()

@end

@implementation ViewFirst

- (void)viewDidLoad {
    [super viewDidLoad];
    self.title = @"根视图";
    self.view.backgroundColor = [UIColor orangeColor];
    self.navigationController.navigationBar.translucent = NO;
    UINavigationBarAppearance* app = [[UINavigationBarAppearance alloc] init];
    app.backgroundColor = [UIColor whiteColor];
    app.shadowImage = [[UIImage alloc] init];
    app.shadowColor = nil;
    self.navigationController.navigationBar.standardAppearance = app;
    self.navigationController.navigationBar.scrollEdgeAppearance = app;
    // Do any additional setup after loading the view.
}
- (void)touchesBegan:(NSSet<UITouch *> *)touches withEvent:(UIEvent *)event {
    ViewSecond* vc = [[ViewSecond alloc] init];
    //作为一个代理来传值
    vc.delegate = self;
    [self.navigationController pushViewController:vc animated:YES];
}
-(void)changeColor:(UIColor *)color {
    self.view.backgroundColor = color;
}
/*
#pragma mark - Navigation

// In a storyboard-based application, you will often want to do a little preparation before navigation
- (void)prepareForSegue:(UIStoryboardSegue *)segue sender:(id)sender {
    // Get the new view controller using [segue destinationViewController].
    // Pass the selected object to the new view controller.
}
*/

@end
第二个界面:
NS_ASSUME_NONNULL_BEGIN
//定义代理协议,视图控制器二的协议
@protocol VCSecondDelegate <NSObject>
-(void) changeColor:(UIColor*) color;
@end

@interface ViewSecond : UIViewController
//定义一个协议函数,改变背景颜色
@property (nonatomic, assign) NSInteger tag;
@property (nonatomic, weak) id<VCSecondDelegate> delegate;
@end
  #import "ViewSecond.h"

@interface ViewSecond ()

@end

@implementation ViewSecond

- (void)viewDidLoad {
    [super viewDidLoad];
    self.view.backgroundColor = [UIColor redColor];
    UIBarButtonItem* btnChange = [[UIBarButtonItem alloc] initWithTitle:@"改变颜色" style:UIBarButtonItemStyleDone target:self action:@selector(pressbtn)];
    self.navigationItem.rightBarButtonItem = btnChange;
    // Do any additional setup after loading the view.
}
-(void) pressbtn {
    [_delegate changeColor:[UIColor purpleColor]];
}
/*
#pragma mark - Navigation

// In a storyboard-based application, you will often want to do a little preparation before navigation
- (void)prepareForSegue:(UIStoryboardSegue *)segue sender:(id)sender {
    // Get the new view controller using [segue destinationViewController].
    // Pass the selected object to the new view controller.
}
*/

@end
实现效果:


 1214
1214


 被折叠的 条评论
为什么被折叠?
被折叠的 条评论
为什么被折叠?
 到【灌水乐园】发言


