


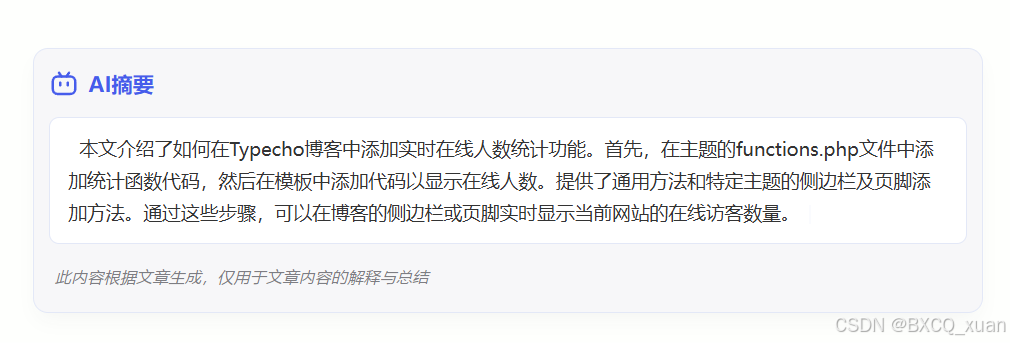
效果预览
AI摘要功能可以自动为每篇文章生成简洁的摘要内容,并以美观的打字机效果呈现在文章开头:
实现方案
插件选择
AISummary插件是Typecho博客实现AI摘要的理想选择,它具有以下优势:
- 支持多种AI平台对接(包括免费平台如阿里千问、Moonshot Kimi等)
- 可一键为所有文章生成摘要,也可单独更新
- 提供自定义样式和显示方式,适配性强
实现步骤
1. 安装AISummary插件
- 从GitHub下载AISummary插件
- 将插件文件夹上传至Typecho的
/usr/plugins/目录 - 进入Typecho后台 → 插件 → 启用AISummary插件
2. 配置插件和API接口
打开AISummary插件设置页面,填写以下配置:
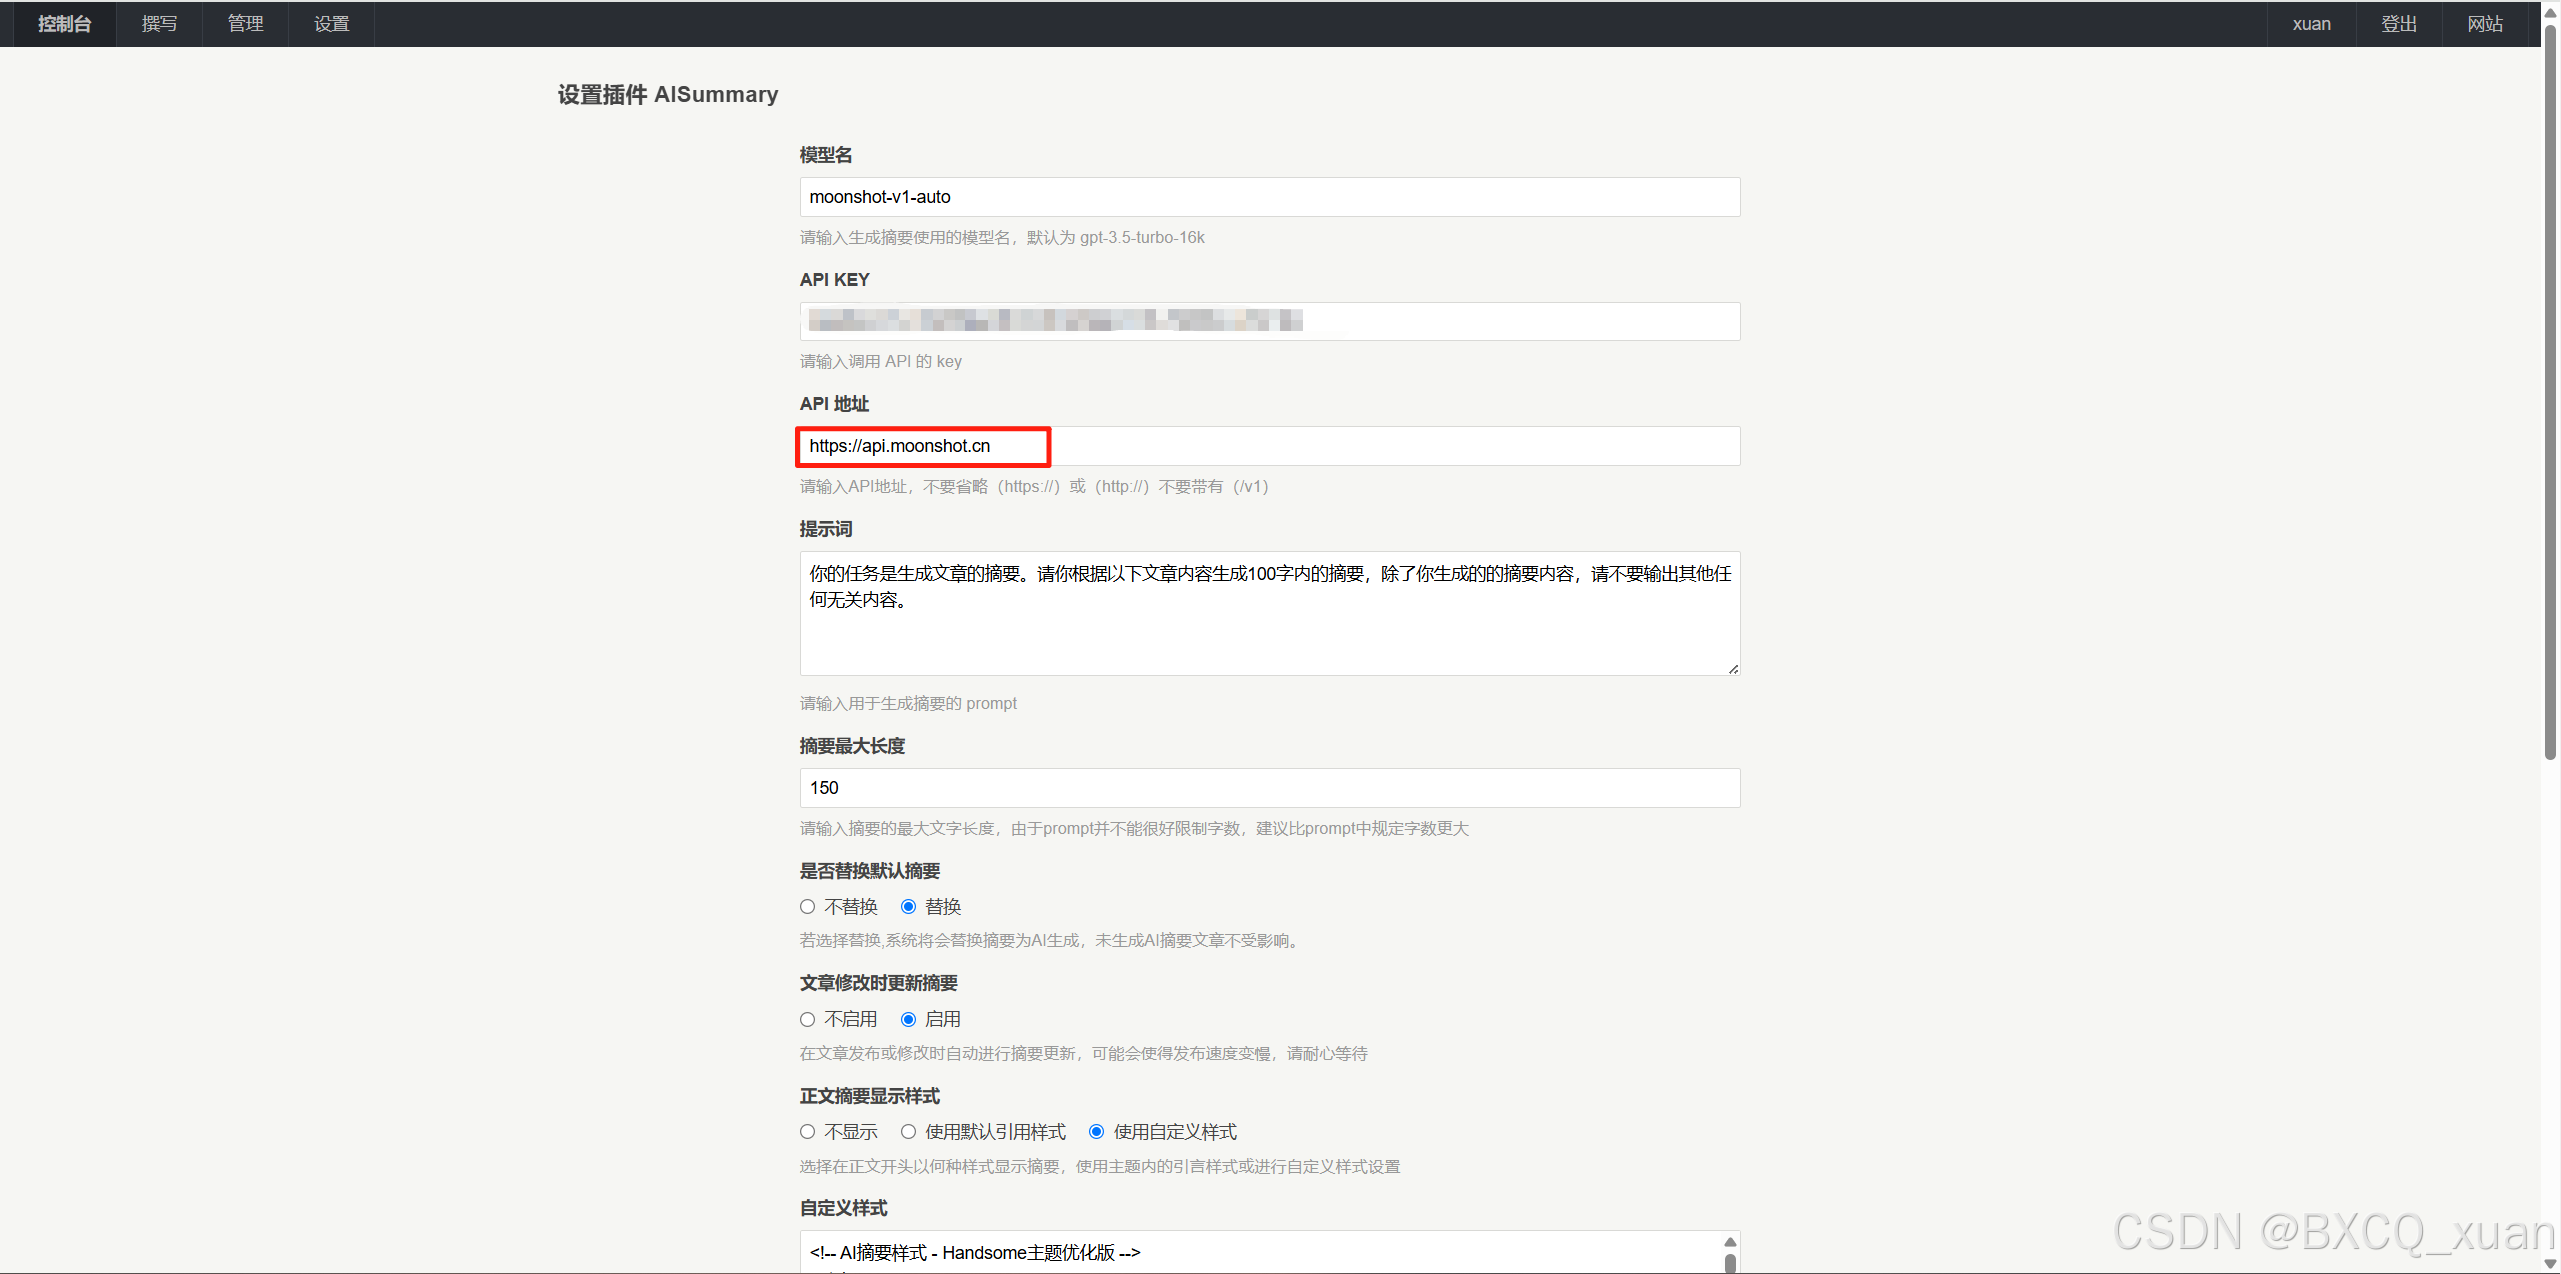
基础设置
- 模型名:
moonshot-v1-auto(Kimi平台的自动选择模型) - API KEY:您的Kimi API密钥(形如
sk-xxxxxx) - API 地址:
https://api.moonshot.cn(注意不需要添加/v1) - 提示词:
你的任务是生成文章的摘要。请你根据以下文章内容生成100字内的摘要,除了你生成的的摘要内容,请不要输出其他任何无关内容。 - 摘要最大长度:
150(建议比提示词中要求的字数大一些)
显示设置
- 是否替换默认摘要:根据需要选择(建议选"替换")
- 文章修改时更新摘要:根据需要选择(如果想自动更新选"启用")
- 正文摘要显示样式:选择"使用自定义样式"
- 存储字段名称:保持默认
summary即可
3. 自定义样式设置
插件提供了样式自定义功能,完美适配Handsome主题,在"自定义样式"文本框中填入以下代码:
[collapse status=“false” title=“展开查看样式代码”]
<!-- AI摘要样式 - Handsome主题优化版 -->
<style>
/* 摘要容器样式 */
.aisummary {
    background: #f7f7f9;
    border-radius: 12px;
    padding: 12px;
    box-shadow: 0 8px 16px -4px rgba(44, 45, 48, 0.047);
    border: 1px solid #e3e8f7;
    margin: 25px 0 30px;
    color: #333;
    position: relative;
    overflow: hidden;
}

/* 标题样式 */
.ai-header {
    margin-bottom: 10px !important;
    color: #465CEB !important;
    text-align: left !important;
    display: flex !important;
    align-items: center !important;
    text-indent: 0 !important;
    font-weight: bold !important;
    font-size: 17px !important;
}

.ai-header svg {
    margin-right: 8px;
    width: 24px;
    height: 24px;
    stroke: currentColor;
}

/* 文本容器样式 */
.ai-text-container {
    background: #fff;
    border-radius: 8px;
    padding: 12px 15px;
    border: 1px solid #e3e8f7;
    margin-bottom: 10px;
    font-size: 15px;
    line-height: 1.7;
    color: #333;
}

.ai-hidden-text {
    display: none;
}

.ai-typewriter-text {
    display: inline;
    text-indent: 2em;
    word-wrap: break-word;
    white-space: pre-wrap;
}

/* 光标样式及动画 */
.ai-cursor {
    display: inline-block;
    width: 2px;
    height: 1em;
    background-color: #465CEB;
    margin-left: 3px;
    animation: ai-blink 0.7s infinite;
    vertical-align: middle;
}

@keyframes ai-blink {
    0%, 100% { opacity: 1; }
    50% { opacity: 0; }
}

/* 页脚样式 */
.ai-footer {
    font-size: 13px !important;
    color: rgba(60, 60, 67, 0.65) !important;
    font-style: italic !important;
    margin-bottom: 0 !important;
    padding: 0 5px !important;
    text-align: left !important;
    text-indent: 0 !important;
    margin-top: 10px !important;
}

/* 响应式调整 */
@media (max-width: 768px) {
    .aisummary {
        padding: 10px;
        margin: 20px 0 25px;
    }
    .ai-header {
        font-size: 16px !important;
    }
    .ai-header svg {
        width: 22px;
        height: 22px;
        margin-right: 6px;
    }
    .ai-text-container {
        font-size: 14px;
        padding: 10px 12px;
        line-height: 1.65;
    }
    .ai-footer {
        font-size: 12px !important;
        margin-top: 8px !important;
    }
}

/* 暗色模式适配 */
[data-night="night"] .aisummary,
.dark-mode .aisummary,
body.dark .aisummary {
    background: #2c2c2e;
    border-color: #38383a;
    color: #d1d1d1;
    box-shadow: 0 8px 16px -4px rgba(0, 0, 0, 0.15);
}

[data-night="night"] .ai-text-container,
.dark-mode .ai-text-container,
body.dark .ai-text-container {
    background: #333333;
    border-color: #4a4a4a;
    color: #c8c8c8;
}

[data-night="night"] .ai-header,
.dark-mode .ai-header,
body.dark .ai-header {
    color: #7c89f1 !important;
}

[data-night="night"] .ai-cursor,
.dark-mode .ai-cursor,
body.dark .ai-cursor {
    background-color: #7c89f1;
}

[data-night="night"] .ai-footer,
.dark-mode .ai-footer,
body.dark .ai-footer {
    color: rgba(200, 200, 200, 0.6) !important;
}
</style>

<!-- AI摘要打字机效果脚本 -->
<script>
    // 全局变量
    let aiSummaryTypingTimeoutId = null;
    let aiSummaryLastProcessedUrl = window.location.href;

    // 打字机效果核心逻辑
    function executeAiSummaryTyping() {
        const typewriterElement = document.querySelector('.ai-typewriter-text');
        const sourceTextElement = document.querySelector('.ai-hidden-text');
        const typingSpeed = 50; // 打字速度,数值越小越快

        if (!typewriterElement || !sourceTextElement) return;

        if (aiSummaryTypingTimeoutId) {
            clearTimeout(aiSummaryTypingTimeoutId);
        }

        let textToType = sourceTextElement.textContent.trim();

        if (textToType.length > 0) {
            textToType = '  ' + textToType; // 首行缩进
        }

        typewriterElement.textContent = '';
        let charIndex = 0;

        function typeNextCharacter() {
            if (charIndex < textToType.length) {
                typewriterElement.textContent += textToType.charAt(charIndex);
                charIndex++;
                aiSummaryTypingTimeoutId = setTimeout(typeNextCharacter, typingSpeed);
            } else {
                aiSummaryTypingTimeoutId = null;
            }
        }
        typeNextCharacter();
    }

    // 页面加载后执行
    document.addEventListener('DOMContentLoaded', function() {
        setTimeout(executeAiSummaryTyping, 300);
    });

    // PJAX/SPA兼容处理
    setInterval(function() {
        if (window.location.href !== aiSummaryLastProcessedUrl) {
            aiSummaryLastProcessedUrl = window.location.href;
            setTimeout(executeAiSummaryTyping, 1000);
        }
    }, 100);
</script>
[/collapse]
4. 设置HTML模板
在"正文摘要前后固定文字"文本框中填入以下HTML代码:
[collapse status=“false” title=“展开查看代码”]
<p class="ai-header">
    <svg xmlns="http://www.w3.org/2000/svg" width="24" height="24" viewBox="0 0 24 24" fill="none" stroke-width="2" stroke-linecap="round" stroke-linejoin="round">
        <path stroke="none" d="M0 0h24v24H0z" fill="none"/>
        <path d="M3 10a4 4 0 0 1 4 -4h10a4 4 0 0 1 4 4v6a4 4 0 0 1 -4 4h-10a4 4 0 0 1 -4 -4v-6z" />
        <path d="M8 3l2 3" />
        <path d="M16 3l-2 3" />
        <path d="M9 13v-2" />
        <path d="M15 11v2" />
    </svg>AI摘要
</p>
<div class="ai-text-container">
    <div class="ai-hidden-text">{{text}}</div>
    <div class="ai-typewriter-text"></div>
    <span class="ai-cursor"></span>
</div>
<p class="ai-footer">
此内容根据文章生成,仅用于文章内容的解释与总结
</p>
[/collapse]
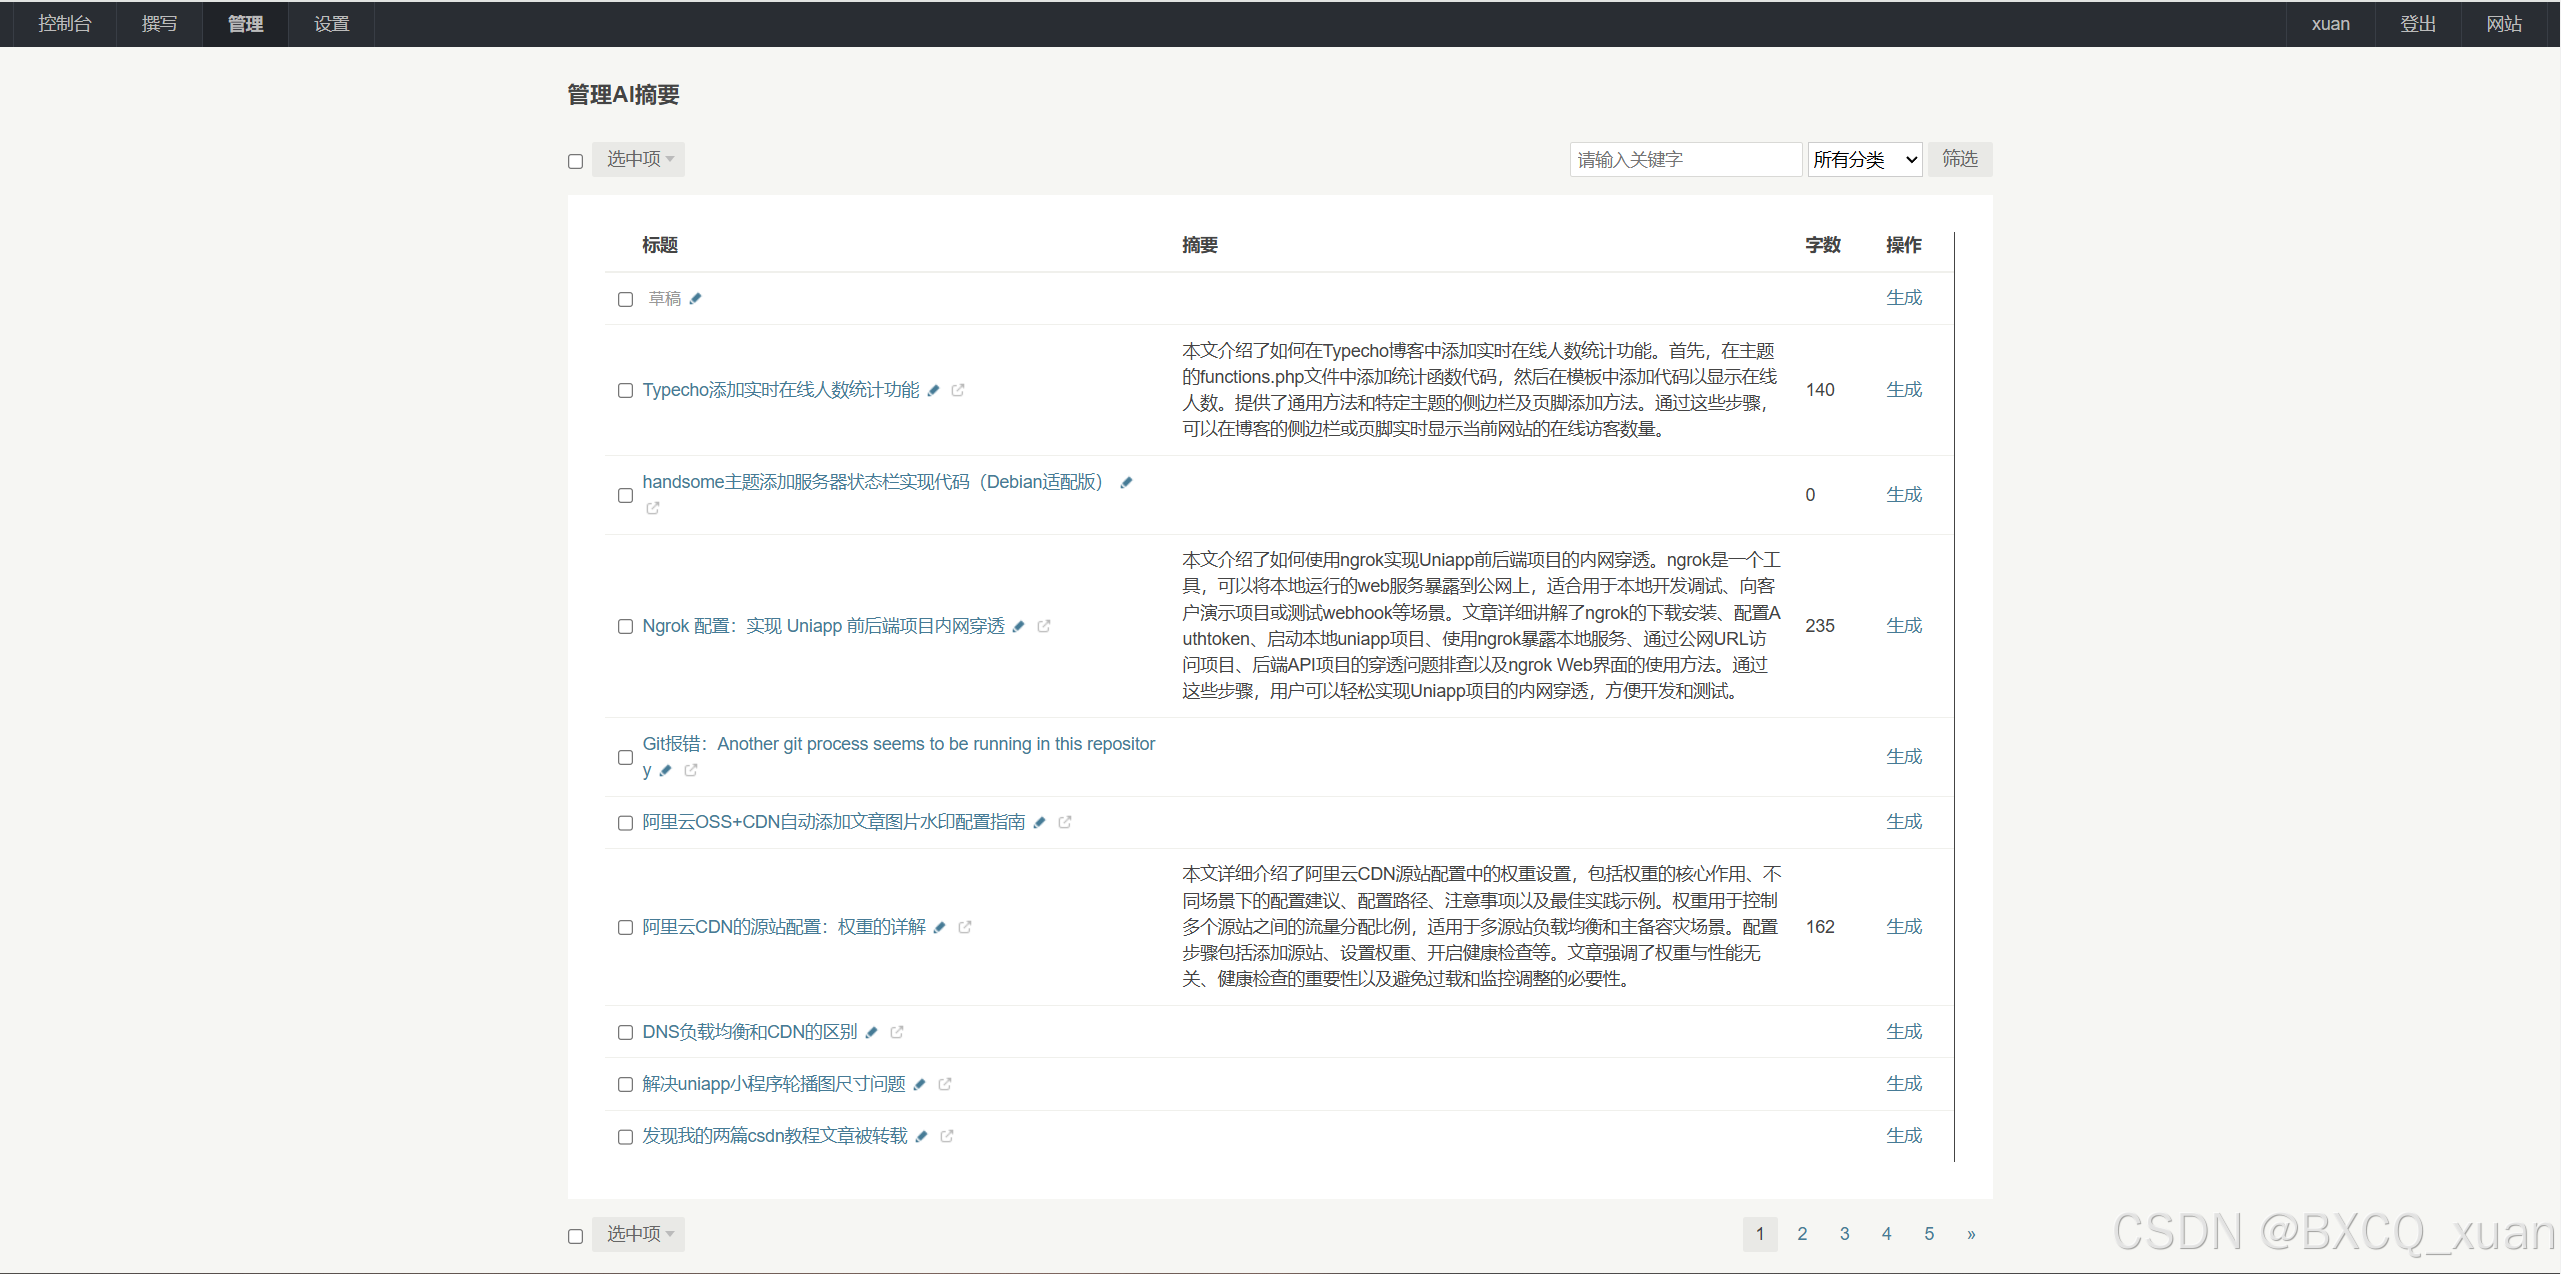
5. 生成摘要
配置完成后,在管理中生成摘要:
总结
通过AISummary插件,你可以轻松为Typecho博客文章添加智能生成的摘要。
如有任何问题或建议,欢迎在评论区留言。
作者:xuan
个人博客:https://blog.ybyq.wang
欢迎访问我的博客,获取更多技术文章和教程。


 1734
1734

 被折叠的 条评论
为什么被折叠?
被折叠的 条评论
为什么被折叠?
 到【灌水乐园】发言


