


决策树
原理
决策树是属于机器学习监督学习分类算法中比较简单的一种,决策树是一个预测模型;他代表的是对象属性与对象值之间的一种映射关系。树中每个节点表示某个对象,而每个分叉路径则代表的某个可能的属性值,而每个叶结点则对应从根节点到该叶节点所经历的路径所表示的对象的值。
优点:1、很容易将模型进行可视化;2、不需要对数据进行转换
缺点:1、容易出现过拟合现象
具体用法
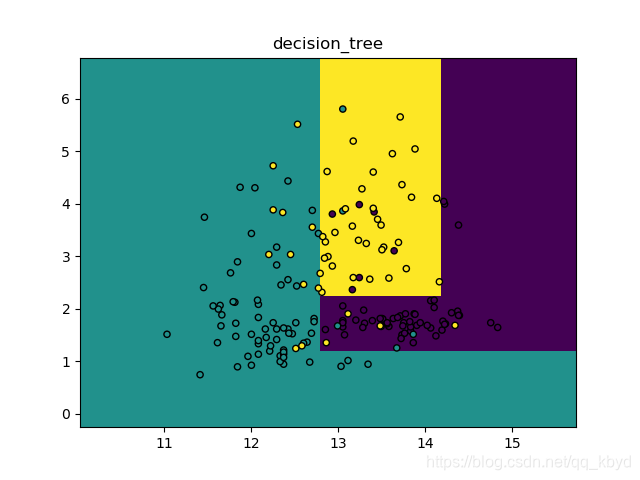
import numpy as np
import matplotlib.pyplot as plt
from sklearn import tree, datasets
from sklearn.model_selection import train_test_split


def decision_tree1():
    wine = datasets.load_wine()
    X = wine.data[:, :2]
    y = wine.target
    X_train, X_test, y_train, y_test = train_test_split(X, y)
    clf = tree.DecisionTreeClassifier(max_depth=3)
    clf.fit(X_train, y_train)
    print(clf)

    # 分别用样本的两个特征值创建图像的横轴和纵轴
    x_min, x_max = X_train[:, 0].min() - 1, X_train[:, 0].max() + 1
    y_min, y_max = X_train[:, 1].min() - 1, X_train[:, 1].max() + 1
    xx, yy = np.meshgrid(np.arange(x_min, x_max, .02),
                         np.arange(y_min, y_max, .02))
    Z = clf.predict(np.c_[xx.ravel(), yy.ravel()])
    # 给每个分类中的样本分配不同的颜色
    Z = Z.reshape(xx.shape)
    plt.figure()
    plt.pcolormesh(xx, yy, Z)

    plt.scatter(X[:, 0], X[:, 1], c=y, edgecolors='k', s=20)
    plt.xlim(xx.min(), xx.max())
    plt.ylim(yy.min(), yy.max())
    plt.title('decision_tree')
    plt.show()
运行结果
DecisionTreeClassifier(class_weight=None, criterion='gini', max_depth=3,
            max_features=None, max_leaf_nodes=None,
            min_impurity_decrease=0.0, min_impurity_split=None,
            min_samples_leaf=1, min_samples_split=2,
            min_weight_fraction_leaf=0.0, presort=False, random_state=None,
            splitter='best')
随机森林
原理
随机森林就是用随机的方式建立一个森林,在森林里有很多决策树组成,并且每一棵决策树之间是没有关联的。当有一个新样本的时候,我们让森林的每一棵决策树分别进行判断,看看这个样本属于哪一类,然后用投票的方式,哪一类被选择的多,作为最终的分类结果。在回归问题中,随机森林输出所有决策树输出的平均值。
优点:1、不需要对数据进行转换;2、能弥补决策树容易出现过拟合的不足;3、支持并行处理
具体用法
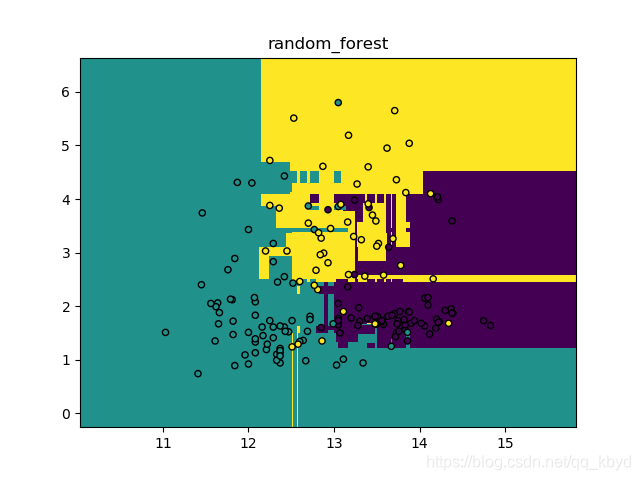
import numpy as np
import matplotlib.pyplot as plt
from sklearn import datasets
from sklearn.ensemble import RandomForestClassifier
from sklearn.model_selection import train_test_split


def random_forest1():
    wine = datasets.load_wine()
    X = wine.data[:, :2]
    y = wine.target
    # 将数据集拆分为训练集和测试集
    X_train, X_test, y_train, y_test = train_test_split(X, y)
    # 设定树的个数 n_estimators; n_jobs=-1 自动使用CPU的全部内核,并行处理
    forest = RandomForestClassifier(n_estimators=6, random_state=3, n_jobs=-1)
    forest.fit(X_train, y_train)
    print(forest)

    # 分别用样本的两个特征值创建图像的横轴和纵轴
    x_min, x_max = X_train[:, 0].min() - 1, X_train[:, 0].max() + 1
    y_min, y_max = X_train[:, 1].min() - 1, X_train[:, 1].max() + 1
    xx, yy = np.meshgrid(np.arange(x_min, x_max, .02),
                         np.arange(y_min, y_max, .02))
    Z = forest.predict(np.c_[xx.ravel(), yy.ravel()])
    # 给每个分类中的样本分配不同的颜色
    Z = Z.reshape(xx.shape)
    plt.figure()
    plt.pcolormesh(xx, yy, Z)

    plt.scatter(X[:, 0], X[:, 1], c=y, edgecolors='k', s=20)
    plt.xlim(xx.min(), xx.max())
    plt.ylim(yy.min(), yy.max())
    plt.title('random_forest')
    plt.show()
运行结果
RandomForestClassifier(bootstrap=True, class_weight=None, criterion='gini',
            max_depth=None, max_features='auto', max_leaf_nodes=None,
            min_impurity_decrease=0.0, min_impurity_split=None,
            min_samples_leaf=1, min_samples_split=2,
            min_weight_fraction_leaf=0.0, n_estimators=6, n_jobs=-1,
            oob_score=False, random_state=3, verbose=0, warm_start=False)


 7394
7394

 被折叠的 条评论
为什么被折叠?
被折叠的 条评论
为什么被折叠?
 到【灌水乐园】发言


