


目录
定位、布局、输入元素以及转换
组件(Compontents)
一个可以重复使用的元素,QML可以自定义元素组件。本文主要介绍以单独文件创建组件。定义一个ClickableImage.qml供下文使用。
ClickableImage.qml实现:
import QtQuick 2.0
Image {
    id: root
    signal clicked
    MouseArea {
        anchors.fill: parent
        onClicked: root.clicked()
    }
}
元素转换(Transformations)
QML元素可以通过平移、旋转、缩放改变对象的几何状态。
平移:通过X、Y坐标完成
旋转:通过rotation(旋转)属性完成(0~360)
缩放:通过scale(比例)完成(小于1缩小,大于1放大)
下面看一个代码案例:
import QtQuick 2.9
import QtGraphicalEffects 1.0

Item {
    width: bg.width
    height: bg.height
    Image {
        id: bg
        source: "./background.png"
    }
    MouseArea {
        id: backgroundClicker
        anchors.fill: parent
        onClicked: {

            rocket1.x = 20
            rocket2.rotation = 0
            rocket3.rotation = 0
            rocket3.scale = 1.0
        }
    }
    Image {
        id: rocket1
        x: 20; y: 100
        source: "./pole.png"
        MouseArea {
            anchors.fill: parent
            onClicked:  {
                rocket1.x += 5
            }
        }
    }
    ClickableImage {
        id: rocket2
        x: 140; y: 100
        source: "./pole.png"
        smooth: true
        onClicked: {
            rotation += 5
        }
    }
    ClickableImage {
        id: rocket3
        x: 240; y: 100
        source: "./pole.png"
        smooth: true
        onClicked: {
            rotation += 5
            scale -= 0.05
        }
    }
}
实现效果:
原图:

点击后效果:

定位元素(Positioning Element)
在QML中定位器用于放置元素对象。QtQuick模块提供Row、Column、Grid、Flow作为定位器。下面分别通过看一下各定位器实现效果:
Row定位器
//Row
import QtQuick 2.5
Item {
    id: root
    width: 400; height: 120

    Row {
        id: row
        anchors.centerIn: parent
        spacing: 20
        Rectangle {
            width: 48
            height: 48
            color: "#ea7025"
        }
        Rectangle {
            width: 48
            height: 48
            color: "#67c111"
        }
        Rectangle {
            width: 48
            height: 48
            color: "#00bde3"
        }

    }
}
效果图:

Column定位器
//Column
import QtQuick 2.5
Item {
    id: root
    width: 120
    height: 240
    Column {
        id: row
        anchors.centerIn: parent
        spacing: 20
        Rectangle {
            width: 48
            height: 48
            color: "#ea7025"
        }
        Rectangle {
            width: 96
            height: 48
            color: "#67c111"
        }
        Rectangle {
            width: 48
            height: 48
            color: "#00bde3"
        }

    }
}
效果图:

Grid定位器
//Grid
import QtQuick 2.5
Item {
    id: root
    width: 160
    height: 160

    Grid {
        id: grid
        rows: 2
        columns: 2
        anchors.centerIn: parent
        spacing: 8
        Rectangle {
            width: 48
            height: 48
            color: "#ea7025"
        }
        Rectangle {
            width: 48
            height: 48
            color: "#67c111"
        }
        Rectangle {
            width: 48
            height: 48
            color: "#00bde3"
        }
        Rectangle {
            width: 48
            height: 48
            color: "#3c3c3c"
        }
    }
}
效果图:

Flow定位器
//Flow
import QtQuick 2.5
Item {
    id: root
    width: 160
    height: 160

    Flow {
        anchors.fill: parent
        anchors.margins: 20
        spacing: 20
        Rectangle {
            width: 48
            height: 48
            color: "#ea7025"
        }
        Rectangle {
            width: 48
            height: 48
            color: "#67c111"
        }
        Rectangle {
            width: 48
            height: 48
            color: "#00bde3"
        }
        Rectangle {
            width: 48
            height: 48
            color: "#3c3c3c"
        }
    }
}
效果图:
默认:

拉伸后:

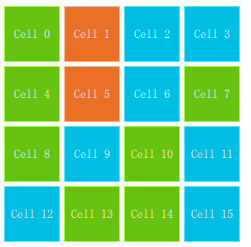
Repeater(重复元素)
这里介绍一下Repeater(重复元素)与定位器一起使用的例子。Repeater类似于for循环与迭代器的模式一样。
看一段代码:
import QtQuick 2.5
Item {
    id: root
    width: 252
    height: 252
    //使用数组定义一组颜色属性
    property variant colorArray: ["#00bde3", "#67c111", "#ea7025"]

    Grid{
        anchors.fill: parent
        anchors.margins: 8
        spacing: 4
        Repeater {
            //重复元素创建16个Rectangle
            model: 16
            Rectangle {
                width: 56; height: 56
                //使用数学函数随机选择颜色
                property int colorIndex: Math.floor(Math.random()*3)
                color: root.colorArray[colorIndex]
                border.color: Qt.lighter(color)
                Text {
                    anchors.centerIn: parent
                    color: "#f0f0f0"
                    //显示index
                    text: "Cell " + index
                }
            }
        }
    }
}
效果图:
布局元素(Layout Element)
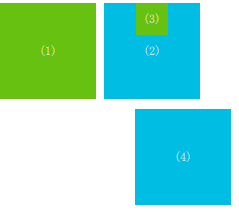
QML中使用anchors(锚)对元素进行布局。anchors是基础元素对象的基本属性,可以被所有可视化QML元素使用。
anchors图:

通过一段代码了解anchors基本使用方法:
import QtQuick 2.5

Item {
    id: root
    width: 400; height: 240

    // M1>>
    Rectangle{
        id:rect1
        width: 96
        height: width
        anchors.margins: 8
        color: "#67c111"
        Text {
            anchors.centerIn: parent
            text: '(1)'
            color: "#f0f0f0"
        }
    }

    // M2>>
    Rectangle{
        id:rect2
        width: 96
        height: width
        anchors.margins: 8
        color: "#00bde3"
        anchors.left: rect1.right
        Text {
            anchors.centerIn: parent
            text: '(2)'
            color: "#f0f0f0"
        }
    }
    // <<M3
    Rectangle{
        id:rect3
        width: 32
        height: width
        anchors.margins: 8
        color: "#67c111"
        anchors.horizontalCenter: rect2.horizontalCenter
        Text {
            anchors.centerIn: parent
            text: '(3)'
            color: "#f0f0f0"
        }
    }

    // M4>>
    Rectangle{
        id:rect4
        width: 96
        height: width
        anchors.margins: 8
        color: "#00bde3"
        anchors.top: rect2.bottom
        anchors.right: parent.right
        anchors.topMargin: 10
        Text {
            anchors.centerIn: parent
            text: '(4)'
            color: "#f0f0f0"
        }
    }

}
效果图:
输入元素(Input Element)
本段主要介绍TextInput(文本输入)和TextEdit(文本编辑)两种文本元素
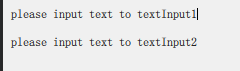
文本输入(TextInput)
文本输入:允许用户输入一行文本。该元素支持使用正则表达式限制输入。
看一段代码示例:
import QtQuick 2.5

Rectangle {
    width: 300
    height: 80
    color: "#f0f0f0"
    TextInput {
        id: textInput1
        x: 8; y: 8
        width: 250; height: 20
        focus: true //接收光标
        text: "please input text to textInput1" //默认text
        KeyNavigation.tab: textInput2 //tab键光标切换到textInput2
    }
    TextInput {
        id: textInput2
        x: 8; y: 36
        width: 250; height: 20
        text: "please input text to textInput2"
        KeyNavigation.tab: textInput1
    }
}
效果图:
焦点区域(FocusScope)
焦点区域(focus scope)定义如果该区域接收焦点,它最后一个使用focus:true的子元素接收焦点。
示例代码:
Rectangle {
    width: 300
    height: 80
    FocusScope {
        TextInput {
            id: textInput1
            x: 8; y: 8
            width: 250; height: 20
            focus: true //接收光标
            text: "please input text to FocusScope" //默认text
            KeyNavigation.tab: textInput2 //tab键光标切换到textInput2
        }
    }
    FocusScope {
        TextInput {
            id: textInput2
            x: 8; y: 36
            width: 250; height: 20
            text: "please input text to FocusScope"
            KeyNavigation.tab: textInput1
        }
    }
}
实现效果:

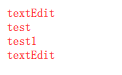
文本编辑(TextEdit)
文本编辑(TextEdit)元素与文本输入(TextInput)元素类似,支持多行文本编辑,但是不支持文本输入限制,提供已输入文本大小的查询功能。
示例代码:
import QtQuick 2.5

Rectangle {
    width: 300
    height: 80
    FocusScope {
        TextEdit {
            id: textEdit1
            x: 8; y: 8
            color: "red"
            width: 250; height: 100
            focus: true //接收光标
            text: "textEdit" //默认text
            KeyNavigation.tab: textEdit2 //tab键光标切换到textInput2
        }
    }
}
效果图:
按键元素(Key Element)
程序运行中,可以使用按键元素(Key Element)执行某个操作,比如up、down进行移动,tab进行切换焦点等。
示例代码:
import QtQuick 2.5

Rectangle {
    width: 400; height: width
    Rectangle{
        id: square
        width: 96
        height: width
        x: 8; y: 8
        color: "#67c111"
    }
    focus:true
    Keys.onLeftPressed: square.x -= 8 //left 向左移动
    Keys.onRightPressed: square.x += 8 //right 向右移动
    Keys.onUpPressed: square.y -= 8 //up 向上移动
    Keys.onDownPressed: square.y += 8 //down 向下移动
    Keys.onPressed: {
        switch(event.key) {
        case Qt.Key_Plus: //+ 放大
            square.scale += 0.2
            break;
        case Qt.Key_Minus: //缩小
            square.scale -= 0.2
            break;
        }
    }
}
效果图:
默认:

右移---->下移----->放大:


 5318
5318


 被折叠的 条评论
为什么被折叠?
被折叠的 条评论
为什么被折叠?
 到【灌水乐园】发言


