


注意以下操作必须使用Android studio2.2以上
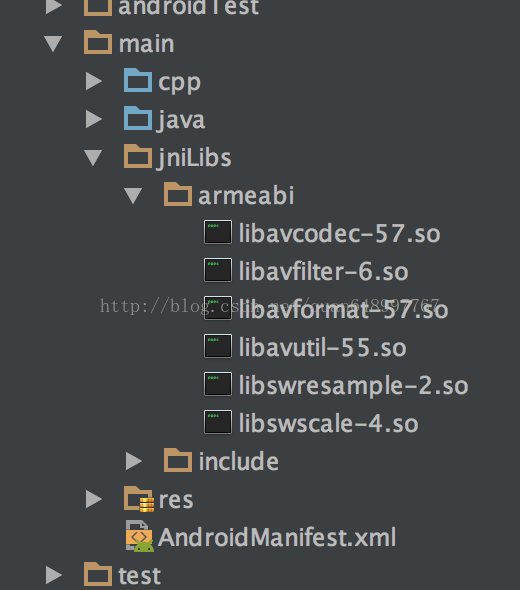
第一步:导入so文件
1、在main目录下新建jniLibs目录
2、再在jniLibs下新建armeabi目录
3、将编译好的so文件拷贝到armeabi目录下
4、将编译生成的include目录拷贝到jniLibs目录下(参考:编译FFmpeg)
第二步:配置CMakeLists
cmake_minimum_required(VERSION 3.4.1)

add_library( native-lib
             SHARED
             src/main/cpp/native-lib.cpp
             src/main/cpp/test_ffmpeg.cpp)

find_library( log-lib
              log )


find_library( android-lib
              android )

set(distribution_DIR ${CMAKE_SOURCE_DIR}/src/main/jniLibs/${ANDROID_ABI})

add_library( avutil-55
             SHARED
             IMPORTED )
set_target_properties( avutil-55
                       PROPERTIES IMPORTED_LOCATION
                       ${distribution_DIR}/libavutil-55.so)

add_library( swresample-2
             SHARED
             IMPORTED )
set_target_properties( swresample-2
                       PROPERTIES IMPORTED_LOCATION
                       ${distribution_DIR}/libswresample-2.so)

add_library( avfilter-6
             SHARED
             IMPORTED )
set_target_properties( avfilter-6
                       PROPERTIES IMPORTED_LOCATION
                       ${distribution_DIR}/libavfilter-6.so)

add_library( avformat-57
             SHARED
             IMPORTED )
set_target_properties( avformat-57
                       PROPERTIES IMPORTED_LOCATION
                       ${distribution_DIR}/libavformat-57.so)

add_library( swscale-4
             SHARED
             IMPORTED )
set_target_properties( swscale-4
                       PROPERTIES IMPORTED_LOCATION
                       ${distribution_DIR}/libswscale-4.so)


add_library( avcodec-57
             SHARED
             IMPORTED )
set_target_properties( avcodec-57
                       PROPERTIES IMPORTED_LOCATION
                       ${distribution_DIR}/libavcodec-57.so)

set(CMAKE_VERBOSE_MAKEFILE on)
set(CMAKE_CXX_FLAGS "${CMAKE_CXX_FLAGS} -std=gnu++11")
include_directories(src/main/cpp)
include_directories(src/main/jniLibs/include)

target_link_libraries(native-lib
                      avcodec-57
                      avfilter-6
                      avformat-57
                      avutil-55
                      swresample-2
                      swscale-4
                      ${log-lib}
                      ${android-lib})
第三步:配置build.gradle
defaultConfig {...
        externalNativeBuild {
            cmake {
                cppFlags "-std=c++11 -frtti -fexceptions"
            }
        }
        ndk {
            //这里我们只有armeabi就只配置这个就行了
            abiFilters  'armeabi'
        }
    }
    sourceSets.main {
        jniLibs.srcDirs = ['src/main/jniLibs']
    }

    externalNativeBuild {
        cmake {
            path "CMakeLists.txt"
        }
    }
第四步:编写native方法
package com.zzq.mack.ffmpeg.natives;

/**
 * Created by mack on 2017/4/28.
 */

public class PlayerNative {

    /**
     * 音视频解码播放
     * @param path
     * @param view
     */
    public native static void paly(String path,Object view);


}
生成头文件 参考http://blog.csdn.net/quan648997767/article/details/64923143
第五步:编写c/c++代码
#include <jni.h>
#include <com_zzq_mack_ffmpeg_PlayerNative.h>
#include <android/native_window.h>
#include <android/native_window_jni.h>
#include <unistd.h>
#include <android/log.h>
#define LOGI(FORMAT,...) __android_log_print(ANDROID_LOG_INFO,"TAG",FORMAT,##__VA_ARGS__);
#define LOGE(FORMAT,...) __android_log_print(ANDROID_LOG_ERROR,"TAG",FORMAT,##__VA_ARGS__);
extern "C" {
#include "libavformat/avformat.h"
#include "libswscale/swscale.h"
#include <libavfilter/avfiltergraph.h>
#include "libavfilter/avfilter.h"
#include "libavutil/imgutils.h"
#include "libavutil/avutil.h"
#include "libavfilter/buffersink.h"
#include "libavfilter/buffersrc.h"
#include "libavcodec/avcodec.h"
}
/**
 *
 * 音视频解码
 */

JNIEXPORT void JNICALL
Java_com_zzq_mack_ffmpeg_natives_PlayerNative_paly(JNIEnv *env, jclass type, jstring path_, jobject view) {
    const char *path = env->GetStringUTFChars(path_, 0);
    //注册所有的编解码器
    av_register_all();
    //avcodec_register_all();
    int ret;
    //封装格式上线文
    AVFormatContext *fmt_ctx = avformat_alloc_context();
    //打开输入流并读取头文件。此时编解码器还没有打开
    if(avformat_open_input(&fmt_ctx,path,NULL,NULL) < 0){
        return;
    }
    //获取信息
    if(avformat_find_stream_info(fmt_ctx,NULL) < 0){
        return;
    }
    //获取视频流的索引位置
    int video_stream_index = -1;
    for (int i = 0; i < fmt_ctx->nb_streams; i++) {
        if(fmt_ctx->streams[i]->codecpar->codec_type == AVMEDIA_TYPE_VIDEO){
            video_stream_index = i;
            LOGE("找到视频流索引位置video_stream_index=%d",video_stream_index);
            break;
        }
    }
    if (video_stream_index == -1){
        LOGE("未找到视频流索引");
    }
    ANativeWindow* nativeWindow = ANativeWindow_fromSurface(env,view);
    if (nativeWindow == NULL) {
        LOGE("ANativeWindow_fromSurface error");
        return;
    }
    //绘制时候的缓冲区
    ANativeWindow_Buffer outBuffer;
    //获取视频流解码器

    AVCodecContext *codec_ctx = avcodec_alloc_context3(NULL);
    avcodec_parameters_to_context(codec_ctx, fmt_ctx->streams[video_stream_index]->codecpar);
    AVCodec *avCodec = avcodec_find_decoder(codec_ctx->codec_id);
    //打开解码器
    if((ret = avcodec_open2(codec_ctx,avCodec,NULL)) < 0){
        ret = -3;
        return;
    }
    //循环从文件读取一帧压缩数据
    //开始读取视频
    int y_size = codec_ctx->width * codec_ctx->height;
    AVPacket *pkt = (AVPacket *)malloc(sizeof(AVPacket));//分配一个packet
    av_new_packet(pkt,y_size);//分配packet的数据
    AVFrame *yuvFrame = av_frame_alloc();
    AVFrame *rgbFrame = av_frame_alloc();
    // 颜色转换器
    SwsContext *m_swsCtx = sws_getContext(codec_ctx->width, codec_ctx->height, codec_ctx->pix_fmt, codec_ctx->width,
                                          codec_ctx->height, AV_PIX_FMT_RGBA, SWS_BICUBIC, NULL, NULL, NULL);
    //int numBytes = av_image_get_buffer_size(AV_PIX_FMT_RGBA, codec_ctx->width, codec_ctx->height, 1);
    //uint8_t *out_buffer = (uint8_t *) av_malloc(numBytes * sizeof(uint8_t));
    LOGE("开始解码");
    int  index = 0;
    while (1){
        if(av_read_frame(fmt_ctx,pkt) < 0){
            //这里就认为视频读完了
            break;
        }
        if(pkt->stream_index == video_stream_index) {
            //视频解码
            ret = avcodec_send_packet(codec_ctx, pkt);
            if (ret < 0 && ret != AVERROR(EAGAIN) && ret != AVERROR_EOF) {
                LOGE("avcodec_send_packet ret=%d", ret);
                av_packet_unref(pkt);
                continue;
            }
            //从解码器返回解码输出数据
            ret = avcodec_receive_frame(codec_ctx, yuvFrame);
            if (ret < 0 && ret != AVERROR_EOF) {
                LOGE("avcodec_receive_frame ret=%d", ret);
                av_packet_unref(pkt);
                continue;
            }
            //avcodec_decode_video2(codec_ctx,yuvFrame,&got_pictue,&pkt);
            sws_scale(m_swsCtx, (const uint8_t *const *) yuvFrame->data, yuvFrame->linesize, 0,
                      codec_ctx->height, rgbFrame->data, rgbFrame->linesize);
            //设置缓冲区的属性
            ANativeWindow_setBuffersGeometry(nativeWindow, codec_ctx->width, codec_ctx->height,
                                             WINDOW_FORMAT_RGBA_8888);
            ret = ANativeWindow_lock(nativeWindow, &outBuffer, NULL);
            if (ret != 0) {
                LOGE("ANativeWindow_lock error");
                return;
            }
            av_image_fill_arrays(rgbFrame->data, rgbFrame->linesize,
                                 (const uint8_t *) outBuffer.bits, AV_PIX_FMT_RGBA,
                                 codec_ctx->width, codec_ctx->height, 1);
            //fill_ANativeWindow(&outBuffer,outBuffer.bits,rgbFrame);
            //将缓冲区数据显示到surfaceView
            ret = ANativeWindow_unlockAndPost(nativeWindow);
            if (ret != 0) {
                LOGE("ANativeWindow_unlockAndPost error");
                return;
            }
            LOGE("成功显示到缓冲区%d次",++index);
        }
        av_packet_unref(pkt);
        usleep(1000*16);

//            /*
//            //UYVY
//            fwrite(pFrameYUV->data[0],(pCodecCtx->width)*(pCodecCtx->height),2,output);
//            //YUV420P
//            fwrite(pFrameYUV->data[0],(pCodecCtx->width)*(pCodecCtx->height),1,output);
//            fwrite(pFrameYUV->data[1],(pCodecCtx->width)*(pCodecCtx->height)/4,1,output);
//            fwrite(pFrameYUV->data[2],(pCodecCtx->width)*(pCodecCtx->height)/4,1,output);
    }
    //av_free(out_buffer);
    av_frame_free(&rgbFrame);
    avcodec_close(codec_ctx);
    sws_freeContext(m_swsCtx);
    avformat_close_input(&fmt_ctx);
    ANativeWindow_release(nativeWindow);
    env->ReleaseStringUTFChars(path_, path);
    LOGI("解析完成");
}public void mPaly(View view){
final String path = "/storage/emulated/0/pp/service/video/test1.flv";//1493695201802.mp4";//
final VideoView mVideo = (VideoView) findViewById(R.id.video);
if (new File(path).exists()){
runOnUiThread(new Runnable() {
@Override
public void run() {
PlayerNative.paly(path,mVideo.getHolder().getSurface());
//PlayerNative.voideCoding(path);
}
});
}else{
System.out.println("文件不存在");
}
}package com.zzq.mack.ffmpeg;
import android.content.Context;
import android.graphics.PixelFormat;
import android.util.AttributeSet;
import android.view.SurfaceHolder;
import android.view.SurfaceView;
/**
* Created by mack on 2017/4/28.
*/
public class VideoView extends SurfaceView {
public VideoView(Context context) {
super(context);
init();
}
public VideoView(Context context, AttributeSet attrs) {
super(context, attrs);
init();
}
public VideoView(Context context, AttributeSet attrs, int defStyleAttr) {
super(context, attrs, defStyleAttr);
init();
}
private void init() {
SurfaceHolder holder = getHolder();
holder.setFormat(PixelFormat.RGBA_8888);
}
}<?xml version="1.0" encoding="utf-8"?>
<LinearLayout xmlns:android="http://schemas.android.com/apk/res/android"
android:layout_width="match_parent"
android:layout_height="match_parent"
android:orientation="vertical"
android:background="@android:color/white">
<Button
android:id="@+id/btn"
android:layout_width="wrap_content"
android:layout_height="wrap_content"
android:text="开始"
android:onClick="mPaly"/>
<com.zzq.mack.ffmpeg.VideoView
android:id="@+id/video"
android:layout_width="match_parent"
android:layout_height="match_parent" />
</LinearLayout> <uses-permission android:name="android.permission.READ_EXTERNAL_STORAGE"/>
<uses-permission android:name="android.permission.WRITE_EXTERNAL_STORAGE"/>
<uses-permission android:name="android.permission.MOUNT_UNMOUNT_FILESYSTEMS"/>
后续会更新最新有FFmpeg其他有趣的东西。。。


 2852
2852

 被折叠的 条评论
为什么被折叠?
被折叠的 条评论
为什么被折叠?
 到【灌水乐园】发言


