


《Pygame游戏编程入门》学习——第2章 初识Pygame:Pie游戏
第2章 挑战1
问题1. 使用本章的示例作为起点,编写一个程序来绘制一个椭圆,这是我们在本章中没有介绍的形状。
- 要点
- pygame.draw.ellipse(surface, color, rect, width=0) -> Rect,绘制椭圆,其中
rect是椭圆的外接矩形2。
首先,在Ellipse类中添加get_rect()方法,返回椭圆的外接矩形的左上角坐标以及宽和高。然后在pygame流程中不断生成椭圆对象,用pygame.draw.ellipse方法在屏幕上绘制。最后添加按键控制功能,当按下1和2时,分别减少和增加椭圆的长半轴长,当按下3和4时,分别减少和增加椭圆的短半轴长。
1_draw_ellipse.py代码如下:
import pygame, sys, RGB
from pygame.locals import *

class Point():
    def __init__( self, x, y ):
        self.x = x
        self.y = y

class Ellipse( Point ):
    def __init__( self, x, y, a, b ):
        super().__init__( x, y )
        self.a = a    # 长半轴a
        self.b = b    # 短半轴b
    def get_rect( self ):
    	# 返回椭圆的外接矩形
    	return ( self.x - self.a, self.y - self.b, self.a * 2, self.b * 2 )

pygame.init()
screen = pygame.display.set_mode( ( 600, 500 ) )	# 屏幕宽=600,高=500
pygame.display.set_caption( '绘制椭圆' )
a = 20	# 椭圆的长半轴
b = 5	# 椭圆的短半轴

while True:
	for event in pygame.event.get():
		if event.type == QUIT:
			sys.exit()
		elif event.type == KEYUP:
			if event.key == pygame.K_ESCAPE:
				sys.exit()
			elif event.key == pygame.K_1:
				a -= 10
				if a < 20:
					a = 20
			elif event.key == pygame.K_2:
				a += 10
			elif event.key == pygame.K_3:
				b -= 5
				if b < 5:
					b = 5
			elif event.key == pygame.K_4:
				b += 5

	e = Ellipse( 300, 250, a, b ) # 默认椭圆的圆心在屏幕中点
	screen.fill( RGB.Black )
	pygame.draw.ellipse( screen, RGB.White, e.get_rect(), width=3 )
	pygame.display.update()
运行结果:

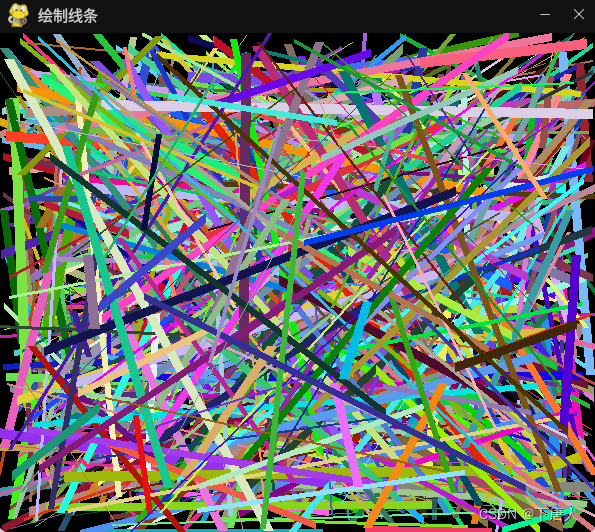
问题2. 选取一个示例,例如,绘制线条示例,修改它以便用随机的值绘制1000个线条。了解一下random库和random.randint()函数。
- 要点:
- random.randint(a, b),返回[a, b]内的随机整数。
- pygame.draw.line(surface, color, start_pos, end_pos, width=1) -> Rect,绘制直线。
思路:首先构建pygame流程循环,用randint()随机生成线条的起点、终点、颜色、宽度,用line()方法在屏幕绘制,然后用一个计数器变量i来保证绘制1000次。注意screen.fill()要放在循环之外,否则最后屏幕上只有一根线条。
2_draw_1000_lines.py代码如下:
import pygame, sys, random, RGB
from pygame.locals import *

pygame.init()

screen = pygame.display.set_mode( ( 600, 500 ) )
pygame.display.set_caption( '绘制线条' )
screen.fill( RGB.Black )

i = 1
while True:
	for event in pygame.event.get():
		if event.type in ( QUIT, KEYDOWN ):
			sys.exit()

	if i <= 1000:
		color = ( random.randint( 0, 255 ), random.randint( 0, 255 ), random.randint( 0, 255 ) )
		width = random.randint( 1, 10 )
		start = random.randint( 0, 600 ), random.randint( 0, 500 )
		end = random.randint( 0, 600 ), random.randint( 0, 500 )
		pygame.draw.line( screen, color, start, end, width )
		pygame.display.update()
		i += 1
运行结果:
问题3. 绘制矩形示例是唯一一个绕着屏幕移动形状的示例。修改该程序,以便任何时候,当矩形碰到屏幕边界时,矩形都将改变颜色。
思路:使用面向对象的方法实现。建立Rectangle类,表示一个矩形,参数有矩形左上角的坐标pos_x和pos_y,矩形的宽和高width和height,矩形的速度vel_x和vel_y,矩形的颜色color。在类中添加move()方法,使得矩形在屏幕内移动,碰到边界时返回并随机改变颜色。
3_draw_rect_with_color.py代码如下:
import pygame, sys, random, RGB
from pygame.locals import *

class Rectangle():
	def __init__( self, pos_x, pos_y, width, height, vel_x, vel_y, color ):
		self.pos_x = pos_x	# 矩形左上角横坐标
		self.pos_y = pos_y	# 矩形左上角纵坐标
		self.width = width	# 矩形宽
		self.height = height	# 矩形高
		self.vel_x = vel_x	# 矩形水平速度
		self.vel_y = vel_y  # 矩形垂直速度
		self.color = color	# 矩形颜色

	def move( self ):
		self.pos_x += self.vel_x
		self.pos_y += self.vel_y
		if self.pos_x > screen_width - self.width or self.pos_x < 0:
			self.vel_x = -self.vel_x
			self.color = random.randint( 0, 255 ), random.randint( 0, 255 ), random.randint( 0, 255 )
		if self.pos_y > screen_height - self.height or self.pos_y < 0:
			self.vel_y = -self.vel_y
			self.color = random.randint( 0, 255 ), random.randint( 0, 255 ), random.randint( 0, 255 )

	def get_rect( self ): # 获取矩形左上角坐标和宽、高
		return ( self.pos_x, self.pos_y, self.width, self.height )

	def get_color( self ):
		return self.color

screen_width, screen_height = 600, 500
pygame.init()
screen = pygame.display.set_mode( ( screen_width, screen_height ) )
pygame.display.set_caption( '绘制移动矩形,碰到边界时改变颜色' )
r = Rectangle( screen_width / 2, screen_height / 2, 100, 100, 2, 1, RGB.White ) # 建立矩形对象

while True:
	for event in pygame.event.get():
		if event.type in ( QUIT, KEYDOWN ):
			sys.exit()

	screen.fill( RGB.Black )
	r.move()
	pygame.draw.rect( screen, r.get_color(), r.get_rect(), width=0 ) # width=0,填充
	pygame.display.update()
运行结果:
1
[美] Jonathan S. Harbour 著,李强 译,Python游戏编程入门,人民邮电出版社,2015.1 ↩︎


 732
732


 被折叠的 条评论
为什么被折叠?
被折叠的 条评论
为什么被折叠?
 到【灌水乐园】发言


