


DenseNet阅读笔记(gluoncv版本)
这两天在看gluoncv版本的Densenet 做点小分析 写点笔记记录下
这个版本的Densenet和论文中的大体结构是一致的, 但是有些小点不大一样.(看代码和表格进行对比发现的)
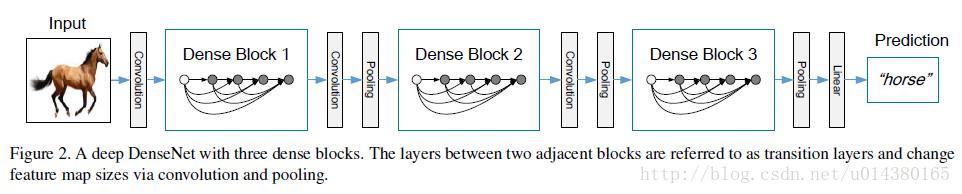
先贴一张图说明下DenseNet的网络结构:

再贴一张图说明下DenseNet中最具个性的结构:
在此先说一下几个要点
- 看第一张图 从第4行的"Dense Block(1)"开始, 都是Dense Block与Transition Layer交替组成, 因此可以将Dense Block与Transition Layer写成两个基本模块, 用循环拼凑起来即可. 与之对应的代码:
# Dense Block部分
def _make_dense_layer(growth_rate, bn_size, dropout, norm_layer, norm_kwargs):
    '''
        2 * [BN - relu - Conv]
        growth_rate 示每个dense block中每层输出的feature map个数
    '''
    new_features = nn.HybridSequential(prefix='')
    # ----------------------
    new_features.add(norm_layer(**({} if norm_kwargs is None else norm_kwargs))) # 不一定有这一层 看具体传入参数
    new_features.add(nn.Activation('relu'))
    new_features.add(nn.Conv2D(bn_size * growth_rate, kernel_size=1, use_bias=False)) # size: 1*1
    # ----------------------
    new_features.add(norm_layer(**({} if norm_kwargs is None else norm_kwargs))) # 不一定有这一层 看具体传入参数
    new_features.add(nn.Activation('relu'))
    new_features.add(nn.Conv2D(growth_rate, kernel_size=3, padding=1, use_bias=False)) # size 3*3
    # ----------------------
    if dropout:
        new_features.add(nn.Dropout(dropout))

    out = HybridConcurrent(axis=1, prefix='')
    out.add(Identity())
    out.add(new_features)

    return out

# Transition Layer部分
def _make_transition(num_output_features, norm_layer, norm_kwargs):
    '''
        BN -> Relu -> Conv -> AvgPool
    '''
    out = nn.HybridSequential(prefix='')
    out.add(norm_layer(**({} if norm_kwargs is None else norm_kwargs))) # 不一定有这一层 看具体传入参数
    out.add(nn.Activation('relu'))
    out.add(nn.Conv2D(num_output_features, kernel_size=1, use_bias=False))  # Size: 1*1
    out.add(nn.AvgPool2D(pool_size=2, strides=2))
    return out
- 在第二张图中的每一个Dense Block中, 最明显的特征就是每个节点与之后的每个节点都有一个concat连接(如下图公式所示), 这也是Denset的魅力所在

但是看函数_make_dense_layer似乎没有体现这一点…但实际上这一特点写在了该函数末尾几行:
   out = HybridConcurrent(axis=1, prefix='')
   out.add(Identity())
   out.add(new_features)
来看看官网对HybridConcurrent的说明: “This block feeds its input to all children blocks, and produce the output by concatenating all the children blocks’ outputs on the specified axis.”
看看该函数的源码:
class HybridConcurrent(HybridSequential):
   """Lays `HybridBlock` s concurrently.

   This block feeds its input to all children blocks, and
   produce the output by concatenating all the children blocks' outputs
   on the specified axis.

   Example::

       net = HybridConcurrent()
       # use net's name_scope to give children blocks appropriate names.
       with net.name_scope():
           net.add(nn.Dense(10, activation='relu'))
           net.add(nn.Dense(20))
           net.add(Identity())

   Parameters
   ----------
   axis : int, default -1
       The axis on which to concatenate the outputs.
   """
   def __init__(self, axis=-1, prefix=None, params=None):
       super(HybridConcurrent, self).__init__(prefix=prefix, params=params)
       self.axis = axis

   def hybrid_forward(self, F, x):
       out = []
       for block in self._children.values():
           out.append(block(x))
       out = F.concat(*out, dim=self.axis)
       return out
大概意思就是把每一个输入在指定维度下进行Concat 嗯, 就是Dense Block里的concat操作, 这里我觉得就是最最最重要的地方了 (至于Identity() 常常与 HybridConcurrent 配合使用, 起啥作用我没搞懂…有没有大佬指点一下)
我觉得以上2点搞懂了 其他代码就没啥问题了 初步的理解DenseNet只要把DenseNet拆成两个模块就Ok了 那接下来看看其他组成部分

我们在上面讲了两个函数: _make_dense_block _make_transition, 这里还有一个 _make_dense_layer, 这个函数实际上就是对_make_dense_block进一步调用封装, 用out.name_scope()对每一个层设置一个名称前缀而已, print查看方便:
def _make_dense_block(num_layers, bn_size, growth_rate, dropout, stage_index,
                      norm_layer, norm_kwargs):
    out = nn.HybridSequential(prefix='stage%d_'%stage_index)
    with out.name_scope():
        for _ in range(num_layers):
            out.add(_make_dense_layer(growth_rate, bn_size, dropout, norm_layer, norm_kwargs))
    return out
在之后的网络创建都会调用这个函数
现在来看看类DenseNet 该类组成最最最基本的DenseNet的结构 把表格中的各个结构拼凑在一起 然后被函数get_densenet进行调用 以及设置一些细节(比如cpu或者gpu 选择121/161/169/201等哪个版本啊啥啥的)
# Net
class DenseNet(HybridBlock):
    r"""Densenet-BC model from the
    `"Densely Connected Convolutional Networks" <https://arxiv.org/pdf/1608.06993.pdf>`_ paper.

    Parameters
    ----------
    num_init_features : int
        Number of filters to learn in the first convolution layer.
    growth_rate : int
        Number of filters to add each layer (`k` in the paper). 每一层feature map的输出数量
    block_config : list of int
        List of integers for numbers of layers in each pooling block.
    bn_size : int, default 4
        Multiplicative factor for number of bottle neck layers.
        (i.e. bn_size * k features in the bottleneck layer)
    dropout : float, default 0
        Rate of dropout after each dense layer.
    classes : int, default 1000
        Number of classification classes.
    norm_layer : object
        Normalization layer used (default: :class:`mxnet.gluon.nn.BatchNorm`)
        Can be :class:`mxnet.gluon.nn.BatchNorm` or :class:`mxnet.gluon.contrib.nn.SyncBatchNorm`.
    norm_kwargs : dict
        Additional `norm_layer` arguments, for example `num_devices=4`
        for :class:`mxnet.gluon.contrib.nn.SyncBatchNorm`.
    """
    def __init__(self, num_init_features, growth_rate, block_config,
                 bn_size=4, dropout=0, classes=1000,
                 norm_layer=BatchNorm, norm_kwargs=None, **kwargs):
        super(DenseNet, self).__init__(**kwargs)
        with self.name_scope():
            # 先是头两层的7*7的Conv + 3*3的Max pool
            self.features = nn.HybridSequential(prefix='') # prefix是设置HybridSequential中每一层的名称前缀
            self.features.add(nn.Conv2D(num_init_features, kernel_size=7,
                                        strides=2, padding=3, use_bias=False))
            self.features.add(norm_layer(**({} if norm_kwargs is None else norm_kwargs)))
            self.features.add(nn.Activation('relu'))
            self.features.add(nn.MaxPool2D(pool_size=3, strides=2, padding=1))
            # for循环添加dense blocks
            num_features = num_init_features
            # 例: block_config: [6, 12, 24, 16]
            for i, num_layers in enumerate(block_config):
                self.features.add(_make_dense_block(
                    # i+1 是 stage_index 只是用来设置网络层名称前缀的
                    num_layers, bn_size, growth_rate, dropout, i+1, norm_layer, norm_kwargs))
                num_features = num_features + num_layers * growth_rate
                if i != len(block_config) - 1:
                    # 添加transition layer
                    self.features.add(_make_transition(num_features // 2, norm_layer, norm_kwargs))
                    num_features = num_features // 2 # 每次过一个transition layer之后 num_features会减半
            self.features.add(norm_layer(**({} if norm_kwargs is None else norm_kwargs)))
            self.features.add(nn.Activation('relu'))
            self.features.add(nn.AvgPool2D(pool_size=7))
            self.features.add(nn.Flatten())

            self.output = nn.Dense(classes) # 全连接层

    def hybrid_forward(self, F, x):
        x = self.features(x)
        x = self.output(x)
        return x
我觉得有必要说明下关于这个 block_config
在其余部分有段代码是:
# Specification
densenet_spec = {121: (64, 32, [6, 12, 24, 16]),    # [6, 12, 24, 16]指每个Dense Block中1*1与3*3组合模块的数量 具体查看表格
                 161: (96, 48, [6, 12, 36, 24]),
                 169: (64, 32, [6, 12, 32, 32]),
                 201: (64, 32, [6, 12, 48, 32])}
...
...
...
num_init_features, growth_rate, block_config = densenet_spec[num_layers]
这个地方就是写了表格中四种版本的DenseNet的配置 根据121/161/169/201等num_layers去选择, 获得num_init_features, growth_rate, block_config 传入类DenseNet
接下来就是看调用DenseNet类的地方了:
def get_densenet(num_layers, pretrained=False, ctx=cpu(),
                 root='~/.mxnet/models', **kwargs):
    r"""Densenet-BC model from the
    `"Densely Connected Convolutional Networks" <https://arxiv.org/pdf/1608.06993.pdf>`_ paper.

    Parameters
    ----------
    num_layers : int
        Number of layers for the variant of densenet. Options are 121, 161, 169, 201.
    pretrained : bool or str
        Boolean value controls whether to load the default pretrained weights for model.
        String value represents the hashtag for a certain version of pretrained weights.
    ctx : Context, default CPU
        The context in which to load the pretrained weights.
    root : str, default $MXNET_HOME/models
        Location for keeping the model parameters.
    norm_layer : object
        Normalization layer used (default: :class:`mxnet.gluon.nn.BatchNorm`)
        Can be :class:`mxnet.gluon.nn.BatchNorm` or :class:`mxnet.gluon.contrib.nn.SyncBatchNorm`.
    norm_kwargs : dict
        Additional `norm_layer` arguments, for example `num_devices=4`
        for :class:`mxnet.gluon.contrib.nn.SyncBatchNorm`.
    """
    num_init_features, growth_rate, block_config = densenet_spec[num_layers]    # 获取指定版本的DenseNet
    net = DenseNet(num_init_features, growth_rate, block_config, **kwargs)
    if pretrained:  # 是否加载预训练模型参数
        from .model_store import get_model_file
        net.load_parameters(get_model_file('densenet%d'%(num_layers),
                                           tag=pretrained, root=root), ctx=ctx)
        from ..data import ImageNet1kAttr
        attrib = ImageNet1kAttr()
        net.synset = attrib.synset
        net.classes = attrib.classes
        net.classes_long = attrib.classes_long
    return net
说实话我觉得这个函数要添加一个classes参数…我们自己训练的时候classes不一定是1000啊…哦对 可以通过**kwargs设置
这个搞懂后之后就是很简单的调用不同版本Densenet的函数了.
比如说
def densenet161(**kwargs):
    return get_densenet(161, **kwargs)
完整的代码还请移步github查看 感觉gluoncv的代码都挺通俗易懂的 有误的地方还请大家指教
Densenet


 2001
2001


 被折叠的 条评论
为什么被折叠?
被折叠的 条评论
为什么被折叠?
 到【灌水乐园】发言


