


1. 创建自定义starter
1.1 生成Maven工程
mvn archetype:generate
	-DarchetypeGroupId=org.apache.maven.archetypes
	-DarchetypeArtifactId=maven-archetype-quickstart
	-DarchetypeVersion=1.4
交互式输入groupId、artificatId、version,生成Maven工程后用IDEA打开
1.2 修改POM文件
主要是引入依赖: spring-boot-starter、spring-boot-starter-web(为了在自定义starter里提供Controller)
<?xml version="1.0" encoding="UTF-8"?>

<project xmlns="http://maven.apache.org/POM/4.0.0" xmlns:xsi="http://www.w3.org/2001/XMLSchema-instance"
         xsi:schemaLocation="http://maven.apache.org/POM/4.0.0 http://maven.apache.org/xsd/maven-4.0.0.xsd">
    <modelVersion>4.0.0</modelVersion>

    <groupId>com.lws</groupId>
    <artifactId>starter</artifactId>
    <version>1.0-SNAPSHOT</version>

    <name>starter</name>

    <parent>
        <groupId>org.springframework.boot</groupId>
        <artifactId>spring-boot-starter-parent</artifactId>
        <version>2.3.1.RELEASE</version>
        <relativePath/> <!-- lookup parent from repository -->
    </parent>

    <properties>
        <project.build.sourceEncoding>UTF-8</project.build.sourceEncoding>
        <greeter.version>0.0.1-SNAPSHOT</greeter.version>
    </properties>

    <dependencies>

        <dependency>
            <groupId>org.springframework.boot</groupId>
            <artifactId>spring-boot-starter</artifactId>
        </dependency>

        <dependency>
            <groupId>org.springframework.boot</groupId>
            <artifactId>spring-boot-starter-web</artifactId>
            <scope>provided</scope>
        </dependency>

    </dependencies>

    <build>
        <pluginManagement><!-- lock down plugins versions to avoid using Maven defaults (may be moved to parent pom) -->
            <plugins>
                <!-- clean lifecycle, see https://maven.apache.org/ref/current/maven-core/lifecycles.html#clean_Lifecycle -->
                <plugin>
                    <artifactId>maven-clean-plugin</artifactId>
                    <version>3.1.0</version>
                </plugin>
                <!-- default lifecycle, jar packaging: see https://maven.apache.org/ref/current/maven-core/default-bindings.html#Plugin_bindings_for_jar_packaging -->
                <plugin>
                    <artifactId>maven-resources-plugin</artifactId>
                    <version>3.0.2</version>
                </plugin>
                <plugin>
                    <artifactId>maven-compiler-plugin</artifactId>
                    <version>3.8.0</version>
                </plugin>
                <plugin>
                    <artifactId>maven-surefire-plugin</artifactId>
                    <version>2.22.1</version>
                </plugin>
                <plugin>
                    <artifactId>maven-jar-plugin</artifactId>
                    <version>3.0.2</version>
                </plugin>
                <plugin>
                    <artifactId>maven-install-plugin</artifactId>
                    <version>2.5.2</version>
                </plugin>
                <plugin>
                    <artifactId>maven-deploy-plugin</artifactId>
                    <version>2.8.2</version>
                </plugin>
                <!-- site lifecycle, see https://maven.apache.org/ref/current/maven-core/lifecycles.html#site_Lifecycle -->
                <plugin>
                    <artifactId>maven-site-plugin</artifactId>
                    <version>3.7.1</version>
                </plugin>
                <plugin>
                    <artifactId>maven-project-info-reports-plugin</artifactId>
                    <version>3.0.0</version>
                </plugin>
            </plugins>
        </pluginManagement>
    </build>
</project>
1.3 创建自动配置类
这个类的主要价值是提供@Configuration,目前测试下来其他在正常项目上能用的注解在这都能用。比如这里我们就用了@ComponentScan。
@EnableConfigurationProperties运行我们将application.properties里的配置封装到指定对象中。
@Conditional***可以设置当前配置类在特定条件下才生效。
package com.lws;


import org.springframework.beans.factory.annotation.Autowired;
import org.springframework.boot.autoconfigure.condition.ConditionalOnProperty;
import org.springframework.boot.context.properties.EnableConfigurationProperties;
import org.springframework.context.annotation.ComponentScan;
import org.springframework.context.annotation.Configuration;

@Configuration
@EnableConfigurationProperties(GreeterProperties.class)
//@ConditionalOnProperty(prefix = "ssr.datasource", name = "url")
@ComponentScan("com.lws")
public class GreeterAutoConfiguration {

    @Autowired
    private GreeterProperties greeterProperties;


}
1.4 接收properties配置的类
这个类就是普通的POJO类,通过注解@ConfigurationProperties提供前缀,类的字段名是最后需要获取的配置名。
package com.lws;

import org.springframework.boot.context.properties.ConfigurationProperties;

@ConfigurationProperties(prefix = "ssr.datasource")
public class GreeterProperties {
}
1.5 配置META-INF/spring.factories
指定我们自定义的配置类全限定名,以便spring自动加载,配置文件内容:
org.springframework.boot.autoconfigure.EnableAutoConfiguration=com.lws.GreeterAutoConfiguration
1.6 创建一个Controller
创建了一个测试Controller,用于测试其他项目引用starter后测试。
package com.lws.controller;


import org.springframework.stereotype.Controller;
import org.springframework.web.bind.annotation.RequestMapping;
import org.springframework.web.bind.annotation.RequestParam;
import org.springframework.web.bind.annotation.ResponseBody;

@Controller("axiba")
@RequestMapping("/v1/ssr")
public class TestController {

    @RequestMapping("hello")
    @ResponseBody
    public String hello(@RequestParam("n") String n) {
        return "hello " + n;
    }

}
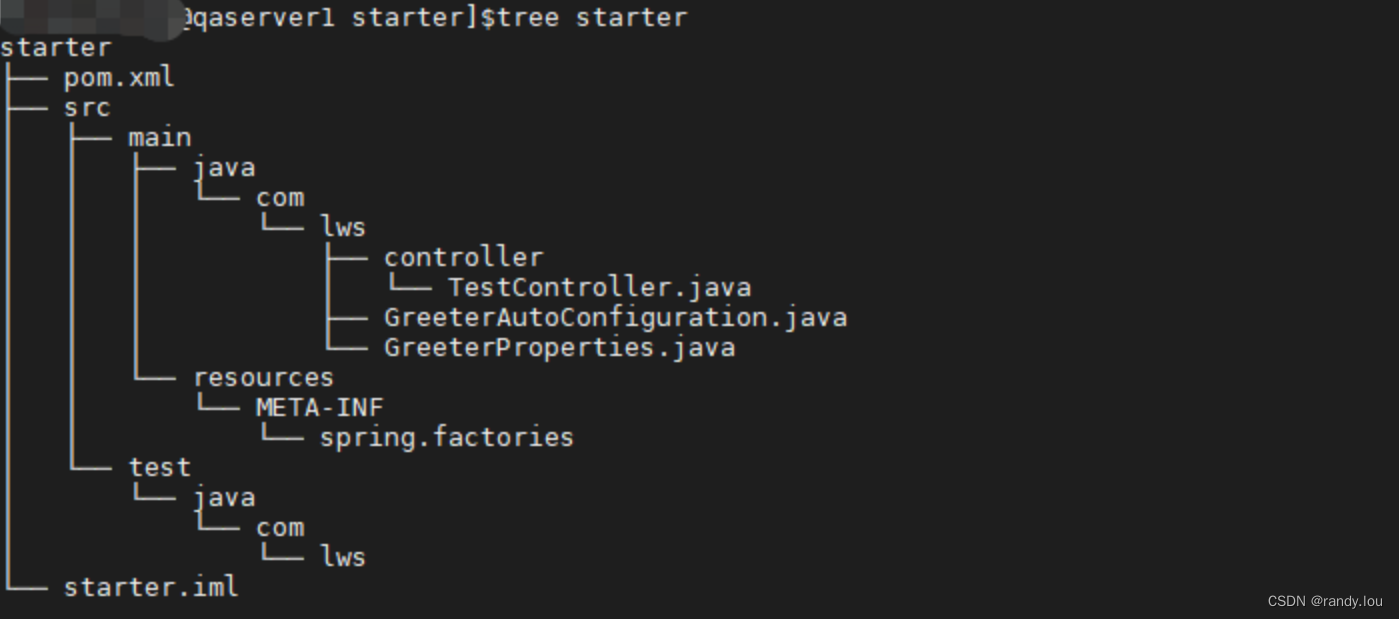
1.7 工程的目录结构
1.8 源码
将通目录下starter.zip
2. 使用
2.1 引入依赖
只需要在POM文件添加依赖:
<dependency>
    <groupId>com.lws</groupId>
    <artifactId>starter</artifactId>
    <version>1.0-SNAPSHOT</version>
</dependency>
2.2 正常启动项目
正常启动项目后即可访问


 195
195

 被折叠的 条评论
为什么被折叠?
被折叠的 条评论
为什么被折叠?
 到【灌水乐园】发言


