


原文:尚硅谷Vue3入门到实战,最新版vue3+TypeScript前端开发教程_哔哩哔哩_bilibili
1.环境安装
nodejs 验证命令node,有node 才有npm这个命令
npm 是 JavaScript 世界的包管理工具,并且是 Node.js 平台的默认包管理工具。通过 npm 可以安装、共享、分发代码,管理项目依赖关系。
npm 由三个独立的部分组成:
- 网站
- 注册表(registry)
- 命令行工具 (CLI)
- 01 - npm 是什么? | npm中文文档 | npm中文网
>npm create vue@latest
只是使用typescript
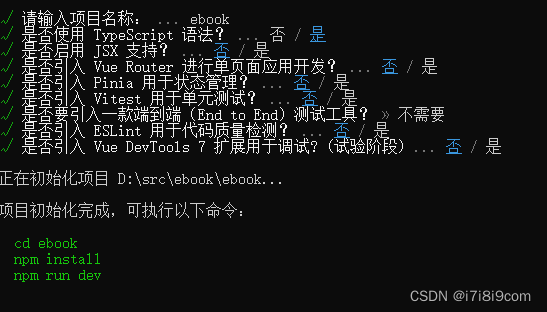
通过vscode打开目录
注意起重一定要有package.json文件,如果没有就另建项目重新npm create vue@latest
工程介绍
1).vscode-->extensions.json

.vscode存放从商店中拿到的插件
比如
Vue - Official(代替了volar)

2)env.d.ts
从node modules引入
如果没有则飘红
npm i
报错npm WARN saveError ENOENT: no such file or directory, open 'D:\src\ebook\package.json'
原因是没有package.json,需要重新运行项目或者考过来pacakge.json
之后会出现node_modules文件夹

vite网址Vite中文网
3)index.html
入口文件
入口文件不是main.js也不是main.ts
vite.config.ts:工程配置文件
3)main.ts
import './assets/main.css' //引入css文件
import { createApp } from 'vue' //类似于养花的花盆,创建应用
import App from './App.vue' //类似于养花的花根
createApp(App).mount('#app'):
createApp(App).把花插在花盆里 创建应用,每个应用都有个根组件
mount: 成果摆在#app里面
4)删掉src
vue文件三个标签
template script style
推荐使用
<script lang="ts">
</script>
2.setup
新配置项,里面不能用this,this是undefined,vue3弱化this
setup比beforecreate还在执行前面
返回对象
setup(){
        // console.log("@@@@@@@@@@@@@@"+this)   this是undefined
        // 数据,直接用let不是响应式的,也就是变化不会引发页面自动更新
        let name="杜甫";
        let age=21;
        let tel='123455'
        // 方法
        function changeName(){
            console.log(1)
           name='李白'
           console.log(name)
        }

        function changeAge(){
            console.log(2)
            age+=1;
            console.log(age)
        }

        function showTel(){
            console.log(3)
              alert(tel)
        }
     return{
        name,age,changeAge,changeName,showTel

     }
    }
上述返回的是对象
返回函数
  return function(){
        return 'haha'
    }
页面上直接出现

因为绝不会有this,改造成箭头函数
  return ()=>{
      return 'haha2'
}箭头函数在语法上比普通函数简洁多。箭头函数就是采用箭头=>来定义函数,省去关键字function。
函数的参数放在=>前面的括号中,函数体跟在=>后的花括号中
①如果箭头函数没有参数,写空括号
②如果箭头函数有一个参数,也可以省去包裹参数的括号
③如果箭头函数有多个参数,将参数依次用逗号(,)分隔,包裹在括号中。
箭头函数的函数体
①如果箭头函数的函数体只有一句执行代码,简单返回某个变量或者返回一个简单的js表达式,可以省去函数体花括号{ }及return
箭头函数没有原型prototype,因此箭头函数没有this指向
箭头函数没有自己的this指向,它会捕获自己定义所处的外层执行环境,并且继承这个this值。箭头函数的this指向在被定义的时候就确定了,之后永远都不会改变。(!永远)
箭头函数进一步
return ()=>"haha3"
语法糖
可以不写setup 及里面的return
<script setup>
let a='666'

</script>
<script lang="ts" setup>
let a='666'
</script>一般vue3都有两个setup
一个用来定义名字,不然就等同文件名
另外一个写数据和方法
配置插件
为了支持把以上两个setup写在一起:
<script lang="ts" setup name="Person2">
let a='666'

</script>
npm i vite-plugin-vue-setup-extend -D
更改vite.config.ts

之后重启就使用了<script lang="ts" setup name="Person2">
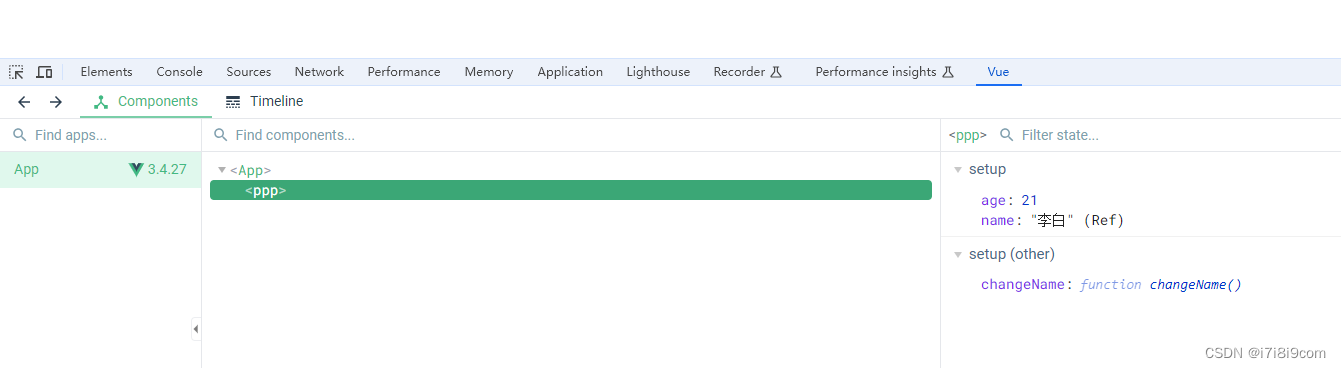
从输出来看 右侧数据被单独放在一块,其余放在一块

响应式数据
不同于vue2用data(){return{}} 里面的数据自动是响应式
ref:基本类型数据
引入ref,在需要变成响应式的前面加ref
<script lang="ts" setup name="Person">
import {ref} from 'vue'
let name=ref("libai");
let a='666';
console.log(name);
console.log(a);
function change(){

}
</script>
从输出可以看到

打开,带下划线的都是系统自身用的

可见name是一个对象,使用时应该用name.value获取其值,但是
注意如下2个位置不同:template中不用写.value,自动添加

reactive:只能对象类型数据
let car=reactive({brand:'Benz',price:100})
没包裹叫原对象
包裹之后变为响应式对象

ref2:对象类型数据
<template>
<div>
{{ car.brand }}{{ car.city }}

<ul>
  <li v-for="item in games" :key="item.id">
  {{item.id  }}  {{item.name  }}
  </li>
</ul>
<button @click="changeBrand">更改品牌</button>
<button @click="changeName">更改游戏编号</button>
</div>
</template>
<script lang='ts' setup name="Person">
import {ref} from 'vue'
let car=ref({brand:'aodi',city:'shanghai'})
let games=ref([
  {id:'a1',name:'王者'},
  {id:'a2',name:'神探'},
  {id:'a3',name:'日落'}])

  function changeBrand(){
    car.value.brand='宝马'
  }


  function changeName(){
    games.value[0].id='a11'

  }


</script>
<style scoped>


</style>

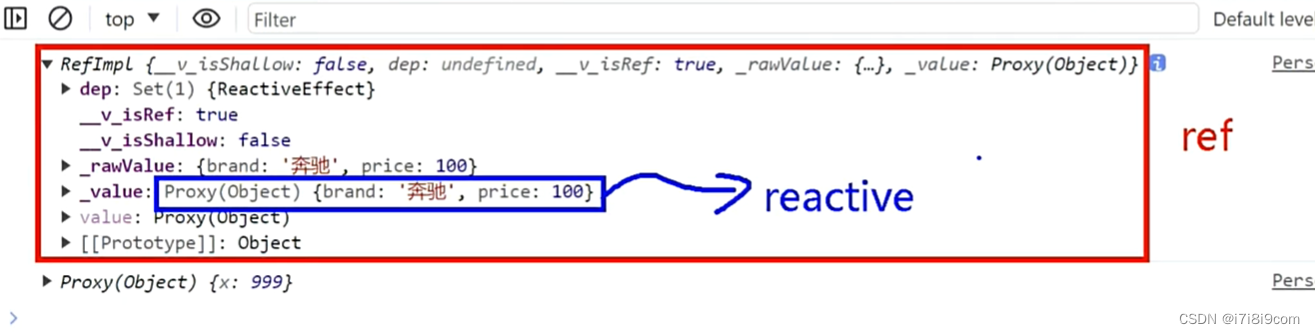
reactive和Ref
RefImpl都是由ref定义得来
Proxy都是由reactive得来

Ref遇到对象时用Reactive

避免ref后面.value每次都要写的设置
左下角齿轮-settings
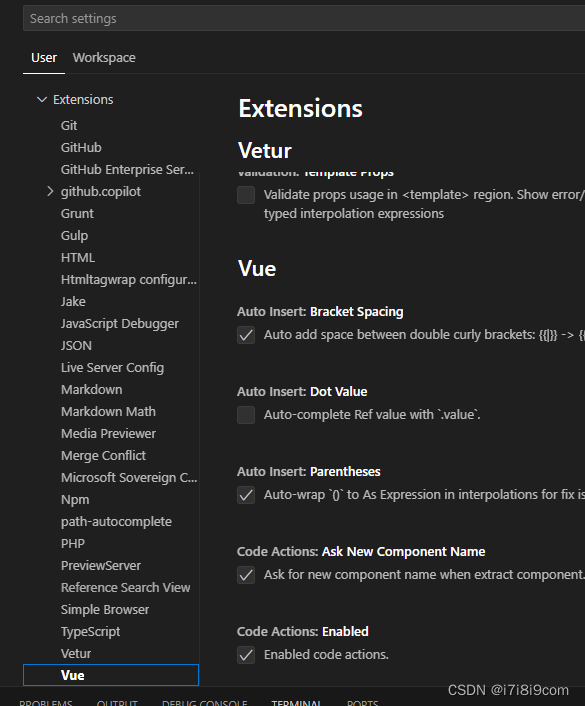
选中 AutoInsertDotvalue
reactive所指元素被重新分配对象
失去响应式
以下function不能更改页面
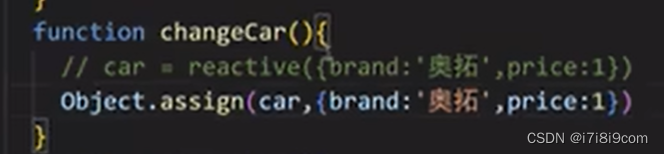
let car=reactive({brand:'aodi',city:'shanghai'})
function changeCar(){
car={brand:'保时捷',city:'tianjin'}
}
但是以下是可以的
function changeCar(){
car.brand='a'
car.csity='gz'
}
解决方法1
to refs结构对象
左边相当于右面

修改为 let {name,age}=toRefs(person)
把reactive对象所定义的每一组key value变成ref对象


并且name就是person.name ,改变name同时也改变了person.name
toRef:只改变某个元素
let nl=toRef(person,'age')
console.log("nl"+nl.value)
3.计算属性
<input type="text"
单向属性 :value= 其实是v-bind:value
双向属性 v-model= 其 实是v-model:value
<template>
<div class="person">
姓:<input type="text" v-model="fName"> <br>
名:<input type="text" v-model="lName"> <br>
<button @click="changeFullName">将全名修改为li-four</button>
全名 <span>{{ fullName }}</span>
<!-- 全名 <span>{{ fullName2() }}</span>
全名 <span>{{ fullName2() }}</span> -->
</div>
</template>
<script lang="ts" setup name="Person">
import {ref,computed} from 'vue'
let fName=ref('zhang')
let lName=ref("big")
// 下面定义的fullName只读,不可修改
// let fullName=computed(()=>{
// // slice(0,1)截取从0开始到1的1个数据 ,slice(1) 截取从1到最后的所有数据
// return (fName.value.slice(0,1).toUpperCase()+fName.value.slice(1)+lName.value)
// })
// 下面定义的fullName 可读写
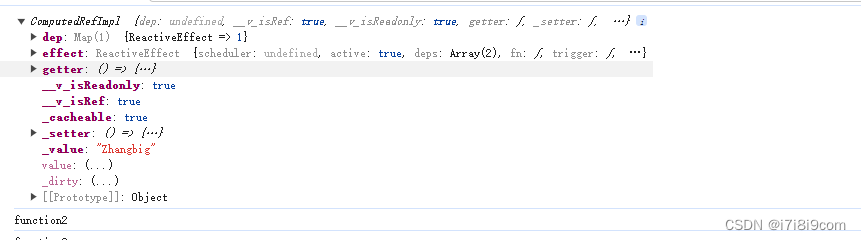
let fullName=computed(
{
get(){ return (fName.value.slice(0,1).toUpperCase()+fName.value.slice(1)+"-"+lName.value)},
set(val){
const [str1,str2]=val.split('-')
fName.value=str1
lName.value=str2
}
}
)
console.log(fullName)
function fullName2(){
console.log("function2")
return (fName.value.slice(0,1).toUpperCase()+fName.value.slice(1)+lName.value)
}
function changeFullName(){
fullName.value="li-si"
}
</script>
<style scoped>
.person{
background-color: cadetblue;
}
</style>
计算属性是有缓存的,发现其构成没变,则即使其它地方使用也不会再计算
方法则没有缓存 {{方法名()}}
如上定义计算属性是只读的
要想该则需要设置get set
set(val) 中的val就是fullname="li-si"中被赋予的值
let fullName=computed(
    {
       get(){ return (fName.value.slice(0,1).toUpperCase()+fName.value.slice(1)+"-"+lName.value)},
       set(val){
        const  [str1,str2]=val.split('-')
        fName.value=str1
        lName.value=str2

       }
    }
)
4.watch
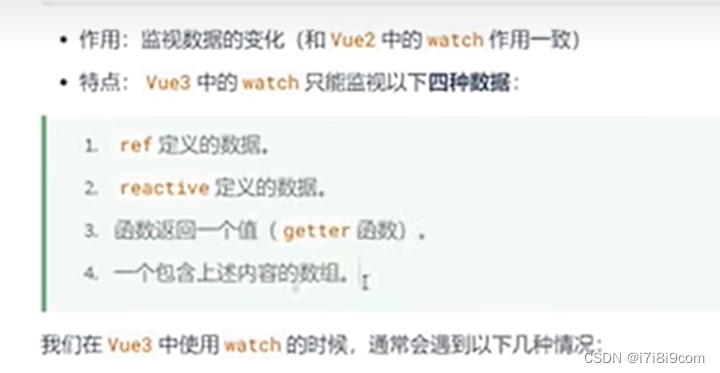
watch在vue3是一个函数
watch(监视谁,回调函数)
监视基本类型
注意:监视sum不需要写.value
let sum=ref(0);
watch(sum,(newVal,oldVal)=>{
console.log("sum变化了"+newVal+"旧值"+oldVal)
})
结束监视
监视函数的返回值就是结束监视函数
import {ref,computed,watch} from 'vue'
let sum=ref(0);
function addOne(){
    sum.value++
}
const stopWatch=watch(sum,(newVal,oldVal)=>{
console.log("sum变化了"+newVal+"旧值"+oldVal)
if(newVal>10){
    stopWatch();
}
})
console.log(stopWatch)
stopWatch就是

监视Ref定义的对象类型数据
监视对象地址值
若需监视对象值,需开启深度监视,使用监视函数第三个值
watch(person,(newVal,oldVal)=>{
   console.log("Person被修改了"+newVal+"旧值"+oldVal)
},{deep:true})
还可以加个immediate参数,一上来先执行,因为原来肯定是undefined
watch(person,(newVal,oldVal)=>{
   console.log("Person被修改了"+newVal+"旧值"+oldVal)
},{deep:true,immediate:true})
另外(newVal,oldVal)如果里面只写一个参数代表的是新值


监视Reatctive定义对象
默认开启深度监视,不能关闭
ref替换对象才是真正的替换,地址也变了,并且一直保持响应式

如果用reactive person={},会失去响应式;object.assign:是修改人的属性而已
监视对象类型的某个属性

对象属性是基本类型

<template>
    <div>
    姓名<h2>{{ person.name }}</h2><br>
    年龄<h2>{{ person.age }}</h2><br>
    车<h2>{{ person.car.c1 }},{{person.car.c2  }}</h2><br>
    <button @click="changeName">修改名字</button>
    <button @click="changeAge">修改年龄</button>
    <button @click="changeFirstCar">修改第一台车</button>
    <button @click="changeSecondCar">修改第二台车</button>
    <button @click="changeCar">修改车</button>
    </div>
</template>
<script lang="ts" setup name="Person">
import {reactive,watch} from 'vue'
let person=reactive({
    name:"白居易",
    age:18,
    car:{
        c1:'奔驰',
        c2:'宝马'
    }
})

function changeName(){
    person.name="素食"
}

function changeAge(){
    person.age++
}

function changeFirstCar(){
    person.car.c1="保时捷"
}

function changeSecondCar(){
    person.car.c2="法拉利"
}

function changeCar(){
//    Object.assign(person.car,{c1:'蓝宇',c2:'比亚迪'})
person.car={c1:'蓝宇',c2:'比亚迪'}
}

watch(()=>{
    return person.name
},(newVal,oldVal)=>{
   console.log("发生变化了",newVal,oldVal)
})

</script>
<style scoped>

</style>
上文中watch第一个值用了一个getter函数,简写为箭头函数,能返回一个值
以实现只监视一个属性

进一步简写为
watch(()=>person.name,(newVal,oldVal)=>{
   console.log("发生变化了",newVal,oldVal)
}) 
对象属性是对象类型
watch(person.car,(newVal,oldVal)=>{
   console.log("发生变化了",newVal,oldVal)
})
上面的有缺陷:就是整个car变了没有被监视到
建议写全,监视的是地址值,属性变化监视不到
watch(()=>person.car,(newVal,oldVal)=>{
   console.log("发生变化了",newVal,oldVal)
})
需要开启deep
watch(()=>person.car,(newVal,oldVal)=>{
   console.log("发生变化了",newVal,oldVal)
},{deep:true})
监视多种值
watch([()=>person.name,()=>person.car.c1],(newVal,oldVal)=>{
   console.log("发生变化了",newVal,oldVal)
},{deep:true})
watch Effect
<template>
    <div>
   <h2>当前水温:{{ temp }}C</h2>
   <h2>当前水位:{{ height }}M</h2>
   <button @click="changeTemp">点我水温+1</button>
   <button @click="changeHeight">点我水位+1</button>
    </div>
</template>
<script lang="ts" setup name="Person">
import {ref,watch} from 'vue'
let temp=ref(20)
let height=ref(3)

function changeTemp(){
    temp.value++
}
function changeHeight(){
    height.value++
}

watch([temp,height],(newVal,oldVal)=>{
    // 从newVal中获取新的温度和水位
    let [newTemp,newHeight]=newVal
    if(newTemp>=30||newHeight>=8){
        console.log("alarm",newVal,oldVal)
    }
})


</script>
<style scoped>

</style>
改用watch effect,有immediate效果
因为被监视值就是定义的属性,
watchEffect(()=>{
   if(temp.value>=30||height.value>=10){
    console.log("hello")
   }
})
标签REF
用Ref的原因,是因为如果使用id属性,那么不同vue文件可能重复使用
<h2 id="title2">深圳</h2>
console.log(document.getElementById('title2'))
输出为
![]()
对应改为ref2
<template>
    <div>
      <h1>中国</h1>
      <!-- 把深圳放在名称为title2的容器里 -->
      <h2 ref="title2">深圳</h2>
      <h3>龙华</h3>
      <button @click="showLog">点我输出h2</button>
    </div>
</template>
<script lang="ts" setup name="Person">
 import{ref} from 'vue'
//  创建一个title2,用于存储ref2标记的内容
 let title2=ref()


function showLog(){
    // console.log(document.getElementById('title2'))
    console.log(title2.value)
}

</script>
<style scoped>

</style>
有的时候会输出,标签中会有 data-v-4cadc14e,这是局部样式导致的,去掉scoped就没有了

<template>
    <div class="person">
      <h1>中国</h1>
      <!-- 把深圳放在名称为title2的容器里 -->
      <h2 >深圳</h2>
      <h3 ref="title2">龙华</h3>
      <button @click="showLog">点我输出h2</button>
    </div>
</template>
<script lang="ts" setup name="Person">
 import{ref} from 'vue'
//  创建一个title2,用于存储ref2标记的内容
 let title2=ref()


function showLog(){
    // console.log(document.getElementById('title2'))
    console.log(title2.value)
}

</script>
<style scoped>
.person{
    background-color: cadetblue;
}
</style>
REF在组件
Ref都是加在普通的html标签上而不是组件标签
如果给组件加,比如
<template>
    <h2 ref="title2">ok</h2>
    <button @click="outPrint">点我输出</button>
   <Person ref="ren"/>
</template>
<script lang="ts" setup name="App">
import  Person from './components/Person.vue'
import {ref} from 'vue'
let title2=ref()
let ren=ref()

function outPrint(){
    // console.log(title2.value)
    console.log(ren.value)
}

// export default{
//     name:'App',
//     components:{Person}
// }

</script>
输出ref是组件的实例对象,但是什么具体值也看不到,原因是被本vue文件作为父级保护起来,这与Vue2不同,在Vue2中父级是可以看到所有子级的

如果要显示,则需要去组件中添加
import{ref,defineExpose} from 'vue
defineExpose({a,b,c})
<template>
    <div class="person">
      <h1>中国</h1>
      <!-- 把深圳放在名称为title2的容器里 -->
      <h2 >深圳</h2>
      <h3 ref="title2">龙华</h3>
      <button @click="showLog">点我输出h2</button>
    </div>
</template>
<script lang="ts" setup name="Person">
 import{ref,defineExpose} from 'vue'
//  创建一个title2,用于存储ref2标记的内容
 let title2=ref()
let a=ref(0)
let b=ref(1)
let c=ref(2)


function showLog(){
    // console.log(document.getElementById('title2'))
    console.log(title2.value)
}

defineExpose({a,b,c})
</script>
<style scoped>
.person{
    background-color: cadetblue;
}
</style>

总结
ref可以定义在html普通标签,拿到的是元素
也可以定义在组件上,拿到的是组件实例,能看到哪些元素取决于组件本身的expose
TS
约束定义
1)在src下新建types文件夹,下面新建index.ts
// 定义一个接口对象,用于限制person对象的具体数值
export interface PersonInter{
    id:string,
    name:string,
    age:number
}

// export type Persons=Array<PersonInter>
export type Persons=PersonInter[]
上面定义的是对象
下面定义了数组,引用了对象,有两种定义方法,一种用泛型,另外一种用[]
约束使用
先引入
然后用冒号
<template>
    <div class="person">
     ???
    </div>
</template>
<script lang="ts" setup name="Person">
// import的是个约束,不是具体值,所以无法打印
import {type PersonInter,type Persons} from '@/types'
//下文的意思是person要符合接口规范,包括变量名称
let person:PersonInter={id:'001',name:'李白',age:22}
//下文的意思是person数组泛型要符合接口规范,包括变量名称
// let persons:Array<PersonInter>=[
    let persons:Persons=[
{id:'001',name:'李白',age:22},
{id:'002',name:'杜甫',age:32}
{id:'003',name:'白居易',age:36}
]
</script>
<style scoped>
.person{
    background-color: cadetblue;
}

</style>
Props
1. 属性中冒号
<h2 a="1+1" :b="1+1" c="x" :d="x" ></h2> let x=99
有了冒号代表取变量或者本身就是表达式,结果如下

2.给子组件传值
<Person a="haha" b="ss" :list="personList"/>
子组件接收:注意子组件里面的let x把所有的defineProps里面的值都保存了起来
<script lang="ts" setup name="Person">
import {defineProps} from 'vue'
// 接收a
// defineProps(['a','b'])
//接收a并且保存起来
let x=defineProps(['a','b','list'])

console.log(x.a)
console.log(x)
</script>
v-for
<Person a="haha" b="ss" :list="personList"/>如果写为 <Person a="haha" b="ss" :list="5"/>
:list="5" 子组件显示会展示5次

v-for的key主要是为了更新,作为索引;如果不指定key,则用数据下标0,1,2等为索引,容易混乱
<li v-for="item in list" :key="item.id"> persons也可以用具体数字
如果v-for对应list为空,则直接不显示
可有可无的属性
参见x后的?
export interface PersonInterface{
    id:string,
    name:string,
    age:number,
    x?: number
}

export type Persons=PersonInterface[]
优雅泛型
参加reactive后面的<Persons>取代了PersonList:Persons
let PersonList=reactive<Persons> ([
    {id:'001',name:'李白',age:22},
    {id:'002',name:'杜甫',age:23},
    {id:'003',name:'白居易',age:24},
    {id:'004',name:'苏轼',age:25},
])
</script>
接收并限制类型
子组件接收时检查类型
<template>
    <div>
       <ul>
        <li v-for="item in list" :key="item.id">
        {{item.id}}---{{item.name}}---{{ item.age }}

        </li>
        </ul>

    </div>
</template>
<script lang="ts" setup name="Person">
   import{defineProps,withDefaults} from 'vue'
   import {type Persons} from '../types'
//    定义需要手动父组件传递过来的的属性名称,同时必须类型符合
// defineProps<{list:Persons}>()

// 接收list+限制类型 +限制必要性+默认值
withDefaults(defineProps<{list?:Persons}>(),{
    //
list:()=>[{id:'008',name:'王麻子',age:99}]
}
)


</script>

<style scoped>

</style>
宏函数
define定义的函数比如defineProps等,vue3默认引入,不会报错
生命周期
也叫生命周期函数,钩子
组件:创建 挂载 更新 销毁
created mounted
vue2声明周期
全局安装
npm install -g @vue/cli查看vue版本 vue -V
创建 vue create vue2test
创建 前 before 后
挂载
更新
销毁
<template>
    <div>
        <h2>当前求和为{{sum}}</h2>
        <button @click="addSum">点我sum+1</button>
    </div>
</template>
<script>
   export default{
    /* eslint-disable */
    name:'Person',
    data(){
   return{
        sum : 1,
   }
    },

    methods:{

        addSum(){
            this.sum++;
        }
    },
//   顺序不重要,何时调vue决定
// 创建:比如人怀孕
   beforeCreate() {
    console.log("创建前");
},
   created(){
    console.log("创建完毕")
  },
  // 挂载:出生

beforeMount() {
    console.log("没有挂载")
    // debugger  //停在这里
},
mounted(){
    console.log("挂载完毕")
},
//更新,多次
beforeUpdate(){
    console.log("更新前")
},
updated() {
    console.log("更新完毕")
},
//销毁前
beforeDestroy(){
    console.log("销毁前")
},
destroyed(){
    console.log("销毁完毕")
}


}


</script>
vue3声明周期
1.子先挂载
![]()
1.子先挂载,App这个组件最后挂载
2.vue2与vue3生命周期对比
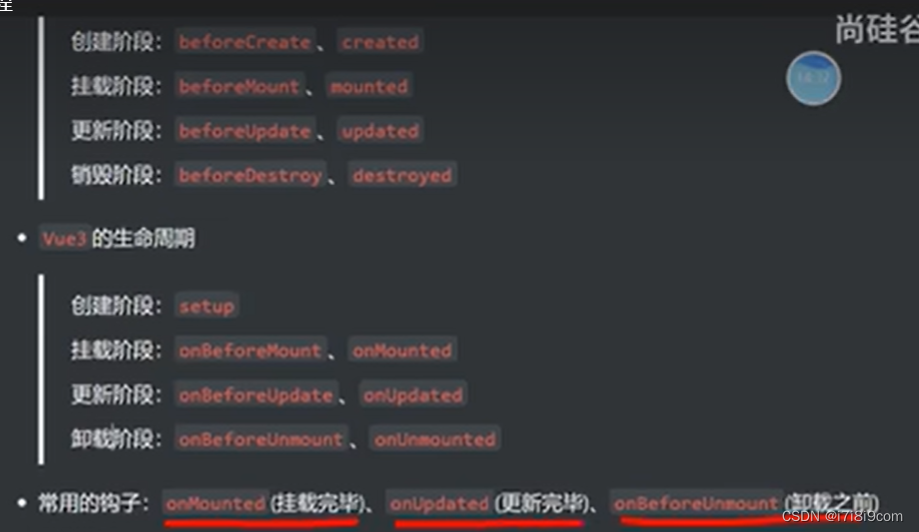
3.vue3
<template>
    <div>
         <h2>{{ sum }}</h2>
         <button @click="addSum">点我加1</button>
    </div>
</template>
<script lang="ts" setup  name="Person">
import { ref,onBeforeMount,onMounted,onBeforeUpdate,onUpdated,onBeforeUnmount,onUnmounted} from 'vue';
   let sum=ref(0)
   function addSum(){
         sum.value++
   }


// setup 相当于befeforeCreate和created
  console.log("创建完了")


//挂载需要引入onBeforeMounted
onBeforeMount(()=>{
    console.log("挂载前")

})

//挂载完引入onMounted
onMounted(()=>{
    console.log("子---挂载完毕")

})
//更新前
onUpdated(()=>{
    console.log("更新前")

})

//更新后
onUpdated(()=>{
    console.log("更新后")

})
//卸载前
onBeforeUnmount(()=>{
    console.log("卸载前")

})

//卸载后
onUnmounted(()=>{
    console.log("卸载后")

})


</script>
<style scoped>


</style>
axios
npm i axios
获取狗的图片
https://dog.ceo/api/breed/pembroke/images/random
后端服务器返回的一定是对象,里面有很多key value
{data: {…}, status: 200, statusText: '', headers: AxiosHeaders, config: {…}, …}
找到需要要的key
hooks
<template>
    <div>
        <h2>{{ sum }}</h2>
        <button @click="addSum">点我加1</button>
        <hr>
        <img v-for="(dog,index) in dogList" :src="dog" :key="index"   />
        <button @click="moreDog">再来一只狗</button>
    </div>
</template>
<script lang="ts" setup name="App">
import { ref,reactive } from 'vue';
import axios from 'axios'
let sum=ref(0);


function addSum(){
    sum.value++;
}
let dogList=reactive([
    "https://images.dog.ceo/breeds/pembroke/n02113023_3927.jpg",
    "https://images.dog.ceo/breeds/pembroke/n02113023_1659.jpg"

])
async function moreDog(){

    try{let result= await axios.get('https://dog.ceo/api/breed/pembroke/images/random')
    dogList.push(result.data.message)}catch(error){
      console.log(error)
    }

}
</script>
<style scoped>
  img{
    height: 200px;
    margin-right: 10px;
  }
</style>
:把相关的数据和方法写在一起,有点像vue2 mixin
step1:
src下新建hooks文件夹
本质就是xx.ts或xx.js
命名规范 useXXX
step2:
定义bing暴露
useDog.ts
import { reactive } from 'vue';
import axios from 'axios'
//export default后面直接跟值比如export default '1',所以也可以跟一个匿名函数,如果没有default则必须命名
export default function(){

let dogList=reactive([
    "https://images.dog.ceo/breeds/pembroke/n02113023_3927.jpg",
    "https://images.dog.ceo/breeds/pembroke/n02113023_1659.jpg"

])
async function getDog(){

    try{let result= await axios.get('https://dog.ceo/api/breed/pembroke/images/random')
    dogList.push(result.data.message)}catch(error){
      console.log(error)
    }

}
// 向外部提供东西,可以提供对象
return {dogList,getDog}
}
useSum.ts
import { ref ,onMounted,computed} from 'vue';
export default function(){
    let sum=ref(0);
    let bigSum=computed(()=>{
        return sum.value*10
    })
    function addSum(){
        sum.value++;
    }

    onMounted(()=>{
      addSum()
    })
    return {sum,addSum,bigSum}
}
stpe3
引入 接收 使用
<template>
    <div>
        <h2>{{ sum }}  放大10倍后{{ bigSum }}</h2>
        <button @click="addSum">点我加1</button>
        <hr>
        <img v-for="(dog,index) in dogList" :src="dog" :key="index"   />
        <button @click="getDog">再来一只狗</button>
    </div>
</template>
<script lang="ts" setup name="App">
import useDog from '@/hooks/useDog'
import useSum from '@/hooks/useSum'
const {dogList,getDog}=useDog()
const {sum,addSum,bigSum}=useSum()
</script>
<style scoped>
  img{
    height: 200px;
    margin-right: 10px;
  }
</style>

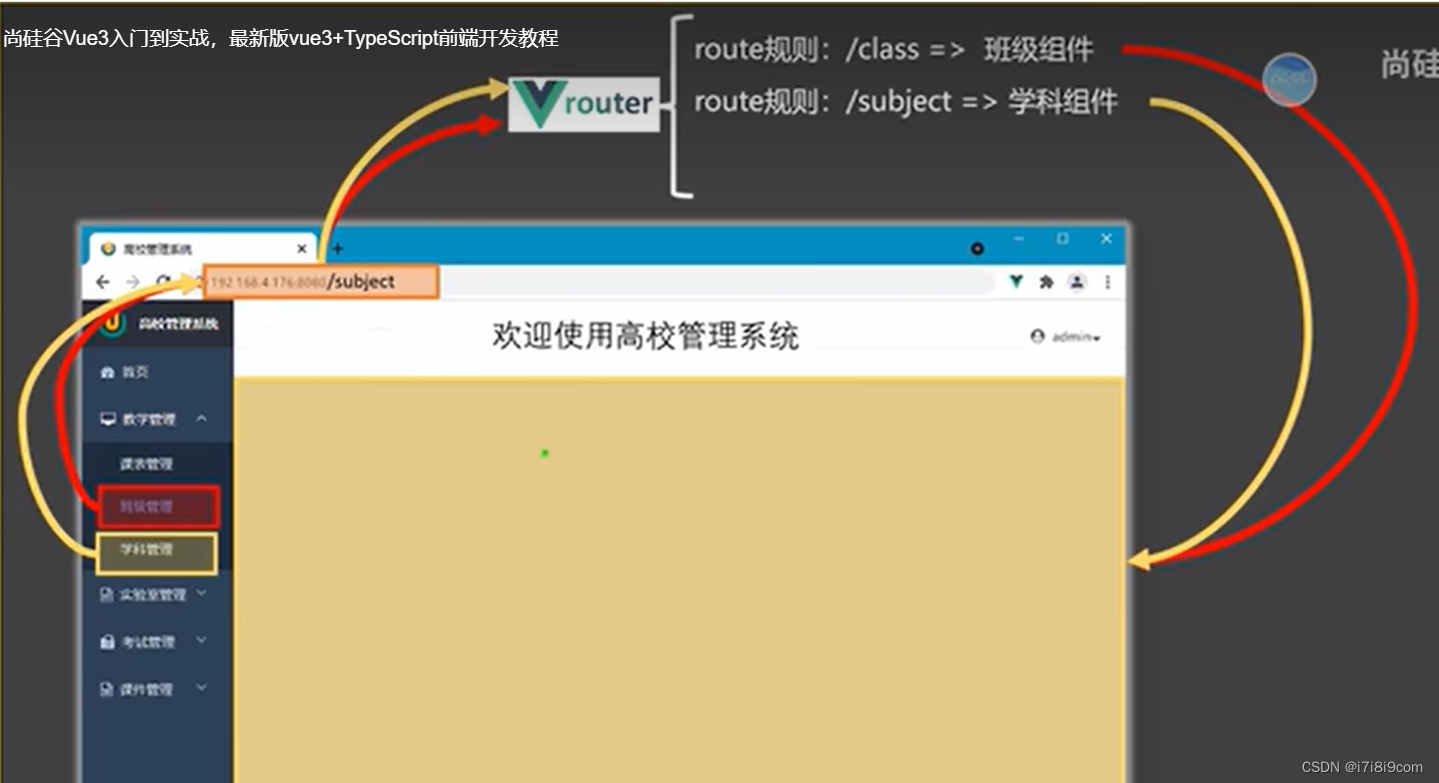
前端路由

因为是单页面应用所以需要路由
当点击左侧导航,触发路径变化
路径变化被路由器捕获到,加载对应组件

点击另外一个目录时,卸载原来的组件,挂载新的组件
路由设置
1)确定页面导航区,展示区
2)请来路由器
安装路由器 npm i vue-router
src下建立router文件夹 建立 index.ts

3)制定路由的具体规则(什么路径,对应什么组件)
// 创建一个路由器bing暴露出去
// 1.1引入createRouter
import { createRouter ,createWebHistory} from "vue-router";
// 1.2引入要呈现的组件  ,一开始飘红需要关掉vscode重新打开,主要是不认vue3
import Home from '@/components/Home.vue'
import News from '@/components/News.vue'
import About from '@/components/About.vue'
// 2.创建路由器
const router=createRouter({
    history:createWebHistory(),//确定工作模式
    routes:[ //一个一个的路由规则
        {
            path:'/home',component:Home
        },
        {
            path:'/news',component:News
        },
        {
            path:'/about',component:About
        }
    ]
})
// 3.暴露
export default router

//4.要去main.ts引入路由器
4)main.ts中引入路由
import { createApp } from "vue"
import App from './App.vue'
// 路由4:引入路由器
import router from "./router"
// 创建一个应用
const app=createApp(App)
// 使用路由器
app.use(router)
// 挂载整个应用
app.mount('#app')
当有个app.use(router)之后,就可以看到控制台多了Routes

这时候在地址栏加比如/news 就会被router监控到,但是还不知道展示在哪里
5)展示位置
import { RouterView } from 'vue-router';
<RouterView></RouterView>
6)增加切换支持
 import { RouterView,RouterLink} from 'vue-router';

<div class="navigate">

           <RouterLink to="/home" class="active">首页</RouterLink>

           <RouterLink to="/news">新闻</RouterLink>

           <RouterLink to="/about">关于</RouterLink>

       </div >
7)选中高亮
<template>
    <div class="app">
        <h2 class="title">Vue 路由测试</h2>
        <!-- 导航区 -->
       <div class="navigate">
           <RouterLink to="/home" active-class="active">首页</RouterLink>
           <RouterLink to="/news" active-class="active">新闻</RouterLink>
           <RouterLink to="/about" active-class="active">关于</RouterLink>
       </div >
        <!-- 展示区 -->
    <div class="main-content">
     <RouterView></RouterView>

    </div>

    </div>

</template>
<script lang="ts" setup name="App">
 import { RouterView,RouterLink} from 'vue-router';


</script>
<style scoped>
/* app */
.title{
    text-align: center;
    word-spacing: 5px;
    margin: 30px 0;
    height: 70px;
    line-height: 70px;
    background-image: linear-gradient(45deg,gray,white);
    border-radius: 10px;
    box-shadow: 0 0 2px;
    font-size: 30px;
}
.navigate{
    display: flex;
    justify-content: space-around;
    margin: 0 100px;
}
.navigate a{
    display: block;
    text-align: center;
    width: 90px;
    height: 40px;
    line-height: 40px;
    border-radius: 10px;
    background-color: gray;
    text-decoration: none;
    color: white;
    font-size: 18px;
    letter-spacing: 5px;
}

.navigate a.active{
    background-color: #64967E;
    color: #ffc268;
    font-weight: 900;
    text-shadow: 0 0 1px black;
    font-family: 微软雅黑;
}

.main-content{
    margin: 0 auto;
    margin-top: 30px;
    border-radius: 10px;
    width: 90%;
    height: 400px;
    border: 1px solid;
}
</style>
注意

路由组件:就是通过路由引入进来的
一般组件:通过import进来的,页面上要写<组件名/>
视觉小时了组件是被卸载了
路由工作模式
history
vue2 mode:'history'
vue3: history:createWebHistory()

hash

路由to的两种写法
1.字符串写法
<RouterLink to="/news/detail?a=哈哈&b=呃呃">{{item.title}}</RouterLink>
2.对象写法1
<RouterLink :to="{path:'/about'}" active-class="active">关于</RouterLink>
3.对象写法2
<RouterLink :to="{name:'xinwen'}" active-class="active">新闻</RouterLink>
参见命名路由
命名路由
增加了name
routes:[ //一个一个的路由规则
{
name:'zhueye',
path:'/home',
component:Home
},
{
name:'xinwen',
path:'/news',component:News
},
{ name:'guanyu',
path:'/about',component:About
}
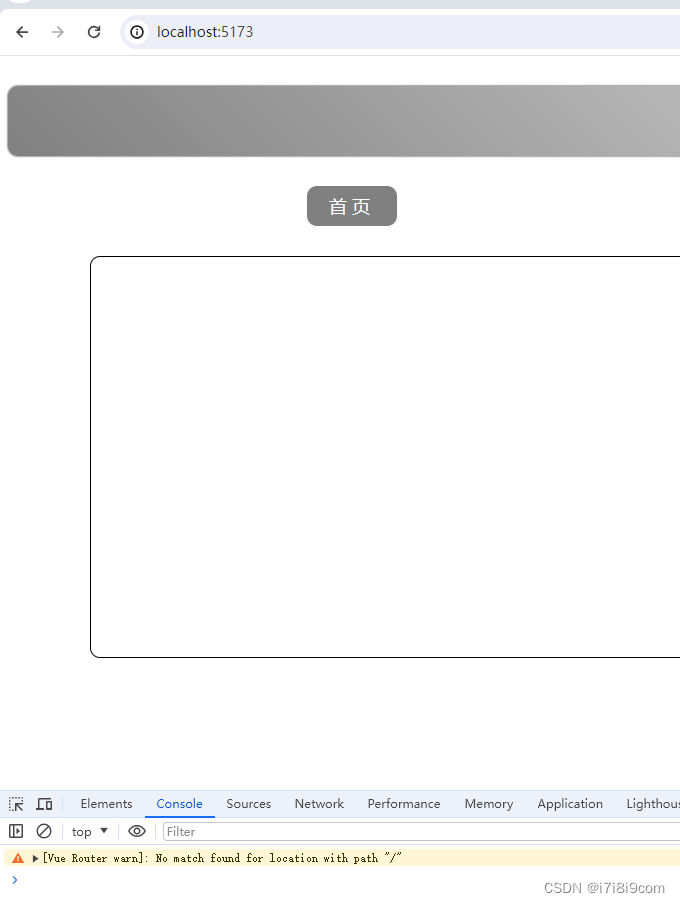
]嵌套路由
[Vue Router warn]: No match found for location with path "/" 没有/的路由http://localhost:5173/
先引入
 routes:[ //一个一个的路由规则
        {
            name:'zhueye',
            path:'/home',
            component:Home
        },
        {
            name:'xinwen',
            path:'/news',component:News,
            children:[
                {
                    path:'detail',
                    component:Details
                }
            ]
        },
        {   name:'guanyu',
            path:'/about',component:About
        }
    ]
})
<template>
<div class="news">
<!-- 新闻里面的导航区 -->
<ul>
<li v-for="item in news" :key="item.id">
<RouterLink to="/news/detail">{{item.title}}</RouterLink>
</li>
</ul>
<!-- 新闻里面的内容区 -->
<div class="news-content">
<RouterView></RouterView>
</div>
</div>
</template>
<script lang="ts" setup name="News">
import { reactive } from 'vue';
import {RouterView,RouterLink} from 'vue-router'
const news=reactive([
{id:'new001',title:'美国进攻伊朗',content:'2023000美国进攻伊朗,从波斯湾开始'},
{id:'new002',title:'一种新的学科',content:'数学化学作为一种新的学科'},
{id:'new003',title:'一种新的昆虫',content:'有点像龙和鱼'},
{id:'new003',title:'好消息',content:'北极熊到达了南极'},
])
</script>
<style scoped>
.news{
padding: 0 20px;
display: flex;
justify-content: space-between;
height: 100%;
}
.news ul{
margin-top: 30px;
list-style: none;
padding-left: 10px;
}
.news li>a{
font-size: 18px;
line-height: 40px;
text-decoration: none;
color: #64967E;
text-shadow: 0 0 1px rgb(0,84,0);
}
.news-content{
width: 70%;
height: 90%;
border: 1px solid ;
margin-top: 20px;
border-radius: 10px;
}
</style>路由参数
query
父给子 <RouterLink to="/news/detail?a=哈哈&b=呃呃">{{item.title}}</RouterLink>
a=哈哈相当于键值对 &连接多个
子组件接收:
引入route
<ul class="news-list">
<li> 编号:{{route.query.id}}</li>
<li>标题:{{route.query.title}}</li>
<li>内容:{{route.query.content}}</li>
</ul>
import {useRoute} from 'vue-router'
let route=useRoute()
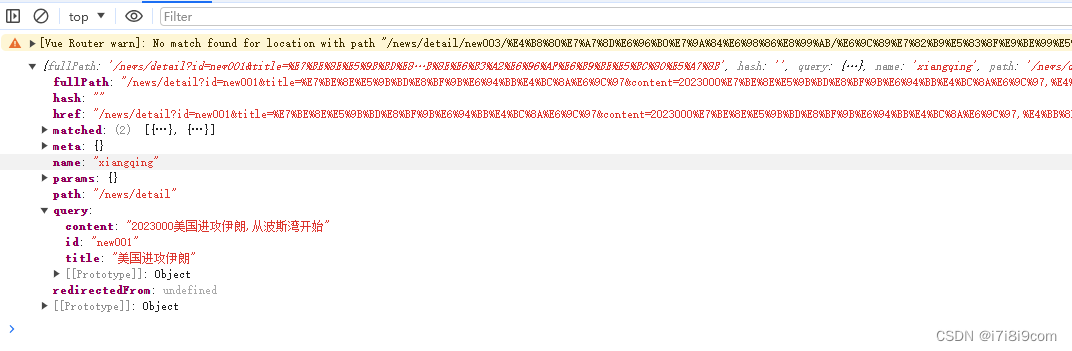
console.log(route)传递的参数在route对象的Target里面的query参数

第一种写法
<RouterLink :to="`/news/detail?id=${item.id}&title=${item.title}&content=${item.content}`">{{item.title}}</RouterLink>
第二种写法
    <RouterLink :to="{
                    path:'/news/detail',
                    query:{
                        id:item.id,
                        title:item.title,
                        content:item.content

                    }

                }">
简化子处使用参数
注意解构赋值会丢失响应式
新的details.vue
<template>
    <ul class="news-list">
        <!-- <li> 编号:{{route.query.id}}</li>
        <li>标题:{{route.query.title}}</li>
        <li>内容:{{route.query.content}}</li> -->
  <li> 编号:{{query.id}}</li>
        <li>标题:{{query.title}}</li>
        <li>内容:{{query.content}}</li>

    </ul>
</template>
<script lang="ts" setup name="Details">
import {toRefs} from 'vue'
import {useRoute} from 'vue-router'
let route=useRoute()
console.log(route)
// 可以从route上进行解构赋值,这是从响应对象上直接解构,丢失响应式,页面切换无效果
// let {query} =route
// 可以从route上进行解构赋值,并用toRefs
let {query} =toRefs(route)
</script>
<style scoped>
.news-list{
    list-style: none;
    padding-left: 20px;
}
.news-list>li{
    line-height: 30px;
}

</style>
params
三个注意
1)在路由注册了参数,才能使用,并且不能缺
除非在路由参数加? path:'detail/:id/:title/:content?',
2)router link对象写法中必须使用路由name
3)router link对象写法中参数值不能是数组,对象
在路由后面不写?直接继续写/,也不用键值对
下面红色是路由,绿色是参数

<RouterLink to="/news/detail/哈哈/呃呃">{{item.title}}</RouterLink>没占位前会报 Vue Router warn]: No match found for location with path "/news/detail/哈哈/呃呃"
2)router/index.ts占位
path:'detail/:id/:title/:content',有三个占位,则要求调用时必须是3个否则无法识别
<RouterLink to="/news/detail/哈哈/呃呃/哈哈">{{item.title}}</RouterLink>
<template>
    <ul class="news-list">
        <!-- <li> 编号:{{route.query.id}}</li>
        <li>标题:{{route.query.title}}</li>
        <li>内容:{{route.query.content}}</li> -->
        <!-- <li> 编号:{{query.id}}</li>
        <li>标题:{{query.title}}</li>
        <li>内容:{{query.content}}</li> -->
          <li> 编号:{{route.params.id}}</li>
        <li>标题:{{route.params.title}}</li>
        <li>内容:{{route.params.content}}</li>

    </ul>
</template>
<script lang="ts" setup name="Details">
// 1.使用query
// import {toRefs} from 'vue'
// import {useRoute} from 'vue-router'
// let route=useRoute()
// console.log(route)
// // 可以从route上进行解构赋值,这是从响应对象上直接解构,丢失响应式,页面切换无效果
// // let {query} =route
// // 可以从route上进行解构赋值,并用toRefs
// let {query} =toRefs(route)

// 2.使用Params
import {useRoute} from 'vue-router'
let route=useRoute()
console.log(route)


</script>


<style scoped>
.news-list{
    list-style: none;
    padding-left: 20px;
}
.news-list>li{
    line-height: 30px;
}

</style>
父组件
如下写法必须使用name
<template>
    <div class="news">
        <!-- 新闻里面的导航区 -->
        <ul>
            <li v-for="item in news" :key="item.id">
                <!-- <RouterLink to="/news/detail?a=哈哈&b=呃呃">{{item.title}}</RouterLink> -->
                <!-- 第一种传参 -->
                <!-- <RouterLink :to="`/news/detail?id=${item.id}&title=${item.title}&content=${item.content}`">{{item.title}}</RouterLink> -->
                  <!-- 第二种传参 -->
                <!-- <RouterLink :to="{
                    path:'/news/detail',
                    query:{
                        id:item.id,
                        title:item.title,
                        content:item.content

                    }

                }">
                    {{item.title}}
                </RouterLink> -->

                <!-- <RouterLink to="/news/detail/哈哈/呃呃/嘿嘿">{{item.title}}</RouterLink> -->
                <!-- <RouterLink :to="`/news/detail/${item.id}/${item.title}/${item.content}`">{{item.title}}</RouterLink> -->

                <RouterLink :to="{
                    //   path:'/news/detail',
                      name:'xiangqing',
                      params:{
                        id:item.id,
                        title:item.title,
                        content:item.content
                      }
                }">{{item.title}}</RouterLink>
            </li>

        </ul>

                <!-- 新闻里面的内容区 -->
    <div class="news-content">

      <RouterView></RouterView>

    </div>


    </div>
</template>
<script lang="ts" setup name="News">
  import { reactive } from 'vue';
  import {RouterView,RouterLink} from 'vue-router'
  const news=reactive([
  {id:'new001',title:'美国进攻伊朗',content:'2023000美国进攻伊朗,从波斯湾开始'},
  {id:'new002',title:'一种新的学科',content:'数学化学作为一种新的学科'},
  {id:'new003',title:'一种新的昆虫',content:'有点像龙和鱼'},
  {id:'new003',title:'好消息',content:'北极熊到达了南极'},

  ])
</script>

<style scoped>
.news{
    padding: 0 20px;
    display: flex;
    justify-content: space-between;
    height: 100%;
}
.news ul{
    margin-top: 30px;
    /* list-style: none; */
    padding-left: 10px;
}
.news li::marker{
    color: #64967E;
}

.news li>a{
    font-size: 18px;
    line-height: 40px;
    text-decoration: none;
    color: #64967E;
    text-shadow: 0 0 1px rgb(0,84,0);
}
.news-content{
    width: 70%;
    height: 90%;
    border: 1px solid ;
    margin-top: 20px;
    border-radius: 10px;

}
</style>
路由的props配置
为了简化页面引用的层级,可以在路由参数中配置: props:true
第一种写法
将路由收到所有params参数作为props传给路由组件
  routes:[ //一个一个的路由规则
        {
            name:'zhueye',
            path:'/home',
            component:Home
        },
        {
            name:'xinwen',
            path:'/news',component:News,
            children:[
                {
                    name:'xiangqing',
                    path:'detail/:id/:title/:content?',
                    component:Details,
                    props:true
                }
            ]
        },
        {   name:'guanyu',
            path:'/about',component:About
        }
    ]
加了props相当于在使用Detail时顺便传三个参数

<template>
    <ul class="news-list">
        <!-- <li> 编号:{{route.query.id}}</li>
        <li>标题:{{route.query.title}}</li>
        <li>内容:{{route.query.content}}</li> -->
        <!-- <li> 编号:{{query.id}}</li>
        <li>标题:{{query.title}}</li>
        <li>内容:{{query.content}}</li> -->
          <!-- <li> 编号:{{route.params.id}}</li>
        <li>标题:{{route.params.title}}</li>
        <li>内容:{{route.params.content}}</li> -->
          <li> 编号:{{id}}</li>
        <li>标题:{{title}}</li>
        <li>内容:{{content}}</li>

    </ul>
</template>
<script lang="ts" setup name="Details">
// 1.使用query
// import {toRefs} from 'vue'
// import {useRoute} from 'vue-router'
// let route=useRoute()
// console.log(route)
// // 可以从route上进行解构赋值,这是从响应对象上直接解构,丢失响应式,页面切换无效果
// // let {query} =route
// // 可以从route上进行解构赋值,并用toRefs
// let {query} =toRefs(route)

// // 2.使用Params
// import {useRoute} from 'vue-router'
// let route=useRoute()
// console.log(route)

//3使用路由props
defineProps(['id','title','content'])


</script>


<style scoped>
.news-list{
    list-style: none;
    padding-left: 20px;
}
.news-list>li{
    line-height: 30px;
}

</style>
第二种写法
可以用于query
自己决定将什么作为路由组件传给props
<RouterLink :to="{
                    //   path:'/news/detail',
                      name:'xiangqing',
                      query:{
                        id:item.id,
                        title:item.title,
                        content:item.content
                      }
                }">{{item.title}}</RouterLink>
children:[
{
name:'xiangqing',
// path:'detail/:id/:title/:content?',
path:'detail',
component:Details,
// 第一种写法将路由收到所有params参数作为props传给路由组件
// props:true
//第二种写法 自己决定将什么作为路由组件传给props
props(qwe){
console.log(qwe)
return{
x:100,
y:200,
z:300
}
}
}
]
},可以看到qwe就是route
router文件修改为
       children:[
                {
                    name:'xiangqing',
                    // path:'detail/:id/:title/:content?',
                    path:'detail',
                    component:Details,
                    // 第一种写法将路由收到所有params参数作为props传给路由组件
                    // props:true
                    //第二种写法    自己决定将什么作为路由组件传给props
                    // props收到的参数本质就是route,并且因为在query查询时query也是对象,所以可以返回
                    props(route){
                        return route.query
                    }
                }
            ]
<template>
<ul class="news-list">
<!-- <li> 编号:{{route.query.id}}</li>
<li>标题:{{route.query.title}}</li>
<li>内容:{{route.query.content}}</li> -->
<!-- <li> 编号:{{query.id}}</li>
<li>标题:{{query.title}}</li>
<li>内容:{{query.content}}</li> -->
<!-- <li> 编号:{{route.params.id}}</li>
<li>标题:{{route.params.title}}</li>
<li>内容:{{route.params.content}}</li> -->
<li> 编号:{{id}}</li>
<li>标题:{{title}}</li>
<li>内容:{{content}}</li>
</ul>
</template>
<script lang="ts" setup name="Details">
// 1.使用query
// import {toRefs} from 'vue'
// import {useRoute} from 'vue-router'
// let route=useRoute()
// console.log(route)
// // 可以从route上进行解构赋值,这是从响应对象上直接解构,丢失响应式,页面切换无效果
// // let {query} =route
// // 可以从route上进行解构赋值,并用toRefs
// let {query} =toRefs(route)
// // 2.使用Params
// import {useRoute} from 'vue-router'
// let route=useRoute()
// console.log(route)
//3使用路由props
defineProps(['id','title','content'])
</script>
<style scoped>
.news-list{
list-style: none;
padding-left: 20px;
}
.news-list>li{
line-height: 30px;
}
</style>
第三种写法
对象写法,但是是写死了,很少用

replace
路由跳转时,会操作浏览器历史记录,默认是push
push:
相当于浏览器历史记录是个栈,有个指针

replace
替换
在导航区routelink上加replace
     <RouterLink replace to="/home" active-class="active">首页</RouterLink>
           <RouterLink replace :to="{name:'xinwen'}" active-class="active">新闻</RouterLink>
           <RouterLink replace :to="{path:'/about'}" active-class="active">关于</RouterLink>
编程式导航
脱离<RouterLink>实现跳转
1.设置自动跳转
import { useRouter } from 'vue-router';
<template>
    <div class="home">
          <img src="https://images.dog.ceo/breeds/pembroke/n02113023_2970.jpg">
    </div>
</template>
<script lang="ts" setup name="Home">
import { onMounted } from 'vue';
import { useRouter } from 'vue-router';
const router=useRouter()
onMounted(()=>{
    setTimeout(()=>{
    // 在此处编写一段代码,让路由实现跳转
      router.push('/news')

    },3000)
})
</script>

<style scoped>
.home{
    display: flex;
    justify-content: center;
    align-items: center;
    height: 100%;
}
</style>
2.设置点击跳转

<template>
    <div class="news">
        <!-- 新闻里面的导航区 -->
        <ul>
            <li v-for="item in news" :key="item.id">
                <!-- <RouterLink to="/news/detail?a=哈哈&b=呃呃">{{item.title}}</RouterLink> -->
                <!-- 第一种传参 -->
                <!-- <RouterLink :to="`/news/detail?id=${item.id}&title=${item.title}&content=${item.content}`">{{item.title}}</RouterLink> -->
                  <!-- 第二种传参 -->
                <!-- <RouterLink :to="{
                    path:'/news/detail',
                    query:{
                        id:item.id,
                        title:item.title,
                        content:item.content

                    }

                }">
                    {{item.title}}
                </RouterLink> -->

                <!-- <RouterLink to="/news/detail/哈哈/呃呃/嘿嘿">{{item.title}}</RouterLink> -->
                <!-- <RouterLink :to="`/news/detail/${item.id}/${item.title}/${item.content}`">{{item.title}}</RouterLink> -->
                   <button @click="showNewsDetail(item)">查看新闻</button>
                <RouterLink :to="{
                    //   path:'/news/detail',
                      name:'xiangqing',
                      query:{
                        id:item.id,
                        title:item.title,
                        content:item.content
                      }
                }">{{item.title}}</RouterLink>
            </li>

        </ul>

                <!-- 新闻里面的内容区 -->
    <div class="news-content">

      <RouterView></RouterView>

    </div>


    </div>
</template>
<script lang="ts" setup name="News">
  import { isTemplateExpression } from 'typescript';
import { reactive } from 'vue';
  import {RouterView,RouterLink,useRouter} from 'vue-router'
  const news=reactive([
  {id:'new001',title:'美国进攻伊朗',content:'2023000美国进攻伊朗,从波斯湾开始'},
  {id:'new002',title:'一种新的学科',content:'数学化学作为一种新的学科'},
  {id:'new003',title:'一种新的昆虫',content:'有点像龙和鱼'},
  {id:'new003',title:'好消息',content:'北极熊到达了南极'},

  ])
   const router=useRouter()

   interface ItemInter{
    id:string,
    title:string,
    content:string

   }
//   function showNewsDetail(item:any){
    function showNewsDetail(item:ItemInter){
    // push()方法支持类似to=""中双引号所包围内容 的写法
//    router.push("/news/detail/哈哈/呃呃/嘿嘿")
   router.push({
    name:'xiangqing',
    query:{
        id:item.id,
        title:item.title,
        content:item.content
    }
   })
  }


</script>

<style scoped>
.news{
    padding: 0 20px;
    display: flex;
    justify-content: space-between;
    height: 100%;
}
.news ul{
    margin-top: 30px;
    /* list-style: none; */
    padding-left: 10px;
}
.news li::marker{
    color: #64967E;
}

.news li>a{
    font-size: 18px;
    line-height: 40px;
    text-decoration: none;
    color: #64967E;
    text-shadow: 0 0 1px rgb(0,84,0);
}
.news-content{
    width: 70%;
    height: 90%;
    border: 1px solid ;
    margin-top: 20px;
    border-radius: 10px;

}
</style>
重定向
主要是解决刚进入网站初始页面路由报错的问题
、让指定的路径重新定位到另一个路径
// 创建一个路由器bing暴露出去
// 1.1引入createRouter
import { createRouter ,createWebHistory} from "vue-router";
// 1.2引入要呈现的组件  ,一开始飘红需要关掉vscode重新打开,主要是不认vue3
import Home from '@/pages/Home.vue'
import News from '@/pages/News.vue'
import About from '@/pages/About.vue'
import Details from "@/pages/Details.vue";
// 2.创建路由器,自己路由不用写斜杠
const router=createRouter({
    history:createWebHistory(),//确定工作模式
    routes:[ //一个一个的路由规则
        {
            name:'zhueye',
            path:'/home',
            component:Home
        },
        {
            name:'xinwen',
            path:'/news',component:News,
            children:[
                {
                    name:'xiangqing',
                    // path:'detail/:id/:title/:content?',
                    path:'detail',
                    component:Details,
                    // 第一种写法将路由收到所有params参数作为props传给路由组件
                    // props:true
                    //第二种写法    自己决定将什么作为路由组件传给props
                    // props收到的参数本质就是route,并且因为在query查询时query也是对象,所以可以返回
                    // props(route){
                    //     return route.query
                    // }
                    // 第三种写法
                    props:{
                        a:100,
                        b:200,
                        c:300
                    }
                }
            ]
        },
        {   name:'guanyu',
            path:'/about',component:About
        },
        {
            path:'/',
            redirect:'/home'
        }
    ]
})
// 3.暴露
export default router

//4.要去main.ts引入路由器
pinia:共用数据的处理
Pinia | The intuitive store for Vue.js
Pinia 是 Vue 的存储库,它允许跨组件/页面共享状态。实际上,pinia就是Vuex的升级版,官网也说过,为了尊重原作者,所以取名pinia,而没有取名Vuex,所以大家可以直接将pinia比作为Vue3的Vuex。
vue2用的是vueX
vue3用的是pinia
集中式状态(也就是数据)管理
把各个组件需要共享的数据交给pinia
https://api.uomg.com/api/rand.qinghua?format=json
生成id npm i nanoid npm i uuid
准备
1.sum.app 注意把下值转换为数字的两种方法
v-model.number=‘n’ 这样更优雅
或者:value=
<template>
    <div class="count">
       <h2>当前求和为{{ sum }}</h2>
       <!-- n就是选择的value -->
       <!-- 为了使收到的n变为数字 -->
       <select v-model.number="n">
        <option value="1">1</option>
        <option value="2">2</option>
        <option value="3">3</option>
<!-- 为了把value变成数字,value前面可以加: -->
         <!-- <option :value="1">1</option>
        <option :value="2">2</option>
        <option :value="3">3</option> -->
       </select>
       <button @click="add">加</button>
       <button @click="minus">减</button>
    </div>
</template>
<script lang="ts" setup name="Count">
import { ref } from 'vue';
let sum=ref(0)
let n=ref(0)
function add(){
 sum.value+=n.value
}


function minus(){
    sum.value-=n.value
}
</script>
<style scoped>
.count{
    background-color: skyblue;
    padding: 10px;
    border-radius: 10px;
    box-shadow: 0 0 10px;
}

select,button{
    margin: 0 5px;
    height: 30px;
}
</style>
2.Talk.vue
注意axios获取接口数据后的两次结构,一次重命名
还有取随机数
<template>
    <div class="talk">
       <button @click="getPoem">获取一句诗歌</button>
       <ul>
        <li v-for="item in talkList" :key="item.id">
        {{ item.title }}
        </li>
       </ul>
    </div>
</template>
<script lang="ts" setup name="Talk">
 import { reactive } from 'vue';
//  axios是默认暴露,直接引入即可
 import axios from 'axios';
 import {nanoid} from 'nanoid'
 let talkList=reactive([
    {id:'0001',title:'秦时明月汉时关'},
    {id:'0002',title:'床前明月光'},
    {id:'0003',title:'北风卷地百草折'},
    {id:'0004',title:'东边不亮西边亮'},
    {id:'0005',title:'遥看瀑布挂前川'}
 ])

 async function getPoem(){
    // 发请求
    // let result= await axios.get('https://api.uomg.com/api/rand.qinghua?format=json')
    // 以下是从返回中先结构data,再从data中结构content,并且把content重命名为title
    let {data:{content:title}}= await axios.get('https://api.uomg.com/api/rand.qinghua?format=json')
    // console.log(result.data.content)
    // 把请求回来的字符串包装成一个对象
    //  let obj={id:nanoid(),title:result.data.content}
    // let obj={id:nanoid(),title:title}
    let obj={id:nanoid(),title}
     talkList.unshift(obj)
 }
</script>
<style scoped>

.talk{
    background-color: orange;
    padding: 10px;
    border-radius: 10px;
    box-shadow: 0 0 10px;
}
</style>
安装
npm i pinia
main.ts引入 创建 安装三步
import { createApp } from "vue"
import App from './App.vue'
// pinia1 :引入pinia
import { createPinia } from "pinia"
// 路由4:引入路由器
// import router from "./router"
// 创建一个应用
const app=createApp(App)
// 使用路由器
// app.use(router)

// pinia2 app创建完后创建pinia
const pinia=createPinia()
// pinia3 :安装pinia
app.use(pinia)
// 挂载整个应用
app.mount('#app')
之后浏览器会出现

建立仓库
pinia强调分类
src下应该建立store
在其下建立比如count.ts
import { defineStore } from "pinia";
// const命名规范:以use开始
// 下面的export使用的是分离暴露,也可以使用统一暴露,分离暴露引用时只能用import {}
export const useCountStore=defineStore(
// 第一个参数一般建议与文件名一致
'count',
{
// 真正存储数据的地方是state
state(){
return{
sum:6
}}
}
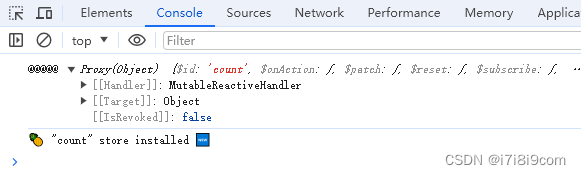
)这样就有了

把cout.ts想象成一个仓库,只要跟统计相关的都放入
组件使用
// pinar1:引入
import {useCountStore} from '@/store/count'
//
const countStore=useCountStore();
console.log("@@@@@",countStore)
countStore实际上是reactive定义的响应式对象
关注sum和$state
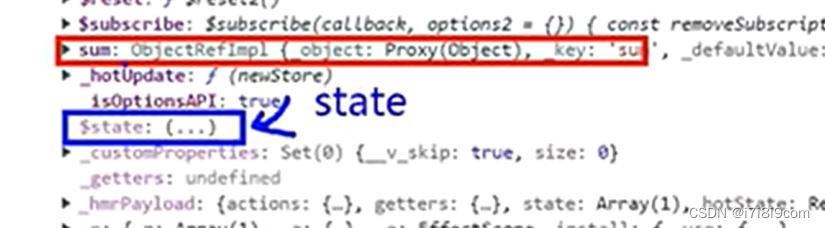
进一步展开

sum是个REF对象,其有value,但是contStore是个Reactive对象
怎么样读出reactive里面的ref值呢?不用.value即可
let obj=reactive({
a:1,
b:2,
c:ref(3)
})
// 在reactove里面的ref不用再拆value出来
// console.log(obj.c.value)
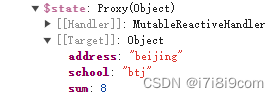
console.log(obj.c)countStore.sum
也可以从state下面拿到,麻烦一点
countStore.$state.sum
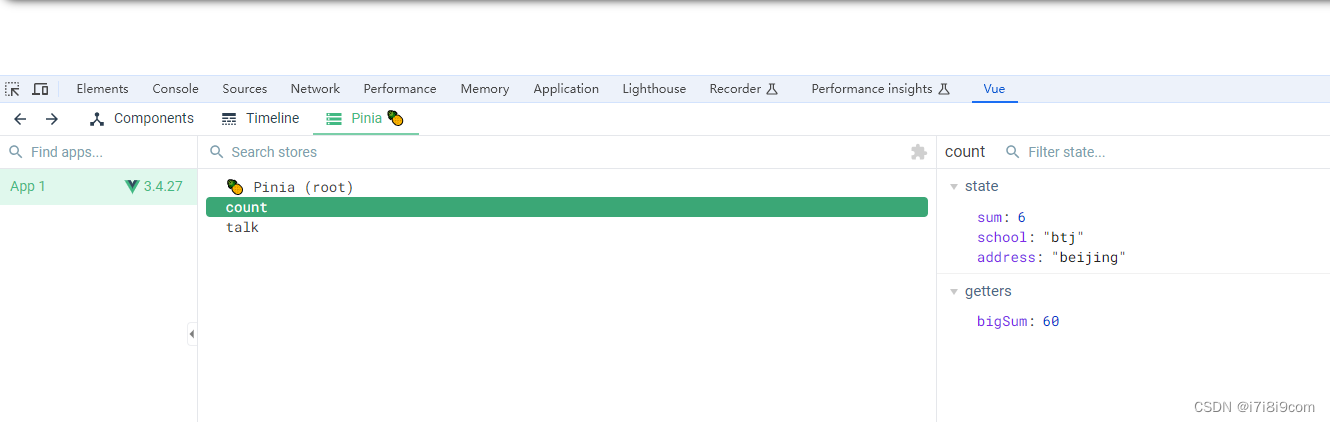
再查看控制台,注意 就是count.ts被组件使用了才会出现在这里

另外一个例子
talk.ts
import { defineStore } from "pinia";
// const命名规范:以use开始
// 下面的export使用的是分离暴露,也可以使用统一暴露,分离暴露引用时只能用import {}
export const useTalkStore=defineStore(
    // 第一个参数一般建议与文件名一致
    'talk',
    {
        // 真正存储数据的地方是state
        state(){
        return{
            talkList:[
                {id:'0001',title:'秦时明月汉时关'},
                {id:'0002',title:'床前明月光'},
                {id:'0003',title:'北风卷地百草折'},
                {id:'0004',title:'东边不亮西边亮'},
                {id:'0005',title:'遥看瀑布挂前川'}
            ]
        }}
    }

)
被使用后
talk.vue
<template>
    <div class="talk">
       <button @click="getPoem">获取一句诗歌</button>
       <ul>
        <li v-for="item in talkStore.talkList" :key="item.id">
        {{ item.title }}
        </li>
       </ul>
    </div>
</template>
<script lang="ts" setup name="Talk">
 import { reactive } from 'vue';
//  axios是默认暴露,直接引入即可
 import axios from 'axios';
 import {nanoid} from 'nanoid'
 import {useTalkStore} from '@/store/talk'
//  let talkList=reactive([
//     {id:'0001',title:'秦时明月汉时关'},
//     {id:'0002',title:'床前明月光'},
//     {id:'0003',title:'北风卷地百草折'},
//     {id:'0004',title:'东边不亮西边亮'},
//     {id:'0005',title:'遥看瀑布挂前川'}
//  ])
const talkStore=useTalkStore();
console.log(talkStore)
 async function getPoem(){
    // 发请求
    // let result= await axios.get('https://api.uomg.com/api/rand.qinghua?format=json')
    // 以下是从返回中先结构data,再从data中结构content,并且把content重命名为title
    // let {data:{content:title}}= await axios.get('https://api.uomg.com/api/rand.qinghua?format=json')
    // // console.log(result.data.content)
    // // 把请求回来的字符串包装成一个对象
    // //  let obj={id:nanoid(),title:result.data.content}
    // // let obj={id:nanoid(),title:title}
    // let obj={id:nanoid(),title}
    //  talkList.unshift(obj)
 }
</script>
<style scoped>

.talk{
    background-color: orange;
    padding: 10px;
    border-radius: 10px;
    box-shadow: 0 0 10px;
}
</style>
talkList是reactive下的reactive,
 修改数据
修改数据
三种修改方法-1,2
<template>
    <div class="count">
       <h2>当前求和为{{ countStore.sum }}</h2>
       <h2>欢迎来到{{ countStore.school }}坐落于{{ countStore.address }}</h2>
       <!-- n就是选择的value -->
       <!-- 为了使收到的n变为数字 -->
       <select v-model.number="n">
        <option value="1">1</option>
        <option value="2">2</option>
        <option value="3">3</option>
<!-- 为了把value变成数字,value前面可以加: -->
         <!-- <option :value="1">1</option>
        <option :value="2">2</option>
        <option :value="3">3</option> -->
       </select>
       <button @click="add">加</button>
       <button @click="minus">减</button>
    </div>
</template>
<script lang="ts" setup name="Count">
import { reactive, ref } from 'vue';
// pinar1:引入
import {useCountStore} from '@/store/count'
//
const countStore=useCountStore();
// console.log("@@@@@",countStore.sum)
console.log("@@@@@",countStore)
let n=ref(0)


function add(){
    // 第一种修改数据方法:直接改
    // countStore.sum+=n.value
    // countStore.school="南京大学"
    // countStore.address="南京"
    // 第二种修改方法:适用于数据较多
    countStore.$patch(
        {
            sum:999,
            school:'苏州大学',
            address:'苏州'
        }
    )
}


function minus(){

}
</script>
<style scoped>
.count{
    background-color: skyblue;
    padding: 10px;
    border-radius: 10px;
    box-shadow: 0 0 10px;
}

select,button{
    margin: 0 5px;
    height: 30px;
}
</style>
其它知识:
时间线的介绍

Mouse:看鼠标事件
常用的Componet events:组件事件
当用上述第一种直接修改,时间线pinia出现了3次,因为确实直接修改了三次

当使用上述第二种方法时,只发生了1次

第三种修改方法
在store/count.ts中使用action
import { defineStore } from "pinia";
// const命名规范:以use开始
// 下面的export使用的是分离暴露,也可以使用统一暴露,分离暴露引用时只能用import {}
export const useCountStore=defineStore(
    // 第一个参数一般建议与文件名一致
    'count',

    {
    //action里面放置的是一个一个方法,用于响应组件中的“动作"
    actions:{
       increment(value:any){
        console.log("increment被调用了",value,this)
        // 通过this操作
        this.sum+=value
        // 或者

       }
    },
        // 真正存储数据的地方是state
        state(){
        return{
            sum:6,
            school:'btj',
            address:'beijing'
        }}
    }

)
组件
<template>
    <div class="count">
       <h2>当前求和为{{ countStore.sum }}</h2>
       <h2>欢迎来到{{ countStore.school }}坐落于{{ countStore.address }}</h2>
       <!-- n就是选择的value -->
       <!-- 为了使收到的n变为数字 -->
       <select v-model.number="n">
        <option value="1">1</option>
        <option value="2">2</option>
        <option value="3">3</option>
<!-- 为了把value变成数字,value前面可以加: -->
         <!-- <option :value="1">1</option>
        <option :value="2">2</option>
        <option :value="3">3</option> -->
       </select>
       <button @click="add">加</button>
       <button @click="minus">减</button>
    </div>
</template>
<script lang="ts" setup name="Count">
import { reactive, ref } from 'vue';
// pinar1:引入
import {useCountStore} from '@/store/count'
//
const countStore=useCountStore();
// console.log("@@@@@",countStore.sum)
console.log("@@@@@",countStore)
let n=ref(0)


function add(){
    // 第一种修改数据方法:直接改
    // countStore.sum+=n.value
    // countStore.school="南京大学"
    // countStore.address="南京"
    // 第二种修改方法:适用于数据较多
    // countStore.$patch(
    //     {
    //         sum:999,
    //         school:'苏州大学',
    //         address:'苏州'
    //     }
    // )
    // 第三种修改方法:
    countStore.increment(n.value);
}


function minus(){

}
</script>
<style scoped>
.count{
    background-color: skyblue;
    padding: 10px;
    border-radius: 10px;
    box-shadow: 0 0 10px;
}

select,button{
    margin: 0 5px;
    height: 30px;
}
</style>
注意this是当前的store,就是countStore可以直接使用sum

还有一个常识:$开始的都是给程序员用的,也可以用里面的$state
第二个案例
import { defineStore } from "pinia";
import axios from "axios";
import { nanoid } from "nanoid";
// const命名规范:以use开始
// 下面的export使用的是分离暴露,也可以使用统一暴露,分离暴露引用时只能用import {}
export const useTalkStore=defineStore(
    // 第一个参数一般建议与文件名一致
    'talk',
    {
        actions:{
         async  getPoem(){
                // 发请求
                let result= await axios.get('https://api.uomg.com/api/rand.qinghua?format=json')
                // 以下是从返回中先结构data,再从data中结构content,并且把content重命名为title
                // let {data:{content:title}}= await axios.get('https://api.uomg.com/api/rand.qinghua?format=json')
                // // console.log(result.data.content)
                // // 把请求回来的字符串包装成一个对象
                 let obj={id:nanoid(),title:result.data.content}
                // // let obj={id:nanoid(),title:title}
                // let obj={id:nanoid(),title}
                 this.talkList.unshift(obj)
             }

        },
        // 真正存储数据的地方是state
        state(){
        return{
            talkList:[
                {id:'0001',title:'秦时明月汉时关'},
                {id:'0002',title:'床前明月光'},
                {id:'0003',title:'北风卷地百草折'},
                {id:'0004',title:'东边不亮西边亮'},
                {id:'0005',title:'遥看瀑布挂前川'}
            ]
        }}
    }

)
<template>
<div class="talk">
<button @click="getPoem">获取一句诗歌</button>
<ul>
<li v-for="item in talkStore.talkList" :key="item.id">
{{ item.title }}
</li>
</ul>
</div>
</template>
<script lang="ts" setup name="Talk">
import { reactive } from 'vue';
// axios是默认暴露,直接引入即可
// import axios from 'axios';
// import {nanoid} from 'nanoid'
import {useTalkStore} from '@/store/talk'
// let talkList=reactive([
// {id:'0001',title:'秦时明月汉时关'},
// {id:'0002',title:'床前明月光'},
// {id:'0003',title:'北风卷地百草折'},
// {id:'0004',title:'东边不亮西边亮'},
// {id:'0005',title:'遥看瀑布挂前川'}
// ])
const talkStore=useTalkStore();
// console.log(talkStore)
// async function getPoem(){
// 发请求
// let result= await axios.get('https://api.uomg.com/api/rand.qinghua?format=json')
// 以下是从返回中先结构data,再从data中结构content,并且把content重命名为title
// let {data:{content:title}}= await axios.get('https://api.uomg.com/api/rand.qinghua?format=json')
// // console.log(result.data.content)
// // 把请求回来的字符串包装成一个对象
// // let obj={id:nanoid(),title:result.data.content}
// // let obj={id:nanoid(),title:title}
// let obj={id:nanoid(),title}
// talkList.unshift(obj)
function getPoem(){
talkStore.getPoem();
}
</script>
<style scoped>
.talk{
background-color: orange;
padding: 10px;
border-radius: 10px;
box-shadow: 0 0 10px;
}
</style>
优雅化
目的是让vue文件插值中的{{counterStore.sum]]中的counterStorm能被去掉
方法1 使用toRefs解构
代价:太多东西被toRefs
count.ts
import { defineStore } from "pinia";
// const命名规范:以use开始
// 下面的export使用的是分离暴露,也可以使用统一暴露,分离暴露引用时只能用import {}
export const useCountStore=defineStore(
    // 第一个参数一般建议与文件名一致
    'count',

    {
    //action里面放置的是一个一个方法,用于响应组件中的“动作"
    actions:{
       increment(value:number){
        console.log("increment被调用了",value,this)
        // 通过this操作
        this.sum+=value
        // 或者

       }
    },
        // 真正存储数据的地方是state
        state(){
        return{
            sum:6,
            school:'btj',
            address:'beijing'
        }}
    }

)
Count.vue
<template>
    <div class="count">
       <h2>当前求和为{{ sum }}</h2>
       <h2>欢迎来到{{ countStore.school }}坐落于{{ countStore.address }}</h2>
       <!-- n就是选择的value -->
       <!-- 为了使收到的n变为数字 -->
       <select v-model.number="n">
        <option value="1">1</option>
        <option value="2">2</option>
        <option value="3">3</option>
<!-- 为了把value变成数字,value前面可以加: -->
         <!-- <option :value="1">1</option>
        <option :value="2">2</option>
        <option :value="3">3</option> -->
       </select>
       <button @click="add">加</button>
       <button @click="minus">减</button>
    </div>
</template>
<script lang="ts" setup name="Count">
import { reactive, ref,toRefs } from 'vue';
// pinar1:引入
import {useCountStore} from '@/store/count'
//
const countStore=useCountStore();
// console.log("@@@@@",countStore.sum)
// console.log("@@@@@",countStore)
// 解构
const {sum,school,address} =toRefs(countStore)
console.log(toRefs(countStore))
let n=ref(0)


function add(){
    // 第一种修改数据方法:直接改
    // countStore.sum+=n.value
    // countStore.school="南京大学"
    // countStore.address="南京"
    // 第二种修改方法:适用于数据较多
    // countStore.$patch(
    //     {
    //         sum:999,
    //         school:'苏州大学',
    //         address:'苏州'
    //     }
    // )
    // 第三种修改方法:
    countStore.increment(n.value);
}


function minus(){
     countStore.sum-=n.value
}
</script>
<style scoped>
.count{
    background-color: skyblue;
    padding: 10px;
    border-radius: 10px;
    box-shadow: 0 0 10px;
}

select,button{
    margin: 0 5px;
    height: 30px;
}
</style>
上文中用了toRefs,但是显示把countStores所有属性都变成了ref,没有这个必要
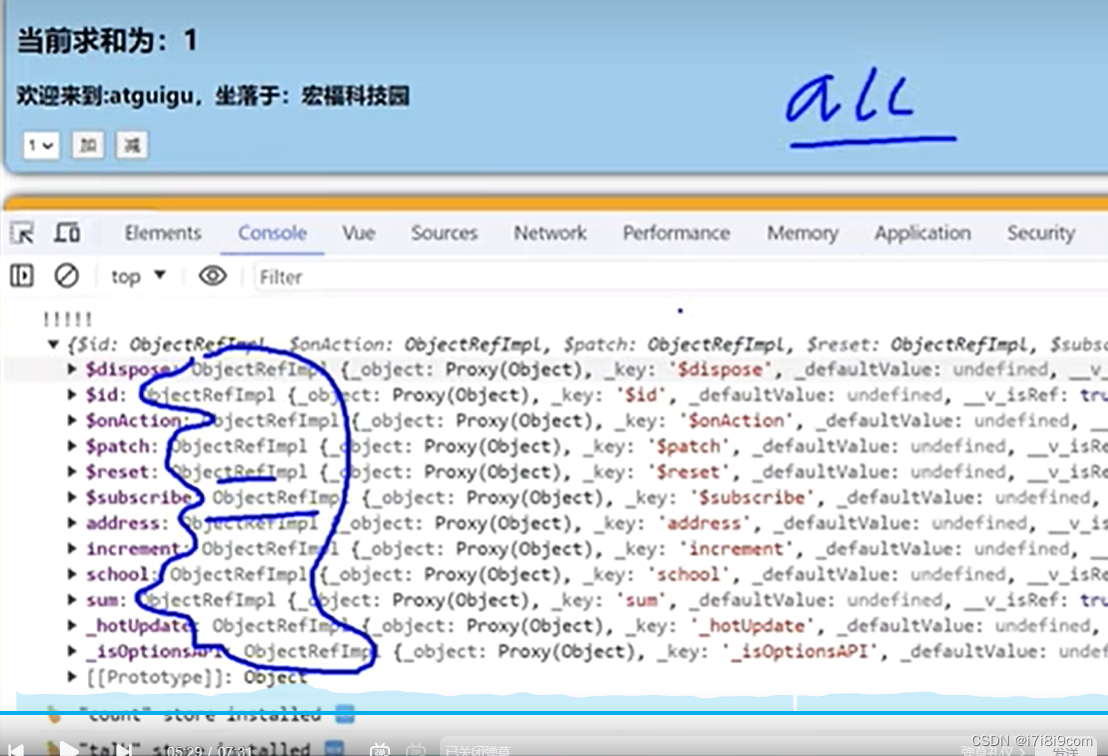
方法2 使用storeToRefs 解构
pinia替你想到了
import { storeToRefs } from 'pinia';
// 解构
const {sum,school,address} =storeToRefs(countStore)
console.log("aaaaa",storeToRefs(countStore))
可以看到storeToRefs只关注数据,不会对方法进行包裹

<template>
    <div class="count">
       <h2>当前求和为{{ sum }}</h2>
       <h2>欢迎来到{{ school }}坐落于{{ address }}</h2>
       <!-- n就是选择的value -->
       <!-- 为了使收到的n变为数字 -->
       <select v-model.number="n">
        <option value="1">1</option>
        <option value="2">2</option>
        <option value="3">3</option>
<!-- 为了把value变成数字,value前面可以加: -->
         <!-- <option :value="1">1</option>
        <option :value="2">2</option>
        <option :value="3">3</option> -->
       </select>
       <button @click="add">加</button>
       <button @click="minus">减</button>
    </div>
</template>
<script lang="ts" setup name="Count">
import { reactive, ref,toRefs } from 'vue';
import { storeToRefs } from 'pinia';
// pinar1:引入
import {useCountStore} from '@/store/count'
//
const countStore=useCountStore();
// console.log("@@@@@",countStore.sum)
// console.log("@@@@@",countStore)
// 解构
const {sum,school,address} =storeToRefs(countStore)
console.log("aaaaa",storeToRefs(countStore))
let n=ref(0)


function add(){
    // 第一种修改数据方法:直接改
    // countStore.sum+=n.value
    // countStore.school="南京大学"
    // countStore.address="南京"
    // 第二种修改方法:适用于数据较多
    // countStore.$patch(
    //     {
    //         sum:999,
    //         school:'苏州大学',
    //         address:'苏州'
    //     }
    // )
    // 第三种修改方法:
    countStore.increment(n.value);
}


function minus(){
     countStore.sum-=n.value
}
</script>
<style scoped>
.count{
    background-color: skyblue;
    padding: 10px;
    border-radius: 10px;
    box-shadow: 0 0 10px;
}

select,button{
    margin: 0 5px;
    height: 30px;
}
</style>
getters
对数据不满意,可以加工下
写法1
import { defineStore } from "pinia";
// const命名规范:以use开始
// 下面的export使用的是分离暴露,也可以使用统一暴露,分离暴露引用时只能用import {}
export const useCountStore=defineStore(
    // 第一个参数一般建议与文件名一致
    'count',

    {
    //action里面放置的是一个一个方法,用于响应组件中的“动作"
    actions:{
       increment(value:number){
        console.log("increment被调用了",value,this)
        // 通过this操作
        this.sum+=value
        // 或者

       }
    },
        // 真正存储数据的地方是state
        state(){
        return{
            sum:6,
            school:'btj',
            address:'beijing'
        }},
        getters:{
            // bigSum(){
            //     return 999
            // }
// 默认被传递进来state
              bigSum(state){
                return state.sum*10
            }
        }
    }

)
写法2
this起始也是state

import { defineStore } from "pinia";
import { compileScript } from "vue/compiler-sfc";
// const命名规范:以use开始
// 下面的export使用的是分离暴露,也可以使用统一暴露,分离暴露引用时只能用import {}
export const useCountStore=defineStore(
    // 第一个参数一般建议与文件名一致
    'count',

    {
    //action里面放置的是一个一个方法,用于响应组件中的“动作"
    actions:{
       increment(value:number){
        console.log("increment被调用了",value,this)
        // 通过this操作
        this.sum+=value
        // 或者

       }
    },
        // 真正存储数据的地方是state
        state(){
        return{
            sum:6,
            school:'btj',
            address:'beijing'
        }},
        getters:{
            // bigSum(){
            //     return 999
            // }
// 默认被传递进来state
            //   bigSum(state){
            //     return state.sum*10
            // },
//简写
      bigSum:state=>state.sum*10,
   //   也可以用this
            // upperSchool(state){
                // :String是表示返回值是字符串
                upperSchool():String{
                console.log("upperschool",this)
                return this.school.toUpperCase()
            }
        }
    }

)
Count.vue
<template>
    <div class="count">
       <h2>当前求和为{{ sum }},放大10倍后{{ bigSum }}</h2>
       <h2>欢迎来到{{ school }},坐落于{{ address }}  大写{{ upperSchool }}</h2>
       <!-- n就是选择的value -->
       <!-- 为了使收到的n变为数字 -->
       <select v-model.number="n">
        <option value="1">1</option>
        <option value="2">2</option>
        <option value="3">3</option>
<!-- 为了把value变成数字,value前面可以加: -->
         <!-- <option :value="1">1</option>
        <option :value="2">2</option>
        <option :value="3">3</option> -->
       </select>
       <button @click="add">加</button>
       <button @click="minus">减</button>
    </div>
</template>
<script lang="ts" setup name="Count">
import { reactive, ref,toRefs } from 'vue';
import { storeToRefs } from 'pinia';
// pinar1:引入
import {useCountStore} from '@/store/count'
//
const countStore=useCountStore();
// console.log("@@@@@",countStore.sum)
// console.log("@@@@@",countStore)
// 解构
const {sum,school,address,bigSum,upperSchool} =storeToRefs(countStore)
console.log("aaaaa",storeToRefs(countStore))
let n=ref(0)


function add(){
    // 第一种修改数据方法:直接改
    // countStore.sum+=n.value
    // countStore.school="南京大学"
    // countStore.address="南京"
    // 第二种修改方法:适用于数据较多
    // countStore.$patch(
    //     {
    //         sum:999,
    //         school:'苏州大学',
    //         address:'苏州'
    //     }
    // )
    // 第三种修改方法:
    countStore.increment(n.value);
}


function minus(){
     countStore.sum-=n.value
}
</script>
<style scoped>
.count{
    background-color: skyblue;
    padding: 10px;
    border-radius: 10px;
    box-shadow: 0 0 10px;
}

select,button{
    margin: 0 5px;
    height: 30px;
}
</style>
订阅
相当于监视store数据变化,可以利用来保存到storage,实现持久化
<template>
    <div class="talk">
       <button @click="getPoem">获取一句诗歌</button>
       <ul>
        <!-- <li v-for="item in talkStore.talkList" :key="item.id"> -->
        <li v-for="item in talkList" :key="item.id">
        {{ item.title }}
        </li>
       </ul>
    </div>
</template>
<script lang="ts" setup name="Talk">
 import { reactive } from 'vue';
//  axios是默认暴露,直接引入即可
//  import axios from 'axios';
//  import {nanoid} from 'nanoid'
 import {useTalkStore} from '@/store/talk'
 import { storeToRefs } from 'pinia';
//  let talkList=reactive([
//     {id:'0001',title:'秦时明月汉时关'},
//     {id:'0002',title:'床前明月光'},
//     {id:'0003',title:'北风卷地百草折'},
//     {id:'0004',title:'东边不亮西边亮'},
//     {id:'0005',title:'遥看瀑布挂前川'}
//  ])
const talkStore=useTalkStore();
const {talkList}=storeToRefs(talkStore)
// talkStore发生变化,会传递mutate即变化信息  state
talkStore.$subscribe((mutate,state)=>{
    console.log("talkStore里面保存的数据发生了变化",mutate,state)
    // 可以做的事举例
    localStorage.setItem('talkList',state.talkList)
})
// console.log(talkStore)
//  async function getPoem(){
    // 发请求
    // let result= await axios.get('https://api.uomg.com/api/rand.qinghua?format=json')
    // 以下是从返回中先结构data,再从data中结构content,并且把content重命名为title
    // let {data:{content:title}}= await axios.get('https://api.uomg.com/api/rand.qinghua?format=json')
    // // console.log(result.data.content)
    // // 把请求回来的字符串包装成一个对象
    // //  let obj={id:nanoid(),title:result.data.content}
    // // let obj={id:nanoid(),title:title}
    // let obj={id:nanoid(),title}
    //  talkList.unshift(obj)
   function getPoem(){
    talkStore.getPoem();
 }
</script>
<style scoped>

.talk{
    background-color: orange;
    padding: 10px;
    border-radius: 10px;
    box-shadow: 0 0 10px;
}
</style>
mutate 和 state分别打印

应用1:修改locaiStorage
比如
locaiStorage里面都是字符串,如果你传的不是字符串会调用toString,如果都是对象就会变成如下:

修改为
localStorage.setItem('talkList',JSON.stringify(state.talkList))
talk.ts
import { defineStore } from "pinia";
import axios from "axios";
import { nanoid } from "nanoid";
// const命名规范:以use开始
// 下面的export使用的是分离暴露,也可以使用统一暴露,分离暴露引用时只能用import {}
export const useTalkStore=defineStore(
    // 第一个参数一般建议与文件名一致
    'talk',
    {
        actions:{
         async  getPoem(){
                // 发请求
                let result= await axios.get('https://api.uomg.com/api/rand.qinghua?format=json')
                // 以下是从返回中先结构data,再从data中结构content,并且把content重命名为title
                // let {data:{content:title}}= await axios.get('https://api.uomg.com/api/rand.qinghua?format=json')
                // // console.log(result.data.content)
                // // 把请求回来的字符串包装成一个对象
                 let obj={id:nanoid(),title:result.data.content}
                // // let obj={id:nanoid(),title:title}
                // let obj={id:nanoid(),title}
                 this.talkList.unshift(obj)
             }

        },
        // 真正存储数据的地方是state
        state(){
        return{
            // 可以从localStorage中获取
            // talkList:[
            //     {id:'0001',title:'秦时明月汉时关'},
            //     {id:'0002',title:'床前明月光'},
            //     {id:'0003',title:'北风卷地百草折'},
            //     {id:'0004',title:'东边不亮西边亮'},
            //     {id:'0005',title:'遥看瀑布挂前川'}
            // ]
            // talkList:JSON.parse(localStorage.getItem('talkList'))
            // 可能去除null,解决方法1:用断言,但是这样初始化就是null,二要添加的时候就会报不能在null上添加unshift,就是null.unshift
            // talkList:JSON.parse(localStorage.getItem('talkList') as string)
            //如下解决null的问题
            talkList:JSON.parse(localStorage.getItem('talkList') as string)||[]
        }}
    }

)
talk.vue
<template>
    <div class="talk">
       <button @click="getPoem">获取一句诗歌</button>
       <ul>
        <!-- <li v-for="item in talkStore.talkList" :key="item.id"> -->
        <li v-for="item in talkList" :key="item.id">
        {{ item.title }}
        </li>
       </ul>
    </div>
</template>
<script lang="ts" setup name="Talk">
 import { reactive } from 'vue';
//  axios是默认暴露,直接引入即可
//  import axios from 'axios';
//  import {nanoid} from 'nanoid'
 import {useTalkStore} from '@/store/talk'
 import { storeToRefs } from 'pinia';
//  let talkList=reactive([
//     {id:'0001',title:'秦时明月汉时关'},
//     {id:'0002',title:'床前明月光'},
//     {id:'0003',title:'北风卷地百草折'},
//     {id:'0004',title:'东边不亮西边亮'},
//     {id:'0005',title:'遥看瀑布挂前川'}
//  ])
const talkStore=useTalkStore();
const {talkList}=storeToRefs(talkStore)
// talkStore发生变化,会传递mutate即变化信息  state
talkStore.$subscribe((mutate,state)=>{
    console.log("talkStore里面保存的数据发生了变化",mutate,state)
    // 可以做的事举例
    localStorage.setItem('talkList',JSON.stringify(state.talkList))
})
// console.log(talkStore)
//  async function getPoem(){
    // 发请求
    // let result= await axios.get('https://api.uomg.com/api/rand.qinghua?format=json')
    // 以下是从返回中先结构data,再从data中结构content,并且把content重命名为title
    // let {data:{content:title}}= await axios.get('https://api.uomg.com/api/rand.qinghua?format=json')
    // // console.log(result.data.content)
    // // 把请求回来的字符串包装成一个对象
    // //  let obj={id:nanoid(),title:result.data.content}
    // // let obj={id:nanoid(),title:title}
    // let obj={id:nanoid(),title}
    //  talkList.unshift(obj)
   function getPoem(){
    talkStore.getPoem();
 }
</script>
<style scoped>

.talk{
    background-color: orange;
    padding: 10px;
    border-radius: 10px;
    box-shadow: 0 0 10px;
}
</style>
store组合式写法
缺点是return多
import { defineStore } from "pinia";
import axios from "axios";
import { nanoid } from "nanoid";
// const命名规范:以use开始
// 下面的export使用的是分离暴露,也可以使用统一暴露,分离暴露引用时只能用import {}
// 1.选项式写法
// export const useTalkStore=defineStore(
//     // 第一个参数一般建议与文件名一致
//     'talk',
//     {
//         actions:{
//          async  getPoem(){
//                 // 发请求
//                 let result= await axios.get('https://api.uomg.com/api/rand.qinghua?format=json')
//                 // 以下是从返回中先结构data,再从data中结构content,并且把content重命名为title
//                 // let {data:{content:title}}= await axios.get('https://api.uomg.com/api/rand.qinghua?format=json')
//                 // // console.log(result.data.content)
//                 // // 把请求回来的字符串包装成一个对象
//                  let obj={id:nanoid(),title:result.data.content}
//                 // // let obj={id:nanoid(),title:title}
//                 // let obj={id:nanoid(),title}
//                  this.talkList.unshift(obj)
//              }

//         },
//         // 真正存储数据的地方是state
//         state(){
//         return{
//             // 可以从localStorage中获取
//             // talkList:[
//             //     {id:'0001',title:'秦时明月汉时关'},
//             //     {id:'0002',title:'床前明月光'},
//             //     {id:'0003',title:'北风卷地百草折'},
//             //     {id:'0004',title:'东边不亮西边亮'},
//             //     {id:'0005',title:'遥看瀑布挂前川'}
//             // ]
//             // talkList:JSON.parse(localStorage.getItem('talkList'))
//             // 可能去除null,解决方法1:用断言,但是这样初始化就是null,二要添加的时候就会报不能在null上添加unshift,就是null.unshift
//             // talkList:JSON.parse(localStorage.getItem('talkList') as string)
//             //如下解决null的问题
//             talkList:JSON.parse(localStorage.getItem('talkList') as string)||[]
//         }}
//     }

// )

// 1.组合式写法
// 组合式数据直接用reactive定义
import { reactive } from "vue";

export const useTalkStore=defineStore('talk',()=>{
    // talklist就是state
    const talkList=reactive(
        JSON.parse(localStorage.getItem('talkList') as string)||[]
    )
    // getPoem相当于action
    async function  getPoem(){
                        let result= await axios.get('https://api.uomg.com/api/rand.qinghua?format=json')
                         let obj={id:nanoid(),title:result.data.content}
                        talkList.unshift(obj)
                     }

return {talkList,getPoem}
})
组件通信

1.props
可以实现父子双向传递
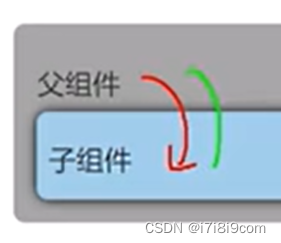
子传父要调用父的函数

父:
<template>
    <div class="father">
    <h3>父组件</h3>
    <h4>汽车{{ car }}</h4>
    <h4 v-show="toy">子给的 {{ toy }}</h4>
    <Child :car="car" :sendToy="getToy"></Child>
    </div>

</template>
<script lang="ts" setup name="Father">
import Child from './Child.vue';
import {ref} from 'vue'

// 数据
let car=ref('奔驰')
let toy=ref('')

// 方法
function getToy(value:string){
  console.log('父',value)
  toy.value=value
}


</script>
<style  scoped>
.father{
    background-color: rgb(165,164,164);
    padding: 20px;
    border-radius: 10px;
}
</style>
子
<template>
    <div class="child">
    <h3>子组件</h3>
     <h4>{{ toy }}</h4>
     <h4>父亲给的车:{{ car }}</h4>
     <button @click="sendToy(toy)"> 把玩具给父亲</button>
    </div>

</template>
<script lang="ts" setup name="Child">
import {ref} from 'vue'
// 数据
let toy=ref('奥特曼')
// 声明接收props
defineProps(['car','sendToy'])
// let props=defineProps(['car','sendToy'])
// // 方法
// function fasong(){
//     console.log(props.sendToy)
// }


</script>
<style  scoped>
.child{
    background-color: skyblue;
    padding: 10px;
    box-shadow: 0 0 10px black;
    border-radius: 10px;
}
</style>
尽可能不要给孙子传,虽然能实现

2.自定义事件
典型的用于子传父
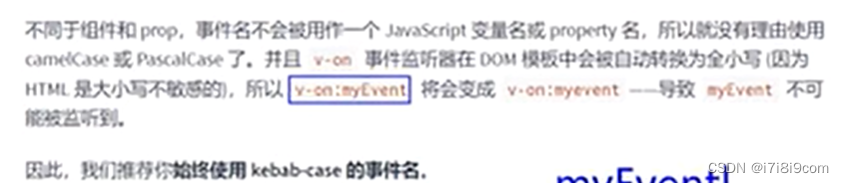
事件名是多个单词是推荐肉串形式 a-b-c, 使用驼峰可能导致见听不到
$event
<button @click="test">点我</button>
function test(value){
console.log('test',value)
}
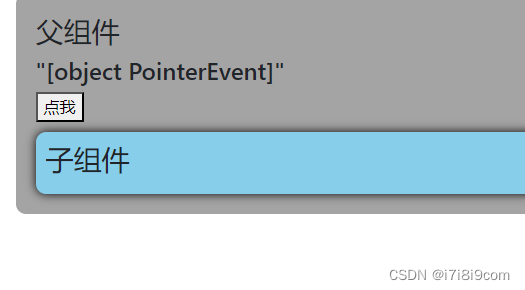
1)调用时如果什么都不传,发现value是事件对象

2)有参调用时需要调用时写$event
<template>
    <div class="father">
    <h3>父组件</h3>
    <button @click="test(6,7,$event)">点我</button>
    <Child></Child>
    </div>

</template>
<script lang="ts" setup name="Father">
import Child from './Child.vue';


function test(a:number,b:number,c:Event){
    console.log('test',c)
}


</script>
<style  scoped>
.father{
    background-color: rgb(165,164,164);
    padding: 20px;
    border-radius: 10px;
}
</style>
3)直接使用 @click="str=$event"
<template>
    <div class="father">
    <h3>父组件</h3>
    <h4>{{ str }}</h4>
    <!-- <button @click="test">点我</button> -->
    <!-- 直接写赋值语句 -->
    <!-- <button @click="str='哈哈哈'">点我</button> -->
    <!--  -->
    <button @click="str=$event">点我</button>
    <Child></Child>
    </div>

</template>
<script lang="ts" setup name="Father">
import Child from './Child.vue';
import { ref } from 'vue';
let str=ref("你好")

function test(){
    str.value="哈哈"
}


</script>
<style  scoped>
.father{
    background-color: rgb(165,164,164);
    padding: 20px;
    border-radius: 10px;
}
</style>
点击输出:
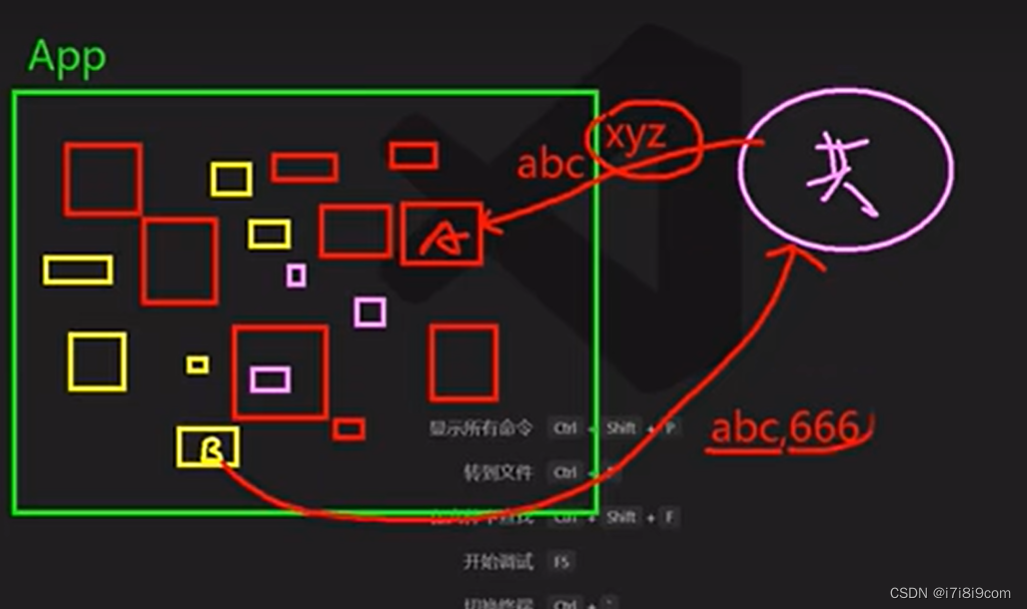
自定义事件
父亲绑定:
   <!-- 给子组件绑定事件,下文abc就是自定义事件名,xyz就是回调 -->
    <Child @abc="xyz"></Child>
<template>
<div class="father">
<h3>父组件</h3>
<!-- <h4>{{ str }}</h4> -->
<!-- <button @click="test">点我</button> -->
<!-- 直接写赋值语句 -->
<!-- <button @click="str='哈哈哈'">点我</button> -->
<!-- -->
<!-- <button @click="str=$event">点我</button> -->
<!-- 给子组件绑定事件,下文abc就是自定义事件名,xyz就是回调 -->
<Child @abc="xyz"></Child>
</div>
</template>
<script lang="ts" setup name="Father">
import Child from './Child.vue';
// import { ref } from 'vue';
// let str=ref("你好")
// function test(){
// str.value="哈哈"
// }
function xyz(value:number){
console.log('xyz',value)
}
</script>
<style scoped>
.father{
background-color: rgb(165,164,164);
padding: 20px;
border-radius: 10px;
}
</style>子声明
并且调用时可以传值
<template>
    <div class="child">
    <h3>子组件</h3>
    <h4>玩具 {{ toy }}</h4>
    <button @click="emit('abc',666)">测试调用父给子绑定的自定义事件并且传递值</button>
    </div>

</template>
<script lang="ts" setup name="Child">
import {ref,onMounted} from 'vue'
let toy=ref("奥特曼")

// 声明事件,并赋值给变量,这样模版就可以用了
const emit=defineEmits(['abc'])
// 加载3秒后触发abc事件,触发结果就是调用Father的xyz
onMounted(()=>{
    setTimeout(()=>{
       emit('abc')
    },3000)
})
</script>
<style  scoped>
.child{
    background-color: skyblue;
    margin-top: 10px;
    padding: 10px;
    box-shadow: 0 0 10px black;
    border-radius: 10px;
}
</style>
自定义事件例子2
Father.vue
<template>
    <div class="father">
    <h3>父组件</h3>
    <!-- <h4>{{ str }}</h4> -->
    <!-- <button @click="test">点我</button> -->
    <!-- 直接写赋值语句 -->
    <!-- <button @click="str='哈哈哈'">点我</button> -->
    <!--  -->
    <!-- <button @click="str=$event">点我</button> -->
    <!-- 给子组件绑定事件,下文abc就是自定义事件名,xyz就是回调 -->
    <!-- <Child @abc="xyz"></Child> -->
    <h4>子给的玩具 {{ toy }}</h4>
    <Child @sent-toy="saveToy"></Child>
    </div>

</template>
<script lang="ts" setup name="Father">
import Child from './Child.vue';
import {ref} from 'vue'
let toy=ref("")
// import { ref } from 'vue';
// let str=ref("你好")

// function test(){
//     str.value="哈哈"
// }
// function xyz(value:number){
//   console.log('xyz',value)
// }
// function saveToy(value:number){
//   console.log('xyz',value)
function saveToy(value:string){
  console.log('sendToy',value)
  toy.value=value
}

</script>
<style  scoped>
.father{
    background-color: rgb(165,164,164);
    padding: 20px;
    border-radius: 10px;
}
</style>
Child.vue
<template>
    <div class="child">
    <h3>子组件</h3>
    <h4>玩具 {{ toy }}</h4>
    <!-- <button @click="emit('abc',666)">测试调用父给子绑定的自定义事件并且传递值</button> -->
    <button @click="emit('sent-toy',toy)">测试调用父给子绑定的自定义事件并且传递值</button>
    </div>

</template>
<script lang="ts" setup name="Child">
import {ref,onMounted} from 'vue'
let toy=ref("奥特曼")

// 声明事件,并赋值给变量,这样模版就可以用了
// const emit=defineEmits(['abc'])
const emit=defineEmits(['sent-toy'])
// 加载3秒后触发abc事件,触发结果就是调用Father的xyz
// onMounted(()=>{
//     setTimeout(()=>{
//        emit('abc')
//     },3000)
// })
</script>
<style  scoped>
.child{
    background-color: skyblue;
    margin-top: 10px;
    padding: 10px;
    box-shadow: 0 0 10px black;
    border-radius: 10px;
}
</style>
3.mitt
任意组件通信
pubsub 订阅
$bus
mitt
收数据的:提前绑定好事件(pubsub叫提前订阅好消息)
提供数据的:在合适的时候触发事件(pubsub叫发布消息)
本质是定义一个公共区域
1.安装 npm i mitt
2.src下建立utils文件夹
emitter.ts
// 引入mitt
import mitt from 'mitt'
// 调用mitt 获得傀儡emitter emitter可以绑定事件,出发事件
const emitter=mitt()
// 暴露emitter
export default emitter
3.main.ts中引入一行
import { createApp } from "vue";
import App from './App.vue'
import { createPinia } from "pinia";
import router from "./router";
import emitter from '@/utils/emitter'
const app=createApp(App)
const pinia=createPinia()
app.use(pinia)
app.use(router)
app.mount('#app')
4.使用
emitter.ts中

all:拿到所有事件
emit:触发事件
off:解绑事件
on:绑定事件
简单使用
// 引入mitt
import mitt from 'mitt'
// 调用mitt 获得傀儡emitter emitter可以绑定事件,出发事件
const emitter=mitt()
// 绑定事件
emitter.on('test1',()=>{
    console.log("test1被调用了")
})
emitter.on('test2',()=>{
    console.log("test2被调用了")
})

// 触发事件
// setTimeout(()=>{
//     emitter.emit('test1')
//     emitter.emit('test2')

// },5000)
setInterval(
    ()=>{
        emitter.emit('test1')
          emitter.emit('test2')
    },2000
)
// 解绑事件,3s后解绑test1
setTimeout(()=>{
emitter.off('test1')
},4000)

// 清空事件

setTimeout(()=>{
    emitter.all.clear()
    },8000)


// 暴露emitter
export default emitter
例子1
哥哥提供玩具给弟弟
哥哥提供数据:触发事件/发布消息
弟弟接收数据:绑定事件/接收消息
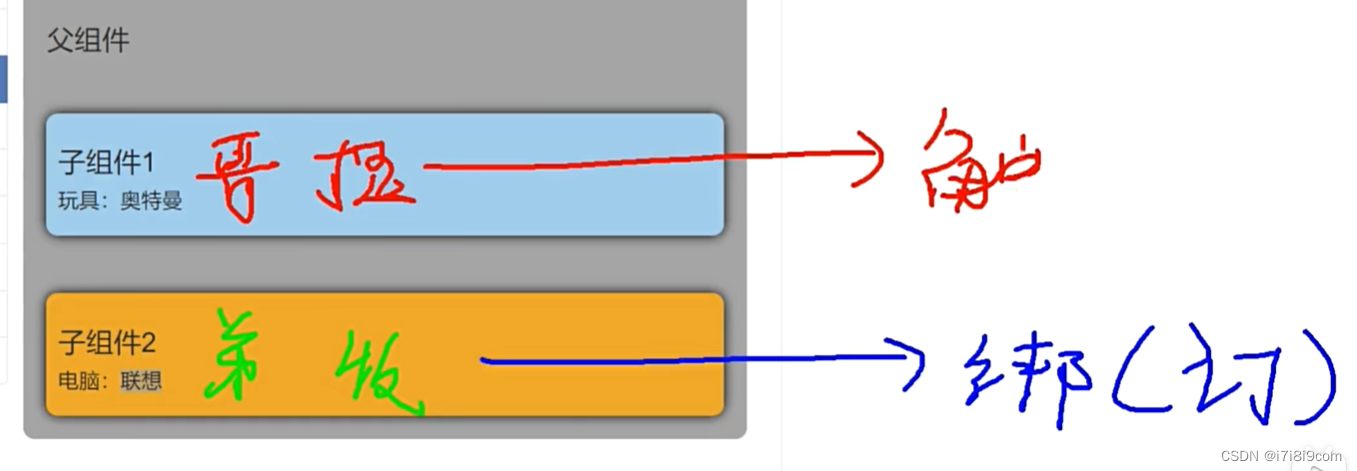
关键是两个组件都要import emitter from '@/utils/emitter'
弟弟
<template>
    <div class="child">
    <h3>子组件2</h3>
    <h4>电脑{{ computer }}</h4>
  <h4>哥哥给的玩具{{ toy }}</h4>
    </div>

</template>
<script lang="ts" setup name="Child2">
import {ref,onUnmounted} from 'vue'
let computer=ref('ThinkPad')
let toy=ref('')  //一开始玩具是空
import emitter from '@/utils/emitter'
// 要拿到文具信息,就要gei emiiter绑定事件
emitter.on('send-toy',(value:any)=>{
console.log("send-toy",value)
        toy.value=value
})
// 注意组件卸载时,解绑事件,有点类似总线,不卸载会被发消息的组件一直惦记,占用内存
onUnmounted(()=>{
    emitter.off('send-toy')
})
</script>
<style  scoped>
.child{
    margin-top: 50px;
    background-color: orange;
    padding: 10px;
    box-shadow: 0 0 10px black;
    border-radius: 10px;
}
</style>
哥哥:
<template>
    <div class="child">
    <h3>子组件1</h3>
    <h4>玩具{{toy }}</h4>
    <!-- 要给玩具弟弟,需要触发消息,并可传递参数 -->
    <button @click="emitter.emit('send-toy',toy)">玩具给弟弟</button>
    </div>

</template>
<script lang="ts" setup name="Child">
import {ref} from 'vue'
import emitter from '@/utils/emitter'
let toy=ref('奥特曼')
</script>
<style  scoped>
.child{
    margin-top: 50px;
    background-color: skyblue;
    padding: 10px;
    box-shadow: 0 0 10px black;
    border-radius: 10px;
}
</style>
emitter.ts
// // 引入mitt
import mitt from 'mitt'
// // 调用mitt 获得傀儡emitter emitter可以绑定事件,出发事件
const emitter=mitt()

// 暴露emitter
export default emitter
main.ts
不必引入emitter,因为传递消息双发已经独立引入了
4. v-model
很少用,可以父子双向传递
比如 <Button a="1">hello<Button/>,这里的大写的Button不是小写的button标签,而是组件
这里的a是传给组件的
UI组件库底层大量使用v-model进行通信
例子1:HTML标签之v-model
<template>
    <div class="father">
    <h3>父组件</h3>
      <input type="text"  v-model="userName"/>
    </div>

</template>
<script lang="ts" setup name="Father">
import {ref} from 'vue'
let userName=ref("李白")


</script>
<style  scoped>
.father{
    background-color: rgb(165,164,164);
    padding: 20px;
    border-radius: 10px;
}
</style>
在控制台可以看到

验证双向可修改

用在html标签上的v-model的本质
<template>
    <div class="father">
    <h3>父组件</h3>
    <!-- v-model用在html标签 -->
      <!-- <input type="text"  v-model="userName"/> -->
      <!-- v-model底层原理是动态赋值+底层事件 -->
      <!-- $event可能是null,因为事件可能new Event,引起飘红 -->
      <!-- <input type="text" :value="userName" @input="userName=$event.target.value"/> -->
      <!-- 给 $event.target加断言一定是HTML输入元素,避免上述飘红-->
      <!-- <input type="text" :value="userName" @input="userName=(<HTMLInputElement>$event.target).value"/> -->


    </div>

</template>
<script lang="ts" setup name="Father">
import {ref} from 'vue'
let userName=ref("李白")


</script>
<style  scoped>
.father{
    background-color: rgb(165,164,164);
    padding: 20px;
    border-radius: 10px;
}
</style>
例子2 组件之v-model
自制一个ui组件
<!-- 这是我自定义的输入组件ui库 -->
<template>
    <input type="text">
</template>
<script lang="ts" setup name="SonghuiInput">
</script>
<style scoped>
input{
    border: 2px solid;
    background-image: linear-gradient(45deg,red,yellow,blue);
    height: 30px;
 font-size:20px;
 color: white;
}
</style>
这个本质上input,但是input自身是可以使用v-model,这个不行
ui组件库绑定事件
<!-- 这是我自定义的输入组件ui库 -->
<template>
    <input
    type="text"
    :value="modelValue"
    @input="emit('update:modelValue',(<HTMLInputElement>$event.target).value)">
</template>
<script lang="ts" setup name="SonghuiInput">
import {defineProps,defineEmits} from 'vue'
defineProps(['modelValue'])
const emit=defineEmits(['update:modelValue'])
</script>
<style scoped>
input{
    border: 2px solid;
    background-image: linear-gradient(45deg,red,yellow,blue);
    height: 30px;
 font-size:20px;
 color: white;
}
</style>
使用ui组件
<template>
    <div class="father">
    <h3>父组件</h3>
    <!-- v-model用在html标签 -->
      <!-- <input type="text"  v-model="userName"/> -->
      <!-- v-model底层原理是动态赋值+底层事件 -->
      <!-- $event可能是null,因为事件可能new Event,引起飘红 -->
      <!-- <input type="text" :value="userName" @input="userName=$event.target.value"/> -->
      <!-- 给 $event.target加断言一定是HTML输入元素,避免上述飘红-->
      <!-- <input type="text" :value="userName" @input="userName=(<HTMLInputElement>$event.target).value"/> -->


<!--   v-model用在组件标签,如下标签名是自定义的输入标签,类似ui组件库标签-->
<!-- <SonghuiInput/> -->
<!-- 给组件使用类似于:value的 :modelValue来实现组件数据到页面 vue2用@input vue3用@update-->
<!-- <SonghuiInput :modelValue="userName" @input="userName=$event"/> -->
<!--  vue3用@update 更新什么用:后面的指定   update:modelValue整个是一个事件名-->
<!-- <SonghuiInput
 :modelValue="username"
  @update:modelValue="username=$event"/> -->
<!-- 上述等价于 -->
<SonghuiInput v-model="username"/>

    </div>

</template>
<script lang="ts" setup name="Father">
import {ref} from 'vue'
import SonghuiInput from './SonghuiInput.vue'
let username=ref("李白")


</script>
<style  scoped>
.father{
    background-color: rgb(165,164,164);
    padding: 20px;
    border-radius: 10px;
}
</style>
综合效果就是

补充
ui中的
 <input
    type="text"
    :value="modelValue"

    @input="emit('update:modelValue',(<HTMLInputElement>$event.target).value)">
event.target中的event是html元素,所以用.target
而下面是组件
<SonghuiInput
 :modelValue="username"
  @update:modelValue="username=$event"/>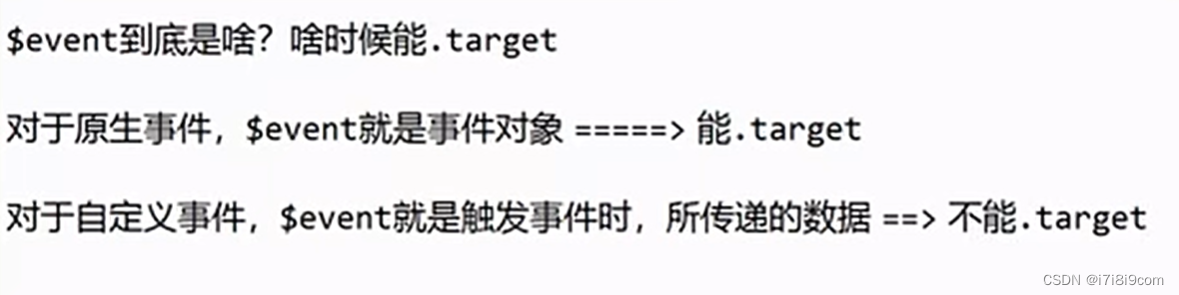
注意
vue2中还是 :value和@input

vue3改为:modelValue和@update
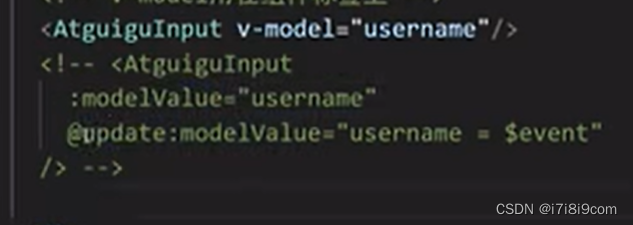
改名
v-model 后面加qwe
右边3处也改为qwe
实现i多次使用v-model
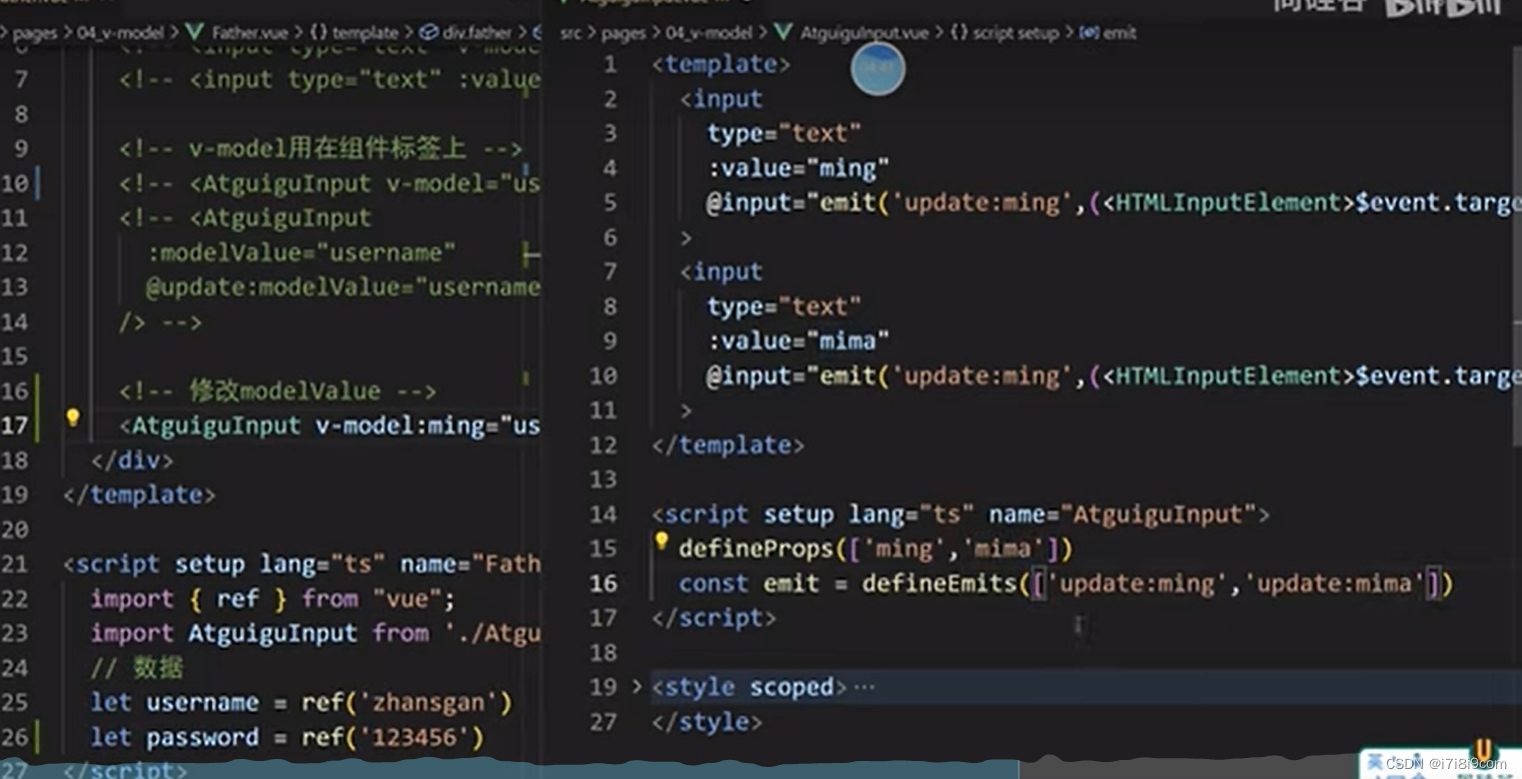
5.attrs
当前组件的父组件给当前组件的子组件传数据,祖给孙
1.父传的多于子收的
父: <Child :a="a" :b="b" :c="c" :d="d"></Child>
子: defineProps(['a',‘b’])
虽然c d没有收,但是记在了attrs里面,所以没声明接收的都在这里

使用 <h4>{{ $attrs }}</h4>
![]()
进一步引入v-bind
   <!-- 以下是等价的 -->
    <Child :a="a" :b="b" :c="c" :d="d" v-bind="{x:200,y:100}"></Child>
    <Child :a="a" :b="b" :c="c" :d="d" :x="200"  :y="100"></Child>
接收时在attrs里面被拆成x y

向孙传递
如果儿子一个都不接收,那么就可以完整的向孙传递
<GrandSon v-bind="$attrs"></GrandSon>
可见把响应数据和写死的xy都传给了孙子

孙子给爷爷
爷爷有方法一样可以传递
 <Child :a="a" :b="b" :c="c" :d="d" v-bind="{x:200,y:100}" :updateA="updateA"></Child>


function updateA(value:number){

    a.value+=value

}
孙子接收,并可更新爷爷的数据
<template>
    <div class="child">
    <h3>孙组件</h3>
    <h4>爷爷a{{ a }}</h4>
    <h4>爷爷a{{ b}}</h4>
    <h4>爷爷a{{ c }}</h4>
    <h4>爷爷a{{ d }}</h4>
    <h4>爷爷a{{ x }}</h4>
    <h4>爷爷a{{ y }}</h4>
    <button @click="updateA(6)">点位更新爷爷a</button>
    </div>

</template>
<script lang="ts" setup name="GrandSon">
import { defineProps } from 'vue';
        defineProps(['a','b','c','d','x','y','updateA'])


</script>
<style  scoped>
.child{
    margin-top: 20px;
    background-color: orange;
    padding: 10px;
    box-shadow: 0 0 10px black;
    border-radius: 10px;
}
</style>
6.$refs $parent
一父多子
$refs:父传子
$parent: 子传父
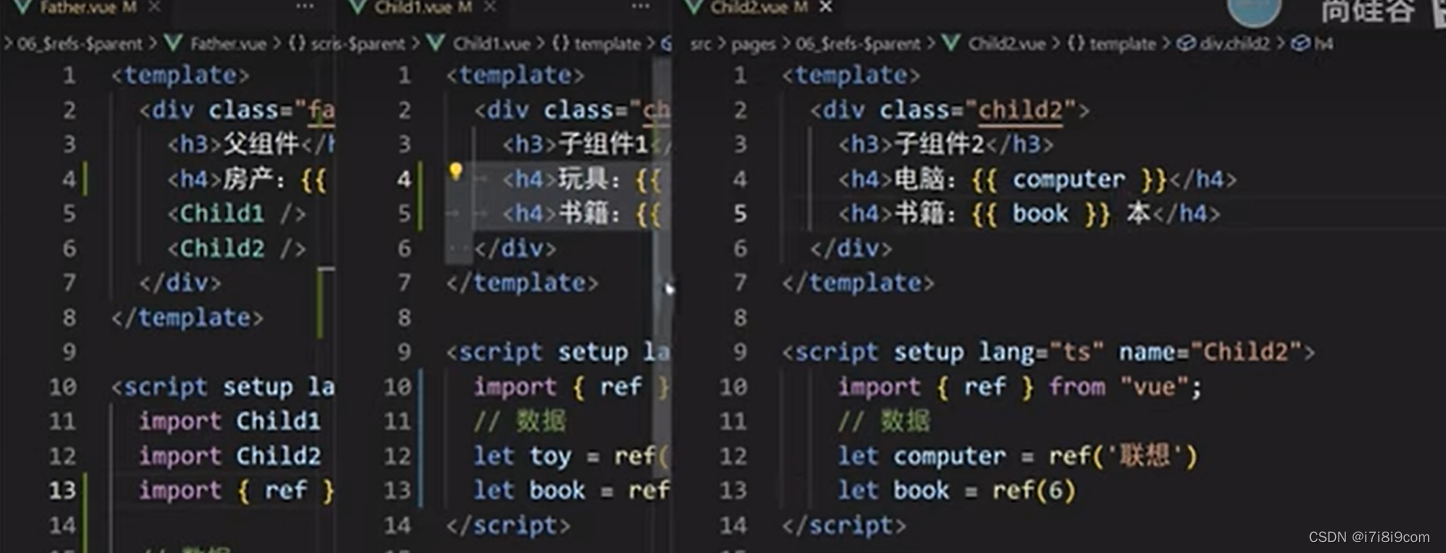
父亲动儿子的-1对1
子组件首先要释放权限defineExpose
<template>
    <div class="child">
    <h3>子组件1</h3>
    <h4>儿子1玩具{{ toy }}</h4>
    <h4>儿子1书籍{{ book }}本书</h4>
    </div>

</template>
<script lang="ts" setup name="Child1">
import {ref} from 'vue'
let toy=ref("奥特曼")
let book=ref(4)
// 把数据交给外部
defineExpose({toy,book})
</script>
<style  scoped>
.child{
    background-color: skyblue;
    padding: 10px;
    box-shadow: 0 0 10px black;
    border-radius: 10px;
}
</style>
父组件调用子组件时给唯一标记ref,因为c1是ref()就可以通过c1.value访问数据
<template>
    <div class="father">
    <h3>父组件</h3>
    <h4>父亲房产数{{ house }}</h4>
    <button @click="changeToy">点我修改儿子1玩具</button>
    <!-- ref定义了唯一标识 -->
    <Child1 ref="c1"></Child1>
    <Child2></Child2>
    </div>

</template>
<script lang="ts" setup name="Father">
import Child1 from './Child1.vue';
import Child2 from './Child2.vue';
import {ref} from 'vue'

let c1=ref()


let house=ref('4')

function changeToy(){
  console.log(c1.value)
  c1.value.toy="变形金刚"
}


</script>
<style  scoped>
.father{
    background-color: rgb(165,164,164);
    padding: 20px;
    border-radius: 10px;
}
</style>
访问结果

父亲动儿子的-1对多$refs
<template>
    <div class="father">
    <h3>父组件</h3>
    <h4>父亲房产数{{ house }}</h4>
    <button @click="changeToy">点我修改儿子1玩具</button>
    <button @click="changeComputer">点我修改儿子2电脑</button>
    <!-- 获取所有子组件实例对象  event因为在普通标签上,所以是事件对象  PointerEvent-->
    <!-- <button @click="getAllChild($event)">获取所有子组件</button> -->
    <button @click="getAllChild($refs)">获取所有子组件</button>
    <!-- ref定义了唯一标识 -->
    <Child1 ref="c1"></Child1>
    <Child2 ref="c2"></Child2>
    </div>

</template>
<script lang="ts" setup name="Father">
import Child1 from './Child1.vue';
import Child2 from './Child2.vue';
import {ref} from 'vue'

let c1=ref()
let c2=ref()


let house=ref('4')

function changeToy(){
  console.log(c1.value)
  c1.value.toy="变形金刚"
}

function changeComputer(){
    c2.value.computer="Dell"
}
function getAllChild(e){
    console.log(e)
}


</script>
<style  scoped>
.father{
    background-color: rgb(165,164,164);
    padding: 20px;
    border-radius: 10px;
}
</style>
$refs
获取了父组件中标记了ref的子组件,没标记则不获取

警告:
Element implicitly has an 'any' type because expression of type 'string' can't be used to index type 'Object'.
No index signature with a parameter of type 'string' was found on type 'Object'.ts(7053)
因为index 可能是c1或 c2

// function getAllChild(refs:Object){
    // 写成any也可以
    // function getAllChild(refs:any){
    function getAllChild(refs:{[key:string]:any}){
    console.log(refs)
    //更改两个儿子的书籍数目,在对象中遍历用key,在数组中遍历用index
    for (let key in refs) {
     console.log(key)   //key就是字符串c1 c2
     console.log(refs[key])    //获取对象中每一个key对应的值
     refs[key].book+=3
    }
<template>
<div class="father">
<h3>父组件</h3>
<h4>父亲房产数{{ house }}</h4>
<button @click="changeToy">点我修改儿子1玩具</button>
<button @click="changeComputer">点我修改儿子2电脑</button>
<!-- 获取所有子组件实例对象 event因为在普通标签上,所以是事件对象 PointerEvent-->
<!-- <button @click="getAllChild($event)">获取所有子组件</button> -->
<button @click="getAllChild($refs)">让所有孩子的书变多</button>
<!-- ref定义了唯一标识 -->
<Child1 ref="c1"></Child1>
<Child2 ref="c2"></Child2>
</div>
</template>
<script lang="ts" setup name="Father">
import Child1 from './Child1.vue';
import Child2 from './Child2.vue';
import {ref} from 'vue'
let c1=ref()
let c2=ref()
let house=ref('4')
function changeToy(){
console.log(c1.value)
c1.value.toy="变形金刚"
}
function changeComputer(){
c2.value.computer="Dell"
}
// function getAllChild(refs:Object){
// 写成any也可以
// function getAllChild(refs:any){
function getAllChild(refs:{[key:string]:any}){
console.log(refs)
//更改两个儿子的书籍数目,在对象中遍历用key,在数组中遍历用index
for (let key in refs) {
console.log(key) //key就是字符串c1 c2
console.log(refs[key]) //获取对象中每一个key对应的值
refs[key].book+=3
}
}
</script>
<style scoped>
.father{
background-color: rgb(165,164,164);
padding: 20px;
border-radius: 10px;
}
</style>$parent
$parent获取父亲的实例对象
一样,父亲要先允许 defineExpose({house})
<template>
    <div class="child">
    <h3>子组件1</h3>
    <h4>儿子1玩具{{ toy }}</h4>
    <h4>儿子1书籍{{ book }}本书</h4>
    <button @click="minusHouse($parent)">去掉父亲的1套房产</button>
    </div>

</template>
<script lang="ts" setup name="Child1">
import {ref} from 'vue'
let toy=ref("奥特曼")
let book=ref(4)
// 把数据交给外部
defineExpose({toy,book})

function minusHouse(parent:any){
console.log(parent)
parent.house-=1
}
</script>
<style  scoped>
.child{
    background-color: skyblue;
    padding: 10px;
    box-shadow: 0 0 10px black;
    border-radius: 10px;
}
</style>
补充
reactive下的ref不需要使用.value读取,自动解包
let obj=reactive({

    a:1,

    b:2,

    c:ref(3)

})

// 当访问obj.c的时候,底层会自动读取value属性,因为c是在这个响应式对象中

console.log(obj.a)

console.log(obj.b)

console.log(obj.c)
7.provide-inject
祖给后代
祖
<template>
    <div class="father">
    <h3>父组件</h3>
    <h4>银子{{ money }}</h4>
    <h4>一辆{{ car.brand }}车,价格{{ car.price }}</h4>
    <Child></Child>
    </div>

</template>
<script lang="ts" setup name="Father">
import Child from './Child.vue';
import {ref,reactive,provide} from 'vue'

let money=ref(5000)
let car=reactive({
    brand:'奔驰',
    price:200
})
// 向后代提供数据
provide('qian',money)
provide('che',car)


</script>
<style  scoped>
.father{
    background-color: rgb(165,164,164);
    padding: 20px;
    border-radius: 10px;
}
</style>
Grandson
<template>
    <div class="child">
    <h3>孙组件</h3>
    <h4>爷爷的钱{{ x }}</h4>
    <!-- '__VLS_ctx.y' is of type 'unknown' ,需要断言-->
    <h4>爷爷的车品牌是{{ y.brand }} 价格是{{ y.price }}</h4>


    </div>

</template>
<script lang="ts" setup name="GrandSon">
import {inject} from 'vue'
        // 80000是找不到qian的注入的备用值
let x=inject('qian',80000)
// 使用第二个参数 缺省值可以相当于起到了推断断言的作用
let y=inject('che',{brand:'未知',price:'未知'})

</script>
<style  scoped>
.child{
    margin-top: 20px;
    background-color: orange;
    padding: 10px;
    box-shadow: 0 0 10px black;
    border-radius: 10px;
}
</style>
后代给祖
要求祖要有方法,一并传给后代
// 向后代提供数据及方法
provide('qianContext',{money,updateMoney})
<template>
<div class="father">
<h3>父组件</h3>
<h4>银子{{ money }}</h4>
<h4>一辆{{ car.brand }}车,价格{{ car.price }}</h4>
<Child></Child>
</div>
</template>
<script lang="ts" setup name="Father">
import Child from './Child.vue';
import {ref,reactive,provide} from 'vue'
let money=ref(5000)
let car=reactive({
brand:'奔驰',
price:200
})
function updateGrandMoney(value:number){
money.value-=value
}
// 向后代提供数据
// provide('qian',money)
provide('che',car)
// 向后代提供数据及方法,注意:千万不能写为money:money.value,这样会让后代接收时失去响应式
provide('qianContext',{money,updateGrandMoney})
//provide('qianContext',{money:money.value,updateGrandMoney})
</script>
<style scoped>
.father{
background-color: rgb(165,164,164);
padding: 20px;
border-radius: 10px;
}
</style>孙
<template>
    <div class="child">
    <h3>孙组件</h3>
    <h4>爷爷的钱{{ money}}</h4>
    <!-- '__VLS_ctx.y' is of type 'unknown' ,需要断言-->
    <h4>爷爷的车品牌是{{ y.brand }} 价格是{{ y.price }}</h4>
     <button @click="updateGrandMoney(3)">花爷爷的钱</button>

    </div>

</template>
<script lang="ts" setup name="GrandSon">
import {inject} from 'vue'
        // 80000是找不到qian的注入的备用值
// let x=inject('qian',80000)
// 解构
// let {money,updateGrandMoney}=inject('qianContext',"我是缺省值")
let {money,updateGrandMoney}=inject('qianContext',{money:0,updateGrandMoney:(param:number)=>{}})
// 使用第二个参数 缺省值可以相当于起到了推断断言的作用
let y=inject('che',{brand:'未知',price:'未知'})

</script>
<style  scoped>
.child{
    margin-top: 20px;
    background-color: orange;
    padding: 10px;
    box-shadow: 0 0 10px black;
    border-radius: 10px;
}
</style>
插槽
三种
需求

因为子组件被调用了3次,需要把三个变量都放在右侧,这样就没法在子组件接收参数
重新分析
如下span不不会显示在页面上,因为vue见到了组件标签就去解析组件了
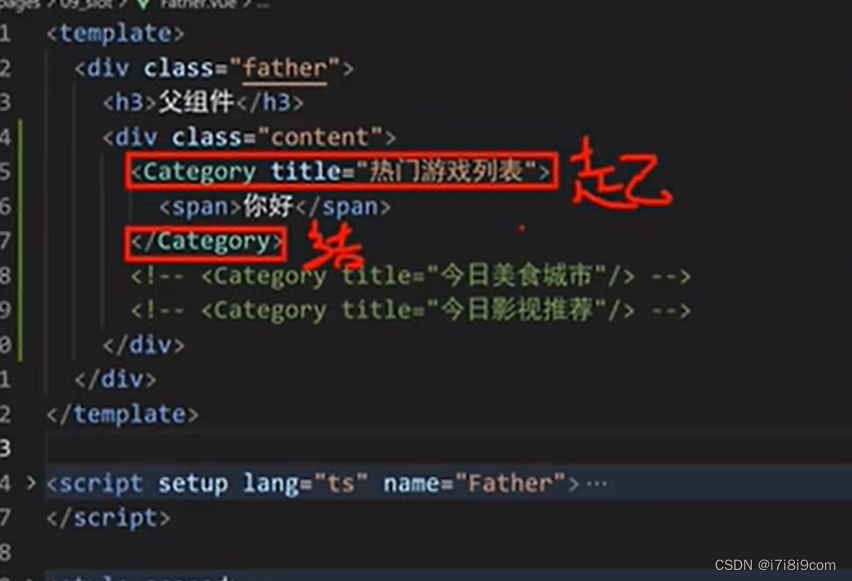
在子组件加入slotE

默认插槽
挖个坑,一般只挖一个,如果挖多个就会每个坑都放
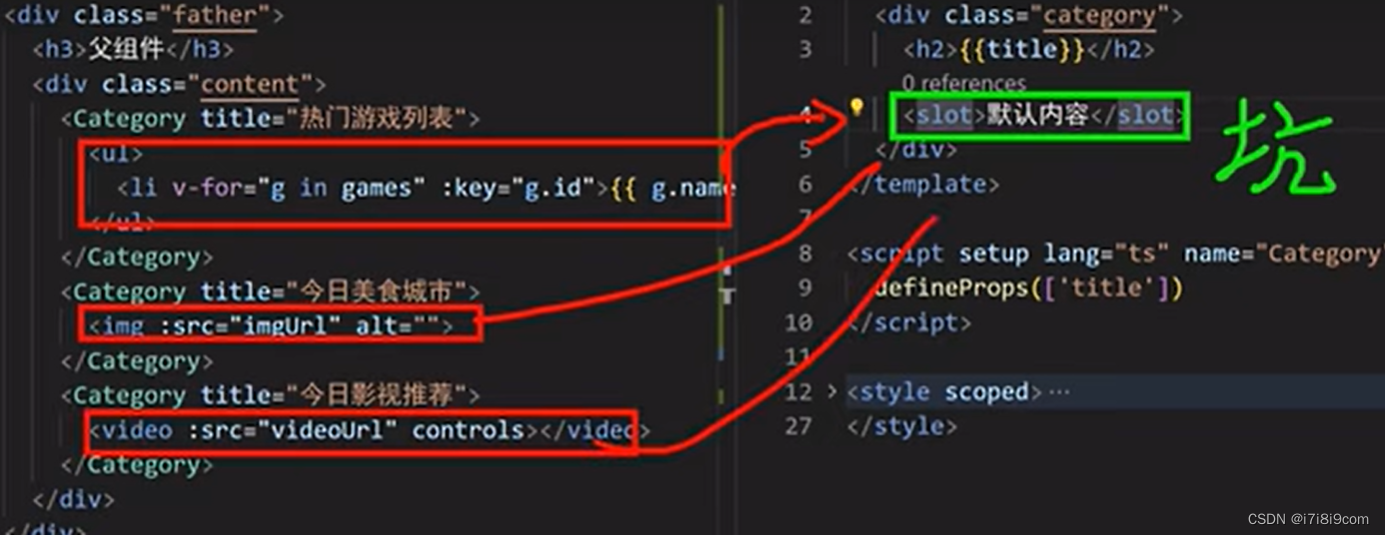
<template>
    <div class="father">
    <h3>父组件</h3>
   <div class="content">
    <Category title="热门游戏列表" >
        <ul>
            <li v-for="item in games" :key="item.id">
            {{ item.id }}--{{item.name}}
            </li>
        </ul>
    </Category>
    <Category title="今日美食城市">
        <img :src="imgUrl" alt="">
    </Category>
    <Category title="今日影视推荐" >

        <video :src="videoUrl" controls ></video>
    </Category>
    </div>

    </div>

</template>
<script lang="ts" setup name="Father">
import Category from './Category.vue';
import {ref,reactive} from 'vue'


let games=reactive([

{id:'001',name:'王者荣耀'},
{id:'002',name:'奇迹'},
{id:'003',name:'传奇'},
{id:'004',name:'原神'},

])

let imgUrl=ref("https://t12.baidu.com/it/app=25&f=JPG&fm=175&fmt=auto&u=517088237%2C2849401642?w=402&h=300&s=501C76966449434754337E740300E078")

let videoUrl=ref("https://media.w3.org/2010/05/sintel/trailer.mp4")


</script>
<style  scoped>
.father{
    background-color: rgb(165,164,164);
    padding: 20px;
    border-radius: 10px;
}
.content{
    display: flex;
    justify-content: space-evenly;
}
img,video{
    width: 100%;

}

</style>
<template>
<div class="category">
<h2>{{title}}</h2>
<slot></slot>
</div>
</template>
<script lang="ts" setup name="Category">
defineProps(['title'])
</script>
<style scoped>
.category{
background-color: skyblue;
border-radius: 10px;
box-shadow: 0 0 10px;
padding: 10px;
width:200px;
height: 300px;
}
h2{
background-color: orange;
text-align: center;
font-size: 20px;
font-weight: 800;
}
</style>具名插槽
默认插槽也是有名字,只不过省略了
![]()
v-slot只能用在组件名称和template上
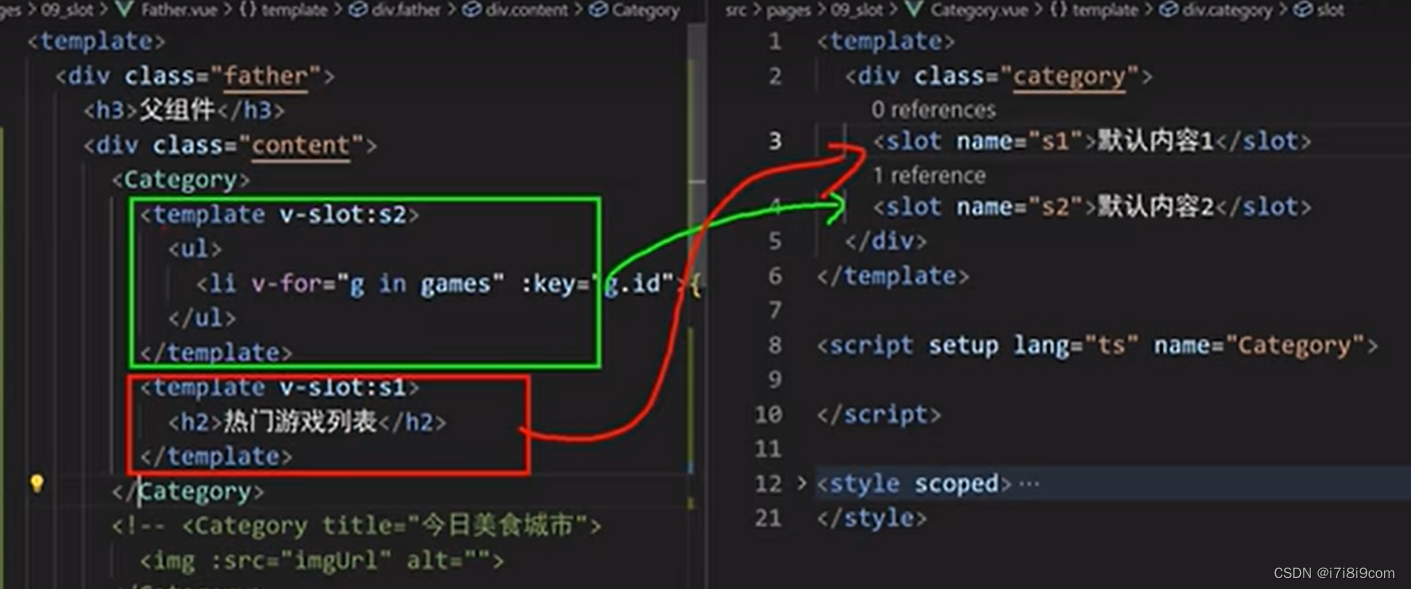
<template>
    <div class="category">
       <!-- <h2>{{title}}</h2> -->

       <slot name="s1">默认标题</slot>
       <slot name="s2">默认内容</slot>
    </div>
</template>
<script lang="ts" setup name="Category">
// defineProps(['title'])
</script>

<style scoped>
.category{
    background-color: skyblue;
    border-radius: 10px;
    box-shadow: 0 0 10px;
    padding: 10px;
    width:200px;
    height: 300px;
}

</style>
<template>
<div class="father">
<h3>父组件</h3>
<div class="content">
<Category>
<!-- v-slot只能用在组件名称和template上 -->
<template v-slot:s1>
<h2>热门游戏列表</h2>
</template>
<template v-slot:s2>
<ul>
<li v-for="item in games" :key="item.id">
{{ item.id }}--{{item.name}}
</li>
</ul>
</template>
</Category>
<Category>
<template v-slot:s1>
<h2>今日美食城市</h2>
</template>
<template v-slot:s2>
<img :src="imgUrl" alt="">
</template>
</Category>
<Category>
<template v-slot:s1>
<h2>今日影视推荐</h2>
</template>
<template v-slot:s2>
<video :src="videoUrl" controls ></video>
</template>
</Category>
</div>
</div>
</template>
<script lang="ts" setup name="Father">
import Category from './Category.vue';
import {ref,reactive} from 'vue'
let games=reactive([
{id:'001',name:'王者荣耀'},
{id:'002',name:'奇迹'},
{id:'003',name:'传奇'},
{id:'004',name:'原神'},
])
let imgUrl=ref("https://t12.baidu.com/it/app=25&f=JPG&fm=175&fmt=auto&u=517088237%2C2849401642?w=402&h=300&s=501C76966449434754337E740300E078")
let videoUrl=ref("https://media.w3.org/2010/05/sintel/trailer.mp4")
</script>
<style scoped>
.father{
background-color: rgb(165,164,164);
padding: 20px;
border-radius: 10px;
}
.content{
display: flex;
justify-content: space-evenly;
}
img,video{
width: 100%;
}
h2{
background-color: orange;
text-align: center;
font-size: 20px;
font-weight: 800;
}
</style>简写#s1
  <Category>
        <template #s1>
            <h2>今日影视推荐</h2>
         </template>
         <template #s2>
            <video :src="videoUrl" controls ></video>
        </template>

    </Category>
    </div>
作用域插槽
子组件slot上定义的属性,被传递给了使用者
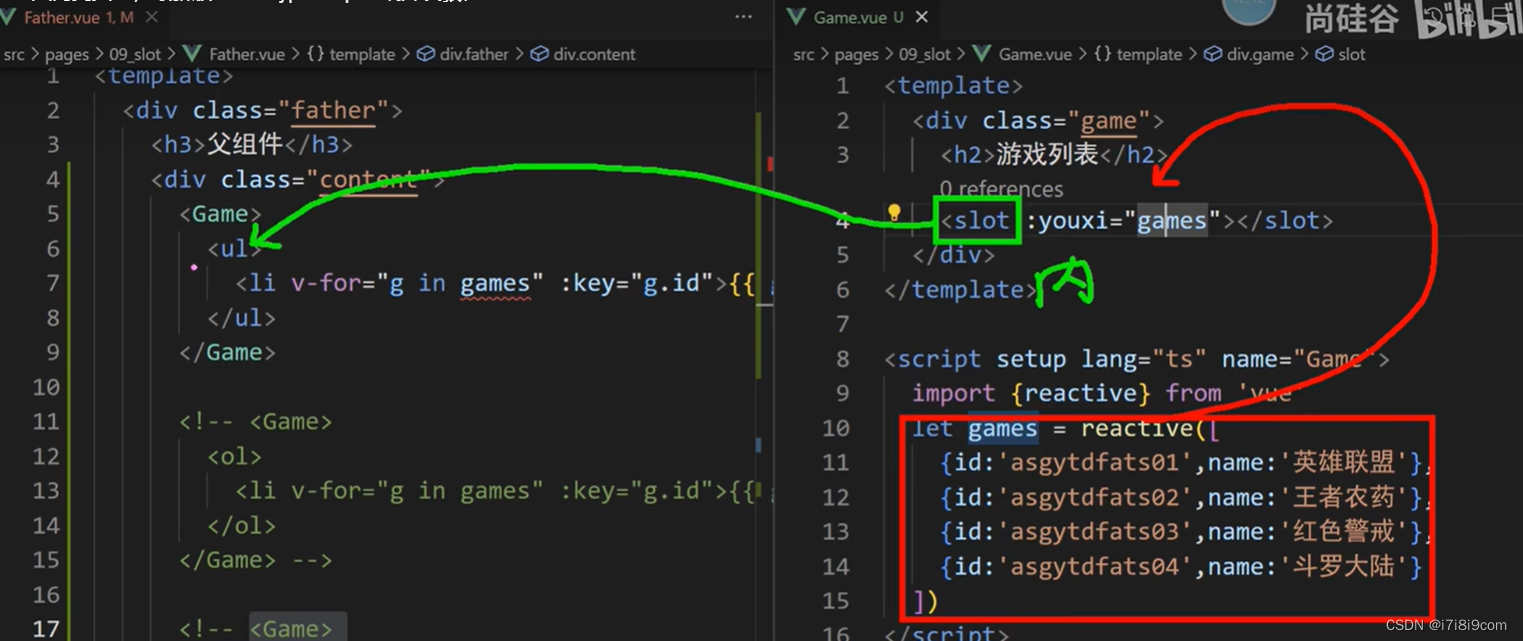
父组件通过如下v-slot='a' 中的a接收

可以看到a是对象{},有三组key value


最后Father
<template>
    <div class="father">
    <h3>父组件</h3>
   <div class="content">
    <Game>
        <!-- 用插槽的slotParams接收slot传递过来的所有属性 -->
     <template v-slot:s1="slotParams">
      <!-- <span>{{ a }}</span> -->
       <ul>
        <li v-for="item in slotParams.games" :key="item.id">
        {{ item.id }}  {{ item.name }}
        </li>
       </ul>
     </template>

    </Game>
    <Game>
     <template #s1="slotParams">
       <ol>
        <li v-for="item in slotParams.games" :key="item.id">
        {{ item.id }}  {{ item.name }}
        </li>
       </ol>
    </template>

    </Game>
    <Game>
        <!-- {}直接对传过来的内容进行了解构 -->
        <template v-slot:s1="{games}">

        <h3 v-for="item in games" :key="item.id">
        {{ item.id }}  {{ item.name }}
        </h3>

    </template>


    </Game>
    </div>

    </div>

</template>
<script lang="ts" setup name="Father">
     import Game from './Game.vue';
</script>
<style  scoped>
.father{
    background-color: rgb(165,164,164);
    padding: 20px;
    border-radius: 10px;
}
.content{
    display: flex;
    justify-content: space-evenly;
}
img,video{
    width: 100%;

}


</style>
最后Game
<template>
    <div class="game">
        <h2>游戏列表</h2>
         <slot name="s1" :games="games" x='哈哈' y="你好"  ></slot>


    </div>
</template>
<script lang="ts" setup name="Game">

import {reactive} from 'vue'

let games=reactive([
{id:'001',name:'王者荣耀'},
{id:'002',name:'奇迹'},
{id:'003',name:'传奇'},
{id:'004',name:'原神'},
])


</script>
<style scoped>
.game{
    width: 200px;
    height: 300px;
    background-color: skyblue;
    border-radius: 10px;
    box-shadow: 0 0 10px;
}

h2{
    background-color: orange;
    text-align: center;
    font-size: 20px;
    font-weight: 800;
}

</style>
其它API
ShallowRef:
浅层次ref,只处理第一层
如下可修改
<template>
    <div class="app">
      <h2>求和为{{ sum }}</h2>
      <h2>名字为{{ person.name }}</h2>
      <h2>年龄为{{ person.age}}</h2>
      <button @click="addSum">sum++</button>
      <button @click="changeName">修改名字</button>
      <button @click="changeAge">修改年龄</button>
      <button @click="changePerson">修改整个人</button>
    </div>
</template>
<script lang="ts" setup name="App">
  import {ref,shallowRef} from 'vue'
let sum=shallowRef(0)
let person=shallowRef({
 name:'张三',
 age:12
})
function addSum(){
    sum.value++
}

function changeName(){
    person.value.name='李白'
}

function changeAge(){
    person.value.age=22

}

function changePerson(){
    person.value={name:'王维',age:55}

}

</script>
<style scoped>
.app{
    background-color: #ddd;
    border-radius: 10px;
    box-shadow: 0 0 10px;
    padding: 10px;
}


</style>
可修改sum和整个人,但是名字和年龄不能改

第一层就是person.value

shallowReactive
reactive定义的数据不能整体替换,要用Objective.
shallowReactive:如下只能改brand这个第一层
<template>
    <div class="app">
      <h2>求和为{{ sum }}</h2>
      <h2>名字为{{ person.name }}</h2>
      <h2>年龄为{{ person.age}}</h2>
      <h2>汽车为{{ car}}</h2>
      <button @click="addSum">sum++</button>
      <button @click="changeName">修改名字</button>
      <button @click="changeAge">修改年龄</button>
      <button @click="changePerson">修改整个人</button>
      <br>
      <button @click="changeCarBrand">修改品牌</button>
      <button @click="changeCarColor">修改颜色</button>
      <button @click="changeCarEngine">修改发动机</button>
      <button @click="changeCarWhole">修改整个车</button>
    </div>
</template>
<script lang="ts" setup name="App">
  import {ref,shallowRef,reactive,shallowReactive} from 'vue'

let car=shallowReactive({
    brand:'奔驰',
    options:{
        color:'红色',
        engine:'v8'
    }
})


let sum=shallowRef(0)
let person=shallowRef({
 name:'张三',
 age:12
})
function addSum(){
    sum.value++
}

function changeName(){
    person.value.name='李白'
}

function changeAge(){
    person.value.age=22

}

function changePerson(){
    person.value={name:'王维',age:55}

}
// 修改车

function changeCarBrand(){
   car.brand='宝马'

}
function changeCarColor(){
   car.options.color='黄色'

}
function changeCarEngine(){
   car.options.engine='V9'

}
function changeCarWhole(){
   car={
    brand:'奥迪',
    options:{
        color:'紫色',
        engine:'A100'
    }
   }

}


</script>
<style scoped>
.app{
    background-color: #ddd;
    border-radius: 10px;
    box-shadow: 0 0 10px;
    padding: 10px;
}


button{
    margin: 0 10px;
}

</style>
readOnly&shallowReadOnly
readOnly:复制一份数据,避免原数据被其他组件更改;原数据变化也会跟着变化
复制出来的这个数据不能修改自己
shallowReadOnly:复制出来的这分数据第一层不能修改,但其它层可以修改

<template>
    <div class="app">
        <h2>sum为{{ sum }}</h2>
        <h2>sum2为{{ sum2 }}</h2>
        <h2>当前(car1)汽车为{{ car }}</h2>
        <h2>当前(car2)汽车为{{ car2 }}</h2>

<button @click="addSum">点我sum+1</button>
<button @click="addSum2">点我sum2+1</button>
<hr>

<button @click="changeCarBrand">修改品牌(car1)</button>
<button @click="changeCarColor">修改颜色(car1)</button>
<button @click="changeCarPrice">修改价格(car1)</button>
<br>
<button @click="changeCar2Brand">修改品牌(car2)</button>
<button @click="changeCar2Color">修改颜色(car2)</button>
<button @click="changeCar2Price">修改价格(car2)</button>

    </div>
</template>
<script lang="ts" setup name="App">
  import {ref,reactive,readonly,shallowReadonly} from 'vue'
  let sum=ref(0)
//   根据可变的sum缔造出一个不可变sum
   let sum2=readonly(sum)
let car=reactive(
    {
        brand:'宝马',
        options:{
            color:'red',
            price:100
        }
    }
)

let car2=readonly(car)

function addSum(){
    sum.value++
}


function addSu2m(){
    sum2.value++    //只读无法使用
}

// 汽车
function changeCarBrand(){
    car.brand='奥迪'
}
function changeCarColor(){
    car.options.color='紫色'
}
function changeCarPrice(){
    car.options.price=400
}

// car2
function changeCar2Brand(){
    car2.brand='奥迪'
}
function changeCar2Color(){
    car2.options.color='紫色'
}
function changeCar2Price(){
    car2.options.price=400
}
</script>
<style scoped>

button{
    margin: 0 10px;
}

</style>
toRaw和MarkRaw
toRaw
let person2=toRaw(person)lodash
MarkRaw

customRef
ref立即变化
customRef用于实现比如6秒后变化
<template>
    <div class="app">
       <h2>{{ msg }}</h2>
     <input type="text" v-model="msg">
    </div>
</template>
<script lang="ts" setup name="App">
 import { TIMEOUT } from 'dns'
import {customRef, ref} from 'vue'
//  自带ref
//  let msg=ref('你好')


// customRef要求必须有get set,用customRef来定义响应式数据
let initValue="你好"
let timer
// 接收底层所传track 跟踪,trigger触发
let msg=customRef((track,trigger)=>{
    return{
        // ,sg被读取时调用   因为其在{{ msg }} ,v-model="msg"两处被读取,所以初始化页面打印出现两次
        get(){
            track()  //告诉vue 要对msg关注,一旦msg变化就去更新,如果没有管制就算有了triggger页面也不会更新
            console.log('get')
            return initValue
        },
        //msg修改时  调入修改值value
        set(value){
            clearTimeout(timer) //清除之前的定时器,因为页面每改一次就会调用setTimmeout
                //msg改变后,要求等1秒页面再变化
        timer=setTimeout(() => {
           console.log('修改',value)
            initValue=value
            trigger()  //通知vue一下数据变了,如果没有trigger vue不知道数据变化,很无聊
        }, 1000)

    }


    }
})

</script>
<style scoped>

button{
    margin: 0 10px;
}

</style>
//hooks改造
import {customRef} from 'vue'

// initValue 初始值   delayTime:延迟时间
export default function(initValue:string,delayTime:number){

// customRef要求必须有get set,用customRef来定义响应式数据
// let initValue="你好"
let timer:number
// 接收底层所传track 跟踪,trigger触发
let msg=customRef((track,trigger)=>{
    return{
        // ,sg被读取时调用   因为其在{{ msg }} ,v-model="msg"两处被读取,所以初始化页面打印出现两次
        get(){
            track()  //告诉vue 要对msg关注,一旦msg变化就去更新,如果没有管制就算有了triggger页面也不会更新
            console.log('get')
            return initValue
        },
        //msg修改时  调入修改值value
        set(value){
            clearTimeout(timer) //清除之前的定时器,因为页面每改一次就会调用setTimmeout
                //msg改变后,要求等1秒页面再变化
        timer=setTimeout(() => {
           console.log('修改',value)
            initValue=value
            trigger()  //通知vue一下数据变了,如果没有trigger vue不知道数据变化,很无聊
        }, delayTime)

    }


    }
})

return {msg}


}
<template>
    <div class="app">
       <h2>{{ msg }}</h2>
     <input type="text" v-model="msg">
    </div>
</template>
<script lang="ts" setup name="App">
    import useMsgRef from './useMsgRef'

// 使用useMsgRef定义响应式数据
let {msg}=useMsgRef('你好',2000)

</script>
<style scoped>

button{
    margin: 0 10px;
}

</style>
TelePort
传送:默认子组件在父组件里,但是子组件弹窗需要以视口定位
父组件
<template>
    <div class="outer">
        <h2>我是APP组件</h2>
   <img src="https://images.dog.ceo/breeds/pembroke/n02113023_6655.jpg" alt="">
   <hr>
   <model></model>
    </div>
</template>
<script lang="ts" setup name="App">
import Model from './Model.vue';

</script>
<style scoped>
.outer{
    background-color: #ddd;
    border-radius: 10px;
    padding:5px;
    box-shadow: 0 0 10px;
    width: 400px;
    height: 800px;
    filter: saturate(200%);

}
img{
    width: 270px;
}
</style>
弹窗组件
<template>
    <button @click="isShow=true">展示弹窗</button>
    <!-- 因为本组件虽然是弹窗,但是是App的子组件,App加了filter子组件的绝对定位就失效了 -->
    <teleport to='body' >
    <div class="model" v-show="isShow">
        <button>展示弹窗</button>
   <h2>我是弹窗标题</h2>
   <p>我是弹窗内容</p>
   <button @click="isShow=false">关闭弹窗</button>
    </div>
</teleport>


</template>
<script lang="ts" setup name="Model">
import {ref} from 'vue'
let isShow=ref(false)


</script>
<style scoped>
.model{
width: 200px;
height: 150px;
background-color: skyblue;
border-radius: 10px;
padding: 5px;
box-shadow: 0 0 5px;
text-align: center;
/* 参考视口定位而不是父组件 */
position: fixed;
top:20px;
left: 50%;
margin-left: -100px;
}
</style>
加了传送 弹窗跑到了body下
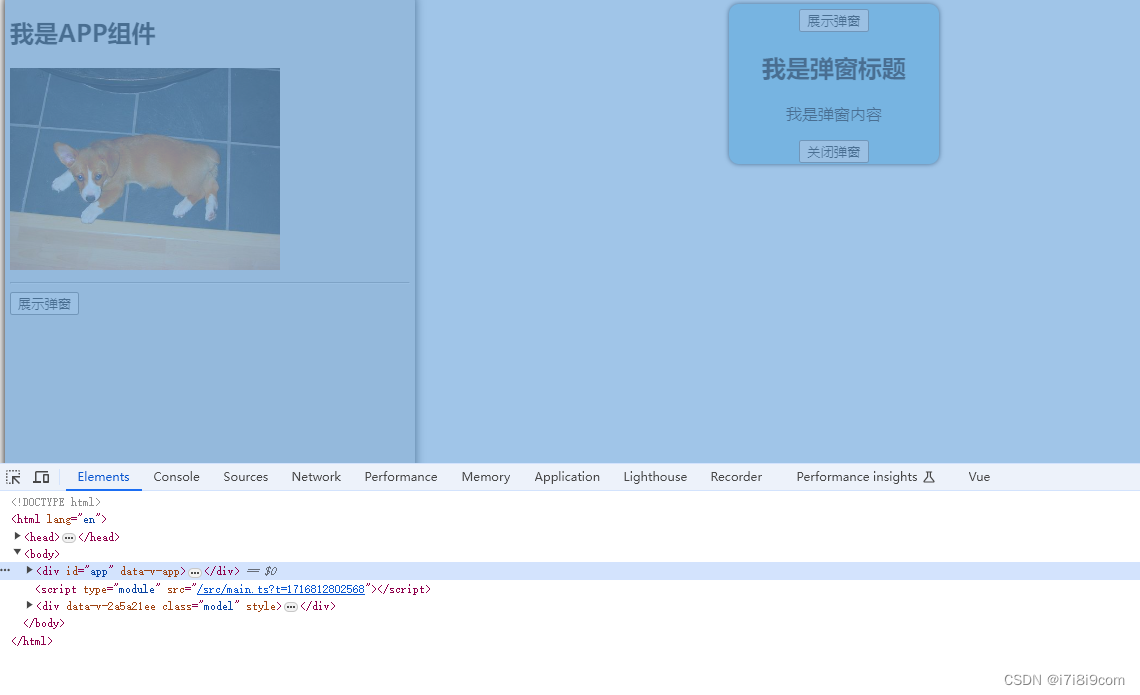
Supense

异步任务导致子组件消失
改为
<template>
    <div class="app">
        <h2>我是App</h2>
        <Suspense>
            <template v-slot:default>
                <child></child>
            </template>

        <!-- <child></child> -->
        <template v-slot:fallback>
              <h2>加载中</h2>
            </template>

        </Suspense>
    </div>
</template>
<script lang="ts" setup name="App">
import { Suspense } from 'vue';
import Child from './Child.vue';


</script>
<style scoped>
.app{
    background-color: #ddd;
    border-radius: 10px;
    padding:10px;
    box-shadow: 0 0 10px;
}

</style>
<template>
<div class="child">
<h2>我是Child</h2>
<h3>当前求和为{{ sum }}</h3>
</div>
</template>
<script lang="ts" setup name="Child">
import {ref} from 'vue'
import acxios from 'axios'
import axios from 'axios'
let sum=ref(0)
let {data:{content}}=await axios.get("https://api.uomg.com/api/rand.qinghua?format=json")
console.log(content)
</script>
<style scoped>
.child{
background-color: skyblue;
border-radius: 10px;
padding:10px;
box-shadow: 0 0 10px;
}
</style>全局API转移到应用
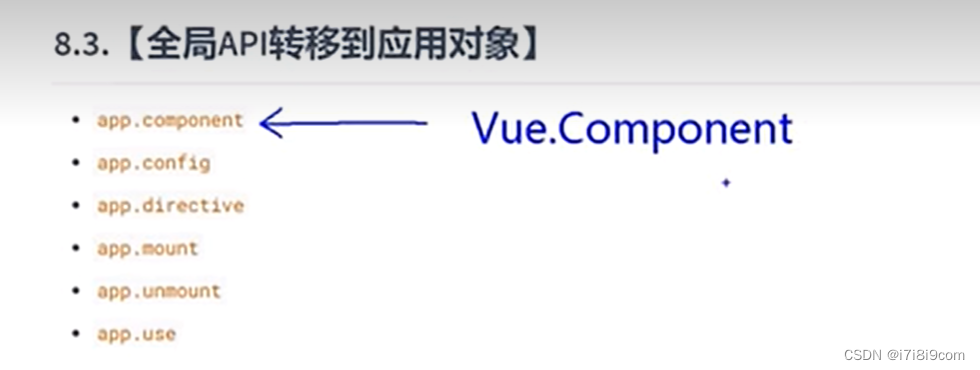
其它


 1434
1434


 被折叠的 条评论
为什么被折叠?
被折叠的 条评论
为什么被折叠?
 到【灌水乐园】发言


