


中心思想:实现窗体标题栏的颜色设置
目标框架:net6.0-windows
一、标准Windows
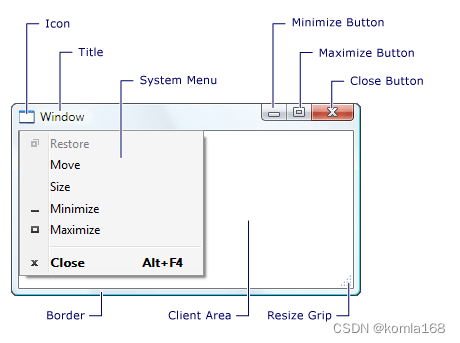
标准窗口由两个重叠的矩形组成。 外部矩形是 非工作区,通常称为 部件版式。 它由操作系统的窗口管理器绘制和管理。 其维度由标准操作系统设置确定。 非客户端框架提供标准窗口功能和行为。 其中包括标题按钮 (最小化、最大化和关闭) 、窗口边框、调整大小和移动行为、应用程序图标和标题以及系统菜单。 内部矩形是 工作区。 它包含应用程序的内容,并由应用程序绘制和管理。 有关 WPF 应用程序中的窗口的详细信息,请参阅 WPF Windows概述。
下图显示了标准窗口的各个部分。
二、 方案选型分析
WPF在不修改样式的情况下是没办法通过原生控件属性修改窗体标题栏相关属性的,不过可以通过其他第三方框架或者其他属性修改原生窗体控件的标题栏。
2.1 自定义窗体标题栏
WindowStyle="None"这个属性可以隐藏掉WPF窗体的自带标题栏,然后我们可以在窗体内部自定义一个标题栏。
但是此时窗体也会失去所有自带的窗体控制,如:最大化、最小化、窗体缩放,而且窗体也没法拖动了。当然可以通过ResizeMode=“CanResizeWithGrip”窗体属性实现窗体缩放(最新版框架其实不需要这个属性也可以实现窗体缩放)。
此时整个窗体就可以通过布局控件(Grid、stackpanel等)进行布局了。文献3.1这位大佬使用WindowChrome自定义窗体样式还是不错的,但只是简单地把窗口的客户区覆盖到非客户区,原生窗口中的交互还在,但样式都已经被遮挡了。
<Window x:Class="WpfApp4.MainWindow"
        xmlns="http://schemas.microsoft.com/winfx/2006/xaml/presentation"
        xmlns:x="http://schemas.microsoft.com/winfx/2006/xaml"
        xmlns:d="http://schemas.microsoft.com/expression/blend/2008"
        xmlns:mc="http://schemas.openxmlformats.org/markup-compatibility/2006"
        xmlns:local="clr-namespace:WpfApp4"
        mc:Ignorable="d"
        Title="MainWindow" Height="450" Width="800"
        FontWeight="ExtraLight" ResizeMode="CanResize" WindowStartupLocation="CenterScreen"
        WindowStyle="None" AllowsTransparency="True" Background="{x:Null}">
    <Window.Resources>
        <Style x:Key="btn_nap" TargetType="{x:Type Button}">
            <Setter Property="Template">
                <Setter.Value>
                    <ControlTemplate TargetType="Button">
                        <Border Background="{TemplateBinding Background}">
                            <ContentPresenter VerticalAlignment="{TemplateBinding VerticalContentAlignment}"
                                              HorizontalAlignment="{TemplateBinding HorizontalContentAlignment}"></ContentPresenter>
                        </Border>
                    </ControlTemplate>
                </Setter.Value>
            </Setter>
            <Setter Property="FontSize" Value="18"/>
            <Setter Property="BorderThickness" Value="0"/>
            <Setter Property="Background" Value="Transparent"/>
            <Style.Triggers>
                <Trigger Property="IsMouseOver" Value="True">
                    <Setter Property="Opacity" Value="0.7"/>
                </Trigger>
                <!--<Trigger Property="IsMouseOver" Value="False">
                    <Setter Property="Background" Value="#EEF0F5"/>
                </Trigger>-->
            </Style.Triggers>
        </Style>
    </Window.Resources>
    <WindowChrome.WindowChrome>
        <WindowChrome CaptionHeight="35" x:Name="windowChrome" CornerRadius="0" GlassFrameThickness="0"/>
    </WindowChrome.WindowChrome>
    <Grid>
        <Grid.RowDefinitions>
            <RowDefinition Height="35"/>
            <RowDefinition/>
        </Grid.RowDefinitions>
        <Grid Background="#3C6AB1">
            <TextBlock x:Name="lblTitle" Text="测试" Foreground="White" FontSize="14" Margin="10 0 0 0" VerticalAlignment="Center"/>
            <StackPanel Orientation="Horizontal" HorizontalAlignment="Right">
                <Button WindowChrome.IsHitTestVisibleInChrome="True" Name="button_MiniSize" Content="─" Style="{StaticResource btn_nap}" HorizontalAlignment="Right" Foreground="White" Margin="0 0 5 0" Height="30" Width="30"/>
                <Button WindowChrome.IsHitTestVisibleInChrome="True" Name="button_MaxSize" Content="☐" Style="{StaticResource btn_nap}" HorizontalAlignment="Right" Foreground="White" Margin="0 0 5 0" Height="30" Width="30"/>
                <Button WindowChrome.IsHitTestVisibleInChrome="True" x:Name="btn_Close" Content="✕" Style="{StaticResource btn_nap}" HorizontalAlignment="Right" Foreground="White" Margin="0 0 5 0" Height="30" Width="30"/>
            </StackPanel>
        </Grid>
        <Grid Grid.Row="1" Background="LightBlue">

        </Grid>
    </Grid>
</Window>
第三方控件实现起来比较容易,
2.2 Fluent.Ribbon
NuGet安装即可,然后在App中引入样式
<Application x:Class="WpfFluentRibbon.App"
xmlns="http://schemas.microsoft.com/winfx/2006/xaml/presentation"
xmlns:x="http://schemas.microsoft.com/winfx/2006/xaml"
xmlns:local="clr-namespace:WpfFluentRibbon"
StartupUri="MainWindow.xaml">
<Application.Resources>
<ResourceDictionary Source="pack://application:,,,/Fluent;Component/Themes/Generic.xaml" />
</Application.Resources>
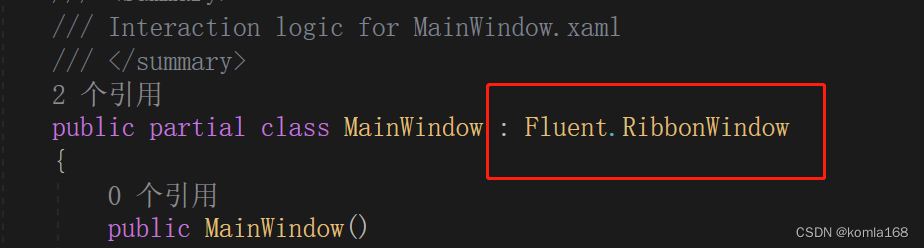
</Application>修改下 Window,改成Fluent:RibbonWindow,同时后台也从继承Windows改成继承Fluent:RibbonWindow
<Fluent:RibbonWindow x:Class="WpfFluentRibbon.MainWindow"
        xmlns="http://schemas.microsoft.com/winfx/2006/xaml/presentation"
        xmlns:x="http://schemas.microsoft.com/winfx/2006/xaml"
        xmlns:d="http://schemas.microsoft.com/expression/blend/2008"
        xmlns:mc="http://schemas.openxmlformats.org/markup-compatibility/2006"
        xmlns:local="clr-namespace:WpfFluentRibbon"
        xmlns:Fluent="urn:fluent-ribbon"
        mc:Ignorable="d"
        Title="MainWindow" Height="450" Width="800"
                     Background="Red">
    <Grid>
        <Grid.RowDefinitions>
            <RowDefinition Height="Auto" />
            <RowDefinition Height="*" />
        </Grid.RowDefinitions>


        <Grid Grid.Row="1">
            <TextBlock>Fluent.Ribbon</TextBlock>
        </Grid>
    </Grid>
</Fluent:RibbonWindow>
这里在 RibbonWindow节点直接设置Background的属性,设个属性会使用于工作区和非工作区
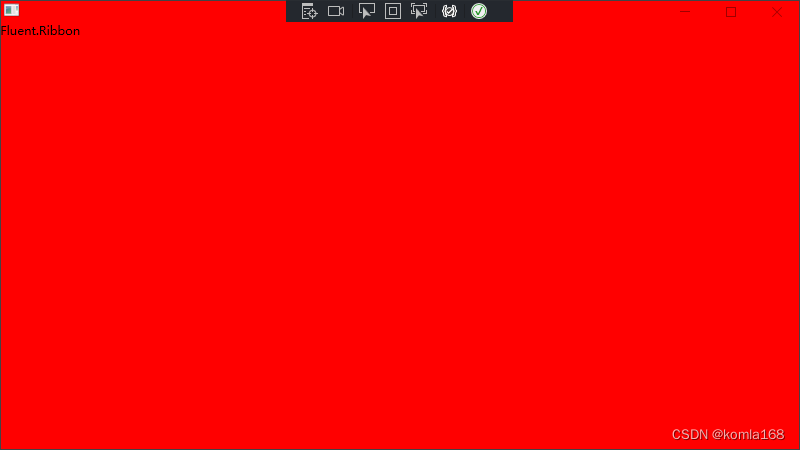
我们把工作区布局控件Grid的Background改下颜色,就可以实现标题栏颜色设置了。
<Grid Background="GreenYellow">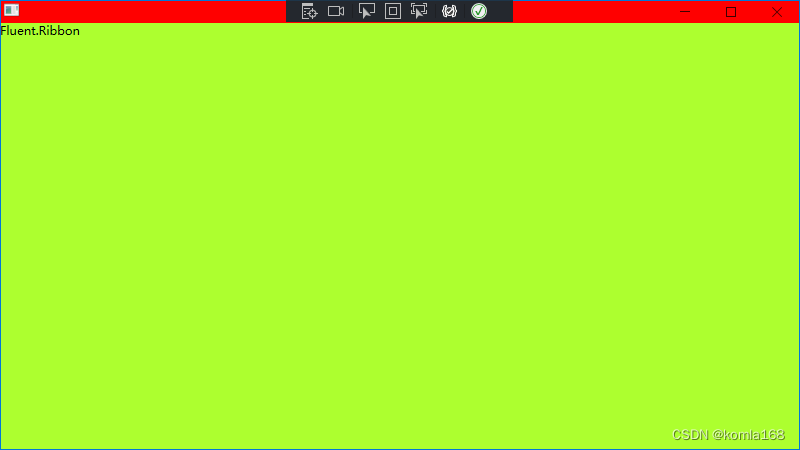
2.3 Panuon.UI.Silver
同理,NuGet安装下,App中添加相关资源
<Application x:Class="WpfPanuonUISilver.App"
             xmlns="http://schemas.microsoft.com/winfx/2006/xaml/presentation"
             xmlns:x="http://schemas.microsoft.com/winfx/2006/xaml"
             xmlns:local="clr-namespace:WpfPanuonUISilver"
             StartupUri="MainWindow.xaml">
    <Application.Resources>
        <ResourceDictionary  Source="pack://application:,,,/Panuon.UI.Silver;component/Control.xaml"/>
    </Application.Resources>
</Application>
主界面前端添加Pu命名空间并修改下Windows节点,同时通过pu:WindowXCaption.Background属性修改窗体标签栏背景色。
<pu:WindowX x:Class="WpfPanuonUISilver.MainWindow"
xmlns="http://schemas.microsoft.com/winfx/2006/xaml/presentation"
xmlns:x="http://schemas.microsoft.com/winfx/2006/xaml"
xmlns:d="http://schemas.microsoft.com/expression/blend/2008"
xmlns:mc="http://schemas.openxmlformats.org/markup-compatibility/2006"
xmlns:local="clr-namespace:WpfPanuonUISilver"
xmlns:pu="clr-namespace:Panuon.UI.Silver;assembly=Panuon.UI.Silver"
mc:Ignorable="d"
Title="MainWindow" Height="450" Width="800"
pu:WindowXCaption.Background="Red">
<Grid>
</Grid>
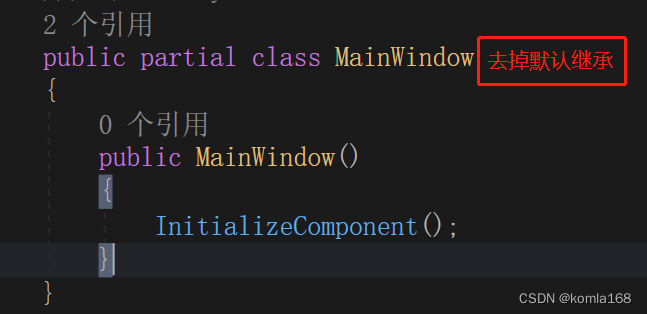
</pu:WindowX>同时后台需要去掉继承的Windows
三、引用文献
3.1 WPF 使用WindowChrome自定义窗体样式_Danny_hi的博客-CSDN博客_windowchrome wpf
3.2 WindowChrome 类 (System.Windows.Shell) | Microsoft Docs
3.3 WPF 使用 WindowChrome,在自定义窗口标题栏的同时最大程度保留原生窗口样式(类似 UWP/Chrome)_walter lv的博客-CSDN博客_windowchrome


 9630
9630


 被折叠的 条评论
为什么被折叠?
被折叠的 条评论
为什么被折叠?
 到【灌水乐园】发言


