


1、环境
操作系统:windows10
elasticsearch:7.14.1
filebeat:7.14.1
elasticsearch-head:5.0.0
2、安装
2.1.安装elasticsearch
官网下载地址:Download Elasticsearch Free | Get Started Now | Elastic | Elastic https://www.elastic.co/cn/downloads/elasticsearch/你可以根据操作系统选择自己需要的版本,由于本次实践采用的是windows10 64位操作系统,所以选择下载了windows版本的es,将下载的es解压到某个目录下中,在es目录下找到config/elasticsearch.yml文件,修改或者增加如下配置即可,最后cd到bin目录下,在命令窗口执行elasticsearch命令启动服务
network.host: 0.0.0.0
By default Elasticsearch listens for HTTP traffic on the first free port it
finds starting at 9200. Set a specific HTTP port here:
#http.port: 9200For more information, consult the network module documentation.
--------------------------------- Discovery ----------------------------------
Pass an initial list of hosts to perform discovery when this node is started:
The default list of hosts is ["127.0.0.1", "[::1]"]
#discovery.seed_hosts: ["host1", "host2"]Bootstrap the cluster using an initial set of master-eligible nodes:
#cluster.initial_master_nodes: ["node-1", "node-2"]For more information, consult the discovery and cluster formation module documentation.
---------------------------------- Various -----------------------------------
Require explicit names when deleting indices:
#action.destructive_requires_name: true#关闭机器学习,否则会导致服务无法启动成功
xpack.ml.enabled: false
#xpack.security.enabled: true
discovery.type: single-node跨域配置
http.cors.enabled: truehttp.cors.allow-origin: "*"
node.master: true
node.data: true
2.2.安装elasticsearch-head
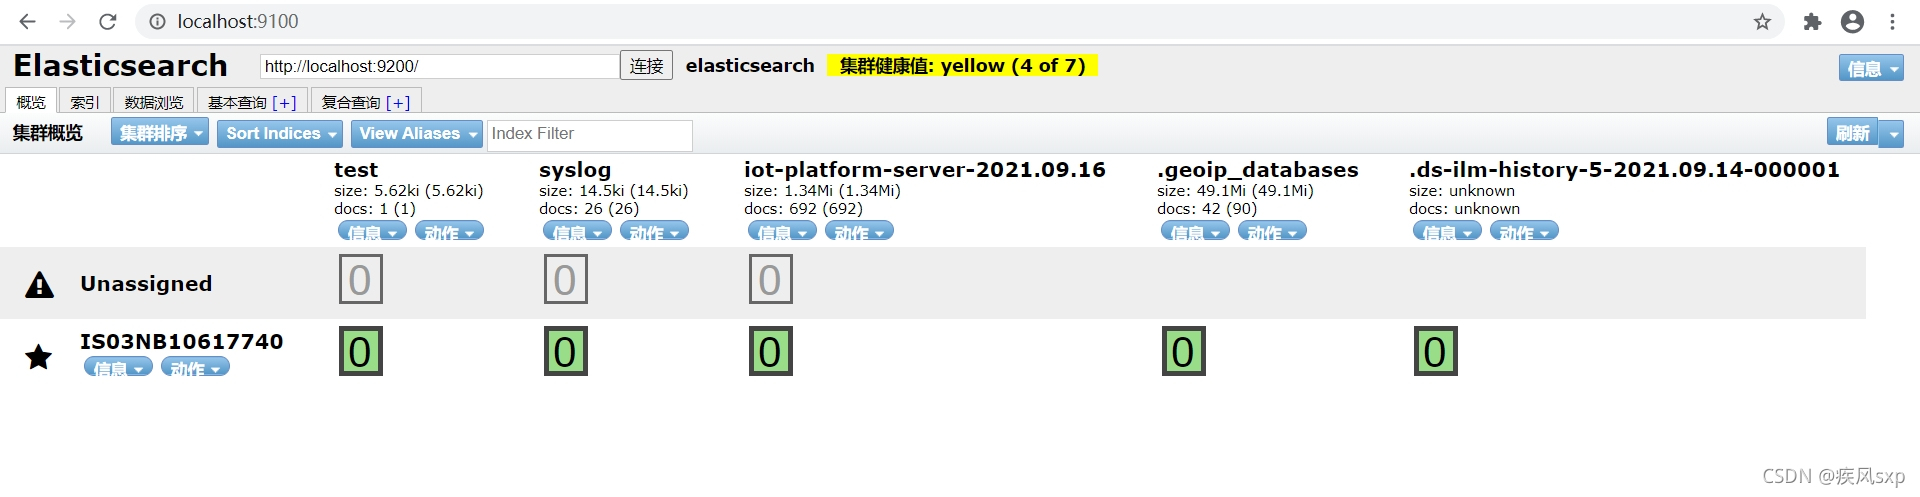
elasticsearch-head是一个es的前端控制台,可以通过它预览索引,索引文档数据等等,具体安装步骤,见地址:windows下安装ElasticSearch的Head插件 - 天生一对 - 博客园,安装好后页面访问如下图:
2.3.安装filebeat
官网下载地址:Download Filebeat • Lightweight Log Analysis | Elastichttps://www.elastic.co/cn/downloads/beats/filebeat下载后解压到本地目录,找到目录下的filebeat.yml,做日志收集配置
①日志收集开启和配置收集的日志路径
filebeat.inputs:

# Each - is an input. Most options can be set at the input level, so
# you can use different inputs for various configurations.
# Below are the input specific configurations.

- type: log

  # Change to true to enable this input configuration.
  # 开启日志收集配置
  enabled: true

  # Paths that should be crawled and fetched. Glob based paths.
  # 收集的应用系统对应的日志路径
  paths:
    - D:\develop\logs\workflow-engine\*.log
②修改索引默认格式,如果不指定的话,会生成filebeat-7.14.1-%{+yyyy.MM.dd}的索引
# Configure what output to use when sending the data collected by the beat.

# ---------------------------- Elasticsearch Output ----------------------------
# 配置索引模板的名字和索引模式的格式
setup.template.enabled: false
setup.template.name: "server1"
setup.template.pattern: "server1-*"
# 索引的生命周期,需要禁用,否则可能无法使用自定义的索引名字
setup.ilm.enabled: false
output.elasticsearch:
  # Array of hosts to connect to.
  hosts: ["localhost:9200"]
  # 输出到那个索引,因为我们这个地方自定义了索引的名字,所以需要上面配置的setup.template.[name|pattern]的配置
  index: "server1-%{+yyyy.MM.dd}"
  enable: true
③使用es的ingest node 的pipeline来处理数据
步骤一:在elasticsearch-head的复合查询tab页,构造pipeline的请求,当返回"acknowledged=true,说明创建成功
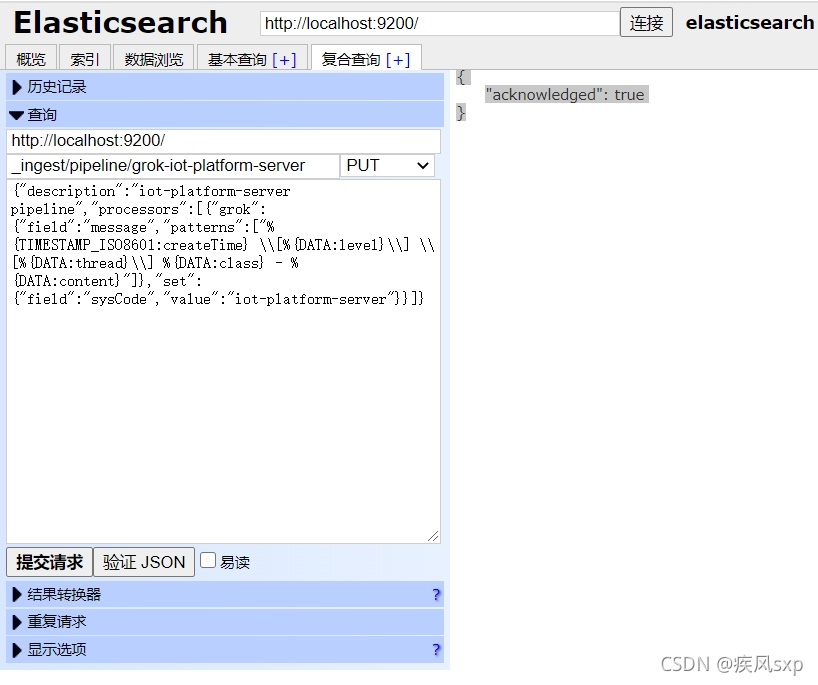
发送的内容如下:
{
    "description":"server1 pipeline",
    "processors":[
        {
            "grok":{
                "field":"message",
                "patterns":[
                    "%{TIMESTAMP_ISO8601:createTime} \\[%{DATA:level}\\] \\[%{DATA:thread}\\] %{DATA:class} - %{DATA:content}"
                ]
            },
            "set":{
                "field":"sysCode",
                "value":"server1"
            }
        }
    ]
步骤二:在output.elasticsearch:下增加如下配置,即可
output.elasticsearch:
  pipelines:
    - pipeline: "grok-server1"
步骤三:启动filebeat,.\filebeat -e -c filebeat.yml,在es-head查看搜集到数据如下:


 5815
5815

 被折叠的 条评论
为什么被折叠?
被折叠的 条评论
为什么被折叠?
 到【灌水乐园】发言


