


本文要解决的问题:
从源码级别对Spark Streaming进行简单学习。
Summarize
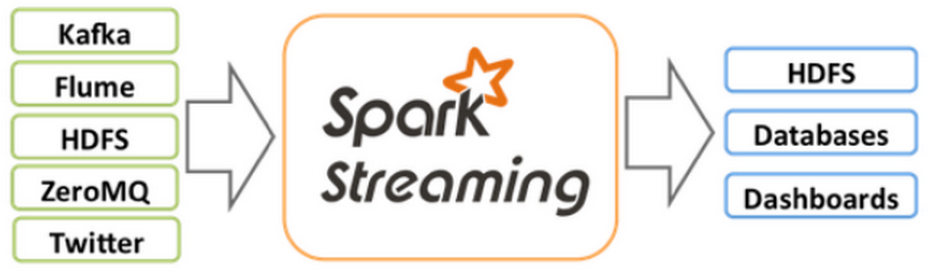
Spark Streaming实现了对实时流数据的高吞吐量、低容错的数据处理API。它的数据来源有很多种:Kafka、Flume、Twitter、ZeroMQ、TCP Scoket等。架构图如下:
Streaming接收实时流输入的数据,将其按批划分,然后交给Spark Enigne分批处理。如下图所示:

StreamingContext
和SparkContext相似。要使用Spark的流处理就必须创建StreamingContext对象。
DStream
DStream是Spark Streaming的是一个抽象类,离散流,它表示一个连续的流。是Spark的一个不可变的分布式数据抽象。
DStream上都用的到任何操作都会转换成底层的RDDs操作。而这些底层RDDs转换是由Spark Engine计算的。
DStream Transformation
离散流转换。DStream支持多种变换的基本SparkRDD使用。
UpdateStateByKey 有状态操作。
UpdateStateByKey在有新的数据信息进入或更新时,可以让用户保持想要的任何状。使用这个功能需要完成两步:
1)定义状态:可以是任意数据类型
2)定义状态更新函数:用一个函数指定如何使用先前的状态,从输入流中的新值更新状态。
对于有状态操作,要不断的把当前和历史的时间切片的RDD累加计算,随着时间的流失,计算的数据规模会变得越来越大。
转换操作 无状态
对于无状态的操作,每一次操作都只是计算当前时间切片的内容,例如每次只计算1s的时间所产生的RDD数据
Window操作
Window操作是针对特定时间并以特定时间间隔为单位进行滑动的操作。比如在1s为时间切片的情况下,统计最近10min的SparkStreaming产生的数据。并且没2min更新一次。
NetworkWordCount
NetworkWordCount是一个单词统计的测试类位于:org.apache.spark.examples.streaming下。
object NetworkWordCount {
  def main(args: Array[String]) {
    if (args.length < 2) {
      System.err.println("Usage: NetworkWordCount <hostname> <port>")
      System.exit(1)
    }

    StreamingExamples.setStreamingLogLevels()

    // Create the context with a 1 second batch size
    val sparkConf = new SparkConf().setAppName("NetworkWordCount")
    val ssc = new StreamingContext(sparkConf, Seconds(1))

    // Create a socket stream on target ip:port and count the
    // words in input stream of \n delimited text (eg. generated by 'nc')
    // Note that no duplication in storage level only for running locally.
    // Replication necessary in distributed scenario for fault tolerance.
    val lines = ssc.socketTextStream(args(0), args(1).toInt, StorageLevel.MEMORY_AND_DISK_SER)
    //每一行以空格划分单词
    val words = lines.flatMap(_.split(" "))
    //统计数量
    val wordCounts = words.map(x => (x, 1)).reduceByKey(_ + _)
    wordCounts.print()
    ssc.start()
    ssc.awaitTermination()
  }
}
下面开始深入分析这段代码:
创建TCP Socket
在上述源码中ssc.socketTextStream(…)创建了TCP Scoket。里面有3个参数:
1)主机名
2)端口
3)stoageLevel,这是个存储对象,默认是放内存和磁盘并且是2份。这个可以自己设置。
继续跟踪socketTextStream中的socketStream方法,发现里面new了一个SocketInputDStream。
  def socketStream[T: ClassTag](
      hostname: String,
      port: Int,
      converter: (InputStream) => Iterator[T],
      storageLevel: StorageLevel
    ): ReceiverInputDStream[T] = {
    new SocketInputDStream[T](this, hostname, port, converter, storageLevel)
  }
SocketInputDStream就是一个DStream了。从源码中可以看出:
SocketInputDStream extendsReceiverInputDStream。而ReceiverInputDStream又extends DStream。
Ok,继续说SocketInputDStream。SocketInputDStream重写了ReceiverInputDStream中的getReceiver方法:
def getReceiver(): Receiver[T] = {
    new SocketReceiver(host, port, bytesToObjects, storageLevel)
  }
这里是new了一个SocketReceiver。
SocketReceiver中的onStart调用了receive这个方法:
def onStart() {

    logInfo(s"Connecting to $host:$port")
    try {
      socket = new Socket(host, port)
    } catch {
      case e: ConnectException =>
        restart(s"Error connecting to $host:$port", e)
        return
    }
    logInfo(s"Connected to $host:$port")

    // Start the thread that receives data over a connection
    new Thread("Socket Receiver") {
      setDaemon(true)
      override def run() { receive() }
    }.start()
  }
下面看receive的具体实现:
def receive() {
    try {
    //用bytesToObjects把InputStream转换成一行行的字符串
      val iterator = bytesToObjects(socket.getInputStream())
      while(!isStopped && iterator.hasNext) {
        store(iterator.next())
      }
      if (!isStopped()) {
        restart("Socket data stream had no more data")
      } else {
        logInfo("Stopped receiving")
      }
    } catch {
      case NonFatal(e) =>
        logWarning("Error receiving data", e)
        restart("Error receiving data", e)
    } finally {
      onStop()
    }
  }
}
这里有个关键的方法store(iterator.next),OK,跟踪进去。
def store(dataItem: T) {
    supervisor.pushSingle(dataItem)
  }
Executor是ReciverSupervisor类型。这个pushSingle就是push数据列表到backend数据存储中。
启动StreamingContext
val lines = ssc.socketTextStream(args(0), args(1).toInt, StorageLevel.MEMORY_AND_DISK_SER)
    val words = lines.flatMap(_.split(" "))
可以发现lines的类型就是SocketInputDStream,然后对他进行一些转换操作(flatMap、map)。这些转换操作都是SocketInputDStream特有的。
最后一步操作就是reduceByKey(+ )。这里的reduceByKey(+ )和RDD的一样都是调用了combineByKey方法。那不一样的地方就是它调用了ShuffledDStream。源码如下:
def combineByKey[C](
      createCombiner: V => C,
      mergeValue: (C, V) => C,
      mergeCombiners: (C, C) => C,
      partitioner: Partitioner,
      mapSideCombine: Boolean = true,
      serializer: Serializer = null): RDD[(K, C)] = self.withScope {
    combineByKeyWithClassTag(createCombiner, mergeValue, mergeCombiners,
      partitioner, mapSideCombine, serializer)(null)
  }
Ok,继续跟踪ShuffledDStream。ShuffledDStream继承了DStream并且实现了compute方法。
 override def compute(validTime: Time): Option[RDD[(K, C)]] = {
    parent.getOrCompute(validTime) match {
      case Some(rdd) => Some(rdd.combineByKey[C](
          createCombiner, mergeValue, mergeCombiner, partitioner, mapSideCombine))
      case None => None
    }
  }
这个方法根据validTime获取RDD进行reduceByKey。再次回到NetworkWordCount。
启动StreamingContext
再次回到NetworkWordCount。面前分源码分析,数据切割动作转换做看完了。现在开始启动StreamingContext。ssc.start()。跟踪源码如下:
 def start(): Unit = synchronized {
    state match {
      case INITIALIZED =>
        startSite.set(DStream.getCreationSite())
        StreamingContext.ACTIVATION_LOCK.synchronized {
          StreamingContext.assertNoOtherContextIsActive()
          try {
            validate()

            // Start the streaming scheduler in a new thread, so that thread local properties
            // like call sites and job groups can be reset without affecting those of the
            // current thread.
            ThreadUtils.runInNewThread("streaming-start") {
              sparkContext.setCallSite(startSite.get)
              sparkContext.clearJobGroup()
              sparkContext.setLocalProperty(SparkContext.SPARK_JOB_INTERRUPT_ON_CANCEL, "false")
              savedProperties.set(SerializationUtils.clone(
                sparkContext.localProperties.get()).asInstanceOf[Properties])
              scheduler.start()
            }
            state = StreamingContextState.ACTIVE
          } catch {
            case NonFatal(e) =>
              logError("Error starting the context, marking it as stopped", e)
              scheduler.stop(false)
              state = StreamingContextState.STOPPED
              throw e
          }
          StreamingContext.setActiveContext(this)
        }
        shutdownHookRef = ShutdownHookManager.addShutdownHook(
          StreamingContext.SHUTDOWN_HOOK_PRIORITY)(stopOnShutdown)
        // Registering Streaming Metrics at the start of the StreamingContext
        assert(env.metricsSystem != null)
        env.metricsSystem.registerSource(streamingSource)
        uiTab.foreach(_.attach())
        logInfo("StreamingContext started")
      case ACTIVE =>
        logWarning("StreamingContext has already been started")
      case STOPPED =>
        throw new IllegalStateException("StreamingContext has already been stopped")
    }
  }
这里重点要看的是scheduler.start()这行。scheduler是JobScheduler实例化变量。继续进入start方法。
def start(): Unit = synchronized {
    if (eventLoop != null) return // scheduler has already been started

    logDebug("Starting JobScheduler")
    eventLoop = new EventLoop[JobSchedulerEvent]("JobScheduler") {
      override protected def onReceive(event: JobSchedulerEvent): Unit = processEvent(event)

      override protected def onError(e: Throwable): Unit = reportError("Error in job scheduler", e)
    }
    eventLoop.start()

    // attach rate controllers of input streams to receive batch completion updates
    for {
      inputDStream <- ssc.graph.getInputStreams
      rateController <- inputDStream.rateController
    } ssc.addStreamingListener(rateController)

    listenerBus.start()
    receiverTracker = new ReceiverTracker(ssc)
    inputInfoTracker = new InputInfoTracker(ssc)
    executorAllocationManager = ExecutorAllocationManager.createIfEnabled(
      ssc.sparkContext,
      receiverTracker,
      ssc.conf,
      ssc.graph.batchDuration.milliseconds,
      clock)
    executorAllocationManager.foreach(ssc.addStreamingListener)
    receiverTracker.start()
    jobGenerator.start()
    executorAllocationManager.foreach(_.start())
    logInfo("Started JobScheduler")
}下面看一下三个start方法
StreamingListenerBus这是个事件监听器,比较简单。
启动ReceiverTracker
ReceiverTracker的start源码如下:
def start(): Unit = synchronized {
    if (isTrackerStarted) {
      throw new SparkException("ReceiverTracker already started")
    }

    if (!receiverInputStreams.isEmpty) {
      endpoint = ssc.env.rpcEnv.setupEndpoint(
        "ReceiverTracker", new ReceiverTrackerEndpoint(ssc.env.rpcEnv))
      if (!skipReceiverLaunch) launchReceivers()
      logInfo("ReceiverTracker started")
      trackerState = Started
    }
  }
if(!receiverInputStreams.isEmpty).。这里要判断receiverInputStreams。receiverInputStreams是在SocketInputDStream的父类InputDStream当中,当实例化InputDStream的时候在DStreamGraph里面添加了InputStrem。


 1337
1337

 被折叠的 条评论
为什么被折叠?
被折叠的 条评论
为什么被折叠?
 到【灌水乐园】发言


