


转载于 http://www.jianshu.com/p/f2fe87e1b714
最后还有:
接下来我们开始正式的代码编写,首先新建一个PjsipManager的单利:
导入头文件#import"pjsua.h",一个初始化Psjip的类方法:
+ (void)pjsipInit{
    ///状态标示
    pj_status_t status;

    ///注册线程
    pj_bool_t bool_t = pj_thread_is_registered();
    if (!bool_t) {
        pj_thread_desc desc;
        pj_thread_t* thed;
        status = pj_thread_register(NULL,desc,&thed);
        if (status != PJ_SUCCESS)
        {
            NSLog(@"线程注册失败");
        }
    }

    status = pjsua_destroy();
    if (status != PJ_SUCCESS)
    {
        NSLog(@"清除信息");
    }

    ///初始化程序
    status = pjsua_create();
    if (status != PJ_SUCCESS){
        NSLog(@"pjsua初始化失败");
    }
    else{//初始化pjsua配置

        ///初始化通话配置
        pjsua_config config;
        pjsua_config_default (&config);
        //设置登录状态改变回调
        config.cb.on_reg_state2 = &on_reg_state2;
        //设置来电回调
        config.cb.on_incoming_call = &on_incoming_call;
        //设置呼叫状态改变回调
        config.cb.on_call_media_state = &on_call_media_state;
        //设置通话状态改变回调
        config.cb.on_call_state = &on_call_state;

        //初始化日志配置
        pjsua_logging_config log_config;
        pjsua_logging_config_default(&log_config);
        //日记等级0不打印日记 4打印详情日记
        log_config.console_level = 0;
        status = pjsua_init(&config, &log_config, NULL);
        //判断是否初始化成功
        if (status != PJ_SUCCESS)
        {
            NSLog(@"创初始化pjsua配置失败");
        }
    }
}
还有4个回调方法:
///登录状态改变回调
static void on_reg_state2(pjsua_acc_id acc_id, pjsua_reg_info *info){
    if (info->renew != 0) {
        if (info->cbparam->code == 200) {
            NSLog(@"登录成功");
        }
        else{
            NSLog(@"登录失败code:%d ",info->cbparam->code);
        }
    }
    else{
        if (info->cbparam->code == 200)
        {
            NSLog(@"SIP退出登录成功");
        }
    }
}

///来电回调
static void on_incoming_call(pjsua_acc_id acc_id, pjsua_call_id call_id, pjsip_rx_data *rdata){
    //获取来电信息
    pjsua_call_info info;
    pjsua_call_get_info(call_id, &info);
    NSString *callStr = [NSString stringWithUTF8String:info.remote_info.ptr];
    //这里发送一个通知
    [[NSNotificationCenter defaultCenter] postNotificationName:@"calling" object:nil userInfo:@{@"calledCAcount":callStr}];
    NSLog(@"%@",callStr);
}

///呼叫回调
static void on_call_media_state(pjsua_call_id call_id)
{
    //获取呼叫信息
    pjsua_call_info info;
    pjsua_call_get_info(call_id, &info);

    if (info.media_status == PJSUA_CALL_MEDIA_ACTIVE)
    {//呼叫接通

        //建立单向媒体流从源到汇
        pjsua_conf_connect(info.conf_slot, 0);
        pjsua_conf_connect(0, info.conf_slot);

        NSLog(@"呼叫成功,等待对方接听");
    }
}

//通话状态改变回调
static void on_call_state(pjsua_call_id call_id, pjsip_event *e)
{

    // 通话状态:CALLING
    // 通话状态:EARLY
    // 通话状态:EARLY
    // 呼叫成功,等待对方接听
    // 通话状态:CONNECTING
    // 通话状态:CONFIRMED
    // DISCONNCTD  对方挂断
    //获取通话信息
    pjsua_call_info ci;
    pjsua_call_get_info(call_id, &ci);

    NSString *status = [NSString stringWithUTF8String:ci.state_text.ptr];
    NSLog(@"通话状态:%@",status);


}
还有呼叫、接应、挂断方法,也要有:
///呼叫
- (void)callAccount:(NSString *)accountsString{

    char accountChar[50];
    sprintf(accountChar,"sip:%s@%s",[accountsString UTF8String],[self.ip UTF8String]);
    pj_str_t url = pj_str(accountChar);

    //初始化呼叫
    pjsua_call_setting  call_set;
    pjsua_call_setting_default(&call_set);

    pj_status_t status = pjsua_call_make_call(_acc_id, &url, &call_set, NULL, NULL, NULL);
    if (status != PJ_SUCCESS)
    {
        NSLog(@"呼叫失败");
    }
}

///挂断
- (void)hangUp{
    //获账户信息
    pjsua_call_info config;
    pjsua_call_get_info(_acc_id, &config);

    ///判断是否在通话中
    if (config.media_status == PJSUA_CALL_MEDIA_ACTIVE)
    {
        pjsua_call_hangup_all();
    }
}

///接电话
- (void)answerCall{
    pjsua_call_answer(_called_id, 200, NULL, NULL);
}
哈哈,以上功能基本能实现接打电话功能了,接下来我们来实战,首先在AppDelegate里项目启动的时候要初始化Pjsua,当然了我们之前封装好了的,直接调用就可以了。
- (BOOL)application:(UIApplication *)application didFinishLaunchingWithOptions:(NSDictionary *)launchOptions {
    //初始化pjsip设置回调
    [PjsipManager pjsipInit];
    return YES;
}
页面的话,在SB里拖几个控件就行了,像这样:
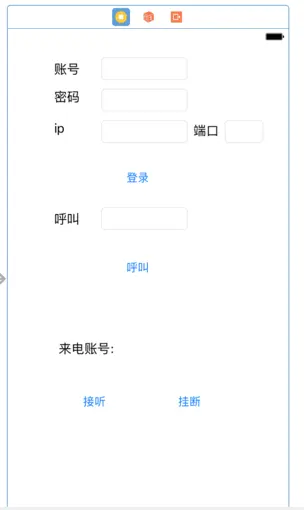
拖几条线,然后实现功能就行了,哎呀,功能我们之前已经封装好的,直接调用就行,还有就是别忘了监听通知显示来电号码哦.
p.p1 {margin: 0.0px 0.0px 0.0px 0.0px; font: 18.0px Menlo}p.p2 {margin: 0.0px 0.0px 0.0px 0.0px; font: 18.0px Menlo; color: #3d1d81}p.p3 {margin: 0.0px 0.0px 0.0px 0.0px; font: 18.0px Menlo; color: #294c50}p.p4 {margin: 0.0px 0.0px 0.0px 0.0px; font: 18.0px Menlo; min-height: 21.0px}span.s1 {font-variant-ligatures: no-common-ligatures}span.s2 {font-variant-ligatures: no-common-ligatures; color: #c32275}span.s3 {font-variant-ligatures: no-common-ligatures; color: #000000}span.s4 {font-variant-ligatures: no-common-ligatures; color: #539aa4}span.s5 {font-variant-ligatures: no-common-ligatures; color: #3c828c}span.s6 {font-variant-ligatures: no-common-ligatures; color: #6122ae}span.s7 {font-variant-ligatures: no-common-ligatures; color: #c91b13}span.s8 {font-variant-ligatures: no-common-ligatures; color: #703daa}span.s9 {font-variant-ligatures: no-common-ligatures; color: #3d1d81}span.s10 {font: 18.0px 'PingFang SC'; font-variant-ligatures: no-common-ligatures; color: #c91b13}

- (void)viewDidLoad {
    [super viewDidLoad];
    _manager = [PjsipManager sharedPjsipManager];
    [[NSNotificationCenter defaultCenter] addObserver:self selector:@selector(calling:) name:@"calling" object:nil];
}

- (void)calling:(NSNotification *)notification{
    NSString *callId = notification.userInfo[@"calledCAcount"];
    _calledAccount.text = [NSString stringWithFormat:@"来电:%@",callId];
}
好了代码功能已经完成,小伙伴们已经等不及测试了吧?好吧,那让我们先启动sip服务器(有服务器的跳过了)控制台输入:
udo /usr/local/sbin/kamctl start
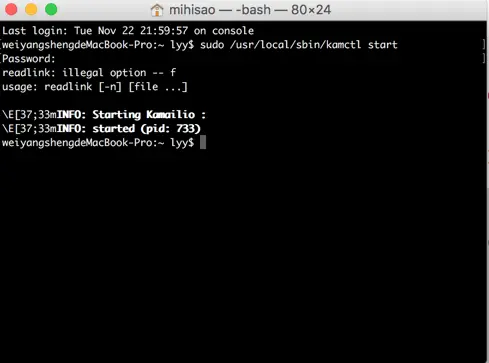
启动成功,万事俱备只欠东风。
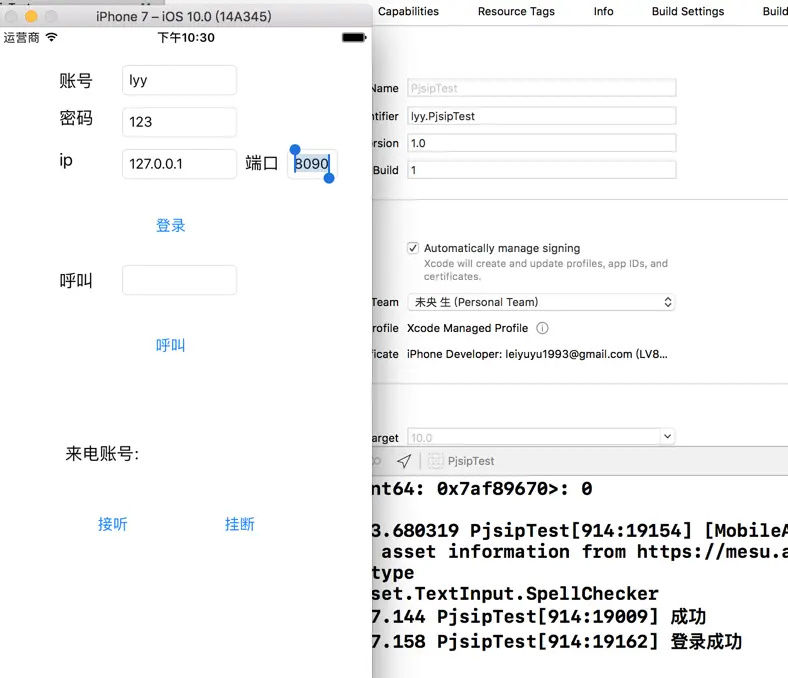
看见控制台打印那几个字没有,登录成功,耶,登录成功了啊。那让我们来试试打电话吧,
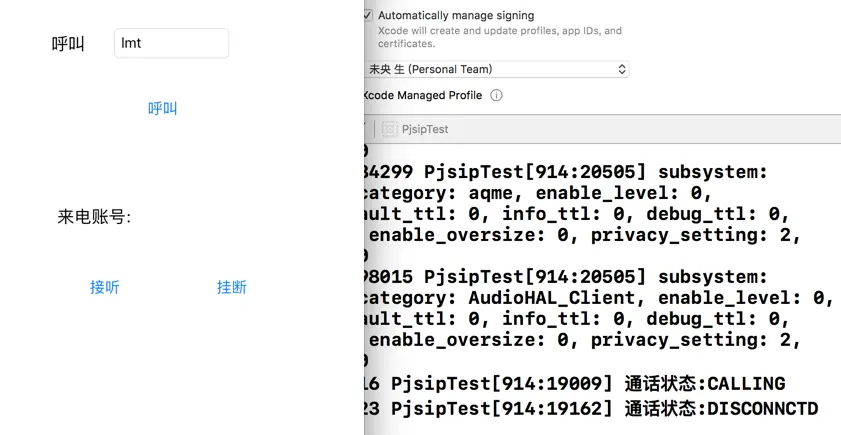
控制台打印了,通话状态calling 正在呼叫 disconnctd 通话断开,怎么回事呢,是因为,我另一个号lmt还没有登录,现在让我手机上跑一个项目测试下打电话.
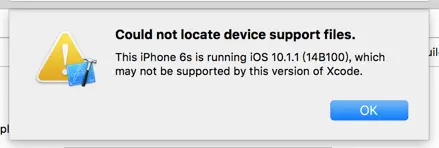
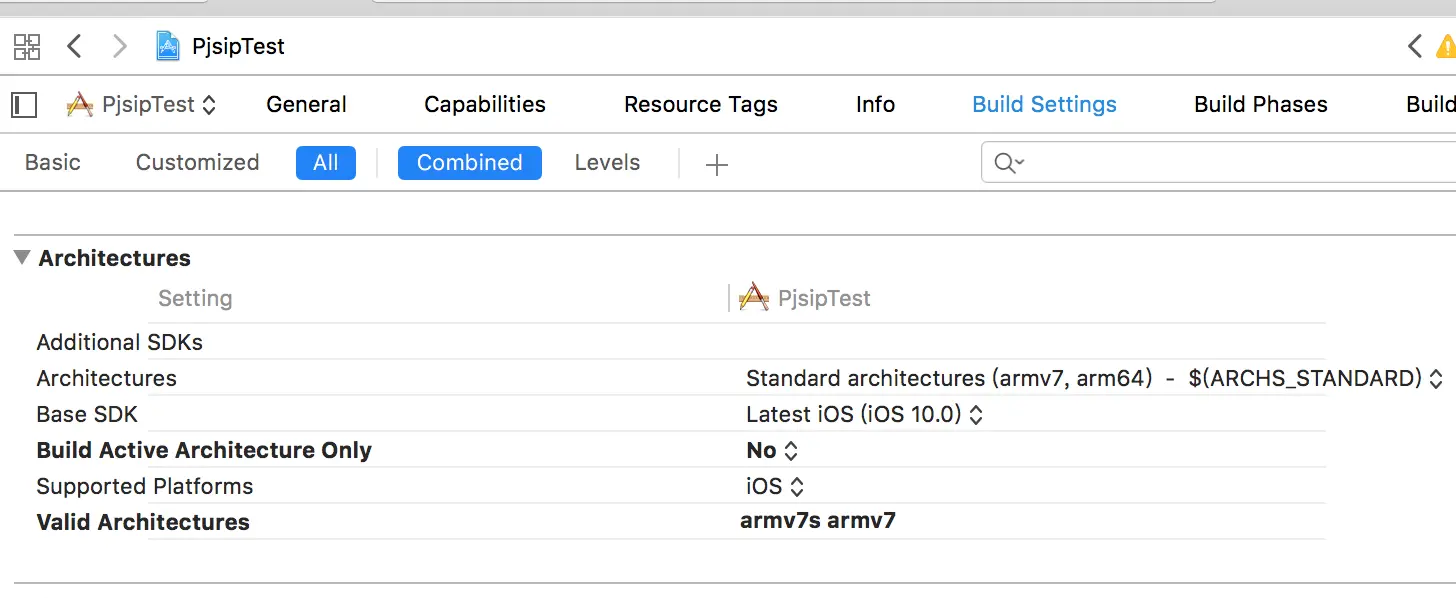
WTF天公不作美啊,Xcode版本太低了,我现在就升级,那么通话的测试就交给小伙伴们了。
demo我已经上传到github了,欢迎大家下载点赞。
https://github.com/SilmeLyy/PjsipDemo
另外这是实现了最基本的功能,还有好多bug,希望有大神看到了,完善项目,做一个带视频的,基于pjsip的Voip项目,期待大神的项目。
想使用linphone的小伙伴们有福了,linphone官网已经有编译好的库文件,可以直接下载使用。
作者:未央生
链接:http://www.jianshu.com/p/f2fe87e1b714
來源:简书
著作权归作者所有。商业转载请联系作者获得授权,非商业转载请注明出处。
最后还有:
接下来我们开始正式的代码编写,首先新建一个PjsipManager的单利:
导入头文件#import"pjsua.h",一个初始化Psjip的类方法:
+ (void)pjsipInit{
    ///状态标示
    pj_status_t status;

    ///注册线程
    pj_bool_t bool_t = pj_thread_is_registered();
    if (!bool_t) {
        pj_thread_desc desc;
        pj_thread_t* thed;
        status = pj_thread_register(NULL,desc,&thed);
        if (status != PJ_SUCCESS)
        {
            NSLog(@"线程注册失败");
        }
    }

    status = pjsua_destroy();
    if (status != PJ_SUCCESS)
    {
        NSLog(@"清除信息");
    }

    ///初始化程序
    status = pjsua_create();
    if (status != PJ_SUCCESS){
        NSLog(@"pjsua初始化失败");
    }
    else{//初始化pjsua配置

        ///初始化通话配置
        pjsua_config config;
        pjsua_config_default (&config);
        //设置登录状态改变回调
        config.cb.on_reg_state2 = &on_reg_state2;
        //设置来电回调
        config.cb.on_incoming_call = &on_incoming_call;
        //设置呼叫状态改变回调
        config.cb.on_call_media_state = &on_call_media_state;
        //设置通话状态改变回调
        config.cb.on_call_state = &on_call_state;

        //初始化日志配置
        pjsua_logging_config log_config;
        pjsua_logging_config_default(&log_config);
        //日记等级0不打印日记 4打印详情日记
        log_config.console_level = 0;
        status = pjsua_init(&config, &log_config, NULL);
        //判断是否初始化成功
        if (status != PJ_SUCCESS)
        {
            NSLog(@"创初始化pjsua配置失败");
        }
    }
}
还有4个回调方法:
///登录状态改变回调
static void on_reg_state2(pjsua_acc_id acc_id, pjsua_reg_info *info){
    if (info->renew != 0) {
        if (info->cbparam->code == 200) {
            NSLog(@"登录成功");
        }
        else{
            NSLog(@"登录失败code:%d ",info->cbparam->code);
        }
    }
    else{
        if (info->cbparam->code == 200)
        {
            NSLog(@"SIP退出登录成功");
        }
    }
}

///来电回调
static void on_incoming_call(pjsua_acc_id acc_id, pjsua_call_id call_id, pjsip_rx_data *rdata){
    //获取来电信息
    pjsua_call_info info;
    pjsua_call_get_info(call_id, &info);
    NSString *callStr = [NSString stringWithUTF8String:info.remote_info.ptr];
    //这里发送一个通知
    [[NSNotificationCenter defaultCenter] postNotificationName:@"calling" object:nil userInfo:@{@"calledCAcount":callStr}];
    NSLog(@"%@",callStr);
}

///呼叫回调
static void on_call_media_state(pjsua_call_id call_id)
{
    //获取呼叫信息
    pjsua_call_info info;
    pjsua_call_get_info(call_id, &info);

    if (info.media_status == PJSUA_CALL_MEDIA_ACTIVE)
    {//呼叫接通

        //建立单向媒体流从源到汇
        pjsua_conf_connect(info.conf_slot, 0);
        pjsua_conf_connect(0, info.conf_slot);

        NSLog(@"呼叫成功,等待对方接听");
    }
}

//通话状态改变回调
static void on_call_state(pjsua_call_id call_id, pjsip_event *e)
{

    // 通话状态:CALLING
    // 通话状态:EARLY
    // 通话状态:EARLY
    // 呼叫成功,等待对方接听
    // 通话状态:CONNECTING
    // 通话状态:CONFIRMED
    // DISCONNCTD  对方挂断
    //获取通话信息
    pjsua_call_info ci;
    pjsua_call_get_info(call_id, &ci);

    NSString *status = [NSString stringWithUTF8String:ci.state_text.ptr];
    NSLog(@"通话状态:%@",status);


}
还有呼叫、接应、挂断方法,也要有:
///呼叫
- (void)callAccount:(NSString *)accountsString{

    char accountChar[50];
    sprintf(accountChar,"sip:%s@%s",[accountsString UTF8String],[self.ip UTF8String]);
    pj_str_t url = pj_str(accountChar);

    //初始化呼叫
    pjsua_call_setting  call_set;
    pjsua_call_setting_default(&call_set);

    pj_status_t status = pjsua_call_make_call(_acc_id, &url, &call_set, NULL, NULL, NULL);
    if (status != PJ_SUCCESS)
    {
        NSLog(@"呼叫失败");
    }
}

///挂断
- (void)hangUp{
    //获账户信息
    pjsua_call_info config;
    pjsua_call_get_info(_acc_id, &config);

    ///判断是否在通话中
    if (config.media_status == PJSUA_CALL_MEDIA_ACTIVE)
    {
        pjsua_call_hangup_all();
    }
}

///接电话
- (void)answerCall{
    pjsua_call_answer(_called_id, 200, NULL, NULL);
}
哈哈,以上功能基本能实现接打电话功能了,接下来我们来实战,首先在AppDelegate里项目启动的时候要初始化Pjsua,当然了我们之前封装好了的,直接调用就可以了。
- (BOOL)application:(UIApplication *)application didFinishLaunchingWithOptions:(NSDictionary *)launchOptions {
    //初始化pjsip设置回调
    [PjsipManager pjsipInit];
    return YES;
}
页面的话,在SB里拖几个控件就行了,像这样:
拖几条线,然后实现功能就行了,哎呀,功能我们之前已经封装好的,直接调用就行,还有就是别忘了监听通知显示来电号码哦.
p.p1 {margin: 0.0px 0.0px 0.0px 0.0px; font: 18.0px Menlo}p.p2 {margin: 0.0px 0.0px 0.0px 0.0px; font: 18.0px Menlo; color: #3d1d81}p.p3 {margin: 0.0px 0.0px 0.0px 0.0px; font: 18.0px Menlo; color: #294c50}p.p4 {margin: 0.0px 0.0px 0.0px 0.0px; font: 18.0px Menlo; min-height: 21.0px}span.s1 {font-variant-ligatures: no-common-ligatures}span.s2 {font-variant-ligatures: no-common-ligatures; color: #c32275}span.s3 {font-variant-ligatures: no-common-ligatures; color: #000000}span.s4 {font-variant-ligatures: no-common-ligatures; color: #539aa4}span.s5 {font-variant-ligatures: no-common-ligatures; color: #3c828c}span.s6 {font-variant-ligatures: no-common-ligatures; color: #6122ae}span.s7 {font-variant-ligatures: no-common-ligatures; color: #c91b13}span.s8 {font-variant-ligatures: no-common-ligatures; color: #703daa}span.s9 {font-variant-ligatures: no-common-ligatures; color: #3d1d81}span.s10 {font: 18.0px 'PingFang SC'; font-variant-ligatures: no-common-ligatures; color: #c91b13}

- (void)viewDidLoad {
    [super viewDidLoad];
    _manager = [PjsipManager sharedPjsipManager];
    [[NSNotificationCenter defaultCenter] addObserver:self selector:@selector(calling:) name:@"calling" object:nil];
}

- (void)calling:(NSNotification *)notification{
    NSString *callId = notification.userInfo[@"calledCAcount"];
    _calledAccount.text = [NSString stringWithFormat:@"来电:%@",callId];
}
好了代码功能已经完成,小伙伴们已经等不及测试了吧?好吧,那让我们先启动sip服务器(有服务器的跳过了)控制台输入:
udo /usr/local/sbin/kamctl start
启动成功,万事俱备只欠东风。
看见控制台打印那几个字没有,登录成功,耶,登录成功了啊。那让我们来试试打电话吧,
控制台打印了,通话状态calling 正在呼叫 disconnctd 通话断开,怎么回事呢,是因为,我另一个号lmt还没有登录,现在让我手机上跑一个项目测试下打电话.
WTF天公不作美啊,Xcode版本太低了,我现在就升级,那么通话的测试就交给小伙伴们了。
demo我已经上传到github了,欢迎大家下载点赞。
https://github.com/SilmeLyy/PjsipDemo
另外这是实现了最基本的功能,还有好多bug,希望有大神看到了,完善项目,做一个带视频的,基于pjsip的Voip项目,期待大神的项目。
想使用linphone的小伙伴们有福了,linphone官网已经有编译好的库文件,可以直接下载使用。
作者:未央生
链接:http://www.jianshu.com/p/f2fe87e1b714
來源:简书
著作权归作者所有。商业转载请联系作者获得授权,非商业转载请注明出处。


 545
545


 被折叠的 条评论
为什么被折叠?
被折叠的 条评论
为什么被折叠?
 到【灌水乐园】发言


