


//--------------------------------------------------------------------------------------
// File: chap14_control_dx9.cpp
//
// Copyright (c) Microsoft Corporation. All rights reserved.
//--------------------------------------------------------------------------------------
#include "DXUT.h"
#include "SDKmisc.h"
#include "DXUTgui.h"
#include "DXUTsettingsdlg.h"
#include "resource.h"

#define IDC_TOGGLE_FULLSCREEN			1
#define IDC_TOGGLE_REF					2
#define IDC_CHANGE_DEVICE				3
#define IDC_COMBO						4
#define	IDC_CHECK_BOX_1					5
#define IDC_CHECK_BOX_2					6
#define IDC_RADIO_1						7
#define	IDC_RADIO_2						8
#define IDC_RADIO_3						9
#define IDC_BUTTON_1					10
#define IDC_BUTTON_2					11
#define IDC_RADIO_4						12
#define IDC_RADIO_5						13
#define	IDC_SLIDER						14
#define IDC_EDIT						15

#define IDC_RADIO_GROUP_1				1
#define IDC_RADIO_GROUP_2				2

#define release_com(p)	do{ if(p) {(p)->Release();(p) = NULL;}} while(0)

// Global variable
ID3DXFont* g_font;
ID3DXSprite* g_text_sprite;
bool g_show_help = true;

/*知识点1:定义控件对象

---------------------------------------------
来自<<DXUT框架剖析(14)>>
---------------------------------------------
控件是用户接口的重要组成部分,为了便于用户操作,为程序界面添加各种控件是非常好的方法。DXUT框架为在Direct3D程序中添加各种控件提供了支持。
为了便于加载控件和处理各控件的消息,通常先在窗口中加载对话框,然后在对话框中添加响应的控件,由对话框来管理控件。为了统一管理各个对话框,
还需要定义对话框资源管理器类CDXUTDialogResourceManager的一个对象
*/


CDXUTDialogResourceManager g_dlg_resource_manager;
CD3DSettingsDlg g_settings_dlg;
CDXUTDialog g_button_dlg;
CDXUTDialog g_control_dlg;

//--------------------------------------------------------------------------------------
// Rejects any D3D9 devices that aren't acceptable to the app by returning false
//--------------------------------------------------------------------------------------
bool CALLBACK IsD3D9DeviceAcceptable( D3DCAPS9* pCaps, D3DFORMAT AdapterFormat, D3DFORMAT BackBufferFormat,
                                      bool bWindowed, void* pUserContext )
{
    // Typically want to skip back buffer formats that don't support alpha blending
    IDirect3D9* pD3D = DXUTGetD3D9Object();
    if( FAILED( pD3D->CheckDeviceFormat( pCaps->AdapterOrdinal, pCaps->DeviceType,
                                         AdapterFormat, D3DUSAGE_QUERY_POSTPIXELSHADER_BLENDING,
                                         D3DRTYPE_TEXTURE, BackBufferFormat ) ) )
        return false;

    return true;
}


//--------------------------------------------------------------------------------------
// Before a device is created, modify the device settings as needed
//--------------------------------------------------------------------------------------
bool CALLBACK ModifyDeviceSettings( DXUTDeviceSettings* pDeviceSettings, void* pUserContext )
{
	// If video card does not support hardware vertex processing, then uses software vertex processing.
	if((DXUTGetD3D9DeviceCaps()->DevCaps & D3DDEVCAPS_HWTRANSFORMANDLIGHT) == 0)
		pDeviceSettings->d3d9.BehaviorFlags = D3DCREATE_SOFTWARE_VERTEXPROCESSING;
	static bool is_first_time = true;
	if(is_first_time)
	{
		//if using reference device, then pop a warning message box.
		if(pDeviceSettings->d3d9.DeviceType == D3DDEVTYPE_REF)
			DXUTDisplaySwitchingToREFWarning(pDeviceSettings->ver);
	}
    return true;
}


//--------------------------------------------------------------------------------------
// Create any D3D9 resources that will live through a device reset (D3DPOOL_MANAGED)
// and aren't tied to the back buffer size
//--------------------------------------------------------------------------------------
HRESULT CALLBACK OnD3D9CreateDevice( IDirect3DDevice9* pd3dDevice, const D3DSURFACE_DESC* pBackBufferSurfaceDesc,
                                     void* pUserContext )
{
	HRESULT hr;
	V_RETURN(g_dlg_resource_manager.OnD3D9CreateDevice(pd3dDevice));
	V_RETURN(g_settings_dlg.OnD3D9CreateDevice(pd3dDevice));
	D3DXCreateFont(pd3dDevice, 18, 0, FW_BOLD, 1, FALSE, DEFAULT_CHARSET, OUT_DEFAULT_PRECIS, DEFAULT_QUALITY,
		DEFAULT_PITCH | FF_DONTCARE, L"Arial", &g_font);
    return S_OK;
}


//--------------------------------------------------------------------------------------
// Create any D3D9 resources that won't live through a device reset (D3DPOOL_DEFAULT)
// or that are tied to the back buffer size
//--------------------------------------------------------------------------------------
HRESULT CALLBACK OnD3D9ResetDevice( IDirect3DDevice9* pd3dDevice, const D3DSURFACE_DESC* pBackBufferSurfaceDesc,
                                    void* pUserContext )
{
	HRESULT hr;
	V_RETURN(g_dlg_resource_manager.OnD3D9ResetDevice());
	V_RETURN(g_settings_dlg.OnD3D9ResetDevice());
	V_RETURN(g_font->OnResetDevice());
	V_RETURN(D3DXCreateSprite(pd3dDevice, &g_text_sprite));

	//设置对话框位置和大小的代码如下所示:

	// set dialog position and size
	g_button_dlg.SetLocation(pBackBufferSurfaceDesc->Width - 170, 0);
	g_button_dlg.SetSize(170, 170);

	g_control_dlg.SetLocation(pBackBufferSurfaceDesc->Width - 170, pBackBufferSurfaceDesc->Height - 350);
	g_control_dlg.SetSize(170, 300);

	// setup view matrix
	D3DXMATRIX mat_view;
	D3DXVECTOR3 eye(0.0f, 0.0f, -5.0f);
	D3DXVECTOR3 at(0.0f, 0.0f, 0.0f);
	D3DXVECTOR3 up(0.0f, 1.0f, 0.0f);

	D3DXMatrixLookAtLH(&mat_view, &eye, &at, &up);
	pd3dDevice->SetTransform(D3DTS_VIEW, &mat_view);

	// set projection matrix
	D3DXMATRIX mat_proj;
	float aspect = (float)pBackBufferSurfaceDesc->Width / pBackBufferSurfaceDesc->Height;
	D3DXMatrixPerspectiveFovLH(&mat_proj, D3DX_PI/4, aspect, 1.0f, 100.0f);
	pd3dDevice->SetTransform(D3DTS_PROJECTION, &mat_proj);


	return S_OK;
}


//--------------------------------------------------------------------------------------
// Handle updates to the scene.  This is called regardless of which D3D API is used
//--------------------------------------------------------------------------------------
void CALLBACK OnFrameMove( double fTime, float fElapsedTime, void* pUserContext )
{
}
void RenderText()
{
	CDXUTTextHelper text_helper(g_font, g_text_sprite, 20);
	text_helper.Begin();

	//show frame and device states
	text_helper.SetInsertionPos(5, 5);
	text_helper.SetForegroundColor(D3DXCOLOR(1.0f, 0.475f, 0.0f, 1.0f));
	text_helper.DrawTextLine(DXUTGetFrameStats(true));
	text_helper.DrawTextLine(DXUTGetDeviceStats());
	// show other simple information
	text_helper.SetForegroundColor( D3DXCOLOR(1.0f, 1.0f, 1.0f, 1.0f));
	text_helper.DrawTextLine(L"Put whatever misc status here");

	//show helper information

	const D3DSURFACE_DESC* surface_desc = DXUTGetD3D9BackBufferSurfaceDesc();

	if(g_show_help)
	{
			text_helper.SetInsertionPos(10, surface_desc->Height - 15 * 6);
			text_helper.SetForegroundColor( D3DXCOLOR(1.0f, 0.475f, 0.0f, 1.0f));
			text_helper.DrawTextLine(L"Controls(F1 to hide):");

			text_helper.SetInsertionPos(40, surface_desc->Height - 15 * 5);
			text_helper.DrawTextLine(L"Quit: ESC");

	}
	else
	{
		text_helper.SetInsertionPos(10, surface_desc->Height - 15 * 4);
		text_helper.SetForegroundColor( D3DXCOLOR(1.0f, 1.0f, 1.0f, 1.0f));
		text_helper.DrawTextLine(L"Press F1 for help");
	}
	text_helper.End();
}


//--------------------------------------------------------------------------------------
// Render the scene using the D3D9 device
//--------------------------------------------------------------------------------------

void CALLBACK OnD3D9FrameRender( IDirect3DDevice9* pd3dDevice, double fTime, float fElapsedTime, void* pUserContext )
{
    HRESULT hr;
/*知识点3:渲染控件


---------------------------------------------
来自<<DXUT框架剖析(14)>>
---------------------------------------------
在主程序的OnFrameRender()回调函数中,调用各个对话框的OnRender()函数对各个对话框进行渲染,代码如下:

*/
	if(g_settings_dlg.IsActive())
	{
		g_settings_dlg.OnRender(fElapsedTime);
		return ;
	}
    // Clear the render target and the zbuffer
    V( pd3dDevice->Clear( 0, NULL, D3DCLEAR_TARGET | D3DCLEAR_ZBUFFER, D3DCOLOR_ARGB( 0, 45, 50, 170 ), 1.0f, 0 ) );

    // Render the scene
    if( SUCCEEDED( pd3dDevice->BeginScene() ) )
    {
		RenderText();

		V(g_button_dlg.OnRender(fElapsedTime));
		V(g_control_dlg.OnRender(fElapsedTime));
        V( pd3dDevice->EndScene() );
    }
}


//--------------------------------------------------------------------------------------
// Handle messages to the application
//--------------------------------------------------------------------------------------
LRESULT CALLBACK MsgProc( HWND hWnd, UINT uMsg, WPARAM wParam, LPARAM lParam,
                          bool* pbNoFurtherProcessing, void* pUserContext )
{
/*知识点4:处理控件消息

---------------------------------------------
来自<<DXUT框架剖析(14)>>
---------------------------------------------
当在应用程序的窗口中单击鼠标或触发其他事件时,先由对话框资源管理器对象g_dlg_resource_manager处理全局消息以更新GUI,然后进入各个对话框的
消息处理函数:


*/
	*pbNoFurtherProcessing = g_dlg_resource_manager.MsgProc(hWnd, uMsg, wParam, lParam);
	if(*pbNoFurtherProcessing)
		return 0;
	if(g_settings_dlg.IsActive())
	{
		g_settings_dlg.MsgProc(hWnd, uMsg, wParam, lParam);
		return 0;
	}
	*pbNoFurtherProcessing = g_button_dlg.MsgProc(hWnd, uMsg, wParam, lParam);
	if(*pbNoFurtherProcessing)
		return 0;;
	*pbNoFurtherProcessing = g_control_dlg.MsgProc(hWnd, uMsg, wParam, lParam);
	if(*pbNoFurtherProcessing)
		return 0;
    return 0;
}
/*知识点6:释放对话框

---------------------------------------------
来自<<DXUT框架剖析(14)>>
---------------------------------------------
在程序退出前需要释放各个对话框所占用的资源:

*/

//--------------------------------------------------------------------------------------
// Release D3D9 resources created in the OnD3D9ResetDevice callback
//--------------------------------------------------------------------------------------
void CALLBACK OnD3D9LostDevice( void* pUserContext )
{
	g_dlg_resource_manager.OnD3D9LostDevice();
	g_settings_dlg.OnD3D9LostDevice();
	g_font->OnLostDevice();
	release_com(g_text_sprite);
}


//--------------------------------------------------------------------------------------
// Release D3D9 resources created in the OnD3D9CreateDevice callback
//--------------------------------------------------------------------------------------
void CALLBACK OnD3D9DestroyDevice( void* pUserContext )
{
	g_dlg_resource_manager.OnD3D9DestroyDevice();
	g_settings_dlg.OnD3D9DestroyDevice();
	release_com(g_font);
}

void CALLBACK OnKeyboardProc(UINT character, bool is_key_down, bool is_alt_down, void* user_context)
{
	if(is_key_down)
	{
		switch(character)
		{
		case VK_F1:
			g_show_help = !g_show_help;
			break;
		}
	}
}
//--------------------------------------------------------------------------------------
// Handle events for controls
//--------------------------------------------------------------------------------------
void CALLBACK OnGUIEvent(UINT event, int control_id, CDXUTControl* control, void* user_context)
{
/*知识点5:处理控件事件

---------------------------------------------
来自<<DXUT框架剖析(14)>>
---------------------------------------------
当触发控件事件后,会先处理控件消息,再处理控件事件
*/
	switch(control_id)
	{
	case IDC_TOGGLE_FULLSCREEN:
		DXUTToggleFullScreen();
		break;
	case IDC_TOGGLE_REF:
		DXUTToggleREF();
		break;
	case IDC_CHANGE_DEVICE:
		g_settings_dlg.SetActive(true);
		break;
	}
}


//--------------------------------------------------------------------------------------
// Initialize dialogs
//--------------------------------------------------------------------------------------
void InitDialogs()
{
	g_settings_dlg.Init(&g_dlg_resource_manager);
	g_button_dlg.Init(&g_dlg_resource_manager);
	g_control_dlg.Init(&g_dlg_resource_manager);
/*知识点2:初始化控件对象

---------------------------------------------
来自<<DXUT框架剖析(14)>>
---------------------------------------------
在程序开始时,调用各个对话框的Init函数和对话框资源管理对象进行初始化:
需要注意的是,对话框类CD3DSettingsDlg是Direct3D封装好的一个专门用于Direct3D渲染设备设置的对话框类,其中的控件已经都加载好了,同时各个控件
将如何响应用户的输入Direct3D也已经实现了。在此只需对它的对象实例g_settings_dlg进行相应的初始化,并在程序退出前释放对应的资源即可。

g_button_dlg和g_control_dlg是两个标准的DXUT对话框,它们中没有任何控件,可以把它们看作两个装载控件的容器。其初始化包括三项内容:设置对话框
控件事件处理回调函数、添加控件、设置对话框位置和大小。

*/
	//设置对话框控件事件处理回调函数、添加控件的代码如下所示(注意:对话框位置和大小需要在OnD3D9ResetDevice函数里设置):

	g_button_dlg.SetCallback(OnGUIEvent);
	int x = 35, y = 10, width = 125, height = 22;
	g_button_dlg.AddButton(IDC_TOGGLE_FULLSCREEN, L"Toggle full screen", x, y, width, height);
	g_button_dlg.AddButton(IDC_TOGGLE_REF, L"Toggle REF(F3)", x, y += 24, width, height, VK_F3);
	g_button_dlg.AddButton(IDC_CHANGE_DEVICE, L"Change device(F2)", x, y += 24, width, height, VK_F2);

	g_control_dlg.SetCallback(OnGUIEvent);

	y = 10;
	g_control_dlg.AddComboBox(IDC_COMBO, x, y += 24, width, height);
	g_control_dlg.GetComboBox(IDC_COMBO)->AddItem(L"Text1", NULL);
	g_control_dlg.GetComboBox(IDC_COMBO)->AddItem(L"Text2", NULL);
	g_control_dlg.GetComboBox(IDC_COMBO)->AddItem(L"Text3", NULL);
	g_control_dlg.GetComboBox(IDC_COMBO)->AddItem(L"Text4", NULL);

	g_control_dlg.AddCheckBox(IDC_CHECK_BOX_1, L"CheckBox1", x, y += 24, width, height);
	g_control_dlg.AddCheckBox(IDC_CHECK_BOX_2, L"CheckBox2", x, y += 24, width, height);

	g_control_dlg.AddRadioButton(IDC_RADIO_1, IDC_RADIO_GROUP_1, L"Radio1G1", x, y += 24, width, height);
	g_control_dlg.AddRadioButton(IDC_RADIO_2, IDC_RADIO_GROUP_1, L"Radio2G1", x, y += 24, width, height);
	g_control_dlg.AddRadioButton(IDC_RADIO_3, IDC_RADIO_GROUP_1, L"Radio3G1", x, y += 24, width, height);
	g_control_dlg.GetRadioButton(IDC_RADIO_3)->SetChecked(true);

	g_control_dlg.AddButton(IDC_BUTTON_1, L"Button1", x, y += 24, width, height);
	g_control_dlg.AddButton(IDC_BUTTON_2, L"Button2", x, y += 24, width, height);

	g_control_dlg.AddRadioButton(IDC_RADIO_4, IDC_RADIO_GROUP_2, L"Radio1G2", x, y += 24, width, height);
	g_control_dlg.AddRadioButton(IDC_RADIO_5, IDC_RADIO_GROUP_2, L"Radio2G2", x, y += 24, width, height);
	g_control_dlg.GetRadioButton(IDC_RADIO_5)->SetChecked(true);

	g_control_dlg.AddSlider(IDC_SLIDER, 50, y += 24, 100, height);
	g_control_dlg.GetSlider(IDC_SLIDER)->SetRange(0, 100);
	g_control_dlg.GetSlider(IDC_SLIDER)->SetValue(50);

	g_control_dlg.AddEditBox(IDC_EDIT, L"Test", x, y += 24, width, 32);

}
//--------------------------------------------------------------------------------------
// Initialize everything and go into a render loop
//--------------------------------------------------------------------------------------
INT WINAPI wWinMain( HINSTANCE, HINSTANCE, LPWSTR, int )
{
    // Enable run-time memory check for debug builds.
#if defined(DEBUG) | defined(_DEBUG)
    _CrtSetDbgFlag( _CRTDBG_ALLOC_MEM_DF | _CRTDBG_LEAK_CHECK_DF );
#endif

    // Set the callback functions
    DXUTSetCallbackD3D9DeviceAcceptable( IsD3D9DeviceAcceptable );
    DXUTSetCallbackD3D9DeviceCreated( OnD3D9CreateDevice );
    DXUTSetCallbackD3D9DeviceReset( OnD3D9ResetDevice );
    DXUTSetCallbackD3D9FrameRender( OnD3D9FrameRender );
    DXUTSetCallbackD3D9DeviceLost( OnD3D9LostDevice );
    DXUTSetCallbackD3D9DeviceDestroyed( OnD3D9DestroyDevice );
    DXUTSetCallbackDeviceChanging( ModifyDeviceSettings );
    DXUTSetCallbackMsgProc( MsgProc );
    DXUTSetCallbackFrameMove( OnFrameMove );

    // TODO: Perform any application-level initialization here
	InitDialogs();
    // Initialize DXUT and create the desired Win32 window and Direct3D device for the application
    DXUTInit( true, true ); // Parse the command line and show msgboxes
    DXUTSetHotkeyHandling( true, true, true );  // handle the default hotkeys
    DXUTSetCursorSettings( true, true ); // Show the cursor and clip it when in full screen
    DXUTCreateWindow( L"chap14_control_dx9" );
    DXUTCreateDevice( true, 640, 480 );

    // Start the render loop
    DXUTMainLoop();

    // TODO: Perform any application-level cleanup here

    return DXUTGetExitCode();
}
运行结果如下:
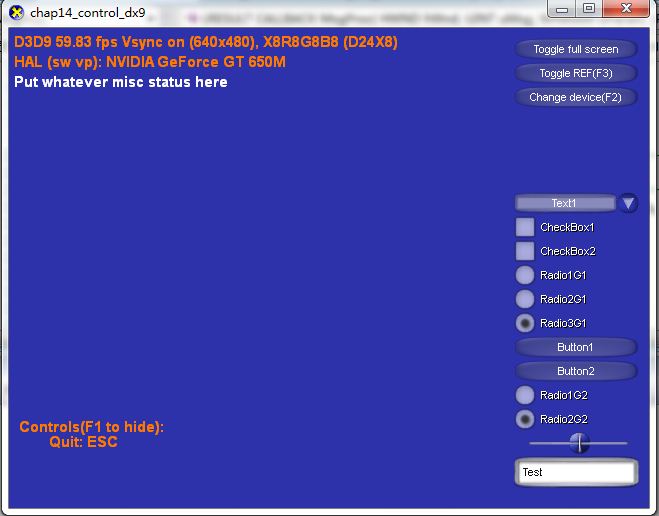
右上角那三个按键就是我们定义的
CDXUTDialog g_button_dlg;
右下角的那些控件就是我们定义的
CDXUTDialog g_control_dlg;
点击Change Device按钮或按F2
我们可以看到:
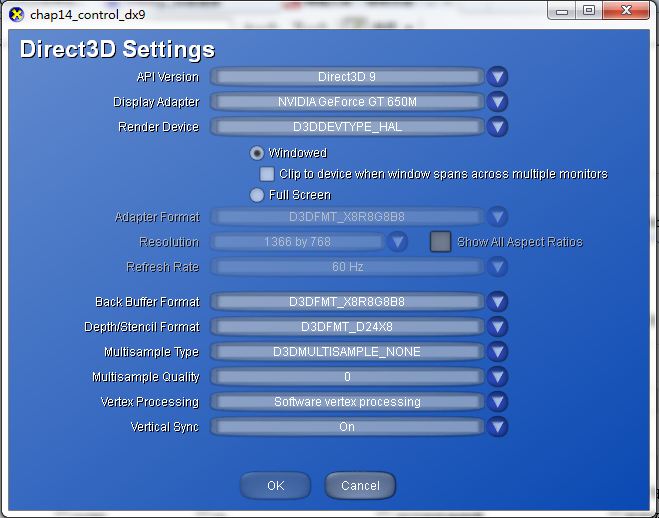
这个对话框就是DXUT为我们实现好了的
CD3DSettingsDlg g_settings_dlg;
好了,经过这三步,你基本上DXUT毕业了.最后我会给个例子演示他们的使用.


 916
916

 被折叠的 条评论
为什么被折叠?
被折叠的 条评论
为什么被折叠?
 到【灌水乐园】发言


