


自动驾驶 - 车辆识别
欢迎来到第3周的编程作业。本次作业你将学习使用YOLO模型用于目标检测。YOLO的两篇论文涵盖了此笔记本中的许多内容:Redmon et al., 2016 (https://arxiv.org/abs/1506.02640) 以及 Redmon and Farhadi, 2016 (https://arxiv.org/abs/1612.08242).
你将学会:
- 在车辆识别数据集上使用目标检测
- 处理边界框
首先运行以下单元格以加载软件包和依赖项!
In [3]:
cd /home/kesci/input/deeplearning107789
/home/kesci/input/deeplearning107789
In [4]:
import argparse
import os
import matplotlib.pyplot as plt
from matplotlib.pyplot import imshow
import scipy.io
import scipy.misc
import numpy as np
import pandas as pd
import PIL
import tensorflow as tf
from keras import backend as K
from keras.layers import Input, Lambda, Conv2D
from keras.models import load_model, Model
from yolo_utils import read_classes, read_anchors, generate_colors, preprocess_image, draw_boxes, scale_boxes
from yad2k.models.keras_yolo import yolo_head, yolo_boxes_to_corners, preprocess_true_boxes, yolo_loss, yolo_body

%matplotlib inline
Using TensorFlow backend.
重要提示:如你所见,我们将Keras后端导入为K。这意味着要在此笔记本中使用Keras函数,你需要编写:K.function(...)。
1 问题描述
假设你正在开发自动驾驶汽车。作为该项目的重要组成部分,首先你想要构建一个车辆识别系统。为了收集数据,你已经在汽车的引擎盖(即前部)上安装了摄像头,该摄像头会在车辆行驶时每隔几秒钟拍摄一次前方道路的照片。
![[外链图片转存失败,源站可能有防盗链机制,建议将图片保存下来直接上传(img-TwRETOil-1667139499326)(L4W3%E4%BD%9C%E4%B8%9A%20%E8%87%AA%E5%8A%A8%E9%A9%BE%E9%A9%B6%20-%20%E8%BD%A6%E8%BE%86%E8%AF%86%E5%88%AB.assets/960.gif)]](https://img-blog.csdnimg.cn/470a603d283b4ca4b827568e8994dbe2.gif)
在硅谷周围行驶时从车载摄像头拍摄的照片。
感谢drive.ai提供此数据集! Drive.ai是一家研究车辆自动驾驶的公司。
你已将所有这些图像收集到一个文件夹中,并通过在找到的每辆汽车周围绘制边框来标记它们。这是边界框的示例。
![[外链图片转存失败,源站可能有防盗链机制,建议将图片保存下来直接上传(img-txvEpvJC-1667139499327)(L4W3%E4%BD%9C%E4%B8%9A%20%E8%87%AA%E5%8A%A8%E9%A9%BE%E9%A9%B6%20-%20%E8%BD%A6%E8%BE%86%E8%AF%86%E5%88%AB.assets/960-1664112808284-31.png)]](https://img-blog.csdnimg.cn/2ccee694b3fc421da8a558152e22a099.png)
图1 :边界框的定义
如果你希望YOLO识别80个类,则可以将类标签c表示为1到80之间的整数,或者表示为80维向量(包含80个数字),其中一个分量为1,其余均为0。在此笔记本中,我们将使用这两种表示形式,哪种方式更方便就用哪种。
在本练习中,你将学习了解YOLO的工作原理,然后将其应用于车辆识别。由于训练YOLO模型需要耗费大量时间,因此我们将加载预训练的权重供你使用。
2 YOLO
YOLO (“you only look once”)是一个很受欢迎的算法,因为它可以在实现高精度的同时能实时运行。网络仅需要进行一次正向传播便可预测,因此说该算法“仅看一次图像”。在非极大值抑制之后,模型将同边界框一起输出识别到的目标。
2.1 模型详细信息
首先要知道的是:
- 输入是一批维度为(m,608,608,3)的图像
- 输出是边界框和已识别的类列表。如上所述,每个边界框由6个数字 ( p c , b x , b y , b h , b w , c ) (p_c, b_x, b_y, b_h, b_w, c) (pc,bx,by,bh,bw,c)表示。如果将c扩展为80维向量,则每个边界框将由85个数字表示。
我们将使用5个锚框。因此,你可以将YOLO架构视为以下内容:IMAGE (m, 608, 608, 3) -> DEEP CNN -> ENCODING (m, 19, 19, 5, 85)
让我们详细了解一下此编码表示:
![[外链图片转存失败,源站可能有防盗链机制,建议将图片保存下来直接上传(img-tIgDnovJ-1667139499327)(L4W3%E4%BD%9C%E4%B8%9A%20%E8%87%AA%E5%8A%A8%E9%A9%BE%E9%A9%B6%20-%20%E8%BD%A6%E8%BE%86%E8%AF%86%E5%88%AB.assets/960-1664112808285-32.png)]](https://img-blog.csdnimg.cn/581a7883642849e4b58086796fefed4e.png)
图2 :YOLO的编码架构
如果目标的中心/中点落在网格单元,则该网格单元负责识别该对象。
由于我们使用的是5个锚框,因此19x19单元中的每一个都对5个框的信息进行编码。锚框仅由其宽度和高度定义。
为简单起见,我们将压平编码的最后两个维度(19,19,5,85),因此,CNN的输出为(19,19,425)。
![[外链图片转存失败,源站可能有防盗链机制,建议将图片保存下来直接上传(img-JmqYTLDT-1667139499328)(L4W3%E4%BD%9C%E4%B8%9A%20%E8%87%AA%E5%8A%A8%E9%A9%BE%E9%A9%B6%20-%20%E8%BD%A6%E8%BE%86%E8%AF%86%E5%88%AB.assets/960-1664112808285-33.png)]](https://img-blog.csdnimg.cn/e84bdb9d5e0a4a268816d171c3b84cb3.png)
图3 :压平最后两个维度
现在,对于(每个单元格的)每个框,我们将计算以下元素乘积,并提取该框包含某个类的概率。
![[外链图片转存失败,源站可能有防盗链机制,建议将图片保存下来直接上传(img-HCZDpX7K-1667139499329)(L4W3%E4%BD%9C%E4%B8%9A%20%E8%87%AA%E5%8A%A8%E9%A9%BE%E9%A9%B6%20-%20%E8%BD%A6%E8%BE%86%E8%AF%86%E5%88%AB.assets/960-1664112808285-34.png)]](https://img-blog.csdnimg.cn/82f51597ed4e4c55b890aec2c411c01f.png)
图4:查找每个框检测到的类别
这是一种可视化YOLO预测图像的方法:
- 对于19x19的每个网格单元,找到概率得分的最大值(在5个锚点框和不同类别中均取最大值)。
- 根据网格单元认为最可能的目标为对应的网格单元着色。
执行此操作将得到以下图片:
![[外链图片转存失败,源站可能有防盗链机制,建议将图片保存下来直接上传(img-8z2HCS8O-1667139499330)(L4W3%E4%BD%9C%E4%B8%9A%20%E8%87%AA%E5%8A%A8%E9%A9%BE%E9%A9%B6%20-%20%E8%BD%A6%E8%BE%86%E8%AF%86%E5%88%AB.assets/960-1664112808285-35.png)]](https://img-blog.csdnimg.cn/16166c5809314fc5b72217fc2eaf2eae.png)
图5:19x19网格单元中的每个单元格预测概率最大的类别。
请注意,这种可视化不是YOLO预测算法的核心部分。这只是可视化算法中间结果的一种好方法。
可视化YOLO输出的另一种方法是绘制其输出的边界框。这样做将产生如下可视化效果:
![[外链图片转存失败,源站可能有防盗链机制,建议将图片保存下来直接上传(img-k7QOPFDz-1667139499330)(L4W3%E4%BD%9C%E4%B8%9A%20%E8%87%AA%E5%8A%A8%E9%A9%BE%E9%A9%B6%20-%20%E8%BD%A6%E8%BE%86%E8%AF%86%E5%88%AB.assets/960-1664112808285-36.png)]](https://img-blog.csdnimg.cn/387c11bf889b411ba556edeb7687849c.png)
图6:每个单元格给你5个方框,该模型总共预测:仅查看一次图像即可一次获得19x19x5 = 1805个框(正向传播)!不同的颜色表示不同的类别。
在上图中,我们仅绘制了模型预测高概率的框,但是框仍然太多,你希望将算法的输出过滤到数量更少的目标类别。为此,你将使用非极大值抑制。具体来说,你将执行以下步骤:
- 丢弃分数较低的盒子(这意味着盒子对检测类别不是很有信心)
- 当多个框彼此重叠并检测到相同的目标时,仅选择一个框。
2.2 对类别分数进行过滤
你将通过阈值化应用第一个过滤器,用于丢弃类“得分”小于所选阈值的所有框。
该模型总共为你提供了19x19x5x85个数,每个框由85个数描述。将维度为(19,19,5,85)(或(19,19,425))的张量重新排列为以下变量将更加方便操作:
box_confidence:维度为(19×19,5,1)的张量包含 p c p_c pc(存在某个目标的置信概率)个19x19单元格中检测到的5个框。boxes:维度为(19×19,5,4)的张量都包含 ( b x , b y , b h , b w ) (b_x, b_y, b_h, b_w) (bx,by,bh,bw)每个单元格中的5个框。box_class_probs:维度为(19×19,5,80)的张量,其中包含5个框中每个单元格的80个类别的对应的检测概率 ( c 1 , c 2 , . . . c 80 ) (c_1, c_2, ... c_{80}) (c1,c2,...c80)。
练习:实现yolo_filter_boxes()。
-
按照图4所述,通过按元素乘积计算框的分数。以下代码可以帮助你选择合适的运算符:
a = np.random.randn(19*19, 5, 1) b = np.random.randn(19*19, 5, 80) c = a * b # shape of c will be (19*19, 5, 80) -
对于每个框,找到:
- 具有最大值的框的类别索引(Hint)(请注意选择的轴;考虑使用axis = -1)
- 相应的框分数 (Hint) (请注意选择的轴;考虑使用axis = -1) -
使用阈值创建mask。提醒一下:
([0.9, 0.3, 0.4, 0.5, 0.1] < 0.4)会返回:[False, True, False, False, True]。对于要保留的框,mask应该为True。 -
使用TensorFlow将mask应用于box_class_scores,box和box_classes,以过滤掉我们不需要的框。你应该只剩下要保留的部分框。 (Hint)
提醒:调用Keras函数应该使用K.function(...)。
In [5]:
# GRADED FUNCTION: yolo_filter_boxes

def yolo_filter_boxes(box_confidence, boxes, box_class_probs, threshold = .6):
    """Filters YOLO boxes by thresholding on object and class confidence.

    Arguments:
    box_confidence -- tensor of shape (19, 19, 5, 1)
    boxes -- tensor of shape (19, 19, 5, 4)
    box_class_probs -- tensor of shape (19, 19, 5, 80)
    threshold -- real value, if [ highest class probability score < threshold], then get rid of the corresponding box

    Returns:
    scores -- tensor of shape (None,), containing the class probability score for selected boxes
    boxes -- tensor of shape (None, 4), containing (b_x, b_y, b_h, b_w) coordinates of selected boxes
    classes -- tensor of shape (None,), containing the index of the class detected by the selected boxes

    Note: "None" is here because you don't know the exact number of selected boxes, as it depends on the threshold.
    For example, the actual output size of scores would be (10,) if there are 10 boxes.
    """

    ### START CODE HERE ### (≈ 1 line)
    box_scores = box_confidence*box_class_probs
    ### END CODE HERE ###

    # Step 2: Find the box_classes thanks to the max box_scores, keep track of the corresponding score
    ### START CODE HERE ### (≈ 2 lines)
    box_classes = K.argmax(box_scores, axis=-1)
    box_class_scores = K.max(box_scores, axis=-1)
    ### END CODE HERE ###

    # Step 3: Create a filtering mask based on "box_class_scores" by using "threshold". The mask should have the
    # same dimension as box_class_scores, and be True for the boxes you want to keep (with probability >= threshold)
    ### START CODE HERE ### (≈ 1 line)
    filtering_mask = box_class_scores >= threshold  # don't use A.eval() >= B
    ### END CODE HERE ###

    # Step 4: Apply the mask to scores, boxes and classes
    ### START CODE HERE ### (≈ 3 lines)
    scores = tf.boolean_mask(box_class_scores, filtering_mask)
    boxes = tf.boolean_mask(boxes, filtering_mask)
    classes = tf.boolean_mask(box_classes, filtering_mask)
    ### END CODE HERE ###

    return scores, boxes, classes
In [6]:
with tf.Session() as test_a:
    box_confidence = tf.random_normal([19, 19, 5, 1], mean=1, stddev=4, seed = 1)
    boxes = tf.random_normal([19, 19, 5, 4], mean=1, stddev=4, seed = 1)
    box_class_probs = tf.random_normal([19, 19, 5, 80], mean=1, stddev=4, seed = 1)
    scores, boxes, classes = yolo_filter_boxes(box_confidence, boxes, box_class_probs, threshold = 0.5)
    print("scores[2] = " + str(scores[2].eval()))
    print("boxes[2] = " + str(boxes[2].eval()))
    print("classes[2] = " + str(classes[2].eval()))
    print("scores.shape = " + str(scores.shape))
    print("boxes.shape = " + str(boxes.shape))
    print("classes.shape = " + str(classes.shape))
scores[2] = 10.750582
boxes[2] = [ 8.426533   3.2713668 -0.5313436 -4.9413733]
classes[2] = 7
scores.shape = (?,)
boxes.shape = (?, 4)
classes.shape = (?,)
预期输出:
scores[2] = 10.750582
boxes[2] = [ 8.426533 3.2713668 -0.5313436 -4.9413733]
classes[2] = 7
scores.shape = (?,)
boxes.shape = (?, 4)
classes.shape = (?,)
2.3 非极大值抑制
即使在通过对类别分数进行阈值过滤后,你仍然会遇到很多重叠的框。用于选择正确框的第二个过滤器叫做非极大值抑制(NMS)。
![[外链图片转存失败,源站可能有防盗链机制,建议将图片保存下来直接上传(img-RHOet5YK-1667139499331)(L4W3%E4%BD%9C%E4%B8%9A%20%E8%87%AA%E5%8A%A8%E9%A9%BE%E9%A9%B6%20-%20%E8%BD%A6%E8%BE%86%E8%AF%86%E5%88%AB.assets/960-1664112808285-37.png)]](https://img-blog.csdnimg.cn/e13ce99a24804d28be5fa8c2ad7cbcc0.png)
图7:在此示例中,该模型检测到了3辆汽车,但实际上是同一辆汽车的3个预测结果。运行非极大值抑制(NMS)将仅选择三个框中最准确的(概率最高)一个。
非极大值抑制使用非常重要的函数,即 “Intersection over Union” 或者说IoU。
![[外链图片转存失败,源站可能有防盗链机制,建议将图片保存下来直接上传(img-Mk5eJaiQ-1667139499332)(L4W3%E4%BD%9C%E4%B8%9A%20%E8%87%AA%E5%8A%A8%E9%A9%BE%E9%A9%B6%20-%20%E8%BD%A6%E8%BE%86%E8%AF%86%E5%88%AB.assets/960-1664112808285-38.png)]](https://img-blog.csdnimg.cn/a3f2661bc82b473e86b12eb7a19cb6e4.png)
图8:“联合交集”的定义。
练习:实现iou()。提示:
-
我们仅在次练习中使用两个角(左上角和右下角)(x1,y1,x2,y2)而不是中点和高度/宽度来定义一个框。
-
要计算矩形的面积,你需要将高度(y2-y1)乘以其宽度(x2-x1)
-
你还需要找到两个框的交点的坐标(xi1,yi1,xi2,yi2)。记住:
- xi1 = 两个框的x1坐标的最大值
- yi1 = 两个框的y1坐标的最大值
- xi2 = 两个框的x2坐标的最小值
- yi2 = 两个框的y2坐标的最小值在此代码中,我们使用以下约束条件:(0,0)代表图像的左上角,(1,0)是右上角,(1,1)是右下角。
In [7]:
# GRADED FUNCTION: iou

def iou(box1, box2):
    """Implement the intersection over union (IoU) between box1 and box2

    Arguments:
    box1 -- first box, list object with coordinates (x1, y1, x2, y2)
    box2 -- second box, list object with coordinates (x1, y1, x2, y2)
    """

    # Calculate the (y1, x1, y2, x2) coordinates of the intersection of box1 and box2. Calculate its Area.
    ### START CODE HERE ### (≈ 5 lines)
    xi1 = max(box1[0],box2[0])
    yi1 = max(box1[1],box2[1])
    xi2 = min(box1[2],box2[2])
    yi2 = min(box1[3],box2[3])
    inter_area = (yi2-yi1)*(xi2-xi1)
    ### END CODE HERE ###

    # Calculate the Union area by using Formula: Union(A,B) = A + B - Inter(A,B)
    ### START CODE HERE ### (≈ 3 lines)
    box1_area = (box1[2]-box1[0])*(box1[3]-box1[1])
    box2_area = (box2[2]-box2[0])*(box2[3]-box2[1])
    union_area = box1_area + box2_area - inter_area
    ### END CODE HERE ###

    # compute the IoU
    ### START CODE HERE ### (≈ 1 line)
    iou = inter_area / union_area
    ### END CODE HERE ###
    return iou
In [8]:
box1 = (2, 1, 4, 3)
box2 = (1, 2, 3, 4)
print("iou = " + str(iou(box1, box2)))
iou = 0.14285714285714285
预期输出:
iou = 0.14285714285714285
现在你可以实现非极大值抑制,其关键步骤是:
- 选择得分最高的框。
- 计算它与所有其他框的重叠,并删除与其重叠超过“iou_threshold”的框。
- 返回到步骤1并进行迭代,直到没有比当前所选框更低的框。
这将删除所有与所选框重叠较大的框。仅保留“最佳”框。
练习:使用TensorFlow实现yolo_non_max_suppression()。TensorFlow有两个内置函数可用于实现非极大值抑制(因此你实际上不需要使用你的iou()实现方法):
In [9]:
# GRADED FUNCTION: yolo_non_max_suppression

def yolo_non_max_suppression(scores, boxes, classes, max_boxes = 10, iou_threshold = 0.5):
    """
    Applies Non-max suppression (NMS) to set of boxes

    Arguments:
    scores -- tensor of shape (None,), output of yolo_filter_boxes()
    boxes -- tensor of shape (None, 4), output of yolo_filter_boxes() that have been scaled to the image size (see later)
    classes -- tensor of shape (None,), output of yolo_filter_boxes()
    max_boxes -- integer, maximum number of predicted boxes you'd like
    iou_threshold -- real value, "intersection over union" threshold used for NMS filtering

    Returns:
    scores -- tensor of shape (, None), predicted score for each box
    boxes -- tensor of shape (4, None), predicted box coordinates
    classes -- tensor of shape (, None), predicted class for each box

    Note: The "None" dimension of the output tensors has obviously to be less than max_boxes. Note also that this
    function will transpose the shapes of scores, boxes, classes. This is made for convenience.
    """

    max_boxes_tensor = K.variable(max_boxes, dtype='int32')     # tensor to be used in tf.image.non_max_suppression()
    K.get_session().run(tf.variables_initializer([max_boxes_tensor])) # initialize variable max_boxes_tensor

    # Use tf.image.non_max_suppression() to get the list of indices corresponding to boxes you keep
    ### START CODE HERE ### (≈ 1 line)
    nms_indices = tf.image.non_max_suppression(boxes, scores, max_boxes, iou_threshold)
    ### END CODE HERE ###

    # Use K.gather() to select only nms_indices from scores, boxes and classes
    ### START CODE HERE ### (≈ 3 lines)
    scores = K.gather(scores, nms_indices)
    boxes = K.gather(boxes, nms_indices)
    classes = K.gather(classes, nms_indices)
    ### END CODE HERE ###

    return scores, boxes, classes
In [10]:
with tf.Session() as test_b:
    scores = tf.random_normal([54,], mean=1, stddev=4, seed = 1)
    boxes = tf.random_normal([54, 4], mean=1, stddev=4, seed = 1)
    classes = tf.random_normal([54,], mean=1, stddev=4, seed = 1)
    scores, boxes, classes = yolo_non_max_suppression(scores, boxes, classes)
    print("scores[2] = " + str(scores[2].eval()))
    print("boxes[2] = " + str(boxes[2].eval()))
    print("classes[2] = " + str(classes[2].eval()))
    print("scores.shape = " + str(scores.eval().shape))
    print("boxes.shape = " + str(boxes.eval().shape))
    print("classes.shape = " + str(classes.eval().shape))
WARNING:tensorflow:From /opt/conda/lib/python3.6/site-packages/tensorflow/python/framework/op_def_library.py:263: colocate_with (from tensorflow.python.framework.ops) is deprecated and will be removed in a future version.
Instructions for updating:
Colocations handled automatically by placer.
scores[2] = 6.938395
boxes[2] = [-5.299932    3.1379814   4.450367    0.95942086]
classes[2] = -2.2452729
scores.shape = (10,)
boxes.shape = (10, 4)
classes.shape = (10,)
预期输出:
scores[2] = 6.938395
boxes[2] = [-5.299932 3.1379814 4.450367 0.95942086]
classes[2] = -2.2452729
scores.shape = (10,)
boxes.shape = (10, 4)
classes.shape = (10,)
2.4 将两者组合以筛选边界框
是时候实现采用CNN输出(19x19x5x85维度编码)并使用刚刚实现的函数对所有框进行过滤筛选了。
练习:实现yolo_eval(),获取YOLO编码的输出,并使用得分阈值和NMS过滤框。你只需要了解最后一个实现细节。有几种表示框的方法,例如通过它们的角或中点和高度/宽度。YOLO使用以下函数(我们已提供)在不同时间内在这几种类格式之间进行转换:
boxes = yolo_boxes_to_corners(box_xy, box_wh)
它将yolo框坐标(x,y,w,h)转换为框角的坐标(x1,y1,x2,y2)以匹配yolo_filter_boxes的输入
boxes = scale_boxes(boxes, image_shape)
YOLO的网络经过训练可以在608x608的图像上运行。如果要在其他尺寸的图像上测试此数据(例如,车辆识别数据集具有720x1280的图像),此步骤将重新调整框的比例,以便可以将其绘制在原始720x1280图像的顶部。
不用担心这两个函数;我们将向你展示哪里需要用到它们。
In [11]:
# GRADED FUNCTION: yolo_eval

def yolo_eval(yolo_outputs, image_shape = (720., 1280.), max_boxes=10, score_threshold=.6, iou_threshold=.5):
    """
    Converts the output of YOLO encoding (a lot of boxes) to your predicted boxes along with their scores, box coordinates and classes.

    Arguments:
    yolo_outputs -- output of the encoding model (for image_shape of (608, 608, 3)), contains 4 tensors:
                    box_confidence: tensor of shape (None, 19, 19, 5, 1)
                    box_xy: tensor of shape (None, 19, 19, 5, 2)
                    box_wh: tensor of shape (None, 19, 19, 5, 2)
                    box_class_probs: tensor of shape (None, 19, 19, 5, 80)
    image_shape -- tensor of shape (2,) containing the input shape, in this notebook we use (608., 608.) (has to be float32 dtype)
    max_boxes -- integer, maximum number of predicted boxes you'd like
    score_threshold -- real value, if [ highest class probability score < threshold], then get rid of the corresponding box
    iou_threshold -- real value, "intersection over union" threshold used for NMS filtering

    Returns:
    scores -- tensor of shape (None, ), predicted score for each box
    boxes -- tensor of shape (None, 4), predicted box coordinates
    classes -- tensor of shape (None,), predicted class for each box
    """

 ### START CODE HERE ###

    # Retrieve outputs of the YOLO model (≈1 line)
    box_confidence, box_xy, box_wh, box_class_probs = yolo_outputs[:]

    # Convert boxes to be ready for filtering functions
    boxes = yolo_boxes_to_corners(box_xy, box_wh)

    # Use one of the functions you've implemented to perform Score-filtering with a threshold of score_threshold (≈1 line)
    scores, boxes, classes = yolo_filter_boxes(box_confidence, boxes, box_class_probs, score_threshold)

    # Scale boxes back to original image shape.
    boxes = scale_boxes(boxes, image_shape)

    # Use one of the functions you've implemented to perform Non-max suppression with a threshold of iou_threshold (≈1 line)
    scores, boxes, classes = yolo_non_max_suppression(scores, boxes, classes, max_boxes, iou_threshold)

    ### END CODE HERE ###

    return scores, boxes, classes
In [12]:
with tf.Session() as test_b:
    yolo_outputs = (tf.random_normal([19, 19, 5, 1], mean=1, stddev=4, seed = 1),
                    tf.random_normal([19, 19, 5, 2], mean=1, stddev=4, seed = 1),
                    tf.random_normal([19, 19, 5, 2], mean=1, stddev=4, seed = 1),
                    tf.random_normal([19, 19, 5, 80], mean=1, stddev=4, seed = 1))
    scores, boxes, classes = yolo_eval(yolo_outputs)
    print("scores[2] = " + str(scores[2].eval()))
    print("boxes[2] = " + str(boxes[2].eval()))
    print("classes[2] = " + str(classes[2].eval()))
    print("scores.shape = " + str(scores.eval().shape))
    print("boxes.shape = " + str(boxes.eval().shape))
    print("classes.shape = " + str(classes.eval().shape))
scores[2] = 138.79124
boxes[2] = [1292.3297  -278.52167 3876.9893  -835.56494]
classes[2] = 54
scores.shape = (10,)
boxes.shape = (10, 4)
classes.shape = (10,)
预期输出:
scores[2] = 138.79124
boxes[2] = [1292.3297 -278.52167 3876.9893 -835.56494]
classes[2] = 54
scores.shape = (10,)
boxes.shape = (10, 4)
classes.shape = (10,)
YOLO总结:
- 输入图像维度为(608、608、3)
- 输入图像通过CNN,输出维度为(19,19,5,85)。
- 将最后两个维度展平后,输出为一定体积的形状(19、19、425):
- 输入图像上方19x19网格中的每个单元格给出425个数字。
- 425 = 5 x 85,因为每个单元格都包含5个预测框,对应于5个锚定框,如讲座中所示。
- 85 = 5 + 80,其中5是因为 ( p c , b x , b y , b h , b w ) (p_c, b_x, b_y, b_h, b_w) (pc,bx,by,bh,bw)具有5个数,而80是我们要识别的类别数量 - 然后,你仅根据以下几点选择框:
- 分数阈值:丢弃检测到分数小于阈值的类别框
- 非极大值抑制:计算并集上的交点,并避免选择重叠的框 - 为你提供YOLO的最终输出。
3 输入图像测试YOLO预训练模型
在本部分中,你将使用预训练的模型并在车辆识别数据集上对其进行测试。与往常一样,你首先要创建会话以开始计算图。
运行以下单元格。
In [13]:
sess = K.get_session()
3.1 定义类,锚点和图像维度
回想一下,我们在尝试识别80个类别,并使用5个定位框。我们已经在两个文件“coco_classes.txt”和“yolo_anchors.txt”中收集了有关80个类和5个框的信息。让我们通过运行下一个单元格将这些数加载到模型中。
车辆识别数据集包含720x1280图像,我们已将其预处理为608x608的图像。
In [14]:
class_names = read_classes("model_data/coco_classes.txt")
anchors = read_anchors("model_data/yolo_anchors.txt")
image_shape = (720., 1280.)
3.2 加载预训练模型
训练YOLO模型需要花费很长时间,并且需要相当大的带标签的边界框数据集。你将要加载存储在“yolo.h5”中的现有预先训练的Keras YOLO模型。(这些权重来自YOLO官方网站,并使用Allan Zelener编写的函数进行转换。技术上讲,这些是“YOLOv2”模型的参数,但我们将更简单地参考(在此笔记本中为“ YOLO”))
运行下面的单元格,从该文件中加载模型。
生成yolo.h5:
git clone https://github.com/allanzelener/YAD2K.git
cd YAD2K
下载yolo.weights和yolo.cfg放到文件夹,命令执行:
python yad2k.py yolo.cfg yolo.weights model_data / yolo.h5
下载地址:http://pjreddie.com/media/files/yolo.weights
https://raw.githubusercontent.com/pjreddie/darknet/master/cfg/yolo.cfg
In [15]:
yolo_model = load_model("model_data/yolo.h5")
/opt/conda/lib/python3.6/site-packages/keras/engine/saving.py:292: UserWarning: No training configuration found in save file: the model was *not* compiled. Compile it manually.
  warnings.warn('No training configuration found in save file: '
加载经过训练的YOLO模型的权重。下面是模型各层信息摘要。
In [16]:
注意:在某些计算机上,你可能会看到Keras发出的警告消息。如果你按要求做,就不必担心。
提示:此模型将经过预处理的一批输入图像(形状:(m,608、608、3))转换为形状为(m,19、19、5、85)的张量,如图(2)所示 )。
3.3 将模型的输出转换为可用的边界框张量
yolo_model 的输出是(m,19,19,5,85)张量,需要通过非特殊的处理和转换。以下单元格为你完成了该操作。
In [17]:
yolo_outputs = yolo_head(yolo_model.output, anchors, len(class_names))
You added yolo_outputs to your graph. This set of 4 tensors is ready to be used as input by your yolo_eval function.
你在图表中添加了yolo_outputs,这4个张量准备用于yolo_eval函数的输入。
3.4 筛选框
yolo_outputs 以正确的格式为你提供了 yolo_model的所有预测框,现在,你可以执行筛选并选择最佳框。让我们调用你先前实现的yolo_eval来执行此操作。
In [18]:
scores, boxes, classes = yolo_eval(yolo_outputs, image_shape)
3.5 运行计算图
你已经创建了一个(sess)图,可以将其总结如下:
- yolo_model.input 输入
yolo_model。计算输出yolo_model.output - yolo_model.output 由
yolo_head处理。输出yolo_outputs - yolo_outputs通过过滤函数
yolo_eval。输出预测结果:分数,框,类
练习:实现predict(),运行计算图以在图像上测试YOLO模型。
你将需要运行一个TensorFlow会话,用其计算scores, boxes, classes。
下面的代码还使用以下函数:
image, image_data = preprocess_image("images/" + image_file, model_image_size = (608, 608))
输出:
- 图片:用于绘图框的图片的python(PIL)表示形式,你不需要使用它。
- image_data:表示图像的numpy数组,也是CNN的输入。
重要提示:当模型使用BatchNorm(如YOLO中的情况)时,你需要在feed_dict {K.learning_phase():0}中传递一个附加的占位符。
In [19]:
def predict(sess, image_file):
    """
    Runs the graph stored in "sess" to predict boxes for "image_file". Prints and plots the preditions.

    Arguments:
    sess -- your tensorflow/Keras session containing the YOLO graph
    image_file -- name of an image stored in the "images" folder.

    Returns:
    out_scores -- tensor of shape (None, ), scores of the predicted boxes
    out_boxes -- tensor of shape (None, 4), coordinates of the predicted boxes
    out_classes -- tensor of shape (None, ), class index of the predicted boxes

    Note: "None" actually represents the number of predicted boxes, it varies between 0 and max_boxes.
    """

    # Preprocess your image
    image, image_data = preprocess_image("images/" + image_file, model_image_size = (608, 608))

    # Run the session with the correct tensors and choose the correct placeholders in the feed_dict.
    # You'll need to use feed_dict={yolo_model.input: ... , K.learning_phase(): 0})
    ### START CODE HERE ### (≈ 1 line)
    out_scores, out_boxes, out_classes = sess.run([scores, boxes, classes],feed_dict={yolo_model.input: image_data,K.learning_phase(): 0})
    ### END CODE HERE ###

    # Print predictions info
    print('Found {} boxes for {}'.format(len(out_boxes), image_file))
    # Generate colors for drawing bounding boxes.
    colors = generate_colors(class_names)
    # Draw bounding boxes on the image file
    draw_boxes(image, out_scores, out_boxes, out_classes, class_names, colors)
    # Save the predicted bounding box on the image
    image.save(os.path.join("out", image_file), quality=90)
    # Display the results in the notebook
    output_image = scipy.misc.imread(os.path.join("out", image_file))
    imshow(output_image)

    return out_scores, out_boxes, out_classes
在“test.jpg”图像上运行以下单元格,以验证你的函数是否正确。
In [20]:
out_scores, out_boxes, out_classes = predict(sess, "test.jpg")
Found 7 boxes for test.jpg
car 0.60 (925, 285) (1045, 374)
car 0.66 (706, 279) (786, 350)
bus 0.67 (5, 266) (220, 407)
car 0.70 (947, 324) (1280, 705)
car 0.74 (159, 303) (346, 440)
car 0.80 (761, 282) (942, 412)
car 0.89 (367, 300) (745, 648)
/opt/conda/lib/python3.6/site-packages/ipykernel_launcher.py:35: DeprecationWarning: `imread` is deprecated!
`imread` is deprecated in SciPy 1.0.0, and will be removed in 1.2.0.
Use ``imageio.imread`` instead.
![[外链图片转存失败,源站可能有防盗链机制,建议将图片保存下来直接上传(img-fEaIRji9-1667139499333)(L4W3%E4%BD%9C%E4%B8%9A%20%E8%87%AA%E5%8A%A8%E9%A9%BE%E9%A9%B6%20-%20%E8%BD%A6%E8%BE%86%E8%AF%86%E5%88%AB.assets/q1vn0torty.png)]](https://img-blog.csdnimg.cn/a0b283639bda4ca095bae960394f66d4.png)
预期输出:
Found 7 boxes for test.jpg
car 0.60 (925, 285) (1045, 374)
car 0.66 (706, 279) (786, 350)
bus 0.67 (5, 266) (220, 407)
car 0.70 (947, 324) (1280, 705)
car 0.74 (159, 303) (346, 440)
car 0.80 (761, 282) (942, 412)
car 0.89 (367, 300) (745, 648)
刚刚运行的模型实际上可以检测“coco_classes.txt”中列出的80个不同的类。要在自己的图像上测试模型:
- 单击此笔记本上部栏中的"File",然后单击"Open"以在Coursera Hub上运行。
- 将图像添加到Jupyter Notebook的目录中,在"images"文件夹中
- 在代码上方的单元格中输入图像的名称
- 运行代码,查看算法输出!
如果要在for循环中运行所有图像的会话。 这是你将得到的:
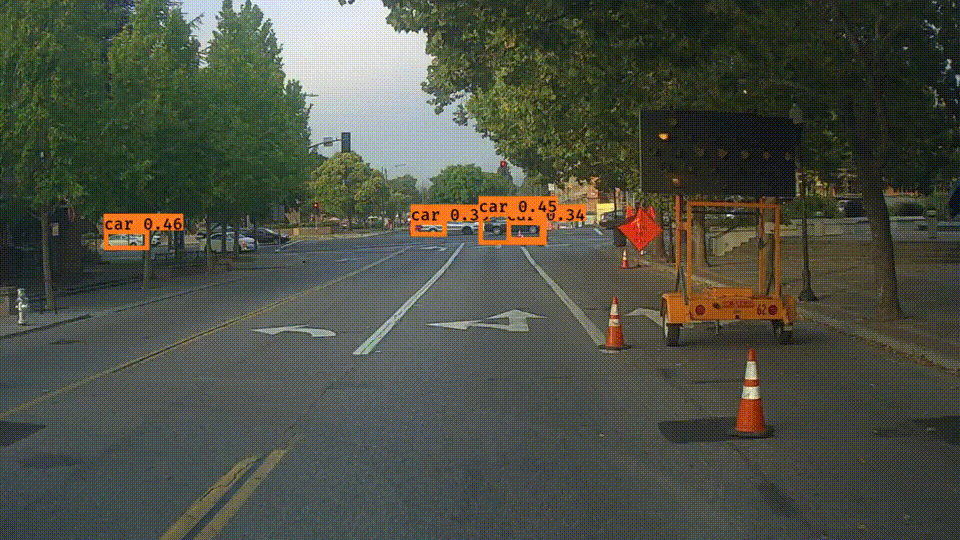
在硅谷周围开车时相机拍摄的照片上YOLO模型的预测
感谢drive.ai提供此数据集!
你应该记住:
- YOLO是一种快速而准确的最新的目标检测模型
- 通过运行CNN输入图像,该CNN输出19x19x5x85维度的体积。
- 可以将编码视为一个网格,其中19x19单元格中的每个单元格包含5个框的信息。
- 使用非极大值抑制功能过滤所有框,其中:
- 对检测到的框的类的概率进行分数阈值化
- 交并比(IoU)阈值处理,以消除重叠的框 - 因为从随机初始化的权重训练YOLO模型是不容易的,并且需要大量数据集以及大量计算,所以在此练习中我们使用了先前训练的模型参数。
如果你愿意,你也可以尝试使用自己的数据集对YOLO模型进行微调,尽管这不是一件容易的事。
参考文献:本笔记本中提出的想法主要来自两篇YOLO论文。实现方法也受到了其启发,并使用了Allan Zelener的github库中的许多组件。本练习中使用的预训练权重则来自YOLO官方网站。
- Joseph Redmon, Santosh Divvala, Ross Girshick, Ali Farhadi - You Only Look Once: Unified, Real-Time Object Detection (2015)
- Joseph Redmon, Ali Farhadi - YOLO9000: Better, Faster, Stronger (2016)
- Allan Zelener - YAD2K: Yet Another Darknet 2 Keras
- The official YOLO website (https://pjreddie.com/darknet/yolo/)
车辆识别数据集:
The Drive.ai Sample Dataset (provided by drive.ai) is licensed under a license Creative Commons Attribution 4.0 International License.
我们特别感谢Brody Huval,Chih Hu和Rahul Patel收集并提供了此数据集。
In [ ]:


 263
263


 被折叠的 条评论
为什么被折叠?
被折叠的 条评论
为什么被折叠?
 到【灌水乐园】发言


