


 本文详细讲解了卷积神经网络反向传播的5个关键步骤:Softmax-Affine、Affine-S4、S4-C3、C3-S2和S2-C1,通过C++和OpenCV代码演示了如何计算误差梯度并更新网络参数。通过一步步的推导和代码实现,帮助读者理解反向传播在深度学习中的作用。
首先列出本系列博文的链接:
4. 卷积神经网络原理及其C++/Opencv实现(4)—误反向传播法
5. 卷积神经网络原理及其C++/Opencv实现(5)—参数更新
6. 卷积神经网络原理及其C++/Opencv实现(6)—前向传播代码实现
上篇文章中我们讲了5层网络的前向传播的代码实现,有前向就有反向,本文就让我们同样使用C++和Opencv来实现反向传播的代码吧~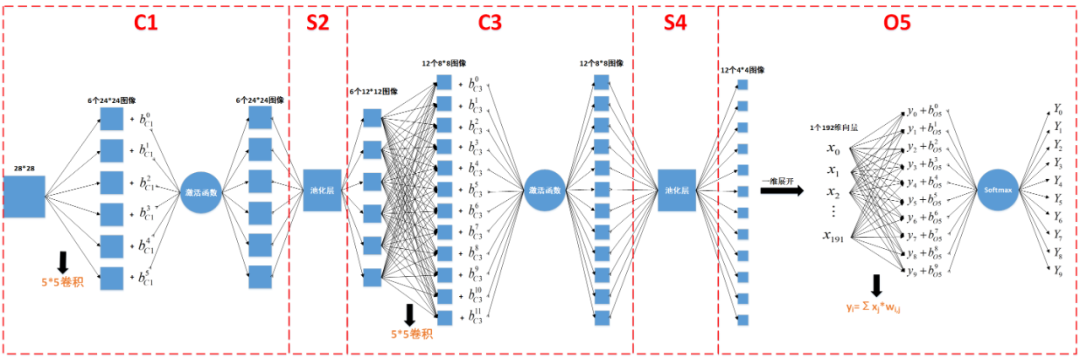
如上图所示,误差信息的反向传播过程可以分为以下5步:
1. Softmax-->Affine
2. Affine-->S4
3. S4-->C3
4. C3-->S2
5. S2-->C1
公式推导我们前文已经详细讲过,核心思想是复合函数的链式求导法则,下面我们分别阐述以上5个步骤的代码实现。
1. Softmax-->Affine
根据前文的推导,本步骤的反向传播公式为,其中y为Affine层的输出,Y为Softmax函数的输出,t为标签,0≤i<10。

代码实现如下:
void softmax_bp(Mat outputData, Mat &e, OutLayer &O)
{
  for (int i = 0; i < O.outputNum; i++)
    e.ptr<float>(0)[i] = O.y.ptr<float>(0)[i] - outputData.ptr<float>(0)[i];   //计算Y-t


  //将Y-t保存到O5层的局部梯度中
  for (int i = 0; i < O.outputNum; i++)
    O.d.ptr<float>(0)[i] = e.ptr<float>(0)[i];// *sigma_derivation(O.y.ptr<float>(0)[i]);
}
2. Affine-->S4
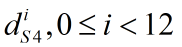
本步骤的反向传播公式如下,其中x为Affine的输入,w为Affine层的权重,0≤j<192。
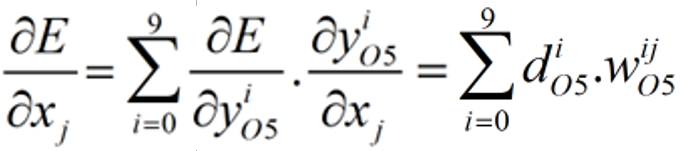
Affine层的输入有192个x,也就是说有192个E关于x的偏导数,把这192个偏导数按顺序重组成12个4*4的二维矩阵,作为S4层的局部梯度,其中有12个d,每个d都是4*4矩阵:
代码实现如下:
void full2pool_bp(OutLayer O, PoolLayer &S)
{
  int outSize_r = S.inputHeight / S.mapSize;
  int outSize_c = S.inputWidth / S.mapSize;
  for (int i = 0; i < S.outChannels; i++)  //输出12张4*4图像
  {
    for (int r = 0; r < outSize_r; r++)
    {
      for (int c = 0; c < outSize_c; c++)
      {
        int wInt = i*outSize_c*outSize_r + r*outSize_c + c;  //i*outSize.c*outSize.r为图像索引,r*outSize.c+c为每张图像中的像素索引
        for (int j = 0; j < O.outputNum; j++)   //O5输出层的输出个数
        {
          //把192个偏导数重组成12个4*4的二维矩阵,作为S4层的局部梯度
          S.d[i].ptr<float>(r)[c] = S.d[i].ptr<float>(r)[c] + O.d.ptr<float>(0)[j] * O.wData.ptr<float>(j)[wInt];  //d_S4 = ∑d_O5*W
        }
      }
    }
  }
}
3. S4-->C3
本步骤的反向传播公式如下,其中upsample为我们前文讲过的池化层向上采样操作,DerivativeRelu为Relu函数的导数,我们前文也讲过。本层的局部梯度是12个8*8的矩阵(0≤i<12):

上述公式的计算代码如下:
/*
矩阵上采样,upc及upr是池化窗口的列、行
如果是最大值池化模式,则把局域梯度放到池化前最大值的位置,比如池化窗口2*2,池化前最大值的位置分别为左上、右上、左下、右下,则上采样后为:
5 9        5 0 0 9
     -->   0 0 0 0
3 6        0 0 0 0
                3 0 0 6
如果是均值池化模式,则把局域梯度除以池化窗口的尺寸2*2=4:
5 9        1.25 1.25 2.25 2.25
     -->   1.25 1.25 2.25 2.25
3 6        0.75 0.75 1.5  1.5
           0.75 0.75 1.5  1.5
*/
Mat UpSample(Mat mat, int upc, int upr)   //均值池化层的向上采样
{
  //int i, j, m, n;
  int c = mat.cols;
  int r = mat.rows;

  Mat res(r*upr, c*upc, CV_32FC1);


  float pooling_size = 1.0 / (upc*upr);


  for (int j = 0; j < r*upr; j += upr)
  {
    for (int i = 0; i < c*upc; i += upc)  // 宽的扩充
    {
      for (int m = 0; m < upc; m++)
      {


        //res[j][i + m] = mat[j / upr][i / upc] * pooling_size;
        res.ptr<float>(j)[i + m] = mat.ptr<float>(j/upr)[i/upc] * pooling_size;
      }
    }


    for (int n = 1; n < upr; n++)      //  高的扩充
    {
      for (int i = 0; i < c*upc; i++)
      {
        //res[j + n][i] = res[j][i];
        res.ptr<float>(j+n)[i] = res.ptr<float>(j)[i];


      }
    }
  }
  return res;
}


//最大值池化层的向上采样
Mat maxUpSample(Mat mat, Mat max_position, int upc, int upr)
{
  int c = mat.cols;
  int r = mat.rows;


  int outsize_r = r*upr;
  int outsize_c = c*upc;


  Mat res = Mat::zeros(outsize_r, outsize_c, CV_32FC1);


  for (int j = 0; j < r; j++)
  {
    for (int i = 0; i < c; i++)
    {
      int index_r = max_position.ptr<int>(j)[i] / outsize_c;   //计算最大值的索引
      int index_c = max_position.ptr<int>(j)[i] % outsize_c;
      res.ptr<float>(index_r)[index_c] = mat.ptr<float>(j)[i];
    }
  }
  return res;
}


void pool2cov_bp(PoolLayer S, CovLayer &C)
{
  for (int i = 0; i < C.outChannels; i++)   //12通道
  {
    Mat C3e;
    if (S.poolType == AvePool)  //均值
      C3e = UpSample(S.d[i], S.mapSize, S.mapSize);    //向上采样,把S4层的局域梯度由4*4扩充为8*8
    else if (S.poolType == MaxPool)  //最大值
      C3e = maxUpSample(S.d[i], S.max_position[i], S.mapSize, S.mapSize);


    for (int r = 0; r < S.inputHeight; r++)   //8*8
    {
      for (int c = 0; c < S.inputWidth; c++)
      {
        C.d[i].ptr<float>(r)[c] = C3e.ptr<float>(r)[c] * sigma_derivation(C.y[i].ptr<float>(r)[c]);
      }
    }
  }
}
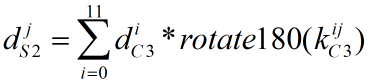
4. C3-->S2
本步骤的反向传播公式如下,其中rotate180为我们前文讲过的矩阵顺时针旋转180度操作,本层的局部梯度为6个(8+5-1)*(8+5-1)=12*12的矩阵(0≤j<6):
代码实现如下:
Mat cov(Mat map, Mat inputData, int type)
{
  Mat flipmap;
  flip(map, flipmap, -1);   //卷积核先顺时针旋转180度
  Mat res = correlation(flipmap, inputData, type);   //然后再进行卷积


  return res;
}


void cov2pool_bp(CovLayer C, int cov_type, PoolLayer &S)
{


  for (int i = 0; i < S.outChannels; i++)   //S2有6通道
  {
    for (int j = 0; j < S.inChannels; j++)  //C3有12通道
    {
      //得到12*12矩阵:full模式下为(inSize+mapSize-1)*(inSize+mapSize-1)
      Mat corr = cov(C.mapData[i][j], C.d[j], cov_type);
      S.d[i] = S.d[i] + corr;   //矩阵累加:cnn->S2->d[i] = cnn->S2->d[i] + corr,得到6个12*12局域梯度
    }
  }
}
5. S2-->C1
本步骤的反向传播公式如下,其中upsample为池化层向上采样操作,DerivativeRelu为Relu函数的导数。本层的局部梯度是6个24*24的矩阵(0≤j<6):

由于本步骤的操作与上述第3步一样,只是输入、输出参数不一样,所以也可以调用第3步实现的pool2cov_bp函数来实现本步骤的反向传播。
最后把上述5个步骤合起来,反向传播的代码为:
//outputData为标签
void cnnbp(CNN &cnn, Mat outputData)
{
  softmax_bp(outputData, cnn.e, cnn.O5);
  full2pool_bp(cnn.O5, cnn.S4);
  pool2cov_bp(cnn.S4, cnn.C3);
  cov2pool_bp(cnn.C3, full, cnn.S2);
  pool2cov_bp(cnn.S2, cnn.C1);
}
欢迎扫码关注以下微信公众号,接下来会不定时更新更加精彩的内容噢~


 1291
1291

 被折叠的 条评论
为什么被折叠?
被折叠的 条评论
为什么被折叠?
 到【灌水乐园】发言


