


关于为listview添加按钮及其它控件的的blog很多,但基本上都是抄来抄去使用常见的几个adapter继承BaseAdapter后,重写了getView()方法来实现定制,网上关于使用继承SimpleCursorAdapter这块的很少,大牛又喜欢用simpleCursorAdapter和simpleAdapter原理一样,不多讲,一定有些朋友会在某些情况下和我一样使用SimpleCursorAdapter来实现自定义Item,希望可以帮到和我一样情况的朋友。
SimpleCursorAdapter是解决listview和数据库之间使用的一个类,如何绑定它与数据库和listview,我这里不讲,如果有需求,网上实例很多,请各位查阅,另外关于想深度了解ListView的,推荐阅读:http://blog.csdn.net/guolin_blog/article/details/44996879。
对于高手,我想一句话就可以解决了,继承SimpleCursorAdapter 重写bindView()方法就可以定制了~
好,以下为正文区,开始!
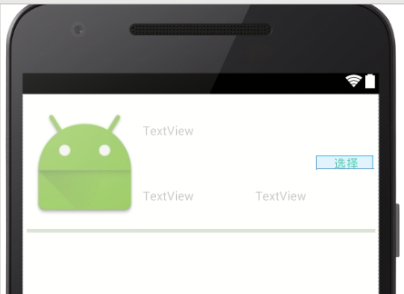
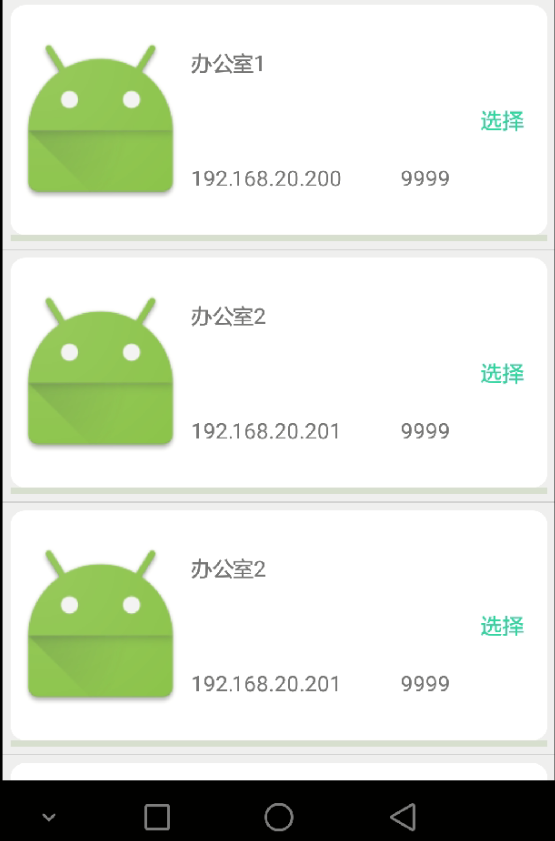
下图为我们自定义Item样式,其中加入了Text显示为选择的Button按钮,组合很常见,image加三个textView和一个Button。
对应Xml代码如下:
<?xml version="1.0" encoding="utf-8"?>
<LinearLayout xmlns:android="http://schemas.android.com/apk/res/android"
    android:orientation="vertical" android:layout_width="match_parent"
    android:layout_height="fill_parent"
    android:padding="5dp"
    android:background="#ffffff"

    >
    <LinearLayout
        android:layout_width="match_parent"
        android:layout_height="wrap_content"
        android:minHeight="150dp"
        android:orientation="horizontal"
        android:background="@drawable/shape_corner_border"

        >
        <LinearLayout
            android:layout_width="0dp"
            android:layout_height="match_parent"
            android:layout_weight="2">
            <TextView
                android:layout_width="wrap_content"
                android:layout_height="wrap_content"
                android:id="@+id/function_Set_RoomChoose_ListView_Id"/>
            <ImageView
                android:layout_width="match_parent"
                android:layout_height="match_parent"
                android:scaleType="fitCenter"
                android:id="@+id/function_Set_RoomChoose_ListView_Photo"
                android:src="@mipmap/ic_launcher"
                />
        </LinearLayout>
        <LinearLayout
            android:layout_width="0dp"
            android:layout_height="match_parent"
            android:orientation="vertical"
            android:layout_weight="3">
            <LinearLayout
                android:layout_width="match_parent"
                android:layout_height="0dp"
                android:layout_weight="1"
                android:orientation="horizontal">
                <TextView
                    android:layout_width="match_parent"
                    android:gravity="center_vertical"
                    android:id="@+id/function_Set_RoomChoose_ListView_Position"
                    android:layout_height="match_parent"
                    android:text="TextView"/>
            </LinearLayout>
            <LinearLayout
                android:layout_width="match_parent"
                android:layout_height="0dp"
                android:layout_weight="1">
                <TextView
                    android:layout_width="wrap_content"
                    android:layout_height="match_parent"
                    android:gravity="center_vertical"
                    android:layout_weight="1"
                    android:text="TextView"
                    android:id="@+id/function_Set_RoomChoose_ListView_Ip"
                    />
                <TextView
                    android:layout_width="0dp"
                    android:layout_height="match_parent"
                    android:id="@+id/function_Set_RoomChoose_ListView_Port"
                    android:gravity="center_vertical"
                    android:text="TextView"
                    android:layout_weight="1"
                    />
            </LinearLayout>
        </LinearLayout>
        <LinearLayout
            android:layout_width="0dp"
            android:layout_height="match_parent"
            android:layout_weight="1">

            <Button
                android:layout_gravity="center"
                android:layout_width="match_parent"
                android:layout_height="wrap_content"
                android:text="选择"
                android:id="@+id/function_Set_RoomChoose_ListView_Btn"
                android:background="#00000000"
                android:textColor="#35d4a0"/>
        </LinearLayout>
    </LinearLayout>

    <TextView
        android:layout_width="match_parent"
        android:layout_height="4dp"
        android:background="#D6DECE"
        />

</LinearLayout>private class MySimpleCursorAdapter extends SimpleCursorAdapter{
public MySimpleCursorAdapter(Context context, int layout, Cursor c, String[] from, int[] to, int flags) {
super(context, layout, c, from, to, flags);
}
@Override
public void bindView(View view, Context context, Cursor cursor) {
super.bindView(view, context, cursor);
Button buildConn = (Button)view.findViewById(R.id.function_Set_RoomChoose_ListView_Btn);
int position = cursor.getPosition(); //获取当前位置
buildConn.setOnClickListener(new MyItemButtonClick(position));
}
private class MyItemButtonClick implements View.OnClickListener{
private int mItemId;
MyItemButtonClick(int id){
mItemId = id;
}
@Override
public void onClick(View v) {
int viewId = v.getId();
if (viewId == R.id.function_Set_RoomChoose_ListView_Btn){
System.out.println("Aim+"+mItemId);
}
}
}
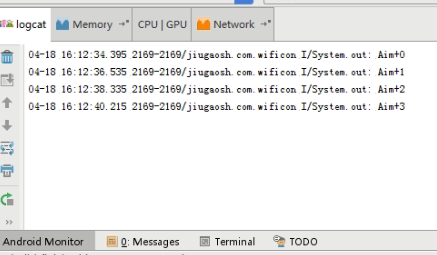
}int position = cursor.getPosition(); //获取当前位置测试中我在数据库中增加了四条消息,运行如下图。
测试信息输出如下,分别点击第一个到第四个按钮,获得了当前的位置输出。
希望可以帮到大家,也可以加深我的记忆。


 1166
1166

 被折叠的 条评论
为什么被折叠?
被折叠的 条评论
为什么被折叠?
 到【灌水乐园】发言


