


前言
记录一下第一次用Faster-rcnn训练自己数据集的过程,希望自己以后不要再犯相同的错误。训练过程全程参照
这位大佬的帖子,跟着大佬一步一步来,最终顺利跑出结果。
源码及环境搭建
源码
本文选择的Windows Faster rcnn python版本代码为 https://github.com/dBeker/Faster-RCNN-TensorFlow-Python3.5
环境搭建
本次训练环境:win11+anaconda3+python3.5+tensorflow-gpu1.1.0+CUDA8.0+CUDNN6.0
- 新建python35虚拟环境
由于本人已经安装了anaconda,因此直接进入配置虚拟环境的过程。如有问题请参照大佬博客。
在cmd中输入
conda create -n python35 python=3.5
这样就建立了一个叫做python35的虚拟环境,且python版本为3.5,之后的所有工作都是在这个环境下完成的,激活虚拟环境,在cmd中使用命令
activate tensorflow,关闭虚拟环境,使用命令:deactivate
- 安装tensorflow
TensorFlow有CPU版本和GPU版本,GPU版本使用显卡,硬件要求较高,但计算效率高,如果要安装GPU版本(需要有NVIDIA显卡),一般是推荐使用性能好的服务器,但你可能需要知道自己电脑是否支持GPU,GPU显存是多少,如何查看自己的电脑是否支持GPU,在cmd命令中输入:
cd C:\Program Files\NVIDIA Corporation\NVSMI
nvidia-smi
就可以看到自己的显卡型号和显存大小,个人建议显存大于4GB的话可以考虑GPU版本的TensorFlow,不然老老实实用CPU版本的,就是训练时间长一些,不然到时候会报错OOM(out of memory)。若使用GPU版本的TensorFlow,还需要安装CUDA和cudnn。
在激活的python35环境下输入如下命令:
conda install tensorflow-gpu=1.10.0 cudatoolkit=8.0 cudnn=6.0
这里不同的电脑可能会出现不同的问题,因人而异,出现的问题还需要自行查找解决方案。
安装Faster-RCNN算法
- 确保TensorFlow和相关的依赖安装成功
- 下载faster rcnn程序包,解压,然后可以看一下里面的readme
- 在虚拟环境python35下安装python依赖库(cython, python-opencv, easydict)
activate tensorflow

pip install cython

pip install python-opencv

pip install easydict
如果在安装python-opencv时失败,提示找不到相关的库,可以换一种安装方式:
在这个网站上http://www.lfd.uci.edu/~gohlke/pythonlibs/ 查找OpenCV,如下图,选择python3.5版本的,且与自己电脑系统匹配的安装包下载。
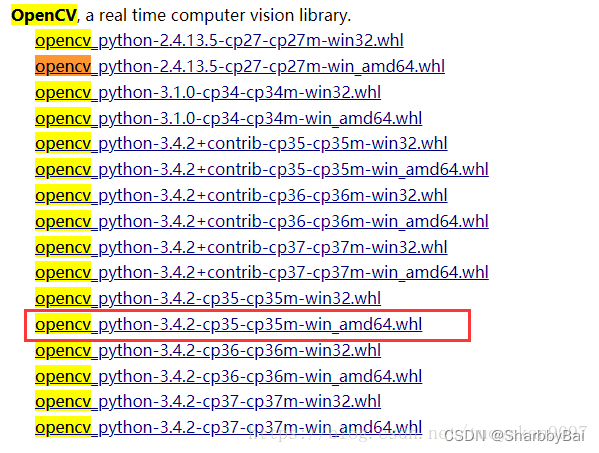
然后使用命令安装:
pip install C:\Users\master\Downloads\opencv_python-3.4.2-cp35-cp35m-win_amd64.whl
注意:如若不成功,可以在anaconda的官网https://anaconda.org/上查找相应版本的open-cv进行安装,许多其他库的安装问题也可以通过这种方式解决。
- 在cmd中使用cd命令到解压后的文件夹下…/data/coco/PythonAPI目录下,执行以下代码:
cd C:\Users\master\Downloads\Faster-RCNN-TensorFlow-Python3.5-master\Faster-RCNN-TensorFlow-Python3.5-master\data\coco\PythonAPI

python setup.py build_ext --inplace

python setup.py build_ext install
执行时报错 Unable to find vcvarsall.bat,安装visual studio 2015,安装时默认的语言是C#和VB,需要把C++也勾上。
附python版本与C++编译器版本对应关系图:
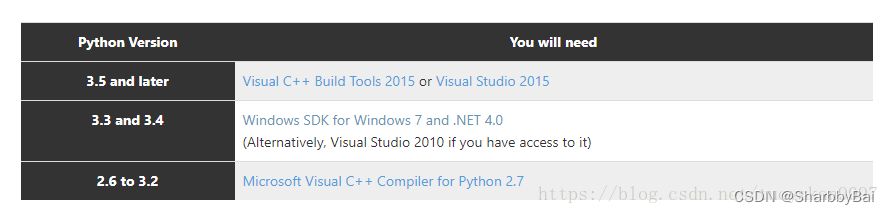
安装VS2015详情请参考这篇博客。
- 下载VOC2007格式的数据集
下载地址:
http://host.robots.ox.ac.uk/pascal/VOC/voc2007/VOCtrainval_06-Nov-2007.tar
http://host.robots.ox.ac.uk/pascal/VOC/voc2007/VOCtest_06-Nov-2007.tar
http://host.robots.ox.ac.uk/pascal/VOC/voc2007/VOCdevkit_08-Jun-2007.tar
将下载后的三个压缩包解压到同一个文件夹下,以WinRAR为例,同时选中三个压缩包,右键,然后选择解压到当前文件夹

可以得到VOCDevkit文件夹,将VOCDevkit重命名为VOCDevkit2007,然后将这个文件夹拷贝到你自己的Faster-RCNN中data目录下。
注意:这里一定要将压缩包下载完整,我之前下了好几次,后来训练的时候出现如下错误:
(tensorflowgpu) D:\Download-of-Chrome\Faster-RCNN-TensorFlow-Python3.5-master>python train.py
Loaded dataset `voc_2007_trainval` for training
Set proposal method: gt
Appending horizontally-flipped training examples...
wrote gt roidb to D:\Download-of-Chrome\Faster-RCNN-TensorFlow-Python3.5-master\data\cache\voc_2007_trainval_gt_roidb.pkl
done
Preparing training data...
done
2019-06-18 20:04:52.594078: I tensorflow/core/platform/cpu_feature_guard.cc:141] Your CPU supports instructions that this TensorFlow binary was not compiled to use: AVX2
2019-06-18 20:04:52.971914: I tensorflow/core/common_runtime/gpu/gpu_device.cc:1432] Found device 0 with properties:
name: GeForce GTX 1060 6GB major: 6 minor: 1 memoryClockRate(GHz): 1.7085
pciBusID: 0000:01:00.0
totalMemory: 6.00GiB freeMemory: 4.96GiB
2019-06-18 20:04:52.977907: I tensorflow/core/common_runtime/gpu/gpu_device.cc:1511] Adding visible gpu devices: 0
2019-06-18 20:04:54.417458: I tensorflow/core/common_runtime/gpu/gpu_device.cc:982] Device interconnect StreamExecutor with strength 1 edge matrix:
2019-06-18 20:04:54.420363: I tensorflow/core/common_runtime/gpu/gpu_device.cc:988]      0
2019-06-18 20:04:54.421951: I tensorflow/core/common_runtime/gpu/gpu_device.cc:1001] 0:   N
2019-06-18 20:04:54.426075: I tensorflow/core/common_runtime/gpu/gpu_device.cc:1115] Created TensorFlow device (/job:localhost/replica:0/task:0/device:GPU:0 with 4714 MB memory) -> physical GPU (device: 0, name: GeForce GTX 1060 6GB, pci bus id: 0000:01:00.0, compute capability: 6.1)
WARNING:tensorflow:From D:\Download-of-Chrome\Faster-RCNN-TensorFlow-Python3.5-master\lib\nets\network.py:57: calling expand_dims (from tensorflow.python.ops.array_ops) with dim is deprecated and will be removed in a future version.
Instructions for updating:
Use the `axis` argument instead
C:\Users\DRL\Anaconda3\envs\tensorflowgpu\lib\site-packages\tensorflow\python\ops\gradients_impl.py:112: UserWarning: Converting sparse IndexedSlices to a dense Tensor of unknown shape. This may consume a large amount of memory.
  "Converting sparse IndexedSlices to a dense Tensor of unknown shape. "
Loading initial model weights from ./data/imagenet_weights/vgg16.ckpt
2019-06-18 20:04:55.428789: W tensorflow/core/framework/allocator.cc:122] Allocation of 411041792 exceeds 10% of system memory.
2019-06-18 20:04:55.714509: W tensorflow/core/framework/allocator.cc:122] Allocation of 411041792 exceeds 10% of system memory.
2019-06-18 20:04:56.225957: W tensorflow/core/framework/allocator.cc:122] Allocation of 411041792 exceeds 10% of system memory.
2019-06-18 20:04:56.464735: W tensorflow/core/framework/allocator.cc:122] Allocation of 411041792 exceeds 10% of system memory.
2019-06-18 20:04:56.697003: W tensorflow/core/framework/allocator.cc:122] Allocation of 411041792 exceeds 10% of system memory.
2019-06-18 20:04:58.240747: W tensorflow/core/util/tensor_slice_reader.cc:95] Could not open .\data\imagenet_weights\vgg16.ckpt: Data loss: file is too short to be an sstable: perhaps your file is in a different file format and you need to use a different restore operator?
Unable to open table file .\data\imagenet_weights\vgg16.ckpt: Data loss: file is too short to be an sstable: perhaps your file is in a different file format and you need to use a different restore operator?
Traceback (most recent call last):
  File "train.py", line 216, in <module>
    train.train()
  File "train.py", line 123, in train
    variables_to_restore = self.net.get_variables_to_restore(variables, var_keep_dic)
  File "D:\Download-of-Chrome\Faster-RCNN-TensorFlow-Python3.5-master\lib\nets\vgg16.py", line 66, in get_variables_to_restore
    if v.name.split(':')[0] in var_keep_dic:
TypeError: argument of type 'NoneType' is not iterable

(tensorflowgpu) D:\Download-of-Chrome\Faster-RCNN-TensorFlow-Python3.5-master>pip install git+https://github.com/philferriere/cocoapi.git#subdirectory=PythonAPI
Looking in indexes: https://pypi.tuna.tsinghua.edu.cn/simple
Collecting git+https://github.com/philferriere/cocoapi.git#subdirectory=PythonAPI
*找了好久的原因才发现是数据集压缩包没有下载完整。。。。。以后还是要直接复制链接下载而不是点击超链接。。。。
但是造成这个问题的原因可能多种多样,详情请见这位大佬的帖子评论区
- 下载预训练的VGG16网络模型:
下载地址:http://download.tensorflow.org/models/vgg_16_2016_08_28.tar.gz
下载之后解压,文件重命名为vgg16.ckpt,新建文件夹imagenet_weights,把vgg16.ckpt放到imagenet_weights下,再将imagenet_weights文件夹拷贝到data文件夹下,这样,VGG16网络模型的地址应该类似于这样:
../data/imagenet_weights/vgg16.ckpt
- 现在就可以训练模型了:
在faster rcnn目录下运行命令:
python train.py
注意:一定要在激活虚拟环境python35的前提下运行。。。。。。不要像我一样。。。。。
OK,搞定,这时候,就是在用VOCDevkit2007下的示例图片训练分类模型了。第一次运行时可能会报错说找不到matplotlib,scipy,PIL(对应的是pillow库)等,安装这些库就好了。
- 模型训练结束后,在 …\default\voc_2007_trainval\default目录下可以看到训练的模型:

默认每5000次保存,一共迭代40000次(max_iters),这些在config.py中可以自己设置。
记录一下,第一次训练voc2007原数据集用了四个小时左右。
- 运行demo,在运行demo.py前在编辑器中对demo.py作些更改
tfmodel = os.path.join('output', demonet, DATASETS[dataset][0], 'default', NETS[demonet][0])
这句代码指向训练模型结果,但实际是不存在的,需要我们新建文件夹,并且拷贝上一步生成的模型到该文件夹下,为简化,直接把这句代码替换成自己的路径即可,例如:
tfmodel=r'D:\FasterRCNN\output\vgg16\voc_2007_trainval\default\vgg16_faster_rcnn_iter_40000.ckpt'
注意后缀是ckpt,关于tensorflow生成的ckpt模型,大家可以自行查阅相关的参考资料,这里简单介绍一下,ckpt模型实际包含三个部分,ckpt.meta保存graph结构,ckpt.index是一个string-string table,ckpt.data保存模型的所有变量值
另外,下面的代码中,–net输入参数默认改成vgg16,–dataset输入参数默认改成pascal_voc:
def parse_args():
    """Parse input arguments."""
    parser = argparse.ArgumentParser(description='Tensorflow Faster R-CNN demo')
    parser.add_argument('--net', dest='demo_net', help='Network to use [vgg16 res101]',
                        choices=NETS.keys(), default='res101')
    parser.add_argument('--dataset', dest='dataset', help='Trained dataset [pascal_voc pascal_voc_0712]',
                        choices=DATASETS.keys(), default='pascal_voc_0712')
    args = parser.parse_args()

    return args
改成下面这样:
def parse_args():
    """Parse input arguments."""
    parser = argparse.ArgumentParser(description='Tensorflow Faster R-CNN demo')
    parser.add_argument('--net', dest='demo_net', help='Network to use [vgg16 res101]',
                        choices=NETS.keys(), default='vgg16')
    parser.add_argument('--dataset', dest='dataset', help='Trained dataset [pascal_voc pascal_voc_0712]',
                        choices=DATASETS.keys(), default='pascal_voc')
    args = parser.parse_args()

    return args
然后,就可以运行了,执行代码:
python demo.py
到此为止,原voc2007数据集已经可以跑出结果。下篇记录训练自己数据集的过程。


 1196
1196


 被折叠的 条评论
为什么被折叠?
被折叠的 条评论
为什么被折叠?
 到【灌水乐园】发言


