


简介
Websocket是一种用于H5浏览器的实时通讯协议,可以做到数据的实时推送,可适用于广泛的工作环境。
客户端和服务端全双工通信。
常用场景如:服务端主动发消息个客户端;网页在线客户聊天等
整合
若依提供相关插件,需要简单复制下代码到项目中即可
插件相关包和代码实现ruoyi-vue/集成websocket实现实时通信.zip
链接: https://pan.baidu.com/s/13JVC9jm-Dp9PfHdDDylLCQ 提取码: y9jt
后端代码复制
添加依赖 ruoyi-framework的pom.xml文件中
```xml
<!-- SpringBoot Websocket -->
        <dependency>
            <groupId>org.springframework.boot</groupId>
            <artifactId>spring-boot-starter-websocket</artifactId>
        </dependency>
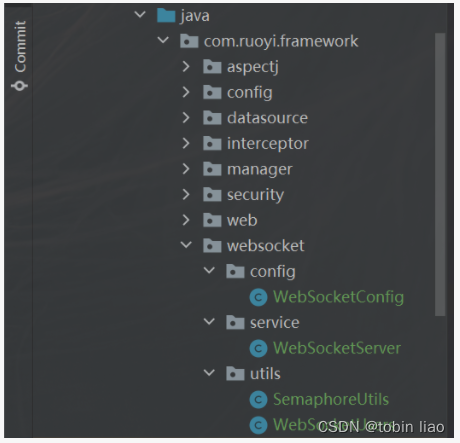
在ruoyi-framework中复制后目录结构(当然按照插件目录结构也可以)
WebSocketConfig.java 配置
```java
@Configuration
public class WebSocketConfig {
@Bean
public ServerEndpointExporter serverEndpointExporter() {
return new ServerEndpointExporter();
}
}
WebSocketUsers.java 连接用户管理
public class WebSocketUsers {
    private static final Logger logger = LoggerFactory.getLogger(WebSocketUsers.class);

    /**
     * 用户回话
     */
    private static Map<String, Session> USERS = new ConcurrentHashMap<>();

    /**
     * 存储用户
     * 存在则覆盖
     * @param key 用户唯一
     * @param session 用户会话信息
     */
    public static void put(String key, Session session) {
        USERS.put(key, session);
    }

    /**
     * 移除用户
     * @param session 用户信息
     * @return 移除结果
     */
    public static boolean remove(Session session) {
        String key = null;
        if (!USERS.containsValue(session)) {
            return true;
        }
        for (Map.Entry<String, Session> entry: USERS.entrySet()) {
            if (entry.getValue().equals(session)) {
                key = entry.getKey();
                break;
            }
        }
        return remove(key);
    }

    /**
     * 移除用户
     * @param key 用户
     * @return boolean
     */
    public static boolean remove(String key) {
        Session session = USERS.remove(key);
        if (session == null) {
            return true;
        }
        boolean value = USERS.containsValue(session);
        logger.info("移除 {}", value? "成功": "失败");
        return value;
    }

    /**
     * 获取在线用户列表
     * @return
     */
    public static Map<String, Session> getUsers() {
        return USERS;
    }

    /**
     * 获取用户数
     * @return int
     */
    public static int size() {
        return USERS.size();
    }

    /**
     * 群发文本消息
     * @param message 消息
     */
    public static void sendMessageToUsersByText(String message) {
        for (Session session: USERS.values()) {
            sendMessageToUsersByText(session, message);
        }
    }

    /**
     * 发送文本消息
     * @param session 会话
     * @param message 消息
     */
    public static void sendMessageToUsersByText(Session session, String message) {
        if (session == null) {
            logger.info("已经离线");
            return;
        }
        try {
            session.getBasicRemote().sendText(message);
        } catch (IOException io) {
            logger.error("", io);
        }
    }

}
SemaphoreUtils.java 用户数量信号量管理
public class SemaphoreUtils {
    private static final Logger logger = LoggerFactory.getLogger(SemaphoreUtils.class);

    /**
     * 获取信号量
     * @param semaphore 信号量
     * @return boolean
     */
    public static boolean tryAcquire(Semaphore semaphore) {
        boolean flag = false;
        try {
            flag = semaphore.tryAcquire();
        } catch (Exception e) {
            logger.error("", e);
        }
        return flag;
    }

    /**
     * 释放信号量
     * @param semaphore
     */
    public static void release(Semaphore semaphore) {
        try {
            semaphore.release();
        } catch (Exception e) {
            logger.error("", e);
        }
    }
}
WebSocketServer.java 提供websocket服务接口
@Component
@ServerEndpoint("/websocket/message")
public class WebSocketServer {
    private static final Logger logger = LoggerFactory.getLogger(WebSocketServer.class);

    // 允许同时在线人数
    public static int socketMaxOnLineCount = 100;

    private static Semaphore socketSemaphore = new Semaphore(socketMaxOnLineCount);

    @OnOpen
    public void onOpen(Session session) throws Exception {
        if (SemaphoreUtils.tryAcquire(socketSemaphore)) {
            // 添加用户
            WebSocketUsers.put(session.getId(), session);
            logger.info("{}建立连接,当前任人数{}", session, WebSocketUsers.size());
            WebSocketUsers.sendMessageToUsersByText(session, "连接成功");
        } else {
            // 未获取信号量
            logger.error("当前超过人数{}限制", socketMaxOnLineCount);
            WebSocketUsers.sendMessageToUsersByText(session, "当前在线人数超过限制数:" + socketMaxOnLineCount);
        }
    }

    @OnClose
    public void onClose(Session session) {
        logger.info("移除用户");
        // 移除用户
        WebSocketUsers.remove(session.getId());
        // 释放信号量
        SemaphoreUtils.release(socketSemaphore);
    }

    @OnError
    public void onError(Session session, Throwable exception) throws Exception {
        if (session.isOpen()) {
            session.close();
        }
        String sessionId = session.getId();
        logger.info("连接异常{},信息{}", session.getId(), exception);
        // 移除用户
        WebSocketUsers.remove(sessionId);
        // 释放信号量
        SemaphoreUtils.release(socketSemaphore);
    }

    @OnMessage
    public void onMessage(Session session, String message) {
        WebSocketUsers.sendMessageToUsersByText(session, message);
    }
}
测试
运行若依后端代码
在线测试
在线websocket测试地址:http://www.websocket-test.com/
需要先断开之前连接,填入websocket服务地址,在连接

后端日志

然后下面发送消息,可以在右边打印
Html方式
创建一个html文件,用浏览器打开
<!DOCTYPE html>
<html lang="en">
<head>
    <meta charset="utf-8">
    <meta http-equiv="X-UA-Compatible" content="IE=edge">
    <title>测试界面</title>
    <script src="https://code.jquery.com/jquery-3.2.1.min.js" ></script>
</head>

<body>

<div>
    <input type="text" style="width: 20%" value="ws://127.0.0.1:80/websocket/message" id="url">
	<button id="btn_join">连接</button>
	<button id="btn_exit">断开</button>
</div>
<br/>
<textarea id="message" cols="100" rows="9"></textarea> <button id="btn_send">发送消息</button>
<br/>
<br/>
<textarea id="text_content" readonly="readonly" cols="100" rows="9"></textarea>返回内容
<br/>
<br/>

<script type="text/javascript">
    $(document).ready(function(){
        var ws = null;
        // 连接
        $('#btn_join').click(function() {
        	var url = $("#url").val();
            ws = new WebSocket(url);
            ws.onopen = function(event) {
                $('#text_content').append('已经打开连接!' + '\n');
            }
            ws.onmessage = function(event) {
                $('#text_content').append(event.data + '\n');
            }
            ws.onclose = function(event) {
                $('#text_content').append('已经关闭连接!' + '\n');
            }
        });
        // 发送消息
        $('#btn_send').click(function() {
            var message = $('#message').val();
            if (ws) {
                ws.send(message);
            } else {
                alert("未连接到服务器");
            }
        });
        //断开
        $('#btn_exit').click(function() {
            if (ws) {
                ws.close();
                ws = null;
            }
        });
    })
</script>
</body>
</html>
打开如下,填入服务地址,连接后,即可发消息

Vue方式
初始化vue项目
(这块适合我刚刚接触vue,熟悉跳过)
安装npm,安装vue,创建脚手架,项目
安装npm到官网下载安装包安装即可
安装vue
npm install -g @vue/cli
npm install -g @vue/cli-init
创建项目
# 一直回车即可
vue init webpack my-project
启动项目
# start dev都行
npm run start/dev
脚本主要在package.josn中配置

注:如果启动报错,可以把相关报错复制搜索解决,其中设置eslint格式导致报错,只要修改.eslintrc.js文件即可
添加测试页面
下项目被拷贝下面代码到App.Vue
<template>
<div>
<el-input v-model="url" type="text" style="width: 20%" />
<el-button @click="join" type="primary">连接</el-button>
<el-button @click="exit" type="danger">断开</el-button>
<br />
<el-input type="textarea" v-model="message" :rows="9" />
<el-button type="info" @click="send">发送消息</el-button>
<br />
<br />
<el-input type="textarea" v-model="text_content" :rows="9" /> 返回内容
<br />
<br />
</div>
</template>
<script>
export default {
data() {
return {
url: "ws://127.0.0.1:8080/websocket/message",
message: "",
text_content: "",
ws: null,
};
},
methods: {
join() {
const wsuri = this.url;
this.ws = new WebSocket(wsuri);
const self = this;
this.ws.onopen = function (event) {
self.text_content = self.text_content + "已经打开连接!" + "\n";
};
this.ws.onmessage = function (event) {
self.text_content = event.data + "\n";
};
this.ws.onclose = function (event) {
self.text_content = self.text_content + "已经关闭连接!" + "\n";
};
},
exit() {
if (this.ws) {
this.ws.close();
this.ws = null;
}
},
send() {
if (this.ws) {
this.ws.send(this.message);
} else {
alert("未连接到服务器");
}
},
},
};
</script>
如果是新创建项目,项目未导出element-ui,则需要导入
在main.js中
import Vue from 'vue'
// 导入
import ElementUI from 'element-ui'
import 'element-ui/lib/theme-chalk/index.css'
import App from './App'
import router from './router'

// 使用
Vue.use(ElementUI);
Vue.config.productionTip = false

/* eslint-disable no-new */
new Vue({
  el: '#app',
  router,
  components: { App },
  template: '<App/>'
})
在依赖添加package.json文件中

安装模块
npm install
在运行即可
npm run start
![[外链图片转存失败,源站可能有防盗链机制,建议将图片保存下来直接上传(img-BGhIpzES-1676012608679)(D:\笔记\image\2023-02-10-15-00-33-image.png)]](https://i-blog.csdnimg.cn/blog_migrate/fa90995d1ee63e62fea7629831d4d138.png)
参考
Websocket实时推送消息 - 刘勇1993 - 博客园
基于若依(SpringBoot前后分离版-vue)的WebSocket消息推送实现-pudn.com
若依框架集成WebSeockt方法_Hello_World_Me的博客-CSDN博客
ng" title=“” alt=“” width=“524”>
安装模块
npm install
在运行即可
npm run start
[外链图片转存中…(img-BGhIpzES-1676012608679)]
参考
Websocket实时推送消息 - 刘勇1993 - 博客园


 1万+
1万+

 被折叠的 条评论
为什么被折叠?
被折叠的 条评论
为什么被折叠?
 到【灌水乐园】发言


