


文章目录
一、相机模型与图像
1.1 针孔相机模型
- 相机将三维世界的坐标点映射到二维图像平面的过程(世界坐标< – >像素坐标)。
- 深度Z ✖ 像素坐标 = 内参K ✖ 相机坐标 = K ✖ (R✖P+t)= K ✖ T ✖ 世界坐标P 【这里的R t T 表示外参】
1.2 畸变模型
-
畸变分为:
1)径向畸变:由透镜形状引起。图像放大率随光轴距离增大而减小,称为桶型畸变;反之,枕型畸变。
2)切向畸变:透镜与成像面不平行引起 -
单目相机成像过程: 世界坐标 经过旋转平移(外参T) 相机坐标 处以深度Z 归一化坐标 去畸变 去畸变坐标 乘以内参K 像素坐标
1.3 双目相机模型
- 两个相机的光圈中心的距离称为基线,基线越长能测到的距离越远
- 视察越大距离越近
1.4 RGB-D相机模型
可分成两类:红外结构光原理、飞行时间(ToF)原理
1.5 图像
二、OpenCV的使用
2.1 CMakeLists.txt
project(imageBasics)

# OpenCV
find_package(OpenCV REQUIRED)
include_directories(${OpenCV_INCLUDE_DIRS})

# 项目imageBasics.cpp
add_executable(imageBasics imageBasics.cpp)
# 链接OpenCV库
target_link_libraries(imageBasics ${OpenCV_LIBS})

# undistortImage.cpp
add_executable(undistortImage undistortImage.cpp)
# 链接OpenCV库
target_link_libraries(undistortImage ${OpenCV_LIBS})
2.2 代码展示
#include <iostream>
#include <chrono>

using namespace std;

#include <opencv2/core/core.hpp>
#include <opencv2/highgui/highgui.hpp>

//OpenCV的使用:读取,输出一些基本信息,遍历,拷贝等

int main(int argc, char **argv) {
  // 1. 图像的读取
  cv::Mat image;
  image = cv::imread("/home/robot/桌面/slambook2-master/ch5/imageBasics/ubuntu.png");
  // 判断图像文件是否正确读取
  if (image.data == nullptr) {
    cerr << "文件不存在." << endl;
    return 0;
  }

  // 2. 输出一些基本信息:宽 高 通道,并且显示图片
  cout << "图像宽为" << image.cols << ",高为" << image.rows << ",通道数为" << image.channels() << endl;
  cv::imshow("image", image);      // 用cv::imshow显示图像
  cv::waitKey(0);                  // 暂停程序,等待一个按键输入

  // 3. 图像类型
  if (image.type() != CV_8UC1 && image.type() != CV_8UC3) {
    cout << "请输入一张彩色图或灰度图." << endl;
    return 0;
  }

  // 4. 遍历图像, 请注意以下遍历方式亦可使用于随机像素访问
  // 使用 std::chrono 来给算法计时
  chrono::steady_clock::time_point t1 = chrono::steady_clock::now();
  //注意image[y][x]表示的是(x,y)的像素点,因为坐标系x朝右,y朝下
  for (size_t y = 0; y < image.rows; y++) {
    // 用cv::Mat::ptr获得图像的行指针y
    unsigned char *row_ptr = image.ptr<unsigned char>(y);  // row_ptr是第y行的头指针
    for (size_t x = 0; x < image.cols; x++) {
      // 访问位于 x,y 处的像素
      unsigned char *data_ptr = &row_ptr[x * image.channels()]; // data_ptr 指向待访问的像素数据
      // 输出该像素的每个通道,如果是灰度图就只有一个通道
      for (int c = 0; c != image.channels(); c++) {
        unsigned char data = data_ptr[c]; // data为I(x,y)第c个通道的值
      }
    }
  }
  chrono::steady_clock::time_point t2 = chrono::steady_clock::now();
  chrono::duration<double> time_used = chrono::duration_cast < chrono::duration < double >> (t2 - t1);
  cout << "遍历图像用时:" << time_used.count() << " 秒。" << endl;


  // 5. 拷贝:直接赋值并不会拷贝数据
  cv::Mat image_another = image;
  // 修改 image_another 会导致 image 发生变化
  image_another(cv::Rect(0, 0, 100, 100)).setTo(0); // 将左上角100*100的块置0
  cv::imshow("image", image);
  cv::waitKey(0);

  // 使用clone函数来拷贝数据
  cv::Mat image_clone = image.clone();
  image_clone(cv::Rect(0, 0, 100, 100)).setTo(255);// 将左上角100*100的块置255
  cv::imshow("image_clone", image_clone);
  cv::waitKey(0);

  // 对于图像还有很多基本的操作,如剪切,旋转,缩放等,限于篇幅就不一一介绍了,请参看OpenCV官方文档查询每个函数的调用方法.
  cv::destroyAllWindows();
  return 0;
}
2.3 结果
三、图像去畸变
3.1 CMakeLists.txt
参见2.1
3.2 代码展示
#include <opencv2/opencv.hpp>
#include <string>
using namespace std;

string image_file = "/home/robot/桌面/slambook2-master/ch5/imageBasics/distorted.png";   // 绝对路径
int main(int argc, char **argv) {

  // 本程序实现去畸变部分的代码。尽管我们可以调用OpenCV的去畸变,但自己实现一遍有助于理解。
  // 1. 设置畸变参数
  double k1 = -0.28340811, k2 = 0.07395907, p1 = 0.00019359, p2 = 1.76187114e-05;
  // 2. 设置内参K
  double fx = 458.654, fy = 457.296, cx = 367.215, cy = 248.375;
  // 3. 创建空的畸变图
  cv::Mat image = cv::imread(image_file, 0);   // 图像是灰度图,CV_8UC1
  int rows = image.rows, cols = image.cols;
  cv::Mat image_undistort = cv::Mat(rows, cols, CV_8UC1);   // 去畸变以后的图

  // 4. 计算去畸变后图像的内容
  for (int v = 0; v < rows; v++) {
    for (int u = 0; u < cols; u++) {
      // 畸变
      double x = (u - cx) / fx, y = (v - cy) / fy;
      double r = sqrt(x * x + y * y);
      double x_distorted = x * (1 + k1 * r * r + k2 * r * r * r * r) + 2 * p1 * x * y + p2 * (r * r + 2 * x * x);
      double y_distorted = y * (1 + k1 * r * r + k2 * r * r * r * r) + p1 * (r * r + 2 * y * y) + 2 * p2 * x * y;
      // 旋转平移(通过内参)
      double u_distorted = fx * x_distorted + cx;
      double v_distorted = fy * y_distorted + cy;

      // 赋值 (最近邻插值)
      if (u_distorted >= 0 && v_distorted >= 0 && u_distorted < cols && v_distorted < rows) {
        image_undistort.at<uchar>(v, u) = image.at<uchar>((int) v_distorted, (int) u_distorted);
      } else {
        image_undistort.at<uchar>(v, u) = 0;
      }
    }
  }

  // 5. 画图去畸变后图像
  cv::imshow("distorted", image);
  cv::imshow("undistorted", image_undistort);
  cv::waitKey();
  return 0;
}
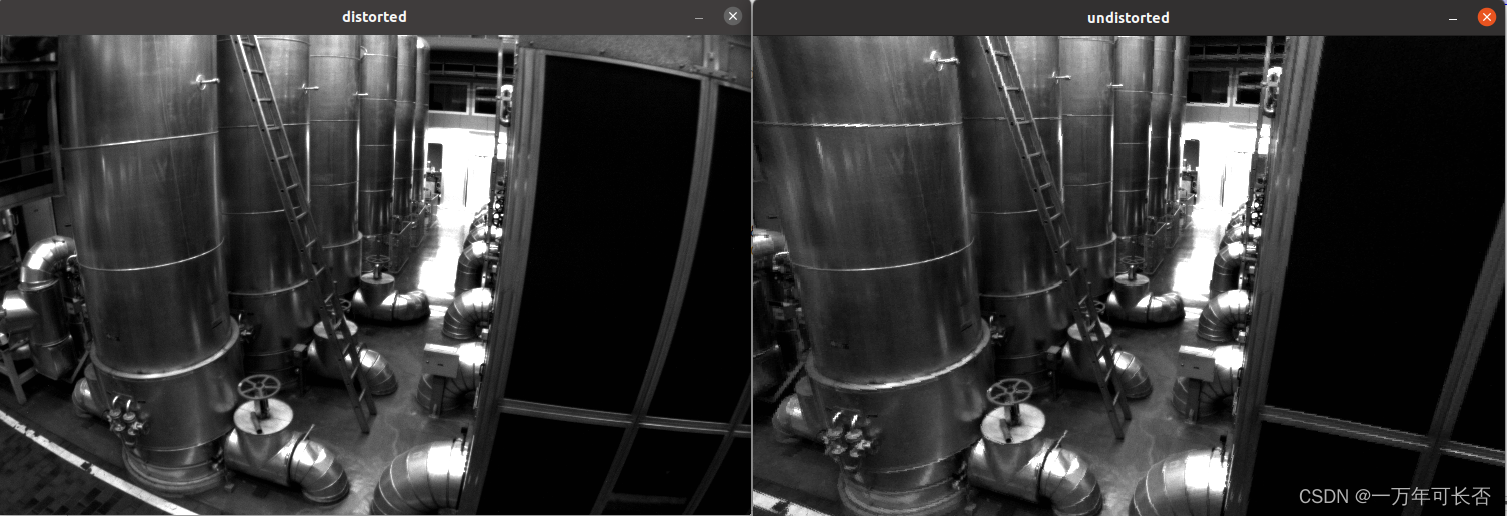
3.3 结果
四、双目视觉:点云地图
4.1 CMakeLists.txt
cmake_minimum_required(VERSION 2.8)
project(stereo)
set(CMAKE_CXX_FLAGS "-std=c++11")

# Pangolin
find_package(Pangolin REQUIRED)
include_directories( ${Pangolin_INCLUDE_DIRS} )

# OpenCV
find_package(OpenCV REQUIRED)
include_directories(${OpenCV_INCLUDE_DIRS})

add_executable(stereoVision stereoVision.cpp)
target_link_libraries(stereoVision ${OpenCV_LIBS} ${Pangolin_LIBRARIES} ${FMT_LIBRARIES} fmt)
4.2 代码展示
#include <opencv2/opencv.hpp>
#include <vector>
#include <string>
#include <Eigen/Core>
#include <pangolin/pangolin.h>
#include <unistd.h>

using namespace std;
using namespace Eigen;

// 左眼+右眼 图象
string left_file = "/home/robot/桌面/slambook2-master/ch5/stereo/left.png";
string right_file = "/home/robot/桌面/slambook2-master/ch5/stereo/right.png";

// 在pangolin中画图,已写好,无需调整
void showPointCloud(
    const vector<Vector4d, Eigen::aligned_allocator<Vector4d>> &pointcloud);

int main(int argc, char **argv) {
    // 1. 设置参数
    // 内参
    double fx = 718.856, fy = 718.856, cx = 607.1928, cy = 185.2157;
    // 基线
    double b = 0.573;

    // 2. 读取图像
    cv::Mat left = cv::imread(left_file, 0);
    cv::Mat right = cv::imread(right_file, 0);
    cv::Ptr<cv::StereoSGBM> sgbm = cv::StereoSGBM::create(
        0, 96, 9, 8 * 9 * 9, 32 * 9 * 9, 1, 63, 10, 100, 32);    // 神奇的参数

    // 3. 处理
    cv::Mat disparity_sgbm, disparity;
    // 通过sgbm将两个图像经过计算传给disparity_sgbm,然后disparity_sgbm->disparity
    sgbm->compute(left, right, disparity_sgbm);
    disparity_sgbm.convertTo(disparity, CV_32F, 1.0 / 16.0f);

    // 4. 声明点云
    vector<Vector4d, Eigen::aligned_allocator<Vector4d>> pointcloud;

    // 5. 计算。如果你的机器慢,请把后面的v++和u++改成v+=2, u+=2
    for (int v = 0; v < left.rows; v++)
        for (int u = 0; u < left.cols; u++) {
            if (disparity.at<float>(v, u) <= 0.0 || disparity.at<float>(v, u) >= 96.0) continue;

            Vector4d point(0, 0, 0, left.at<uchar>(v, u) / 255.0); // 前三维为xyz,第四维为颜色

            // 根据双目模型计算 point 的位置
            double x = (u - cx) / fx;
            double y = (v - cy) / fy;
            double depth = fx * b / (disparity.at<float>(v, u));
            point[0] = x * depth;
            point[1] = y * depth;
            point[2] = depth;

            pointcloud.push_back(point);
        }

    cv::imshow("disparity", disparity / 96.0);
    cv::waitKey(0);
    // 画出点云
    showPointCloud(pointcloud);
    return 0;
}

void showPointCloud(const vector<Vector4d, Eigen::aligned_allocator<Vector4d>> &pointcloud) {

    if (pointcloud.empty()) {
        cerr << "Point cloud is empty!" << endl;
        return;
    }

    pangolin::CreateWindowAndBind("Point Cloud Viewer", 1024, 768);
    glEnable(GL_DEPTH_TEST);
    glEnable(GL_BLEND);
    glBlendFunc(GL_SRC_ALPHA, GL_ONE_MINUS_SRC_ALPHA);

    pangolin::OpenGlRenderState s_cam(
        pangolin::ProjectionMatrix(1024, 768, 500, 500, 512, 389, 0.1, 1000),
        pangolin::ModelViewLookAt(0, -0.1, -1.8, 0, 0, 0, 0.0, -1.0, 0.0)
    );

    pangolin::View &d_cam = pangolin::CreateDisplay()
        .SetBounds(0.0, 1.0, pangolin::Attach::Pix(175), 1.0, -1024.0f / 768.0f)
        .SetHandler(new pangolin::Handler3D(s_cam));

    while (pangolin::ShouldQuit() == false) {
        glClear(GL_COLOR_BUFFER_BIT | GL_DEPTH_BUFFER_BIT);

        d_cam.Activate(s_cam);
        glClearColor(1.0f, 1.0f, 1.0f, 1.0f);

        glPointSize(2);
        glBegin(GL_POINTS);
        for (auto &p: pointcloud) {
            glColor3f(p[3], p[3], p[3]);
            glVertex3d(p[0], p[1], p[2]);
        }
        glEnd();
        pangolin::FinishFrame();
        usleep(5000);   // sleep 5 ms
    }
    return;
}
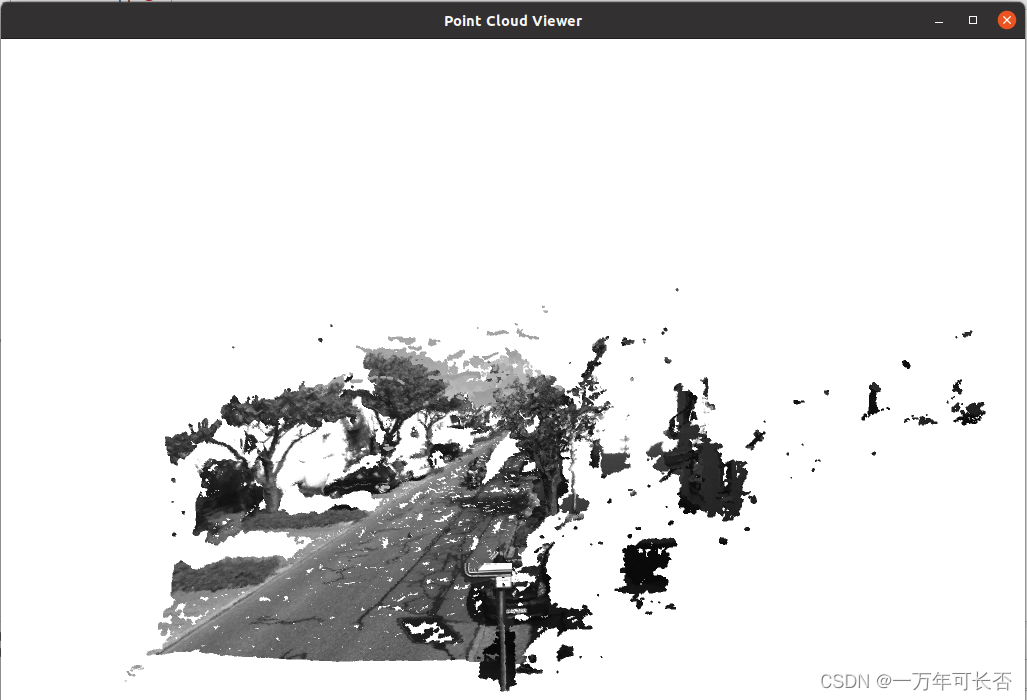
4.3 结果

五、RCB-D视觉:点云地图
5.1 CMakeLists.txt
cmake_minimum_required(VERSION 2.8)
project(rgbd)
set(CMAKE_CXX_FLAGS "-std=c++11")

# Sophus
find_package(Sophus REQUIRED)
include_directories(${Sophus_INCLUDE_DIRS})

# Pangolin
find_package(Pangolin REQUIRED)
include_directories( ${Pangolin_INCLUDE_DIRS} )

# OpenCV
find_package(OpenCV REQUIRED)
include_directories(${OpenCV_INCLUDE_DIRS})

add_executable(joinMap joinMap.cpp)
target_link_libraries(joinMap ${OpenCV_LIBS} ${Pangolin_LIBRARIES} ${FMT_LIBRARIES} fmt)
5.2 代码展示
#include <iostream>
#include <fstream>
#include <opencv2/opencv.hpp>
#include <boost/format.hpp>  // for formating strings
#include <pangolin/pangolin.h>
#include <sophus/se3.hpp>


using namespace std;
typedef vector<Sophus::SE3d, Eigen::aligned_allocator<Sophus::SE3d>> TrajectoryType;
typedef Eigen::Matrix<double, 6, 1> Vector6d;

// 在pangolin中画图,已写好,无需调整
void showPointCloud(
    const vector<Vector6d, Eigen::aligned_allocator<Vector6d>> &pointcloud);

int main(int argc, char **argv) {
    // 1. 声明彩色图、深度图、相机位姿
    vector<cv::Mat> colorImgs, depthImgs;
    TrajectoryType poses;
    // 2. 读取位姿文件
    ifstream fin("/home/robot/桌面/slambook2-master/ch5/rgbd/pose.txt");
    if (!fin) {
        cerr << "请在有pose.txt的目录下运行此程序" << endl;
        return 1;
    }
    // 3. 将图像和位姿分别存入
    for (int i = 0; i < 5; i++) {
        //图像:fmt设置图像文件格式
        boost::format fmt("/%s/%d.%s"); //图像文件格式
        colorImgs.push_back(cv::imread((fmt % "home/robot/桌面/slambook2-master/ch5/rgbd/color" % (i + 1) % "png").str()));
        depthImgs.push_back(cv::imread((fmt % "home/robot/桌面/slambook2-master/ch5/rgbd/depth" % (i + 1) % "pgm").str(), -1)); // 使用-1读取原始图像
        //位姿
        double data[7] = {0};
        for (auto &d:data)
            fin >> d;
        Sophus::SE3d pose(Eigen::Quaterniond(data[6], data[3], data[4], data[5]),//旋转四元数
                          Eigen::Vector3d(data[0], data[1], data[2]));//平移xyz
        poses.push_back(pose);
    }

    // 4. 计算点云并拼接
    // 相机内参
    double cx = 325.5;
    double cy = 253.5;
    double fx = 518.0;
    double fy = 519.0;
    double depthScale = 1000.0;
    vector<Vector6d, Eigen::aligned_allocator<Vector6d>> pointcloud;
    pointcloud.reserve(1000000);

    for (int i = 0; i < 5; i++) {
        cout << "转换图像中: " << i + 1 << endl;
        cv::Mat color = colorImgs[i];
        cv::Mat depth = depthImgs[i];
        Sophus::SE3d T = poses[i];//取出位姿
        for (int v = 0; v < color.rows; v++)
            for (int u = 0; u < color.cols; u++) {
                unsigned int d = depth.ptr<unsigned short>(v)[u]; // 深度值
                if (d == 0) continue; // 为0表示没有测量到
                Eigen::Vector3d point;
                // 像素坐标转换成相机坐标
                point[2] = double(d) / depthScale;
                point[0] = (u - cx) * point[2] / fx;
                point[1] = (v - cy) * point[2] / fy;
                // 相机坐标*T(外参)->世界坐标
                Eigen::Vector3d pointWorld = T * point;

                Vector6d p;
                p.head<3>() = pointWorld;
                p[5] = color.data[v * color.step + u * color.channels()];   // blue
                p[4] = color.data[v * color.step + u * color.channels() + 1]; // green
                p[3] = color.data[v * color.step + u * color.channels() + 2]; // red
                pointcloud.push_back(p);
            }
    }

    cout << "点云共有" << pointcloud.size() << "个点." << endl;
    showPointCloud(pointcloud);
    return 0;
}

void showPointCloud(const vector<Vector6d, Eigen::aligned_allocator<Vector6d>> &pointcloud) {

    if (pointcloud.empty()) {
        cerr << "Point cloud is empty!" << endl;
        return;
    }

    pangolin::CreateWindowAndBind("Point Cloud Viewer", 1024, 768);
    glEnable(GL_DEPTH_TEST);
    glEnable(GL_BLEND);
    glBlendFunc(GL_SRC_ALPHA, GL_ONE_MINUS_SRC_ALPHA);

    pangolin::OpenGlRenderState s_cam(
        pangolin::ProjectionMatrix(1024, 768, 500, 500, 512, 389, 0.1, 1000),
        pangolin::ModelViewLookAt(0, -0.1, -1.8, 0, 0, 0, 0.0, -1.0, 0.0)
    );

    pangolin::View &d_cam = pangolin::CreateDisplay()
        .SetBounds(0.0, 1.0, pangolin::Attach::Pix(175), 1.0, -1024.0f / 768.0f)
        .SetHandler(new pangolin::Handler3D(s_cam));

    while (pangolin::ShouldQuit() == false) {
        glClear(GL_COLOR_BUFFER_BIT | GL_DEPTH_BUFFER_BIT);

        d_cam.Activate(s_cam);
        glClearColor(1.0f, 1.0f, 1.0f, 1.0f);

        glPointSize(2);
        glBegin(GL_POINTS);
        for (auto &p: pointcloud) {
            glColor3d(p[3] / 255.0, p[4] / 255.0, p[5] / 255.0);
            glVertex3d(p[0], p[1], p[2]);
        }
        glEnd();
        pangolin::FinishFrame();
        usleep(5000);   // sleep 5 ms
    }
    return;
}
5.3 结果
转换图像中: 1
转换图像中: 2
转换图像中: 3
转换图像中: 4
转换图像中: 5
点云共有1081843个点.


 1425
1425


 被折叠的 条评论
为什么被折叠?
被折叠的 条评论
为什么被折叠?
 到【灌水乐园】发言


