


1.简介
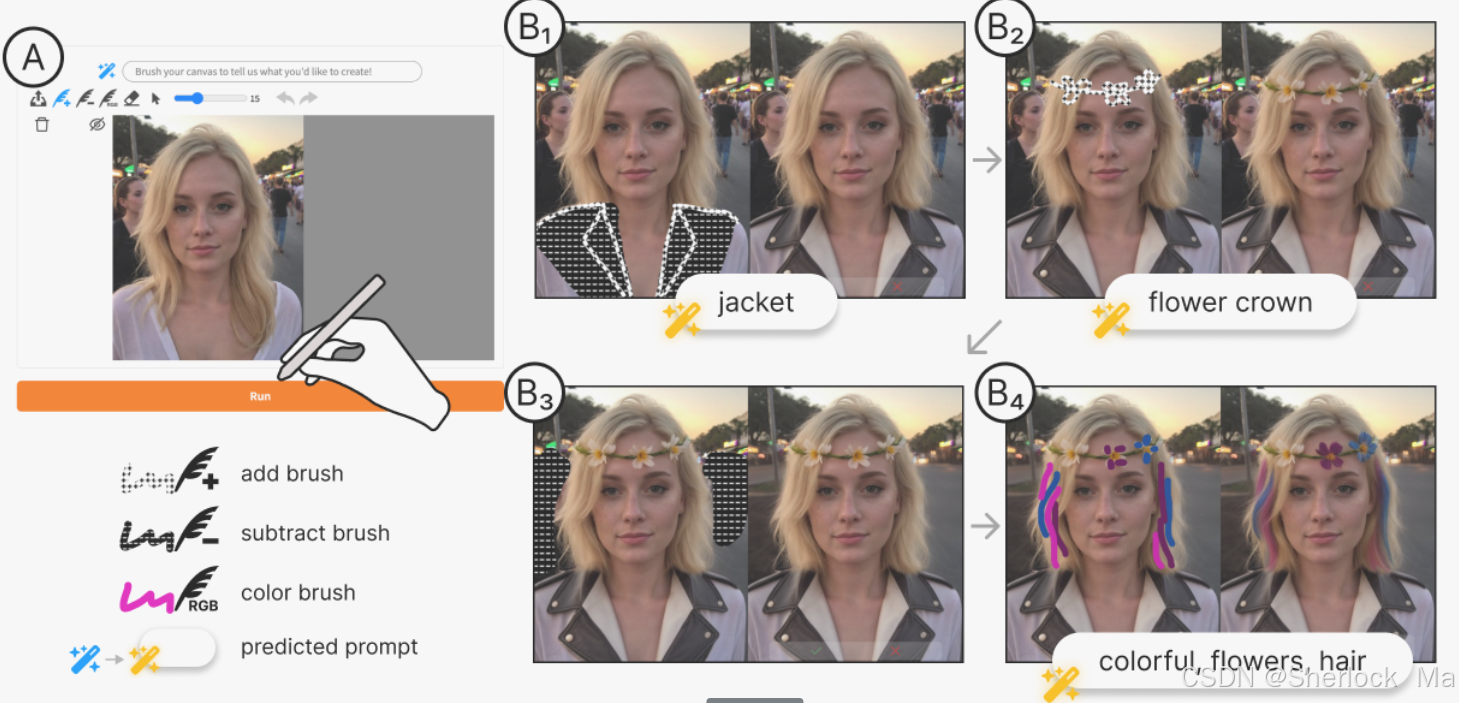
MagicQuill是一个创新的智能互动图像编辑系统,它通过结合扩散模型和多模态大型语言模型(MLLM),使用户能够以直观的笔触编辑图像,如添加、减去元素或改变颜色。
这个系统通过实时监测用户的笔触并预测其意图,省去了传统编辑中输入复杂指令的步骤,使得编辑过程更加流畅和高效。
它由三个核心模块组成:编辑处理器、绘画助手和想法收集器。编辑处理器负责精确控制图像的编辑,确保用户意图在颜色和边缘调整中得到准确反映;绘画助手通过解读笔触和自动预测提示来减少用户的工作量;而想法收集器则提供了一个用户友好的界面,使用户可以轻松地绘制和操作笔触。MagicQuill的设计旨在简化图像编辑流程,提高编辑的精确度和效率,同时降低专业图像编辑的门槛,让创意表达变得更加容易和高效。
项目主页:MagicQuill
论文地址:https://arxiv.org/abs/2411.09703
huggingface demo:Gradio
视频介绍:https://www.youtube.com/watch?v=5DiKfONMnE4
2.效果展示
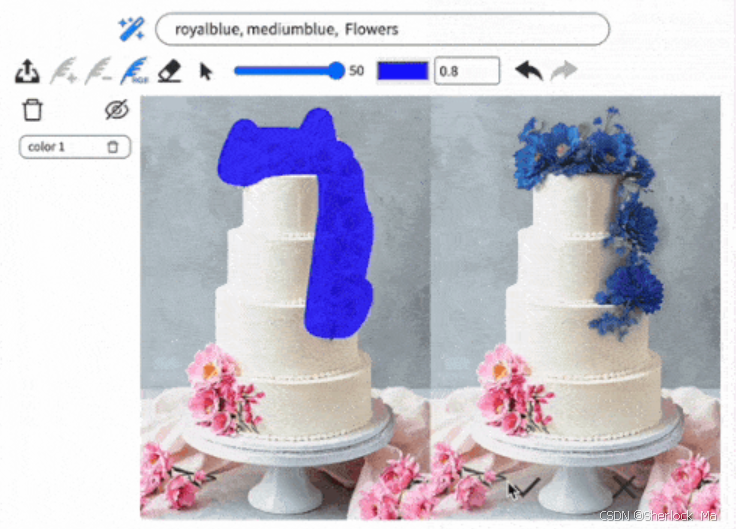
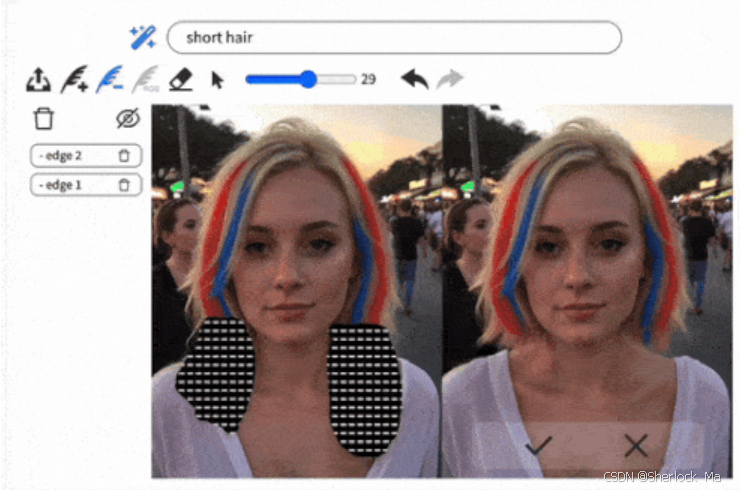
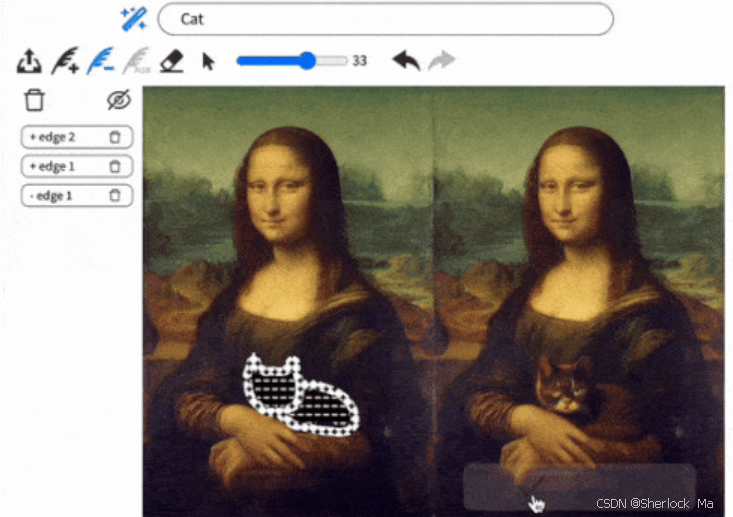
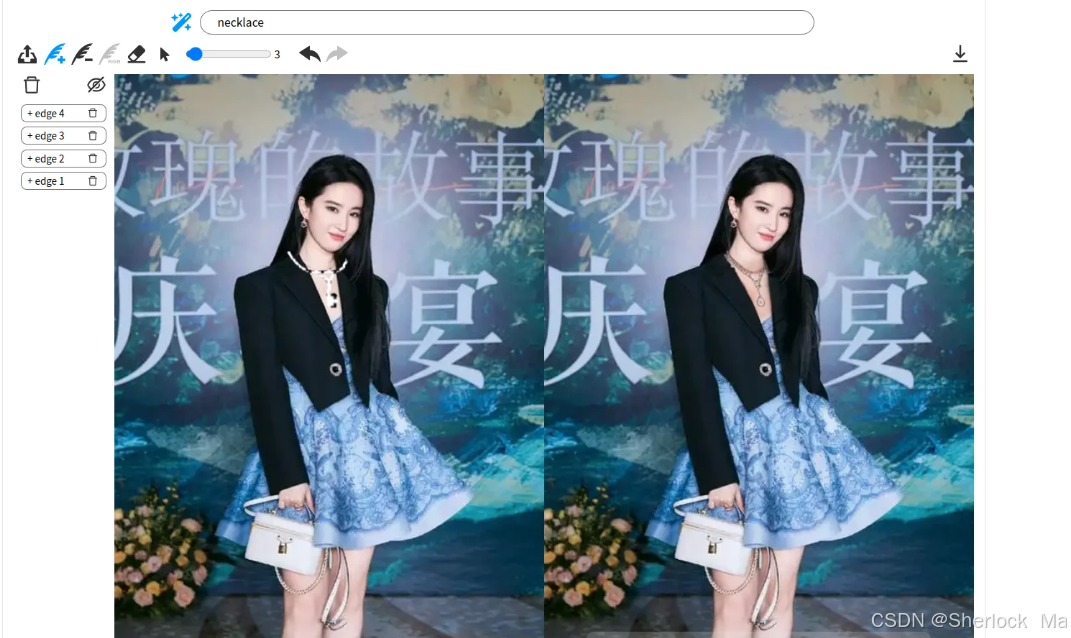
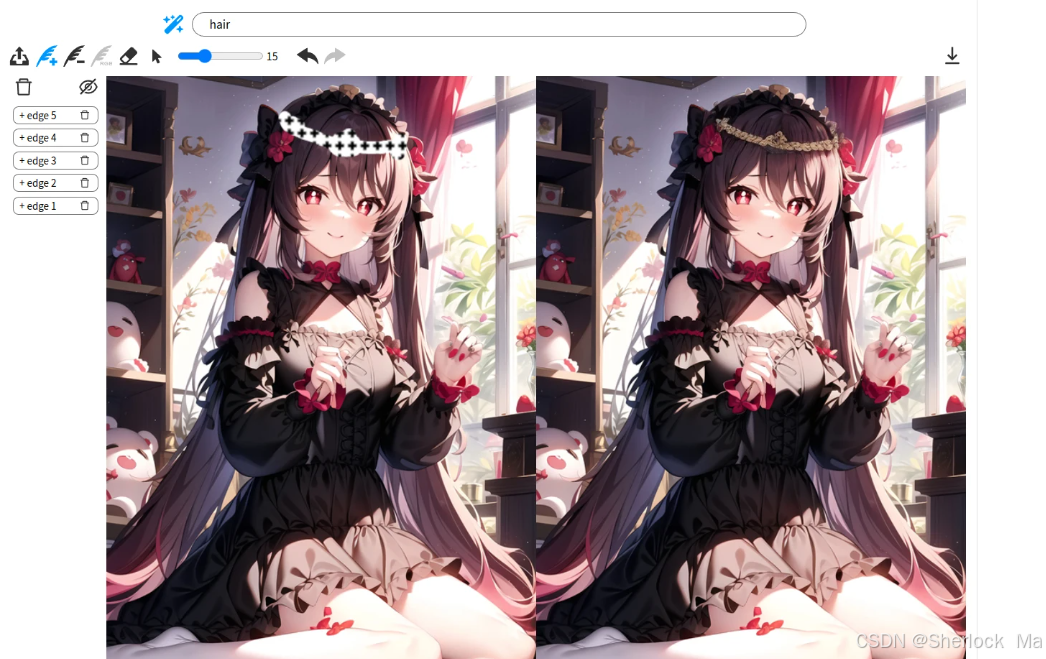
这里是使用MagicQuill生成的图像,使用教程请看第四章。
官方效果图:
我的绘制效果图:
3.论文详解
要想对照片进行细致入微的精准编辑,无疑是一项颇具挑战性的任务。尽管扩散模型技术取得了迅猛进展,且在提升编辑控制力方面也有了新尝试,但要达成如此精细的编辑效果,依然面临着不小的难题。这主要是因为缺少了既直观又能够进行精细操控的界面和模型。
作者的目标是开发一个强大的、开源的、交互式的精确图像编辑系统,使图像编辑变得简单高效。作者的系统无缝集成了三个核心模块:编辑处理器(Editing Processor,代码中使用了diffusion+controlnet+brushnet), 绘画助手(Painting Assistor,代码中使用LLaVA), 创意收集器(Idea Collector,也就是可视化界面)。编辑处理器确保高质量、可控的编辑生成,准确反映用户在颜色和边缘调整方面的编辑意图。绘画助手增强了系统预测和解释用户编辑意图的能力。Idea Collector作为一个直观的界面,允许用户快速轻松地输入他们的想法,大大提高了编辑效率。

Painting Assistor
提示词工程
具体来说,作者使用LLaVA模型预测画笔区域的内容,方式是微调LLaVA,输入一个猜测的提示词,让模型猜测画笔区域可能的内容,模型只输出类别,然后交由Editing Processor进行编辑。
对于添加画笔,作者使用如下结构的提示词:“这是一个'绘制和猜测'游戏。我会上传一个包含一些笔画的图像。为了帮助您定位笔画,我将为您提供笔画的规范化边界框坐标,其中它们的原始坐标除以填充的图像宽度和高度。边界框的左上角位于(x1,y1),右下角位于(x2,y2)。现在用一个词一个短语告诉我,我想用图像中的这些笔画画什么?“其输出直接用作预测提示。
对于减画笔,作者绕过了问答过程,因为结果表明,无提示生成可获得令人满意的结果。
对于彩色画笔,问答设置类似:“用户将上传一张包含一些红色轮廓的图像。为了帮助您定位轮廓,...您需要使用单个单词或短语来识别轮廓内的内容。",(the重复部分被省略)。系统从彩色画笔描边边界中提取轮廓信息。通过将笔画的颜色信息与模型输出相结合来生成最终的预测提示。
数据集构建
作者使用Densely Captioned Images (DCI),DCI数据集中的每个图像都有详细的多粒度掩码,并附有开放式词汇标签和丰富的描述。这种丰富的注释结构使得模型能够捕获不同的视觉特征和语义上下文。
步骤1:为问答生成答案。初始阶段包括使用PiDiNet从DCI数据集中的图像生成边缘图。作者计算掩蔽区域内的边缘密度,并选择具有最高边缘密度的前5个掩模,与这些所选面具相对应的标签将作为问答的基本事实。为了确保模型专注于猜测用户意图,而不是解析不相关的细节,作者清理了标签,只保留名词组件,简化以强调基本元素。
第2步:使用边缘覆盖模拟画笔笔划。在数据集构建的第二部分中,作者重点关注第一步中确定的五个掩码。每个掩模经历随机形状扩展以引入可变性。作者使用基于SDXL的BrushNet模型对这些具有空提示的增强掩码执行修复。随后,将先前生成的边缘图叠加到修复区域上。这些覆盖图像模拟了用户手绘笔划可能如何改变图像的实际示例。
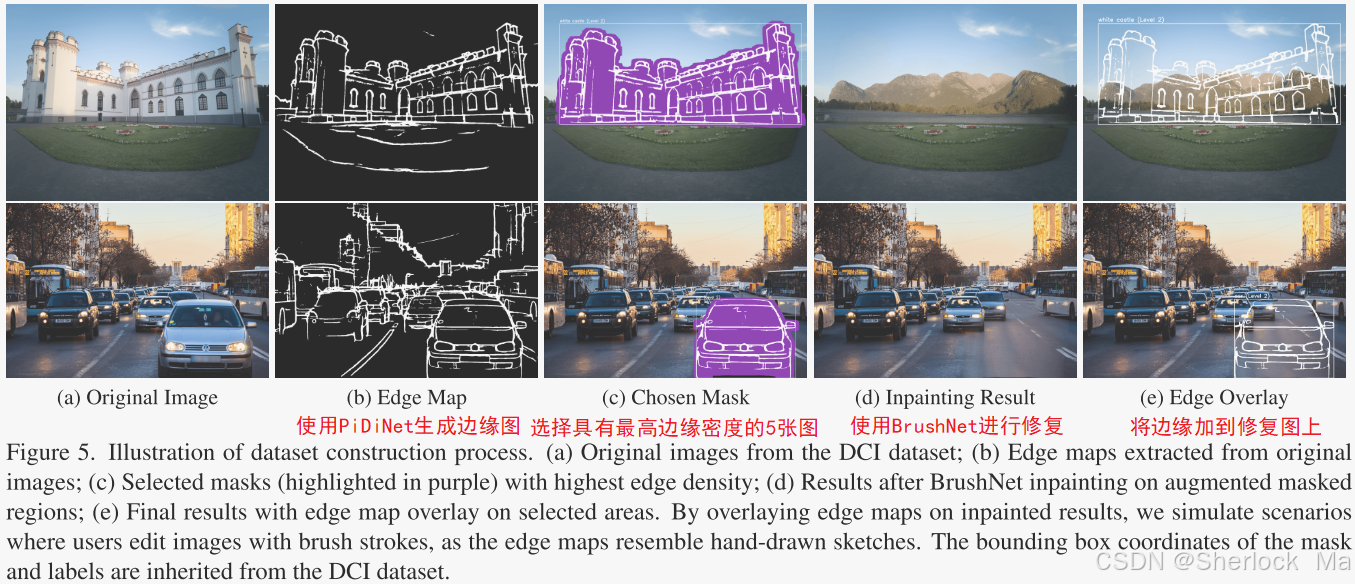
数据集其中包含总共24315张图像,分类在4412个不同的标签下。作者利用低秩自适应(LoRA)技术微调了LLaVA模型,使得LLaVA能够识别掩码区域的内容,并返回精简的结果。
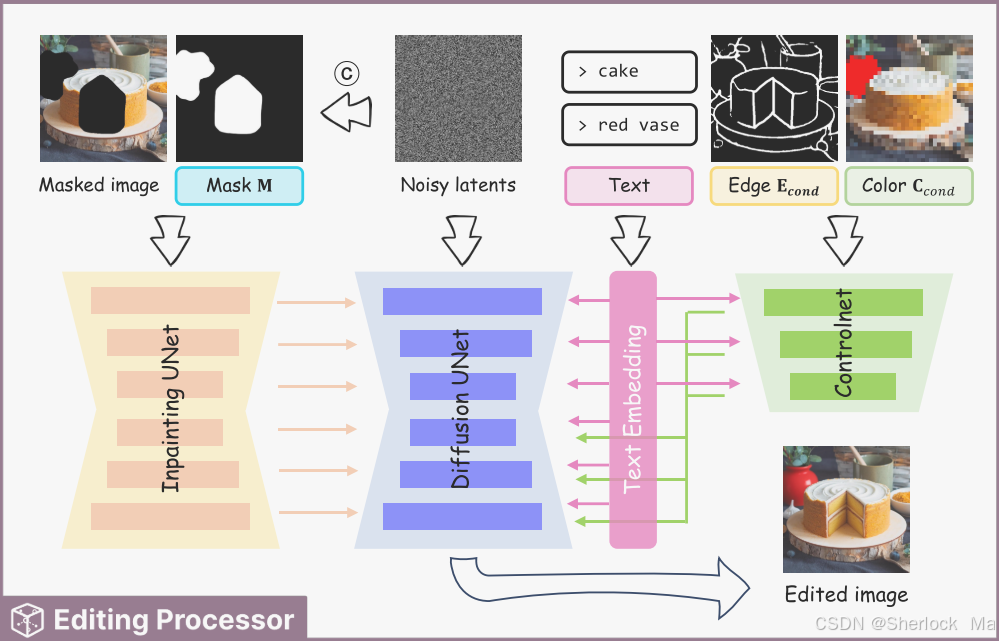
Editing Processor
过程如下:
- 用户绘制:用户绘制结果通过转换,最终创建出用于指导编辑过程的边缘条件(Econd)和颜色条件(Ccond)以及掩码条件(MCond)。
- LLaVA预测:绘制结果通过LLaVA预测,输入到Text Embedding,然后将向量嵌入Diffusion和ControlNet.
-
双分支架构:Editing Processor采用了一个双分支架构,包括一个用于内容感知像素级指导的修复分支(Inpainting Branch)和一个提供结构指导的控制分支(Control Branch)。具体来说,边缘条件(Econd)和颜色条件(Ccond)通过ControlNet嵌入Diffusion中,而掩码条件(MCond)通过Inpainting Unet(BrushNet)嵌入diffusion。
4.代码解析
环境安装
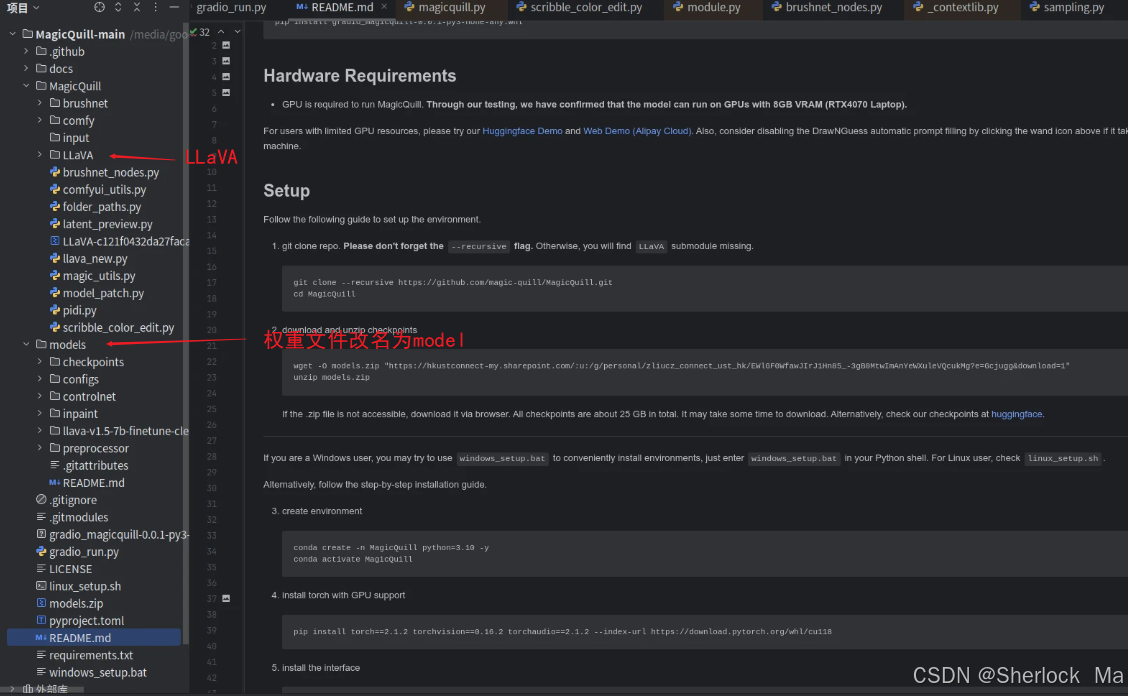
首先下载github代码,如果使用git,一定要加--recursive
git clone --recursive https://github.com/magic-quill/MagicQuill.git然后下载权重,建议直接使用huggingface,使用wget经常中途断掉:https://huggingface.co/LiuZichen/MagicQuill-models/tree/main
然后将权重文件夹改名为model,位置和MagicQuill平级
接着创建一个虚拟环境,建议Python3.10,安装pytorch
pip install torch==2.1.2 torchvision==0.16.2 torchaudio==2.1.2 --index-url https://download.pytorch.org/whl/cu118安装官方提供的包:
pip install gradio_magicquill-0.0.1-py3-none-any.whl安装LLaVA环境(注意Linux和Windows的区别)
(For Linux)
cp -f pyproject.toml MagicQuill/LLaVA/
pip install -e MagicQuill/LLaVA/

(For Windows)
copy /Y pyproject.toml MagicQuill\LLaVA\
pip install -e MagicQuill\LLaVA\

如果使用Windows Powershell,第一行改成:
Copy-Item -Path pyproject.toml -Destination "MagicQuill\LLaVA" -Force
安装其他包:
pip install -r requirements.txt接着运行:
python gradio_run.py如何使用
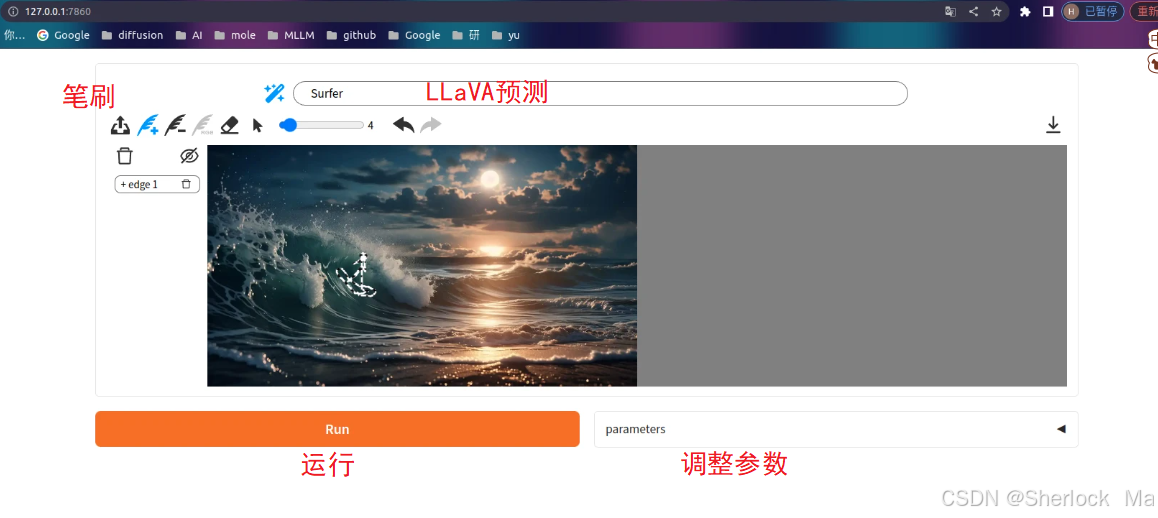
使用步骤:
- 上传图片
- 使用笔刷进行编辑。需要注意的是:颜色笔刷和添加/减笔试不能同时使用,如果需要同时用,应先保留预览图的效果
- 添加笔刷:使用添加笔刷,根据提示添加细节和元素--用自己生动的笔触表达自己的想法!
- 减笔刷:减法笔刷可以根据提示去除多余的细节或重绘区域。如果有不满意的地方,只需将其减去即可!
- 颜色笔刷:彩色画笔可以精确地为图像上色,与您画笔的颜色相匹配
- 更改LLaVA预测结果,调参+运行
- 满意就保留(预览框里面的绿色√),不满意重新画(预览框里面的红色的×)
如何debug
在async def guess_prompt(request: Request)处打断点,可以对LLaVA预测进行debug(注意要先用画笔绘图)

在generate_image_handler()处打断点可以对生成部分进行debug(注意要点run才能debug)
llava预测
在gradio_run.py下面的guess_prompt()定义了一个异步的HTTP POST请求处理器,具体来说:
- 接收请求:通过 @app.post("/magic_quill/guess_prompt") 装饰器定义了一个POST请求的路由。
- 解析请求数据:使用 await request.json() 解析客户端发送的JSON数据。
- 处理数据:调用 guess_prompt_handler 函数,传入解析后的图像数据,其中是llava模型,用于预测人想要画的物体。
- 返回结果:将 guess_prompt_handler 的返回值作为HTTP响应返回给客户端,显示在最上面。
@app.post("/magic_quill/guess_prompt")
async def guess_prompt(request: Request):
    data = await request.json()     # 解析JSON数据
    res = guess_prompt_handler(data['original_image'], data['add_color_image'], data['add_edge_image'])     # 图像传入llava,返回llava的预测值
    return res      # 返回llava的预测值作为HTTP响应返回给客户端。
其中,guess_prompt_handler()如下,其功能为加载和预处理原始图像、颜色图像和边缘图像,并通过guess()交由llava进行预测。
def guess_prompt_handler(original_image, add_color_image, add_edge_image):
    original_image_tensor = load_and_preprocess_image(original_image)       # 处理原图

    if add_color_image:
        add_color_image_tensor = load_and_preprocess_image(add_color_image)     # 处理颜色笔刷
    else:
        add_color_image_tensor = original_image_tensor

    width, height = original_image_tensor.shape[1], original_image_tensor.shape[2]
    add_edge_mask = create_alpha_mask(add_edge_image) if add_edge_image else torch.zeros((1, height, width), dtype=torch.float32, device="cpu")     # 处理边缘笔刷
    res = guess(original_image_tensor, add_color_image_tensor, add_edge_mask)   # llava预测
    return res
通过guess调用自定义的llavaModel进行处理
def guess(original_image_tensor, add_color_image_tensor, add_edge_mask):
    description, ans1, ans2 = llavaModel.process(original_image_tensor, add_color_image_tensor, add_edge_mask)
    ans_list = []
    if ans1 and ans1 != "":
        ans_list.append(ans1)
    if ans2 and ans2 != "":
        ans_list.append(ans2)

    return ", ".join(ans_list)
其中调用llavaModel.process分别对颜色和边缘图像进行处理
- 处理边缘图像:
- 检查 add_mask 中是否有绘制区域(即 torch.sum(add_mask).item() > 0)。
- 如果有绘制区域,计算该区域的边界框坐标,并生成描述问题。
-
通过add_mask给原图加上掩码(也就是笔触区域)
根据图像的亮度调整笔触效果:如果平均亮度大于 0.8,则将笔触区域设为黑色;否则设为白色。
- llava预测
- 处理带有颜色差异的图像:
- 检查 colored_image 和 image 是否不相等。
- 如果不相等,检测颜色差异,生成带有颜色轮廓的图像,并计算颜色差异区域的边界框坐标。
- 检查 colored_image 和 image 是否不相等。
class LLaVAModel:
    ...

    def process(self, image, colored_image, add_mask):
        description = ""
        answer1 = ""
        answer2 = ""

        image_with_sketch = image.clone()
        if torch.sum(add_mask).item() > 0:  # 如果 add_mask 中有绘制区域,则计算该区域的边界框坐标。
            x_min, y_min, x_max, y_max = get_bounding_box_from_mask(add_mask)
            # print(x_min, y_min, x_max, y_max)
            question = f"This is an 'I draw, you guess' game. I will upload an image containing some sketches. To help you locate the sketch, I will give you the normalized bounding box coordinates of the sketch where their original coordinates are divided by the image width and height. The top-left corner of the bounding box is at ({x_min}, {y_min}), and the bottom-right corner is at ({x_max}, {y_max}). Now tell me, what am I trying to draw with these sketches in the image?"
            # image_with_sketch[add_mask > 0.5] = 1.0
            bool_add_mask = add_mask > 0.5
            mean_brightness = image_with_sketch[bool_add_mask].mean()
            if mean_brightness > 0.8:       # 这样做的目的是为了在图像中创建更清晰的笔触效果,通过将笔触区域的亮度设置为极端值(黑色或白色),可以使得笔触更加突出,从而在图像编辑中实现更精确的控制。
                image_with_sketch[bool_add_mask] = 0.0
            else:
                image_with_sketch[bool_add_mask] = 1.0
            answer1 = self.generate_description([image_with_sketch.squeeze() * 255], question)
            print(answer1)
       if not torch.equal(image, colored_image):   # 如果 colored_image 和 image 不相等,则检测颜色差异。
            color = find_different_colors(image.squeeze() * 255, colored_image.squeeze() * 255)
            image_with_bbox, colored_mask = get_colored_contour(colored_image.squeeze() * 255, image.squeeze() * 255)
            x_min, y_min, x_max, y_max = get_bounding_box_from_mask(colored_mask)       # # 计算颜色差异区域的边界框坐标。
            question = f"The user will upload an image containing some contours in red color. To help you locate the contour, I will give you the normalized bounding box coordinates where their original coordinates are divided by the image width and height. The top-left corner of the bounding box is at ({x_min}, {y_min}), and the bottom-right corner is at ({x_max}, {y_max}). You need to identify what is inside the contours using a single word or phrase."
            answer2 = color + ', ' + self.generate_description([image_with_bbox.squeeze() * 255], question)
            print(answer2)

        return (description, answer1, answer2)
使用LLaVAModel的generate_description()方法调用llava生成预测结果。具体来说:
- 生成问题qs,其中额外添加了图像令牌
- 图像预处理:使用llava的CLIP提取图像的特征
- 通过conv_templates构建最终的prompt,转换为input_ids
- 通过llama进行预测
class LLaVAModel:
    ...

    def generate_description(self, images, question):
        qs = question   # 你画我猜,给位置猜我画什么
        image_token_se = DEFAULT_IM_START_TOKEN + DEFAULT_IMAGE_TOKEN + DEFAULT_IM_END_TOKEN
        if IMAGE_PLACEHOLDER in qs:
            if self.model.config.mm_use_im_start_end:
                qs = re.sub(IMAGE_PLACEHOLDER, image_token_se, qs)
            else:
                qs = re.sub(IMAGE_PLACEHOLDER, DEFAULT_IMAGE_TOKEN, qs)
        else:
            if self.model.config.mm_use_im_start_end:
                qs = image_token_se + "\n" + qs
            else:
                qs = DEFAULT_IMAGE_TOKEN + "\n" + qs    # 走这里:qs+图片的令牌

        images_tensor = []
        image_sizes = []
        to_pil = transforms.ToPILImage()
        for image in images:
            image = image.clone().permute(2, 0, 1).cpu()
            image = to_pil(image)
            image_sizes.append(image.size)
            image = expand2square(image, tuple(int(x) for x in self.image_processor.image_mean))
            image = self.image_processor.preprocess(image, return_tensors='pt')['pixel_values'][0]  # clip处理 [3,h,w]->[3,336,336]
            images_tensor.append(image.half())

        conv = conv_templates["llava_v1"].copy()
        conv.append_message(conv.roles[0], qs)      # # 将处理后的问题文本添加到对话模板中
        conv.append_message(conv.roles[1], None)
        prompt = conv.get_prompt()      # 获取对话模板的最终prompt

        input_ids = (
            tokenizer_image_token(prompt, self.tokenizer, IMAGE_TOKEN_INDEX, return_tensors="pt")
            .unsqueeze(0)
            .cuda()
        )

        with torch.inference_mode():
            output_ids = self.model.generate(   # llama模型进行生成
                input_ids,
                images=images_tensor,
                image_sizes=image_sizes,
                temperature=0.2,
                do_sample=True,
                use_cache=True,
            )
        outputs = self.tokenizer.decode(output_ids[0]).strip()      # llava预测结果
        outputs = outputs.split('>')[1].split('<')[0]
        # print(outputs)
        return outputs
生成图像
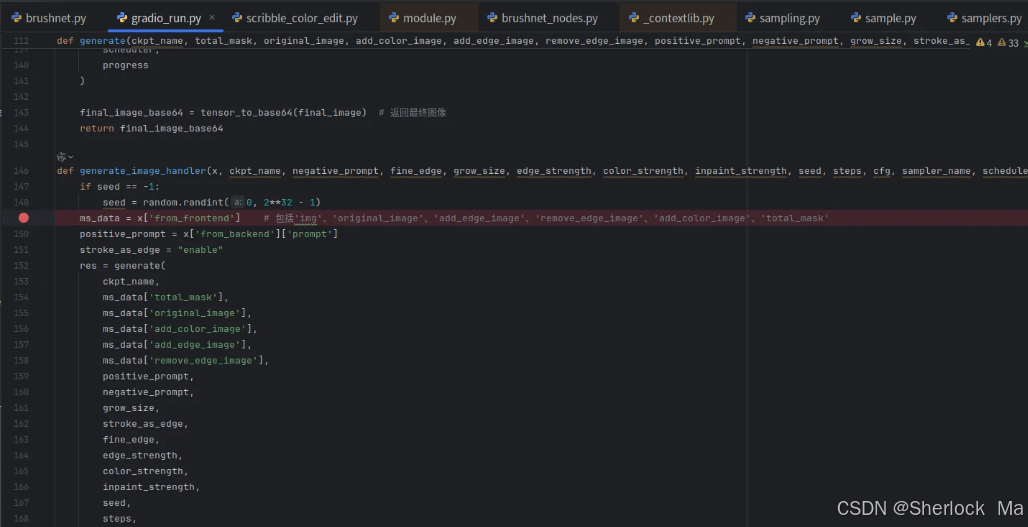
接下来,我们在窗口中按下run,即可开始图像生成部分的debug
按下按钮后,会通过307行代码调用generate_image_handler()
btn.click(generate_image_handler, inputs=[ms, ckpt_name, negative_prompt, fine_edge, grow_size, edge_strength, color_strength, inpaint_strength, seed, steps, cfg, sampler_name, scheduler], outputs=ms)
generate_image_handler()会调用generate()函数,generate函数如下:
def generate(ckpt_name, total_mask, original_image, add_color_image, add_edge_image, remove_edge_image, positive_prompt, negative_prompt, grow_size, stroke_as_edge, fine_edge, edge_strength, color_strength, inpaint_strength, seed, steps, cfg, sampler_name, scheduler):
    add_color_image, original_image, total_mask, add_edge_mask, remove_edge_mask = prepare_images_and_masks(total_mask, original_image, add_color_image, add_edge_image, remove_edge_image)
    progress = None
    if torch.sum(remove_edge_mask).item() > 0 and torch.sum(add_edge_mask).item() == 0:
        if positive_prompt == "":
            positive_prompt = "empty scene"     # 为空则设为 "empty scene"
        edge_strength /= 3.

    latent_samples, final_image, lineart_output, color_output = scribbleColorEditModel.process(     # 图像处理
        ckpt_name,
        original_image,
        add_color_image,
        positive_prompt,
        negative_prompt,
        total_mask,
        add_edge_mask,
        remove_edge_mask,
        grow_size,
        stroke_as_edge,
        fine_edge,
        edge_strength,
        color_strength,
        inpaint_strength,
        seed,
        steps,
        cfg,
        sampler_name,
        scheduler,
        progress
    )

    final_image_base64 = tensor_to_base64(final_image)  # 返回最终图像
    return final_image_base64
其中的prepare_images_and_masks()如下:
def prepare_images_and_masks(total_mask, original_image, add_color_image, add_edge_image, remove_edge_image):
    total_mask = create_alpha_mask(total_mask)      # 创建总掩码
    original_image_tensor = load_and_preprocess_image(original_image)   # 原始图像
    if add_color_image:     # 颜色图像
        add_color_image_tensor = load_and_preprocess_image(add_color_image)
    else:
        add_color_image_tensor = original_image_tensor

    add_edge_mask = create_alpha_mask(add_edge_image) if add_edge_image else torch.zeros_like(total_mask)   # 添加边缘掩码
    remove_edge_mask = create_alpha_mask(remove_edge_image) if remove_edge_image else torch.zeros_like(total_mask)  # 移除边缘掩码
    return add_color_image_tensor, original_image_tensor, total_mask, add_edge_mask, remove_edge_mask
进入scribbleColorEditModel.process(),具体来说:
这段Python代码定义了一个process方法,用于处理图像生成任务。具体功能如下:
- 模型加载:根据检查点名称加载模型、CLIP编码器和VAE。
- 模型初始化:如果模型未加载,则加载边缘控制网络、颜色控制网络和BrushNet。
- 文本编码:对正向和负向提示进行编码。
- 掩码处理:扩展掩码区域。
- 图像处理:
- 根据参数决定是否将笔触作为边缘。
- 如果彩色图像和灰度图像不同,应用颜色控制网络和边缘控制网络。
- 如果相同,应用边缘控制网络,并调整图像中的添加和移除区域。
- BrushNet更新:使用BrushNet更新模型状态。
- 样本生成:使用KSampler生成潜变量。
- 图像融合:解码潜变量并进行图像融合。
- 返回结果:返回生成的潜变量、最终图像、线稿输出和颜色输出。
class ScribbleColorEditModel():
    ...

    def process(self, ckpt_name, image, colored_image, positive_prompt, negative_prompt, mask, add_mask, remove_mask, grow_size, stroke_as_edge, fine_edge, edge_strength, color_strength, inpaint_strength, seed, steps, cfg, sampler_name, scheduler, base_model_version='SD1.5', dtype='float16', palette_resolution=2048):
        if ckpt_name != self.ckpt_name:
            self.ckpt_name = ckpt_name
            with torch.no_grad():
                self.model, self.clip, self.vae = self.checkpoint_loader.load_checkpoint(ckpt_name)
        if not hasattr(self, 'edge_controlnet') or not hasattr(self, 'color_controlnet') or not hasattr(self, 'brushnet'):
            self.load_models(base_model_version, dtype)

        positive = self.clip_text_encoder.encode(self.clip, positive_prompt)[0]     # 对正向和负向提示进行编码
        negative = self.clip_text_encoder.encode(self.clip, negative_prompt)[0]

        mask = self.mask_processor.expand_mask(mask, expand=grow_size, tapered_corners=True)[0]     # 使用GrowMask扩展掩码区域

        image_copy = image.clone()
        if stroke_as_edge == "disable":     # 根据参数决定是否将笔触作为边缘
            bool_add_mask = add_mask > 0.5
            mean_brightness = image_copy[bool_add_mask].mean()
            if mean_brightness > 0.8:
                image_copy[bool_add_mask] = 0.0
            else:
                image_copy[bool_add_mask] = 1.0


        if not torch.equal(image, colored_image):   # 如果彩色图像和灰度图像不同,应用颜色控制网络和边缘控制网络。
            print("Apply color controlnet")
            color_output = self.color_processor.execute(colored_image, resolution=palette_resolution)[0]
            lineart_output = self.lineart_processor.execute(image, resolution=512, coarse=False)[0]
            positive, negative = self.controlnet_apply.apply_controlnet(positive, negative, self.color_controlnet, color_output, color_strength, 0.0, 1.0)
            positive, negative = self.controlnet_apply.apply_controlnet(positive, negative, self.edge_controlnet, lineart_output, 0.8, 0.0, 1.0)
        else:   # 如果相同,应用边缘控制网络,并调整图像中的添加和移除区域。
            print("Apply edge controlnet")
            # Resize masks to match the dimensions of lineart_output
            color_output = self.color_procesfsor.execute(image, resolution=palette_resolution)[0]
            if fine_edge == "enable":
                lineart_output = self.lineart_processor.execute(image, resolution=512, coarse=False)[0]
            else:
                lineart_output = self.scribble_processor.execute(image, resolution=512)[0]
            add_mask_resized = F.interpolate(add_mask.unsqueeze(0).unsqueeze(0).float(), size=(1, lineart_output.shape[1], lineart_output.shape[2]), mode='nearest').squeeze(0).squeeze(0)
            remove_mask_resized = F.interpolate(remove_mask.unsqueeze(0).unsqueeze(0).float(), size=(1, lineart_output.shape[1], lineart_output.shape[2]), mode='nearest').squeeze(0).squeeze(0)

            bool_add_mask_resized = (add_mask_resized > 0.5)
            bool_remove_mask_resized = (remove_mask_resized > 0.5)

            if stroke_as_edge == "enable":
                lineart_output[bool_remove_mask_resized] = 0.0
                lineart_output[bool_add_mask_resized] = 1.0
            else:
                lineart_output[bool_remove_mask_resized & ~bool_add_mask_resized] = 0.0
            positive, negative = self.controlnet_apply.apply_controlnet(positive, negative, self.edge_controlnet, lineart_output, edge_strength, 0.0, 1.0)


        # BrushNet
        model, positive, negative, latent = self.brushnet_node.model_update(    # 使用BrushNet更新模型状态,以便更好地生成图像。
            model=self.model,
            vae=self.vae,
            image=image,
            mask=mask,
            brushnet=self.brushnet,
            positive=positive,
            negative=negative,
            scale=inpaint_strength,
            start_at=0,
            end_at=10000
        )

        # KSampler Node
        latent_samples = self.ksampler.sample(      # 使用KSampler进行样本生成,生成最终的潜变量。
            model=model,
            seed=seed,
            steps=steps,
            cfg=cfg,
            sampler_name=sampler_name,
            scheduler=scheduler,
            positive=positive,
            negative=negative,
            latent_image=latent,
        )[0]

        # Image Blending
        final_image = self.vae_decoder.decode(self.vae, latent_samples)[0]
        final_image = self.blender.blend_inpaint(final_image, image, mask, kernel=10, sigma=10.0)[0]    # 图像融合

        # Return the final image
        return (latent_samples, final_image, lineart_output, color_output)
mask_processor.expand_mask
对于self.mask_processor.expand_mask,其定义方法在MagicQuill/comfyui_utils.py下:
这段代码定义了一个名为 expand_mask 的方法,用于扩展或收缩输入的掩码(mask)。具体功能如下:
- 内核生成:根据 tapered_corners 的值生成一个 3x3 的内核 kernel,用于后续的膨胀或腐蚀操作。
- 掩码重塑:将输入的掩码重塑为 (batch_size, height, width) 形状。
- 逐个处理掩码:遍历每个掩码,将其转换为 NumPy 数组。根据 expand 的值,进行多次膨胀或腐蚀操作。将处理后的掩码转换回 PyTorch 张量并存储在列表 out 中。其中:
-
scipy.ndimage.grey_dilation:用于执行灰度膨胀操作。 -
footprint=kernel:这是传递给grey_dilation函数的参数,footprint定义了结构元素的形状和大小,它决定了膨胀操作的邻域范围和形状。kernel是一个定义了这种结构元素的数组。 -
灰度膨胀的效果是增加图像中亮区域的面积,通过将亮区域的灰度值扩散到周围区域。这通常会导致图像中的亮区域变大,暗区域变小,从而增强了图像的对比度,尤其是在亮区域的边缘附近。
这种操作在图像预处理、特征提取、图像增强和去噪等多种应用中都非常有用。例如,在医学成像中,灰度膨胀可以用来增强血管或其他结构的可视化;在机器视觉中,它可以用来突出物体的边缘,以便后续的处理步骤。
-
- 返回结果:将处理后的掩码堆叠成一个新的张量并返回。
class GrowMask:
    def expand_mask(self, mask, expand, tapered_corners):
        c = 0 if tapered_corners else 1
        kernel = np.array([[c, 1, c],
                           [1, 1, 1],
                           [c, 1, c]])      # 生成一个 3x3 的内核 kernel,用于后续的膨胀或腐蚀操作。
        mask = mask.reshape((-1, mask.shape[-2], mask.shape[-1]))
        out = []
        for m in mask:
            output = m.numpy()
            for _ in range(abs(expand)):
                if expand < 0:
                    output = scipy.ndimage.grey_erosion(output, footprint=kernel)
                else:
                    output = scipy.ndimage.grey_dilation(output, footprint=kernel)      # 进行灰度膨胀操作,膨胀操作的结构元素由 kernel 定义。
            output = torch.from_numpy(output)
            out.append(output)
        return (torch.stack(out, dim=0),)   # [1,h,w]
color_processor.execute
对于self.color_processor.execute,其定义方法在MagicQuill/comfyui_utils.py下
具体步骤如下:
- 创建 ColorDetector 类的实例。
- 调用 common_annotator_call 函数,传入 ColorDetector 实例、image 和 resolution 参数。
- 将 common_annotator_call 函数的返回值封装成一个元组并返回。
class Color_Preprocessor:
    def execute(self, image, resolution=512, **kwargs):
        return (common_annotator_call(ColorDetector(), image, resolution=resolution), )
scribble_processor.execute
对于self.scribble_processor.execute,其定义方法在MagicQuill/comfyui_utils.py下
class PIDINET_Preprocessor:
    def execute(self, image, resolution=512, **kwargs):    # 用于处理图像并生成特定分辨率的输出
        model = PidiNetDetector.from_pretrained().to(comfy.model_management.get_torch_device())     # 加载 PidiNetDetector 模型,
        out = common_annotator_call(model, image, resolution=resolution, safe=True)     # 调用模型,处理输入图像并设置分辨率和安全模式。
        del model
        return (out, )
controlnet_apply.apply_controlnet
对于self.controlnet_apply.apply_controlnet,其定义方法在MagicQuill/comfyui_utils.py下
class ControlNetApplyAdvanced:
    def apply_controlnet(self, positive, negative, control_net, image, strength, start_percent, end_percent):   # 用于在图像生成过程中应用控制网络(ControlNet)
        if strength == 0:
            return (positive, negative)     # 如果 strength 为 0,则直接返回输入的 positive 和 negative。

        control_hint = image.movedim(-1,1)      # 将输入图像 image 的通道维度进行调整,生成 control_hint
        cnets = {}

        out = []
        for conditioning in [positive, negative]:
            c = []
            for t in conditioning:
                d = t[1].copy()

                prev_cnet = d.get('control', None)
                if prev_cnet in cnets:      # 如果该属性已存在于 cnets 字典中,则直接使用
                    c_net = cnets[prev_cnet]
                else:       # 创建一个新的 control_net 实例,并设置其条件提示和强度。
                    c_net = control_net.copy().set_cond_hint(control_hint, strength, (start_percent, end_percent))
                    c_net.set_previous_controlnet(prev_cnet)
                    cnets[prev_cnet] = c_net

                d['control'] = c_net
                d['control_apply_to_uncond'] = False
                n = [t[0], d]
                c.append(n)
            out.append(c)
        return (out[0], out[1])     # 返回处理后的 positive 和 negative 条件列表。
brushnet_node.model_update
对于self.brushnet_node.model_update,其定义在MagicQuill/brushnet_nodes.py
具体过程如下:
- 检查兼容性:调用 check_compatibilty 函数检查模型和刷网模型是否兼容。如果不兼容,抛出异常。
- 克隆模型:为了避免在工作流中到处修改原始模型,创建一个模型副本。
- 准备图像和掩码:调用 prepare_image 函数对输入的图像和掩码进行预处理。
- 计算缩放因子:根据模型配置或模型类型确定缩放因子。
- 准备条件潜变量:调用 get_image_latents 函数生成条件潜变量,并将其移动到指定设备。
- 准备嵌入向量:处理正向和负向提示的嵌入向量,确保它们具有相同的长度。如果需要,扩展嵌入向量。
- 应用补丁:调用 add_brushnet_patch 函数将刷网模型的补丁应用到主模型上。
- 初始化潜变量:创建一个初始的全0潜变量张量。
- 返回结果:返回更新后的模型和其他相关数据。
class BrushNet:
    ...

    def model_update(self, model, vae, image, mask, brushnet, positive, negative, scale, start_at, end_at):

        is_SDXL, is_PP = check_compatibilty(model, brushnet)        # 检查兼容性

        if is_PP:
            raise Exception("PowerPaint model was loaded, please use PowerPaint node")

        # Make a copy of the model so that we're not patching it everywhere in the workflow.
        model = model.clone()   # 克隆模型

        # prepare image and mask
        # no batches for original image and mask
        masked_image, mask = prepare_image(image, mask)     # 生成掩码图像

        batch = masked_image.shape[0]
        width = masked_image.shape[2]
        height = masked_image.shape[1]

        if hasattr(model.model.model_config, 'latent_format') and hasattr(model.model.model_config.latent_format, 'scale_factor'):
            scaling_factor = model.model.model_config.latent_format.scale_factor
        elif is_SDXL:
            scaling_factor = sdxl_scaling_factor
        else:
            scaling_factor = sd15_scaling_factor

        torch_dtype = brushnet['dtype']

        # prepare conditioning latents
        conditioning_latents = get_image_latents(masked_image, mask, vae, scaling_factor)       # 准备条件潜变量
        conditioning_latents[0] = conditioning_latents[0].to(dtype=torch_dtype).to(brushnet['brushnet'].device)
        conditioning_latents[1] = conditioning_latents[1].to(dtype=torch_dtype).to(brushnet['brushnet'].device)

        # unload vae     卸载 VAE:删除 VAE 实例并释放相关资源
        del vae
        for loaded_model in comfy.model_management.current_loaded_models:
            if type(loaded_model.model.model) in ModelsToUnload:
                comfy.model_management.current_loaded_models.remove(loaded_model)
                loaded_model.model_unload()
                del loaded_model

        # prepare embeddings    处理正向和负向提示的嵌入向量
        prompt_embeds = positive[0][0].to(dtype=torch_dtype).to(brushnet['brushnet'].device)
        negative_prompt_embeds = negative[0][0].to(dtype=torch_dtype).to(brushnet['brushnet'].device)

        ...

        # apply patch to model
        brushnet_conditioning_scale = scale
        control_guidance_start = start_at
        control_guidance_end = end_at

        add_brushnet_patch(model,       # 将一个名为 BrushNet 的模型集成到现有的深度学习模型中
                           brushnet['brushnet'],
                           torch_dtype,
                           conditioning_latents,
                           (brushnet_conditioning_scale, control_guidance_start, control_guidance_end),
                           prompt_embeds, negative_prompt_embeds,
                           pooled_prompt_embeds, negative_pooled_prompt_embeds, time_ids,
                           False)

        latent = torch.zeros([batch, 4, conditioning_latents[0].shape[2], conditioning_latents[0].shape[3]], device=brushnet['brushnet'].device)        # [1,4,潜在h,潜在w]

        return (model, positive, negative, {"samples":latent},)
prepare_image()的核心部分:将掩码和原图合并
masked_image = image * (1.0 - mask[:,:,:,None]) # 生成掩码图像:通过 image * (1.0 - mask[:,:,:,None]) 计算掩码后的图像。其中get_image_latents()如下:总体来说就是使用VAE处理图像,得到潜在表示,然后使用插值计算将掩码图像转换到到与图像潜在表示相同的尺寸。
@torch.inference_mode()
def get_image_latents(masked_image, mask, vae, scaling_factor):
    processed_image = masked_image.to(vae.device)
    image_latents = vae.encode(processed_image[:,:,:,:3]) * scaling_factor      # 使用 VAE 对图像进行编码,并乘以缩放因子 scaling_factor。
    processed_mask = 1. - mask[:,None,:,:]
    interpolated_mask = torch.nn.functional.interpolate(        # 将掩码反转并插值到与图像潜在表示相同的尺寸。
                processed_mask,
                size=(
                    image_latents.shape[-2],
                    image_latents.shape[-1]
                )
            )
    interpolated_mask = interpolated_mask.to(image_latents.device)      # 将编码后的图像潜在表示和插值后的掩码组合成一个列表

    conditioning_latents = [image_latents, interpolated_mask]

    print('BrushNet CL: image_latents shape =', image_latents.shape, 'interpolated_mask shape =', interpolated_mask.shape)

    return conditioning_latents
ksampler.sample
对于self.ksampler.sample,它会跳入KSampler.common_ksampler,其定义在MagicQuill/brushnet_nodes.py。主要功能包括:
- 初始化潜在图像:从输入的 latent 中获取 samples,并修复潜在图像的通道。
- 生成噪声:根据 disable_noise 参数决定是否生成噪声。如果不禁用噪声,则根据种子和批处理索引生成噪声。
- 处理噪声掩码:如果 latent 中包含 noise_mask,则提取出来。
- 准备回调函数:为采样过程准备回调函数。
- 执行采样:调用 comfy.sample.sample 函数进行采样,生成最终的样本。(核心)
- 返回结果:将生成的样本复制到输出字典中并返回。
class KSampler:
    def common_ksampler(self, model, seed, steps, cfg, sampler_name, scheduler, positive, negative, latent, denoise, disable_noise=False, start_step=None, last_step=None, force_full_denoise=False):
        latent_image = latent["samples"]
        latent_image = comfy.sample.fix_empty_latent_channels(model, latent_image)

        if disable_noise:
            noise = torch.zeros(latent_image.size(), dtype=latent_image.dtype, layout=latent_image.layout, device="cpu")
        else:
            batch_inds = latent["batch_index"] if "batch_index" in latent else None
            noise = comfy.sample.prepare_noise(latent_image, seed, batch_inds)      # 生成噪声

        noise_mask = None
        if "noise_mask" in latent:
            noise_mask = latent["noise_mask"]

        callback = latent_preview.prepare_callback(model, steps)    # 准备回调函数
        disable_pbar = not comfy.utils.PROGRESS_BAR_ENABLED
        samples = comfy.sample.sample(model, noise, steps, cfg, sampler_name, scheduler, positive, negative, latent_image,      # 执行采样
                                    denoise=denoise, disable_noise=disable_noise, start_step=start_step, last_step=last_step,
                                    force_full_denoise=force_full_denoise, noise_mask=noise_mask, callback=callback, disable_pbar=disable_pbar, seed=seed)
        out = latent.copy()
        out["samples"] = samples    # 将生成的样本复制到输出字典中
        return (out, )
接着,我们来详细看看comfy.sample.sample,这是整个代码的核心。sample最终会进入sample_euler_ancestral(),其定义在MagicQuill/comfy/k_diffusion/sampling.py,具体过程如下:
- 循环迭代:遍历 sigmas 列表,对每个 sigma 值进行处理。
- 模型预测:调用模型 model 对输入 x 进行去噪处理。
- 回调函数:如果提供了 callback 函数,则在每次迭代时调用它。
- Euler方法:计算步长 dt 并更新 x。
- 添加噪声:如果下一个 sigma 值大于0,则向 x 添加噪声。
@torch.no_grad()
def sample_euler_ancestral(model, x, sigmas, extra_args=None, callback=None, disable=None, eta=1., s_noise=1., noise_sampler=None):
    """Ancestral sampling with Euler method steps."""
    extra_args = {} if extra_args is None else extra_args
    noise_sampler = default_noise_sampler(x) if noise_sampler is None else noise_sampler
    s_in = x.new_ones([x.shape[0]])
    for i in trange(len(sigmas) - 1, disable=disable):      # 进度条
        denoised = model(x, sigmas[i] * s_in, **extra_args)     # 调用模型
        sigma_down, sigma_up = get_ancestral_step(sigmas[i], sigmas[i + 1], eta=eta)
        if callback is not None:
            callback({'x': x, 'i': i, 'sigma': sigmas[i], 'sigma_hat': sigmas[i], 'denoised': denoised})
        d = to_d(x, sigmas[i], denoised)
        # Euler method
        dt = sigma_down - sigmas[i]     # Euler方法:计算步长 dt 并更新 x。
        x = x + d * dt
        if sigmas[i + 1] > 0:       # 如果下一个 sigma 值大于0,则向 x 添加噪声。
            x = x + noise_sampler(sigmas[i], sigmas[i + 1]) * s_noise * sigma_up
    return x
模型推理过程如下:
class BrushNetModel(ModelMixin, ConfigMixin):
    def forward(...) -> Union[BrushNetOutput, Tuple[Tuple[torch.FloatTensor, ...], torch.FloatTensor]]:
        ...

        # check channel order
        channel_order = self.config.brushnet_conditioning_channel_order     # rgb

        if channel_order == "rgb":
            # in rgb order by default
            ...
        elif channel_order == "bgr":
            brushnet_cond = torch.flip(brushnet_cond, dims=[1])
        else:
            raise ValueError(f"unknown `brushnet_conditioning_channel_order`: {channel_order}")

        # prepare attention_mask
        if attention_mask is not None:
            attention_mask = (1 - attention_mask.to(sample.dtype)) * -10000.0
            attention_mask = attention_mask.unsqueeze(1)

        if timestep is None and time_emb is None:       # 确保 timestep 和 time_emb 至少有一个不为 None
            raise ValueError(f"`timestep` and `emb` are both None")

        #print("BN: sample.device", sample.device)
        #print("BN: TE.device", self.time_embedding.linear_1.weight.device)

        if timestep is not None:
            # 1. time
            timesteps = timestep
            if not torch.is_tensor(timesteps):
                # TODO: this requires sync between CPU and GPU. So try to pass timesteps as tensors if you can
                # This would be a good case for the `match` statement (Python 3.10+)
                is_mps = sample.device.type == "mps"
                if isinstance(timestep, float):
                    dtype = torch.float32 if is_mps else torch.float64
                else:
                    dtype = torch.int32 if is_mps else torch.int64
                timesteps = torch.tensor([timesteps], dtype=dtype, device=sample.device)
            elif len(timesteps.shape) == 0:
                timesteps = timesteps[None].to(sample.device)

            # broadcast to batch dimension in a way that's compatible with ONNX/Core ML
            timesteps = timesteps.expand(sample.shape[0])

            t_emb = self.time_proj(timesteps)       # 时间嵌入 [2]->[2,320]

            # timesteps does not contain any weights and will always return f32 tensors
            # but time_embedding might actually be running in fp16. so we need to cast here.
            # there might be better ways to encapsulate this.
            t_emb = t_emb.to(dtype=sample.dtype)

            #print("t_emb.device =",t_emb.device)

            emb = self.time_embedding(t_emb, timestep_cond)     # 时间嵌入 [2,320] -> [2,1280]
            aug_emb = None

            #print('emb.shape', emb.shape)

            if self.class_embedding is not None:
                if class_labels is None:
                    raise ValueError("class_labels should be provided when num_class_embeds > 0")

                if self.config.class_embed_type == "timestep":
                    class_labels = self.time_proj(class_labels)

                class_emb = self.class_embedding(class_labels).to(dtype=self.dtype)
                emb = emb + class_emb

            if self.config.addition_embed_type is not None:
                if self.config.addition_embed_type == "text":
                    aug_emb = self.add_embedding(encoder_hidden_states)

                elif self.config.addition_embed_type == "text_time":
                    if "text_embeds" not in added_cond_kwargs:
                        raise ValueError(
                            f"{self.__class__} has the config param `addition_embed_type` set to 'text_time' which requires the keyword argument `text_embeds` to be passed in `added_cond_kwargs`"
                        )
                    text_embeds = added_cond_kwargs.get("text_embeds")
                    if "time_ids" not in added_cond_kwargs:
                        raise ValueError(
                            f"{self.__class__} has the config param `addition_embed_type` set to 'text_time' which requires the keyword argument `time_ids` to be passed in `added_cond_kwargs`"
                        )
                    time_ids = added_cond_kwargs.get("time_ids")
                    time_embeds = self.add_time_proj(time_ids.flatten())
                    time_embeds = time_embeds.reshape((text_embeds.shape[0], -1))

                    add_embeds = torch.concat([text_embeds, time_embeds], dim=-1)
                    add_embeds = add_embeds.to(emb.dtype)
                    aug_emb = self.add_embedding(add_embeds)

                    #print('text_embeds', text_embeds.shape, 'time_ids', time_ids.shape, 'time_embeds', time_embeds.shape, 'add__embeds', add_embeds.shape, 'aug_emb', aug_emb.shape)

            emb = emb + aug_emb if aug_emb is not None else emb
        else:
            emb = time_emb

        # 2. pre-process   将输入样本与条件输入拼接,并通过卷积层进行预处理

        brushnet_cond=torch.concat([sample,brushnet_cond],1)    # [2,4,h,w]+[2,5,h,w]=[2,9,h,w]
        sample = self.conv_in_condition(brushnet_cond)      # Conv2d(9, 320, kernel_size=(3, 3), stride=(1, 1), padding=(1, 1)) -> [2,320,h,w]

        # 3. down   下采样,生成多个分辨率的特征图。
        down_block_res_samples = (sample,)
        for downsample_block in self.down_blocks:   # resnet
            if hasattr(downsample_block, "has_cross_attention") and downsample_block.has_cross_attention:
                sample, res_samples = downsample_block(
                    hidden_states=sample,
                    temb=emb,
                    encoder_hidden_states=encoder_hidden_states,
                    attention_mask=attention_mask,
                    cross_attention_kwargs=cross_attention_kwargs,
                )
            else:       # sample:[2, 320, 32, 57]  ; res_samples:[3个,尺寸分别是[2, 320, 64, 113], [2, 320, 64, 113], [2, 320, 32, 57]]
                sample, res_samples = downsample_block(hidden_states=sample, temb=emb)

            down_block_res_samples += res_samples   # 生成多个分辨率的特征图。

        # 4. PaintingNet down blocks
        brushnet_down_block_res_samples = ()
        for down_block_res_sample, brushnet_down_block in zip(down_block_res_samples, self.brushnet_down_blocks):
            down_block_res_sample = brushnet_down_block(down_block_res_sample)
            brushnet_down_block_res_samples = brushnet_down_block_res_samples + (down_block_res_sample,)


        # 5. mid
        if self.mid_block is not None:
            if hasattr(self.mid_block, "has_cross_attention") and self.mid_block.has_cross_attention:
                sample = self.mid_block(
                    sample,
                    emb,
                    encoder_hidden_states=encoder_hidden_states,
                    attention_mask=attention_mask,
                    cross_attention_kwargs=cross_attention_kwargs,
                )
            else:
                sample = self.mid_block(sample, emb)        # [2,1280,h,w]

        # 6. BrushNet mid blocks
        brushnet_mid_block_res_sample = self.brushnet_mid_block(sample)     # Conv2d(1280, 1280, kernel_size=(1, 1), stride=(1, 1)) [2,1280,h,w]

        # 7. up
        up_block_res_samples = ()
        for i, upsample_block in enumerate(self.up_blocks):
            is_final_block = i == len(self.up_blocks) - 1

            res_samples = down_block_res_samples[-len(upsample_block.resnets) :]    # 每次取后三层,也就是当前尺寸最小的
            down_block_res_samples = down_block_res_samples[: -len(upsample_block.resnets)]     # 剩下的

            # if we have not reached the final block and need to forward the
            # upsample size, we do it here
            if not is_final_block:
                upsample_size = down_block_res_samples[-1].shape[2:]    # 下一轮的尺寸大小

            if hasattr(upsample_block, "has_cross_attention") and upsample_block.has_cross_attention:
                sample, up_res_samples = upsample_block(
                    hidden_states=sample,
                    temb=emb,
                    res_hidden_states_tuple=res_samples,
                    encoder_hidden_states=encoder_hidden_states,
                    cross_attention_kwargs=cross_attention_kwargs,
                    upsample_size=upsample_size,
                    attention_mask=attention_mask,
                    return_res_samples=True
                )
            else:
                sample, up_res_samples = upsample_block(
                    hidden_states=sample,
                    temb=emb,
                    res_hidden_states_tuple=res_samples,
                    upsample_size=upsample_size,
                    return_res_samples=True
                )

            up_block_res_samples += up_res_samples

        # 8. BrushNet up blocks
        brushnet_up_block_res_samples = ()
        for up_block_res_sample, brushnet_up_block in zip(up_block_res_samples, self.brushnet_up_blocks):
            up_block_res_sample = brushnet_up_block(up_block_res_sample)
            brushnet_up_block_res_samples = brushnet_up_block_res_samples + (up_block_res_sample,)

        # 6. scaling
        if guess_mode and not self.config.global_pool_conditions:   # 根据 guess_mode 决定是否进行条件缩放。
            scales = torch.logspace(-1, 0, len(brushnet_down_block_res_samples) + 1 + len(brushnet_up_block_res_samples), device=sample.device)  # 0.1 to 1.0
            scales = scales * conditioning_scale

            brushnet_down_block_res_samples = [sample * scale for sample, scale in zip(brushnet_down_block_res_samples, scales[:len(brushnet_down_block_res_samples)])]
            brushnet_mid_block_res_sample = brushnet_mid_block_res_sample * scales[len(brushnet_down_block_res_samples)]
            brushnet_up_block_res_samples = [sample * scale for sample, scale in zip(brushnet_up_block_res_samples, scales[len(brushnet_down_block_res_samples)+1:])]
        else:   # 固定缩放特征图
            brushnet_down_block_res_samples = [sample * conditioning_scale for sample in brushnet_down_block_res_samples]
            brushnet_mid_block_res_sample = brushnet_mid_block_res_sample * conditioning_scale
            brushnet_up_block_res_samples = [sample * conditioning_scale for sample in brushnet_up_block_res_samples]


        if self.config.global_pool_conditions:      # 对特征图进行全局平均池化。
            brushnet_down_block_res_samples = [
                torch.mean(sample, dim=(2, 3), keepdim=True) for sample in brushnet_down_block_res_samples
            ]
            brushnet_mid_block_res_sample = torch.mean(brushnet_mid_block_res_sample, dim=(2, 3), keepdim=True)
            brushnet_up_block_res_samples = [
                torch.mean(sample, dim=(2, 3), keepdim=True) for sample in brushnet_up_block_res_samples
            ]

        if not return_dict:
            return (brushnet_down_block_res_samples, brushnet_mid_block_res_sample, brushnet_up_block_res_samples)

        return BrushNetOutput(
            down_block_res_samples=brushnet_down_block_res_samples,
            mid_block_res_sample=brushnet_mid_block_res_sample,
            up_block_res_samples=brushnet_up_block_res_samples
        )
其中各层的网络结构如下:
brushnet_down_blocks:
ModuleList(
  (0-3): 4 x Conv2d(320, 320, kernel_size=(1, 1), stride=(1, 1))
  (4-6): 3 x Conv2d(640, 640, kernel_size=(1, 1), stride=(1, 1))
  (7-11): 5 x Conv2d(1280, 1280, kernel_size=(1, 1), stride=(1, 1))
)
down_blocks:
ModuleList(
  (0): DownBlock2D(
    (resnets): ModuleList(
      (0-1): 2 x ResnetBlock2D(
        (norm1): GroupNorm(32, 320, eps=1e-05, affine=True)
        (conv1): Conv2d(320, 320, kernel_size=(3, 3), stride=(1, 1), padding=(1, 1))
        (time_emb_proj): Linear(in_features=1280, out_features=320, bias=True)
        (norm2): GroupNorm(32, 320, eps=1e-05, affine=True)
        (dropout): Dropout(p=0.0, inplace=False)
        (conv2): Conv2d(320, 320, kernel_size=(3, 3), stride=(1, 1), padding=(1, 1))
        (nonlinearity): SiLU()
      )
    )
    (downsamplers): ModuleList(
      (0): Downsample2D(
        (conv): Conv2d(320, 320, kernel_size=(3, 3), stride=(2, 2), padding=(1, 1))
      )
    )
  )
  (1): DownBlock2D(
    (resnets): ModuleList(
      (0): ResnetBlock2D(
        (norm1): GroupNorm(32, 320, eps=1e-05, affine=True)
        (conv1): Conv2d(320, 640, kernel_size=(3, 3), stride=(1, 1), padding=(1, 1))
        (time_emb_proj): Linear(in_features=1280, out_features=640, bias=True)
        (norm2): GroupNorm(32, 640, eps=1e-05, affine=True)
        (dropout): Dropout(p=0.0, inplace=False)
        (conv2): Conv2d(640, 640, kernel_size=(3, 3), stride=(1, 1), padding=(1, 1))
        (nonlinearity): SiLU()
        (conv_shortcut): Conv2d(320, 640, kernel_size=(1, 1), stride=(1, 1))
      )
      (1): ResnetBlock2D(
        (norm1): GroupNorm(32, 640, eps=1e-05, affine=True)
        (conv1): Conv2d(640, 640, kernel_size=(3, 3), stride=(1, 1), padding=(1, 1))
        (time_emb_proj): Linear(in_features=1280, out_features=640, bias=True)
        (norm2): GroupNorm(32, 640, eps=1e-05, affine=True)
        (dropout): Dropout(p=0.0, inplace=False)
        (conv2): Conv2d(640, 640, kernel_size=(3, 3), stride=(1, 1), padding=(1, 1))
        (nonlinearity): SiLU()
      )
    )
    (downsamplers): ModuleList(
      (0): Downsample2D(
        (conv): Conv2d(640, 640, kernel_size=(3, 3), stride=(2, 2), padding=(1, 1))
      )
    )
  )
  (2): DownBlock2D(
    (resnets): ModuleList(
      (0): ResnetBlock2D(
        (norm1): GroupNorm(32, 640, eps=1e-05, affine=True)
        (conv1): Conv2d(640, 1280, kernel_size=(3, 3), stride=(1, 1), padding=(1, 1))
        (time_emb_proj): Linear(in_features=1280, out_features=1280, bias=True)
        (norm2): GroupNorm(32, 1280, eps=1e-05, affine=True)
        (dropout): Dropout(p=0.0, inplace=False)
        (conv2): Conv2d(1280, 1280, kernel_size=(3, 3), stride=(1, 1), padding=(1, 1))
        (nonlinearity): SiLU()
        (conv_shortcut): Conv2d(640, 1280, kernel_size=(1, 1), stride=(1, 1))
      )
      (1): ResnetBlock2D(
        (norm1): GroupNorm(32, 1280, eps=1e-05, affine=True)
        (conv1): Conv2d(1280, 1280, kernel_size=(3, 3), stride=(1, 1), padding=(1, 1))
        (time_emb_proj): Linear(in_features=1280, out_features=1280, bias=True)
        (norm2): GroupNorm(32, 1280, eps=1e-05, affine=True)
        (dropout): Dropout(p=0.0, inplace=False)
        (conv2): Conv2d(1280, 1280, kernel_size=(3, 3), stride=(1, 1), padding=(1, 1))
        (nonlinearity): SiLU()
      )
    )
    (downsamplers): ModuleList(
      (0): Downsample2D(
        (conv): Conv2d(1280, 1280, kernel_size=(3, 3), stride=(2, 2), padding=(1, 1))
      )
    )
  )
  (3): DownBlock2D(
    (resnets): ModuleList(
      (0-1): 2 x ResnetBlock2D(
        (norm1): GroupNorm(32, 1280, eps=1e-05, affine=True)
        (conv1): Conv2d(1280, 1280, kernel_size=(3, 3), stride=(1, 1), padding=(1, 1))
        (time_emb_proj): Linear(in_features=1280, out_features=1280, bias=True)
        (norm2): GroupNorm(32, 1280, eps=1e-05, affine=True)
        (dropout): Dropout(p=0.0, inplace=False)
        (conv2): Conv2d(1280, 1280, kernel_size=(3, 3), stride=(1, 1), padding=(1, 1))
        (nonlinearity): SiLU()
      )
    )
  )
)
brushnet_mid_block:
Conv2d(1280, 1280, kernel_size=(1, 1), stride=(1, 1))
mid_block:
 MidBlock2D(
  (resnets): ModuleList(
    (0-1): 2 x ResnetBlock2D(
      (norm1): GroupNorm(32, 1280, eps=1e-05, affine=True)
      (conv1): Conv2d(1280, 1280, kernel_size=(3, 3), stride=(1, 1), padding=(1, 1))
      (time_emb_proj): Linear(in_features=1280, out_features=1280, bias=True)
      (norm2): GroupNorm(32, 1280, eps=1e-05, affine=True)
      (dropout): Dropout(p=0.0, inplace=False)
      (conv2): Conv2d(1280, 1280, kernel_size=(3, 3), stride=(1, 1), padding=(1, 1))
      (nonlinearity): SiLU()
    )
  )
)
brushnet_up_blocks:
ModuleList(
  (0-7): 8 x Conv2d(1280, 1280, kernel_size=(1, 1), stride=(1, 1))
  (8-11): 4 x Conv2d(640, 640, kernel_size=(1, 1), stride=(1, 1))
  (12-14): 3 x Conv2d(320, 320, kernel_size=(1, 1), stride=(1, 1))
)
up_blocks:
ModuleList(
  (0): UpBlock2D(
    (resnets): ModuleList(
      (0-2): 3 x ResnetBlock2D(
        (norm1): GroupNorm(32, 2560, eps=1e-05, affine=True)
        (conv1): Conv2d(2560, 1280, kernel_size=(3, 3), stride=(1, 1), padding=(1, 1))
        (time_emb_proj): Linear(in_features=1280, out_features=1280, bias=True)
        (norm2): GroupNorm(32, 1280, eps=1e-05, affine=True)
        (dropout): Dropout(p=0.0, inplace=False)
        (conv2): Conv2d(1280, 1280, kernel_size=(3, 3), stride=(1, 1), padding=(1, 1))
        (nonlinearity): SiLU()
        (conv_shortcut): Conv2d(2560, 1280, kernel_size=(1, 1), stride=(1, 1))
      )
    )
    (upsamplers): ModuleList(
      (0): Upsample2D(
        (conv): Conv2d(1280, 1280, kernel_size=(3, 3), stride=(1, 1), padding=(1, 1))
      )
    )
  )
  (1): UpBlock2D(
    (resnets): ModuleList(
      (0-1): 2 x ResnetBlock2D(
        (norm1): GroupNorm(32, 2560, eps=1e-05, affine=True)
        (conv1): Conv2d(2560, 1280, kernel_size=(3, 3), stride=(1, 1), padding=(1, 1))
        (time_emb_proj): Linear(in_features=1280, out_features=1280, bias=True)
        (norm2): GroupNorm(32, 1280, eps=1e-05, affine=True)
        (dropout): Dropout(p=0.0, inplace=False)
        (conv2): Conv2d(1280, 1280, kernel_size=(3, 3), stride=(1, 1), padding=(1, 1))
        (nonlinearity): SiLU()
        (conv_shortcut): Conv2d(2560, 1280, kernel_size=(1, 1), stride=(1, 1))
      )
      (2): ResnetBlock2D(
        (norm1): GroupNorm(32, 1920, eps=1e-05, affine=True)
        (conv1): Conv2d(1920, 1280, kernel_size=(3, 3), stride=(1, 1), padding=(1, 1))
        (time_emb_proj): Linear(in_features=1280, out_features=1280, bias=True)
        (norm2): GroupNorm(32, 1280, eps=1e-05, affine=True)
        (dropout): Dropout(p=0.0, inplace=False)
        (conv2): Conv2d(1280, 1280, kernel_size=(3, 3), stride=(1, 1), padding=(1, 1))
        (nonlinearity): SiLU()
        (conv_shortcut): Conv2d(1920, 1280, kernel_size=(1, 1), stride=(1, 1))
      )
    )
    (upsamplers): ModuleList(
      (0): Upsample2D(
        (conv): Conv2d(1280, 1280, kernel_size=(3, 3), stride=(1, 1), padding=(1, 1))
      )
    )
  )
  (2): UpBlock2D(
    (resnets): ModuleList(
      (0): ResnetBlock2D(
        (norm1): GroupNorm(32, 1920, eps=1e-05, affine=True)
        (conv1): Conv2d(1920, 640, kernel_size=(3, 3), stride=(1, 1), padding=(1, 1))
        (time_emb_proj): Linear(in_features=1280, out_features=640, bias=True)
        (norm2): GroupNorm(32, 640, eps=1e-05, affine=True)
        (dropout): Dropout(p=0.0, inplace=False)
        (conv2): Conv2d(640, 640, kernel_size=(3, 3), stride=(1, 1), padding=(1, 1))
        (nonlinearity): SiLU()
        (conv_shortcut): Conv2d(1920, 640, kernel_size=(1, 1), stride=(1, 1))
      )
      (1): ResnetBlock2D(
        (norm1): GroupNorm(32, 1280, eps=1e-05, affine=True)
        (conv1): Conv2d(1280, 640, kernel_size=(3, 3), stride=(1, 1), padding=(1, 1))
        (time_emb_proj): Linear(in_features=1280, out_features=640, bias=True)
        (norm2): GroupNorm(32, 640, eps=1e-05, affine=True)
        (dropout): Dropout(p=0.0, inplace=False)
        (conv2): Conv2d(640, 640, kernel_size=(3, 3), stride=(1, 1), padding=(1, 1))
        (nonlinearity): SiLU()
        (conv_shortcut): Conv2d(1280, 640, kernel_size=(1, 1), stride=(1, 1))
      )
      (2): ResnetBlock2D(
        (norm1): GroupNorm(32, 960, eps=1e-05, affine=True)
        (conv1): Conv2d(960, 640, kernel_size=(3, 3), stride=(1, 1), padding=(1, 1))
        (time_emb_proj): Linear(in_features=1280, out_features=640, bias=True)
        (norm2): GroupNorm(32, 640, eps=1e-05, affine=True)
        (dropout): Dropout(p=0.0, inplace=False)
        (conv2): Conv2d(640, 640, kernel_size=(3, 3), stride=(1, 1), padding=(1, 1))
        (nonlinearity): SiLU()
        (conv_shortcut): Conv2d(960, 640, kernel_size=(1, 1), stride=(1, 1))
      )
    )
    (upsamplers): ModuleList(
      (0): Upsample2D(
        (conv): Conv2d(640, 640, kernel_size=(3, 3), stride=(1, 1), padding=(1, 1))
      )
    )
  )
  (3): UpBlock2D(
    (resnets): ModuleList(
      (0): ResnetBlock2D(
        (norm1): GroupNorm(32, 960, eps=1e-05, affine=True)
        (conv1): Conv2d(960, 320, kernel_size=(3, 3), stride=(1, 1), padding=(1, 1))
        (time_emb_proj): Linear(in_features=1280, out_features=320, bias=True)
        (norm2): GroupNorm(32, 320, eps=1e-05, affine=True)
        (dropout): Dropout(p=0.0, inplace=False)
        (conv2): Conv2d(320, 320, kernel_size=(3, 3), stride=(1, 1), padding=(1, 1))
        (nonlinearity): SiLU()
        (conv_shortcut): Conv2d(960, 320, kernel_size=(1, 1), stride=(1, 1))
      )
      (1-2): 2 x ResnetBlock2D(
        (norm1): GroupNorm(32, 640, eps=1e-05, affine=True)
        (conv1): Conv2d(640, 320, kernel_size=(3, 3), stride=(1, 1), padding=(1, 1))
        (time_emb_proj): Linear(in_features=1280, out_features=320, bias=True)
        (norm2): GroupNorm(32, 320, eps=1e-05, affine=True)
        (dropout): Dropout(p=0.0, inplace=False)
        (conv2): Conv2d(320, 320, kernel_size=(3, 3), stride=(1, 1), padding=(1, 1))
        (nonlinearity): SiLU()
        (conv_shortcut): Conv2d(640, 320, kernel_size=(1, 1), stride=(1, 1))
      )
    )
  )
)这里的brushnet是impaintingNet,而其他的均为diffusion的模块,由于我并不熟悉comyui和controlNet,这里我没有找到controlNet的部分,如果读者运行找到了相关代码,欢迎在评论区指出。
因为作者并不了解相关内容,如果内容有误,请在评论区批评指正。
融合图像
将模型输出结果和原始图像、掩码图像融合,然后输出。
# Image Blending
final_image = self.vae_decoder.decode(self.vae, latent_samples)[0]
final_image = self.blender.blend_inpaint(final_image, image, mask, kernel=10, sigma=10.0)[0]    # 图像融合
5.总结
MagicQuill是一个先进的智能互动图像编辑系统,它通过结合强大的扩散模型和多模态大型语言模型(MLLM),使用户能够以直观的笔触进行图像编辑。
系统的核心在于三个模块:编辑处理器、绘画助手和想法收集器。编辑处理器利用先进的扩散模型和ControlNet技术,精确控制图像的编辑过程,确保用户的每一笔都能准确反映其编辑意图。绘画助手通过解读用户的笔触,自动预测并生成编辑提示,减少了手动输入的需要。而想法收集器则提供了一个用户友好的界面,让用户可以轻松地表达创意。
MagicQuill的创新之处在于它将这些技术集成在一起,提供了一个既强大又易于使用的图像编辑平台,使得即使是非专业人士也能轻松进行高质量的图像编辑。通过这种方式,MagicQuill不仅提高了编辑的精度和效率,还降低了专业图像编辑的门槛,让创意表达变得更加容易和高效。
探索图像编辑的新境界,MagicQuill系统以其革命性的方式,将深度学习的力量带入了创意工作的掌心。这不仅仅是一个工具,它是一个桥梁,连接了创意思维与数字世界的无限可能。通过直观的笔触,MagicQuill让图像编辑变得前所未有的简单和直观,无论是细微的色彩调整还是大胆的结构变化,都能一气呵成。
如果你对图像编辑充满热情,或者渴望将你的创意转化为现实,那么MagicQuill就是你的不二之选。点赞收藏并关注,让我们一起开启图像编辑的新纪元,探索创意的无限可能。加入我们,见证技术的魔法如何将想象变为现实。


 283
283

 被折叠的 条评论
为什么被折叠?
被折叠的 条评论
为什么被折叠?
 到【灌水乐园】发言


