


1.简介
Janus-Pro 是一款在多模态领域取得重大突破的先进模型,其通过在训练策略、数据规模和模型容量等方面的全面优化,实现了多模态理解和生成能力的显著提升。在多模态理解方面,Janus-Pro 在多个权威基准测试中取得了优异的成绩,展现出卓越的语义解析和视觉推理能力,能够准确处理复杂的多模态输入并生成高质量的输出。同时,在文本到图像生成任务中,Janus-Pro 也表现出色,能够根据文本指令生成具有丰富细节和高稳定性的图像,其生成的图像不仅在视觉上更具吸引力,还能准确反映文本描述的语义信息。这些性能的提升使得 Janus-Pro 在多模态任务中展现出强大的竞争力,为未来多模态模型的发展提供了重要的参考和启示。
Janus-Pro 相比其他多模态模型,具有以下显著优势:
- 首先,在多模态理解方面,Janus-Pro 通过独特的视觉编码解耦设计,有效解决了多模态理解与生成任务之间的冲突,使得模型在处理复杂的视觉语言任务时能够表现出更精准的语义理解和推理能力。在多个权威多模态理解基准测试中,Janus-Pro 的性能显著优于许多现有的顶尖模型,包括一些规模更大的模型,这充分证明了其在多模态理解任务中的强大竞争力。
- 其次,在文本到图像生成方面,Janus-Pro 展现出了卓越的指令遵循能力和生成稳定性。它能够根据简短的文本提示生成高质量、细节丰富的图像,并且在处理复杂的、长文本描述时也能保持较高的生成精度。在 GenEval 和 DPG-Bench 等基准测试中,Janus-Pro 的表现超越了包括 DALL-E 3、Stable Diffusion 3 等在内的众多生成模型,这表明其在生成任务中不仅能够更好地理解文本指令,还能生成更具美感和细节的图像。
- 此外,Janus-Pro 在模型设计和训练策略上的创新也为其带来了显著的性能提升。通过优化训练阶段的策略,以及引入大规模、高质量的训练数据,Janus-Pro 在多模态任务中展现出了更好的泛化能力和适应性。这种设计使得模型在处理多样化的多模态任务时能够保持较高的性能水平,同时在训练效率和资源利用方面也表现出色。
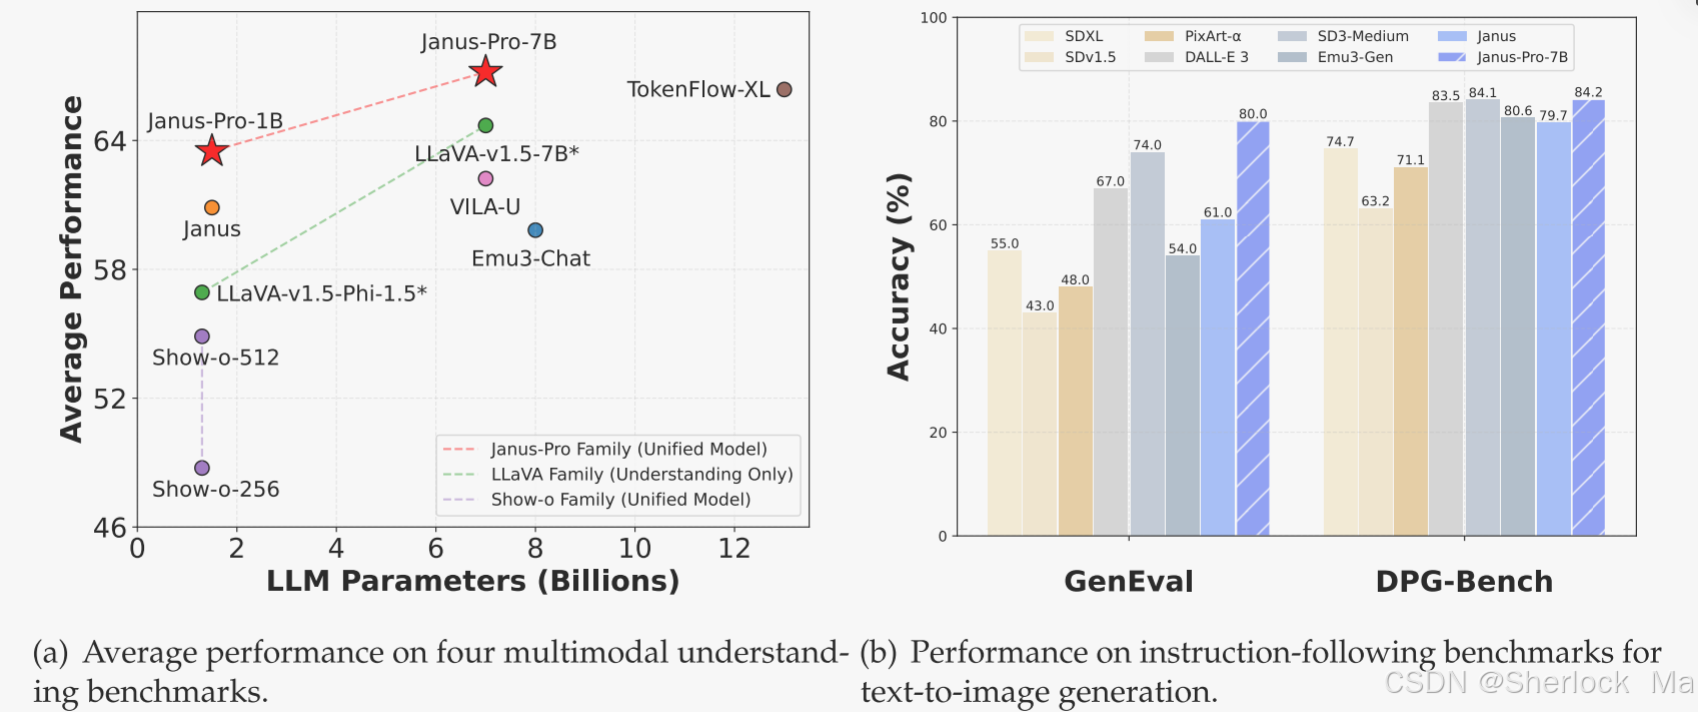
多模态理解和可视化生成的结果.对于多模态理解,作者对POPE、MME感知、GQA和MMMU的准确性进行了平均。将MME-感知评分除以20,缩放至[0,100]。在可视化生成方面,我们在GenEval和DPG-Bench两个指令跟踪实验室上进行了性能评估。总体而言,Janus-Pro优于之前最先进的统一多模态模型以及一些特定任务模型。
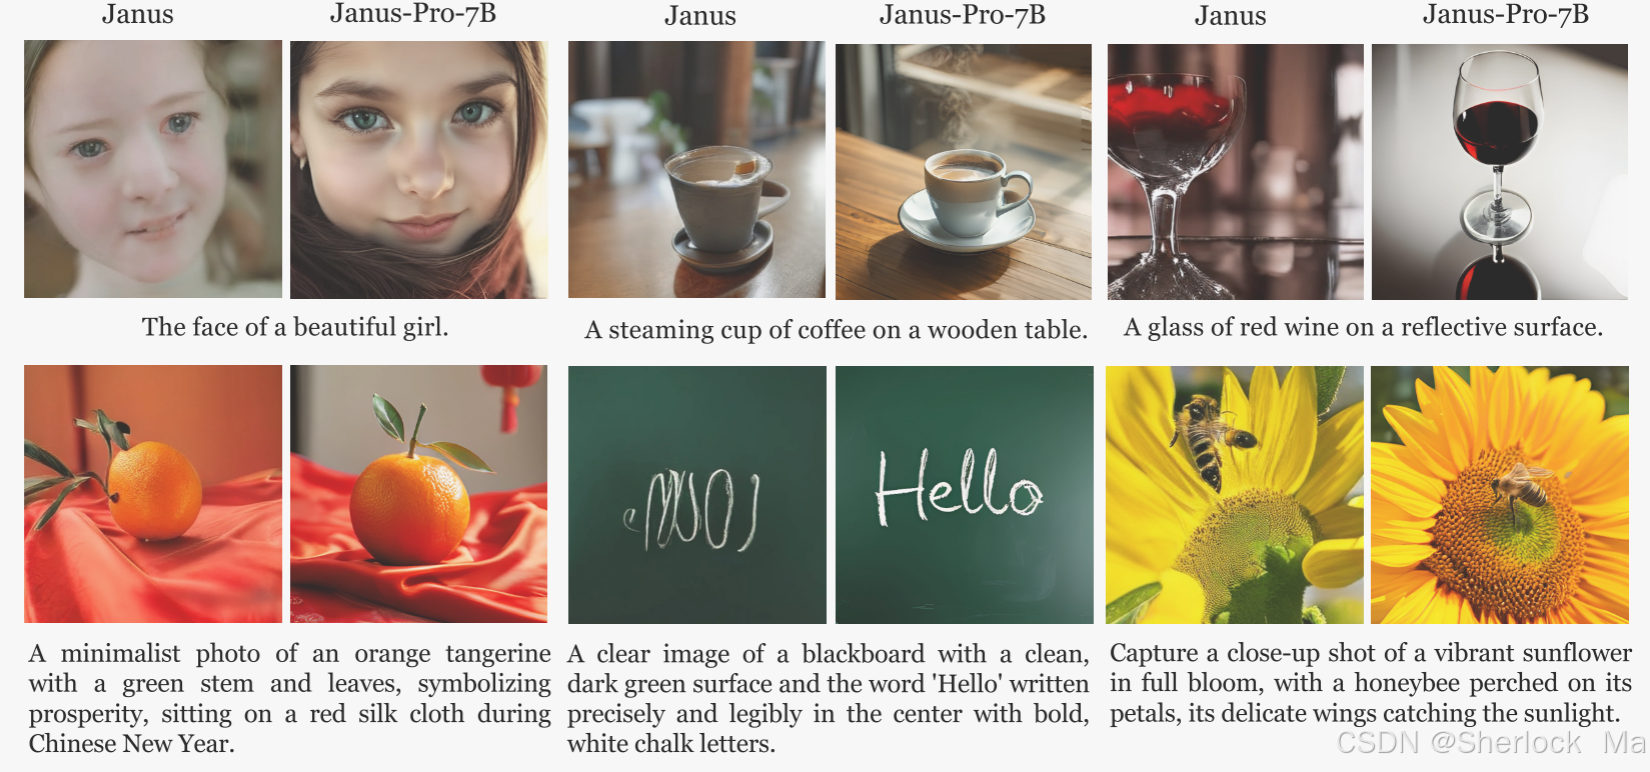
Janus-Pro与其前身Janus之间的文本到图像生成比较如下所示。Janus-Pro为短提示提供更稳定的输出,具有更高的视觉质量,更丰富的细节,并能够生成简单的文本。图像分辨率为384 × 384。
-
项目地址:GitHub - deepseek-ai/Janus: Janus-Series: Unified Multimodal Understanding and Generation Models
论文地址:Janus/janus_pro_tech_report.pdf at main · deepseek-ai/Janus · GitHub
权重地址:https://huggingface.co/deepseek-ai/Janus-Pro-7B
在线体验:https://huggingface.co/spaces/deepseek-ai/Janus-Pro-7B
-
-
2.论文详解
统一的多模态理解和生成模型的最新进展已经证明了重大进展,然而,由于这两个任务所需的表示不同,这往往会导致多模态理解的次优性能。为了解决这个问题,Janus提出了解耦视觉编码,它消除了多模态理解和生成任务之间的冲突,在这两个任务中实现了出色的性能。然而,由于有限的训练数据量和相对较小的模型容量,它表现出一定的缺点,如次优性能的短提示图像生成和不稳定的文本到图像的生成质量。
在本文中,作者介绍了Janus-Pro,这是Janus的增强版本,它在三个方面进行了改进:训练策略,数据和模型大小。Janus-Pro系列包括两种型号尺寸:1B和7 B,展示了视觉编码解码方法的可扩展性。
-
方法
架构
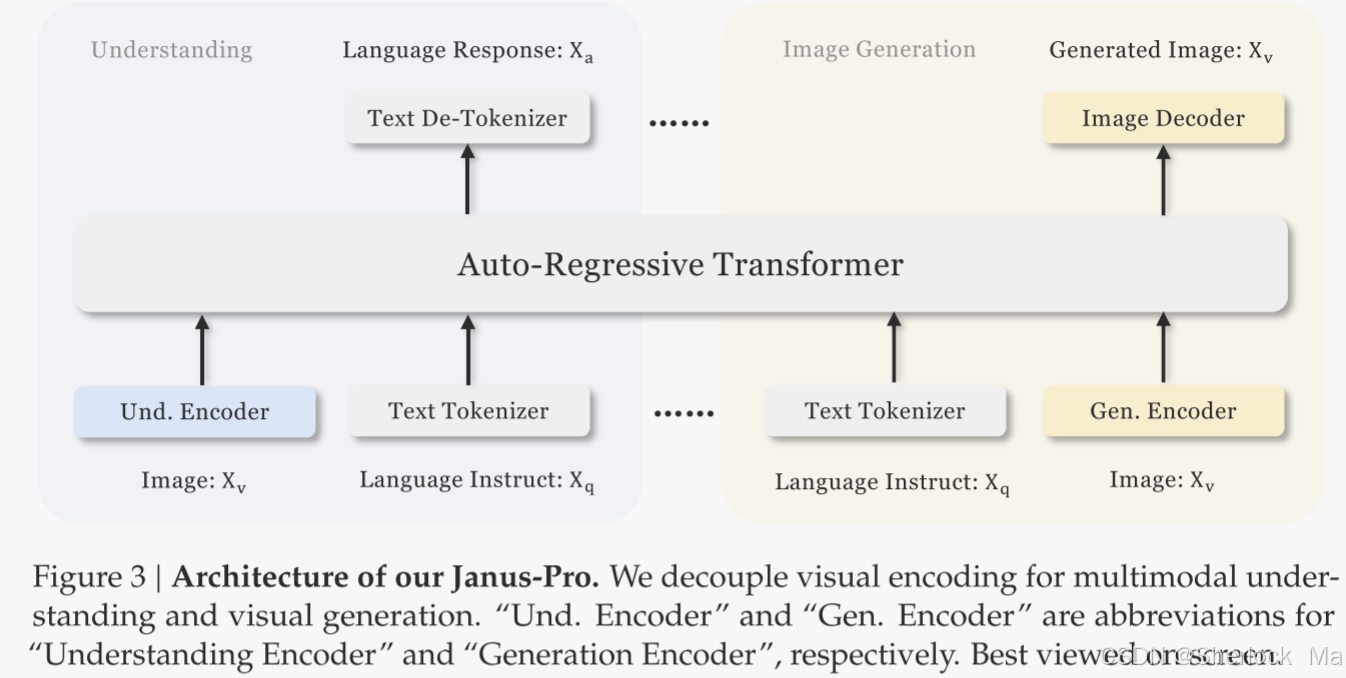
Janus-Pro的架构如图所示,与Janus相同。整体架构的核心设计原则是对视觉编码进行解耦,以实现多模态理解和生成。作者采用独立的编码方法将原始输入转换为特征,然后由统一的自回归Transformer进行处理。
- 对于多模态理解,使用SigLIP编码器从图像中提取高维语义特征。这些特征从2-D网格展平为1-D序列,并且理解适配器(understanding adaptor)用于将这些图像特征映射到LLM的输入空间中。
- 对于视觉生成任务,使用中的VQ tokenizer将图像转换为离散ID。在ID序列被展平为一维后,然后使用生成适配器(generation adaptor)将每个ID对应的码本嵌入映射到LLM的输入空间。然后,将这些特征序列连接起来,形成一个多模态特征序列,随后将其送入LLM进行处理。
除了LLM中内置的预测头之外,作者还在视觉生成任务中使用随机初始化的预测头进行图像预测。整个模型遵循自回归框架。
训练策略
Janus的前一个版本采用了三个阶段的训练过程。
- 第一阶段的重点是训练适配器和图像头。
- 第二阶段处理统一的预训练,在此期间,除了理解编码器和生成编码器之外的所有组件都更新了参数。
- 第三阶段是监督微调,通过在训练期间进一步解锁理解编码器的参数来建立在第二阶段的基础上。
然而这种培训策略存在一些问题。在第二阶段,Janus将文本到图像能力的训练分为两个部分。
- 第一部分训练ImageNet数据,使用图像类别名称作为文本到图像生成的提示,目标是对像素依赖性进行建模。
- 第二部分在普通的文本到图像数据上训练。
在实现过程中,第一部分占据了66.67%的训练步骤。然而,通过进一步的实验,作者发现,这种策略是次优的,并导致显着的计算效率低下。
-
为了解决这个问题,作者做了两个修改。
- 第一阶段的训练时间更长:作者增加了第一阶段的训练步骤,允许在ImageNet数据集上进行足够的训练。我们的研究结果表明,即使LLM参数固定,该模型也可以有效地建模像素依赖性,并根据类别名称生成合理的图像。
- 第二阶段的集中训练:在第二阶段,作者放弃ImageNet数据,直接利用普通的文本到图像数据来训练模型,以生成基于密集描述的图像。这种重新设计的方法使第二阶段能够更有效地利用文本到图像数据,从而提高训练效率和整体性能。
作者还调整了第三阶段监督微调过程中不同类型数据集的数据比例,将多模态数据、纯文本数据和文本到图像数据的比例从7:3:10改为5:1:4。作者观察到这种调整使我们能够保持强大的视觉生成能力,同时实现改进的多模态理解性能。
数据缩放
作者在多模态理解和视觉生成方面扩展了Janus的训练数据。
- 多模态理解。对于第二阶段预训练数据,作者添加约9000万个样本。这些包括图像字幕数据集(例如,YFCC),以及用于表格、图表和文档理解的数据(例如,Docmatix )。对于第三阶段的监督微调数据,作者还纳入了来自DeepSeek-VL 2的额外数据集,如MEME理解、中文会话数据和旨在增强对话体验的数据集。这些新增功能显著扩展了模型的功能,丰富了其处理各种任务的能力,同时改善了整体会话体验。
- 可视化生成作者观察到,在先前版本的Janus中使用的真实世界数据缺乏质量,并且包含显著的噪声,这通常导致文本到图像生成的不稳定性,从而导致美学上较差的输出。在Janus-Pro中,作者整合了大约7200万个合成美学数据样本,在统一的预训练阶段,使真实的数据与合成数据的比例达到1:1。实验结果表明,该模型在人工合成数据上的收敛速度更快,得到的文本到图像的输出不仅更加稳定,而且具有明显的美学效果。
模型尺寸
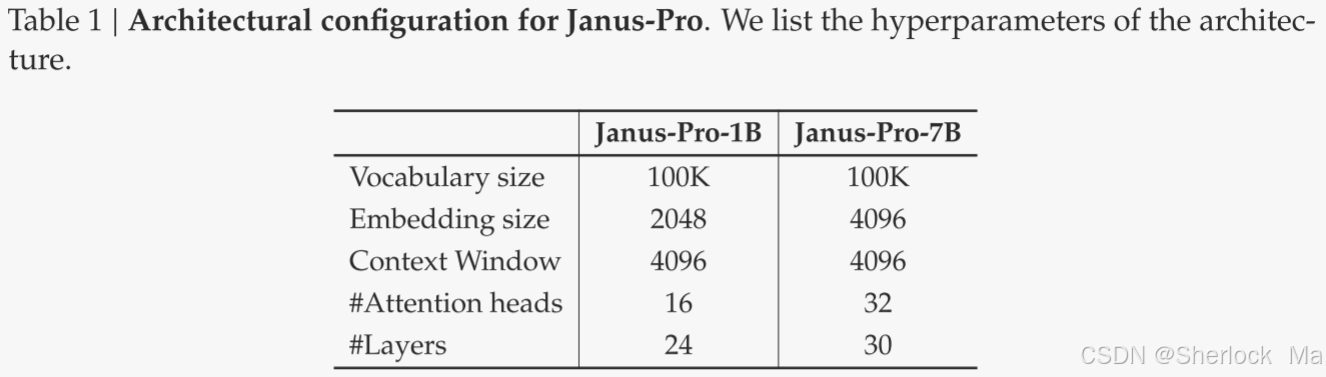
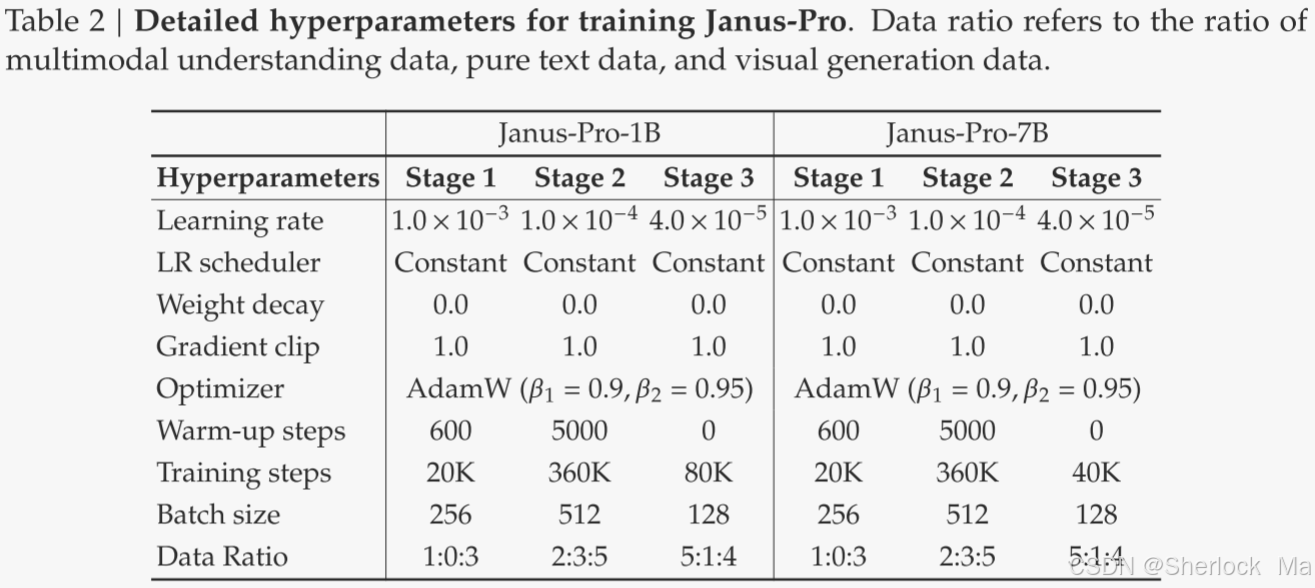
在Janus-Pro中,作者将模型扩展到7 B,1.5B和7 B LLM的超参数详见表1。作者观察到,当使用较大规模的LLM时,与较小的模型相比,多模态理解和视觉生成的损失的收敛速度显着提高。这一发现进一步验证了这种方法的强大可扩展性。
-
实验
在实验中,作者使用DeepSeek-LLM(1.5B和7 B),这是一个最大支持序列长度为4096的语言模型。对于用于理解任务的视觉编码器,作者选择SigLIP-Large-Patch 16-384。生成编码器具有大小为16384的码本,图像下采样因子为16。理解适配器和生成适配器都是两层MLP。
所有图像的大小都调整为384 × 384像素。对于多模态理解数据,作者调整图像长边的大小,并用背景颜色(RGB:127,127,127)填充短边,以达到384。对于视觉生成数据,短边的大小调整为384,长边裁剪为384。
每个阶段的详细超参数见表2。请注意,对于第二阶段,作者采用提前停止策略,在270 K步停止。作者在训练过程中使用序列打包来提高训练效率。单个训练步骤中根据指定的比率混合所有数据类型。作者的Janus-Pro是使用HAI-LLM进行训练和评估的,HAI-LLM是一个基于PyTorch的轻量级高效分布式训练框架。整个训练过程在1.5B/7 B模型的16/32个节点的集群上花费了大约9/14天,每个节点配备了8个Nvidia A100(40 GB)GPU。
基准测试
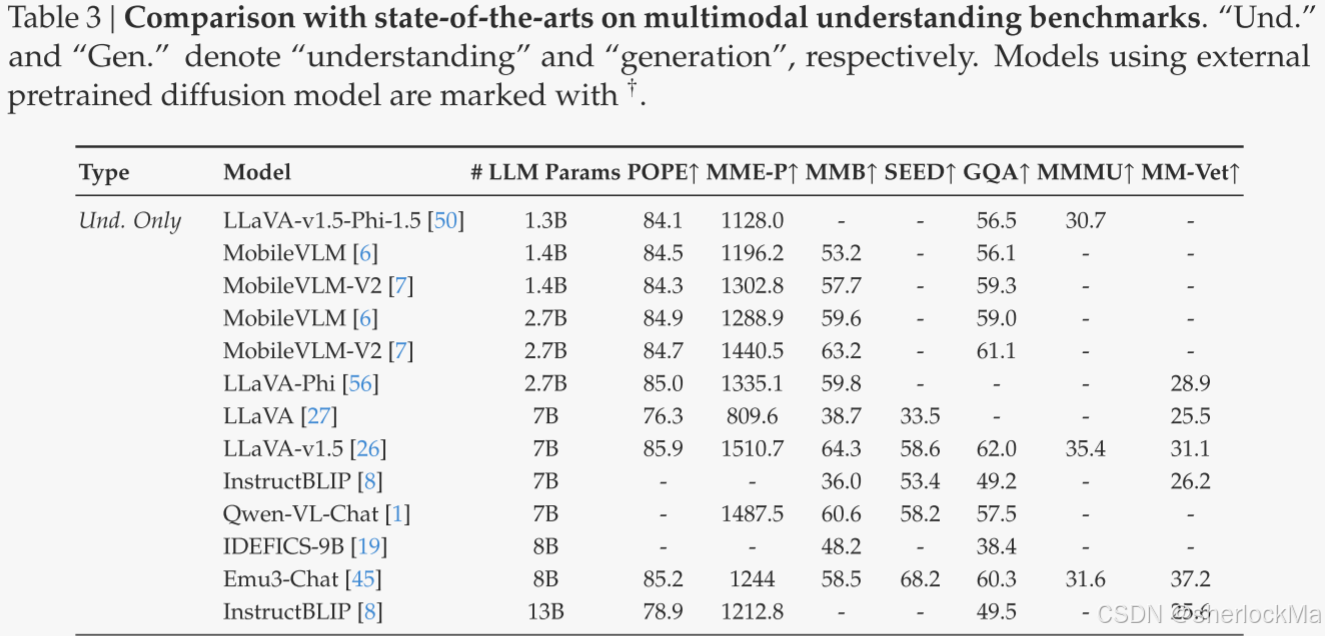
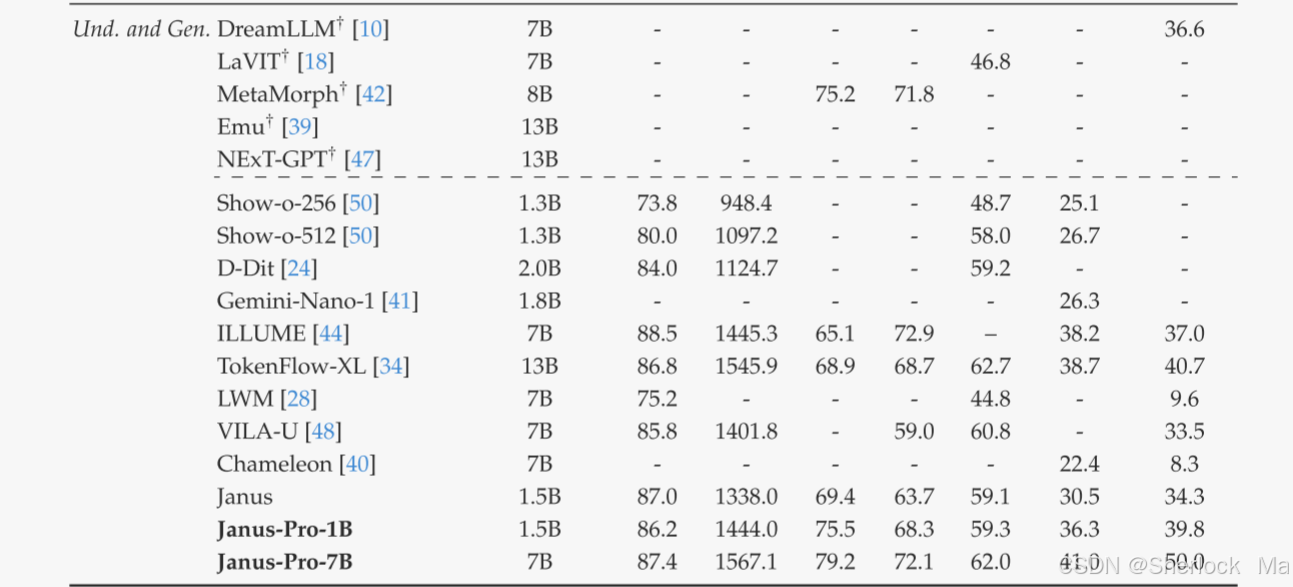
多模态理解。为了评估多模态理解能力,作者在广泛认可的基于图像的视觉语言基准上评估了我们的模型,这些基准包括GQA、POPE、MME、SEED、MMB、MM-Vet和MMMU。
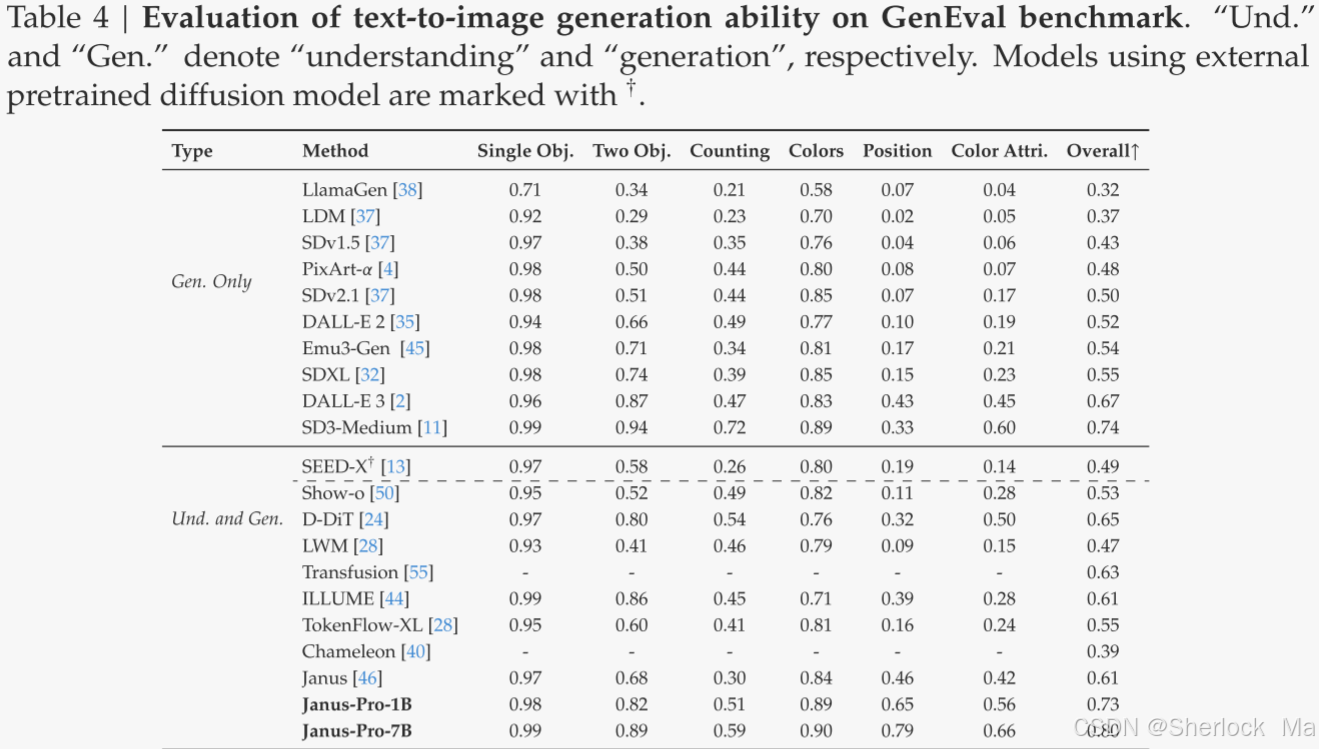
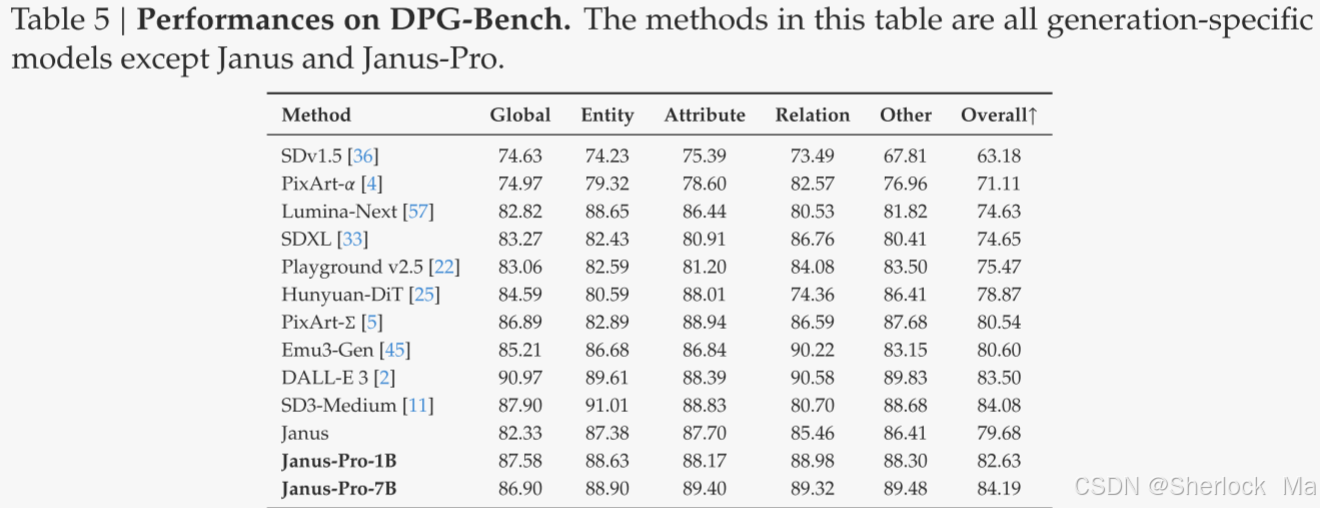
可视化生成。为了评估可视化生成能力,作者使用GenEval和DPG-Bench。GenEval是一个具有挑战性的文本到图像生成基准测试,旨在通过提供对视觉生成模型的合成能力的详细实例级分析来反映其综合生成能力。DPG-Bench(Dense Prompt Graph Benchmark)是一个包含1065个冗长、密集提示的综合数据集,旨在评估文本到图像模型的复杂语义对齐能力。
与SOTA进行比较
多模态理解性能。作者将所提出的方法与表3中的最先进的统一模型和仅理解模型进行了比较。Janus-Pro实现了整体最佳效果。与尺寸更大的型号相比,Janus-Pro仍然具有很强的竞争力。例如,Janus-Pro-7 B在除GQA之外的所有基准测试中均优于TokenFlow-XL(13 B)。
视觉生成性能。如表4所示,Janus-Pro-7 B在GenEval上获得了80%的总体准确度,优于所有其他统一或仅生成的方法,例如,,Transfusion(63%)、SD 3-Medium(74%)和DALL-E 3(67%)。这表明作者的方法具有更好的能力。如表5所示,Janus-Pro在DPG-Bench上获得了84.19分,超过了所有其他方法。这表明Janus-Pro在遵循密集的文本到图像生成指令方面表现出色。
量化结果
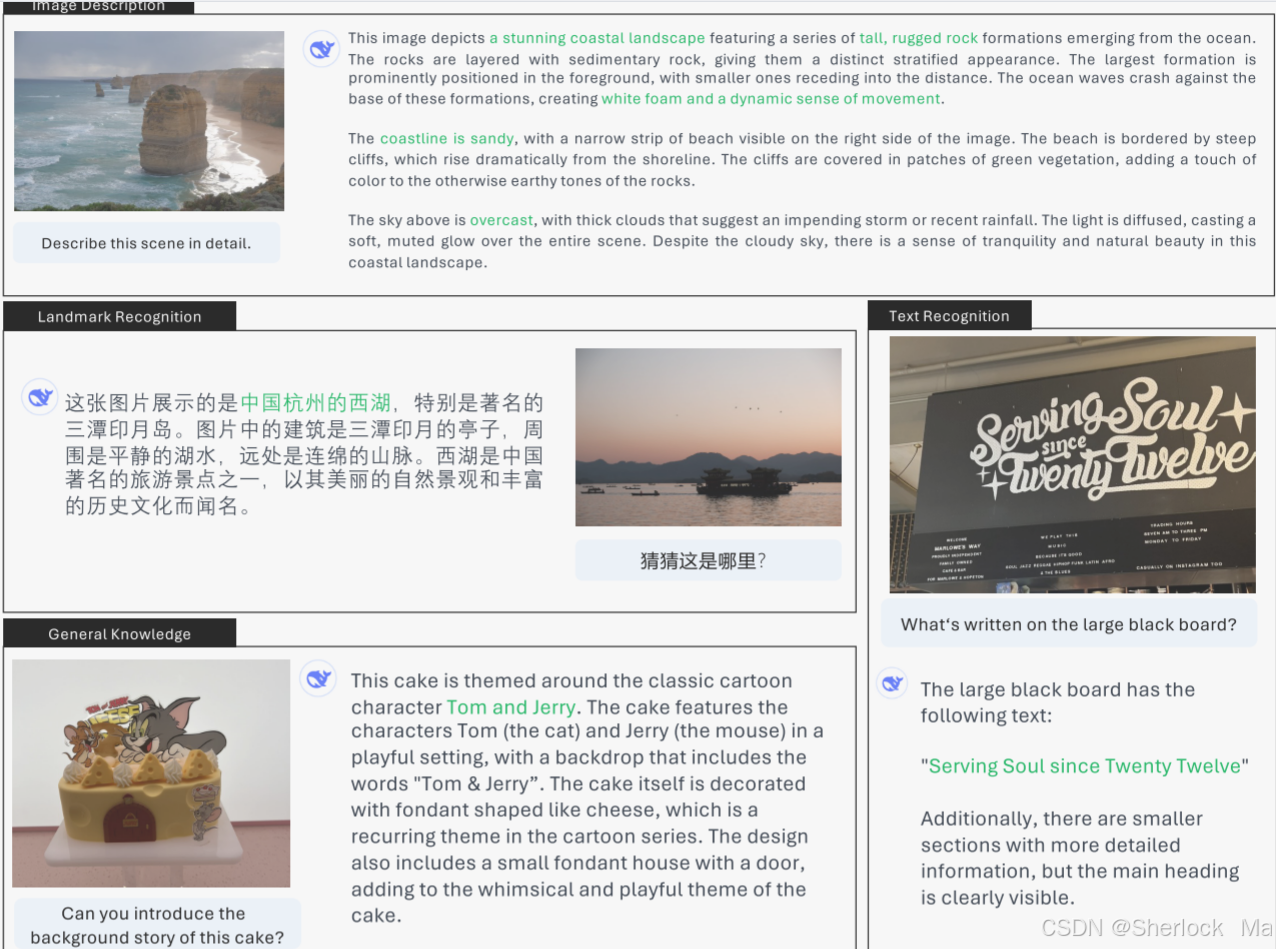
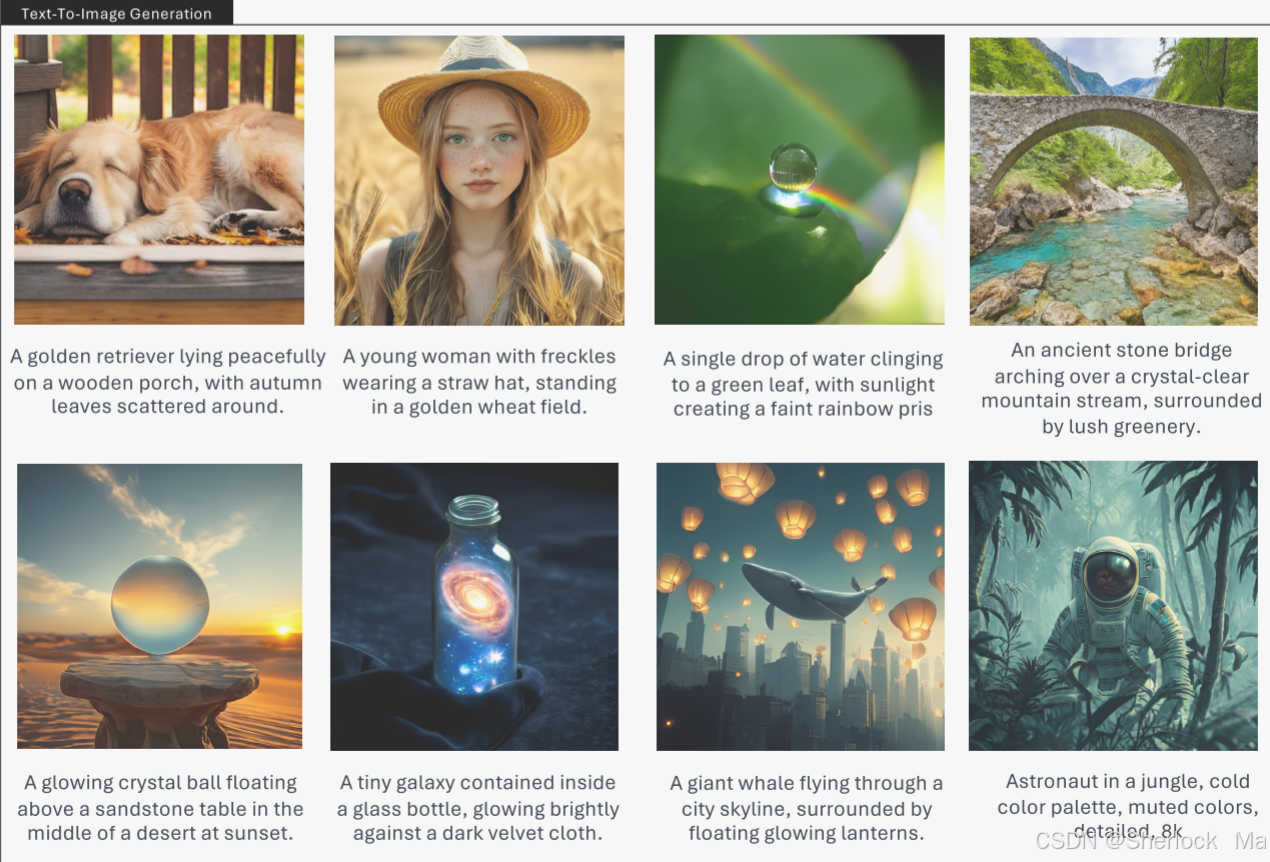
作者在图4中给出了多模态理解的结果。Janus-Pro在处理来自不同背景的输入时表现出令人印象深刻的理解能力,展示了其强大的功能。在图4的下半部分,作者还展示了一些文本到图像的生成结果。由Janus-Pro-7 B生成的图像具有高度的真实感,尽管分辨率只有384 × 384,但它们仍然包含了大量的细节。对于富有想象力和创造性的场景,Janus-Pro7 B从提示中准确地捕捉语义信息,产生推理充分和连贯的图像。
-
-
3.代码详解
环境安装
首先确保使用Python3.8以上的环境,然后使用以下命令
pip install -e .下载权重:
- Janus-1B:https://huggingface.co/deepseek-ai/Janus-Pro-1B
- Janus-7B:https://huggingface.co/deepseek-ai/Janus-Pro-7B
-
【可选】构建本地gradio:
pip install -e .[gradio]

python demo/app_januspro.py
-
使用代码
多模态理解示例
import torch
from transformers import AutoModelForCausalLM
from janus.models import MultiModalityCausalLM, VLChatProcessor
from janus.utils.io import load_pil_images


model_path = "deepseek-ai/Janus-Pro-7B"
vl_chat_processor: VLChatProcessor = VLChatProcessor.from_pretrained(model_path)    # 加载预训练的处理器,它包含了用于处理多模态输入(文本和图像)的工具。
tokenizer = vl_chat_processor.tokenizer    # 从处理器中提取分词器

vl_gpt: MultiModalityCausalLM = AutoModelForCausalLM.from_pretrained(    # 加载 Janus-Pro 模型
    model_path, trust_remote_code=True
)
vl_gpt = vl_gpt.to(torch.bfloat16).cuda().eval()

conversation = [
    {
        "role": "<|User|>",
        "content": f"<image_placeholder>\n{question}",    # 用户的角色中包含一个图像占位符 <image_placeholder> 和一个文本问题 {question}
        "images": ["images/equation.png"],
    },
    {"role": "<|Assistant|>", "content": ""},
]

# load images and prepare for inputs
pil_images = load_pil_images(conversation)    # 使用 load_pil_images 函数从对话中加载图像数据。
prepare_inputs = vl_chat_processor(    # 使用 VLChatProcessor 处理对话内容和图像,生成模型所需的输入格式。
    conversations=conversation, images=pil_images, force_batchify=True
).to(vl_gpt.device)

# 调用模型的 prepare_inputs_embeds 方法,将处理后的输入转换为模型所需的嵌入向量。
inputs_embeds = vl_gpt.prepare_inputs_embeds(**prepare_inputs)

# 使用模型的 generate 方法生成回答。
outputs = vl_gpt.language_model.generate(
    inputs_embeds=inputs_embeds,
    attention_mask=prepare_inputs.attention_mask,
    pad_token_id=tokenizer.eos_token_id,
    bos_token_id=tokenizer.bos_token_id,
    eos_token_id=tokenizer.eos_token_id,
    max_new_tokens=512,
    do_sample=False,
    use_cache=True,
)

answer = tokenizer.decode(outputs[0].cpu().tolist(), skip_special_tokens=True)    # 使用分词器将生成的标记解码为文本。
print(f"{prepare_inputs['sft_format'][0]}", answer)
文生图示例
import os
import PIL.Image
import torch
import numpy as np
from transformers import AutoModelForCausalLM
from janus.models import MultiModalityCausalLM, VLChatProcessor


model_path = "deepseek-ai/Janus-Pro-7B"
vl_chat_processor: VLChatProcessor = VLChatProcessor.from_pretrained(model_path)    # 使用 VLChatProcessor 加载预训练的处理器,它包含了用于处理多模态输入(文本和图像)的工具。
tokenizer = vl_chat_processor.tokenizer    # 从处理器中提取分词器(tokenizer),用于将文本转换为模型可处理的格式。

vl_gpt: MultiModalityCausalLM = AutoModelForCausalLM.from_pretrained(    # 使用 AutoModelForCausalLM 加载 Janus-Pro 模型
    model_path, trust_remote_code=True
)
vl_gpt = vl_gpt.to(torch.bfloat16).cuda().eval()

conversation = [
    {
        "role": "<|User|>",
        "content": "A stunning princess from kabul in red, white traditional clothing, blue eyes, brown hair",
    },
    {"role": "<|Assistant|>", "content": ""},
]

sft_format = vl_chat_processor.apply_sft_template_for_multi_turn_prompts(    # 使用 VLChatProcessor 的 apply_sft_template_for_multi_turn_prompts 方法,将对话内容格式化为模型可以理解的提示。
    conversations=conversation,
    sft_format=vl_chat_processor.sft_format,
    system_prompt="",
)
prompt = sft_format + vl_chat_processor.image_start_tag    # 在提示末尾添加图像开始标记(image_start_tag),表示接下来将生成图像。


@torch.inference_mode()
def generate(
    mmgpt: MultiModalityCausalLM,
    vl_chat_processor: VLChatProcessor,
    prompt: str,
    temperature: float = 1,
    parallel_size: int = 16,
    cfg_weight: float = 5,
    image_token_num_per_image: int = 576,
    img_size: int = 384,
    patch_size: int = 16,
):
    input_ids = vl_chat_processor.tokenizer.encode(prompt)    # 将提示文本编码为输入 ID。
    input_ids = torch.LongTensor(input_ids)

    tokens = torch.zeros((parallel_size*2, len(input_ids)), dtype=torch.int).cuda()    # 创建一个张量 tokens,用于存储并行生成的输入 ID。
    for i in range(parallel_size*2):    # 对于奇数索引的行,将中间的标记替换为填充标记(pad_id),用于分类引导。
        tokens[i, :] = input_ids
        if i % 2 != 0:
            tokens[i, 1:-1] = vl_chat_processor.pad_id

    inputs_embeds = mmgpt.language_model.get_input_embeddings()(tokens)    # 使用模型的嵌入层将输入 ID 转换为嵌入向量。

    generated_tokens = torch.zeros((parallel_size, image_token_num_per_image), dtype=torch.int).cuda()    # 初始化一个张量 generated_tokens,用于存储生成的图像标记。

    for i in range(image_token_num_per_image):    # 使用一个循环逐个生成图像标记
        outputs = mmgpt.language_model.model(inputs_embeds=inputs_embeds, use_cache=True, past_key_values=outputs.past_key_values if i != 0 else None)    # 调用模型生成下一个标记的 logits。
        hidden_states = outputs.last_hidden_state

        logits = mmgpt.gen_head(hidden_states[:, -1, :])
        logit_cond = logits[0::2, :]
        logit_uncond = logits[1::2, :]

        logits = logit_uncond + cfg_weight * (logit_cond-logit_uncond)    # 使用分类引导(CFG)技术,结合条件和无条件 logits,计算最终的 logits。
        probs = torch.softmax(logits / temperature, dim=-1)    # 使用 softmax 和温度参数计算概率分布,并通过采样选择下一个标记。

        next_token = torch.multinomial(probs, num_samples=1)
        generated_tokens[:, i] = next_token.squeeze(dim=-1)

        next_token = torch.cat([next_token.unsqueeze(dim=1), next_token.unsqueeze(dim=1)], dim=1).view(-1)
        img_embeds = mmgpt.prepare_gen_img_embeds(next_token)
        inputs_embeds = img_embeds.unsqueeze(dim=1)


    dec = mmgpt.gen_vision_model.decode_code(generated_tokens.to(dtype=torch.int), shape=[parallel_size, 8, img_size//patch_size, img_size//patch_size])
    dec = dec.to(torch.float32).cpu().numpy().transpose(0, 2, 3, 1)    # 使用模型的解码器将生成的标记解码为图像张量。

    dec = np.clip((dec + 1) / 2 * 255, 0, 255)    # 将解码后的图像张量转换为 NumPy 数组,并调整像素值范围到 [0, 255]。

    visual_img = np.zeros((parallel_size, img_size, img_size, 3), dtype=np.uint8)
    visual_img[:, :, :] = dec

    os.makedirs('generated_samples', exist_ok=True)
    for i in range(parallel_size):
        save_path = os.path.join('generated_samples', "img_{}.jpg".format(i))    # 创建一个目录 generated_samples,用于保存生成的图像。
        PIL.Image.fromarray(visual_img[i]).save(save_path)    # 使用 PIL 将每张生成的图像保存为 JPEG 文件。


generate(        # 调用 generate 函数
    vl_gpt,
    vl_chat_processor,
    prompt,
)
-
模型代码
load_pil_images
首先是janus/model/utils/io.py下的load_pil_images(),该函数用于读取对话中的图片,并返回成PIL格式。
def load_pil_images(conversations: List[Dict[str, str]]) -> List[PIL.Image.Image]:
    """

    Support file path or base64 images.

    Args:
        conversations (List[Dict[str, str]]): 一个列表,其中每个元素是一个字典,表示一条对话消息。
        pil_images (List[PIL.Image.Image]): 一个包含 PIL.Image.Image 对象的列表,表示加载的图像。

    """

    pil_images = []

    for message in conversations:
        if "images" not in message:
            continue

        for image_data in message["images"]:
            if image_data.startswith("data:image"):    # 如果图像数据以 "data:image" 开头,说明它是 Base64 编码的图像数据
                _, image_data = image_data.split(",", 1)
                image_bytes = base64.b64decode(image_data)
                pil_img = PIL.Image.open(io.BytesIO(image_bytes))
            else:
                #如果图像数据不是 Base64 编码,则假设它是文件路径。
                pil_img = PIL.Image.open(image_data)    # 使用 PIL.Image.open 直接打开文件路径,加载图像。
            pil_img = pil_img.convert("RGB")        # 将加载的图像转换为 RGB 模式(确保图像为彩色图像)。
            pil_images.append(pil_img)    # 将加载的图像对象添加到 pil_images 列表中。

    return pil_images
vl_chat_processor类
其代码在janus/model/processing_vlm.py下
当我们使用vl_chat_processor()时,实际上是调用VLChatProcessor类的__call__()方法,其中会调用VLChatProcessor的两个方法:
- 使用
process_one()方法对输入进行预处理。process_one方法会根据输入的prompt或conversations生成格式化的提示,并将图像嵌入到文本中。 -
如果
force_batchify为True,则将单个预处理结果批量化。batchify方法会将多个VLChatProcessorOutput对象合并为一个BatchedVLChatProcessorOutput对象,以便用于批量推理。
class VLChatProcessor(ProcessorMixin):
    def __call__(
        self,
        *,
        prompt: str = None,
        conversations: List[Dict[str, str]] = None,
        images: List[Image] = None,
        force_batchify: bool = True,
        **kwargs,
    ):
        """

        Args:
            prompt (str): 格式化的提示文本。如果提供,将直接用于处理。
            conversations (List[Dict]): 对话列表,每条对话是一个字典,包含角色(role)和内容(content)。
            images (List[ImageType]): 图像列表,图像可以是 PIL.Image.Image 对象。
            force_batchify (bool): 是否强制将输入批量化。默认为 True。
            **kwargs:

        Returns:
            outputs (BaseProcessorOutput): the output of the processor,
                - input_ids (torch.LongTensor): [N + image tokens]
                - images (torch.FloatTensor): [n_images, 3, H, W]
                - image_id (int): the id of the image token
                - num_image_tokens (List[int]): the number of image tokens
        """

        prepare = self.process_one(
            prompt=prompt, conversations=conversations, images=images
        )

        if force_batchify:
            prepare = self.batchify([prepare])

return prepare其中process_one()如下
class VLChatProcessor(ProcessorMixin):
    def process_one(
        self,
        prompt: str = None,
        conversations: List[Dict[str, str]] = None,
        images: List[Image] = None,
        **kwargs,
    ):
        assert (        # 确保 prompt 和 conversations 不同时使用。如果两者都提供,会抛出异常。
            prompt is None or conversations is None
        ), "prompt and conversations cannot be used at the same time."

        if prompt is None:
            # 如果没有提供 prompt,则使用 apply_sft_template_for_multi_turn_prompts 方法将对话内容格式化为 SFT(Supervised Fine-Tuning)模板。
            sft_format = self.apply_sft_template_for_multi_turn_prompts(
                conversations=conversations,
                sft_format=self.sft_format,
                system_prompt=self.system_prompt,
            )
        else:    # 如果提供了 prompt,则直接使用 prompt 作为格式化的提示文本。
            sft_format = prompt

        # tokenize    使用 tokenizer 对格式化的提示文本进行编码,将其转换为 input_ids(即 token ID 列表)。
        input_ids = self.tokenizer.encode(sft_format)
        input_ids = torch.LongTensor(input_ids)

        # add image tokens to the input_ids
        image_token_mask: torch.BoolTensor = input_ids == self.image_id    # 找出 input_ids 中所有图像 Token 的位置(self.image_id)。
        image_indices = image_token_mask.nonzero()
        input_ids, num_image_tokens = self.add_image_token(    # 调用 add_image_token 方法,在每个图像 Token 的位置插入图像的起始 Token、图像 Token 和结束 Token。
            image_indices=image_indices,
            input_ids=input_ids,
        )

        # load images
        images_outputs = self.image_processor(images, return_tensors="pt")    # 使用 image_processor 对图像列表进行处理,返回处理后的图像张量(pixel_values)。

        prepare = VLChatProcessorOutput(    # 创建一个 VLChatProcessorOutput 对象
            sft_format=sft_format,
            input_ids=input_ids,
            pixel_values=images_outputs.pixel_values,
            num_image_tokens=num_image_tokens,
        )

return prepare其中add_image_token()如下:add_image_token 方法的主要功能是在文本输入(input_ids)中插入图像相关的特殊 Token,以便模型能够识别图像的位置并进行多模态处理。具体来说,它会:
-
在每个图像 Token 的位置插入图像的起始 Token(
<begin_of_image>)、图像 Token(<image_placeholder>)和结束 Token(<end_of_image>)。 -
返回更新后的
input_ids和每个图像的 Token 数量。
class VLChatProcessor(ProcessorMixin):
    def add_image_token(
        self,
        image_indices: List[int],
        input_ids: torch.LongTensor,
    ):
        """

        Args:
            image_indices (List[int]): [index_0, index_1, ..., index_j] 图像 Token 在 input_ids 中的位置索引列表。
            input_ids (torch.LongTensor): [N]  文本 Token ID 列表。

        Returns:
            input_ids (torch.LongTensor): [N + image tokens]  更新后的 input_ids,其中插入了图像相关的特殊 Token。
            num_image_tokens (torch.IntTensor): [n_images]    每个图像的 Token 数量
        """

        input_slices = []        # 用于存储插入图像 Token 后的文本片段。

        start = 0        # start 和 end 用于确定当前图像 Token 的位置范围。
        for index in image_indices:
            if self.add_special_token:
                end = index + 1
            else:
                end = index

            # original text tokens
            input_slices.append(input_ids[start:end])    # 将当前图像 Token 之前的文本 Token 添加到 input_slices 中。

            # add boi, image tokens, eoi and set the mask as False
            input_slices.append(self.image_start_id * torch.ones((1), dtype=torch.long))    # 插入图像的起始 Token(<begin_of_image>)。
            input_slices.append(    # 插入图像 Token(<image_placeholder>),数量为 self.num_image_tokens。
                self.image_id * torch.ones((self.num_image_tokens,), dtype=torch.long)
            )
            input_slices.append(self.image_end_id * torch.ones((1), dtype=torch.long))    # 插入图像的结束 Token(<end_of_image>)。
            start = index + 1    # 更新 start 为当前图像 Token 的下一个位置。

        # the left part
        input_slices.append(input_ids[start:])    # 将最后一个图像 Token 之后的所有文本 Token 添加到 input_slices 中。

        # concat all slices
        input_ids = torch.cat(input_slices, dim=0)    # 将所有片段拼接成一个新的 input_ids。
        num_image_tokens = torch.IntTensor([self.num_image_tokens] * len(image_indices))    # 生成一个张量,表示每个图像的 Token 数量。

        return input_ids, num_image_tokens
假设我们有以下输入:
input_ids = torch.LongTensor([1, 2, 3, 4, 5])  # 原始文本 Token
image_indices = [2]  # 图像 Token 的位置索引

self.image_start_id = 100
self.image_id = 200
self.image_end_id = 300
self.num_image_tokens = 2
调用 add_image_token 方法后,input_ids 将变为:
[1, 2, 100, 200, 200, 300, 4, 5]batchify
batchify 方法是 VLChatProcessor 类中的一个重要方法,它的作用是将多个单个的预处理结果(VLChatProcessorOutput 对象)批量化,以便用于多模态模型的批量推理。批量化处理可以提高推理效率,尤其是在处理多个输入时。
class VLChatProcessor(ProcessorMixin):
    def batchify(
        self, prepare_list: List[VLChatProcessorOutput]
    ) -> BatchedVLChatProcessorOutput:
        """
        Preprocesses the inputs for multimodal inference.

        Args:
            prepare_list (List[VLChatProcessorOutput]): 一个包含多个 VLChatProcessorOutput 对象的列表,每个对象代表一个预处理后的输入。

        Returns:
            BatchedVLChatProcessorOutput: 一个批量化后的输出对象,包含批量化的输入数据,可以直接用于模型推理。
        """

        batch_size = len(prepare_list)
        sft_format = []    # 用于存储每个输入的格式化提示文本。
        n_images = []
        seq_lens = []
        for prepare in prepare_list:
            n_images.append(len(prepare.num_image_tokens))
            seq_lens.append(len(prepare))

        #  计算最大序列长度和最大图像数量
        input_token_max_len = max(seq_lens)
        max_n_images = max(1, max(n_images))

        batched_input_ids = torch.full(    # 填充后的文本 Token ID 矩阵。
            (batch_size, input_token_max_len), self.pad_id
        ).long()  # FIXME
        batched_attention_mask = torch.zeros((batch_size, input_token_max_len)).long()    # 注意力掩码矩阵,用于指示哪些位置是有效的。
        batched_pixel_values = torch.zeros(    # 图像张量,存储所有图像的像素值。
            (batch_size, max_n_images, *self.image_processor.default_shape)
        ).float()
        batched_images_seq_mask = torch.zeros((batch_size, input_token_max_len)).bool()    # 图像序列掩码,用于指示文本序列中哪些位置是图像 Token。

        batched_images_emb_mask = torch.zeros(    # 图像嵌入掩码,用于指示每个图像的嵌入位置。
            (batch_size, max_n_images, self.num_image_tokens)
        ).bool()

        for i, prepare in enumerate(prepare_list):
            input_ids = prepare.input_ids    # 将文本 Token ID 填充到 batched_input_ids 中。
            seq_len = len(prepare)
            n_image = len(prepare.num_image_tokens)
            # left-padding
            batched_attention_mask[i, -seq_len:] = 1    # 更新注意力掩码 batched_attention_mask。
            batched_input_ids[i, -seq_len:] = torch.LongTensor(input_ids)
            batched_images_seq_mask[i, -seq_len:] = input_ids == self.image_id    # 更新图像序列掩码 batched_images_seq_mask。

            if n_image > 0:    # 如果有图像,则将图像像素值填充到 batched_pixel_values 中,并更新图像嵌入掩码 batched_images_emb_mask。
                batched_pixel_values[i, :n_image] = prepare.pixel_values
                for j, n_image_tokens in enumerate(prepare.num_image_tokens):
                    batched_images_emb_mask[i, j, :n_image_tokens] = True

            sft_format.append(prepare.sft_format)    # 将格式化提示文本添加到 sft_format 列表中。

        batched_prepares = BatchedVLChatProcessorOutput(    # 使用批量化的数据创建一个 BatchedVLChatProcessorOutput 对象
            input_ids=batched_input_ids,
            attention_mask=batched_attention_mask,
            pixel_values=batched_pixel_values,
            images_seq_mask=batched_images_seq_mask,
            images_emb_mask=batched_images_emb_mask,
            sft_format=sft_format,
        )

        return batched_prepares
假设我们有以下两个预处理后的输入:
prepare1 = VLChatProcessorOutput(
    sft_format="This is the first image.",
    input_ids=[1, 2, 3, 4],
    pixel_values=torch.randn(1, 3, 224, 224),
    num_image_tokens=[2]
)

prepare2 = VLChatProcessorOutput(
    sft_format="This is the second image.",
    input_ids=[5, 6, 7],
    pixel_values=torch.randn(1, 3, 224, 224),
    num_image_tokens=[1]
)
调用 batchify 方法后, batched_output 将包含以下内容:
input_ids:填充后的文本 Token ID 矩阵。
attention_mask:注意力掩码矩阵。
pixel_values:图像像素值张量。
images_seq_mask:图像序列掩码。
images_emb_mask:图像嵌入掩码。
sft_format:格式化提示文本列表。
MultiModalityCausalLM
其代码在janus/models/modeling_vlm.py下
prepare_inputs_embeds 方法的主要作用是将输入的文本 Token 和图像特征结合起来,生成用于多模态因果语言模型的输入嵌入。具体步骤包括:
-
提取图像特征并进行对齐处理。
-
处理文本嵌入,忽略图像 Token 的位置。
-
将图像嵌入替换到文本嵌入中对应的位置。
class MultiModalityCausalLM(MultiModalityPreTrainedModel):
    def __init__(self, config: MultiModalityConfig):
        super().__init__(config)

        vision_config = config.vision_config
        vision_cls = model_name_to_cls(vision_config.cls)
        self.vision_model = vision_cls(**vision_config.params)

        aligner_config = config.aligner_config
        aligner_cls = model_name_to_cls(aligner_config.cls)
        self.aligner = aligner_cls(aligner_config.params)

        gen_vision_config = config.gen_vision_config
        gen_vision_cls = model_name_to_cls(gen_vision_config.cls)
        self.gen_vision_model = gen_vision_cls()

        gen_aligner_config = config.gen_aligner_config
        gen_aligner_cls = model_name_to_cls(gen_aligner_config.cls)
        self.gen_aligner = gen_aligner_cls(gen_aligner_config.params)

        gen_head_config = config.gen_head_config
        gen_head_cls = model_name_to_cls(gen_head_config.cls)
        self.gen_head = gen_head_cls(gen_head_config.params)

        self.gen_embed = torch.nn.Embedding(
            gen_vision_config.params.image_token_size, gen_vision_config.params.n_embed
        )

        language_config = config.language_config
        self.language_model = LlamaForCausalLM(language_config)

    def prepare_inputs_embeds(
        self,
        input_ids: torch.LongTensor,
        pixel_values: torch.FloatTensor,
        images_seq_mask: torch.LongTensor,
        images_emb_mask: torch.LongTensor,
        **kwargs,
    ):
        """

        Args:
            input_ids (torch.LongTensor): [b, T]    形状为 [batch_size, sequence_length],表示文本 Token 的 ID。
            pixel_values (torch.FloatTensor):   [b, n_images, 3, h, w]    形状为 [batch_size, n_images, 3, height, width],表示图像的像素值。
            images_seq_mask (torch.BoolTensor): [b, T]    形状为 [batch_size, sequence_length],表示文本序列中哪些位置是图像 Token。
            images_emb_mask (torch.BoolTensor): [b, n_images, n_image_tokens]    形状为 [batch_size, n_images, n_image_tokens],表示每个图像的嵌入位置。

            assert torch.sum(images_seq_mask) == torch.sum(images_emb_mask)

        Returns:
            input_embeds (torch.Tensor): [b, T, D]
        """

        bs, n = pixel_values.shape[0:2]
        images = rearrange(pixel_values, "b n c h w -> (b n) c h w")    # 将 pixel_values 重新排列为 [batch_size x n_images, 3, height, width],以便一次性处理所有图像。
        # [b x n, T2, D]
        images_embeds = self.aligner(self.vision_model(images))    # 使用 vision_model 提取图像特征,然后通过 aligner 对图像特征进行对齐处理,得到图像嵌入 images_embeds。

        # [b x n, T2, D] -> [b, n x T2, D]
        images_embeds = rearrange(images_embeds, "(b n) t d -> b (n t) d", b=bs, n=n)    # 将图像嵌入 images_embeds 重新排列为 [batch_size, n_images x T2, D],其中 T2 是每个图像的嵌入长度。
        # [b, n, T2] -> [b, n x T2]
        images_emb_mask = rearrange(images_emb_mask, "b n t -> b (n t)")    # 将 images_emb_mask 重新排列为 [batch_size, n_images x T2],以便与图像嵌入的形状一致。

        # [b, T, D]
        input_ids[input_ids < 0] = 0  # 将 input_ids 中的负值(表示图像 Token)替换为 0,以避免在文本嵌入中处理图像 Token。
        inputs_embeds = self.language_model.get_input_embeddings()(input_ids)    # 使用 language_model 的输入嵌入层将 input_ids 转换为文本嵌入 inputs_embeds。

        # 使用 images_seq_mask 和 images_emb_mask 将文本嵌入中对应的图像 Token 位置替换为图像嵌入。
        inputs_embeds[images_seq_mask] = images_embeds[images_emb_mask]

        return inputs_embeds
假设我们有以下输入:
input_ids = torch.LongTensor([[1, 2, -1, 4, -1], [5, 6, 7, -1, 9]])
pixel_values = torch.randn(2, 2, 3, 224, 224)  # 2 个样本,每个样本 2 张图像
images_seq_mask = torch.BoolTensor([[False, False, True, False, True], [False, False, False, True, False]])
images_emb_mask = torch.BoolTensor([[[True, True], [True, True]], [[True, True], [False, False]]])
调用 prepare_inputs_embeds 方法后,inputs_embeds 将是一个形状为 [2, 5, embedding_dim] 的张量,其中文本 Token 的嵌入和图像嵌入被整合在一起。
-
接着,主程序调用vl_gpt.language_model.generate进行预测,其中vl_gpt.language_model是:
self.language_model = LlamaForCausalLM(language_config)-
接下来来看生成部分的内容
class MultiModalityPreTrainedModel(PreTrainedModel):
    def prepare_gen_img_embeds(self, image_ids: torch.LongTensor):
        return self.gen_aligner(self.gen_embed(image_ids))
vq_model
这部分代码在janus/models/vq_model.py下
Encoder 类将输入图像逐步编码到一个低分辨率、高通道数的潜在空间表示中。它结合了残差块和注意力块,以增强特征提取的能力,并通过下采样逐步降低特征图的空间分辨率。最终,输出的潜在空间表示可以用于后续的处理,例如向量量化或解码。
class Encoder(nn.Module):
    def __init__(
        self,
        in_channels=3,
        ch=128,
        ch_mult=(1, 1, 2, 2, 4),
        num_res_blocks=2,
        norm_type="group",
        dropout=0.0,
        resamp_with_conv=True,
        z_channels=256,
    ):
        super().__init__()
        self.num_resolutions = len(ch_mult)
        self.num_res_blocks = num_res_blocks
        self.conv_in = nn.Conv2d(in_channels, ch, kernel_size=3, stride=1, padding=1)

        # downsampling
        in_ch_mult = (1,) + tuple(ch_mult)
        self.conv_blocks = nn.ModuleList()
        for i_level in range(self.num_resolutions):
            conv_block = nn.Module()
            # res & attn
            res_block = nn.ModuleList()
            attn_block = nn.ModuleList()
            block_in = ch * in_ch_mult[i_level]
            block_out = ch * ch_mult[i_level]
            for _ in range(self.num_res_blocks):
                res_block.append(
                    ResnetBlock(
                        block_in, block_out, dropout=dropout, norm_type=norm_type
                    )
                )
                block_in = block_out
                if i_level == self.num_resolutions - 1:
                    attn_block.append(AttnBlock(block_in, norm_type))
            conv_block.res = res_block
            conv_block.attn = attn_block
            # downsample
            if i_level != self.num_resolutions - 1:
                conv_block.downsample = Downsample(block_in, resamp_with_conv)
            self.conv_blocks.append(conv_block)

        # middle
        self.mid = nn.ModuleList()
        self.mid.append(
            ResnetBlock(block_in, block_in, dropout=dropout, norm_type=norm_type)
        )
        self.mid.append(AttnBlock(block_in, norm_type=norm_type))
        self.mid.append(
            ResnetBlock(block_in, block_in, dropout=dropout, norm_type=norm_type)
        )

        # end
        self.norm_out = Normalize(block_in, norm_type)
        self.conv_out = nn.Conv2d(
            block_in, z_channels, kernel_size=3, stride=1, padding=1
        )

    def forward(self, x):
        h = self.conv_in(x)
        # downsampling
        for i_level, block in enumerate(self.conv_blocks):
            for i_block in range(self.num_res_blocks):
                h = block.res[i_block](h)
                if len(block.attn) > 0:
                    h = block.attn[i_block](h)
            if i_level != self.num_resolutions - 1:
                h = block.downsample(h)

        # middle
        for mid_block in self.mid:
            h = mid_block(h)

        # end
        h = self.norm_out(h)
        h = nonlinearity(h)
        h = self.conv_out(h)
        return h
Decoder 类是一个用于将潜在空间的表示解码回原始图像的神经网络模块。它与 Encoder 类相对应,但方向相反:Encoder 将图像压缩到潜在空间,而 Decoder 将潜在空间的表示解码回图像。Decoder 也基于 U-Net 架构,通过一系列的卷积层、残差块和注意力块逐步增加特征图的空间分辨率,同时减少通道数。
class Decoder(nn.Module):
    def __init__(
        self,
        z_channels=256,
        ch=128,
        ch_mult=(1, 1, 2, 2, 4),
        num_res_blocks=2,
        norm_type="group",
        dropout=0.0,
        resamp_with_conv=True,
        out_channels=3,
    ):
        super().__init__()
        self.num_resolutions = len(ch_mult)
        self.num_res_blocks = num_res_blocks

        block_in = ch * ch_mult[self.num_resolutions - 1]
        # z to block_in
        self.conv_in = nn.Conv2d(
            z_channels, block_in, kernel_size=3, stride=1, padding=1
        )

        # middle
        self.mid = nn.ModuleList()
        self.mid.append(
            ResnetBlock(block_in, block_in, dropout=dropout, norm_type=norm_type)
        )
        self.mid.append(AttnBlock(block_in, norm_type=norm_type))
        self.mid.append(
            ResnetBlock(block_in, block_in, dropout=dropout, norm_type=norm_type)
        )

        # upsampling
        self.conv_blocks = nn.ModuleList()
        for i_level in reversed(range(self.num_resolutions)):
            conv_block = nn.Module()
            # res & attn
            res_block = nn.ModuleList()
            attn_block = nn.ModuleList()
            block_out = ch * ch_mult[i_level]
            for _ in range(self.num_res_blocks + 1):
                res_block.append(
                    ResnetBlock(
                        block_in, block_out, dropout=dropout, norm_type=norm_type
                    )
                )
                block_in = block_out
                if i_level == self.num_resolutions - 1:
                    attn_block.append(AttnBlock(block_in, norm_type))
            conv_block.res = res_block
            conv_block.attn = attn_block
            # downsample
            if i_level != 0:
                conv_block.upsample = Upsample(block_in, resamp_with_conv)
            self.conv_blocks.append(conv_block)

        # end
        self.norm_out = Normalize(block_in, norm_type)
        self.conv_out = nn.Conv2d(
            block_in, out_channels, kernel_size=3, stride=1, padding=1
        )

    @property
    def last_layer(self):
        return self.conv_out.weight

    def forward(self, z):
        # z to block_in
        h = self.conv_in(z)

        # middle
        for mid_block in self.mid:
            h = mid_block(h)

        # upsampling
        for i_level, block in enumerate(self.conv_blocks):
            for i_block in range(self.num_res_blocks + 1):
                h = block.res[i_block](h)
                if len(block.attn) > 0:
                    h = block.attn[i_block](h)
            if i_level != self.num_resolutions - 1:
                h = block.upsample(h)

        # end
        h = self.norm_out(h)
        h = nonlinearity(h)
        h = self.conv_out(h)
        return h
VectorQuantizer 类是一个用于向量量化的神经网络模块,它将连续的潜在表示映射到离散的码本向量。这种技术在多模态模型中非常重要,尤其是在图像生成和压缩任务中。
class VectorQuantizer(nn.Module):
    def __init__(self, n_e, e_dim, beta, entropy_loss_ratio, l2_norm, show_usage):
        super().__init__()
        self.n_e = n_e  # 码本大小
        self.e_dim = e_dim  # 码本嵌入维度
        self.beta = beta  # 提交损失的权重
        self.entropy_loss_ratio = entropy_loss_ratio  # 熵损失的比例
        self.l2_norm = l2_norm  # 是否对码本进行 L2 归一化
        self.show_usage = show_usage  # 是否显示码本的使用情况

        self.embedding = nn.Embedding(self.n_e, self.e_dim)  # 码本嵌入
        self.embedding.weight.data.uniform_(-1.0 / self.n_e, 1.0 / self.n_e)  # 初始化嵌入
        if self.l2_norm:
            self.embedding.weight.data = F.normalize(
                self.embedding.weight.data, p=2, dim=-1
            )  # L2 归一化
        if self.show_usage:
            self.register_buffer("codebook_used", nn.Parameter(torch.zeros(65536)))  # 记录码本的使用情况

    def forward(self, z):
        # 将输入 z 从 [batch, channel, height, width] 重塑为 [batch, height, width, channel],并展平为 [batch x height x width, channel]。
        z = torch.einsum("b c h w -> b h w c", z).contiguous()
        z_flattened = z.view(-1, self.e_dim)
        # distances from z to embeddings e_j (z - e)^2 = z^2 + e^2 - 2 e * z

        if self.l2_norm:    # 计算输入向量 z_flattened 与码本向量 embedding 之间的距离。
            z = F.normalize(z, p=2, dim=-1)
            z_flattened = F.normalize(z_flattened, p=2, dim=-1)
            embedding = F.normalize(self.embedding.weight, p=2, dim=-1)
        else:
            embedding = self.embedding.weight

        d = (
            torch.sum(z_flattened**2, dim=1, keepdim=True)
            + torch.sum(embedding**2, dim=1)
            - 2
            * torch.einsum(
                "bd,dn->bn", z_flattened, torch.einsum("n d -> d n", embedding)
            )
        )

        min_encoding_indices = torch.argmin(d, dim=1)    # 使用 torch.argmin 找到每个输入向量最近的码本向量的索引。
        z_q = embedding[min_encoding_indices].view(z.shape)    # 使用找到的索引从码本中获取最近的向量,并将其重塑回原始输入的形状。
        perplexity = None
        min_encodings = None
        vq_loss = None
        commit_loss = None
        entropy_loss = None

        # compute loss for embedding
        if self.training:    # 如果在训练模式下,计算量化损失、提交损失和熵损失。
            vq_loss = torch.mean((z_q - z.detach()) ** 2)
            commit_loss = self.beta * torch.mean((z_q.detach() - z) ** 2)
            entropy_loss = self.entropy_loss_ratio * compute_entropy_loss(-d)

        # 使用 detach 保留梯度,确保量化操作不会影响反向传播。
        z_q = z + (z_q - z).detach()

        # reshape back to match original input shape
        z_q = torch.einsum("b h w c -> b c h w", z_q)

        return (    # 将量化后的向量 z_q 重塑回原始输入的形状 [batch, channel, height, width]。
            z_q,
            (vq_loss, commit_loss, entropy_loss),
            (perplexity, min_encodings, min_encoding_indices),
        )

    def get_codebook_entry(self, indices, shape=None, channel_first=True):
        # shape = (batch, channel, height, width) if channel_first else (batch, height, width, channel)
        if self.l2_norm:
            embedding = F.normalize(self.embedding.weight, p=2, dim=-1)
        else:
            embedding = self.embedding.weight
        z_q = embedding[indices]  # (b*h*w, c)    使用索引 indices 从码本中获取对应的向量。

        if shape is not None:
            if channel_first:    # 如果 channel_first 为 True,将通道维度移到前面。
                z_q = z_q.reshape(shape[0], shape[2], shape[3], shape[1])
                # reshape back to match original input shape
                z_q = z_q.permute(0, 3, 1, 2).contiguous()
            else:
                z_q = z_q.view(shape)
        return z_q
VQModel 是一个完整的向量量化模型,结合了编码器(Encoder)、解码器(Decoder)和向量量化器(VectorQuantizer)。它主要用于将输入图像编码到离散的潜在空间,并从该离散表示中重建图像。这种模型在图像生成、压缩和多模态任务中非常有用。以下是 VQModel 类的详细解释:
class VQModel(nn.Module):
    def __init__(self, config: ModelArgs):
        super().__init__()
        self.config = config
        self.encoder = Encoder(    # 编码器:将输入图像编码到潜在空间。
            ch_mult=config.encoder_ch_mult,
            z_channels=config.z_channels,
            dropout=config.dropout_p,
        )
        self.decoder = Decoder(    # 解码器:将量化后的潜在表示解码回图像。
            ch_mult=config.decoder_ch_mult,
            z_channels=config.z_channels,
            dropout=config.dropout_p,
        )

        self.quantize = VectorQuantizer(    # 向量量化器:将潜在空间的连续表示量化为离散的码本向量。
            config.codebook_size,
            config.codebook_embed_dim,
            config.commit_loss_beta,
            config.entropy_loss_ratio,
            config.codebook_l2_norm,
            config.codebook_show_usage,
        )
        self.quant_conv = nn.Conv2d(config.z_channels, config.codebook_embed_dim, 1)
        self.post_quant_conv = nn.Conv2d(
            config.codebook_embed_dim, config.z_channels, 1
        )

    def encode(self, x):
        h = self.encoder(x)    # 将输入图像 x 编码到潜在空间。
        h = self.quant_conv(h)    # 使用 quant_conv 将编码器的输出转换为码本嵌入维度。
        quant, emb_loss, info = self.quantize(h)    # 通过 quantize 方法将连续的潜在表示量化为离散的码本向量。
        return quant, emb_loss, info

    def decode(self, quant):
        quant = self.post_quant_conv(quant)    # 将量化后的潜在表示 quant 解码回图像。使用 post_quant_conv 将量化后的嵌入转换回解码器所需的维度。
        dec = self.decoder(quant)    # 通过 quantize 方法将连续的潜在表示量化为离散的码本向量。
        return dec

    def decode_code(self, code_b, shape=None, channel_first=True):
        quant_b = self.quantize.get_codebook_entry(code_b, shape, channel_first)    # 使用 quantize.get_codebook_entry 获取对应的码本向量。
        dec = self.decode(quant_b)    # 将码本向量解码为图像。
        return dec

    def forward(self, input):
        quant, diff, _ = self.encode(input)    # 将输入图像 input 编码到潜在空间,并进行量化。
        dec = self.decode(quant)    # 将量化后的潜在表示解码回图像。
        return dec, diff
-
-
4.总结
本文介绍了 Janus-Pro,这是 Janus 模型的高级版本,通过优化训练策略、扩展训练数据和扩大模型规模,显著提升了多模态理解和文本到图像生成的能力。Janus-Pro 在多模态理解基准测试中超越了现有的先进模型,并在文本到图像指令遵循任务中表现出色。代码和模型已公开。
-
方法
1. 架构设计
Janus-Pro 的架构与 Janus 保持一致,核心是将多模态理解任务和视觉生成任务的视觉编码进行解耦。对于多模态理解任务,使用 SigLIP 编码器提取图像的高维语义特征;对于视觉生成任务,使用 VQ 词元化器将图像转换为离散 ID。这些特征被映射到语言模型的输入空间后,通过统一的自回归变换器进行处理。
2. 优化训练策略
Janus-Pro 对训练过程进行了改进,包括:
-
延长第一阶段训练:增加 ImageNet 数据集的训练步骤,使模型能够更好地建模像素依赖关系。
-
聚焦第二阶段训练:直接使用正常的文本到图像数据进行训练,提高训练效率。
-
调整第三阶段数据比例:减少文本到图像数据的比例,以平衡多模态理解和视觉生成的性能。
3. 数据扩展
Janus-Pro 在多模态理解和视觉生成方面扩展了训练数据:
-
多模态理解:增加了约 9000 万样本,包括图像字幕数据和表格、图表、文档理解数据。
-
视觉生成:引入了约 7200 万合成美学数据,以提高生成图像的稳定性和美学质量。
4. 模型扩展
Janus-Pro 将模型规模从 1.5B 扩大到 7B,验证了视觉编码解耦方法的可扩展性。
-
实验
1. 性能对比
-
多模态理解:Janus-Pro-7B 在 MMBench 上取得了 79.2 的分数,超越了 Janus(69.4)、TokenFlow(68.9)和 MetaMorph(75.2)等先进模型。
-
视觉生成:在 GenEval 上,Janus-Pro-7B 的整体准确率达到 80%,优于 DALL-E 3(67%)、Stable Diffusion 3 Medium(74%)等模型。在 DPG-Bench 上,Janus-Pro-7B 的分数为 84.19,表现最佳。
2. 定性结果
Janus-Pro 在多模态理解任务中展现了强大的语义解析能力,并在文本到图像生成任务中生成了高质量、细节丰富的图像。
如果你觉得这篇关于 Janus-Pro 的总结对你有所帮助,或者你对多模态模型的最新进展感到兴奋,那么请一定要给我点个赞哦!👍 你的点赞不仅是对我努力的认可,也是对我继续分享更多优质内容的最大鼓励。
同时,如果你对这个话题感兴趣,或者希望在今后能够看到更多关于多模态理解和生成模型的内容,不妨关注我一下吧!🌟 关注后,你将第一时间获取到更多前沿技术的解读、实用的代码示例以及深度学习领域的最新动态。
另外,如果你觉得这篇总结可能会对你今后的学习或工作有所帮助,也可以选择收藏起来呀!🔖 这样,你随时都能回过头来查看这些关键信息,无论是复习还是深入研究,都非常方便。
如果你有任何疑问、想法,或者想要探讨更多关于 Janus-Pro 的细节,也欢迎在评论区留言。我非常期待与大家一起交流,共同进步!让我们在这个充满挑战和机遇的 AI 时代,一起成长,一起探索未知的领域!
最后,感谢你的阅读和支持!希望我们都能在这个充满奇迹的多模态世界中,找到属于自己的宝藏。💖


 213
213

 被折叠的 条评论
为什么被折叠?
被折叠的 条评论
为什么被折叠?
 到【灌水乐园】发言


