


1. 导出yolov5 ONNX模型
选择一台x64的PC机,OS为Ubuntu18.04,在此台机器上完成Yolov5模型转ONNX模型。
1.1 下载原始yolov5代码、模型和权重文件
-
下载yolov5源代码
$ git clone -b v2.0 https://github.com/ultralytics/yolov5.git Cloning into 'yolov5'... remote: Enumerating objects: 6233, done. remote: Counting objects: 100% (27/27), done. remote: Compressing objects: 100% (20/20), done. remote: Total 6233 (delta 10), reused 14 (delta 7), pack-reused 6206 Receiving objects: 100% (6233/6233), 8.45 MiB | 19.00 KiB/s, done. Resolving deltas: 100% (4268/4268), done. Note: checking out '2a149a48d65bf4d358d4289058ef6066cda8c7c9'. You are in 'detached HEAD' state. You can look around, make experimental changes and commit them, and you can discard any commits you make in this state without impacting any branches by performing another checkout. If you want to create a new branch to retain commits you create, you may do so (now or later) by using -b with the checkout command again. Example: git checkout -b <new-branch-name> -
下载权重文件
$ cd yolov5/weights

$ wget https://github.com/ultralytics/yolov5/releases/download/v2.0/yolov5s.pt
如果不能在设备上直接下载权重文件,请在别的平台下载权重文件,然后拷贝到设备上。
1.2 Pytorch模型转ONNX模型
-
修改models/export.py脚本生成onnx文件,注意目前onnx版本应选择11
$ cd ~/yolov5/models $ vim export.py ... #省略部分 # ONNX export try: import onnx print('\nStarting ONNX export with onnx %s...' % onnx.__version__) f = opt.weights.replace('.pt', '.onnx') # filename model.fuse() # only for ONNX ####修改此处的opset_version为11###### torch.onnx.export(model, img, f, verbose=False, opset_version=11, input_names=['images'], output_names=['classes', 'boxes'] if y is None else ['output']) # Checks onnx_model = onnx.load(f) # load onnx model onnx.checker.check_model(onnx_model) # check onnx model print(onnx.helper.printable_graph(onnx_model.graph)) # print a human readable model print('ONNX export success, saved as %s' % f) except Exception as e: print('ONNX export failure: %s' % e) ...#省略部分-
安装docker,访问https://hub.docker.com/r/shinerchen/pytorch-1.8.1-py37-cpu下载docker 镜像
$sudo apt-get install docker.io $sudo docker version Client: Version: 20.10.2 API version: 1.41 Go version: go1.13.8 Git commit: 20.10.2-0ubuntu1~18.04.2 Built: Tue Mar 30 21:24:16 2021 OS/Arch: linux/amd64 Context: default Experimental: true Server: Engine: Version: 20.10.2 API version: 1.41 (minimum version 1.12) Go version: go1.13.8 Git commit: 20.10.2-0ubuntu1~18.04.2 Built: Mon Mar 29 19:27:41 2021 OS/Arch: linux/amd64 Experimental: false containerd: Version: 1.3.3-0ubuntu1~18.04.4 GitCommit: runc: Version: spec: 1.0.2-dev GitCommit: docker-init: Version: 0.19.0 GitCommit: $ sudo docker pull shinerchen/pytorch-1.8.1-py37-cpu $ sudo docker images REPOSITORY TAG IMAGE ID CREATED SIZE shinerchen/pytorch-1.8.1-py37-cpu latest 3f812182d768 2 hours ago 1.98GB -
运行docker镜像,导出ONNX模型文件
$ sudo docker run -it --ipc=host -v <你的yolov5的代码目录>:/data pytorch-1.8.1-py37-cpu:latest $ cd /data $ python3.7 models/export.py --weights ./weights/yolov5s.pt --img 640 --batch 1 Namespace(batch_size=1, img_size=[640, 640], weights='./weights/yolov5s.pt') [W NNPACK.cpp:80] Could not initialize NNPACK! Reason: Unsupported hardware. Starting TorchScript export with torch 1.8.1+cpu... /usr/local/lib/python3.7/dist-packages/torch/jit/_trace.py:940: TracerWarning: Encountering a list at the output of the tracer might cause the trace to be incorrect, this is only valid if the container structure does not change based on the module's inputs. Consider using a constant container instead (e.g. for `list`, use a `tuple` instead. for `dict`, use a `NamedTuple` instead). If you absolutely need this and know the side effects, pass strict=False to trace() to allow this behavior. _force_outplace, TorchScript export success, saved as ./weights/yolov5s.torchscript.pt Starting ONNX export with onnx 1.9.0... ... ONNX export success, saved as ./weights/yolov5s.onnx Starting CoreML export with coremltools 4.1... WARNING:root:Tuple detected at graph output. This will be flattened in the converted model. Converting Frontend ==> MIL Ops: 100%|███████████████████████████████████████████████████████████████████████████████████████████████████▋| 730/732 [00:00<00:00, 779.53 ops/s] Running MIL optimization passes: 100%|████████████████████████████████████████████████████████████████████████████████████████████████████| 18/18 [00:00<00:00, 55.74 passes/s] Translating MIL ==> MLModel Ops: 100%|████████████████████████████████████████████████████████████████████████████████████████████████████| 944/944 [00:01<00:00, 768.94 ops/s] CoreML export success, saved as ./weights/yolov5s.mlmodel Export complete. Visualize with https://github.com/lutzroeder/netron. -
简化模型
对导出的onnx模型使用onnx-simplifer工具进行简化
$ pip3.7 install onnx-simplifier
$ cd yolov5/weights
$ python3.7 -m onnxsim --skip-optimization yolov5s.onnx yolov5s_sim.onnx
Simplifying...
Checking 0/3...
Checking 1/3...
Checking 2/3...
Ok!
创建包含以下代码的modify_yolov5.py脚本
# Copyright 2020 Huawei Technologies Co., Ltd
#
# Licensed under the Apache License, Version 2.0 (the "License");
# you may not use this file except in compliance with the License.
# You may obtain a copy of the License at
#
#     http://www.apache.org/licenses/LICENSE-2.0
#
# Unless required by applicable law or agreed to in writing, software
# distributed under the License is distributed on an "AS IS" BASIS,
# WITHOUT WARRANTIES OR CONDITIONS OF ANY KIND, either express or implied.
# See the License for the specific language governing permissions and
# limitations under the License.
import sys
import onnx

INT_MAX = sys.maxsize

if len(sys.argv) == 1:
    print("usage: python3.7 modify_yolov5.py model.onnx [n,c,h,w]")
    exit(0)

model_path = sys.argv[1]
model = onnx.load(model_path)

b, c, h, w = 1, 3, 640, 640
if len(sys.argv) == 3:
    b, c, h, w = list(map(int, sys.argv[2].split(',')))
    print(f"input shape: {b, c, h, w}")


def get_node_by_name(nodes, name):
    for n in nodes:
        if n.name == name:
            return n
    return -1

"""
before:                           after:
            input                             input
    /      /      \      \                /           \
slice4 slice14 slice24 slice34        slice4        slice14
   |      |       |       |              |             |
slice9 slice19 slice29 slice39           t              t
    \      \      /       /           /    \         /     \
            concat                slice9 slice29 slice19 slice39
                                     |      |       |       |
                                     t      t       t       t
                                      \      \      /       /
                                              concat
"""

model.graph.node.remove(get_node_by_name(model.graph.node, "Slice_24"))
model.graph.node.remove(get_node_by_name(model.graph.node, "Slice_34"))

prob_info1 = onnx.helper.make_tensor_value_info('to_slice9', onnx.TensorProto.FLOAT, [b, c, h, w//2])
prob_info3 = onnx.helper.make_tensor_value_info('to_slice19', onnx.TensorProto.FLOAT, [b, c, h, w//2])
prob_info5 = onnx.helper.make_tensor_value_info('from_slice9', onnx.TensorProto.FLOAT, [b, c, h//2, w//2])
prob_info6 = onnx.helper.make_tensor_value_info('from_slice19', onnx.TensorProto.FLOAT, [b, c, h//2, w//2])
prob_info7 = onnx.helper.make_tensor_value_info('from_slice29', onnx.TensorProto.FLOAT, [b, c, h//2, w//2])
prob_info8 = onnx.helper.make_tensor_value_info('from_slice39', onnx.TensorProto.FLOAT, [b, c, h//2, w//2])

# slice4 slice24 后的Transpose,若自定义模型,inputs中的编号需根据onnx图中实际编号修改
node1 = onnx.helper.make_node(
    'Transpose',
    inputs=[get_node_by_name(model.graph.node, "Slice_4").output[0]],
    outputs=['to_slice9'],
    perm=[0, 1, 3, 2]
)
node3 = onnx.helper.make_node(
    'Transpose',
    inputs=[get_node_by_name(model.graph.node, "Slice_14").output[0]],
    outputs=['to_slice19'],
    perm=[0, 1, 3, 2]
)
# slice9 slice19 slice29 slice39后的Transpose
node5 = onnx.helper.make_node(
    'Transpose',
    inputs=['from_slice9'],
    outputs=[get_node_by_name(model.graph.node, "Slice_9").output[0]],
    perm=[0, 1, 3, 2]
)
node6 = onnx.helper.make_node(
    'Transpose',
    inputs=['from_slice19'],
    outputs=[get_node_by_name(model.graph.node, "Slice_19").output[0]],
    perm=[0, 1, 3, 2]
)
node7 = onnx.helper.make_node(
    'Transpose',
    inputs=['from_slice29'],
    outputs=[get_node_by_name(model.graph.node, "Slice_29").output[0]],
    perm=[0, 1, 3, 2]
)
node8 = onnx.helper.make_node(
    'Transpose',
    inputs=['from_slice39'],
    outputs=[get_node_by_name(model.graph.node, "Slice_39").output[0]],
    perm=[0, 1, 3, 2]
)
model.graph.node.append(node1)
model.graph.node.append(node3)
model.graph.node.append(node5)
model.graph.node.append(node6)
model.graph.node.append(node7)
model.graph.node.append(node8)

# slice9 slice19 换轴
model.graph.initializer.append(onnx.helper.make_tensor('starts_9', onnx.TensorProto.INT64, [1], [0]))
model.graph.initializer.append(onnx.helper.make_tensor('ends_9', onnx.TensorProto.INT64, [1], [INT_MAX]))
model.graph.initializer.append(onnx.helper.make_tensor('axes_9', onnx.TensorProto.INT64, [1], [2]))
model.graph.initializer.append(onnx.helper.make_tensor('steps_9', onnx.TensorProto.INT64, [1], [2]))
newnode1 = onnx.helper.make_node(
    'Slice',
    name='Slice_9',
    inputs=['to_slice9', 'starts_9', 'ends_9', 'axes_9', 'steps_9'],
    outputs=['from_slice9']
)
model.graph.node.remove(get_node_by_name(model.graph.node, "Slice_9"))
model.graph.node.insert(9, newnode1)
newnode2 = onnx.helper.make_node(
    'Slice',
    name='Slice_19',
    inputs=['to_slice19', 'starts_9', 'ends_9', 'axes_9', 'steps_9'],
    outputs=['from_slice19']
)
model.graph.node.remove(get_node_by_name(model.graph.node, "Slice_19"))
model.graph.node.insert(19, newnode2)

# slice29 slice39 换轴
model.graph.initializer.append(onnx.helper.make_tensor('starts_29', onnx.TensorProto.INT64, [1], [1]))
model.graph.initializer.append(onnx.helper.make_tensor('ends_29', onnx.TensorProto.INT64, [1], [INT_MAX]))
model.graph.initializer.append(onnx.helper.make_tensor('axes_29', onnx.TensorProto.INT64, [1], [2]))
model.graph.initializer.append(onnx.helper.make_tensor('steps_29', onnx.TensorProto.INT64, [1], [2]))
newnode3 = onnx.helper.make_node(
    'Slice',
    name='Slice_29',
    inputs=['to_slice9', 'starts_29', 'ends_29', 'axes_29', 'steps_29'],
    outputs=['from_slice29']
)
model.graph.node.remove(get_node_by_name(model.graph.node, "Slice_29"))
model.graph.node.insert(29, newnode3)
newnode4 = onnx.helper.make_node(
    'Slice',
    name='Slice_39',
    inputs=['to_slice19', 'starts_29', 'ends_29', 'axes_29', 'steps_29'],
    outputs=['from_slice39']
)
model.graph.node.remove(get_node_by_name(model.graph.node, "Slice_39"))
model.graph.node.insert(39, newnode4)

onnx.save(model, model_path.split('.')[0] + "_t.onnx")
print("success")
修改生成的onnx模型文件
$ cd yolov5/weights
$ python3.7 modify_yolov5.py yolov5s_sim.onnx #生成的模型名为:yolov5s_sim_t.onnx
-
1.3 升级DLAP221的系统
由于华为在CANN3.3.0版本及配套的1.0.9固件版本中针对yolov5做了优化,如果DLAP221的系统版本不是此版本,建议直接将DLAP221的SD系统整体升级到此版本。Adlink提供一键制卡工具包,方便客户制作该版本的系统。制卡工具包可以从以下的网盘地址下载。阅读工具包中README文件进行制卡。
-
制卡
###注意以下步骤,不要在Docker中执行,在PC机的Host环境(Ubuntu18.04)中执行!!! ###通过如下命令进行安装制卡工具包的系统依赖。 $ sudo apt-get install -y qemu-user-static python3-yaml binfmt-support gcc-aarch64-linux-gnu g++-aarch64-linux-gnu expect unzip squashfs-tools #注意Ubuntu 18.04系统:“gcc-aarch64-linux-gnu”与“g++-aarch64-linux-gnu”版本要求为7.4.0,其他依赖软件包无版本要求。默认安装的gcc版本为7.4.0。 $ tar xvf sd_maker_1.0.9_can3.3.0alpha006.tgz $ cd sd_maker #注意将micro SD卡插入PC机,如果PC机没有Micro SD卡槽,请用Micro SD读卡器进行转接。 $ sudo python3.7.5 make_sd_card.py local /dev/sdX #这里的sdX需要根据Micro SD卡插入Linux系统后生成的磁盘名来修改!! -
启动系统
将制好的卡插入DLAP221设备,上电启动,第一次启动系统会自动安装一些的平台依赖包和开发工具包,整个过程大概10多分钟,完成后系统会自动重启。建议用户接串口线来监视整个过程。串口波特率为115200 8N1,具体可以参考DLAP221的使用手册。
2. 模型转换
在DLAP221上完成ONNX模型到OM模型的转换
2.1 安装昇腾软件包
| 软件 | 版本 | 说明 | 获取方式 |
|---|---|---|---|
| mxManufacture | 2.0.1 | mxManufacture软件包 | mxManufacture下载页面 选择下载ARM安装包 |
| Ascend-CANN-toolkit | 3.3.0.alpha006 | Ascend-cann-toolkit开发套件包,社区版 | 社区版官网获取链接选择历史版本中的3.3.0.alpha006 |
-
安装Ascend Toolkit
从上表中的链接下载toolkit,保存到/home/HwHiAiUser目录中并安装
$ chmod +x Ascend-cann-toolkit_3.3.0.alpha006_linux-aarch64.run $ ./Ascend-cann-toolkit_3.3.0.alpha006_linux-aarch64.run --install --chip=Ascend310-minirc -
安装mxManufacture
从上表中的链接下载mxManufacture,保存到/home/HwHiAiUser目录中并安装
$ chmod +x Ascend-mindxsdk-mxmanufacture_2.0.1_linux-aarch64.run
$ ./Ascend-mindxsdk-mxmanufacture_2.0.1_linux-aarch64.run --install
$ source ~/.bashrc # 激活mxManufacture环境变量
运行结果:生成mxManufacture-2.0.1目录和mxManufacuture软链接。
2.2 模型转换
-
将Yolov5的ONNX模型拷贝到DLAP221上
$ scp yolov5s_sim_t.onnx HwHiAiUser@<DLAP221的IP>:~/yolov5 -
创建aipp配置文件aipp_yolov5s.cfg, 并输入以下内容
aipp_op { aipp_mode : static related_input_rank : 0 input_format : YUV420SP_U8 src_image_size_w : 640 src_image_size_h : 640 crop : false csc_switch : true rbuv_swap_switch : false matrix_r0c0 : 256 matrix_r0c1 : 0 matrix_r0c2 : 359 matrix_r1c0 : 256 matrix_r1c1 : -88 matrix_r1c2 : -183 matrix_r2c0 : 256 matrix_r2c1 : 454 matrix_r2c2 : 0 input_bias_0 : 0 input_bias_1 : 128 input_bias_2 : 128 var_reci_chn_0 : 0.0039216 var_reci_chn_1 : 0.0039216 var_reci_chn_2 : 0.0039216 } -
模型转换
$ source env.sh ##此步可选,默认制卡时已将环境变量设置好了
$ atc --model=./yolov5s_sim_t.onnx \
    --framework=5 \
    --output=./yolov5s_sim_t \
 	--input_format=NCHW \
    --input_shape="images:1,3,640,640"  \
 	--enable_small_channel=1 \
    --insert_op_conf=./aipp_yolov5s.cfg \
    --soc_version=Ascend310 \
 	--log=info
3. 推理测试
3.1 准备
-
编写pipeline文件
已为您编排好使用yolov5s进行目标检测的pipeline文件如下,该pipeline中只包括一条名为"classification+detection"的业务流,该业务流运行在0号芯片(DLAP221也只有一颗atlas200),由appsrc、mxpi_imagedecoder、mxpi_imageresize、mxpi_modelinfer、mxpi_dataserialize、appsink六个插件依次串连而成。注意,mxpi_imageresize插件设置缩放后的图片宽高为640*640且为等比缩放(“resizeType”: “Resizer_KeepAspectRatio_Fit”);mxpi_modelinfer插件中使用了与yolov5s_sim_t.om相适应的配置文件yolov5s.cfg和标签文件coco.names,均在此文档中提供。
yolov5s_example.pipelines
{
  "classification+detection": {
    "stream_config": {
      "deviceId": "0"
    },
    "mxpi_imagedecoder0": {
      "factory": "mxpi_imagedecoder",
      "next": "mxpi_imageresize0"
    },
    "mxpi_imageresize0": {
      "props": {
        "parentName": "mxpi_imagedecoder0",
        "resizeHeight": "640",
        "resizeWidth": "640",
        "resizeType": "Resizer_KeepAspectRatio_Fit"
      },
      "factory": "mxpi_imageresize",
      "next": "mxpi_modelinfer0"
    },s
    "mxpi_modelinfer0": {
      "props": {s
        "parentName": "mxpi_imageresize0",
        "modelPath": "../models/yolov5s/yolov5s_sim_t.om",
        "postProcessConfigPath": "../models/yolov5s/yolov5s.cfg",
        "labelPath": "../models/yolov5s/coco.names",
        "postProcessLibPath": "../../../lib/libMpYOLOv5PostProcessor.so"
      },
      "factory": "mxpi_modelinfer",
      "next": "mxpi_dataserialize0"
    },
    "mxpi_dataserialize0": {
      "props": {
        "outputDataKeys": "mxpi_modelinfer0"
      },
      "factory": "mxpi_dataserialize",
      "next": "appsink0"
    },
    "appsrc0": {
      "props": {
        "blocksize": "409600"
      },
      "factory": "appsrc",
      "next": "mxpi_imagedecoder0"
    },
    "appsink0": {
      "props": {
        "blocksize": "4096000"
      },
      "factory": "appsink"
    }
  }
}
将如上文件命名为yolov5s_example.pipeline,并保存至/home/HwHiAiUser/mxManufacture-2.0.1/samples/mxManufacture/pipeline目录。
-
编写yolov5s配置文件yolov5s.cfg
CLASS_NUM=80
BIASES_NUM=18
BIASES=10,13,16,30,33,23,30,61,62,45,59,119,116,90,156,198,373,326
SCORE_THRESH=0.6
OBJECTNESS_THRESH=0.6
IOU_THRESH=0.5
YOLO_TYPE=3
ANCHOR_DIM=3
MODEL_TYPE=1
RESIZE_FLAG=0
将如上文件命名为yolov5s.cfg,并保存至/home/HwHiAiUser/mxManufacture-2.0.1/samples/mxManufacture/models/yolov5s目录。
-
标签文件coco.names
# This file is originally from https://github.com/pjreddie/darknet/blob/master/data/coco.names
person
bicycle
car
motorbike
aeroplane
bus
train
truck
boat
traffic light
fire hydrant
stop sign
parking meter
bench
bird
cat
dog
horse
sheep
cow
elephant
bear
zebra
giraffe
backpack
umbrella
handbag
tie
suitcase
frisbee
skis
snowboard
sports ball
kite
baseball bat
baseball glove
skateboard
surfboard
tennis racket
bottle
wine glass
cup
fork
knife
spoon
bowl
banana
apple
sandwich
orange
broccoli
carrot
hot dog
pizza
donut
cake
chair
sofa
pottedplant
bed
diningtable
toilet
tvmonitor
laptop
mouse
remote
keyboard
cell phone
microwave
oven
toaster
sink
refrigerator
book
clock
vase
scissors
teddy bear
hair drier
toothbrush
将如上文件命名为coco.names,并保存至/home/HwHiAiUser/mxManufacture-2.0.1/samples/mxManufacture/models/yolov5s目录。
-
离线模型文件
拷贝yolov5s_sim_t.om文件到/home/HwHiAiUser/mxManufacture-2.0.1/samples/mxManufacture/models/yolov5s目录
至此,你已准备好运行yolov5s sample需要的所有文件。
4. 推理应用调度代码开发
4.1 理解并运行sample code
-
mxManufacture已为你准备好sample code,在/home/HwHiAiUser/mxManufacture-2.0.1/samples/mxManufacture/C++和/home/HwHiAiUser/mxManufacture-2.0.1/samples/mxManufacture/Python目录下。我们以C++代码为例,为了不影响默认提供的demo代码,我们另外在/home/HwHiAiUser/mxManufacture-2.0.1/samples/mxManufacture目录中创建一个文件夹:yolov5s_C++, 同时copy C++目录中的main.cpp和run.sh到我们新创建的目录。
$ cd /home/HwHiAiUser/mxManufacture-2.0.1/samples/mxManufacture $ mkdir yolov5s_C++ $ cp C++/main.cpp yolov5s_C++/ $ cp C++/run.sh yolov5s_C++/ $ ls main.cpp run.sh -
编辑main.cpp
打开main.cpp文件,在main函数中指定待推理的图片(88行)和待创建的业务流编排文件(94行),然后依次调用mxManufacture初化接口(102行,InitManager,初化始日志级别等)、业务流创建接口(108行,CreateMultipleStreams,根据pipeline文件创建业务流)、发送推理请求接口(116行,SendData,发送推理请求,参数中指定业务流名称和待推理图片)、获取推理结果接口(122行,GetResult,获取推理结果)和业务流销毁接口(132行,DestroyAllStreams,程序退出前调用)。
  1 /*
  2  * Copyright (c) 2020.Huawei Technologies Co., Ltd. All rights reserved.
  3  *
  4  * Licensed under the Apache License, Version 2.0 (the "License");
  5  * you may not use this file except in compliance with the License.
  6  * You may obtain a copy of the License at
  7  *
  8  *     http://www.apache.org/licenses/LICENSE-2.0
  9  *
 10  * Unless required by applicable law or agreed to in writing, software
 11  * distributed under the License is distributed on an "AS IS" BASIS,
 12  * WITHOUT WARRANTIES OR CONDITIONS OF ANY KIND, either express or implied.
 13  * See the License for the specific language governing permissions and
 14  * limitations under the License.
 15  */
 16
 17 #include <cstring>
 18 #include "MxBase/Log/Log.h"
 19 #include "MxStream/StreamManager/MxStreamManager.h"
 20 namespace {
 21 APP_ERROR ReadFile(const std::string& filePath, MxStream::MxstDataInput& dataBuffer)
 22 {
 23     char c[PATH_MAX + 1] = { 0x00 };
 24     size_t count = filePath.copy(c, PATH_MAX + 1);
 25     if (count != filePath.length()) {
 26         LogError << "Failed to copy file path(" << c << ").";
 27         return APP_ERR_COMM_FAILURE;
 28     }
 29     // Get the absolute path of input file
 30     char path[PATH_MAX + 1] = { 0x00 };
 31     if ((strlen(c) > PATH_MAX) || (realpath(c, path) == nullptr)) {
 32         LogError << "Failed to get image, the image path is (" << filePath << ").";
 33         return APP_ERR_COMM_NO_EXIST;
 34     }
 35     // Open file with reading mode
 36     FILE *fp = fopen(path, "rb");
 37     if (fp == nullptr) {
 38         LogError << "Failed to open file (" << path << ").";
 39         return APP_ERR_COMM_OPEN_FAIL;
 40     }
 41     // Get the length of input file
 42     fseek(fp, 0, SEEK_END);
 43     long fileSize = ftell(fp);
 44     fseek(fp, 0, SEEK_SET);
 45     // If file not empty, read it into FileInfo and return it
 46     if (fileSize > 0) {
 47         dataBuffer.dataSize = fileSize;
 48         dataBuffer.dataPtr = new (std::nothrow) uint32_t[fileSize];
 49         if (dataBuffer.dataPtr == nullptr) {
 50             LogError << "allocate memory with \"new uint32_t\" failed.";
 51             return APP_ERR_COMM_FAILURE;
 52         }
 53
 54         uint32_t readRet = fread(dataBuffer.dataPtr, 1, fileSize, fp);
 55         if (readRet <= 0) {
 56             fclose(fp);
 57             return APP_ERR_COMM_READ_FAIL;
 58         }
 59         fclose(fp);
 60         return APP_ERR_OK;
 61     }
 62     fclose(fp);
 63     return APP_ERR_COMM_FAILURE;
 64 }
 65
 66 std::string ReadPipelineConfig(const std::string& pipelineConfigPath)
 67 {
 68     std::ifstream file(pipelineConfigPath.c_str(), std::ifstream::binary);
 69     if (!file) {
 70         LogError << pipelineConfigPath <<" file dose not exist.";
 71         return "";
 72     }
 73     file.seekg(0, std::ifstream::end);
 74     uint32_t fileSize = file.tellg();
 75     file.seekg(0);
 76     std::unique_ptr<char[]> data(new char[fileSize]);
 77     file.read(data.get(), fileSize);
 78     file.close();
 79     std::string pipelineConfig(data.get(), fileSize);
 80     return pipelineConfig;
 81 }
 82 }
 83
 84 int main(int argc, char* argv[])
 85 {
 86     // read image file and build stream input
 87     MxStream::MxstDataInput dataBuffer;
 88     APP_ERROR ret = ReadFile("./test.jpg", dataBuffer);
 89     if (ret != APP_ERR_OK) {
 90         LogError << GetError(ret) << "Failed to read image file.";
 91         return ret;
 92     }
 93     // read pipeline config file
 94     std::string pipelineConfigPath = "../pipeline/yolov5s_example.pipeline";
 95     std::string pipelineConfig = ReadPipelineConfig(pipelineConfigPath);
 96     if (pipelineConfig == "") {
 97         LogError << "Read pipeline failed.";
 98         return APP_ERR_COMM_INIT_FAIL;
 99     }
100     // init stream manager
101     MxStream::MxStreamManager mxStreamManager;
102     ret = mxStreamManager.InitManager();
103     if (ret != APP_ERR_OK) {
104         LogError << GetError(ret) << "Failed to init Stream manager.";
105         return ret;
106     }
107     // create stream by pipeline config file
108     ret = mxStreamManager.CreateMultipleStreams(pipelineConfig);
109     if (ret != APP_ERR_OK) {
110         LogError << GetError(ret) << "Failed to create Stream.";
111         return ret;
112     }
113     std::string streamName = "classification+detection";
114     int inPluginId = 0;
115     // send data into stream
116     ret = mxStreamManager.SendData(streamName, inPluginId, dataBuffer);
117     if (ret != APP_ERR_OK) {
118         LogError << GetError(ret) << "Failed to send data to stream.";
119         return ret;
120     }
121     // get stream output
122     MxStream::MxstDataOutput* output = mxStreamManager.GetResult(streamName, inPluginId);
123     if (output == nullptr) {
124         LogError << "Failed to get pipeline output.";
125         return ret;
126     }
127
128     std::string result = std::string((char *)output->dataPtr, output->dataSize);
129     LogInfo << "Results:" << result;
130
131     // destroy streams
132     mxStreamManager.DestroyAllStreams();
133     delete dataBuffer.dataPtr;
134     dataBuffer.dataPtr = nullptr;
135
136     delete output;
137     return 0;
138 }
实际开发时,用户可以参考如上代码调用mxManufacture的五个接口:InitManager, CreateMultipleStreams, SendData, GetResult, DestroyAllStreams, 即可在自己的推理应用中使用mxManufacture进行推理了。这里我们指定业务流编排文件为3.1中编写好的yolov5s_example.pipeline文件,图片使用C++目录下的默认图片(test.jpg,是一张背景纯白的狗),无需修改。在C++目录下运行如下命令,可在日志中看到推理结果。
$ bash run.sh
省略部分输出....
I0518 04:23:20.026540  7934 MxGstBase.cpp:764] element(mxpi_imageresize0) gst_change_state NULL_TO_READY.
I0518 04:23:20.026688  7934 MxGstBase.cpp:632] element(mxpi_imageresize0) dynamicImageSize=640,640;
I0518 04:23:20.026892  7934 MxGstBase.cpp:764] element(mxpi_imagedecoder0) gst_change_state NULL_TO_READY.
I0518 04:23:20.027192  7934 MxStreamManager.cpp:384] Creates stream(classification+detection) successfully.
I0518 04:23:20.027390  7934 MxStreamManager.cpp:434] Creates streams successfully.
I0518 04:23:20.075621  7934 main.cpp:129] Results:{"MxpiObject":[{"classVec":[{"classId":16,"className":"dog","confidence":0.67863529899999997,"headerVec":   []}],"x0":72.779052699999994,"x1":941.77044699999999,"y0":132.82678200000001,"y1":604.33477800000003}]} ##此行为推理结果!!
I0518 04:23:20.075755  7934 MxsmStream.cpp:688] Begin to destroy stream(classification+detection).
I0518 04:23:20.075904  7934 MxsmStream.cpp:743] Send custom eos to the Stream successfully.
I0518 04:23:20.076239  7934 MxsmStream.cpp:749] Send eos to the Stream successfully.
I0518 04:23:20.076385  7934 MxsmStream.cpp:755] Flushes the Stream data successfully.
省略部分输出....
4.2 推理结果可视化&性能打点
为将推理结果更加直观地显示并简单测试推理性能,对run.sh脚本和main.cpp文件作简单修改:
-
run.sh脚本包含opencv的头文件和引入opencv_world动态库。
#!/bin/bash # Copyright 2020 Huawei Technologies Co., Ltd # # Licensed under the Apache License, Version 2.0 (the "License"); # you may not use this file except in compliance with the License. # You may obtain a copy of the License at # # http://www.apache.org/licenses/LICENSE-2.0 # # Unless required by applicable law or agreed to in writing, software # distributed under the License is distributed on an "AS IS" BASIS, # WITHOUT WARRANTIES OR CONDITIONS OF ANY KIND, either express or implied. # See the License for the specific language governing permissions and # limitations under the License. set -e CUR_PATH=$(cd "$(dirname "$0")" || { warn "Failed to check path/to/run.sh" ; exit ; } ; pwd) # Simple log helper functions info() { echo -e "\033[1;34m[INFO ][MxStream] $1\033[1;37m" ; } warn() { echo >&2 -e "\033[1;31m[WARN ][MxStream] $1\033[1;37m" ; } export MX_SDK_HOME="${CUR_PATH}/../../.." export LD_LIBRARY_PATH="${MX_SDK_HOME}/lib":"${MX_SDK_HOME}/opensource/lib":"${MX_SDK_HOME}/opensource/lib64":"/usr/local/Ascend/ascend-toolkit/latest/acllib/lib64":${LD_LIBRARY_PATH} export GST_PLUGIN_SCANNER="${MX_SDK_HOME}/opensource/libexec/gstreamer-1.0/gst-plugin-scanner" export GST_PLUGIN_PATH="${MX_SDK_HOME}/opensource/lib/gstreamer-1.0":"${MX_SDK_HOME}/lib/plugins" # complie ###包含opencv的头文件和引入opencv_world动态库 g++ main.cpp -I "${MX_SDK_HOME}/include/" -I "${MX_SDK_HOME}/opensource/include/" -I "${MX_SDK_HOME}/opensource/include/opencv4" -L "${MX_SDK_HOME}/lib/" -L "${MX_SDK_HOME}/opensource/lib/" -L "${MX_SDK_HOME}/opensource/lib64/" -std=c++11 -D_GLIBCXX_USE_CXX11_ABI=0 -Dgoogle=mindxsdk_private -fPIC -fstack-protector-all -g -Wl,-z,relro,-z,now,-z,noexecstack -pie -Wall -lglog -lmxbase -lmxpidatatype -lplugintoolkit -lstreammanager -lcpprest -lmindxsdk_protobuf -lopencv_world -o main # run ./main -
main.cpp添加利用opencv显示坐标框和性能打点代码。
-
第20行插入如下代码
#include "opencv4/opencv2/opencv.hpp" -
第116行插入如下代码
auto startTime = std::chrono::high_resolution_clock::now(); -
第125-128行插入如下代码
auto endTime = std::chrono::high_resolution_clock::now(); double costMs = std::chrono::duration<double, std::milli>(endTime - startTime).count(); LogInfo << "[SendData-GetResult] cost: " << costMs << "ms. "; LogInfo << "[SendData-GetResult] fps: " << 1000/costMs << "fps"; -
第137-173行插入如下代码
web::json::value jsonText = web::json::value::parse(result);
if (jsonText.is_object()) {
    web::json::object textObject = jsonText.as_object();
    auto itInferObject = textObject.find("MxpiObject");
    if (itInferObject == textObject.end() || (!itInferObject->second.is_array())) {
        return 0;
    }
    auto iter = itInferObject->second.as_array().begin();
    cv::Mat src = cv::imread("./test.jpg");
    for (; iter != itInferObject->second.as_array().end(); iter++) {
        if (iter->is_object()) {
            auto modelInferObject = iter->as_object();
            float x0 = 0;
            float x1 = 0;
            float y0 = 0;
            float y1 = 0;
            auto it = modelInferObject.find("x0");
            if (it != modelInferObject.end()) {
                x0 = float(it->second.as_double());
            }
            it = modelInferObject.find("x1");
            if (it != modelInferObject.end()) {
                x1 = float(it->second.as_double());
            }
            it = modelInferObject.find("y0");
            if (it != modelInferObject.end()) {
                y0 = float(it->second.as_double());
            }
            it = modelInferObject.find("y1");
            if (it != modelInferObject.end()) {
                y1 = float(it->second.as_double());
            }
            cv::Rect rect(x0, y0, x1 - x0, y1 - y0);
            cv::rectangle(src, rect, cv::Scalar(0, 255, 0),5, cv::LINE_8,0);
        }
    }
    cv::imwrite("./result.jpg", src);
}
-
修改完后的代码如下:
  1 /*
  2  * Copyright (c) 2020.Huawei Technologies Co., Ltd. All rights reserved.
  3  *
  4  * Licensed under the Apache License, Version 2.0 (the "License");
  5  * you may not use this file except in compliance with the License.
  6  * You may obtain a copy of the License at
  7  *
  8  *     http://www.apache.org/licenses/LICENSE-2.0
  9  *
 10  * Unless required by applicable law or agreed to in writing, software
 11  * distributed under the License is distributed on an "AS IS" BASIS,
 12  * WITHOUT WARRANTIES OR CONDITIONS OF ANY KIND, either express or implied.
 13  * See the License for the specific language governing permissions and
 14  * limitations under the License.
 15  */
 16
 17 #include <cstring>
 18 #include "MxBase/Log/Log.h"
 19 #include "MxStream/StreamManager/MxStreamManager.h"
 20 #include "opencv4/opencv2/opencv.hpp"
 21 namespace {
 22 APP_ERROR ReadFile(const std::string& filePath, MxStream::MxstDataInput& dataBuffer)
 23 {
 24     char c[PATH_MAX + 1] = { 0x00 };
 25     size_t count = filePath.copy(c, PATH_MAX + 1);
 26     if (count != filePath.length()) {
 27         LogError << "Failed to copy file path(" << c << ").";
 28         return APP_ERR_COMM_FAILURE;
 29     }
 30     // Get the absolute path of input file
 31     char path[PATH_MAX + 1] = { 0x00 };
 32     if ((strlen(c) > PATH_MAX) || (realpath(c, path) == nullptr)) {
 33         LogError << "Failed to get image, the image path is (" << filePath << ").";
 34         return APP_ERR_COMM_NO_EXIST;
 35     }
 36     // Open file with reading mode
 37     FILE *fp = fopen(path, "rb");
 38     if (fp == nullptr) {
 39         LogError << "Failed to open file (" << path << ").";
 40         return APP_ERR_COMM_OPEN_FAIL;
 41     }
 42     // Get the length of input file
 43     fseek(fp, 0, SEEK_END);
 44     long fileSize = ftell(fp);
 45     fseek(fp, 0, SEEK_SET);
 46     // If file not empty, read it into FileInfo and return it
 47     if (fileSize > 0) {
 48         dataBuffer.dataSize = fileSize;
 49         dataBuffer.dataPtr = new (std::nothrow) uint32_t[fileSize];
 50         if (dataBuffer.dataPtr == nullptr) {
 51             LogError << "allocate memory with \"new uint32_t\" failed.";
 52             return APP_ERR_COMM_FAILURE;
 53         }
 54
 55         uint32_t readRet = fread(dataBuffer.dataPtr, 1, fileSize, fp);
 56         if (readRet <= 0) {
 57             fclose(fp);
 58             return APP_ERR_COMM_READ_FAIL;
 59         }
 60         fclose(fp);
 61         return APP_ERR_OK;
 62     }
 63     fclose(fp);
 64     return APP_ERR_COMM_FAILURE;
 65 }
 66
 67 std::string ReadPipelineConfig(const std::string& pipelineConfigPath)
 68 {
 69     std::ifstream file(pipelineConfigPath.c_str(), std::ifstream::binary);
 70     if (!file) {
 71         LogError << pipelineConfigPath <<" file dose not exist.";
 72         return "";
 73     }
 74     file.seekg(0, std::ifstream::end);
 75     uint32_t fileSize = file.tellg();
 76     file.seekg(0);
 77     std::unique_ptr<char[]> data(new char[fileSize]);
 78     file.read(data.get(), fileSize);
 79     file.close();
 80     std::string pipelineConfig(data.get(), fileSize);
 81     return pipelineConfig;
 82 }
 83 }
 84
 85 int main(int argc, char* argv[])
 86 {
 87     // read image file and build stream input
 88     MxStream::MxstDataInput dataBuffer;
 89     APP_ERROR ret = ReadFile("./test.jpg", dataBuffer);
 90     if (ret != APP_ERR_OK) {
 91         LogError << GetError(ret) << "Failed to read image file.";
 92         return ret;
 93     }
 94     // read pipeline config file
 95     std::string pipelineConfigPath = "../pipeline/yolov5s_example.pipeline";
 96     std::string pipelineConfig = ReadPipelineConfig(pipelineConfigPath);
 97     if (pipelineConfig == "") {
 98         LogError << "Read pipeline failed.";
 99         return APP_ERR_COMM_INIT_FAIL;
100     }
101     // init stream manager
102     MxStream::MxStreamManager mxStreamManager;
103     ret = mxStreamManager.InitManager();
104     if (ret != APP_ERR_OK) {
105         LogError << GetError(ret) << "Failed to init Stream manager.";
106         return ret;
107     }
108     // create stream by pipeline config file
109     ret = mxStreamManager.CreateMultipleStreams(pipelineConfig);
110     if (ret != APP_ERR_OK) {
111         LogError << GetError(ret) << "Failed to create Stream.";
112         return ret;
113     }
114     std::string streamName = "classification+detection";
115     int inPluginId = 0;
116     // send data into stream
117     auto startTime = std::chrono::high_resolution_clock::now();
118     ret = mxStreamManager.SendData(streamName, inPluginId, dataBuffer);
119     if (ret != APP_ERR_OK) {
120         LogError << GetError(ret) << "Failed to send data to stream.";
121         return ret;
122     }
123     // get stream output
124     MxStream::MxstDataOutput* output = mxStreamManager.GetResult(streamName, inPluginId);
125     auto endTime = std::chrono::high_resolution_clock::now();
126     double costMs = std::chrono::duration<double, std::milli>(endTime - startTime).count();
127     LogInfo << "[SendData-GetResult] cost: " << costMs << "ms. ";
128     LogInfo << "[SendData-GetResult] fps: " << 1000/costMs << "fps";
129     if (output == nullptr) {
130         LogError << "Failed to get pipeline output.";
131         return ret;
132     }
133
134     std::string result = std::string((char *)output->dataPtr, output->dataSize);
135     LogInfo << "Results:" << result;
136
137     web::json::value jsonText = web::json::value::parse(result);
138     if (jsonText.is_object()) {
139         web::json::object textObject = jsonText.as_object();
140         auto itInferObject = textObject.find("MxpiObject");
141         if (itInferObject == textObject.end() || (!itInferObject->second.is_array())) {
142             return 0;
143         }
144         auto iter = itInferObject->second.as_array().begin();
145         cv::Mat src = cv::imread("./test.jpg");
146         for (; iter != itInferObject->second.as_array().end(); iter++) {
147             if (iter->is_object()) {
148                 auto modelInferObject = iter->as_object();
149                 float x0 = 0;
150                 float x1 = 0;
151                 float y0 = 0;
152                 float y1 = 0;
153                 auto it = modelInferObject.find("x0");
154                 if (it != modelInferObject.end()) {
155                     x0 = float(it->second.as_double());
156                 }
157                 it = modelInferObject.find("x1");
158                 if (it != modelInferObject.end()) {
159                     x1 = float(it->second.as_double());
160                 }
161                 it = modelInferObject.find("y0");
162                 if (it != modelInferObject.end()) {
163                     y0 = float(it->second.as_double());
164                 }
165                 it = modelInferObject.find("y1");
166                 if (it != modelInferObject.end()) {
167                     y1 = float(it->second.as_double());
168                 }
169                 cv::Rect rect(x0, y0, x1 - x0, y1 - y0);
170                 cv::rectangle(src, rect, cv::Scalar(0, 255, 0),5, cv::LINE_8,0);
171             }
172         }
173         cv::imwrite("./result.jpg", src);
174     }
175     // destroy streams
176     mxStreamManager.DestroyAllStreams();
177     delete dataBuffer.dataPtr;
178     dataBuffer.dataPtr = nullptr;
179
180     delete output;
181     return 0;
182 }
再回到yolov5s_C++目录,运行bash run.sh,日志显示, 处理时间为:49.491ms. 平均帧率为:20.2057fps, test.jpg的分辨率为:1024x683
$ bash run.sh
省略部分输出...
I0518 05:48:41.255576  8093 MxGstBase.cpp:632] element(mxpi_imageresize0) dynamicImageSize=640,640;
I0518 05:48:41.255784  8093 MxGstBase.cpp:764] element(mxpi_imagedecoder0) gst_change_state NULL_TO_READY.
I0518 05:48:41.256076  8093 MxStreamManager.cpp:384] Creates stream(classification+detection) successfully.
I0518 05:48:41.256207  8093 MxStreamManager.cpp:434] Creates streams successfully.
I0518 05:48:41.305809  8093 main.cpp:131] [SendData-GetResult] cost: 49.491ms.
I0518 05:48:41.305980  8093 main.cpp:132] [SendData-GetResult] fps: 20.2057fps
I0518 05:48:41.306020  8093 main.cpp:135] Results:{"MxpiObject":[{"classVec":[{"classId":16,"className":"dog","confidence":0.67103165399999998,"headerVec":[]}],"x0":71.558685299999993,"x1":943.03247099999999,"y0":132.90640300000001,"y1":604.41442900000004}]}
I0518 05:48:41.377825  8093 MxsmStream.cpp:688] Begin to destroy stream(classification+detection).
I0518 05:48:41.378067  8093 MxsmStream.cpp:743] Send custom eos to the Stream successfully.
I0518 05:48:41.378247  8093 MxsmStream.cpp:749] Send eos to the Stream successfully.
I0518 05:48:41.378386  8093 MxsmStream.cpp:755] Flushes the Stream data successfully.
I0518 05:48:41.378731  8093 MxGstBase.cpp:770] element(mxpi_dataserialize0) gst_change_state PLAYING_TO_PAUSED.
I0518 05:48:41.378816  8093 MxGstBase.cpp:770] element(mxpi_modelinfer0) gst_change_state PLAYING_TO_PAUSED.
I0518 05:48:41.378883  8093 MxGstBase.cpp:770] element(mxpi_imageresize0) gst_change_state PLAYING_TO_PAUSED.
I0518 05:48:41.378957  8093 MxGstBase.cpp:770] element(mxpi_imagedecoder0) gst_change_state PLAYING_TO_PAUSED.
I0518 05:48:41.379127  8093 MxGstBase.cpp:773] element(mxpi_dataserialize0) gst_change_state PAUSED_TO_READY.
省略部分输出...
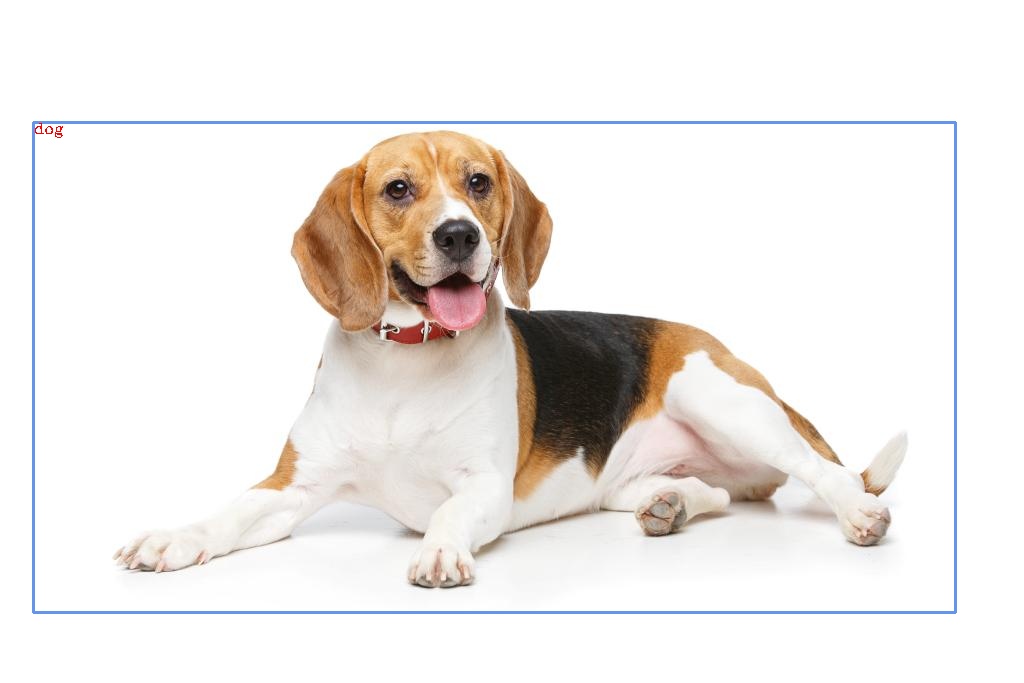
和当前目录生成的result.jpg图片如下。

5. 纯推理测试
4.2中的推理性能是端到端的性能,其中包括了图像预处理和推理结果的后处理时间,现在我们测试模型的纯推理时间。
5.1 下载benchmark工具
从网盘下载benchmark工具,提取码:5uzu,并解压缩到/home/HwHiAiUser目录
$ cd /home/HwHiAiUser
$ unzip Ascend-cann-benchmark_5.0.1-Linux-aarch64.zip
5.2 性能测试
$ cd /home/HwHiAiUser/mxManufacture/samples/mxManufacture/models/yolov5s
$ sudo /home/HwHiAiUser/benchmark_tools/benchmark.aarch64 -batch_size=1 -om_path=./yolov5s_sim_t.om -round=50 -device_id=0
[INFO][Inference] PureInfer Init SUCCESS
[INFO] Dataset number: 0 finished cost 24.818ms
[INFO] Dataset number: 1 finished cost 9.682ms
[INFO] Dataset number: 2 finished cost 9.714ms
[INFO] Dataset number: 3 finished cost 9.707ms
[INFO] Dataset number: 4 finished cost 9.658ms
[INFO] Dataset number: 5 finished cost 9.704ms
[INFO] Dataset number: 6 finished cost 9.686ms
[INFO] Dataset number: 7 finished cost 9.612ms
[INFO] Dataset number: 8 finished cost 9.588ms
[INFO] Dataset number: 9 finished cost 9.631ms
[INFO] Dataset number: 10 finished cost 9.614ms
[INFO] Dataset number: 11 finished cost 9.721ms
[INFO] Dataset number: 12 finished cost 9.677ms
[INFO] Dataset number: 13 finished cost 9.717ms
[INFO] Dataset number: 14 finished cost 9.671ms
[INFO] Dataset number: 15 finished cost 9.652ms
[INFO] Dataset number: 16 finished cost 9.672ms
[INFO] Dataset number: 17 finished cost 9.594ms
[INFO] Dataset number: 18 finished cost 9.622ms
[INFO] Dataset number: 19 finished cost 9.624ms
[INFO] Dataset number: 20 finished cost 9.671ms
[INFO] Dataset number: 21 finished cost 9.621ms
[INFO] Dataset number: 22 finished cost 9.682ms
[INFO] Dataset number: 23 finished cost 9.75ms
[INFO] Dataset number: 24 finished cost 9.736ms
[INFO] Dataset number: 25 finished cost 9.645ms
[INFO] Dataset number: 26 finished cost 9.657ms
[INFO] Dataset number: 27 finished cost 9.59ms
[INFO] Dataset number: 28 finished cost 9.631ms
[INFO] Dataset number: 29 finished cost 9.61ms
[INFO] Dataset number: 30 finished cost 9.616ms
[INFO] Dataset number: 31 finished cost 9.651ms
[INFO] Dataset number: 32 finished cost 9.671ms
[INFO] Dataset number: 33 finished cost 9.661ms
[INFO] Dataset number: 34 finished cost 9.71399ms
[INFO] Dataset number: 35 finished cost 9.691ms
[INFO] Dataset number: 36 finished cost 9.69ms
[INFO] Dataset number: 37 finished cost 9.666ms
[INFO] Dataset number: 38 finished cost 9.62ms
[INFO] Dataset number: 39 finished cost 9.607ms
[INFO] Dataset number: 40 finished cost 9.591ms
[INFO] Dataset number: 41 finished cost 9.63ms
[INFO] Dataset number: 42 finished cost 9.633ms
[INFO] Dataset number: 43 finished cost 9.66ms
[INFO] Dataset number: 44 finished cost 9.71ms
[INFO] Dataset number: 45 finished cost 9.706ms
[INFO] Dataset number: 46 finished cost 9.688ms
[INFO] Dataset number: 47 finished cost 9.665ms
[INFO] Dataset number: 48 finished cost 9.616ms
[INFO] Dataset number: 49 finished cost 9.617ms
[INFO] PureInfer result saved in ./result/PureInfer_perf_of_yolov5s_sim_t_in_device_0.txt
-----------------PureInfer Performance Summary------------------
[INFO] ave_throughputRate: 103.547samples/s, ave_latency: 9.9612ms
----------------------------------------------------------------
6. 基于SDK的推理代码开发
6.1 下载样例代码
从https://gitee.com/shiner-chen/APISamples获取最新的样例代码。
$ git clone git@gitee.com:shiner-chen/APISamples.git
6.2 编译运行
$ cd APISamples/src/Samples/InferObjectDetection
$ bash build.sh YOLOV5
$ cd dist
$ ./main -i test.jpg -t 2
[Info ][2021-05-20 11:39:19:411328][ResourceManager.cpp InitResource:75] Initialized acl successfully.
[Info ][2021-05-20 11:39:19:505191][ResourceManager.cpp InitResource:84] Open device 0 successfully.
[Info ][2021-05-20 11:39:19:506968][ResourceManager.cpp InitResource:91] Created context for device 0 successfully
[Info ][2021-05-20 11:39:19:507094][ResourceManager.cpp InitResource:102] Init resource successfully.
[Info ][2021-05-20 11:39:19:507272][AclProcess.cpp InitResource:161] Create context successfully
[Info ][2021-05-20 11:39:19:507957][AclProcess.cpp InitResource:167] Create stream successfully
[Info ][2021-05-20 11:39:19:523990][AclProcess.cpp InitModule:121] Initialize dvppCommon_ successfully
[Info ][2021-05-20 11:39:19:524167][ModelProcess.cpp Init:240] ModelProcess:Begin to init instance.
[Info ][2021-05-20 11:39:19:839716][AclProcess.cpp InitModule:139] Initialize ModelProcess_ successfully
[Info ][2021-05-20 11:39:19:856578][AclProcess.cpp InitModule:145] Loaded label successfully.
[Info ][2021-05-20 11:39:19:884394][AclProcess.cpp YoloPostProcess:503] The number of output buffers of yolov3 model is 3
[Info ][2021-05-20 11:39:19:903552][AclProcess.cpp YoloPostProcess:528] #Obj0, box(33.537, 122.282, 955.744, 612.067)   confidence: 0.777343 label: dog
[Info ][2021-05-20 11:39:19:903891][AclProcess.cpp YoloPostProcess:535] [Process Delay] cost: 47.1801ms fps: 21.1954
[Info ][2021-05-20 11:39:19:942970][AclProcess.cpp Release:71] Destroy stream successfully
[Info ][2021-05-20 11:39:19:943135][ModelProcess.cpp DeInit:150] Model[yolov3][0] deinit begin
[Info ][2021-05-20 11:39:19:965709][ModelProcess.cpp DeInit:189] Model[yolov3][0] deinit success
[Info ][2021-05-20 11:39:19:973285][ResourceManager.cpp Release:44] Finalized acl successfully.

$ ls ./result/result_test.jpg
result_test.jpg
生成的结果图片:


 2569
2569


 被折叠的 条评论
为什么被折叠?
被折叠的 条评论
为什么被折叠?
 到【灌水乐园】发言


