


TORCHVISION 目标检测微调教程
前言
前四节,我们初步掌握了通过PyTorch构建神经网络模型,以及优化参数,模型集成等问题,本章程将微调Penn-Fudan 数据库中用于行人检测和分割的预训练Mask R-CNN模型。它包含 170 张图像和 345 个行人实例,我们将用它来说明如何使用 torchvision 中的新功能在自定义数据集上训练实例分割模型。
定义数据集
用于训练对象检测、实例分割和人物关键点检测的参考脚本允许轻松支持添加新的自定义数据集。数据集应该继承自标准 torch.utils.data.Dataset类,并实现len 和 getitem 。
-
图像:大小的 PIL 图像 (H, W)
-
目标:包含以下字段的字典
- boxes(FloatTensor[N, 4]):N 边界框的坐标格式,范围从to和to[x0, y0, x1, y1] 0 W 0 H
- labels(Int64Tensor[N]):每个边界框的标签。0始终代表背景类。
- image_id (Int64Tensor[1]):图像标识符。
- area (Tensor[N]):边界框的面积。在使用coco指标评估期间用以分离小,中,和大框之间的指标分数。
- iscrowd (UInt8Tensor[N]):在评估期间将忽略 iscrowd=True 的实例。
如果使用上述类,使其适用于训练和评估,并且将使用 pycocotools可以通过pip install pycocotools上的一个注释labels
!pip install cython
!pip install git+https://github.com/philferriere/cocoapi.git#subdirectory=PythonAPI
注意:安装git教程参考https://git-scm.com。第二条命令可能会出现一些问题,请确认正确git地址。如果其中一个图像具有两个类,则您的 labels张量为[1,2]。另外,如果在训练时使用纵横比分组(每个batch只包含纵横比相似的图像)建议使用get_height_and_width返回图像高度和宽度。
为 PennFudan 编写自定义数据集
为 PennFudan 数据集编写一个数据集点击下载地址。文件结构如下;
PennFudanPed/
PedMasks/
  FudanPed00001_mask.png
  FudanPed00002_mask.png
  FudanPed00003_mask.png
  FudanPed00004_mask.png
  ...
PNGImages/
  FudanPed00001.png
  FudanPed00002.png
  FudanPed00003.png
  FudanPed00004.png
如下图所示,这是一对图像和分割掩码的例子
from PIL import Image
img=Image.open('C:/Users/12499/Documents/PennFudanPed/PNGImages/FudanPed00001.png')
img.show()
mask = Image.open('C:/Users/12499/Documents/PennFudanPed/PNGImages/FudanPed00001.png')
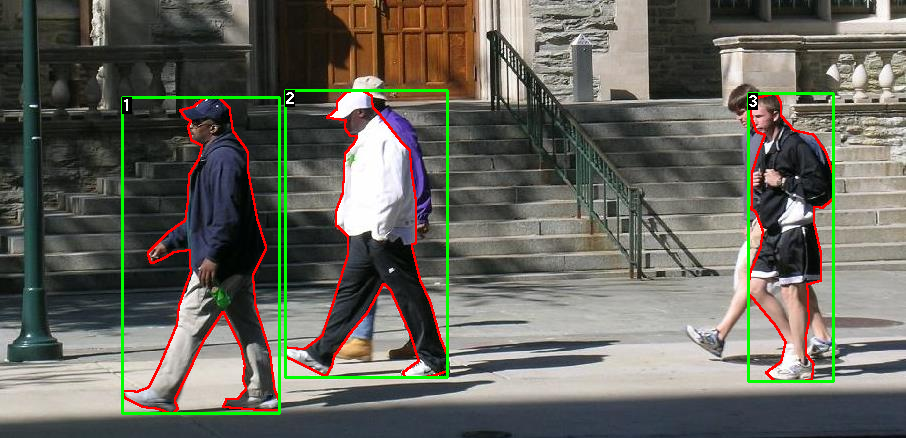

每个图像都有一个对应的分割掩码,其中每种颜色对应不同的实例。使用torch.utils.data.Dataset为该数据集编写一个类
import os
import numpy as np
import torch
from PIL import Image


class PennFudanDataset(torch.utils.data.Dataset):
  def __init__(self, root, transforms):
      self.root = root
      self.transforms = transforms
      # load all image files, sorting them to
      # ensure that they are aligned
      self.imgs = list(sorted(os.listdir(os.path.join(root, "PNGImages"))))
      self.masks = list(sorted(os.listdir(os.path.join(root, "PedMasks"))))

  def __getitem__(self, idx):
      # load images and masks
      img_path = os.path.join(self.root, "PNGImages", self.imgs[idx])
      mask_path = os.path.join(self.root, "PedMasks", self.masks[idx])
      img = Image.open(img_path).convert("RGB")
      # note that we haven't converted the mask to RGB,
      # because each color corresponds to a different instance
      # with 0 being background
      mask = Image.open(mask_path)
      # convert the PIL Image into a numpy array
      mask = np.array(mask)
      # instances are encoded as different colors
      obj_ids = np.unique(mask)
      # first id is the background, so remove it
      obj_ids = obj_ids[1:]

      # split the color-encoded mask into a set
      # of binary masks
      masks = mask == obj_ids[:, None, None]

      # get bounding box coordinates for each mask
      num_objs = len(obj_ids)
      boxes = []
      for i in range(num_objs):
          pos = np.where(masks[i])
          xmin = np.min(pos[1])
          xmax = np.max(pos[1])
          ymin = np.min(pos[0])
          ymax = np.max(pos[0])
          boxes.append([xmin, ymin, xmax, ymax])

      # convert everything into a torch.Tensor
      boxes = torch.as_tensor(boxes, dtype=torch.float32)
      # there is only one class
      labels = torch.ones((num_objs,), dtype=torch.int64)
      masks = torch.as_tensor(masks, dtype=torch.uint8)

      image_id = torch.tensor([idx])
      area = (boxes[:, 3] - boxes[:, 1]) * (boxes[:, 2] - boxes[:, 0])
      # suppose all instances are not crowd
      iscrowd = torch.zeros((num_objs,), dtype=torch.int64)

      target = {
   }
      target["boxes"] = boxes
      target["labels"] = labels
      target["masks"] = masks
      target["image_id"] = image_id
      target["area"] = area
      target["iscrowd"] = iscrowd

      if self.transforms is not None:
          img, target = self.transforms(img, target)

      return img, target

  def __len__(self):
      return len(self.imgs)
模型定义
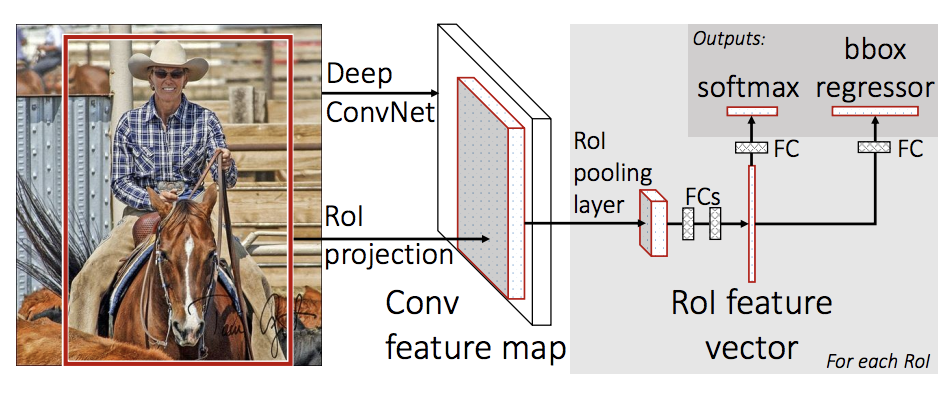
我们将使用Faster R-CNN和Mask R-CNN。Faster R-CNN 是一种用于对象检测的深度卷积网络,在用户看来是一个单一的、端到端的、统一的网络。该网络可以准确快速地预测不同物体的位置。
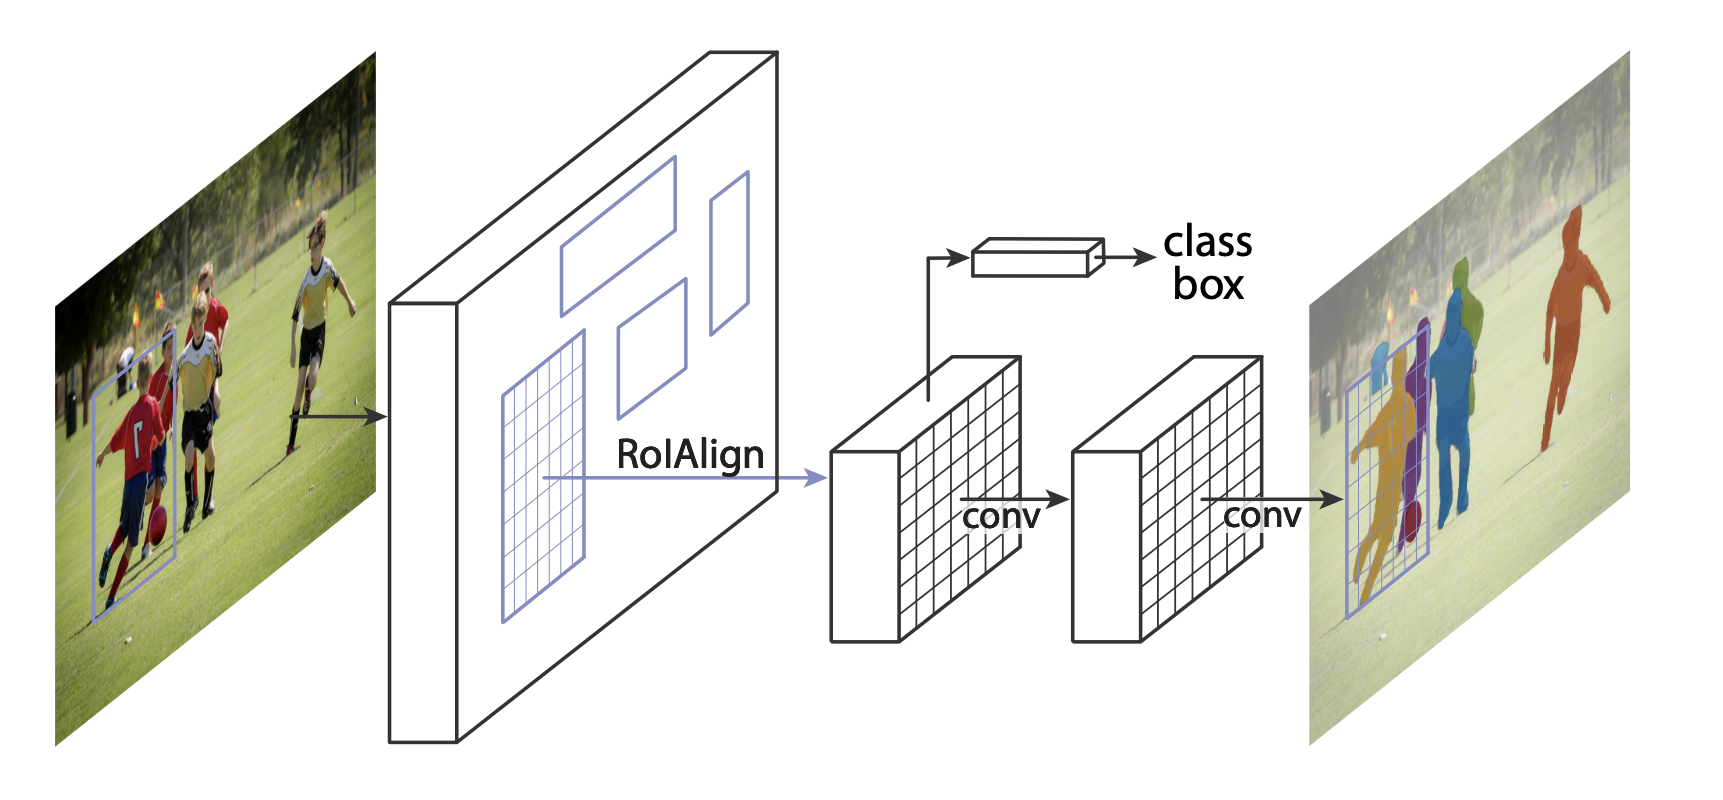
Mask R-CNN 在 Faster R-CNN 中添加了一个额外的分支,它还可以为每个实例生成高质量的分割掩码,在图像分割方面是最先进的。
在预训练模型最后一层进行微调或者使用不同模型替换模型主干时可以通过以下方法进行调整
微调预训练模型
从coco上预训练模型开始,针对特定类进行微调,调整方式如下所示;
import torchvision
from torchvision.models.detection.faster_rcnn import FastRCNNPredictor

# load a model pre-trained pre-trained on COCO
model = torchvision.models
最低0.47元/天 解锁文章


 527
527


 被折叠的 条评论
为什么被折叠?
被折叠的 条评论
为什么被折叠?
 到【灌水乐园】发言


