


1 编译构建
1)源码路径:1、例程源码->6、BusyBox 源码->busybox-1.29.0.tar.bz2
1.1 初步构建
-
环境准备
1)创建目录:在~/linux/nfs目录下新建一个名为rootfs的文件夹,将来的根文件系统就存放在这个目录下,mkdir rootfs2)将
busybox-1.29.0.tar.bz2拷贝到~/linux/IMX6ULL/busybox目录下,并解压busybox-1.29.0.tar.bz2文件 -
修改Makefile,添加编译器
打开busybox的顶层Makefile,添加ARCH和CROSS_COMPOLE的值,CROSS_COMPOLE的值要为绝对路径,如下所示:CROSS_COMPILE ?= /usr/local/arm/gcc-linaro-4.9.4-2017.01-x86_64_arm-linux-gnueabihf/bin/arm-linux-gnueabihf- ARCH ?= arm -
busybox对中文字符的支持
1)打开busybox- 1.29.0/libbb/printable_string.c文件,找到函数printable_string,,做如下修改:const char* FAST_FUNC printable_string(uni_stat_t *stats, const char *str) { char *dst; const char *s; s = str; while (1) { unsigned char c = *s; if (c == '\0') { /* 99+% of inputs do not need conversion */ if (stats) { stats->byte_count = (s - str); stats->unicode_count = (s - str); stats->unicode_width = (s - str); } return str; } if (c < ' ') break; // 注释这两行 /* if (c >= 0x7f) break; */ s++; } #if ENABLE_UNICODE_SUPPORT dst = unicode_conv_to_printable(stats, str); #else { char *d = dst = xstrdup(str); while (1) { unsigned char c = *d; if (c == '\0') break; // 修改这个地方 /* if (c < ' ' || c >= 0x7f) */ // 去掉内容 if ( c < ' ') // 修改内容 *d = '?'; d++; } if (stats) { stats->byte_count = (d - dst); stats->unicode_count = (d - dst); stats->unicode_width = (d - dst); } } #endif return auto_string(dst); }2)打开
busybox-1.29.0/libbb/unicode.c文件,找到unicode_conv_to_printable2函数(1003行),修改如下内容:static char* FAST_FUNC unicode_conv_to_printable2(uni_stat_t *stats, const char *src, unsigned width, int flags) { char *dst; unsigned dst_len; unsigned uni_count; unsigned uni_width; if (unicode_status != UNICODE_ON) { char *d; if (flags & UNI_FLAG_PAD) { d = dst = xmalloc(width + 1); while ((int)--width >= 0) { unsigned char c = *src; if (c == '\0') { do *d++ = ' '; while ((int)--width >= 0); break; } /* 修改代码 */ *d++ = (c >= ' ' && c < 0x7f) ? c : '?'; *d++ = (c >= ' ' ) ? c : '?'; src++; } *d = '\0'; } else { d = dst = xstrndup(src, width); while (*d) { unsigned char c = *d; /* 修改代码 */ /* if (c < ' ' || c >= 0x7f) */ if (c < ' ') *d = '?'; d++; } } ...... } -
配置busybox
busybox的配置选项有如下几种:- defconfig:默认配置
- allyesconfig:全选配置
- allnconfig:最小配置
一般使用默认配置即可,下面使用默认配置配置busybox。
make defconfigbusybox也支持图形化配置,打开图形化配置界面:
make menuconfig1)取消静态编译,配置路径如下:
 Location:
 	-> Settings
 		-> Build static binary (no shared libs)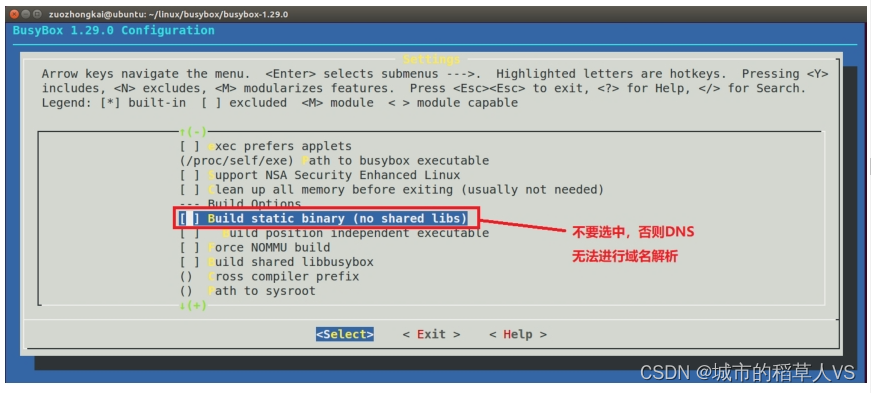
2)支持vi风格,路径如下:Location: -> Settings -> vi-style line editing commands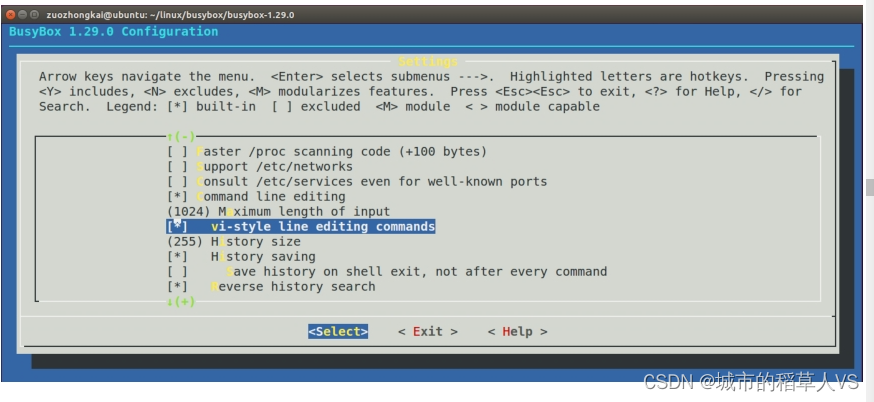
3)取消勾选Simplified modutils
 Location:
 	-> Linux Module Utilities
 		-> Simplified modutils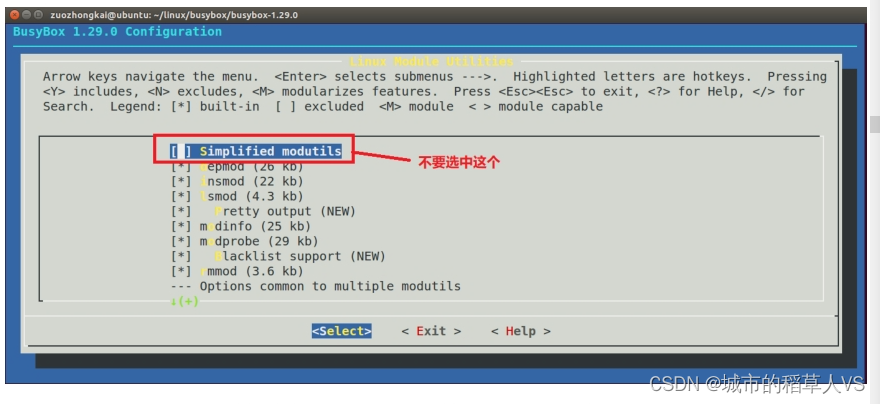
4)确保 mdev (16 kb)下面的全部选中Location: -> Linux System Utilities -> mdev (16 kb) //确保下面的全部选中,默认都是选中的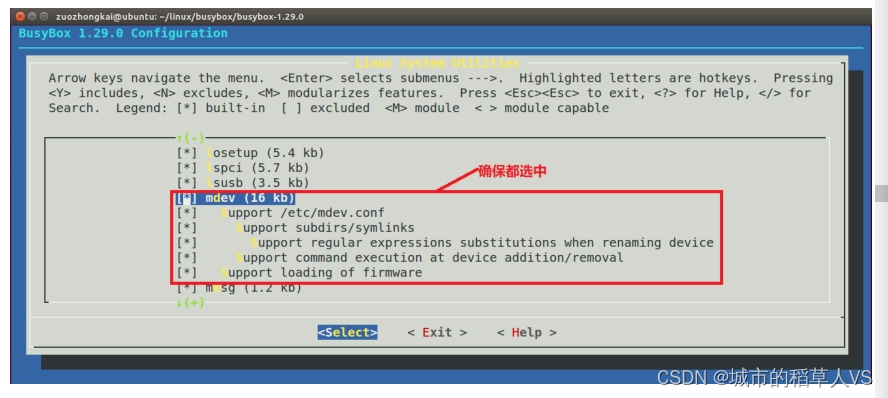
5)使能 unicode 编码以支持中文Location: -> Settings -> Support Unicode //选中 -> Check $LC_ALL, $LC_CTYPE and $LANG environment variables //选中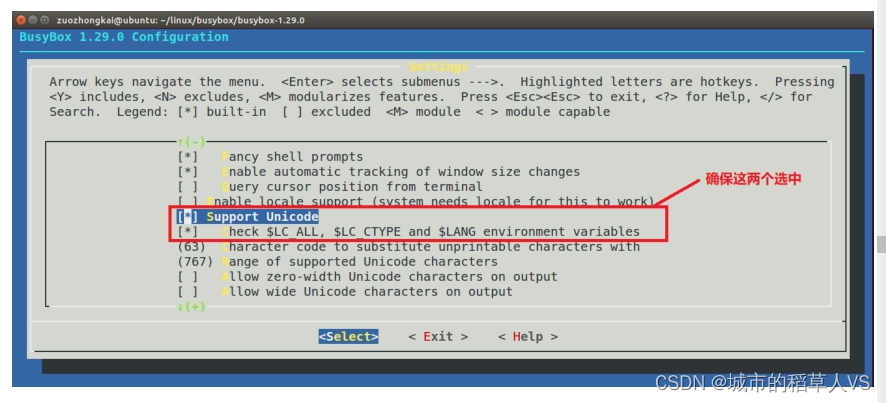
-
编译busybox
编译busybox时,将编译结果存放在最~/linux/nfs/rootfs目录中,命令如下:make install CONFIG_PREFIX=/home/zuozhongkai/linux/nfs/rootfsCOFIG_PREFIX 指定编译结果的存放目录,编译完成以后会在 busybox 的所有工具和文件就会被安装到 rootfs 目录中。目录内容有
bin、linuxrc、sbin、usr
1.2 向根文件系统添加lib库
1.2.1 向rootfs的/lib目录添加库文件
在rootfs目录下新建lib目录,将库文件拷贝到该目录下。执行如下命令:
1) 进入到下面路径
cd /usr/local/arm/gcc-linaro-4.9.4-2017.01-x86_64_arm-linux-gnueabihf/arm-linux-gnueabihf/libc/lib
2)拷贝so和.a文件
cp *so* *.a /home/zuozhongkai/linux/nfs/rootfs/lib/ -d
3)替换ld-linux-armhf.so.3
在rootfs/lib中删除ld-linux-armhf.so.3,重新拷贝
cd ~/linux/nfs/rootfs/lib
rm ld-linux-armhf.so.3
cd  /usr/local/arm/gcc-linaro-4.9.4-2017.01-x86_64_arm-linux-gnueabihf/arm-linux-gnueabihf/libc/lib
cp ld-linux-armhf.so.3 /home/zuozhongkai/linux/nfs/rootfs/lib/
4)继续拷贝库文件
cd /usr/local/arm/gcc-linaro-4.9.4-2017.01-x86_64_arm-linux-gnueabihf/arm-linux-gnueabihf/lib
cp *so* *.a /home/zuozhongkai/linux/nfs/rootfs/lib/ -d
1.2.2 向usr/lib目录添加库文件
在usr中创建一个名为lib的目录,拷贝库文件到该目录
cd /usr/local/arm/gcc-linaro-4.9.4-2017.01-x86_64_arm-linux-gnueabihf/arm-linux-gnueabihf/libc/usr/lib
cp *so* *.a /home/zuozhongkai/linux/nfs/rootfs/usr/lib/ -d
可以使用du命令查看两个lib库的大小
cd rootfs //进入根文件系统目录
du ./lib ./usr/lib/ -sh //查看 lib 和 usr/lib 这两个目录的大小
1.2.3 创建其他文件夹
创建dev、proc、mnt、sys、tmp 和 root文件夹。
1.2.4 根文件系统测试
修改bootargs环境变量,修改为如下内容:
setenv bootargs 'console=ttymxc0,115200 root=/dev/nfs rw nfsroot=192.168.0.12:/home/user/linux/nfs/rootfs ip=192.168.0.100:192.168.0.12:192.168.0.1:255.255.255.0::eth0:off' //设置 bootargs
saveenv //保存环境变量
bootargs环境变量设置root的值设置方式如下:
root=/dev/nfs nfsroot=[<server-ip>:]<root-dir>[,<nfs-options>] ip=<client-ip>:<server-ip>:<gw-ip>:<netmask>:<hostname>:<device>:<autoconf>:<dns0-ip>:<dns1-ip>

server-ip:服务器IP地址
root-dir:根文件系统的存放路径
nfs-options:NFS的其他可选选项
client-ip:客户端ip
gw-ip:网关地址
netmask:子网掩码
hostname:主机名
device:设备名
autoconf:自动配置
dns0-ip:DNS0 服务器 IP 地址,不使用
dns1-ip:DNS1 服务器 IP 地址,不使用
此时的根文件系统还不完善,会提示错误can't run '/etc/init.d/rcS': No such file or directory,提示很简单,说是无法运行“/etc/init.d/rcS”这个文件,因为这个文件不存在。
2 完善根文件系统
2.1 创建/etc/init.d/rcS文件
rcS是个shell脚本,Linux内核启动后需要启动一些服务,而rcS就是规定启动哪些文件的脚本,在root中/etc/init.d/rcS文件,输入如下内容:
#!/bin/sh

PATH=/sbin:/bin:/usr/sbin:/usr/bin:$PATH		# 保存可执行文件的路径
LD_LIBRARY_PATH=$LD_LIBRARY_PATH:/lib:/usr/lib	# 保存库文件所在路径
export PATH LD_LIBRARY_PATH		# 导出环境变量,相当于全局变量

mount -a			# 挂在所有文件,这些文件系统由文件/etc/fstab指定
mkdir /dev/pts		# 创建/dev/pts文件
mount -t devpts devpts /dev/pts		# 挂在/dev/pts文件

# 热插拔 linux内核可以在/dev目录下自动创建设备节点
echo /sbin/mdev > /proc/sys/kernel/hotpiug
mdev -s
创建好文件之后,一定要给文件可执行权限:
chmod 777 rcS
2.2 创建/etc/fstab文件
在rootfs中创建/etc/fstab文件,在linux开机后自动配置哪些需要自动挂在的分区,格式如下
<file system> <mount point> <type> <options> <dump> <pass>
file system:要挂载的特殊的设备,也可以是块设备,比如/dev/sda 等等
mount point:挂载点
type:文件系统类型,比如 ext2、ext3、proc、romfs、tmpfs 等等
options:挂载选项,一般使用 defaults,也就是默认选项,defaults 包含了 rw、suid、 dev、 exec、 auto、 nouser 和 async
dump:为 1 的话表示允许备份,为 0 不备份,一般不备份,因此设置为 0
pass:磁盘检查设置,为 0 表示不检查。根目录‘/’设置为 1,其他的都不能设置为 1,其他的分区从 2 开始。一般不在 fstab 中挂载根目录,因此这里一般设置为 0
fstab内容如下:
 #<file system> <mount point> <type> <options> <dump> <pass>
 proc /proc proc defaults 0 0
 tmpfs /tmp tmpfs defaults 0 0
 sysfs /sys sysfs defaults 0 0
2.3 创建/etc/inittab文件
init 程序会读取/etc/inittab这个文件,inittab 由若干条指令组成。每条指令的结构都是一样的,由以:分隔的 4 个段组成,格式如下:
<id>:<runlevels>:<action>:<process>
id:每个指令的标识符,不能重复,对于 busybox 的 init 来说,有着特殊意义。对于 busybox 而言用来指定启动进程的控制 tty,一般我们将串口或者 LCD 屏幕设置为控
制 tty。
runlevels :对 busybox 来说此项完全没用,所以空着。
action:动作,用于指定可能用到的动作
process:具体的动作,比如程序、脚本或命令等
新建/etc/inittab文件,内容如下:
1 #etc/inittab
2 ::sysinit:/etc/init.d/rcS
3 console::askfirst:-/bin/sh
4 ::restart:/sbin/init
5 ::ctrlaltdel:/sbin/reboot
6 ::shutdown:/bin/umount -a -r
7 ::shutdown:/sbin/swapoff -a
第 2 行,系统启动以后运行/etc/init.d/rcS 这个脚本文件。
第 3 行,将 console 作为控制台终端,也就是 ttymxc0
第 4 行,重启的话运行/sbin/init。
第 5 行,按下 ctrl+alt+del 组合键的话就运行/sbin/reboot,看来 ctrl+alt+del 组合键用于重启系统。
第 6 行,关机的时候执行/bin/umount,也就是卸载各个文件系统。
第 7 行,关机的时候执行/sbin/swapoff,也就是关闭交换分区。


 1624
1624

 被折叠的 条评论
为什么被折叠?
被折叠的 条评论
为什么被折叠?
 到【灌水乐园】发言


