


承接上文硬件
http://t.csdnimg.cn/LkIiK
这次我们记录一下如何在nx上用ros_canopen来发送can消息
一、软件安装
1.安装canopen
强烈建议参考http://t.csdnimg.cn/GoZBP的第一部分,这里不做过多的赘述
2.安装SocketCAN
ubuntu中自己就集成有SocketCAN,应用命令行直接安装就行
sudo apt-get install can-utils linux-can二、软件调试
这里笔者直接从零建了一个工作空间,程序可以借鉴http://t.csdnimg.cn/GoZBP
1.一个可能会误人子弟的程序
这里笔者放出自己的程序
can_speed_controller.cpp
#include <ros/ros.h>
#include <can_msgs/Frame.h>
#include <socketcan_interface/socketcan.h>

#include <socketcan_bridge/topic_to_socketcan.h>
#include <socketcan_bridge/socketcan_to_topic.h>

#include <sstream>  // Include for std::stringstream
#include <string>  // Ensure you include the string library

#include <ros/spinner.h>
#include <std_msgs/String.h>
#include<tf/transform_broadcaster.h>
#include<nav_msgs/Odometry.h>
#include<geometry_msgs/Twist.h>


can_msgs::Frame createSpeedFrame(int speed) {
    can_msgs::Frame frame;
    frame.id = 0x601; // CAN ID for node 1
    frame.is_rtr = false;
    frame.is_extended = false;
    frame.is_error = false;
    frame.dlc = 8; // Data length code

    frame.data[0] = 0x23; // SDO command specifier (write 4 bytes)
    frame.data[1] = 0x00; // Index 0x2000 low byte
    frame.data[2] = 0x20; // Index 0x2000 high byte
    frame.data[3] = 0x01; // Subindex
    frame.data[4] = speed & 0xFF; // Low byte of speed
    frame.data[5] = (speed >> 8) & 0xFF; // High byte of speed
    frame.data[6] = 0x00; // Unused
    frame.data[7] = 0x00; // Unused

    return frame;
}

void printFrame(const can_msgs::Frame& frame) {
    std::stringstream ss;
    ss << std::hex << std::setfill('0');
    ss << std::setw(3) << frame.id << "#";
    for (int i = 0; i < frame.dlc; ++i) {
        ss << std::setw(2) << static_cast<int>(frame.data[i]);
        if (i < frame.dlc - 1) ss << '.';
    }
    ROS_INFO("%s", ss.str().c_str());
}

int main(int argc, char** argv) {
    ros::init(argc, argv, "can_speed_controller");
    ros::NodeHandle nh;

    std::string can_device;  // Declare the variable to hold the CAN device nam1
    nh.param<std::string>("can_device", can_device, "can0");
    ros::Publisher can_pub = nh.advertise<can_msgs::Frame>("sent_messages", 10);//注意socketcan_bridge的话题

    // Send a frame to set speed to 500
    can_msgs::Frame frame = createSpeedFrame(500);
    ros::Rate loop_rate(1); // 1 Hz

    while (ros::ok()) {
        can_pub.publish(frame);
        printFrame(frame);  // Call the function to print frame information
        ros::spinOnce();
        loop_rate.sleep();
    }

    return 0;
}
具体这个程序怎么来的,各位需要参考自己手里的控制器can通讯协议了
一般来说,id,位数的长短,所用的字节都会详细给出,只要按照说明一步一步来就好了,再不济,我们还有chatgpt或者kimi不是^_^
2.建立工作空间
cd ~/catkin_ws/src //按照你自己的想法来命名catkin_ws

catkin_create_pkg canopen_test roscpp std_msgs tf nav_msgs geometry_msgs socketcan_bridge can_msgs    //创建功能包,配置各种依赖
修改一下CMakeLists.txt
cmake_minimum_required(VERSION 3.0.3)
project(canopen_test)

find_package(catkin REQUIRED COMPONENTS
  roscpp
  std_msgs
  tf
  nav_msgs
  geometry_msgs
  socketcan_bridge
  can_msgs
)

catkin_package(
  CATKIN_DEPENDS
    roscpp
    std_msgs
    tf
    nav_msgs
    geometry_msgs
    socketcan_bridge
    can_msgs
)

include_directories(
  ${catkin_INCLUDE_DIRS}
)

add_executable(can_speed_controller src/can_speed_controller.cpp)
target_link_libraries(can_speed_controller
  ${catkin_LIBRARIES}
)

)
将can_speed_controller.cpp放到canopen_test/src下面
在canopen_test功能包下新建一个launch文件夹用来放launch文件
配置一下can_speed_controller.launch文件
<launch>
    <arg name="can_device" default="can0"/>  <!-- 设定CAN设备名称,通常是 can0 或 can1 -->

    <!-- Topic to SocketCAN Node -->
    <node pkg="socketcan_bridge" name="topic_to_socketcan_node" type="topic_to_socketcan_node" output="screen">
        <param name="can_device" value="$(arg can_device)"/>
    </node>

    <!-- SocketCAN to Topic Node -->
    <node pkg="socketcan_bridge" name="socketcan_to_topic_node" type="socketcan_to_topic_node" output="screen">
        <param name="can_device" value="$(arg can_device)"/>
    </node>

    <!-- Custom CANopen Node -->
    <node pkg="canopen_test" type="can_speed_controller" name="can_speed_controller" output="screen" required="true">
    </node>
</launch>
接下来就是在catkin_ws下激动人心的
catkin_make如果这步没有问题,就可以
source devel/setup.bash
roslaunch canopen_test can_speed_controller.launch
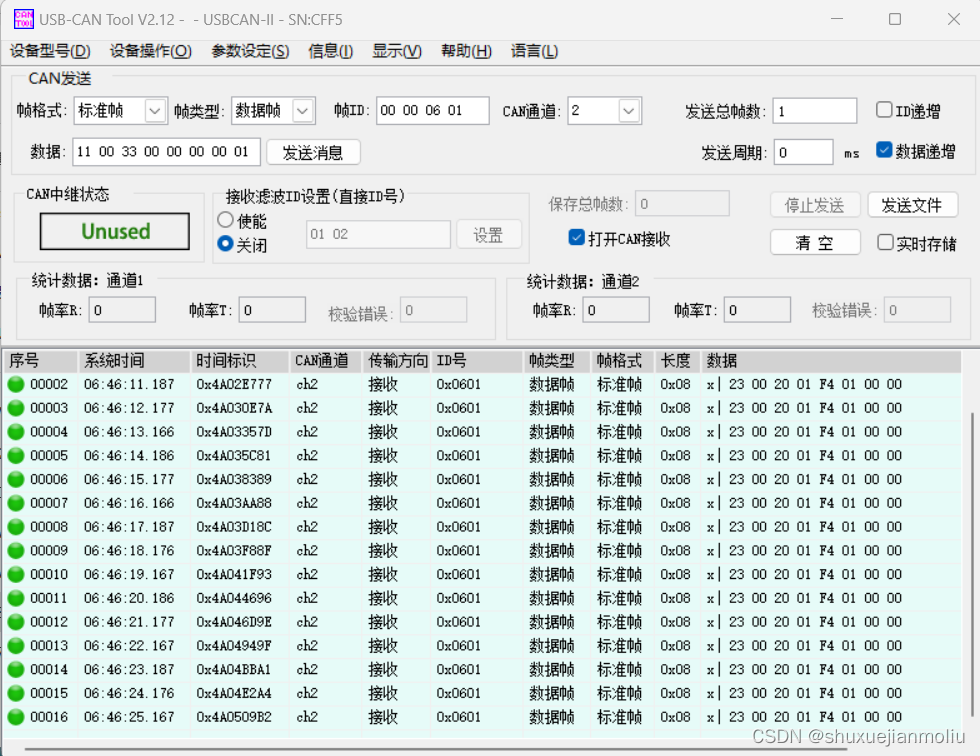
pc端和硬件方面和http://t.csdnimg.cn/LkIiK是一样的
效果展示一下


 1273
1273

 被折叠的 条评论
为什么被折叠?
被折叠的 条评论
为什么被折叠?
 到【灌水乐园】发言


