【ARM Cortex-M 系列 2.1 -- Cortex-M7 Debug system registers】


请阅读【嵌入式开发学习必备专栏】


Debug system registers

在ARMv7架构中,调试功能通过一系列的系统控制块(System Control Block, SCB)寄存器来提供。这些寄存器不仅帮助开发者诊断程序运行中的错误,还提供了硬件故障的详细信息。以下是SCB中与调试相关的重要寄存器和标志位的介绍:
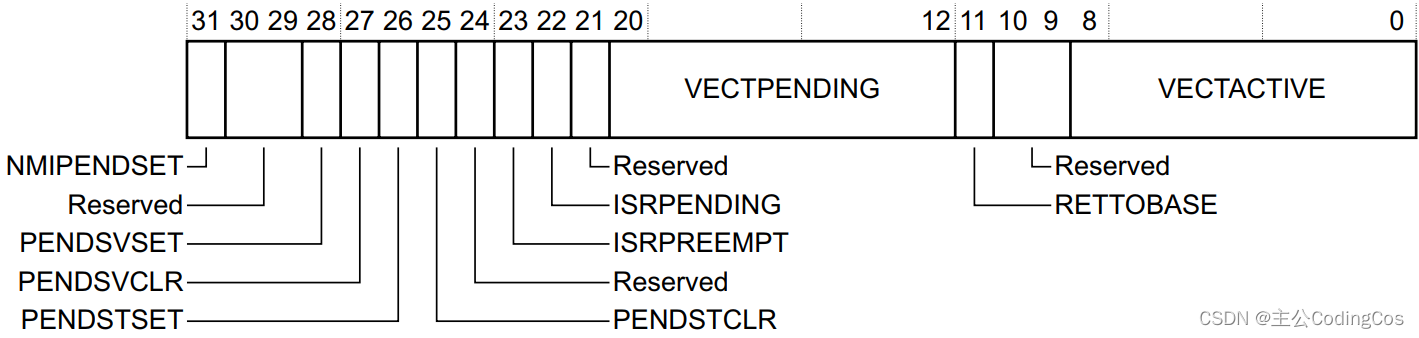
中断控制状态寄存器(ICSR)

ICSR 寄存器可在应用程序中用于:

  • 设置和清除系统异常的挂起状态,其中包括 SysTick、PendSV 和 NMI。
  • 通过读取 VECTACTIVE 可以确定当前执行的异常/中断编号。

另外,调试器还可利用该寄存器确定中断状态。VECTACTIVE 域和 IPSR 相同。

  • 中断控制和状态寄存器(SCB->ICSR,0xE000ED04)

在这里插入图片描述

debug 寄存器小结
在这里插入图片描述

Debug Halting Control and Status Register, DHCSR

在这里插入图片描述

  • C_DEBUGEN: Enables debug.
    启用调试。这只能由 AHB-AP 修改,而不是由软件修改。它在软件进行写入时将被忽略,软件不能设置或清除它。当写入 C_HALT 来暂停CPU时,内核必须向它写入 1。当外部debugger将该bit配置从0修改为1时 必须同时将 域 C_MASKINTS(bit[3])置0

  • C_Halt: Halts the core.
    暂停 cpu。当CPU停止时,该位自动设置。例如断点。此位在CPU reset 时清除。该位只能在 C_DEBUGEN 为 1 时写入,否则将被忽略。

    • 当设置该位为 1 时,且 C_DEBUGEN 置位时,将会将cpu halt住;
    • 当CPU 处于 debug state时,将该bit写0,将会退出 debug state。
  • C_STEP, bit[2]:单步调试使能bit。

  • C_MASKINTS, bit[3]:当debug 模式使能后,也即C_DEBUGEN 配置为1后,外部 debugger 可以通过配置该bit来屏蔽ysTick 和 外部其它中断。

  • C_SNAPSTALL, bit[5]:设置此位为1允许调试器请求不精确地进入调试状态。C_SNAPSTALL 提供了一种机制,通过它调试器可以请求处理器进入调试状态,而不需要等待具体的断点触发。这对于那些需要在特定条件下暂停处理器执行,但又不依赖于精确断点位置的调试场景特别有用。

当处理器执行加载(load)或存储(store)指令时,可能会遇到“阻塞”(stalled)的情况。这种情况通常发生于数据无法立即从内存中被访问时,例如因为缓存未命中(cache miss)、访问外设或者内存争用等原因。阻塞的加载或存储指令需要等待相关数据可用后才能完成其操作。下面详细介绍这一过程及其影响。可以通过配置C_SNAPSTALL 让 阻塞的 load 或者store强制结束。

  • S_REGRDY:
    调试内核寄存器选择器寄存器上的寄存器读/写可用。 为1表示最后一次传输完成。

  • S_HALT
    当 S_HALT 为高时,表示处于调试状态

  • S_SLEEP
    表示内核正在休眠.WFI、WFE 或 SLEEP-ON-EXIT, 必须使用 C_HALT 来获得控制权或等待中断唤醒。

  • S_LOCKUP:
    如果内核正在运行(未停止)并且存在锁定条件,则读取为 1。

  • S_RETIRE_ST: I表示自上次读取后指令已完成。 这是一个在读取时清除的粘性位。 这确定核心是否在加载/存储或获取时停止。

  • S_RESET_ST
    表示自从上次读取该位以来,内核已被复位或正在被复位。 这是一个在读取时清除的粘性位。 因此,读取两次并得到 1 然后 0 意味着它在过去被重置。 读取两次并获得 1 意味着它现在正在重置(仍然保持在重置状态)。

Debug 寄存器DCRSR与DCRDR

与调试功能有关的,还有NVIC中另外两个寄存器。它们分别是:调试内核寄存器选择者寄存器DCRSR),以及调试内核寄存器数据寄存器DCRDR)。调试器需要通过这两个寄存器来访问处理器的寄存器,并且只有在处理器停机时,才能使用这里的寄存器传送功能

DCRSR
在这里插入图片描述
DCRDR
在这里插入图片描述

CPU 寄存器读操作

使用DCRSRDCRDR这两个寄存器来读取内核的寄存器的内容,则必须按如下的顺序做:

  • 确定处理器已停机
  • DCRSR写数据来选择读CPU的哪个寄存器,其中bit[16]要为0,表示这是要读数据
  • 查询,直到DHCSR.S_REGRDY=1
  • 读取DCRDR以获取寄存器的内容

CPU 寄存器写操作

寄存器写操作的顺序与上面的类似:

  • 确定处理器已停机
  • DCRDR中写数据
  • DCRSR写数据来选择准备写CPU的哪个寄存器,其中bit[16]要为1,表示这是要写数据
  • 查询,直到DHCSR.S_REGRDY=1

NOTE: 使用DCRSR和DCRDR来访问寄存器,只适用于停机模式。

CPU 寄存器选择

DCRSR bit[16] 用标志是读操作还是写操作:

  • 0 Read
  • 1 Write

DCRSR bits[6:0] 用于选择要操作哪个寄存器:

  • 0b0000000-0b0001100:选择寄存器R0-R12
  • 0b0001101:选择寄存器 SP
  • 0b0001110:选择寄存器 LR
  • 0b0001111:DebugReturnAddress
  • 0b0010000:xPSR
  • 0b0010001:Main stack pointer, MSP
  • 0b0010010 Process stack pointer, PSP.
  • 0b0010100 Bits[31:24] CONTROL.
    • Bits[23:16] FAULTMASK.
    • Bits[15:8] BASEPRI.
    • Bits[7:0] PRIMASK.
  • 0b0100001:Floating-point Status and Control Register, FPSCR.

CPU 寄存器读写示例

写操作:

#define REGW_FLAG    BIT(16)
#define S_REGRDY     BIT(16)

int cpu_reg_write(uint32_t reg, uint32_t val)
{
        uint32_t data, try = 5;

        mcu_write(DCRDR, val);
        mcu_write(DCRSR, REGW_FLGA | reg);
        mcu_read(DHCSR, &data);
        while ((data & S_REGRDY) == 0x0 && try) {
                log_warn("wait for transfer complete\n");
                try--;
        }

        if (!try) {
                log_err("write gpu mcu reg failed\n");
                return -1;
        }

        return 0;
}

读操作

uint32_t cpu_reg_read(uint32_t reg, uint32_t *pdata)
{
        uint32_t data, try = 5;

        mcu_write(DCRSR, reg);
        mcu_read(DHCSR, &data);
        while ((data & S_REGRDY) == 0x0 && try) {
                log_warn("wait for transfer complete\n");
                try--;
        }

        if (!try) {
                log_err("write gpu mcu reg failed\n");
                return -1;
        }

        mcu_read(DCRDR, pdata);

        return 0;
}

调试故障状态寄存器(DFSR)

DFSR(Debug Fault Status Register)是SCB的一部分,提供了与调试相关的故障信息。它指示了最后一次调试事件的原因,例如硬件断点触发或访问违例。DFSR寄存器包括以下几个关键字段:
在这里插入图片描述

  • HALTED:当处理器因调试请求而停止时,该位被设置。 C_HALT 和 C_STEP 请求都会触发该位置位。
  • BKPT:当执行到PFB中硬件断点时或者软件断点指令BKPT指令时,该位被设置。
  • DWTTRAP:当数据观察点和追踪(Data Watchpoint and Trace, DWT)单元检测到匹配事件时,该位被设置。
  • VCATCH:当向量捕捉事件发生时,该位被设置。
  • EXTERNAL:当由于外部调试请求而停止时,该位被设置。

DFSR为开发者提供了关于程序为何停止的直接线索,是调试过程中不可或缺的资源。

  • 37
    点赞
  • 17
    收藏
    觉得还不错? 一键收藏
  • 打赏
    打赏
  • 0
    评论
1.1 Processor architecture and organization 2 1.2 Abstraction in hardware design 3 1.3 MU0 - a simple processor 7 1.4 Instruction set design 14 1.5 Processor design trade-offs 19 1.6 The Reduced Instruction Set Computer 24 1.7 Design for low power consumption 28 1.8 Examples and exercises 32…… 2.1 The Acorn RISC Machine 36 2.2 Architectural inheritance 37 2.3 The ARM programmer's model 39 2.4 ARM development tools 43 2.5 Example and exercises 47…… 3.1 Data processing instructions 50 3.2 Data transfer instructions 55 3.3 Control flow instructions 63 3.4 Writing simple assembly language programs 69 3.5 Examples and exercises 72…… 4.1 3-stage pipeline ARM organization 75 4.2 5-stage pipeline ARM organization 78 4.3 ARM instruction execution 82 4.4 ARM implementation 86 4.5 The ARM coprocessor interface 101 4.6 Examples and exercises 103…… 5.1 Introduction 106 5.2 Exceptions 108 5.3 Conditional execution 111 5.4 Branch and Branch with Link (B, BL) 113 5.5 Branch, Branch with Link and eXchange (BX, BLX) 115 5.6 Software Interrupt (SWI) 117 5.7 Data processing instructions 119 5.8 Multiply instructions 122 5.9 Count leading zeros (CLZ - architecture v5T only) 124 5.10 Single word and unsigned byte data transfer instructions 125 5.11 Half-word and signed byte data transfer instructions 128 5.12 Multiple register transfer instructions 130 5.13 Swap memory and register instructions (SWP) 132 5.14 Status register to general register transfer instructions 133 5.15 General register to status register transfer instructions 134 5.16 Coprocessor instructions 136 5.17 Coprocessor data operations 137 5.18 Coprocessor data transfers 138 5.19 Coprocessor register transfers 139 5.20 Breakpoint instruction (BRK - architecture v5T only) 141 5.21 Unused instruction space 142 5.22 Memory faults 143 5.23 ARM architecture variants 147 5.24 Example and exercises 149…… 6.1 Abstraction in software design 152 6.2 Data types 153 6.3 Floating-point data types 158 6.4 The ARM floating-point architecture 163 6.5 Expressions 168 6.6 Conditional statements 170 6.7 Loops 173 6.8 Functions and procedures 175 6.9 Use of memory 180 6.10 Run-time environment 185 6.11 Examples and exercises 186…… 7.1 The Thumb bit in the CPSR 189 7.2 The Thumb programmer's model 190 7.3 Thumb branch instructions 191 7.4 Thumb software interrupt instruction 194 7.5 Thumb data processing instructions 195 7.6 Thumb single register data transfer instructions 198 7.7 Thumb multiple register data transfer instructions 199 7.8 Thumb breakpoint instruction 200 7.9 Thumb implementation 201 7.10 Thumb applications 203 7.11 Example and exercises 204…… 8.1 The ARM memory interface 208 8.2 The Advanced Microcontroller Bus Architecture (AMBA) 216 8.3 The ARM reference peripheral specification 220 8.4 Hardware system prototyping tools 223 8.5 The ARMulator 225 8.6 The JTAG boundary scan test architecture 226 8.7 The ARM debug architecture 232 8.8 Embedded Trace 237 8.9 Signal processing support 239 8.10 Example and exercises 245…… 9.1 ARM7TDMI 248 9.2 ARM8 256 9.3 ARM9TDMI 260 9.4 ARM10TDMI 263 9.5 Discussion 266 9.6 Example and exercises 267…… 10.1 Memory size and speed 10.2 On-chip memory 10.3 Caches 10.4 Cache design - an example 10.5 Memory management 10.6 Examples and exercises…… Architectural Support for Operating Systems 270 271 272 279 283 289 290 11.1 An introduction to operating systems 11.2 The ARM system control coprocessor 11.3 CP15 protection unit registers 11.4 ARM protection unit 11.5 CP15 MMU registers 11.6 ARM MMU architecture 11.7 Synchronization 11.8 Context switching 11.9 Input/Output 11.10 Example and exercises…… ARM CPU Cores 291 293 294 297 298 302 309 310 312 316 317 12.1 The ARM710T, ARM720T and ARM740T 12.2 The ARM810 12.3 The StrongARM SA-110 12.4 The ARM920T and ARM940T 12.5 The ARM946E-S and ARM966E-S 12.6 The ARM1020E 12.7 Discussion 12.8 Example and exercises Embedded ARM Applications…… 318 323 327 335 339 341 344 346 347 13.1 The VLSI Ruby II Advanced Communication Processor 13.2 The VLSI ISDN Subscriber Processor 13.3 The OneC™ VWS22100 GSM chip 13.4 The Ericsson-VLSI Bluetooth Baseband Controller 13.5 The ARM7500 and ARM7500FE
SimIt-ARM-3.0 给予命令行ARM指令模拟器,短小精悍,是研究ARM处理器的好工具,该模拟器既可以运行用户级别的ELF程序,又可以模拟运行Linux操作系统;提供了简单易用的调试命令,可以逐条跟踪指令的执行。 SimIt-ARM-3.0-gk-20150902.tar.bz2 HowTo 0.what is SimIt-ARM-3.0 SimIt-ARM 3.0 is an instruction-set simulator that runs both system-level and user-level ARM programs, for more about it please read user's guide file. 1.how to build tar jxvf SimIt-ARM-3.0-gk-20150902.tar.bz2 cd SimIt-ARM-3.0-gk ./configure make make install After these steps, the ./build/bindirectory contains the following programs: ema An ARM interpreter. To test the installation was successful type ./build/bin/ema test/wc configure modifiy PATH environment variable: PATH=$PATH:$HOME/SimIt-ARM-3.0-gk/build/bin ; export PATH 2. how to use 2.1 run user-level ARM programs [root@ORA9 SimIt-ARM-3.0-gk]# cd gcc-asm [root@ORA9 gcc-asm]# more hello.c /* * hello.c * Tue Sep 8 10:13:40 CST 2015 */ int main() { printf("hello world\n"); __asm("mov r0,#2\n\t" "swi 0x1\n\t"); // syscall: exit(2); } [root@ORA9 gcc-asm]# arm-linux-gcc -v Reading specs from /usr/local/arm/3.4.1/bin/../lib/gcc/arm-linux/3.4.1/specs Configured with: /opt/crosstool/crosstool-0.28/build/arm-linux/gcc-3.4.1-glibc-2.3.2/gcc-3.4.1/configure --target=arm-linux --host=i686-host_pc-linux-gnu --prefix=/opt/crosstool/arm-linux/gcc-3.4.1-glibc-2.3.2 --with-float=soft --with-headers=/opt/crosstool/arm-linux/gcc-3.4.1-glibc-2.3.2/arm-linux/include --with-local-prefix=/opt/crosstool/arm-linux/gcc-3.4.1-glibc-2.3.2/arm-linux --disable-nls --enable-threads=posix --enable-symvers=gnu --enable-__cxa_atexit --enable-languages=c,c++ --enable-shared --enable-c99 --enable-long-long Thread model: posix gcc version 3.4.1 [root@ORA9 gcc-asm]# arm-linux-gcc hello.c -o hello -static [root@ORA9 gcc-asm]# ls -l hello* -rwxr-xr-x 1 root root 520775 Sep 8 10:18 hello -rw-r--r-- 1 root root 160 Sep 8 10:15 hello.c [root@ORA9 gcc-asm]# file hello hello: ELF 32-bit LSB executable, ARM, vers
首先,你需要选择一个适用于Cortex-A9 SoC的开发板,例如Xilinx Zynq-7000系列或TI Sitara AM437x系列。然后,你需要安装交叉编译工具链,以便在PC上编写和编译代码,然后将其传输到开发板上运行。 对于LED驱动程序,你可以使用汇编语言编写底层代码,然后使用C语言编写高层代码。以下是一个示例: 汇编代码: ```assembly .global led_on led_on: ldr r0, =0x01 ;将LED的地址加载到r0寄存器 ldr r1, =0x01 ;将要写入LED的值加载到r1寄存器 str r1, [r0] ;写入LED的值 bx lr ;返回 ``` C代码: ```c void led_on(void); int main(void) { led_on(); return 0; } ``` 接下来,你需要编写一个设备驱动程序,以便在操作系统中控制LED。以下是一个示例: ```c #include <linux/module.h> #include <linux/kernel.h> #include <linux/init.h> #include <linux/platform_device.h> #include <linux/ioport.h> #include <linux/io.h> #define LED_REG_OFFSET 0x01 static struct resource led_res[] = { { .start = 0x12340000, .end = 0x1234ffff, .flags = IORESOURCE_MEM, }, }; static int led_probe(struct platform_device *pdev) { void __iomem *regs; int val; pr_info("led_probe\n"); /* 获取LED资源 */ if (!devm_request_mem_region(&pdev->dev, led_res[0].start, resource_size(&led_res[0]), "led")) { pr_err("failed to request LED memory region\n"); return -EBUSY; } /* 映射LED寄存器 */ regs = devm_ioremap(&pdev->dev, led_res[0].start, resource_size(&led_res[0])); if (IS_ERR(regs)) { pr_err("failed to map LED registers\n"); return PTR_ERR(regs); } /* 打开LED */ val = ioread32(regs + LED_REG_OFFSET); val |= 0x01; iowrite32(val, regs + LED_REG_OFFSET); return 0; } static int led_remove(struct platform_device *pdev) { pr_info("led_remove\n"); return 0; } static struct platform_driver led_driver = { .driver = { .name = "led", }, .probe = led_probe, .remove = led_remove, }; module_platform_driver(led_driver); MODULE_AUTHOR("Your Name"); MODULE_DESCRIPTION("LED driver for Cortex-A9"); MODULE_LICENSE("GPL"); ``` 这个驱动程序将LED资源映射到内存中,并使用ioread32和iowrite32函数读取和写入LED的值。你可以使用insmod和rmmod命令加载和卸载驱动程序。

“相关推荐”对你有帮助么?

  • 非常没帮助
  • 没帮助
  • 一般
  • 有帮助
  • 非常有帮助
提交
评论
添加红包

请填写红包祝福语或标题

红包个数最小为10个

红包金额最低5元

当前余额3.43前往充值 >
需支付:10.00
成就一亿技术人!
领取后你会自动成为博主和红包主的粉丝 规则
hope_wisdom
发出的红包

打赏作者

主公CodingCos

你的鼓励将是我创作的最大动力

¥1 ¥2 ¥4 ¥6 ¥10 ¥20
扫码支付:¥1
获取中
扫码支付

您的余额不足,请更换扫码支付或充值

打赏作者

实付
使用余额支付
点击重新获取
扫码支付
钱包余额 0

抵扣说明:

1.余额是钱包充值的虚拟货币,按照1:1的比例进行支付金额的抵扣。
2.余额无法直接购买下载,可以购买VIP、付费专栏及课程。

余额充值