


On-screen virtual keyboard is an alternative input method that can replace a real hardware keyboard. Virtual keyboard may be a necessity in various cases. For example, your hardware keyboard is just broken; you do not have enough keyboards for extra machines; your hardware does not have an available port left to connect a keyboard; you are a disabled person with difficulty in typing on a real keyboard; or you are building a touchscreen-based web kiosk.
On-screen keyboard can also be a protection mechanism against a hardware keylogger which silently records your keystrokes for sensitive information such as passwords. Some online banking sites actually force you to use a virtual keyboard for security-enhanced transactions.
In Linux environment, there are a couple of open-source virtual keyboard software available, e.g., GOK (GNOME Onscreen Keyboard), kvkbd, onboard, Florence.
In this tutorial, I am going to focus on Florence, and show you how to set up a virtual keyboard with Florence. Florence comes with a number of nice features such as flexible layout, multiple input methods, auto-hide, etc. As part of the tutorial, I will also demonstrate how to use Ubuntu desktop with a mouse only.
Install Florence Virtual Keyboard on Linux
Fortunately, Florence is available on base repositories of most Linux distros.
On Debian, Ubuntu or Linux Mint:
On Fedora, CentOS or RHEL (EPEL repo is required for CentOS/RHEL):
On Mandriva or Mageia:
For Archlinux users, the package is available in AUR.
Configure and Launch Virtual Keyboard
Once you install Florence, you can launch virtual keyboard simply by typing:
By default, the virtual keyboard is always on top of other windows, allowing you to type on any active window easily.
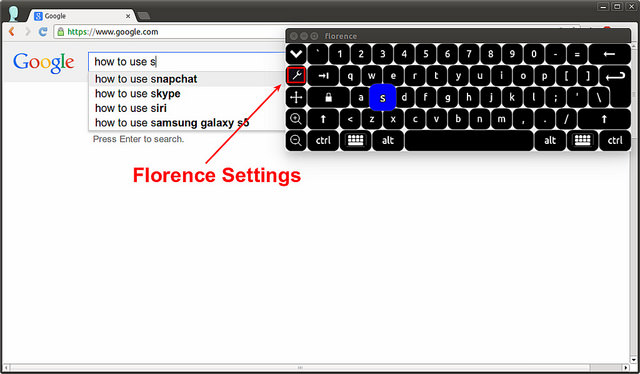
To change default settings of Florence, click on tool key on the left side of the keyboard.
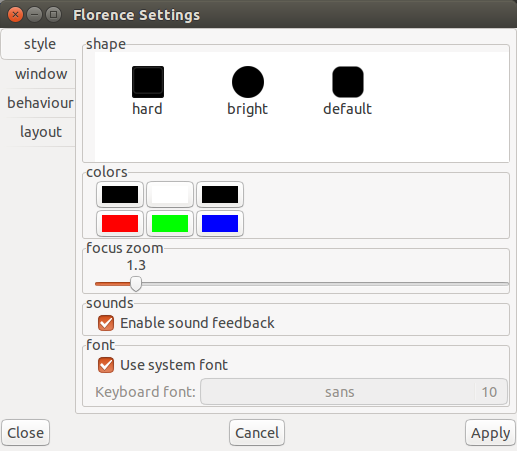
In "style" menu of Florence settings, you can customize keyboard style, and enable/disable sound effect.
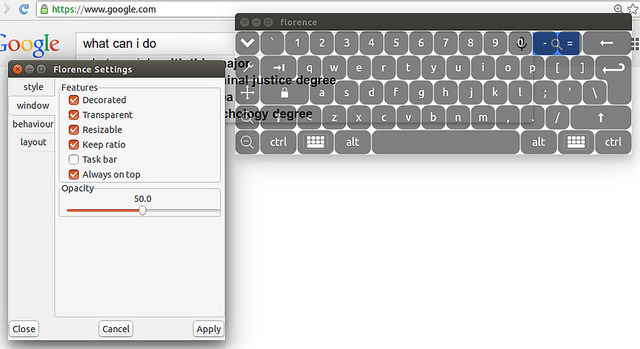
In "window" menu, you can adjust keyboard background transparency and key opacity, as well as control keyboard ratio, taskbar, resizability and always-on-top features. Transparency and opacity adjustment can be useful if your screen resolution is not high enough, so the virtual keyboard is blocking other windows. In this example, I switch to transparent keyboard, and set opacity to 50%.
In "behaviour" menu, you can change an input method. Florence supports several different input methods: mouse, touch screen, timer and ramble. The default input is mouse method. The last two methods do not require button clicks. With timer method, key press is triggered by locating a pointer at the key for a certain amount of time. The ramble method works similar to timer input, but with dexterity and training, can type much faster than timer method.

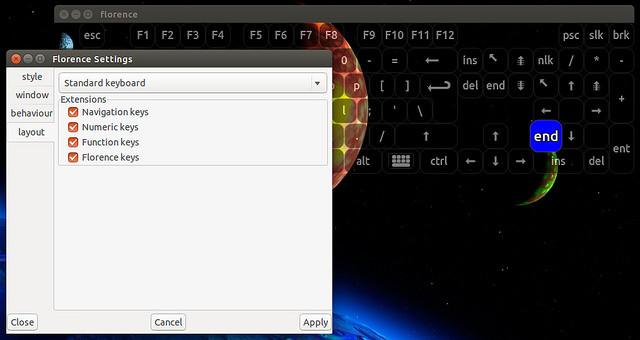
In "layout" menu, you can change the keyboard layout. For example, you can extend the keyboard layout to include navigation keys, numeric keys, and function keys.
Use Ubuntu Desktop with Mouse Only
I am going to demonstrate how to integrate Florence with Ubuntu desktop, so that we can access the desktop without a hardware keyboard. While this tutorial is specific to Ubuntu desktop with LightDM (Ubuntu's default display manager), a similar environment can be set up for other desktop environments.
The initial setup requires a hardware keyboard, but once the setup is completed, you only need a mouse, but not the keyboard.
When you boot up Ubuntu desktop, the boot procedure ends with launch of a display manager (or login manager) with Greeter interface, where you type in your login info. By default, Ubuntu desktop uses LightDM with Unity Greeter interface. Without a hardware keyboard, you cannot enter username and password at the login screen.
To be able to launch a virtual keyboard at the login screen, install GTK+ Greeter, which comes with on-screen keyboard support.
Then, open a Greeter configuration file (/etc/lightdm/lightdm-gtk-greeter.conf) with a text editor, and specify Florence as an on-screen keyboard to use. Instead of Florence, you could also use onboard, Ubuntu's default on-screen keyboard.
[greeter]
keyboard=florence --no-gnome --focus &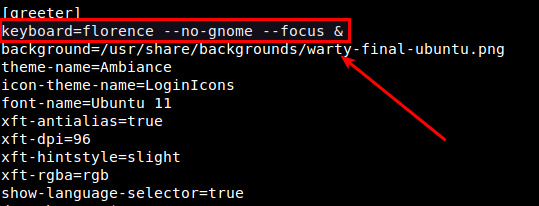
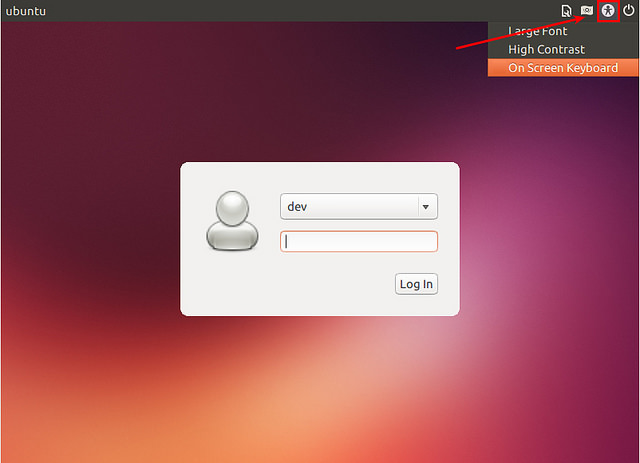
Let's reboot Ubuntu desktop, and verify whether you can use virtual keyboard at the login screen.
When you see the GTK+ Greeter's login screen after boot, click on a human symbol icon on the top right corner. You will see "On Screen Keyboard" menu option as follows.
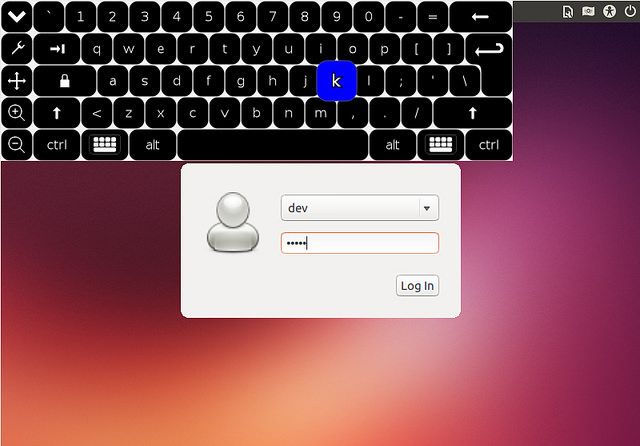
Click on this option, and a virtual keyboard will pop up on the login screen. Now you should be able to log in by tapping on the on-screen keyboard.
For those GDM2/GDM3 users, the Florence official site offers documentation on using virtual keyboard at GDM2/GDM3 screen.
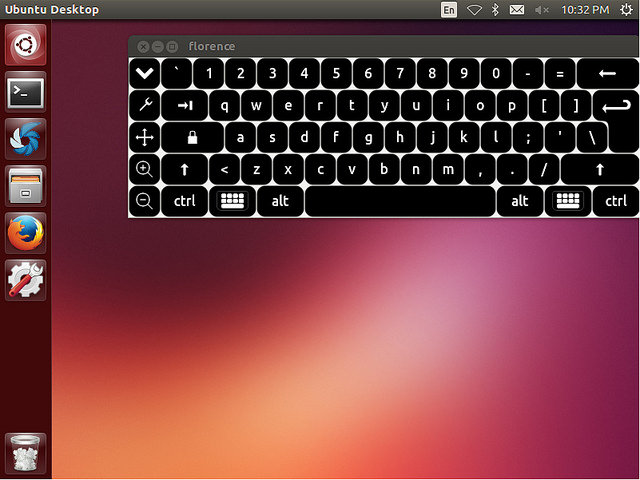
The last step to make our Ubuntu desktop fully keyboard-less is to have virtual keyboard auto-start upon login, so that we can use our desktop without a hardware keyboard even after logging in. For that, create the following desktop file.
$ vi ~/.config/autostart/florence.desktop
[Desktop Entry]
Type=Application
Name=Virtual Keyboard
Comment=Auto-start virtual keyboard
Exec=florence --no-gnome
Hope this tutorial is useful to you. As you can see, Florence is quite powerful virtual keyboard which can be used for different purposes. Let me know if you have any use case for virtual keyboard.
RENFERENCE:http://xmodulo.com/onscreen-virtual-keyboard-linux.html


 8001
8001

 被折叠的 条评论
为什么被折叠?
被折叠的 条评论
为什么被折叠?
 到【灌水乐园】发言


